


.020 size GLH
 12-13-2013, 05:51 PM
#126


I wouldn't think so Andrew unless that was your neighborhood pest. I can remember my mom telling me to.... SHUT THAT THING OFF!...if she was in ear shot of it.
I always liked the sound myself.
I always liked the sound myself.
 12-13-2013, 07:01 PM
#128

Thread Starter

Good evening folks and welcome to a special edition of RCU's GLH 020! This one goes out to CP to help him keep those dogs and brew down. Unlike those drama queens on TV "Reality" shows that sit in shops with every single piece of machinery available from CNC's to planishing hammers, english wheels, water jets, and hydro tubing benders and still whine about how things aren't coming out right, we here in the 1/2a forum make do with a few tools, lots of sweat and good old inginuity.
I, like CP and a lot of others here, usually multi-task between a few projects. So for CP's benifit I thought I'd share one of mine. Just picked up some stuff from the chromers on Wednesday. Here is one piece, the sissy bar. This started out as a single 8 foot piece of 5/8" bar stock and a bunch of flat stock. Being that there were no camera's rolling, I fabricated this in the garage by heating it with a torch and making all the bends over a few steel castor wheels in different sizes. Brackets were cut, welded and polished smooth. Peace sign (hey it's a 70's old school chopper) was formed around another steel caster. At no time during the fabrication did I feel the need to cry, whine or yell "CUT!"
In the second pic is the transmission going back together. Again, since we can't just call up a fancy shop and order one up, we actually have to rebuild ours. Yep, the old fashioned way. Not really much more difficult than resetting a piston on a TD as long as you remember what order the spacers and clips go on.
Anyway CP, you should be starting to feel a bit better knowing that the real work gets done every week in basements, back yards, and garages all over the country (and abroad) by real people who still know how to use their mind and hand tools AND still take pride in doing it right!
Back to our regularly scheduled programing, almost all the parts have come in. But I am still waiting on the venturi and a few other parts. Plus I have been tied up with the transmission rebuild and am leaving early in the morning for a 500 mile trip on the bike for the weekend. I did get a chance to solder in the end of the nipple in between adjusting the belt and checking the levels on the bike for the trip. Hopefully next week the rest of the stuff should be here. Tracking shows my props from the Ukraine have made it as far as Jersey. So I think I can start on the TD mods early next week.
12-13-2013, 07:54 PM
#129

That's amazing looking work..! It's great to see examples of craftsmanship like this where the determination to see the victorious result was greater than the obstacles and the challenges that had to be met to get there. Good luck on your 500 mile shake down cruise.
12-13-2013, 08:33 PM
#130
Thread Starter
Thanks CP. Cruise tomorrow is on my softail. The chopper won't be cruising until February. Once finished I have to trailer it down to West Palm and deal with the DMV on VIN assignment and title. This is when I really miss the old days.
12-13-2013, 10:07 PM
#131
That's excellent looking work, HWB.
I'll bet a lot of youngsters won't recognize the symbol on the sissy bar or know the turmoil that surrounded it 45 years ago. In addition to the nation's youth that got ground up in that conflict, I also remain saddened at how this country was pitted against itself.
I'll bet a lot of youngsters won't recognize the symbol on the sissy bar or know the turmoil that surrounded it 45 years ago. In addition to the nation's youth that got ground up in that conflict, I also remain saddened at how this country was pitted against itself.
12-17-2013, 08:33 AM
#132
Thread Starter
OK,
Back onto the project as more parts have dribbled in over the weekend while I was away. Next up is the 1150 Dominator project. Turns out the 049 venturi is way to big as is to thread into the 020 intake. So, I cut the 049 thread area down on my Black&Decker lathe (which consists of holding the venturi by hand and rotating it slowly against my B&D bench grinder), Then I tapped the thread to a 12X24 thread. I then drilled out the intake and tapped that to the same thread. It gives me just enough room for a small "O" ring in between the Texas Timers NVA and the intake. It clears both the cylinder and the prop fine. I have also lightened the piston (using CP's Black&Decker method) and also trimmed just a smidge off the bottom. Reset the piston and it should give me a good base run to start with.
My props did get here from the Ukraine, but I was not here to sign for it so thats a trip to the post office to pick them up. So next up is the backplate pressure nipple.
12-17-2013, 12:05 PM
#133
That's the first time I ever heard of anything using a #12 thread for...... uhh, anything. The bulk of that venturi looks like it has a lot of leverage against those threads.I'd be tempted to lop off the excess [upper] part of that venturi, press in a plastic dump tube and go with a remote needle.
12-17-2013, 12:31 PM
#134

Some of the old OS .15's FP? had a 7/32" - 32 thread which is a 12-32. Quite an odd thread. I just bought one for $12 to make one spinner, and then an old neighbor give me a couple hundred taps of every size I could think of. BSW sets, lots of weird stuff. I used a 12-28 tap for a lot of threaded inserts at work with a modified inside diameter. There was little tangs to lock the insert in place. Nice insert for some things.I put thousands of them in. Otherwise it is pretty much not popular.
12-17-2013, 06:57 PM
#136
Thread Starter
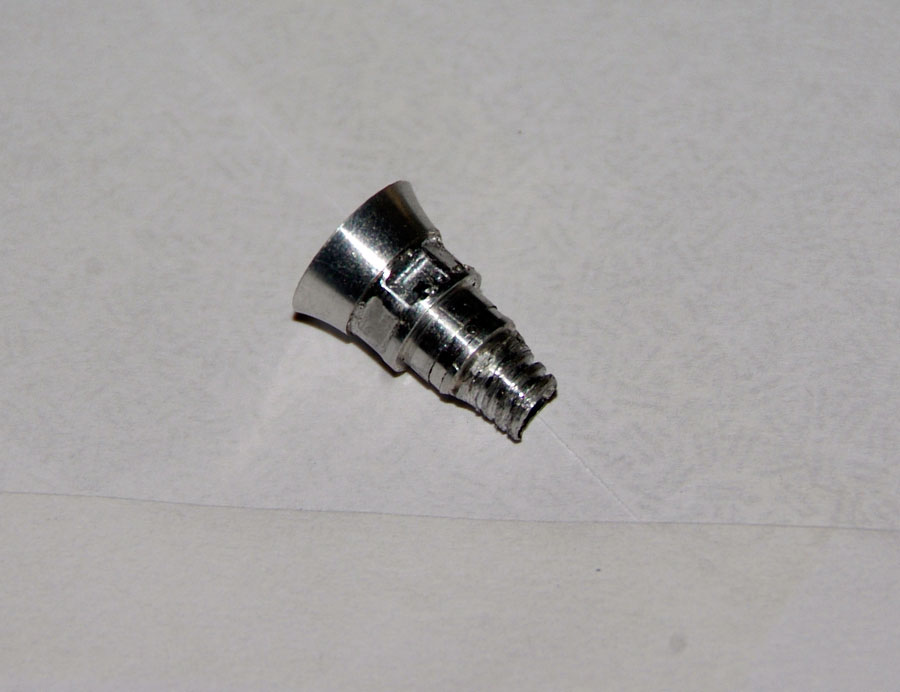
Well, it actually mounted up well. I kind of like the look. Like a velocity stack on a big block. I might add some Holley and Hooker Header stickers to the plane to make it fit in  You can see the difference in the side by side pics. Also turns out the plastic back plates by MECOA are quite beefy. Had no issues tapping it for the pressure nipple. I measured one of my 049 TD backplates and found the hole to be a #80 drill. I drilled the nipple out with a #76 drill, just a smidge bigger, not for any speed secret, but because my pin vise wouldn't clamp down all the way on the #80-77.
The fit is so tight a socket won't fit in. So once I had it tightened with needle nose, I filled in the surrounding space with 30 min epoxy to keep it from backing out. Since I will need to run the line straight back through the firewall, I may drill a hole through the outside of the back plate to run the feed line through as well. Should make for a nice clean install.
I picked up the props today and they are niiiccceee. I'll post pics. My plan is as follows and see if this makes sense. I am first going to get a good tach reading on the stock motor with the cox prop. I am then going to cut down one of the new props until I get the same tach readings, then also run some test flights to see how the plane likes it.
Then I will start by running the second motor on that or a clone of that prop and see how it does. Then I will start cutting it down from there until I can get 25-26k on the ground. That should keep me under 28k in the air. From there I will start prepping another piston/cylinder set with some agressive work and see how that goes. Seems to be a logic approach that should let me make measurable changes without duplicating too much work. Plus I would like to see how fast I can get this on just a stock TD with the right prop.


You can see the difference in the side by side pics. Also turns out the plastic back plates by MECOA are quite beefy. Had no issues tapping it for the pressure nipple. I measured one of my 049 TD backplates and found the hole to be a #80 drill. I drilled the nipple out with a #76 drill, just a smidge bigger, not for any speed secret, but because my pin vise wouldn't clamp down all the way on the #80-77.The fit is so tight a socket won't fit in. So once I had it tightened with needle nose, I filled in the surrounding space with 30 min epoxy to keep it from backing out. Since I will need to run the line straight back through the firewall, I may drill a hole through the outside of the back plate to run the feed line through as well. Should make for a nice clean install.
I picked up the props today and they are niiiccceee. I'll post pics. My plan is as follows and see if this makes sense. I am first going to get a good tach reading on the stock motor with the cox prop. I am then going to cut down one of the new props until I get the same tach readings, then also run some test flights to see how the plane likes it.
Then I will start by running the second motor on that or a clone of that prop and see how it does. Then I will start cutting it down from there until I can get 25-26k on the ground. That should keep me under 28k in the air. From there I will start prepping another piston/cylinder set with some agressive work and see how that goes. Seems to be a logic approach that should let me make measurable changes without duplicating too much work. Plus I would like to see how fast I can get this on just a stock TD with the right prop.
12-17-2013, 08:21 PM
#137
It looks like a factory option...!
Looking at the combat prop and trying to think like a .020, it's hard to forecast what the best blade shape would be....and how well the engine responds as the search begins.
I've always noted a fine line for what small engines can handle well and it seems that the smaller the engine, the finer that line is.
Last edited by combatpigg; 12-17-2013 at 08:25 PM.
12-17-2013, 08:49 PM
#138
Thread Starter
I'm really impressed with the props. They are essentially a 4.9 X2.75 prop. But the blade design looks perfect. They are just under. 4" wide (compared to. 5 for the cox 4.5X2 grey) but the blades are super thin as well. They are .045 compared to. 085 for the cox. I will try and get some pictures tomorrow. I am thinking of starting at cutting one down to 4" to start and see what I can get for rpms.
Last edited by hllywdb; 12-17-2013 at 08:51 PM.
12-18-2013, 09:06 AM
#139
My Feedback: (1)
Join Date: May 2003
Location: Orangeville, ON, CANADA
Posts: 8,658
Likes: 0
Received 2 Likes
on
2 Posts
I bet you end up smaller, like 3.5". That's almost 40% more pitch than the Cox 4.5x2. It will be really interesting to find out! I think you could remove some material (weight) from either side of the hub as well, if you have a good balancing rig for small props. With the reduced blade mass and rpm not so much material is needed. But of course, you can easily get too silly with these mods.. then it is even more of a P-off when you break one.. ")
On a whim when I ordered my last props from Eliminator, I got a couple of the CF .010 props. I did not have great luck balancing those, at least well enough to run well on an .010.
On a whim when I ordered my last props from Eliminator, I got a couple of the CF .010 props. I did not have great luck balancing those, at least well enough to run well on an .010.
Last edited by MJD; 12-18-2013 at 09:08 AM.
12-18-2013, 12:37 PM
#140
Thread Starter
OK, lots to report today. Got pictures of the prop next to the Cox grey and the APC 4.2. The first test was to cut down the prop to 4" and run it on the stock TD. I used my handy prop reducer made by drilling and tapping a piece of angle to take an #8 bolt which fits perfectly in the hole, which by the way is much smaller than the APC. Just needs a thin piece of tubing. The prop size locater (also known as vise grips) easily adjusts to any size. This yielded 20500 on the stock motor. This will give me a tad over 53mph if it doesn't pick up anything in the air.
The dominator project had some hurdles, lots. 1st off the small TD just doesn't like pressure. After an abysmal run with the dominator, I swapped out the stock one and got equally bad results. So off went the backplate and on went the tank. Also swapped out for a stock piston/cylinder set. Since I am still waiting for a tank back, I ran it on an external tank. Once I got a good base run with the cox grey prop, I then hogged out the stock 020 venturi. This did ok with the 4" prop but needs to spin higher with the opened up venturi. So I shaved the prop down to just under 3.5 and was rewarded with 23,800 steady. This translates to 62mph if it doesn't unload at all. If it picks up a simple 1200 rpm in the air I'm at 65mph, and this is with a stock piston/liner. I still have room to hog out the venturi and I can cut the prop down a bit more if needed. So I think 70 is doable, but it will be in small increments.
I'm kind of glad the pressure didn't work out as I have no room for any kind of comercial tank in there. Hav't flown it yet as it's windy today with the front coming through. So maybe in the next few days I will get a flight or two on it.
By the way MJD, these turned out easy to balance, probably because they are so thin that a little here or there doesn't make a bunch of difference.
12-18-2013, 04:17 PM
#143
Thread Starter
It reacts kind of funny to pressure, which I think may have more to do with how it uses crankcase pressure than the intake and NVA. Usually a motor on pressure you have to keep adjusting it as you go up because as it runs faster, it makes more pressure, which changes the needle setting, etc.... This just runs rich until it quits from not lean enough, which makes me think case pressure is different. It didn't care which intake I used either.
The other thing I am noticing which may also be related to ports and timing, is that it kind of hits a brick wall in the 23k to 24k range. I cut down another prop to 3" and really shaved the tips down and thinned them. It runs almost the same as the other one. Since the piston/liners are the same for the pee wee and TD in the 020 size, I am thinking there are no boost or bypass ports, at least not what I am used to in the 049 TD. This may explain the back plate pressure issue. But also gives me things to play with. I can cut some ports into a spare liner just for S&G and see what it does. I can also try running a bladder, whith both intake setups. Plus there is still room to hog out the venturi, but I may order another one and leave this one as it runs good as is.
Has anyone run one these on a bladder? Anyone gotten past 24k on one? Seems I am in kind of uncharted territory here, but making progress anyway. Can't wait to try it on just the stock TD with the 2.75 prop.
12-18-2013, 05:20 PM
#144
My Feedback: (1)
Join Date: May 2003
Location: Orangeville, ON, CANADA
Posts: 8,658
Likes: 0
Received 2 Likes
on
2 Posts
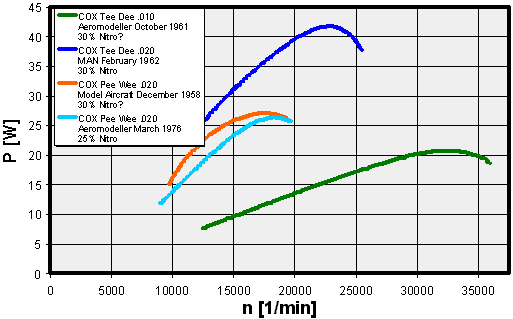
On the stock engine the power starts falling off quickly after about 23k anyway - at least according to the data collected on Dr. Hepperle's site which is harvested from magazine reviews. Could be why you are hitting a wall, esp. with that much pitch? Can't say I've seen evidence of a dyno run of a TD .020 to back this up, I suppose it is back-calculated from prop data.
12-18-2013, 06:04 PM
#145
Thread Starter
It's got to be a porting issue. Has anyone compared the cylinder ports on a .010 and .020? It looks like I should get to 25K though if I can get to 20500 with the 4" prop looking at the chart, no?
12-18-2013, 09:17 PM
#146
Compare the general port configuration to a TD .049. The TD has the double fluted bypass ports.
The .020 ought to look proportional to the .049..unless there is some sort of airflow voodoo that I know nothing about.
A fairly easy idea would be to shim the liner and remove all the head shims until you see no gain.
Your numbers jive with that graph, so you're going to have to go a step beyond what all those clever folks at Cox were able to do while getting paid to do it..!
I'll bet they carved up a few liners looking for the best compromise between user friendly and all out power...leaning towards user friendly.
Is the crankshaft passage a "bottle neck" in this engine's intake tract..?
Does the lower end with just a prop connected to the crank spin for days when you just flick the prop..?
It should.
600+ grit paper on the main journal while you twirl the crank in your drill motor helps to eliminate any drag.
I just saw a show about how those Swiss watches are made and they use electron microscopes to inspect them, plus the watch is actually "alive" at the factory for quite a long time, then completely inspected for wear or any flaws before they allow it to go to a good home. After seeing that show, I don't feel qualified to change a light bulb...and forget about trying to set a degree wheel up on a .020..!
12-19-2013, 05:42 AM
#147
My Feedback: (1)
Join Date: May 2003
Location: Orangeville, ON, CANADA
Posts: 8,658
Likes: 0
Received 2 Likes
on
2 Posts
Since for speed you want maximum hp, with stock porting/intake configuration, and assuming the data is correct, the goal would be to run at 23k in the air with the appropriate prop load. I doubt reviews that provided the data are based on reams of test results.. the graph was generated from old Aeromodeller reviews and the like, with some extrapolation and curve fitting applied I'm sure. As to the test procedures.. run it on an .049 prop, run it on stock Cox .020 props, clip the Cox prop, measure rpm, use rule of thumb calcs to determine power, repeat, extrapolate, etc. Or so I tend to think. I doubt any magazine reviewer was using a dynamometer to record torque on a TD .020 in the late '60's.
12-19-2013, 12:39 PM
#148
I'd be curious to see how well it could rev a 3 inch long x 1/4" wide x 1/8" thick hunk of poplar or bass that was carved to about a 3x2 prop size. Make the blades wafer thin and hit them with thin CA.
If it can't respond to something that light then the engine has a built in "governor" that needs to be opened up.
If it can't respond to something that light then the engine has a built in "governor" that needs to be opened up.
12-19-2013, 05:52 PM
#149
Thread Starter
OK, I spent a bunch of time last night going through FF sources on the TD 020. Yes, it is possible to get to the 27k to 30k range, but a little different than with a 1/2a motor. A great source is Bob Mattes at http://www.flyfreeflight.com. I agree with his findings 100% based on what I have been finding myself, he just drew better conclusions quicker than I did The steps are as follows:
1. Clean up the crank. This is always my first step. I usuallt clean it up with 1500 grit until it doesn't drag, then load it up with toothpaste, install a prop and hand lap it in. He also added that you can polish the inside passage.
2. The head. He makes a conversion head for a nelson flat coil plug (or Merlin) Most of us know from 1/2a stuff that while compression helps, it is the design of the squish chamber that helps these small motors perform. Doug Galbreath will also convert a burned out 020 plug to take a glow bee plug.
3. The 020 cylinders have bypass ports, but no boost ports. These can be added.
4. Apparently there is a wide range of manufacturing tolerances in the 020 size between the piton/liner/case combinations. Much more than the 049. Depending on the combination of all 3 of these at TDC your piston may be even with the top of the cylinder, below it or even above it. My findings agree as different combinations on my 020 will require anywhere from 1 to 3 shims to achive the same result. This is usually a $10 expenditure to find which combination. But the important thing is that he has found that this will cause exhaust timing varriances as much as 25 degrees. Again I have to agree where I have one setup that I can actually see bubbles being pushed backwards into the fuel line from the carb, much like the blow back you get in a small block V8 with a bad exhaust cam lobe. This timing would also contribute to the brick wall you hit. The solution is to shim the cylinder to get the exhaust timing correct, then shim the head accordingly.
5. Vibration. Most IC motors will have areas in the rpm range where they have balance issues. My Harley would hit it at 68mph and it would be gone by 73mph. These motors have a bad habit of hitting this at the 22k to 23k range. This becomes amplified by the plastic tank with only 2 mounting screws. I have seen this happen on my runs. It sets up some kind of harmonic occelation and the motor can't get past it. In my runs over 23k I was able to run past it only by leaving the glow clip on the engine, which helps to stablize it or put my finger on the side of the motor until it gets past this point. At first I thought it was a prop balance issue, but it is not. Bob does make and aluminum mount to overcome this issue.
6. Nitro. Yep, 40 to 65% depending on how fast you want to go, and replace parts. Bob calls 27k a safe max and 30k is do-able for competition. With his mods he accepts a minum of 27k with a 4.2X2 APC.
OK, sounds all well and good but the big issue for me right now is I'm not sure I WANT to run 27k on the ground with a 2.75 on this plane. I got a chance to fly the plane tonight. With it turning 20500 on the bench I was expecting a nice 35 to 40% boost in speed on a nice flying plane. Nope! These props UNLOAD. A LOT! Those of you who have played with CF props on re-worked TDs or AMEs can relate to this. I found the best setting to be very rich on the ground, just starting to 4 stroke. Within 15 feet after lauch it has gone to a high pitched scream and it's on. It then becomes not so much an act of flying the plane, but spending a tank of fuel trying very hard not to crash. It reminds me of when I was 9 years old. I had been flying 1/2a combat with lil satans with TD's on them. It was fun, but I figured moving up to 35's would be lots more fun. So I built a voo doo and installed a 36x with a bladder. Then, with all the wisdom of a 9 year old I set the elevator throws to match my 35 size ringmaster. Today was a lot like that flight. Part of the problem was my flying field. Its a huge field and I fly from down in the corner in the mornings, with the sun at my back and about 100 acres to fly in. I have flown a few times in the afternoon, but the sun is over the field and I fly down in the corner, which has water on both sides. Bad idea. There is no such thing as flying this close and in. Trim adjustments are made on the ground as there is no time in flight. It quickly becomes a small dot and loosing orientation happens in a fraction of a second. The control throws become way too much at this speed. Being a glutton for punishment I still made 3 flights like this. This makes flying the 28" glh at over 100 a liesure activity, almost boring.
So I will wait for a morning flight where I can make nice big circles around me to get things sorted out. I am also going to move the cg forward and reduce the throws quite a bit more. I have also contacted Bob Mattes and will start on some of his modifications and get some parts from him. I'm just not in such a darn hurry to put it on the plane right now
The steps are as follows:1. Clean up the crank. This is always my first step. I usuallt clean it up with 1500 grit until it doesn't drag, then load it up with toothpaste, install a prop and hand lap it in. He also added that you can polish the inside passage.
2. The head. He makes a conversion head for a nelson flat coil plug (or Merlin) Most of us know from 1/2a stuff that while compression helps, it is the design of the squish chamber that helps these small motors perform. Doug Galbreath will also convert a burned out 020 plug to take a glow bee plug.
3. The 020 cylinders have bypass ports, but no boost ports. These can be added.
4. Apparently there is a wide range of manufacturing tolerances in the 020 size between the piton/liner/case combinations. Much more than the 049. Depending on the combination of all 3 of these at TDC your piston may be even with the top of the cylinder, below it or even above it. My findings agree as different combinations on my 020 will require anywhere from 1 to 3 shims to achive the same result. This is usually a $10 expenditure to find which combination. But the important thing is that he has found that this will cause exhaust timing varriances as much as 25 degrees. Again I have to agree where I have one setup that I can actually see bubbles being pushed backwards into the fuel line from the carb, much like the blow back you get in a small block V8 with a bad exhaust cam lobe. This timing would also contribute to the brick wall you hit. The solution is to shim the cylinder to get the exhaust timing correct, then shim the head accordingly.
5. Vibration. Most IC motors will have areas in the rpm range where they have balance issues. My Harley would hit it at 68mph and it would be gone by 73mph. These motors have a bad habit of hitting this at the 22k to 23k range. This becomes amplified by the plastic tank with only 2 mounting screws. I have seen this happen on my runs. It sets up some kind of harmonic occelation and the motor can't get past it. In my runs over 23k I was able to run past it only by leaving the glow clip on the engine, which helps to stablize it or put my finger on the side of the motor until it gets past this point. At first I thought it was a prop balance issue, but it is not. Bob does make and aluminum mount to overcome this issue.
6. Nitro. Yep, 40 to 65% depending on how fast you want to go, and replace parts. Bob calls 27k a safe max and 30k is do-able for competition. With his mods he accepts a minum of 27k with a 4.2X2 APC.
OK, sounds all well and good but the big issue for me right now is I'm not sure I WANT to run 27k on the ground with a 2.75 on this plane. I got a chance to fly the plane tonight. With it turning 20500 on the bench I was expecting a nice 35 to 40% boost in speed on a nice flying plane. Nope! These props UNLOAD. A LOT! Those of you who have played with CF props on re-worked TDs or AMEs can relate to this. I found the best setting to be very rich on the ground, just starting to 4 stroke. Within 15 feet after lauch it has gone to a high pitched scream and it's on. It then becomes not so much an act of flying the plane, but spending a tank of fuel trying very hard not to crash. It reminds me of when I was 9 years old. I had been flying 1/2a combat with lil satans with TD's on them. It was fun, but I figured moving up to 35's would be lots more fun. So I built a voo doo and installed a 36x with a bladder. Then, with all the wisdom of a 9 year old I set the elevator throws to match my 35 size ringmaster. Today was a lot like that flight. Part of the problem was my flying field. Its a huge field and I fly from down in the corner in the mornings, with the sun at my back and about 100 acres to fly in. I have flown a few times in the afternoon, but the sun is over the field and I fly down in the corner, which has water on both sides. Bad idea. There is no such thing as flying this close and in. Trim adjustments are made on the ground as there is no time in flight. It quickly becomes a small dot and loosing orientation happens in a fraction of a second. The control throws become way too much at this speed. Being a glutton for punishment I still made 3 flights like this. This makes flying the 28" glh at over 100 a liesure activity, almost boring.
So I will wait for a morning flight where I can make nice big circles around me to get things sorted out. I am also going to move the cg forward and reduce the throws quite a bit more. I have also contacted Bob Mattes and will start on some of his modifications and get some parts from him. I'm just not in such a darn hurry to put it on the plane right now
12-19-2013, 06:26 PM
#150
The whole idea is to adjust the plane so that it will be less "fun" to fly than what you had today........
I've taken a pair of pliers and grabbed the upper cylinder of a running engine and noted an RPM improvement. I'm not talking about an engine that was running rough, either. I've never gotten around to doing it, but I've intended to take a .049 and clamp the cylinder to the firewall with just enough rubber to keep from tweeking it.
Hearing that 27-30,000 is possible restores my faith in how these little engines are supposed to behave if they are propped right.
With TD .049s the ball socket would predictably fragment after a handfull of flights, [above 25,000 or more] but this was before I learned about shaving the pistons. Shaving the piston ought to also improve the balance if what I've understood what Clarence Lee wrote about typical steel piston model engines.
It would be a kick to see some top notch free flight done out in the wide open country someday....before the sport goes away.
What you said about going for every last RPM you can get......if it can be done without blowing plugs, running too hot and breaking parts every other time you try to run it, then that's a nice level of performance to be at. Now, OTOH if some totally wacked out .020 Freak was to move in right next door to you and taunt you with his 30,000 rpm .020 powered pylon racer, then that's WAR TIME JACK...!!!