


Cox TD .010 Ply Rolled Fuselage 3Ch Speeder
 04-13-2014, 12:13 AM
#1

Thread Starter

Well time for a build so going with the TD .010 will have 3 Ch - Ailerons / Elevator / Throttle Sleeve. 
Rolled 1/32nd or .08 mm Ply fuselage for maximum room and strength keeping things thin; so thin the top curve of the fuselage matches the engine mount. In this case the smaller of the options requiring a remote fuel tank. Here's some pics will add more as the build continues; this is pure scratch no plans. In the final pics the all up weight thus far with engine is a mere 29.5g.
No balsa has been used all formers are ply.
Last edited by Pond Skipper; 04-13-2014 at 12:26 AM.
 04-13-2014, 12:22 AM
#2
Thread Starter
Will flip it upside down for an underside view once I have a moment for now here is another pic set. Not sure if I will use this CL tank but if used the lower v of the tank will face down for maximum fuel draw during verted flight. I may fab up a small plastic bottle with clunk style tank. 4.5g servo's will be used one for reference. I will either use 4 cell 280mah or a lighter set up with li poly 2S. Solid balsa wing will be used and landing gear in lieu of having throttle.
.
.
 04-13-2014, 08:46 AM
#4
Thread Starter
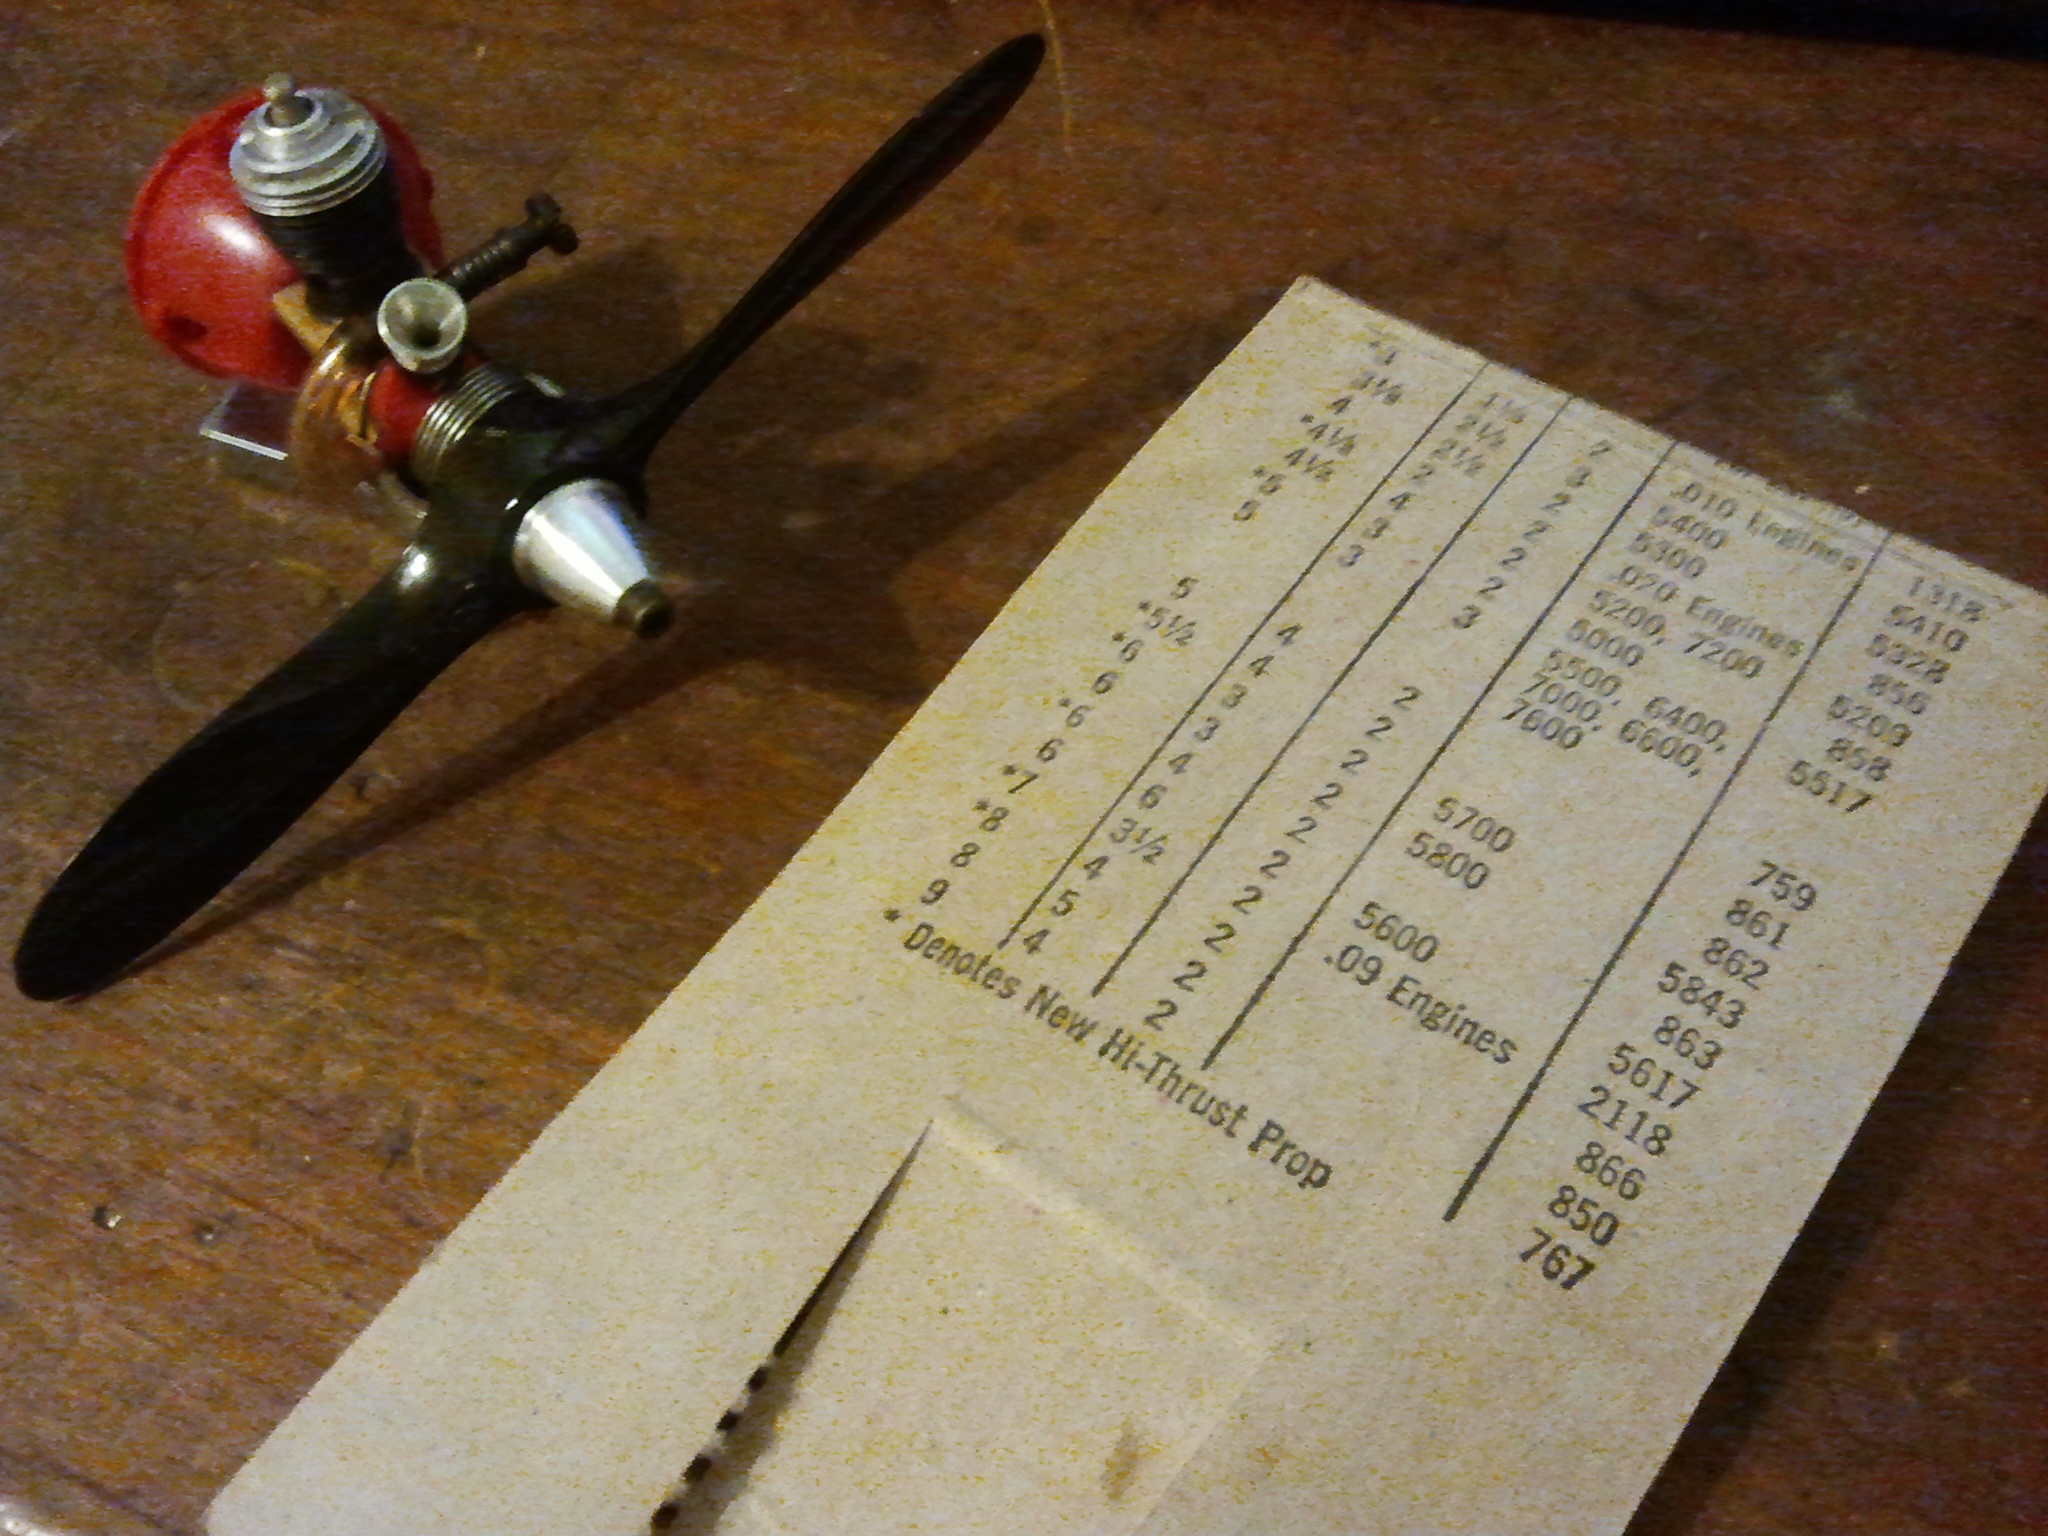
I want to use landing gear and throttle. Instead of running out of fuel down wind I plan to land the plane at idle. If on paved surface I would like to ROG do touch n goes. At this time I don't anticipate a rudder so taxi to take off isn't in the cards, just point and go. I may add rudder as my local flying field has a taxi lane to runway. Its a low wing but can be hand tossed with ease. The fuselage is long n lanky to allow reduced tail surfaces reducing drag is the goal. I have used a strap type throttle sleeve on .020 the same will be duplicated as shown with the .010 the pattern has been fitted and thin steel will be used. To make the sleeve I drill a series of small holes for the exhaust ports then file out. A simple twist and drill hole produces a control arm with the excess material as shown. Took a underside pic to show the former placements. Additional materials for wing saddle and for the entire bottom edge to have enough surface area once the bottom thinner ply sheets are glued in. I will have a hatch for the fuel / battery bay leaving only the wing saddle open to access the Rx and two servo's. Have not committed to wing mount type option 1 a nylon bolt hold down or wood dowel rubber banded wing. The design allows ample space for 4ch set up if I wish. I may order some new coreless micro servo's will have to research. Nothing will protrude from the fuselage other than piano wire and fuel hose. Note the far left .010 it uses a .020 spinner and a 4.5x2 I plan to cut and reshape one of these props for a 3x2 scimitar shape tips.
Last edited by Pond Skipper; 04-13-2014 at 08:53 AM.
04-13-2014, 09:39 AM
#5
Thread Starter
Good news for the .010 crowd there is a new composite glass / plastic prop on the market 3x2 that is stiff enough to use on IC . Found for the FMS Easy Trainer. If anyone has used this prop pipe in. I will order 3 to test. I have many small and larger E props in this material and they hold up to use with IC engines. The 3x2 was made for a 3900kv brushless motor and will handle 34k rpm + http://www.rchighperformancehobbies....ropeller/SN105 If anyone sources composites in 2.75 x 2.5 or 2.5 x 3 scimitar please post. Cox makes a rare 3.5 x 2.5 that can be reshaped to a scimitar 2.75 x 2.5 was for the CL Pee Wee .020 Lil Stinker. Note prop chart every prop Cox made. Hub was made to suit the press on rubber spinner shown with a TD .020 I used a .020 aluminum spinner on the .010 engine to compensate.


Last edited by Pond Skipper; 04-13-2014 at 03:10 PM.
 04-13-2014, 07:32 PM
#7
Thread Starter
Thank you = )
I use to do this trick when thin ply first showed up at my local hobby store many moons ago; it was such a natural progression from the typical building techniques.
Once framed out you can cut in cockpits, air intakes two step the tail section for full top and bottom round taper. You get a very straight fuselage if done right; key thing is moderate warm water don't over soak, mind your layout as it dries so when done it sits level and don't let the formers change / warp the effort. Wing saddles and additional strips lined around the bottom removes any traces of flexed out or wavy edges. You can paint with ease and the skin doesn't ding up like balsa. I have created other small fast planes with sheeted built up wings using the paper thin 6x12 sheets carbon tube. Twigs or any sharp / heavy foliage is not an issue on the finish. I need to pop over to the hobby store for piano wire suitable for the landing gear, ailerons and throttle. Will use thin carbon rod to the elevator. If you expand this onto its own web page you should get to full scale, fuselage should be 14.75" Once I start on the wings I should have a handle on the rudder shape. I used the swept vertical stabs back in the late 90's these days it's very common. Note the airfoil is 5mm thick I will source 3/16th balsa to suit.
Last edited by Pond Skipper; 04-13-2014 at 08:58 PM.
04-13-2014, 08:57 PM
#9
Thread Starter
Yes it does have a fine finish, I pre-sand with fine sandpaper not removing much and have thus far had no issues.
I use thick CA / thin is just not an option. Sometimes one side is less glossy / finished. You could use it for this size plane if double layered. The up swing is no water needed, tighter curves and laminating them would have it holding it shape as soon as the glue cured 70%. I plan to use 1/64th in the tail starting from the trailing edge of the wing saddle.
I use thick CA / thin is just not an option. Sometimes one side is less glossy / finished. You could use it for this size plane if double layered. The up swing is no water needed, tighter curves and laminating them would have it holding it shape as soon as the glue cured 70%. I plan to use 1/64th in the tail starting from the trailing edge of the wing saddle.
04-14-2014, 09:15 AM
#10


Join Date: Oct 2002
Location: Chilliwack, BC, CANADA
Posts: 12,425
Likes: 0
Received 22 Likes
on
19 Posts
I've not had any issues with gluing 1/64 ply myself. It has worked well with CA's and other glues. Mind you my supply is really old so it's been through multiple humidity cycles. That may be part of the reason.
I'd suggest you ditch the CL tank. The pickup is at the other end of the wedge so as soon as you go inverted it will cut the fuel flow and give you air instead.
For a model this small I'd suggest you use a pair of party balloons that are doubled by putting one inside the other. Then fill the balloon with enough fuel to just make it full without stretching the rubber. The idea is to use it as a slack bladder tank. The upside is that you don't need a vent line of any sort and it isn't at all position sensitive. And best of all on a model this small you are not trying to work with a really tiny little fuel bottle and so short a length of clunk rubber tube that the clunk has to take up most of the room to be heavy enough to make the tube flex enough. You don't need a very big balloon either. The Tee Dee .010 won't have enough draw power to work with any amount bigger than around 1/2 to 5/8 of an ounce worth of fuel in any event. And even then you want the balloon bladder tank to reside in the spot immediately behind the firewall.
To protect the model and the tank you'll want to coat the inside of that area and smooth it with some sanding so there's no burrs or dust catchers that would rub through the balloons.
If you've got a paved runway then wheels is a great idea. But if you fly off grass at all then you'll find that the wheels are more trouble than they are worth. On models this small landing gear in the grass just acts like a carrier deck arrestor cable and the model touches the grass and flips over RIGHT NOW every time.
The taco shell fuselage is a great idea. I'm often surprised that we don't see this method more often. All the best with the rest of the build and good luck with the first flights.
 04-14-2014, 10:44 AM
#12
I've run a lot of hard tanks with fixed pickups in .049 powered RC planes and unless you maintain perfectly flat inverted flight for at least 10 seconds.... your engine will continue to run until it warns you that you either need to roll over or else watch the engine quit. Random splash into the fuel pickup is enough to keep the engine running and the fuel droplets will reassemble themselves into a solid stream by the time it gets to the spray bar.
Working with .020 or .010 I figure these engines will be that much more forgiving about using a fixed pick up in the tank.
For this reason a fixed fuel pickup is a good choice unless you are planning on flying inverted for big blocks of time once the tank is empty enough to prevent any fuel splash into the hungry feed line. .
04-14-2014, 09:05 PM
#13
Thread Starter
I have some ideas on the tank solution, original idea was use the wedge tank with the wedge facing down the fuel would push to the back while moving and settle in the wedge during level flight and rolls. Inverted flight would simply be a short moment in time to avoid starving the engine. I made desolder the back and pop in a clunk line by removing the small copper tube enlarge the hole just enough to snug the fuel line thru without collapsing the tube. I would flare outward the hole for some tube grip and smooth surface to avoid cutting the fuel line over use. Could use a small servo rubber grommet. With a small wheel collar and small bit of copper tube fab a clunk weight. And grind the weight into a angled cone shape to sit lown in the tank. I have some hard plastic tube and some cork material to do a typical micro tank. I may just wimp out and use a balloon lol. Steady fuel draw is a must I may but a pressure tap on the lil tuned pipe idea. Or tap the engine mount and fill the void with epoxy to help seal and hold the threaded tube. Will post some pics soon. Could make a small jig heat up the prop and reshape to 2.8 x 2.8. Once hot put in the freezer for 2hrs then drop in warm water to harden the prop. Old trick new day.

04-14-2014, 10:00 PM
#14
Your prop looks pretty racy..!
Whoever they had in charge of their prop program did a great job. I'm not sure how much safer their rubber props are vs hard plastic..but a Christmas Eve shopper would certainly see the rubber prop and maybe even the "Good Housekeeping Seal Of Approval" on the box...?
Otherwise, how would they test / evaluate the actual safety of various prop materials..?
Use a package of hot dogs..?
04-14-2014, 10:43 PM
#15
Thread Starter
Thank you I liked the doodle so much I had to hold one here she is in the flesh, factory edge Thimble Drome 2014. I will have a go at balancing the lil guy one blade could be heavy by a few hairs.

.

.
Last edited by Pond Skipper; 04-14-2014 at 10:47 PM.
04-14-2014, 10:51 PM
#16
Thread Starter
lol right Combat hot dogs over cooked would work.
I would have to say if anyone pursues making one of these use the hard plastic it files, sands and polishes better.
Last edited by Pond Skipper; 04-14-2014 at 11:38 PM.
04-16-2014, 05:37 PM
#18
Thread Starter
Have some parts in and can proceed K&S thin brass stock for the throttle sleeve fabrication, 4.5g HS-35HD Ultra Nano Servos 11oz / in of torque high speed .1sec for elevator and ailerons, DS35 3.5g very high speed servo .05 sec. for instant throttle adjustment.
A Fourmost one way check valve very light only .4g I now have everything I need to complete this project so will get after it as time allows.
A Fourmost one way check valve very light only .4g I now have everything I need to complete this project so will get after it as time allows.
04-16-2014, 10:35 PM
#19
Thread Starter
Here is the fuel delivery system and 4 cell configurated power pack 260 mah nimh. I may fab up a tank and clunk least this gets the engine running for now to set up the throttle sleeve.


Last edited by Pond Skipper; 04-16-2014 at 10:38 PM.
04-17-2014, 01:37 AM
#20
Thread Starter
And now the throttle sleeve, on an engine this size I went with some thin brass sheet from K&S easy to fabricate the exhaust slots and form. Heres some pics. I will undo the back nut to add a L shape arm on this particular one do to linkage location of the throttle servo.


04-17-2014, 06:38 PM
#22
Thread Starter
Hey CP there are only three methods to construct a throttle sleeve due to the seating flange at the bottom cylinder. Cox original method was to have a two half pieces with venting slots placed into between the flange and the first cooling fin then a full ring slid over to hold it all together. The 2nd method is to grind off the flange which I had done on a TD 15 to slip over a Medallion sleeve on. Lastly is to just make a strap and retain with a bolt /nut. All the older thin walled cylinders with the flange had a different range of throttle type systems to compensate. Later when the thick walled cylinders came out many of the 020, 049 and 051, 09 stopped using lower flange for easy slip over throttle rings. Here's two that I own that had the half pieces in to fill the void prior to slipping over the sleeve done to the Olympic and Sportsman .15's


04-17-2014, 09:31 PM
#24
Thread Starter
Yes a real rpm beast for its day.. mint ones do show up once and awhile on ebay its a luck of the draw deal. My fav. is the Mark II.
I have been collecting Cox 15 size engines for a while now. So far two TD .15's 1 Mark II, 2 Sportsman .15's and a Olympic front bearing .15
I have some .09's real power houses for their size / weight so looking forward to doing up a TD .15 at some point for a vintage looking racer using the spoked wheels and 1/4 scale pilot bust shown. You may find a .15 around $90 -140. The single exhaust port Mark II was new in the case and cost me $208 had over 30 bids for it. The TD Special with the gold front collar was won at $165.24. I up graded that one and the Mark with alumium carb bodies and sourced a new throttle ring from Australia. All the 15's are RC. I have found a special throttled exhaust muffler for the Mark II its in the mail will post a pic once it comes in. I would like to add a tuned pipe if all works out.
I cut down the flange on one of my .010's takes a steady hand on a grinding wheel. 8mm dia cylinder I am going to the hobby shop to source some thick walled aluminum tube if possible and have a go at a more modern throttle sleeve. Will have to go to the hardware store and source a clip too.
Last edited by Pond Skipper; 04-17-2014 at 09:49 PM.
04-17-2014, 10:07 PM
#25
Do the .09s and .15s ever need rod resets done..?
I've been in the hobby almost 30 years and have only seen a .09 run a few times, never any .15s.
This has been one of the most boring ARF40INSIDELOOPLEFTHANDTURNONLY areas for RC over the years. If not for the great amount of control line activity I would not have seen first hand very much variety...especially below .40 size.
Now that I see what mail order fuel costs, I'm glad to be biased towards .15 and under.
8 mm aluminum sleeve.....I'll keep my eyes peeled.

