


Ply Rolled Fuselage Part Deux - 1/2A " Mini Skorch "
 08-08-2014, 12:29 PM
#26
I guess you are referring to AndyW's mods, if I remember correctly he only kept the crankcase and the crank, the rest is Norvel stuff...
Here is one of my threads from the time; http://www.rcuniverse.com/forum/1-2-...i-give-up.html
Here is one of my threads from the time; http://www.rcuniverse.com/forum/1-2-...i-give-up.html
 08-08-2014, 04:32 PM
#27

Thread Starter

Not bad I see after some effort you managed to get a APC 5.7x3 at about 18000 rpm.
Will have to bench run mine to find out what its made of with the APC 5.7x3 to compare after it has a 4 rich 1oz tanks ran thru it I will lean it up for a final tach check.
Will have to bench run mine to find out what its made of with the APC 5.7x3 to compare after it has a 4 rich 1oz tanks ran thru it I will lean it up for a final tach check.
08-08-2014, 11:45 PM
#28
Thread Starter
Ok bench ran the CS it doesn't hold a low idle very well ran two tanks thru and flips over nice now compression is strong no bubbles or leaks, it started right up on the second try with a hornet 1/2A starter. Looks like I need to drill a air bleed hole. I had to really open up the needle valve though even when using some fuel line to seal things up to improve draw. Seems fussy and doesn't like quick throttle ups. No adjustment screw to set the throttle arm throw. For now I will use the TD .051 with crank case pressure / sanity check completed pressing on with the build.")


08-09-2014, 12:01 AM
#29
Yes, there is no compensation at low throttle settings, so you need to add an airbleed or notch the throttle drum for instance. I have a fixed airbleed on mine.
If the needle is far out then you might have a problem with a partially blocked intake hole in the black plastic (where the fuel line attaches). On mine the hole in the plastic was very small (needs deburring) and it didn't line up well with the groove in the brass needle holder. It has been some time now, but if I remember correctly I deburred/drilled out the plastic part slightly (by hand) and widened the groove on the brass part (in a lathe).
You really do need to check absolutely every single thing with these engines...
08-09-2014, 02:18 AM
#30
Thread Starter
Hey Kris, I bet thats it with the black plastic nipple makes sense will have to take a look. I like the simple grove idea in the throttle barrel but If I pull the carb apart might as well just drill a hole for the air bleed. Also will add an extra thrust washer a bit too much slop for my taste if I continue to use a starter.
Ah stopped and took a look at the nipple it was ok but there was some trash fuzz that got in there blocking one of the two feeder holes going into the needle housing. Need to use some loctite on the throttle arm screw that or change to an allen head. The engine aesthetically looks good and the weights reasonable. I may go ahead and run another tank of fuel threw it Sat. I had already changed out the muffler bolt to a allen head. With the back plate off there is no black sludge build up so the parts are breaking in nicely thus far. I would hope this engine can flip start with little fuss in the long run. Added a 3mm allen bolt for the prop.
Ah stopped and took a look at the nipple it was ok but there was some trash fuzz that got in there blocking one of the two feeder holes going into the needle housing. Need to use some loctite on the throttle arm screw that or change to an allen head. The engine aesthetically looks good and the weights reasonable. I may go ahead and run another tank of fuel threw it Sat. I had already changed out the muffler bolt to a allen head. With the back plate off there is no black sludge build up so the parts are breaking in nicely thus far. I would hope this engine can flip start with little fuss in the long run. Added a 3mm allen bolt for the prop.
08-09-2014, 09:40 AM
#31
The Norvel spring starter fits well, just rotate 180� and make a hole in the engine mount, if you don't want to drill through the engine mounting lug. I didn't like the stock "muffler", it was leaky and didn't really muffle much either.
Here is an old picture of the DIY muffler I used at the time;

Here is an old picture of the DIY muffler I used at the time;
08-09-2014, 01:32 PM
#32
Thread Starter
I bet that made a cool sound!
I removed the heli throttle exhaust tube from the norvel muffler and found this tuned pipe to fit well but would need to remove the final step down stage on the muffler to avoid obstruction fits tight perhaps worth trying for kicks.

I removed the heli throttle exhaust tube from the norvel muffler and found this tuned pipe to fit well but would need to remove the final step down stage on the muffler to avoid obstruction fits tight perhaps worth trying for kicks.
08-12-2014, 10:21 PM
#33
Thread Starter
I have been sorting out the plumbing the crank pressure line can be activated by blocking off the over fill line coming out the fire wall. The carb line will be the fill line the engine wont flood while filling up as the least path of resistance is the over fill line. Almost ready to cover up the bottom of the fuselage simple piano wire control rods. Will use E Flite servos for the throttle and rudder and a tad more beef with spectrum servo's for the elevator and ailerons. Full range Rx and 260mah nominal Nimh batts that peak charges to 320mah. Lastly a doodle layout of the potential design of the flying feathers.

08-13-2014, 10:46 AM
#34
I just checked my notes from the time and realized another odd/bad thing with these engines, and that is the timing...
While AndyW kept the crank and crankcase, they still needed some extensive modding. The intake is circular in both the crank and crankcase, while this not only gives a rather poor breathing, the timing is also a fair bit "off" from the norm.
My stock engine measured (approximately);
Exhaust: 150� duration
Transfer: 120� duration
Intake: 50� (ABDC) - 25� (ATDC) for a total of 155� duration
While the exhaust and transfer are only a little modest (for high revving applications) the intake seems well too short and has a too small area. I modded mine a little for a more rectangular shape (by freehand) but one should ideally use a milling machine as AndyW did.
08-13-2014, 12:20 PM
#35
Thread Starter
Thank you Kris good info recorded for all in need of the data in the future. There are still many of these engines floating around.
If left stock looks like that sport CS RC engine is better suited for swinging 6in props rather than pushing them on smaller 5in dia props.
The TD .051 will maiden the plane for now and will go from there. I need to make a trip to the hobby store this weekend for some odds and ends.
If left stock looks like that sport CS RC engine is better suited for swinging 6in props rather than pushing them on smaller 5in dia props.
The TD .051 will maiden the plane for now and will go from there. I need to make a trip to the hobby store this weekend for some odds and ends.
08-13-2014, 12:40 PM
#36

The plane is shaping up nicely..!
One way to gas up these planes is with the model's nose pointed straight down and then squirt the fuel in through the vent line. Fuel will harmlessly pour out the carb once the tank is full. This method assumes that the feed line doesn't flop away from the back end of the tank.
One way to gas up these planes is with the model's nose pointed straight down and then squirt the fuel in through the vent line. Fuel will harmlessly pour out the carb once the tank is full. This method assumes that the feed line doesn't flop away from the back end of the tank.
08-13-2014, 08:34 PM
#37
Thread Starter
Thank you CP, this one I wanted to fill with it sitting on it's legs and rigged to get a full tank each time as the breather tube is curved straight up into the top of the tank within a hair of almost touching the roof plus the over flow line. I do fill the Lil Speedy with its nose standing straight up thru the carb line every little drop counts with its present tank size. I should go to the drug store with my calipers and or the current tank to match up more volume. The dia is maxed out but the length is good for another 10mm about 1 min. of additional run time.
The Mini Skorch will have a rudder / tail wheel to allow taxi to ROGs when the terrain is available. The 1.5in foam wheels are just enough to fly off a hard dirt surface and lanky enough to restrain from flopping over when landing in short grass is desired - will be fitted with a 1/2 dia foam tail wheel.
The Mini Skorch will have a rudder / tail wheel to allow taxi to ROGs when the terrain is available. The 1.5in foam wheels are just enough to fly off a hard dirt surface and lanky enough to restrain from flopping over when landing in short grass is desired - will be fitted with a 1/2 dia foam tail wheel.
08-14-2014, 12:51 AM
#38
Thread Starter
Finally I have finished the tail logistics for the push rods for Rudder and Elevator put in the square stock to straighten edge warp and dramatically increase strength, twist resistance prior to skinning the bottom with the 1/64th ply. Left a small section at the trailing edge of the wing saddle unfinished so I can cut in the cockpit and to have more room for my fingers while setting up the push rods and 3 servo's. Added a small section of thicker ply for the tail wheel bracket. This thing is very strong ready to smack full throttle into the ground laughing at terraferma! Note the lean mean frontal profile regardless of a engine cowl the air Skorcher should be fast. The technique leaves you with a very straight low Reynolds fuselage.
I am curious what the wood weight is without anything else - as originally stated my goal is sub 11oz. RTF.
For now I dropped in all the servo's, Rx and batteries for a quick weight check - 7.4 oz less the balsa wing and tail feathers and front 1/64th ply hatch. Holding my breath only 3.33oz left to play with. The piano wires are all longer than needed at the moment so odds are I have 3.5oz + to work with.
Last edited by Pond Skipper; 08-14-2014 at 01:03 AM.
08-14-2014, 09:44 PM
#39
Thread Starter
Good ol Carl Goldberg lightweight nylon steerable tailwheel bracket.
I have been using this kind for many years on all sub 1 lb planes. The assembly completed requiring piano wire forming and tail wheel selection.
Once complete you are rewarded with a simple light system to taxi your creation to the runway and up into the heavens.

I have been using this kind for many years on all sub 1 lb planes. The assembly completed requiring piano wire forming and tail wheel selection.
Once complete you are rewarded with a simple light system to taxi your creation to the runway and up into the heavens.
08-15-2014, 10:56 PM
#40
Thread Starter
Ok rolling along did some more work on the plane. 3 servo's set up with the now trimmed control rods. CG is currently at the arrow and appears to be enough wiggle room once the wing / aileron servo / tail feathers are added I will be right on the money for the CG. The Battery should fit in the nose but there is room if need be to place it behind the landing gear and still clear the aileron servo. With the push rods trimmed and the tail wheel bracket installed. Im at 7.6oz with 3.4oz available for the balsa flying surfaces if to stay at 11oz less fuel.
If I had a 7x2 prop I would imagine 2:1 power to weight ratio if at 11oz
If with a 6x3 I will have about 1.6:1 ratio. not bad with the TD .051
Here's the layout

If I had a 7x2 prop I would imagine 2:1 power to weight ratio if at 11oz
If with a 6x3 I will have about 1.6:1 ratio. not bad with the TD .051
Here's the layout
08-17-2014, 07:29 AM
#41
Thread Starter
I may take time to put in the extra effort to incorporate some stunt flaps and to aid in landing allowing me to keep the wings low in squares. Not very many 1/2A planes have ever touted a 5 ch setup with flaps. With the advent of smaller servo's lighter longer duration batteries might be time to for a full 6ch 1/2A plane with retracts one day soon.
Even Skorch's legs could be hinged to flip back under the wings along the fuselage. By doing so less tendency to down pitch at high speeds and add a few mph.
I like this layout.

Even Skorch's legs could be hinged to flip back under the wings along the fuselage. By doing so less tendency to down pitch at high speeds and add a few mph.
I like this layout.
Last edited by Pond Skipper; 08-17-2014 at 07:44 AM.
08-17-2014, 08:36 AM
#42

I never use landing gear on the little ones anyway. I have only flown on grass fields in the last 30 years, and the few years before that, I could not hit the runway on purpose anyway.
08-17-2014, 04:13 PM
#45
Thread Starter
Thank you gents! - It has been awhile since I have pursued anything with more than 3 servo's as many electric builds included a esc.
I went with three 6.5g servos for the fuselage and 7.7g Spectrum servo's for the wing.
I bought the plank of balsa today for the wing the thickest I have ever gone in the past is 1/4in thick today I break into the mics out at 10mm thick / labeled at 3/8th in or.394 inch
On the scale this plank of balsa reads 2.74oz It should be interesting to see once formed into a airfoiled wing what the weight will be. My guess 1.72oz.
Last edited by Pond Skipper; 08-17-2014 at 04:15 PM.
08-24-2014, 10:39 AM
#46
Thread Starter
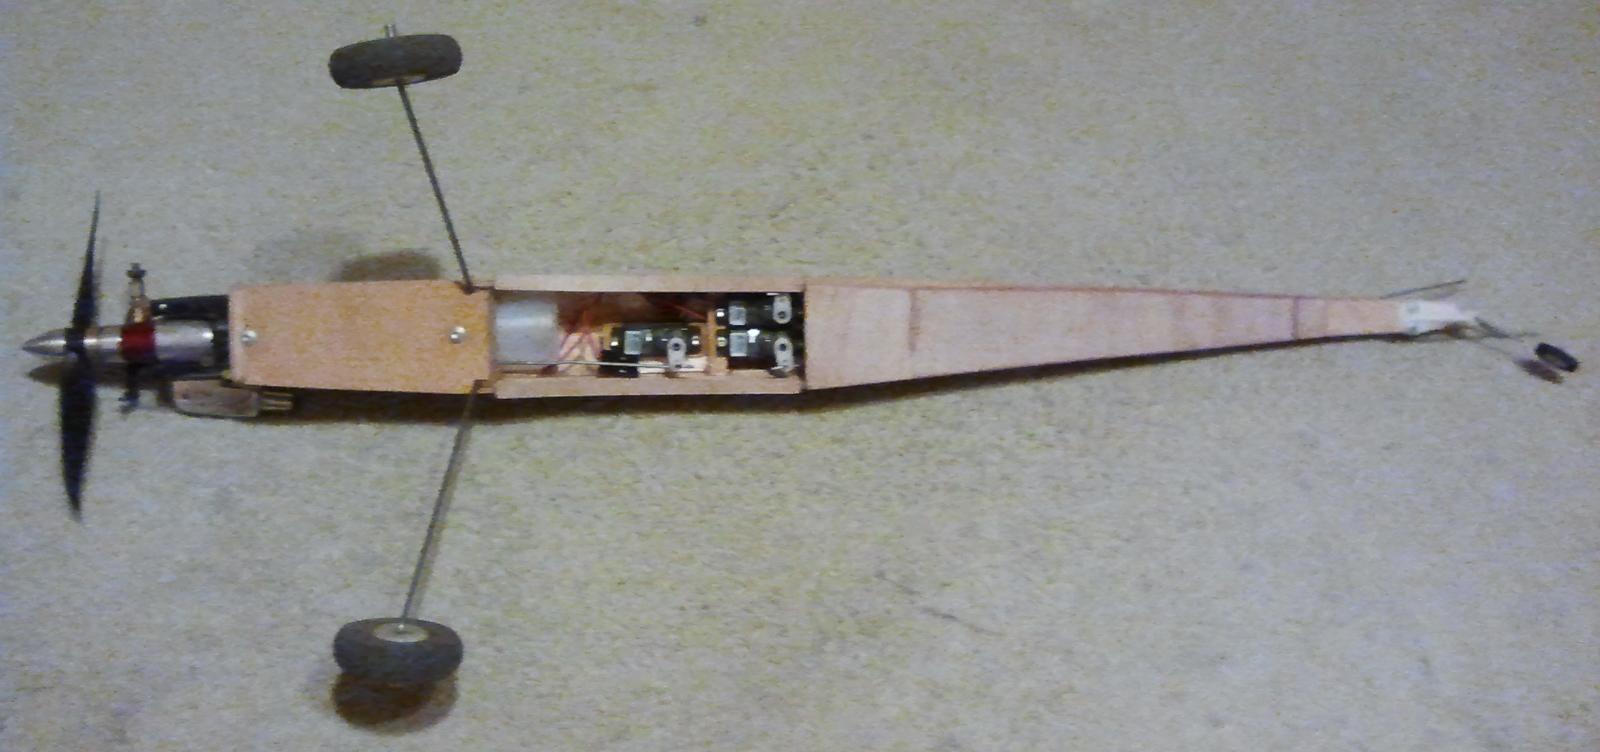
Ok back again, I finished out the 3 servo mounts, made a access hatch for the battery fuel tank bay same thickness as the fuselage and closed off the final section of 1/64th ply just behind the servo's added saddle seat strips - not shown is the RX that will sit next to the throttle servo.
The fuselage is done less fuel proofing the wood, with all the gear inside including the RX and batteries I am now at 7.804oz with 3.194 oz left for the balsa flying surfaces, 2 servo's and the horns and wire. Going to be close one for sure. The fuselage is very strong and can handle a TD .09 Have my templates done for the flying surfaces and ready to let the balsa dust fly
The fuselage is done less fuel proofing the wood, with all the gear inside including the RX and batteries I am now at 7.804oz with 3.194 oz left for the balsa flying surfaces, 2 servo's and the horns and wire. Going to be close one for sure. The fuselage is very strong and can handle a TD .09 Have my templates done for the flying surfaces and ready to let the balsa dust fly
Last edited by Pond Skipper; 08-24-2014 at 07:53 PM.
08-24-2014, 06:26 PM
#48
Thread Starter
Yea wont crank it flooded just hand flip it over to the side to dump the excess out the muffler. I have bench tested this one *posted a vid, Takes just a few drops when cold into the throttle and few flips with the carb closed the line fills up..great for a Cox engine and the crankcase tap seems to help with a faster throttle response. I will most likely maiden over a good thick grassy area then seek some runway action. Has generous right thrust tad down. May try this glass / plastic prop 4.1 x 4.1 first picks up fast on the throttle. It will be nice to do the full boat of commands for a broader range of flying. I have had 1 other 4ch 1/2A but never a 5ch. Should be a great year to year flyer robust enough to last many seasons and give me a platform to try different engines.

08-24-2014, 07:21 PM
#49
That's interesting to me that you have good throttle control while using CC pressure. I always assumed it would flood the engine at idle and carrying a battery [on the plane] for the glow plug wouldn't be practical. I've had the feed line off a .CC pressurized .049 while cranking with a starter and it pumps like a fire hose.
Many years ago I read about a model engine tinkerer who had 2 or 3 separate remote needles regulating a pressurized source and he made some kind of a slide valve that allowed the separate sources to contribute to fuel flow or not, depending on the throttle position.
I don't know if this is similar in principle to the old Rochester Fuel Injection that Corvettes had, but I've heard it described as "mechanically timed" injection.
08-24-2014, 08:07 PM
#50
Thread Starter
KK uses the smallest hole I have ever seen so small that low engine idle isnt enough to add more pressure in fact it appears the engine needs to ramp up some to even start to dump into the tank.
Take a look at this post I made and vid let me know if the hole you see is anything near the size you had in your setup.
Here is the vid taken as I ran with the pressure tap for the first time running with the carb almost closed / has a air bleed hole tarno carb. Tank is not in the best spot but I figured if I have pressure it shouldnt matter as much.
Sounds lil lound Im inside - after a few mins I ran out of fuel.
http://www.rcgroups.com/forums/showt...2152487&page=2
https://www.youtube.com/watch?v=oC5jb7HlU_0&feature=youtu.be
Last edited by Pond Skipper; 08-24-2014 at 08:21 PM.