I’ve seen some interest expressed by RCU members concerning methods of how to generate rib patterns for a tapered wing. As with most things there are multiple ways to “skin the cat” but I thought I’d share the method I use for those who may be interested. This particular method is only workable on straight taper wings (or fuselages for that matter), elliptical shapes are a different colored horse and, quite frankly, I’ve not figured out exactly how to do an elliptical shape yet. I’m using AutoCAD for my design work but the principles are the same no matter what software you use, or even if you don’t use any software at all. A ruler and some French Curves will do the job, just not as quickly! This whole process will be much harder to adequately explain than it is to accomplish so feel free to ask questions if something is not clear. I will also preface this by saying that everything I know about AutoCAD is what I’ve taught myself. You AutoCAD experts out there know just how massive a program it is and I’m sure there are some processes that can be done with more efficient methods than those that I’m aware of. Please feel free to interject here as well. I’m always happy to learn better/faster/easier ways of doing things!
For the sake of this particular tutorial I’m going to assume you already have your root and tip ribs selected and have generated drawings of them. Just getting to this point can be quite an involved process but I’ll leave that for another thread. Below are my two airfoils, these being for a Japanese Ki-46 Dinah that I’m currently drawing up. Notice that the root is almost symmetrical while the tip is much closer to flat bottom. No problem, using this method we can loft from a circle to a square if we want to! Also notice that I’ve set the tip rib at three degrees negative so that we will automatically loft in the desired wash-out.

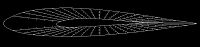
Ok, now that we have our root and tip ribs the next step is to divide them both up into an equal number of segments. In this instance I’ve divided each rib into 20 segments. The more segments you use the more accurate your lofted ribs will be but more segments also means more work as you will see. (And to be honest I probably would have been just fine with a few less) Just play around until you get the feel for it. Gentle curves require less segments while steeper curves, such as the leading edge radius of the airfoil, will require more segments. For the time being I am not going to loft the leading edge of the airfoil as it will just make things more cluttered than they already are. More often than not you don’t need to loft the leading edge anyway as you will be sticking a chunk of balsa up there and sanding it to the proper shape.

It is best to divide everything up and put it on different layers, ie, root rib, tip rib, segment lines, etc. You will notice that during some steps I've shut off certain layers to make things easier to see and understand. I have not deleted them as I may need them again later but it is nice not to have to look through them when I don't need to.
Next we overlay the tip rib on the root rib. For the sake of simplicity I usually put the tip rib right in the center of the root rib but that is just my preference as the relationship between the two makes no difference at all when lofting. It is easier if you keep the tip rib within the confines of the root rib however.

Now we join the respective segments of each rib with a straight line. Connect the two trailing edges with a line as well. Make certain both ribs are divided into the same number of segments or this step will get very frustrating!

Now comes the time-consuming part. Each of the lines we created in the last step has to be divided into whatever number of ribs we want. In this case I needed seven equally spaced ribs total, including the root and tip ribs that I’ve already got. In order to get a total of seven ribs it is necessary to divide each line into six segments. (Always one less than the total required, confused yet?) Because my ribs are equally spaced I will divide the lines into six equal spaces. It is no problem to generate ribs that are not equally spaced as well, just takes a bit more math. (I’ll explain in more detail a bit later) In the example pictured the upper line which I have marked off has a total length of 4.766 inches which results in six equal spaces of .794 inches. I’m sure every CAD program has different tools that can help you to speed up the process of dividing the lines. I keep a calculator handy to do the math and use the “offset” and/or “array” commands in ACAD to lay out my marks. You can see now why more segments results in more work!

Here they are all laid out and ready for the next step.
Now it’s just a simple matter of connect the dots to get our intermediate ribs. Get comfortable with the snap functions of your CAD program, they make quick work of this. In AutoCAD I use the “arc” tool to get smooth curved lines here.

Now, again in the interest of keeping this simple, I’ve lopped off the front of the ribs here as if we were going to use a big chunk of leading edge stock. If we were doing this for real chances are the cut off would not be right at a segment line but you get the idea.
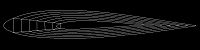
And here are the ribs shapes ready for sheeting, spars, etc.

As time permits I will try and expound on this in a bit more detail to cover such things as lofting the leading edge radius and also generating those ribs that my be at odd spacing. Hope it is of some use!