


Pulse 125 Pilot Size
 02-25-2014, 06:04 AM
#51

Thread Starter

A temporary hold has been put on further assembly of this plane. Rather than just add the electrical components like receiver, battery, kill switch, I have decided to consider where the aircraft currently balances. My assumption is that the DLE20 will make this plane nose heavy. If that turns out to be the case, I will move the battery and other parts rearward in the bay where they now sit. Not only will it give me more room in the depth of the bay, but will open up the front where the height of the bay is less. And I am hopeful that the balance will be closer than if I added and checked later. I will continue to post as progress warrants.
Last edited by hookedonrc; 02-25-2014 at 06:07 AM.


 02-25-2014, 08:46 AM
#53
Thread Starter
Thanks tailskid, that will help me decide where to put it. I am thinking about building a slide in compartment where the oval opening is at the front. It is pictured here.

Yep, just checked and the A123 slides in easily. Now it is just a matter of design and there will be plenty of room in the bay and may not even need the double shelf.
Yep, just checked and the A123 slides in easily. Now it is just a matter of design and there will be plenty of room in the bay and may not even need the double shelf.
Last edited by hookedonrc; 02-25-2014 at 01:44 PM.
02-26-2014, 07:04 PM
#54
Senior Member

Good idea to stop and think where to put the internals.
It probably had a lot to do with the dual elevator servos...
... but mine needed weight in the nose. If you do, don't buy it from the hobby shop - go to your local tire store and ask if they can spare some flat weights. They give me a couple of pounds whenever I ask for it.
It probably had a lot to do with the dual elevator servos...
... but mine needed weight in the nose. If you do, don't buy it from the hobby shop - go to your local tire store and ask if they can spare some flat weights. They give me a couple of pounds whenever I ask for it.
02-27-2014, 04:53 AM
#55
Thread Starter
Thanks, I am leaving the covering off of the tail just for that reason. Once I get the plane all assembled, the balancing will be done with the covering removed. After checking that the battery will fit in the opening in front of the servo bay, I will be putting in a slide in rack. Still working out the design, but I will want it light so as to not add much more weight. Then I can remove the shelf I have created as there is just enough room left in the bay to install the receiver. If it will just warm up a little I will get back to work.
02-27-2014, 10:33 AM
#56
Senior Member
Looking good!
Don't know if I've mentioned this before but for the sake of access I made the canopy bolt-on and mounted the pilot to a removable plate in the cockpit. It's been a big help.
Don't know if I've mentioned this before but for the sake of access I made the canopy bolt-on and mounted the pilot to a removable plate in the cockpit. It's been a big help.
02-27-2014, 11:00 AM
#57
Thread Starter
Yes, I did see that, and it might be that is what I will do. For now, I should be able to fit everything in and still have access. The bigger hatch on the lower front of the fuse will get me at what is up there. I am planning to put the pilot on the cross brace in the cockpit as I think it looks fine. And the canopy is the tallest at that point.
03-09-2014, 11:56 AM
#58
Thread Starter
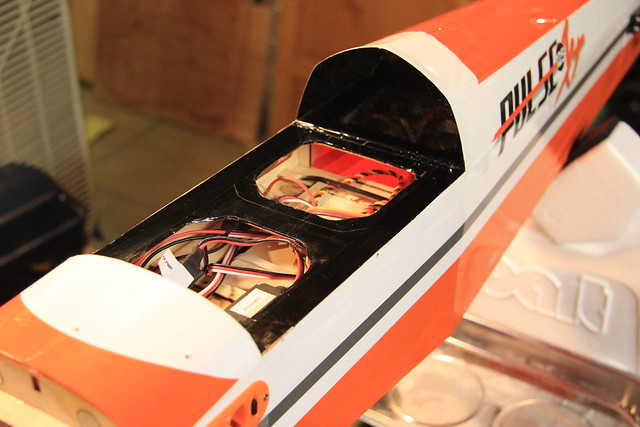
Finally, we may have turned the corner on this Winter and it is warm enough to get back to work. When I left off last time I was trying to determine where the battery would go. When you have the Electronic Ignition box, optical kill switch, and modifications that caused the servos to be moved, space is short. I was going to build a second shelf in the servo bay for the receiver and battery, but had a better idea. Between the servo bay and the ignition box (sitting behind the fuel tank) there is a big empty space, but no real way to get at it. So I decided to build a battery tray, slide it in place, and then using screws, attach it to the fuse bottom. Doing it this way will allow for the battery to be forward, out of the way, and removable if needed. Just undo the four screws and slide it out. I can also remove the second shelf, anchor the optical kill switch using servo tape, and place the receiver right behind the kill switch. Here are the pics of the progress and current set up. The open space in the bay is for the receiver and I am headed back out to get it and the manual switch installed.


03-09-2014, 01:12 PM
#59
Thread Starter
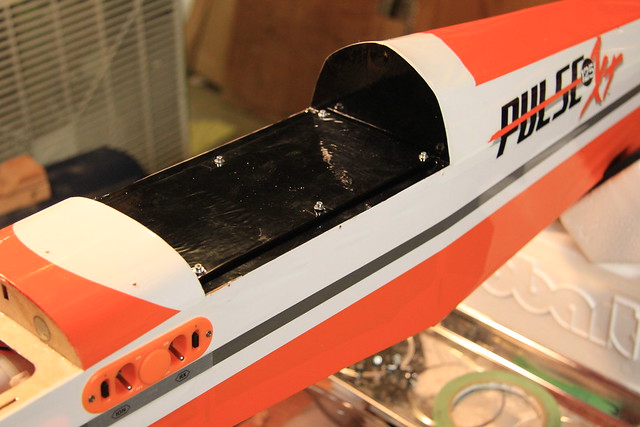
Well, the next step was not a big deal since most of my planning is done and switch cutout was already in the fuse. Installed the manual switch, which will provide the manual shutdown and optic kill switch methods. Next was the receiver, remote receiver, (remote is located at the rear of the servo bay mounted to the rear bulkhead) and landing gear, which was moved forward due to problems with plane nosing in. In the pictures, the one servo lead is the aileron extension from the receiver, I need one more for the dual servos, install spinner and prop, add wings and balance. Then it's just wheels and wheel pants. I am considering painting a white stripe right down the center of the pants, separating the top and bottom. I think the pants the way they are look bulky and will be better with a stripe. Latest pics.


OOPS,..no I haven't forgotten...Canopy and Pilot are also on the list.
OOPS,..no I haven't forgotten...Canopy and Pilot are also on the list.
03-10-2014, 03:55 AM
#61
Thread Starter
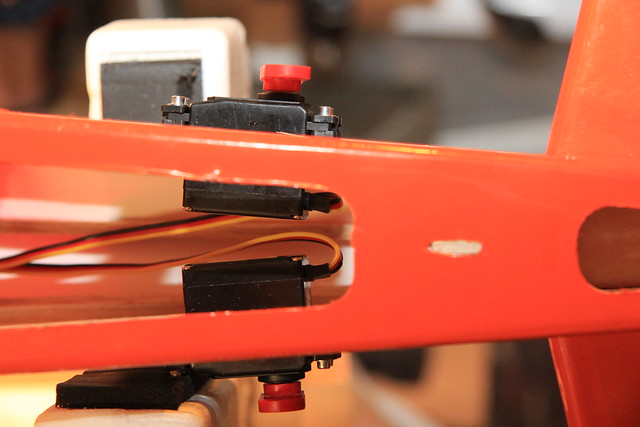
Thanks, I like a clean servo bay to ensure no moving parts get tangled with the wires. I also noticed I need to cut off 1/2 of the rudder servo arm to lessen the possibility.
03-11-2014, 08:37 AM
#62
Thread Starter
Well we are closing in on the last of the things to do before final programming and maiden flight. However, I always like to have a pilot figure in my planes, it just looks better. Sort of like having people on an HO Railroad. Anyway, I got the pilot and after measuring, it was obvious that he is too tall without being modified. So I did that yesterday. First, I measured the distance from top of the canopy to the bottom edge by placing a piece of masking tape side to side running across. Then using my trusty square, I measured the height of the pilot and found him to be too tall...knew that already, but not by how much. Then using a small block of balsa and a pop sickle stick, I made a template for the line I would need around the entire figure. This ensured that I cut it level and straight. Then, I made a new mounting block for the bottom of the figure, epoxied it in place and let it dry overnight. Last picture shows the results. That is one b**t ugly figure, so the least I can do is paint him up a little better...and that is my next step.


03-11-2014, 05:45 PM
#65
Senior Member
03-12-2014, 03:53 AM
#67
Thread Starter
Yeah, those sun glasses...or swimming goggles will need some work. I need to get to Hobby Lobby and get some acrylics because he is going to undergo a paint job. Maybe I can improve the looks of them, but there is only so much I can do.
03-21-2014, 05:29 AM
#68
Thread Starter
Finished repainting the pilot last night. He is still one ugly dude, but at least he looks a little better. This is only my second attempt to paint a life like figure and admittedly, I didn't start with a good subject. However, that said, when you put him under the tinted canopy, the affect is fine. Now it is on to the install of pilot and canopy...then balancing and programming... Looks like this plane will be ready for the season....YAY.


03-29-2014, 12:00 PM
#70
Thread Starter
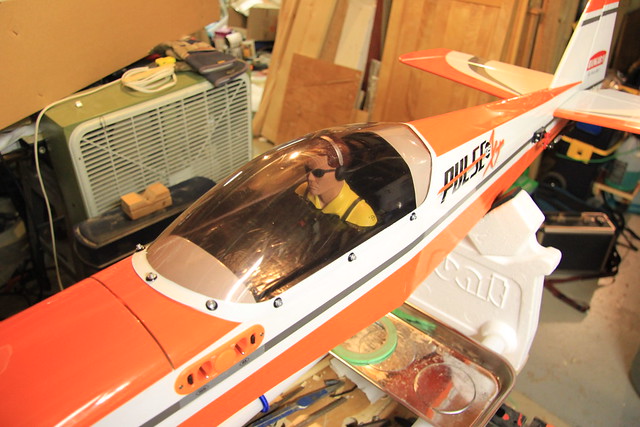
Well here she is....my winter project at the 99% mark with only a few steps left. Took me longer than I thought, but we had a colder winter than anticipated, I have some health problems that are still here, and I made changes in my design which took some retooling. And if you have noticed, I took one look at the orange wheel pants and knew something had to be added, so I did....white stripes.
However, as the post title says, I still need to balance, cover the fuselage bottom where new push rods were installed, charge the 2500mah Life Battery, and program the radio. Of course the regular stuff is still needed, but that is what is needed for even older planes. I need to fuel and get the DLE20 running smooth, then maiden this puppy after testing everything including the optical cutoff switch. I am going to program it to the gear switch since this doesn't have retracts. This has been a fun project, and has boosted my confidence on installing the bigger gasser...yeah, I know I've got a long way to to to get to 100cc's, but the principle's are the same.
Like I said I still have some health issues... I turn 63 next week and have been blessed with very good health all my life..but time comes and your body age creeps up on you without warning. I may not be able to fly for a while, but will find out Monday at the hospital...I had a stress test on Friday that did not go well. Ok enough about that, enjoy the pics, I love this plane and wish it was still in production. If it flies half as good as it looks I will be very happy.
Enjoy the pics..next post will hopefully be post maiden.
Last edited by hookedonrc; 03-30-2014 at 06:12 AM.
04-01-2014, 09:38 AM
#72
Thread Starter
Thanks Grosbeak, I am glad to get it finished, with just programming left. First, I am headed to the hospital this week for a stent. Started having problems last November during a bout of bronchitis. Too bad, it's supposed to be a nice weekend and I will be recovering. I am really looking forward to flying this after all the mods I did.
02-10-2015, 05:13 AM
#73
Thread Starter
Well after a looong delay, I took the Pulse out to the field this past weekend. First on Saturday, where it was too windy to fly, so I spent the time getting the engine running. Found out that the throttle idle screw had the RPMs set way to high and it required removing the cowl to adjust. Also, needed more length on the throttle arm and luckily I had it...the engine now idles perfectly and the tech-aero optical switch shuts the engine down using the Gear port on the receiver...that part is great.
Unfortunately, the maiden flight did not go too well. First attempt, our taxiway at the field requires a turn to get the plane on the paved runway. I had used a length of fuel tubing to hold on the tailwheel that came right off and the plane hit a fence chipping the prop a little...only damage received. Second attempt, the plane started down the runway perfectly, but I did not have enough rudder in her to make a correction turn and it went off into the weeds. The strengthened gear handled the mowing well and no damage on that one either. It was also evident that I need to practice my take offs using rudder steering with another plane before I put this one through its paces. I can't replace this plane and it has too many hours it it to take chances, so it will wait till my skills are better. I am planning to get a big tail dragger and practice extended take off runs before I try the Pulse again. More reports will follow...I will get this one in the air.
Unfortunately, the maiden flight did not go too well. First attempt, our taxiway at the field requires a turn to get the plane on the paved runway. I had used a length of fuel tubing to hold on the tailwheel that came right off and the plane hit a fence chipping the prop a little...only damage received. Second attempt, the plane started down the runway perfectly, but I did not have enough rudder in her to make a correction turn and it went off into the weeds. The strengthened gear handled the mowing well and no damage on that one either. It was also evident that I need to practice my take offs using rudder steering with another plane before I put this one through its paces. I can't replace this plane and it has too many hours it it to take chances, so it will wait till my skills are better. I am planning to get a big tail dragger and practice extended take off runs before I try the Pulse again. More reports will follow...I will get this one in the air.
