


RC Guys 33% Pitts S1 ARF
 01-02-2014, 05:14 AM
#101


Join Date: Sep 2006
Location: The Sunshine state, when it's not raining!
Posts: 8,131
Likes: 0
Received 2 Likes
on
2 Posts
I would say you summed it up pretty well. Usually the top wing has the incidence but the results should be the same in flight characteristic's with one wing stalling just prior to the other. I don't see why it would matter as to which one goes first. In our scale I don't think we could tell the difference with how close they both are. The way you describe the instructions I would agree a novice probably would not make it to the end, some don't fare well with good one's.
Looking forward to seeing it airborne.
Looking forward to seeing it airborne.
 01-02-2014, 06:02 AM
#102
Thread Starter
My Feedback: (19)

Join Date: Feb 2004
Location: Raeford, North Carolina
Posts: 3,988
Likes: 0
Received 2 Likes
on
2 Posts
Thanks, Robert.
I think the only difference is the stability when the top wing stops flying first. To what degree, who knows? I really think that each model is the sum of what its builder has done while assembling it and getting it flight-ready. Add in a bunch of little things like sloppy linkages on critical surfaces, not paying attention to the CG (or poor choice of initial CG position), not enough or too much down-thrust or right-thrust, and you have a completely different flying model plane than the identical model parked right next to it. If this was a smaller bird, say, maybe, a .46-size Pitts, I'd worry more about the incidence being spot-on before it ever flies.
My next item that I've been researching is my basic CG placement. I can get a good idea of what the guys are experiencing by reading the other posts on this RC Guys Pitts. Most of them are using 50CC engines, and my research tells me that these engines start at 48 ounces and many go up to 65 ounces or more. Also, I suspect the weights given on the 48-ounce 50CC engines are without ignition weight included.
I was going to go with a single 35CC, but instead went with the Valley View 40CC Twin, which has a weight with ignition of 44 ounces. As much as I'd like to have all the servos in the tail, I can't ignore what I'm seeing there. On a regular plane with a long body, one ounce in the tail requires 3 ounces of weight in the nose. It's probably 1 to 4 here, with the stubby body. (Gorgeous, ain't it?)
I think the VV 40CC at 44 ounces gives me (barely) enough for the elevator halves to get one servo each. No way am I using that U-bar for the elevators on this bird, that's just crazy. This model was clearly designed when the older radios were still in use. Most of today's computer radios should give you separate elevator controls. But - that leaves the rudder servo.
There are 28 grams in an ounce.
I PREFER to use a servo in the tail, and carbon-fiber linkage to the rudder, and if I can manage it without having to shovel lead into the nose, I'll build it that way. But here are my choices of rudder servos from my new servo stock: JR ST126MG servo with aluminum arm, 52 grams. Next, a HITEC HS645MG with aluminum arm, 58 grams, and last, one JR DS8611A with an aluminum rudder bar, which is 75 grams.
So, we're pretty much looking at two servos weighing two ounces each, and one that tops out just under three ounces. If I decide to go with pull-pull, the powerful DS8611A is a no-brainer, and besides, it's way too heavy to go back in the tail, period. If I used that one, I might as well order in some lead right now. But it wouldn't be bad on the servo tray, doing pull-pull duty.
I usually try to wait until I can put a mock-up together and run a tentative CG test before deciding which way to go on this, but even with some quick calculations in my head, I come up with the same likely results every time. Short of adding lead, I can't see any way to find enough leeway for a two-ounce servo in the tail. I'm already down the eight ounces in the nose it would likely require for balance, just because I didn't use a 50CC engine. In fact, most of those engines are 16 to 22 ounces more in weight, so it's an uphill battle for balance from the start for me. I think it's safe to say that, unless I'm pleasantly surprised when I put it together and CG it, I'd better get ready to use a pull-pull in this Pitts.
Sure, I could use some lead in the nose, and this plane can handle it. But the less lead I use, the lighter the wing loading, and the better the plane will perform, especially when gliding or on approach. Pitts are stubby and have a lot of drag, but a lighter Pitts will always glide farther than a heavy Pitts. It has a ton of wing area, and I'd like to make the most of that wing area.
Hoping to get some more work done on the old girl today. Cold and blustery outside today, making it good to play with my planes, for a change.
I'm going to contact Dan Speers at RC Guys today, and see if he can provide me with some extra covering. I need to repair these wingtips where the bracing has broken loose and the pieces are rattling around, and there's no way I can do it without fresh covering.
~ Jim ~
Last edited by PacificNWSkyPilot; 01-02-2014 at 06:17 AM.
01-02-2014, 06:36 AM
#103
Join Date: Sep 2006
Location: The Sunshine state, when it's not raining!
Posts: 8,131
Likes: 0
Received 2 Likes
on
2 Posts
Sounds like you have it well under control. My 33%'er came in at 22lbs with a 55cc twin. I have to cut throttle half a circle in order to bleed off enough speed to be anywhere near slow enough for landing. These things are floaters, and don't slow down in my opinion and with your experience I'm sure you will agree once airborne. My tail servos are right behind the seat and did not become tail heavy, I don't know how. And the big one I had to move everything I could behind the seat so as not to be nose heavy, go figure. You never know which way they will fall, but like you mentioned, I to do balancing well before the finish to make accommodation's.
It suck's there are so many issues with the RCGUYS version, be it minor for a builder, major for a beginner, still should not be.
It suck's there are so many issues with the RCGUYS version, be it minor for a builder, major for a beginner, still should not be.
01-02-2014, 04:26 PM
#105
Thread Starter
My Feedback: (19)
Join Date: Feb 2004
Location: Raeford, North Carolina
Posts: 3,988
Likes: 0
Received 2 Likes
on
2 Posts
Jim, You got it. It's close enough the way it is. Before committing myself to all that work, I should see how it takes off, maneuvers, glides, and lands. The way I see it, I am probably looking at recovering it before the year is out. If it turns out that it requires some major rework on the incidences, maybe that recovering job will happen earlier.
~ Jim ~
~ Jim ~
01-02-2014, 05:08 PM
#106
Thread Starter
My Feedback: (19)
Join Date: Feb 2004
Location: Raeford, North Carolina
Posts: 3,988
Likes: 0
Received 2 Likes
on
2 Posts
Robert,
Glad to hear that yours floated nicely. Did you program flaperons into yours?
I agree with you. Planning the CG starts early in a build, if you want to get it right, and probably most important, if you want to avoid adding lead to the plane.
I don't feel these issues are a real problem, so far. The manual's a pain in the butt, because it really needs updating, and there are steps missing. Because of that, it's more of a "Builder's ARF," but I think the quality is fairly good. I've had to do some extra gluing, but that's normal on any ARF I've built. I routinely discard hardware from my ARFs, and use Sullivan, Robart, and DuBro hardware, so that's no surprise, and I have to say, this hardware is pretty decent for an ARF. It could be used without any problems, as far as I can see.
The one thing I'm truly disappointed in is the film covering. It doesn't want to stick very well. Coverite film adhesive needed, for sure.
But I had a pleasant experience today when I contacted RC Guys and spoke with Dan Speers. I mentioned that I had to cut into the wingtips and repair the braces that came loose, and expressed my concern about not having access to coating to re-cover the wingtips. He asked me how much I needed, and said it was on its way to me. Looks like I'll be able to repair the spots I work on.
So, RC Guys definitely gets extra points for a great response to a customer's problem.
~ Jim ~
Last edited by PacificNWSkyPilot; 01-02-2014 at 05:18 PM.
01-02-2014, 05:29 PM
#107
Join Date: Sep 2006
Location: The Sunshine state, when it's not raining!
Posts: 8,131
Likes: 0
Received 2 Likes
on
2 Posts
Nice to hear a company actually standing behind their stuff. And I'm glad you are liking the plane, the Pitts is a sweet one. No flaperons in mine, they are not needed, at least in my opinion. Yours may differ, lol. It has been my experience that most ARF's require a re-gluing of sorts. And usually a tossing of the hardware, so it's good you did not have to. I have had some so called name brands that were lacking in all areas. But one has to take the bad with the good.
By the way a ways back you asked about the engine going in my current Pitts build. It is a Valach 170 four stroke.
By the way a ways back you asked about the engine going in my current Pitts build. It is a Valach 170 four stroke.
Last edited by acerc; 01-02-2014 at 05:34 PM.
 01-14-2014, 02:10 PM
#110
Thread Starter
My Feedback: (19)
Join Date: Feb 2004
Location: Raeford, North Carolina
Posts: 3,988
Likes: 0
Received 2 Likes
on
2 Posts
I'm glad you're enjoying the thread, EGG! I'm hoping to get some work time this weekend, and should do some more posting. I was able to get the elevators and rudder glued to mine a few days ago. Just for fun, I doubled up the Robart pins at the top and bottom of the rudder, adding one just a half-inch from the existing upper and lower for extra holding power, a total of five. I thought about doing the same to the elevators, since Bipes are so aerobatic and the elevators really get a workout. But I must admit, I only thought about it after they were already mounted. Too late. Maybe next year, when she becomes a different color, or possibly a Christen Eagle.
Robert,
I wouldn't say the flaperons are really needed, but I enjoy programming them into each of my planes, just to see what they will do, and how the plane reacts to them. The only time I ever had disastrous results was when I put them on a SIG Spacewalker II, with the big barn-door ailerons. The plane just FELL out of the sky, and I swear I cut grass with that sucker before she turned back up into the sky. I'm a lot more tentative an start very small with them now. I've had really good luck with bipes so far, though as you might imagine, they don't take much movement at all for the four ailerons to present me with some real flap action. Ironically, I have big barn-door ailerons on my Giant Super Sportster, and it works GREAT when I actuate the flaperons, but I was very careful to limit how far they actuate.
The bipes slow down quickly because they're very dirty and have a ton of drag, but I found the flaperons help to limit the drop rate.
Great news! I just bought the Realflight 7, and it was only $129 ! It came without a radio like my old 3.5 had, but it has a module that enables my JR 9505 radio to plug into it. Can't get the flaperons working yet, but the great news I talked about is that there's a VERY real-flying 1/3rd scale Pits bipe in the aircraft selection. WHAT a blast this thing is to fly. I had a Pitts on my 3.5, but I was positive that it wasn't flying realistically; I could just feel it in my bones. This new one is a bit of a handful, just the way you'd expect a truly aerobatic old-school bipe to be. I had to cut the power down to 70% of what it was, since that model shows it is powered with an OS 300 twin. It's a bit of a rocket at full power.
It's great fun, and I think it's a great primer for getting a feel for this bird.
~ Jim ~
01-14-2014, 02:27 PM
#111
Join Date: Sep 2006
Location: The Sunshine state, when it's not raining!
Posts: 8,131
Likes: 0
Received 2 Likes
on
2 Posts
I have done that a time or two as well. And no doubt the four ailerons need very little actuation to be OH SHI_IT!! I love my Pitts but I do not have the drops like a rock with power off, quite the opposite. I have to chop power further away from Tera than any other model I have ever had. It is a rocket ship for sure under full bore, but a delightful little performer just the same. I wish my dinosaur of a Realflight had anything close to the Pitts, oh well. Later guys.
01-14-2014, 02:47 PM
#112
My Feedback: (3)
I have done that a time or two as well. And no doubt the four ailerons need very little actuation to be OH SHI_IT!! I love my Pitts but I do not have the drops like a rock with power off, quite the opposite. I have to chop power further away from Tera than any other model I have ever had. It is a rocket ship for sure under full bore, but a delightful little performer just the same. I wish my dinosaur of a Realflight had anything close to the Pitts, oh well. Later guys.
Energy Management: I need to bleed some speed and altitude. Solution: High "G" turns to final. Ninety degree bank and pull just sucks up lots of energy which means you should be allowing the nose to drop as you roll the bank out and walla - not too much energy and not too high.
Of course I practice that a lot - used to push a Sig Kougar around the pattern inside a 300 foot circle and rarely (if ever) above 10 feet. The funniest thing about my Pitts and flying habits happened at at the EAA field where I fly a lot. There is an instructor who fly's in (his Pitts that looks just like mine of course) to teach some guy a few hangars down how to fly. The first time I saw him chop power and pull the turn from base to final (just like I do) I looked around to see who was flying a Pitts. It was almost surreal because it looked just exactly like I had been flying it....
Any one seen a GP 1/3 Pitts lately? (drool)
01-14-2014, 02:55 PM
#113
Join Date: Sep 2006
Location: The Sunshine state, when it's not raining!
Posts: 8,131
Likes: 0
Received 2 Likes
on
2 Posts
I have had several Pitts and while I cannot say I have to chop power further away from touchdown than any other model, I have not found them to be terrible bricks.. However you do have to use energy management techniques and you can get a greaser every time.
Energy Management: I need to bleed some speed and altitude. Solution: High "G" turns to final. Ninety degree bank and pull just sucks up lots of energy which means you should be allowing the nose to drop as you roll the bank out and walla - not too much energy and not too high.
Of course I practice that a lot - used to push a Sig Kougar around the pattern inside a 300 foot circle and rarely (if ever) above 10 feet. The funniest thing about my Pitts and flying habits happened at at the EAA field where I fly a lot. There is an instructor who fly's in (his Pitts that looks just like mine of course) to teach some guy a few hangars down how to fly. The first time I saw him chop power and pull the turn from base to final (just like I do) I looked around to see who was flying a Pitts. It was almost surreal because it looked just exactly like I had been flying it....
Any one seen a GP 1/3 Pitts lately? (drool)
The GP, well, it's an ARF. But it does look good, they did a nice job.
01-15-2014, 11:03 AM
#115
Thread Starter
My Feedback: (19)
Join Date: Feb 2004
Location: Raeford, North Carolina
Posts: 3,988
Likes: 0
Received 2 Likes
on
2 Posts
Robert,
I had been avoiding getting a replacement RealFlight for some time, because for a long time it was around two hundred bucks, which just rubbed me the wrong way. When I learned that this version 7 has a module to use your own radio, and a price of $129.00 to boot, I just had to bite the bullet and get it. I can't explain exactly why, but I was convinced that my 3.5 upgrade Pitts model wasn't flying realistically. it just didn't "feel" real to me. This new version feels real, and the best way I can describe why THAT feels real to me is that it feels like you can get into trouble with it if you push things too far. The old one just seemed to keep flying when my instincts told me that it should be failing or falling from the sky. The new one has a few small things that make me feel that way. I can point it at the ground full-bore, and then yank it straight back up without peeling the wings off it, and I know for darn sure that any real model would have shed its wings and kissed the planet in a final swan-song in such a maneuver. Overall, though, I can't say how tickled I am by the way this new one responds. And it's really nice to use my own radio with my own Pitts model selected.
Before I fly my model, I'm going to copy the model and rename it RealFlight Pitts, so my trim adjustments on the actual model don't translate into the RealFlight model, and vice-versa, of course.
I can see where it'll fly right by the field, and the RealFlight model is no exception to that. That makes me think that the flaperons will add a little ease to landing the model. I haven't yet figured out how to use the settings in my radio - which already work the flaperons on my RC Guys Pitts perfectly - and make them work on the RealFlight Pitts.
I like to use lots of momentum-robbing maneuvers too - hard banks, loops, fly it in a few circles, etc. Sometimes, I just pull it straight up, and let it hammerhead, and catch it on the way down, usually running a LOT less hot by then. I sometimes flap my rudder left and right rapidly a bunch of times, which doesn't appear to do a lot, but usually expends quite a lot of the momentum.
I'm looking forward to seeing how this bird flies, because no matter what, the real one will never fly exactly the way the RealFlight bird does. That makes sense, since two of the same models built by two different guys usually won't fly exactly the same.
~ Jim ~
01-17-2014, 07:23 PM
#117
That sounds about perfect. Normally I have to cut power (Model dependent of course) just as I start the bank for approach. But with the Pitts I have to cut about 100 feet sooner. And there is nothing better looking than a scale approach followed by two point with a nice roll out. It's just a beautiful thing.
The GP, well, it's an ARF. But it does look good, they did a nice job.
The GP, well, it's an ARF. But it does look good, they did a nice job.
I just found a GP Pitts on Craigslist and snapped it up! I am going to model it after my 1992 S-2B I owned a few years back.
01-21-2014, 06:31 AM
#119
Thread Starter
My Feedback: (19)
Join Date: Feb 2004
Location: Raeford, North Carolina
Posts: 3,988
Likes: 0
Received 2 Likes
on
2 Posts
CaptRKO,
Is the Pitts you bought all built, or still ARF, or??
Let us know all about it! This thread needs new blood to grow. It's nice to have some variety, also nice to have comparisons.
Speaking of variety - if anybody has had experience with this 33% Pitts from RC Guys, we'd like to hear about it. Not looking for rants, just for experiences, so we can all have a barometer to guage what we're facing with the prospect of building these.
For instance, I'm singularly unimpressed with the covering on this model, and I can finally say with certainty that it's terrible stuff. Also, the promised covering from RC Guys never arrived, so what I thought was great customer service was just hot air, sad to say.
The other day, when I was mounting my rudder, one of the black diamonds simply FELL OFF the rudder, and I had to use Black Baron film adhesive to reattach it. Suffice it to say, I think I can look forward to the phenomenon of stripes peeling off in flight, as others have described. I'll be recovering this bird when winter comes again, that's almost a given. But it's still an impressive model, and structurally it's got a lot going for it, so it's worth the extra work, in my opinion.
I've been preparing the tail surfaces for controls,and I've factored in the probability that as little weight should be in the tail as possible, to prevent addition of lead in the nose. The VV 40CC is lighter than the 50CC engines many of the guys use, but 50CC's of power simply isn't needed for this bird. To offset the reduced weight, I went with adding Central Hobbies carbon-fiber rods/linkages extending back from the servo tray. I'm mating up two servos, rather than using just one.
I cut into the very center of the bottom, which opens it up just enough to allow access for gluing and preparing linkage windows, etc. There are already plates built in with slots, so this linkage choice is ideal. They recommend that you cross the linkage rods, but I modified that and ran the rods parallel along each side, which took a little carving, and I had to reroute the diagonal braces to allow the rod to run that way. I also took the opportunity to reach on and glue anything that looked light on glue. It didn't need much, but enough to make it a worthwhile effort.
I'll try and get some photos of that. Next, I plan to set up the rudder, which may be pull-pull. I like the carbon-fiber rods best, but pull-pull would be lighter. Light enough to tip the scales in its favor? I'm still torn about that.
Thoughts?
~ Jim ~
Last edited by PacificNWSkyPilot; 01-21-2014 at 06:57 AM.
01-21-2014, 12:55 PM
#120

I had the RC Guys Decathlon and the covering was a major PITA. Like you said all the decals or pin stripes would peel off. The plane flew great, the fiberglass parts were perfect and the plastic parts were robust. They'd have a real winner if they would just move to Ultracote. Jerry.
01-21-2014, 08:09 PM
#121
Thread Starter
My Feedback: (19)
Join Date: Feb 2004
Location: Raeford, North Carolina
Posts: 3,988
Likes: 0
Received 2 Likes
on
2 Posts
Hi Jerry,
Thanks for dropping in. I also have the Decathlon, but haven't built it. It's on the shelf.
I agree completely. Just the simple move to Ultracote would make all the difference in the world. I understand that such a change would be expensive, but in the last few years, this plane has increased from $395.00 to $529.00 in price. That's a lot of money, and in that time span, they've changed the coloring scheme, so it seems to me that they could have incorporated a better quality of covering during that time.
Even with the covering issues, I'm looking forward with great anticipation to flying this bird.
~ Jim ~
Last edited by PacificNWSkyPilot; 02-05-2014 at 07:45 AM.
02-05-2014, 07:59 AM
#122
Thread Starter
My Feedback: (19)
Join Date: Feb 2004
Location: Raeford, North Carolina
Posts: 3,988
Likes: 0
Received 2 Likes
on
2 Posts
Hi Guys, I'm back with some photos. The news here is that there IS no news here. The promised covering being shipped from RC Guys never arrived. I can't do the repairs to the wing tips unless I'm willing to change the color or use a different shade of yellow.
Moving on - I decided which way I was going with the weight & balance issue due to my smaller engine, which is a 40CC Valley View Opposed twin, and it comes in at roughly 10 to 20 ounces less than the typical 50CC gasser so often used with the RC Guys 33% Pitts. I ordered in some carbon-fiber linkages from Central Hobbies with 3/16" X 4-40 Titanium ends, and I placed all three tail linkages forward, and used the tray. I didn't go with a pull-pull system, which might have saved a few grams in the tail, but I'm fond of the carbon fiber linkages on my rudders these days, so I went with that. At least I kept the servos forward, and the rudder servo is a JR 8611-A, which is MUCH heavier than the elevator servos, both JR 126MG, and they only weigh 52 grams with their metal arms. I didn't refer to specs. I weighed them on my own scale. The rudder servo had to be raised up about a half-inch or so, to clear the elevator servo arms. Here are a few photos of the setup:

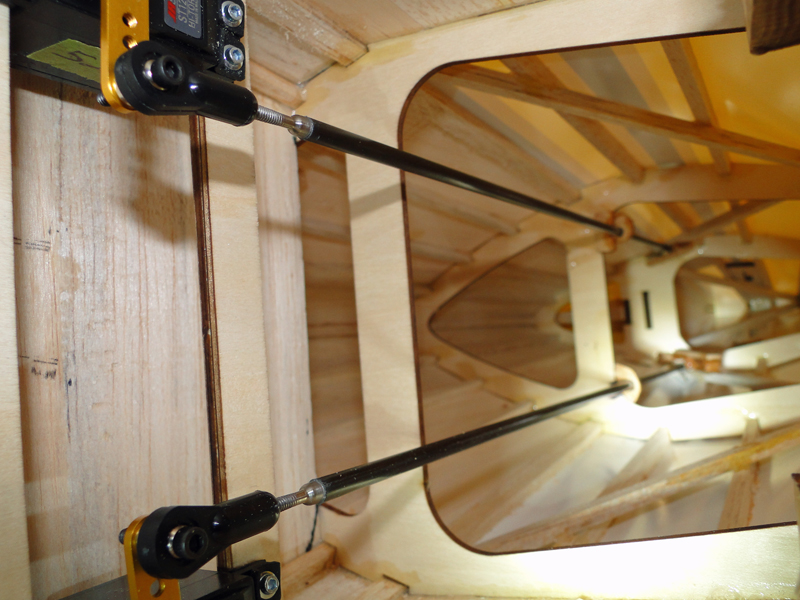


You'll notice I cut the belly open. I did that so I could each in and work on the linkages and linkage guides, and because I thought more covering was on its way. I also got inside there and glued/reinforced everything thoroughly, which I do on virtually every ARF I build. Never trust the factory to do it for you. I used the large DuBro control horns. They're beefy, with a good footprint. I have horns like these on my Giant Super Sportster, and they're rock-solid. I always remove the covering underneath the horn and soak the balsa underneath with thin CA, letting it harden up before the final installation. The DuBro locking clevises shown are as close to perfect as any linkage I know. In the first photo, You can see I used the DuBro heavy-duty 4-40 ball-links on the metal arms. They screw right into the arm, and I follow that up with a drop of blue Loctite, and finish it off by securing it with the locking nut under the arm. You might think the linkage assembly is now bullet-proof, but it's not complete until you remember to also use the blue Loctite on the servo arm screw.
Most of us don't have a fortune to spend on planes, so I try not to go into deep debt putting mine together. Linkages can make a model live or die, so I do spend a little in the linkages. The 36" Carbon-fiber linkage assemblies from Central hobbies are about 16 or 17 dollars for a pack of two (two rods, and four 3/16" X 4-40 titanium rod ends in a pack), and I bought two packs for this bird. I installed 3 long rods going back to the tail, which took more than a single pack. I also ordered another pack of the rod ends - $12, I think (?), so I could make aileron linkages with the scrap tubing. The DuBro large T-style horns came two to a pack, and I used two packs for the tail, about 3 bucks apiece. The DuBro 4-40 locking clevises cost about $2.50 for a pack of two, and I used three packs (including building aileron linkages), and two packs of DuBro 2-53 locking clevises as well for my aileron interlinks, so I spent about 15 bucks on those. I also chose a smaller carbon fiber linkage for the interlinks, with smaller titanium rods ends to fit the 2-53 clevises, another 16 or 17 bucks. And the JB Weld I used to assemble the linkages was less than ten bucks. The metal servo arms were about ten bucks apiece, so that's fifty dollars. But the servos I typically use on the size birds are not expensive. The JR 126MG servos average 35 dollars each. They're powerful, rugged, and not too costly. I had the JR 8611A I used on the rudder just hanging around the shop, from some previous use. Otherwise, I wouldn't have hesitated to use a JR126MG on the rudder. So, the rough overall cost, for servos and linkages, was realistically about $320.00
When I was first thinking about buying the Pitts, I scratched out a list, and started making trips to the hobby shop every week or so after that, picking up a servo, Robart hinges and some epoxy this week, some glue and control horns next week, and at some point I send off to Central Hobbies for my linkages. I sometimes over-buy on those. As a result, this time I didn't need to buy the extra titanium rods ends, because there were still some left over from the last batch I purchased. I don't spend the whole 320 bucks in one shot. I usually nickel-and-dime it while I research the model, the engine, etc. For most of us with wives, families, and tight budgets, it usually takes weeks - or even months - to pull the trigger on the actual purchase of the model, never mind the other big ticket item, the engine. By the time I order the ARF, I usually have most of what I'll need. I've been known to time the build so that the local swap meets happen just about when I'll be looking for a good used engine.
Moving on - I decided which way I was going with the weight & balance issue due to my smaller engine, which is a 40CC Valley View Opposed twin, and it comes in at roughly 10 to 20 ounces less than the typical 50CC gasser so often used with the RC Guys 33% Pitts. I ordered in some carbon-fiber linkages from Central Hobbies with 3/16" X 4-40 Titanium ends, and I placed all three tail linkages forward, and used the tray. I didn't go with a pull-pull system, which might have saved a few grams in the tail, but I'm fond of the carbon fiber linkages on my rudders these days, so I went with that. At least I kept the servos forward, and the rudder servo is a JR 8611-A, which is MUCH heavier than the elevator servos, both JR 126MG, and they only weigh 52 grams with their metal arms. I didn't refer to specs. I weighed them on my own scale. The rudder servo had to be raised up about a half-inch or so, to clear the elevator servo arms. Here are a few photos of the setup:
You'll notice I cut the belly open. I did that so I could each in and work on the linkages and linkage guides, and because I thought more covering was on its way. I also got inside there and glued/reinforced everything thoroughly, which I do on virtually every ARF I build. Never trust the factory to do it for you. I used the large DuBro control horns. They're beefy, with a good footprint. I have horns like these on my Giant Super Sportster, and they're rock-solid. I always remove the covering underneath the horn and soak the balsa underneath with thin CA, letting it harden up before the final installation. The DuBro locking clevises shown are as close to perfect as any linkage I know. In the first photo, You can see I used the DuBro heavy-duty 4-40 ball-links on the metal arms. They screw right into the arm, and I follow that up with a drop of blue Loctite, and finish it off by securing it with the locking nut under the arm. You might think the linkage assembly is now bullet-proof, but it's not complete until you remember to also use the blue Loctite on the servo arm screw.
Most of us don't have a fortune to spend on planes, so I try not to go into deep debt putting mine together. Linkages can make a model live or die, so I do spend a little in the linkages. The 36" Carbon-fiber linkage assemblies from Central hobbies are about 16 or 17 dollars for a pack of two (two rods, and four 3/16" X 4-40 titanium rod ends in a pack), and I bought two packs for this bird. I installed 3 long rods going back to the tail, which took more than a single pack. I also ordered another pack of the rod ends - $12, I think (?), so I could make aileron linkages with the scrap tubing. The DuBro large T-style horns came two to a pack, and I used two packs for the tail, about 3 bucks apiece. The DuBro 4-40 locking clevises cost about $2.50 for a pack of two, and I used three packs (including building aileron linkages), and two packs of DuBro 2-53 locking clevises as well for my aileron interlinks, so I spent about 15 bucks on those. I also chose a smaller carbon fiber linkage for the interlinks, with smaller titanium rods ends to fit the 2-53 clevises, another 16 or 17 bucks. And the JB Weld I used to assemble the linkages was less than ten bucks. The metal servo arms were about ten bucks apiece, so that's fifty dollars. But the servos I typically use on the size birds are not expensive. The JR 126MG servos average 35 dollars each. They're powerful, rugged, and not too costly. I had the JR 8611A I used on the rudder just hanging around the shop, from some previous use. Otherwise, I wouldn't have hesitated to use a JR126MG on the rudder. So, the rough overall cost, for servos and linkages, was realistically about $320.00
When I was first thinking about buying the Pitts, I scratched out a list, and started making trips to the hobby shop every week or so after that, picking up a servo, Robart hinges and some epoxy this week, some glue and control horns next week, and at some point I send off to Central Hobbies for my linkages. I sometimes over-buy on those. As a result, this time I didn't need to buy the extra titanium rods ends, because there were still some left over from the last batch I purchased. I don't spend the whole 320 bucks in one shot. I usually nickel-and-dime it while I research the model, the engine, etc. For most of us with wives, families, and tight budgets, it usually takes weeks - or even months - to pull the trigger on the actual purchase of the model, never mind the other big ticket item, the engine. By the time I order the ARF, I usually have most of what I'll need. I've been known to time the build so that the local swap meets happen just about when I'll be looking for a good used engine.
Last edited by PacificNWSkyPilot; 02-05-2014 at 08:56 AM.
02-05-2014, 11:51 AM
#124
Thread Starter
My Feedback: (19)
Join Date: Feb 2004
Location: Raeford, North Carolina
Posts: 3,988
Likes: 0
Received 2 Likes
on
2 Posts
I did something experimental here as well. If you look closely at picture four, you'll see a gray spot a few inches up the rod from the clevis (one on each rod).
One thing that's irksome when building the carbon fiber linkages is that when you're pushing the second rod end into the rod, it compresses the air in the rod, which in turn pushes the rod ends back out. Well, we've devised ways of holding them in place until the glue hardens, but when you're using JB Weld, whatever you do has to hold it in place for a minimum of 6 hours! I decided to see if I could use my mini-pin drill to make a tiny hole in the carbon fiber rod, which I could seal later on.
Well, the short answer for that is NO, I couldn't use the tiny drill bits. Compared to those little drill bits, that carbon fiber rod might as well be tungsten steel. I bent a couple bits, and gave up.
Staring at it in frustration for a few minutes afterward, a plan formulated in my head. I put a fresh #11 blade into my X-acto knife, and started spinning it in one place on the rod, and within a minute or so, I was into the wall far enough that the knife blade, held so that the flat of the blade (top to bottom) ran lengthwise with the sides of the rod, pushed through the fibers into the rod's center. Just popping it into the center was plenty. When I gooped up the inside of the tube and the rod end with JB Weld, and pressed the end into the rod, there was no resistance, and it stayed where it laid. Once I was sure it was going to stay put, I took just a drop of the JB Weld, and used a pin to push it into the little X-acto hole I'd drilled. Once the hole was filled, I wiped the outside of the rod smooth with a paper towel, and it was done. A thing of beauty. I did all three of these that way, and it made ALL the difference.
Still, I'm curious as to what the naysayers will have to say about it.
~ Jim ~
02-05-2014, 03:30 PM
#125
My Feedback: (3)
Staring at it in frustration for a few minutes afterward, a plan formulated in my head. I put a fresh #11 blade into my X-acto knife, and started spinning it in one place on the rod, and within a minute or so, I was into the wall far enough that the knife blade, held so that the flat of the blade (top to bottom) ran lengthwise with the sides of the rod, pushed through the fibers into the rod's center. Just popping it into the center was plenty. When I gooped up the inside of the tube and the rod end with JB Weld, and pressed the end into the rod, there was no resistance, and it stayed where it laid. Once I was sure it was going to stay put, I took just a drop of the JB Weld, and used a pin to push it into the little X-acto hole I'd drilled. Once the hole was filled, I wiped the outside of the rod smooth with a paper towel, and it was done. A thing of beauty. I did all three of these that way, and it made ALL the difference.
Still, I'm curious as to what the naysayers will have to say about it.
~ Jim ~
Still, I'm curious as to what the naysayers will have to say about it.
~ Jim ~
Consider that another idea stolen. JB Weld FTW!