


SIG T-Clips 70 Build Thread, IT's Here!
 08-20-2014, 06:41 AM
#1

Thread Starter
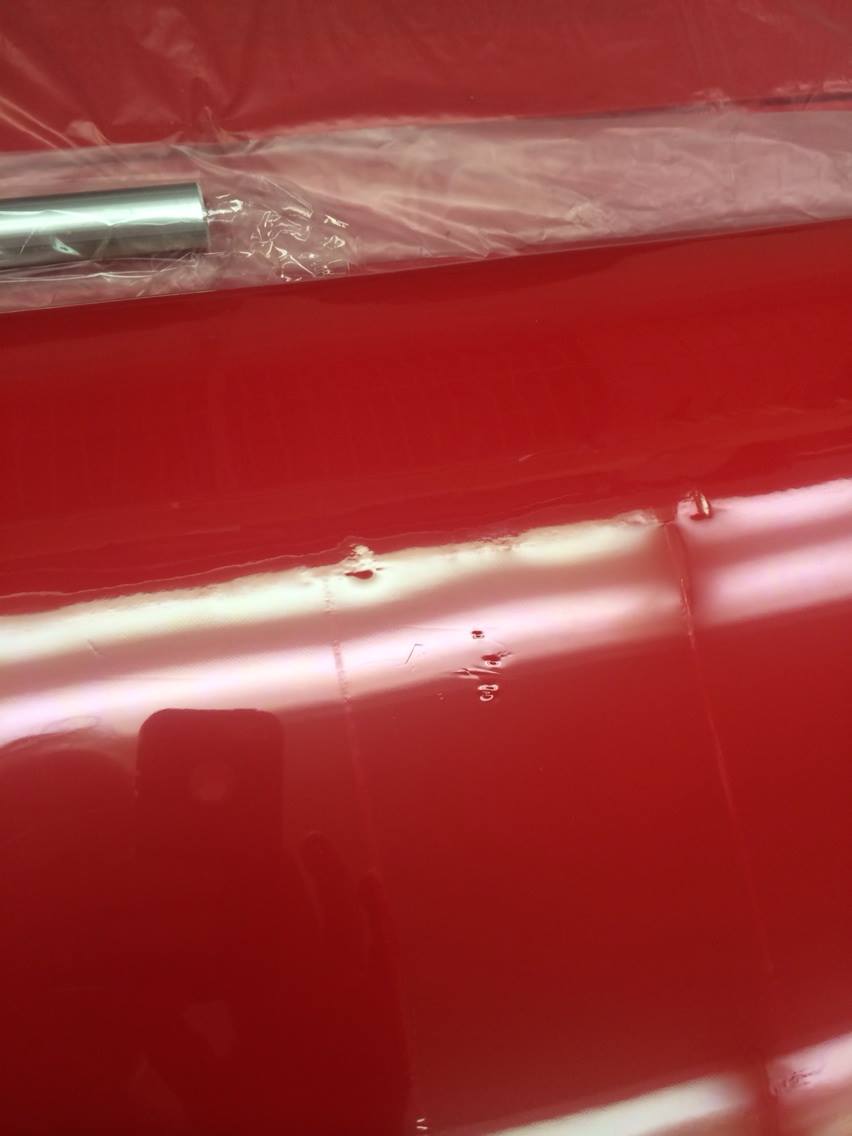
Received mine yesterday, pre-ordered it at the Toledo show with high hopes it will be as nice a plane as the prototype and typical of SIG, IT IS! There are a few flaws I have to point out, most of which can be easily addressed, such as wrinkles and dents in the covering, and a few that may not be so easy.
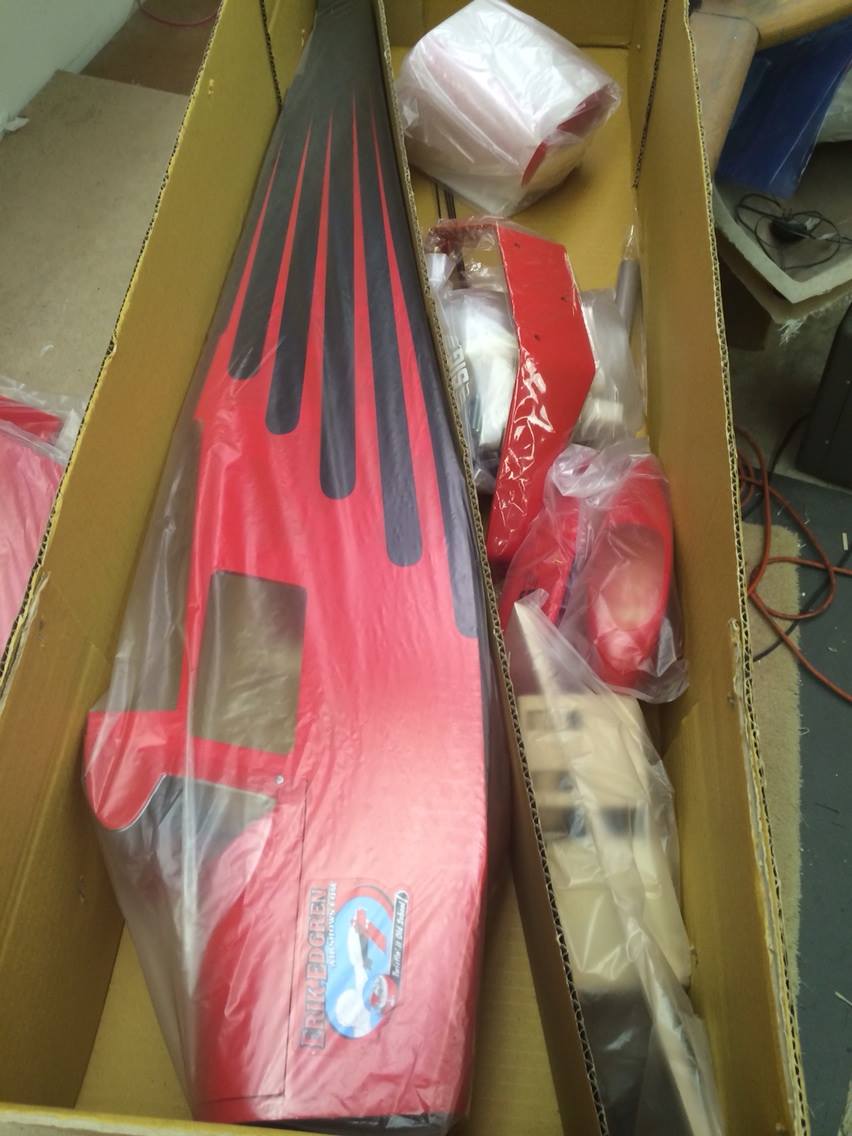
First off, Very well packed, no box damage as you usually see on ARF's, and each part is nicely packed and protected. So far the instructions(what I have read) are clear and precise so should be a quick build.
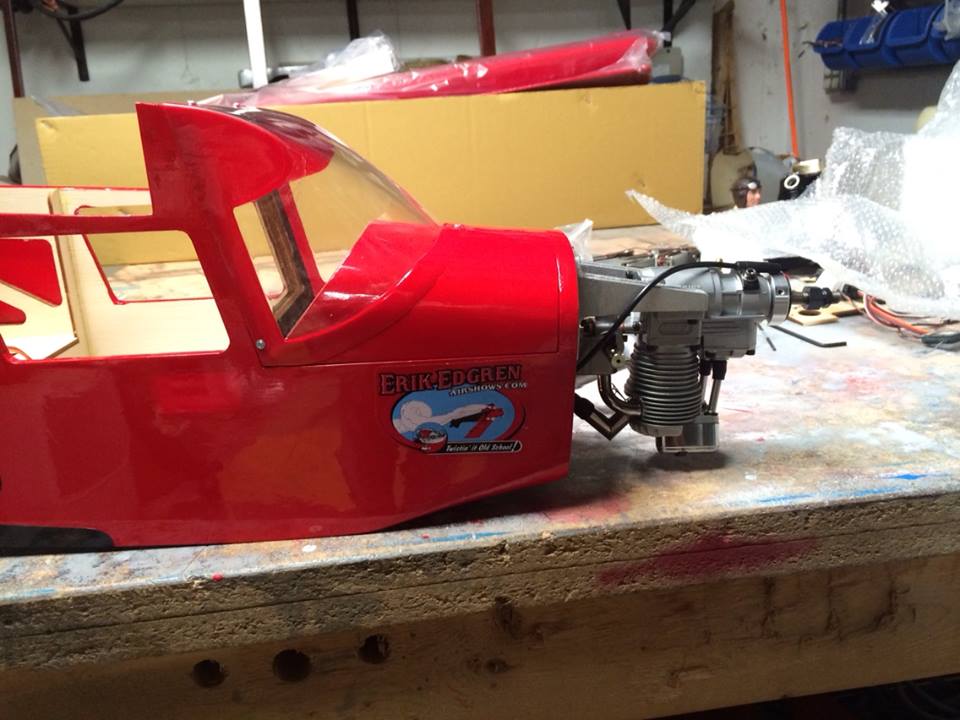
I test fitted the major parts, wings, tail, cowl, and they all fit very well. The wing joiner is an aluminum tube and fits snug in each wing panel, the right panel is a bit tight, but it goes in with a twisting motion easy enough to not be a concern. Once joined, the joint between the wings is barely noticeable. It fit nice and tight to the fuse. the tail, which was the part I noticed right away on the prototype at Toledo did not disappoint, the fairing for the fin is really well done, and other than a slight wrinkle on one side, looks really nice. Over all there are very few wrinkles on the entire plane, only spot of concern is a dent on one wing panel which I am pretty sure a shot with the heat gun will take right out since this is NOT monojoke, but the good stuff.
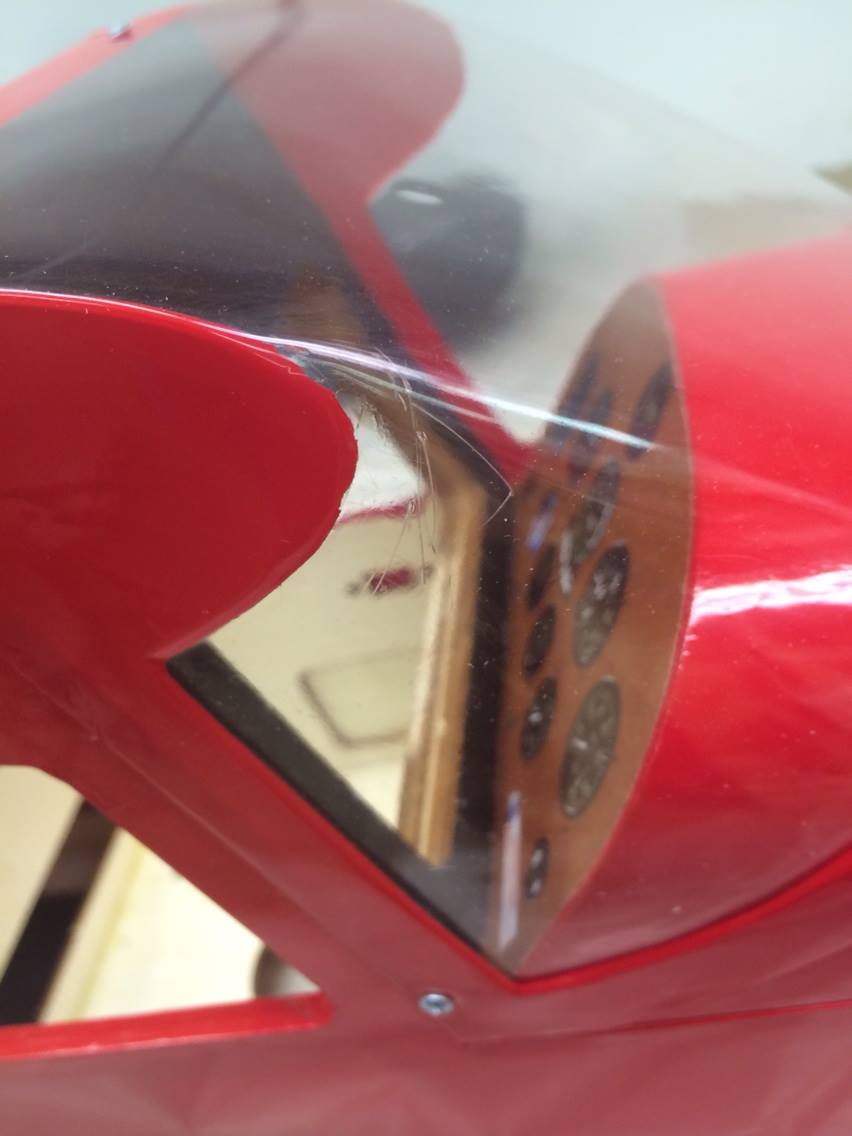
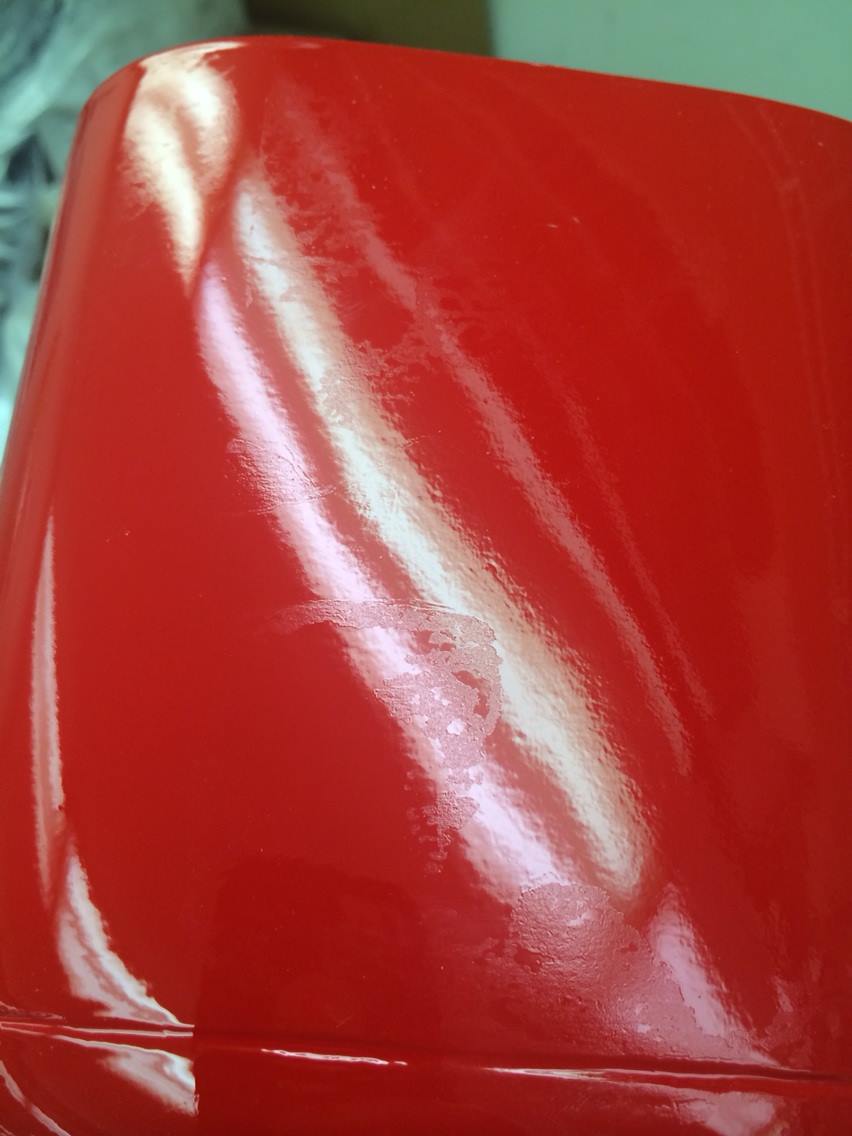
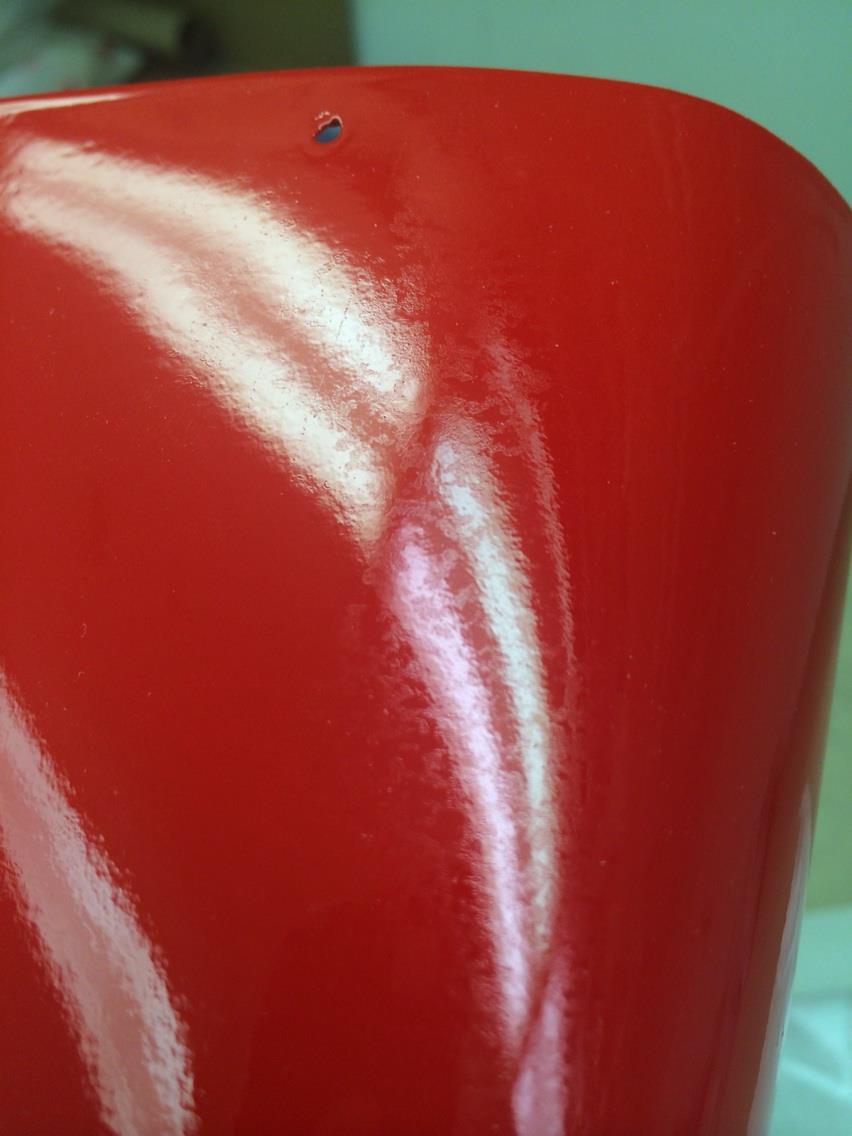
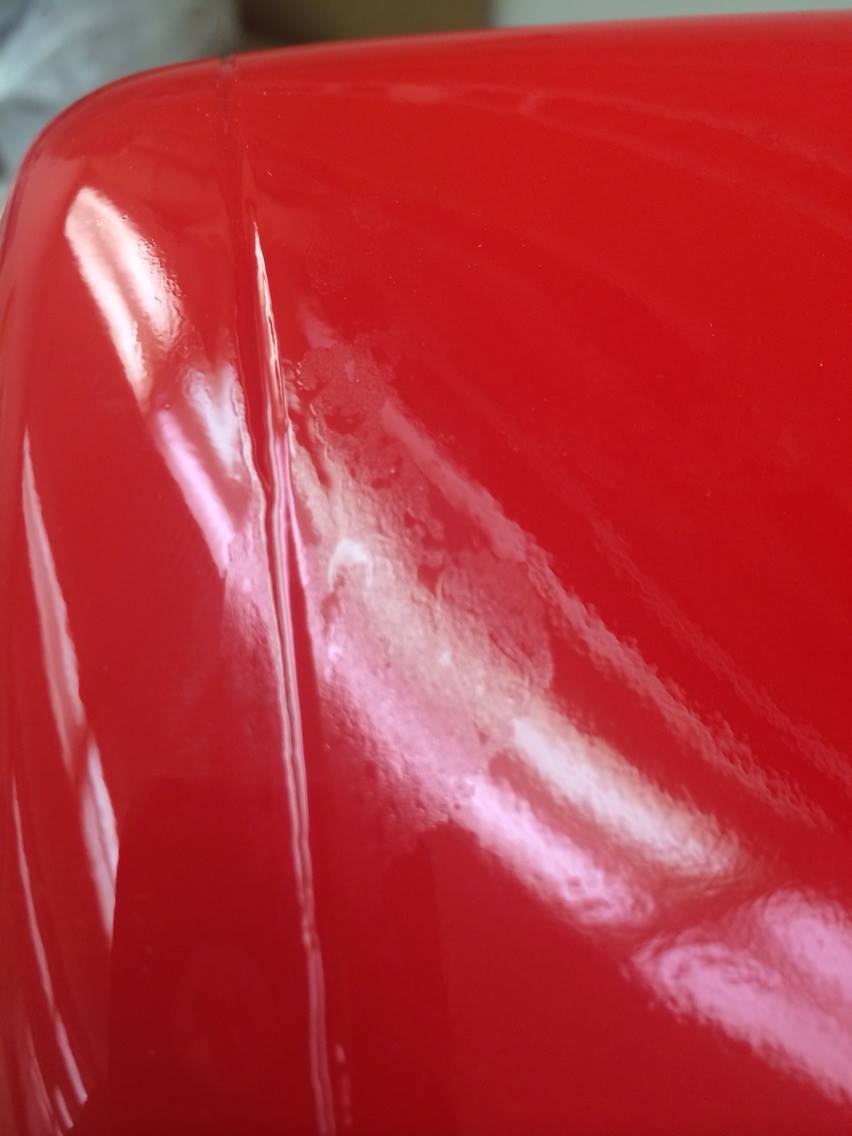
The only two items that I notice that were not up to snuff, the front windshield has some scratches on the inside, and the paint on the cowl has blemishes, I believe from being wrapped up before fully cured. Hoping that rubbing compound can smooth it out.
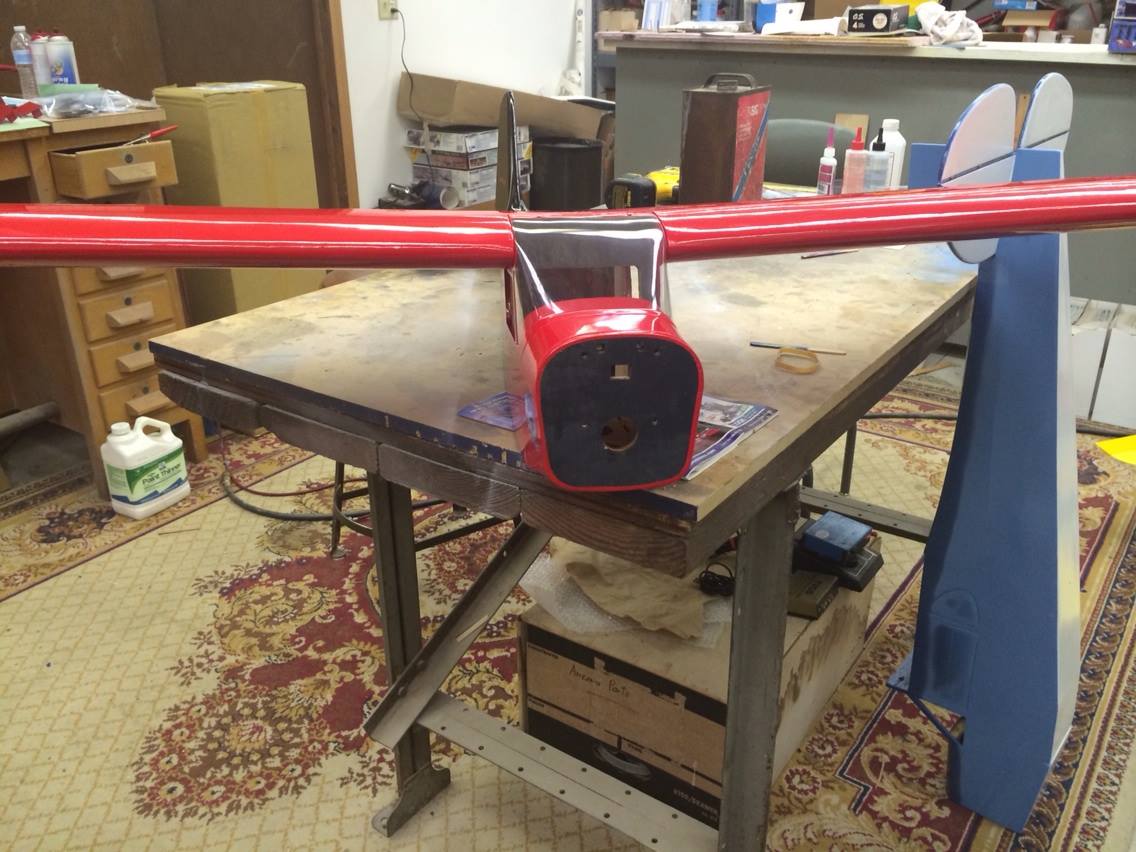
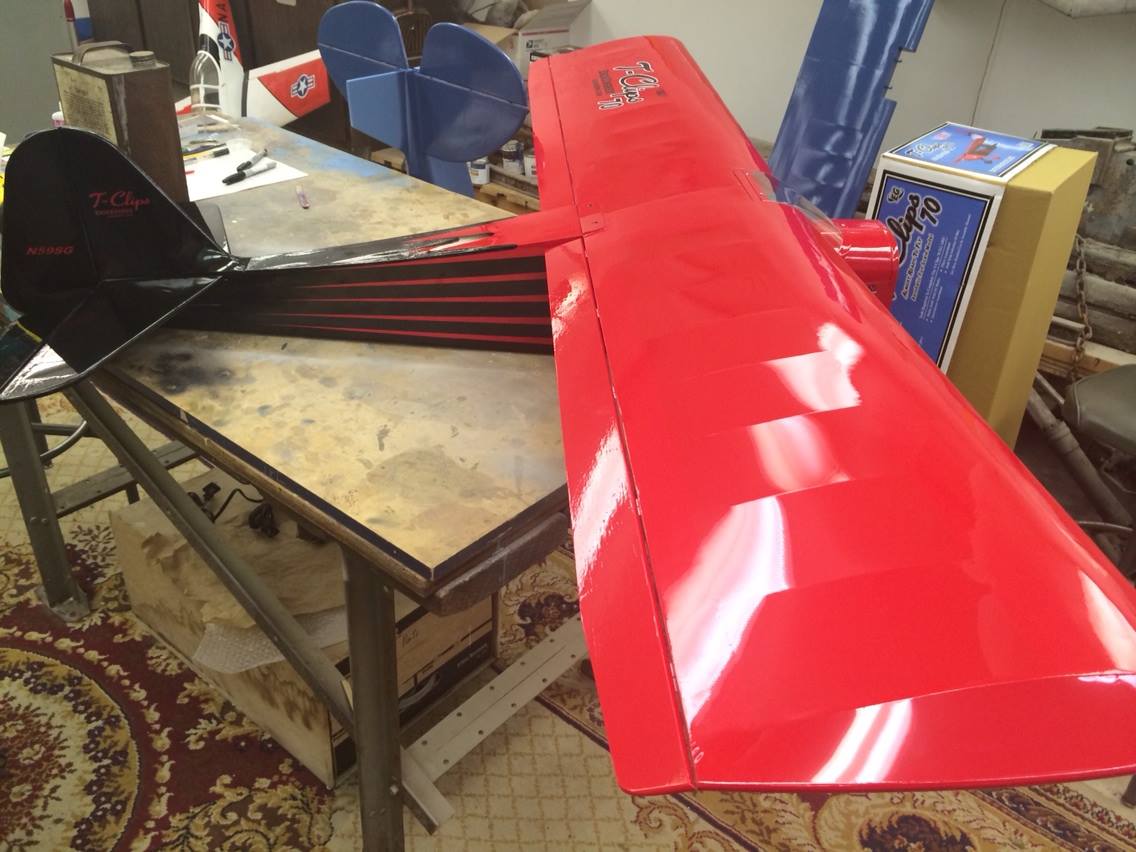
Now for the unboxing. Pictures dont do it justice, its a beautiful airframe.


The wrinkle

First off, Very well packed, no box damage as you usually see on ARF's, and each part is nicely packed and protected. So far the instructions(what I have read) are clear and precise so should be a quick build.
I test fitted the major parts, wings, tail, cowl, and they all fit very well. The wing joiner is an aluminum tube and fits snug in each wing panel, the right panel is a bit tight, but it goes in with a twisting motion easy enough to not be a concern. Once joined, the joint between the wings is barely noticeable. It fit nice and tight to the fuse. the tail, which was the part I noticed right away on the prototype at Toledo did not disappoint, the fairing for the fin is really well done, and other than a slight wrinkle on one side, looks really nice. Over all there are very few wrinkles on the entire plane, only spot of concern is a dent on one wing panel which I am pretty sure a shot with the heat gun will take right out since this is NOT monojoke, but the good stuff.
The only two items that I notice that were not up to snuff, the front windshield has some scratches on the inside, and the paint on the cowl has blemishes, I believe from being wrapped up before fully cured. Hoping that rubbing compound can smooth it out.
Now for the unboxing. Pictures dont do it justice, its a beautiful airframe.
The wrinkle
 08-20-2014, 06:49 AM
#2
Thread Starter
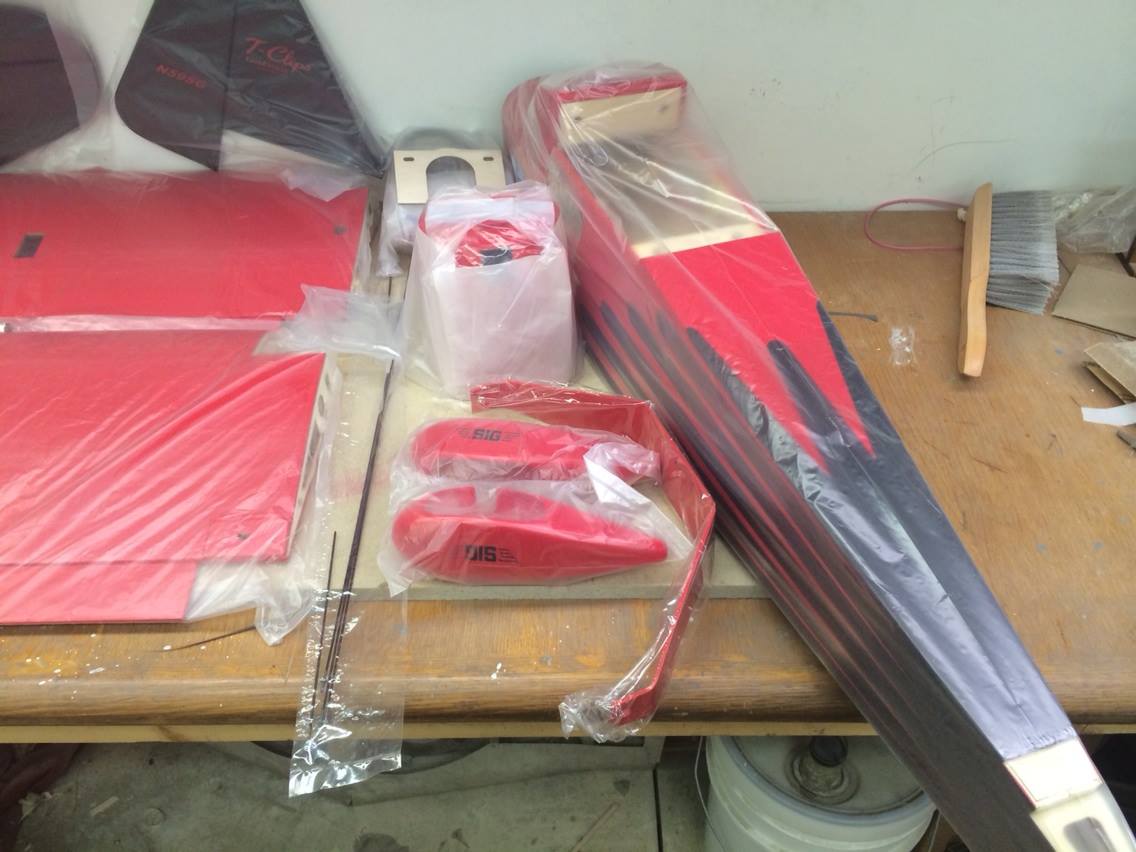
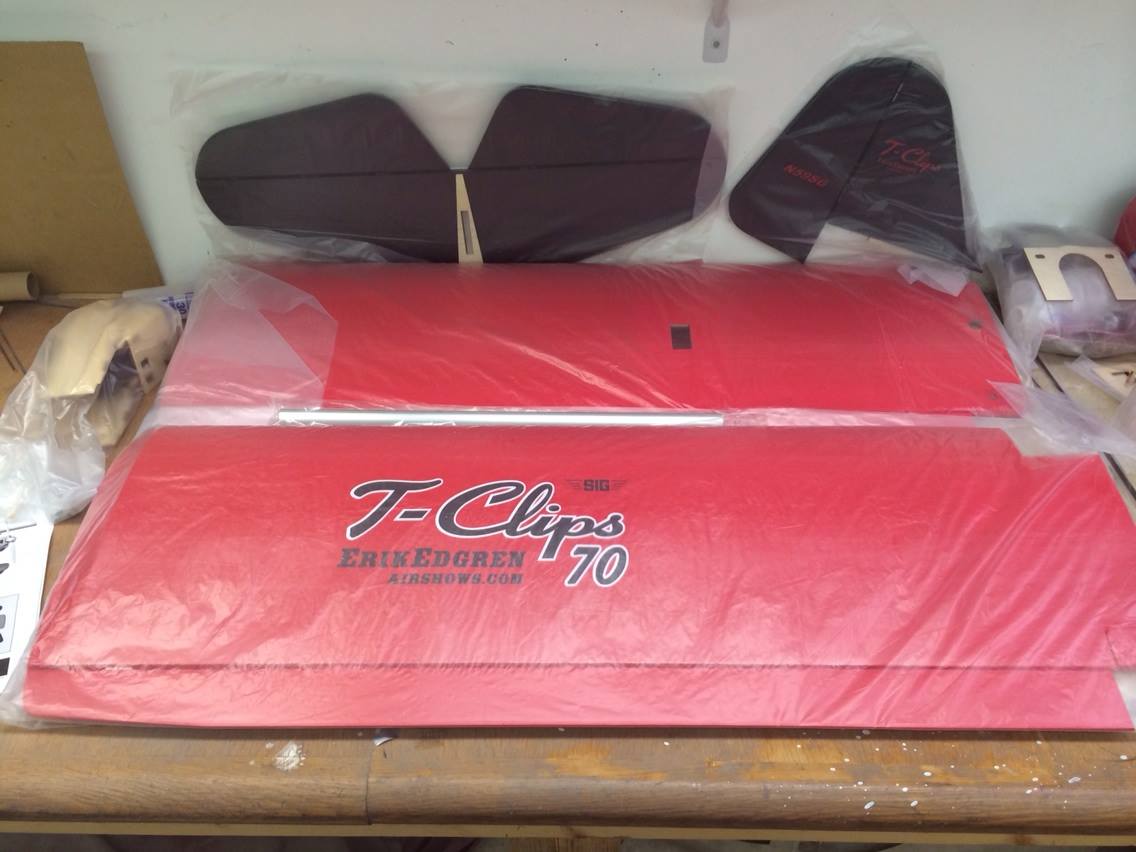
More pictures, these are to show the parts and the blemishes.
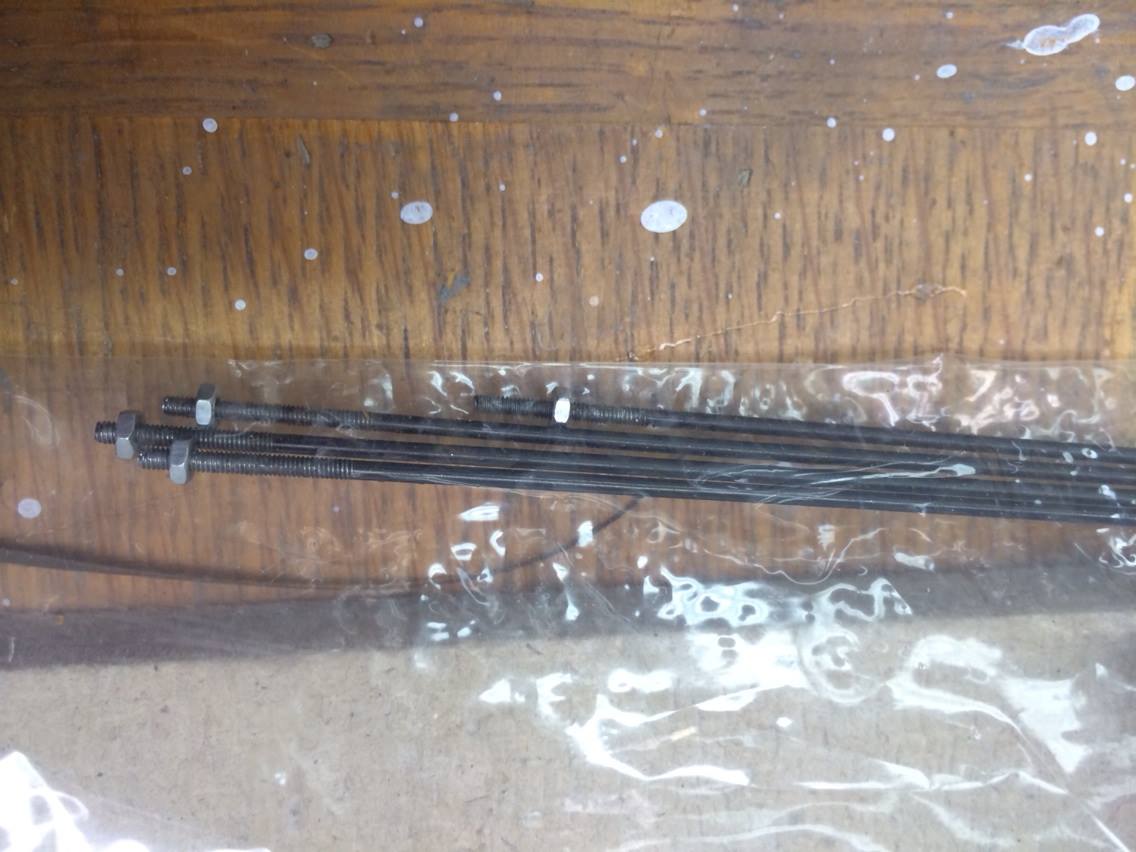
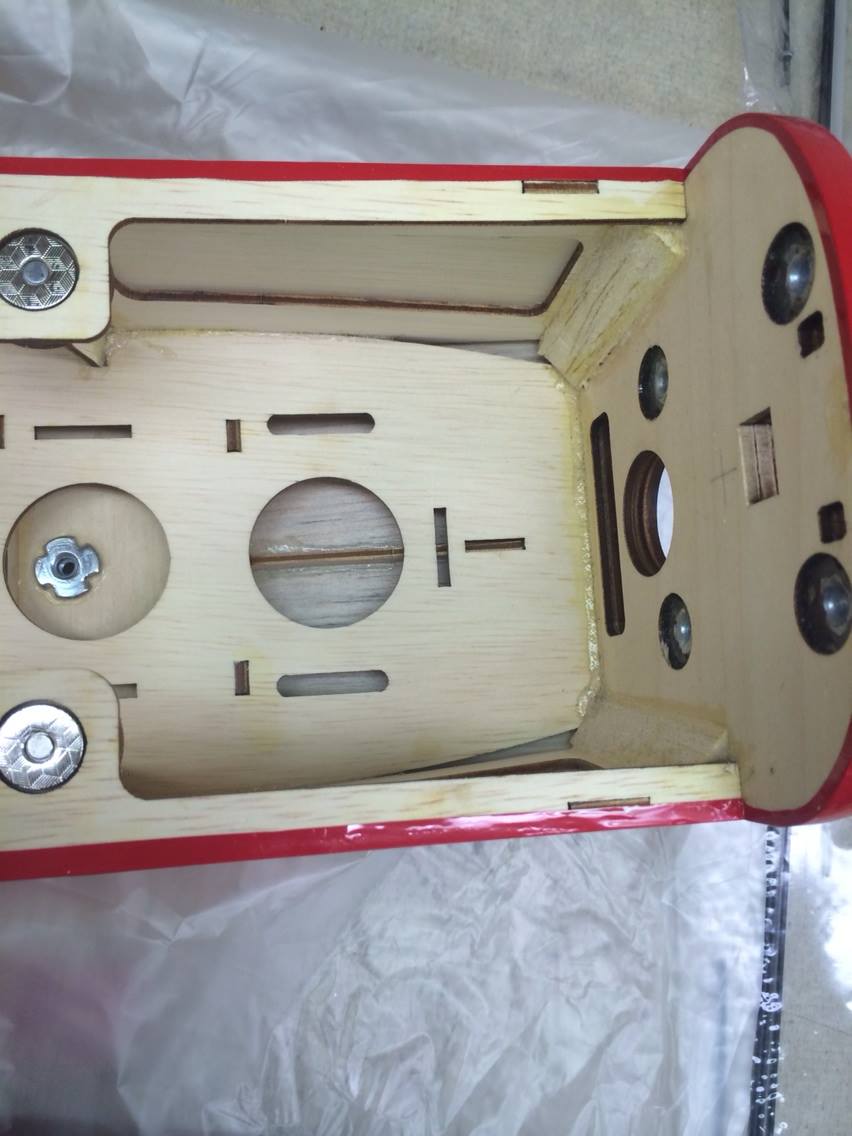
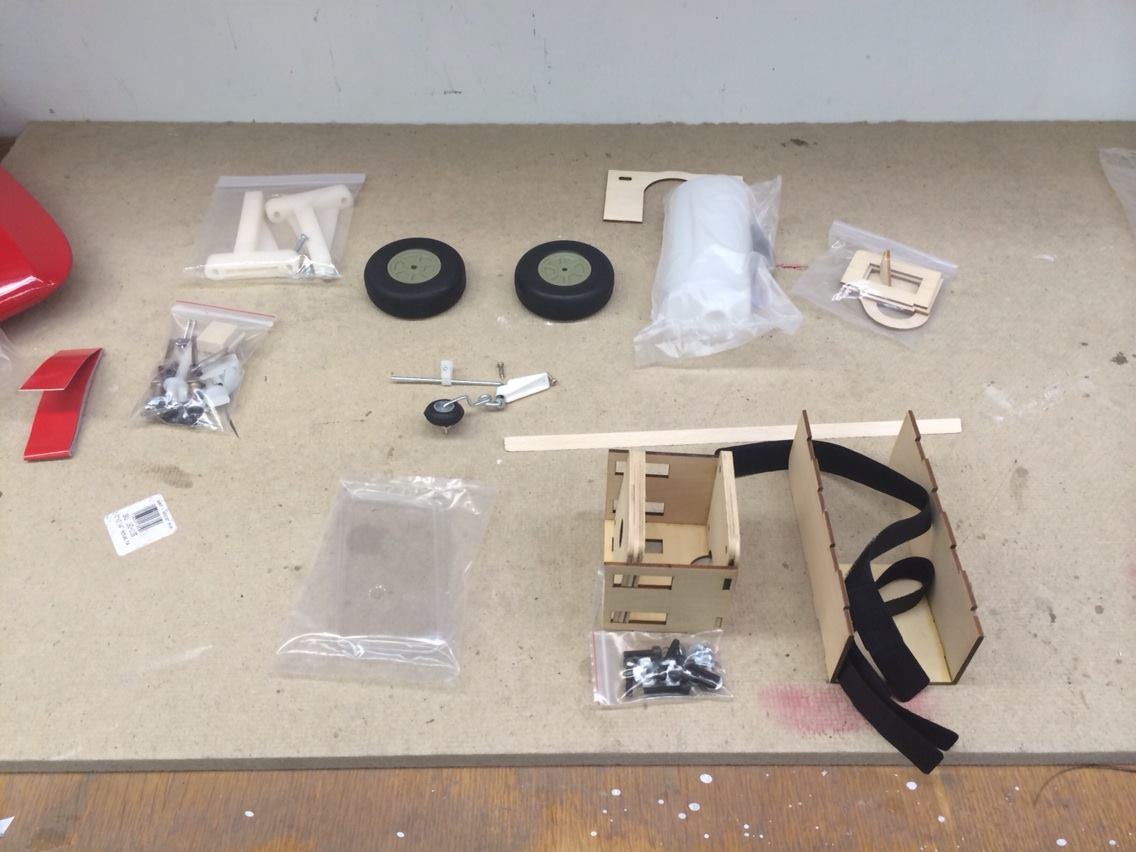
Now for the parts that are so-so
I am hoping to get some time to work on it tonight and start installing the radio gear, haven't decided on a power system yet. I originally though a Magnum 91 would be good, but after taking this out of the box and finding it is so light, a 91 would be overkill and no sense stressing the frame of such a nice looking plane, so thinking maybe a Saito FG11 gas 4 stroker instead. I need to compare weights vs a 62 or 70 size 4 stroke which I feel would be just the right amount of power for this plane. I have an OS 70 but it has a home in a SIG 1/5th CUB.
 08-20-2014, 07:17 AM
#4
Thread Starter
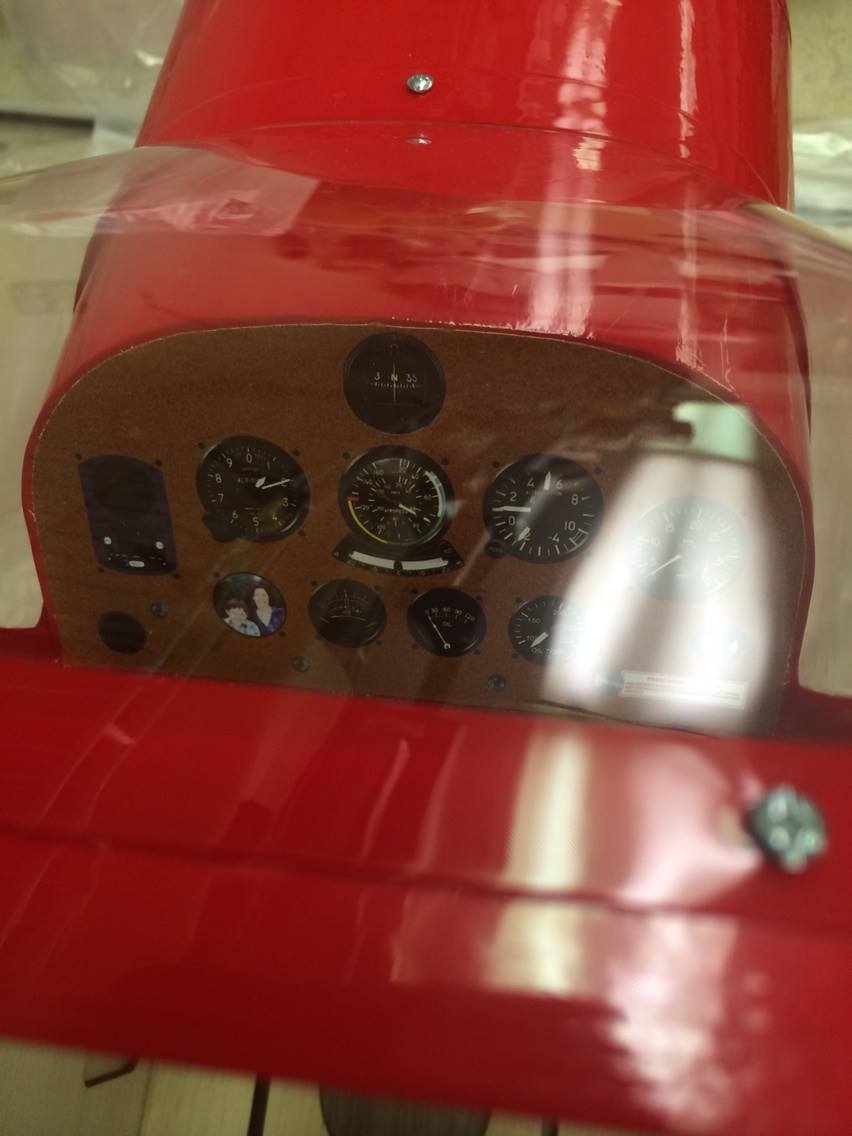
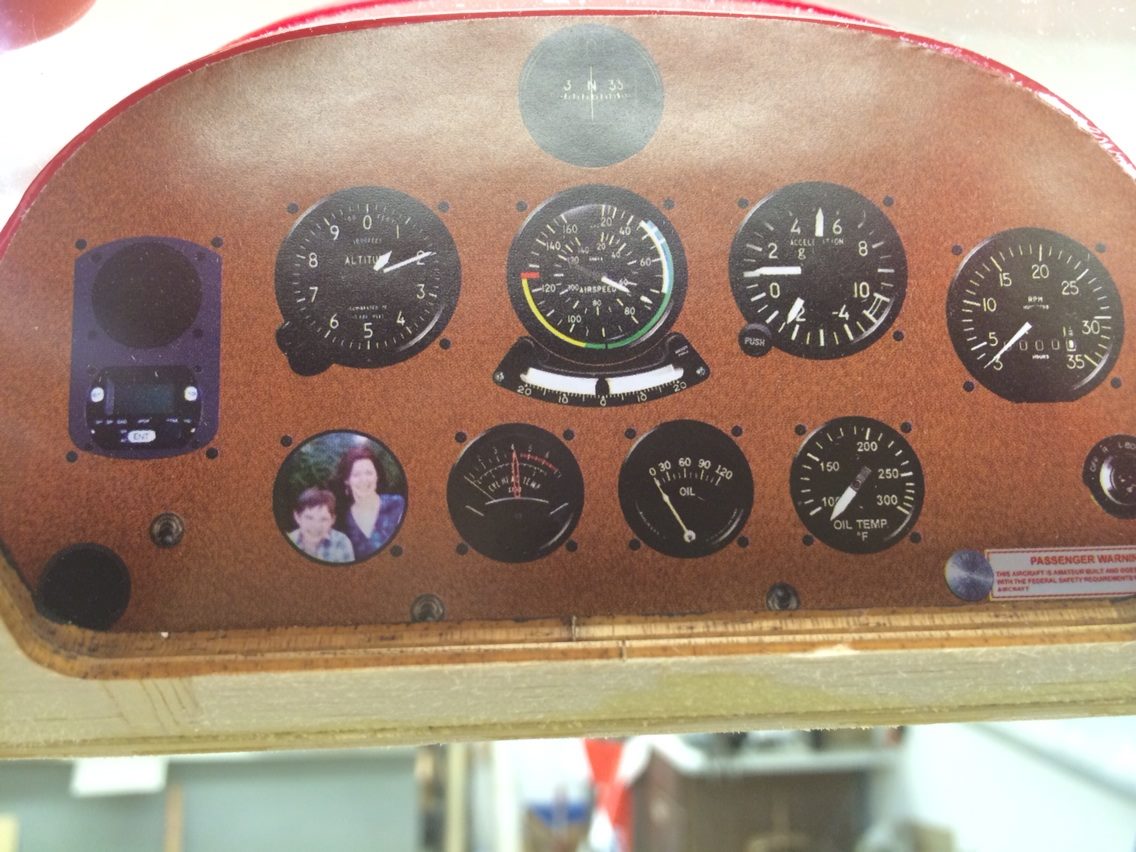
I will see if I can polish up the cowl, if not, no big deal, and the scratches on the windscreen, I didn't notice them until my friend pointed them out. But that instrument panel is downright cool, even down to the picture.
08-20-2014, 08:26 AM
#5
Thread Starter
Choice has been made. It was a toss up between the FG14 and FG11, and after reviewing specs on both I decided the FG11 would be a better choice since it is based on a 60 sized case, where the FG14 is based on an 82 sized case. This plane calls for a 62 sized engine, so the FG-11 should be the perfect choice. It also works off a 2S Lipo, so I can counter balance the weight of the ignition with the Lipo. For servos going to go with my usual reliable Futaba 3004 servos, but have not decided which radio yet, Futaba or JR, will need to go through what I have left for RX. I may just gut my Chipmunk and use what I have in it for the radio gear, and when I get another batch of servos put an Orange RX in it instead.
08-21-2014, 03:37 AM
#6

My smaller T-Clips had similar covering blemishes, and few wrinkles. After a few days in the sun, the airframe needed a going over with a covering iron. No big deal.
I like the looks of the larger version. I'm sure there will be one in my fleet, soon.
I like the looks of the larger version. I'm sure there will be one in my fleet, soon.
08-21-2014, 05:45 AM
#7
Thread Starter
Well once I get the Saito, which is scheduled to arrive today, i will get rolling on the actual build. I just wanted to get the pictures of this plane up and out there for anyone interested in it to see. Overall, this ARF is pretty good in the quality department, right up there as expected from SIG.
One thing that I did notice, the servo locations on the wings, I would have preferred the servo mounted sideways with a hatch for a cleaner look, but thats just how I build planes. Depending on the weather, looking at either Tuesday or next Saturday for the maiden. If this takes me more than 6 hours to get assembled I will be surprised.
One thing that I did notice, the servo locations on the wings, I would have preferred the servo mounted sideways with a hatch for a cleaner look, but thats just how I build planes. Depending on the weather, looking at either Tuesday or next Saturday for the maiden. If this takes me more than 6 hours to get assembled I will be surprised.
08-21-2014, 06:43 PM
#11
Thread Starter
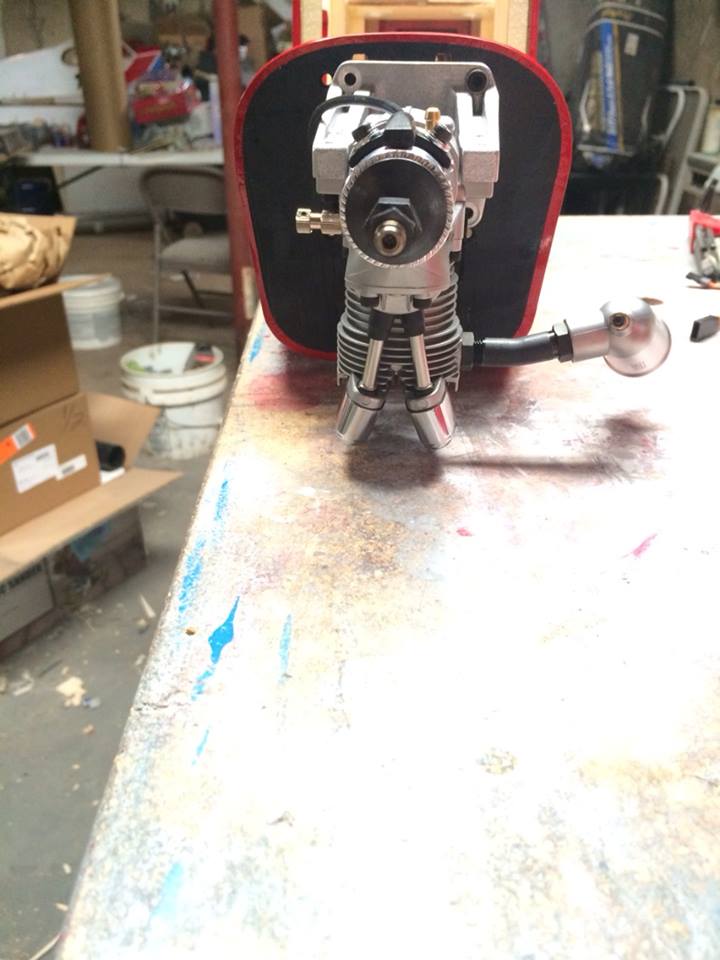
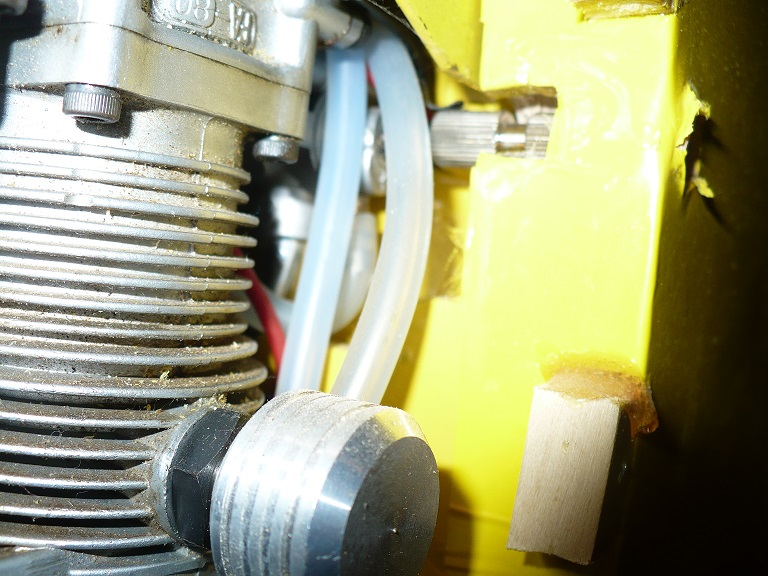
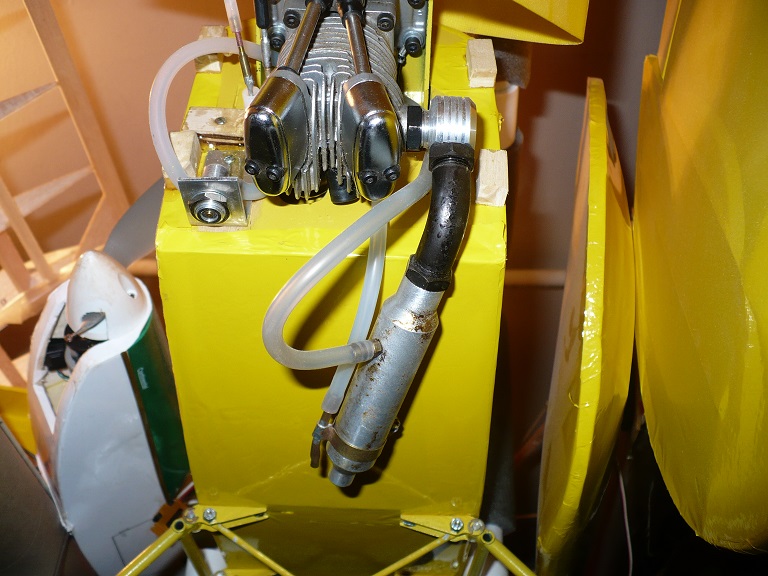
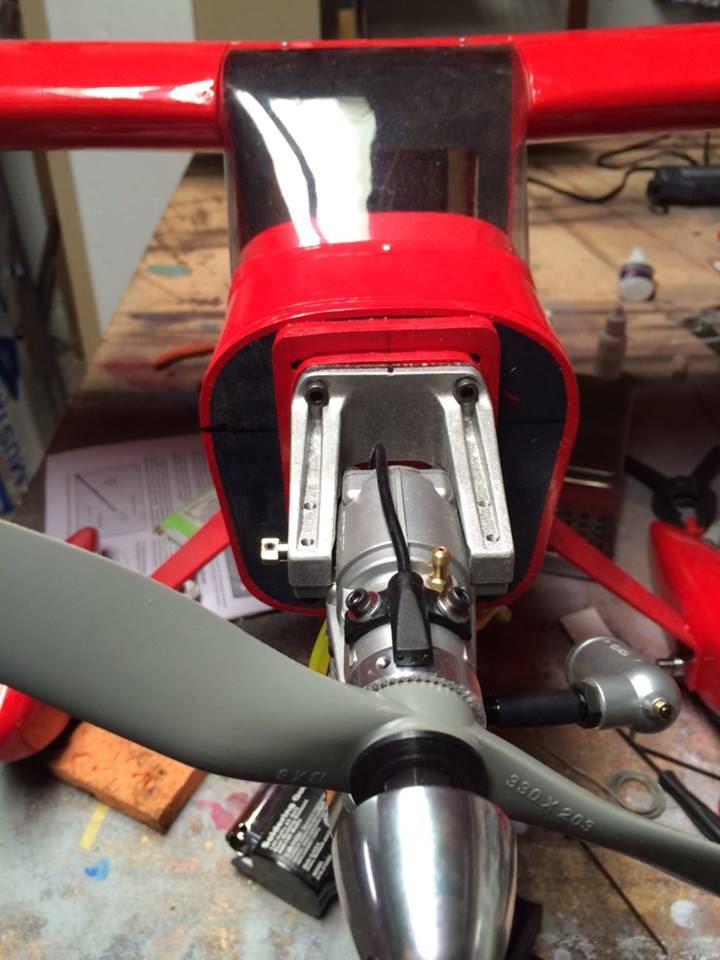
The engine is here, got the FG-11 Gas engine. It is a perfect fit. The manual says to use the included mount and not a plastic one due to heat and vibration. I temporarily attached it to the firewall, I will need to redrill and move the T-nuts to center the engine, and take a measurement to see if it is out far enough or if I need to build up the firewall a bit to extend it out. In any case, the FG-11 is the perfect size and should haul this plane around nicely while not sounding like a chain saw.


I dont know why but I get invalid file sometimes, so large pictures it is.
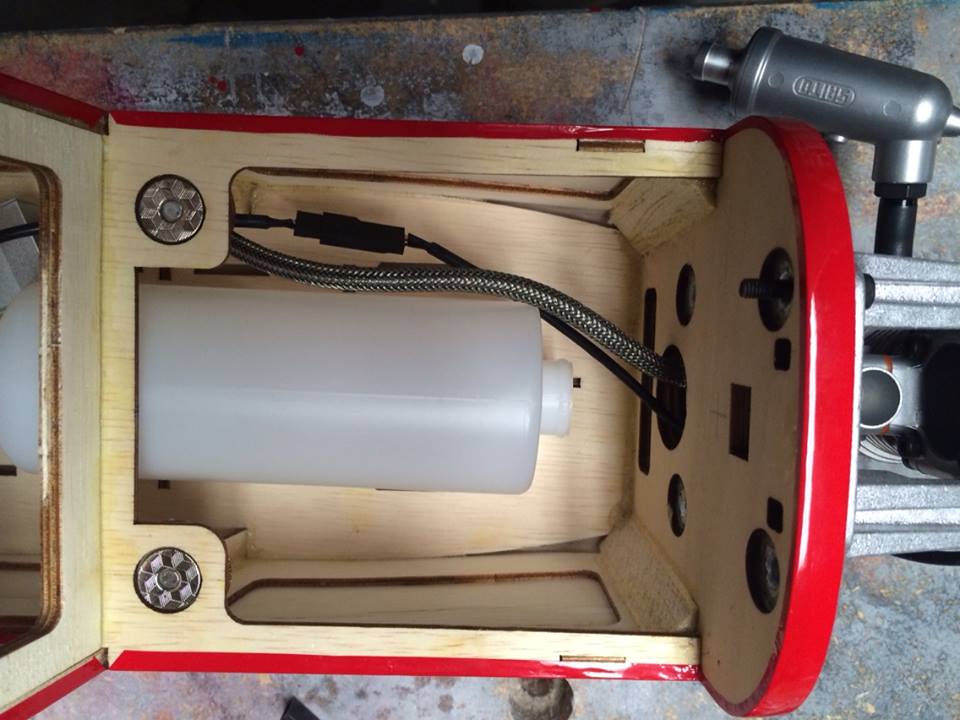
I may need to replace the tank, it uses a funky type of stopper and plastic tubes, which I know gas will just eat through them. Since I will be running a gas engine, the tank needs to be gas friendly. The spark plug wire fits perfectly though the hole in the firewall and there is enough lead to where I can set the module on the CG. This will help offset the extra weight of the Saito.
I dont know why but I get invalid file sometimes, so large pictures it is.
I may need to replace the tank, it uses a funky type of stopper and plastic tubes, which I know gas will just eat through them. Since I will be running a gas engine, the tank needs to be gas friendly. The spark plug wire fits perfectly though the hole in the firewall and there is enough lead to where I can set the module on the CG. This will help offset the extra weight of the Saito.
08-22-2014, 01:24 AM
#12
How well does the tak centerline match up with your carb ? I know that it's not important for gassers, but I'm considering an inverted glow 4 stroke.
When I did something similar on my Kadet Sport, I had to modify the tank mounts, in order to lower the fuel tank.
When I did something similar on my Kadet Sport, I had to modify the tank mounts, in order to lower the fuel tank.
08-22-2014, 06:44 AM
#13
Thread Starter
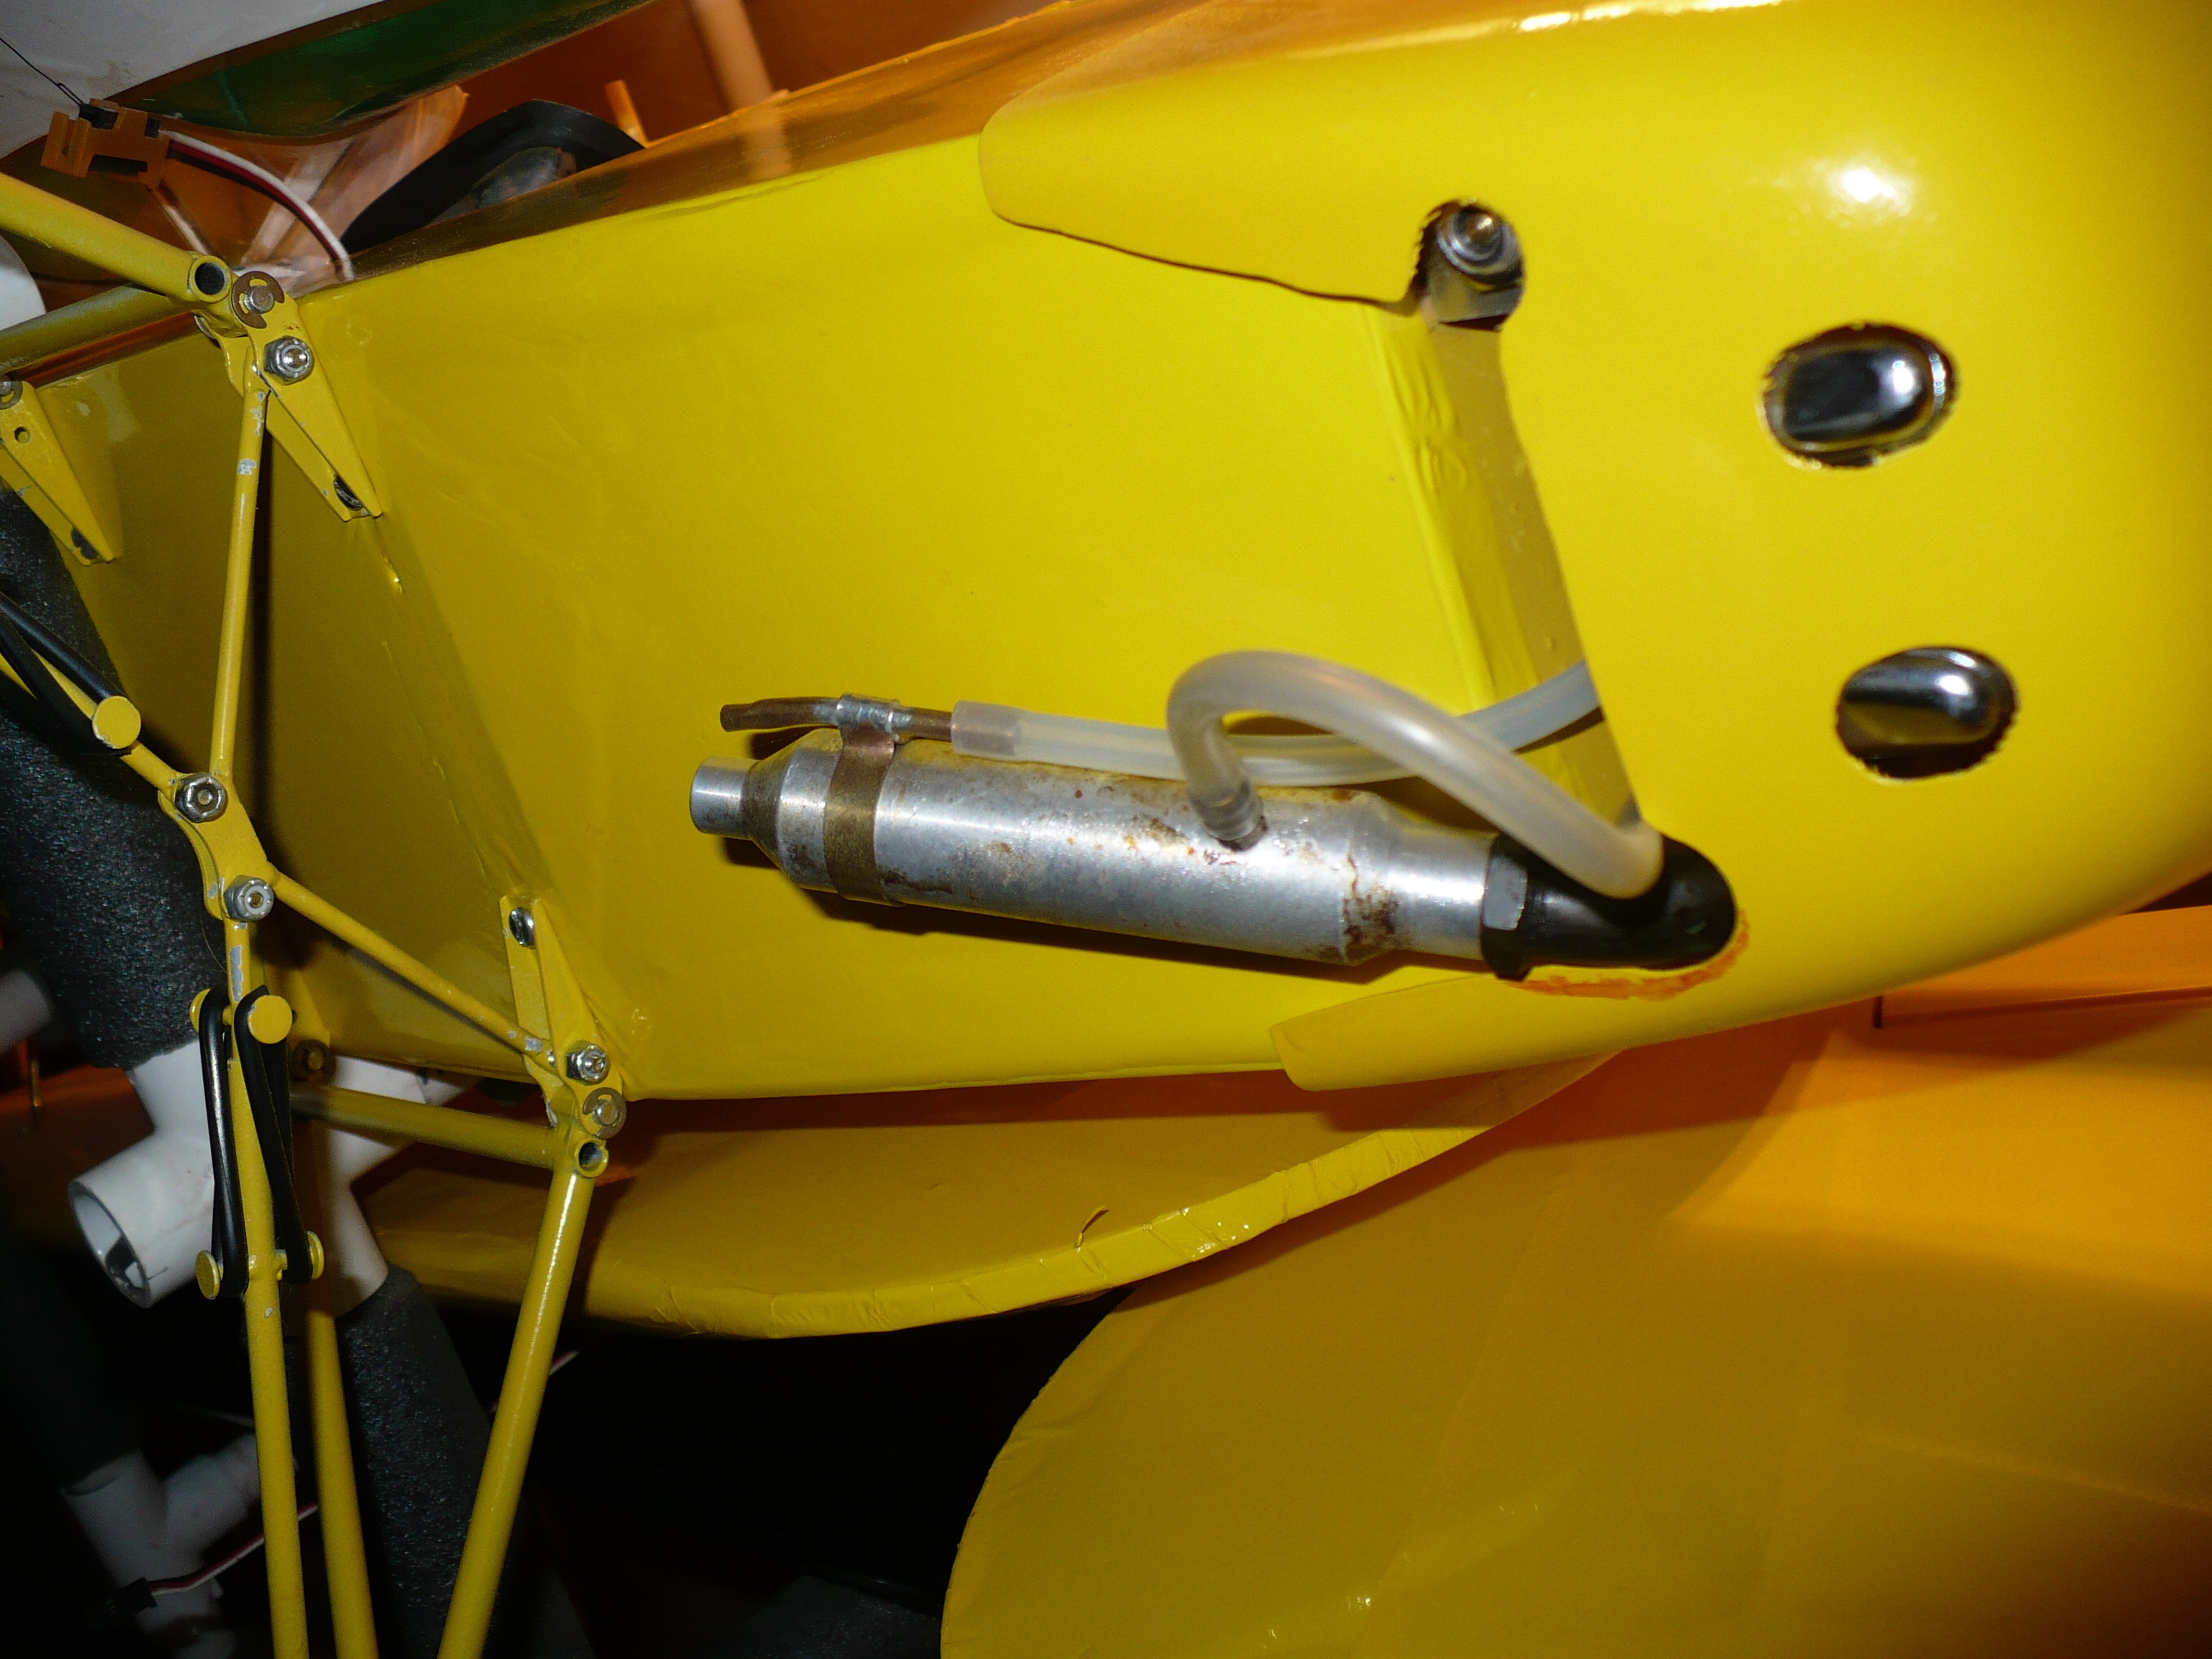
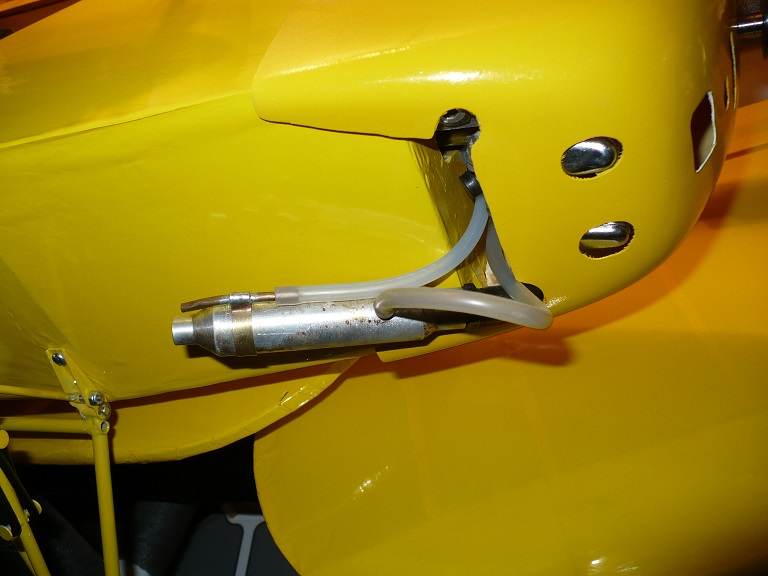
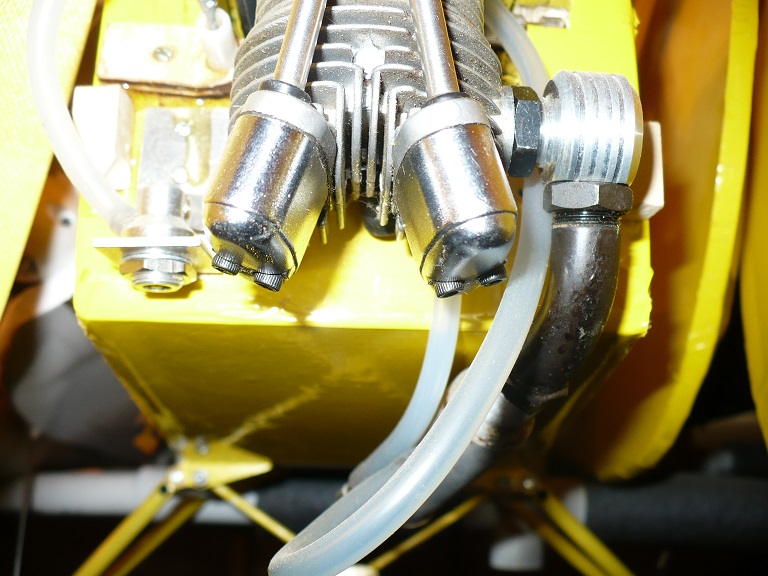
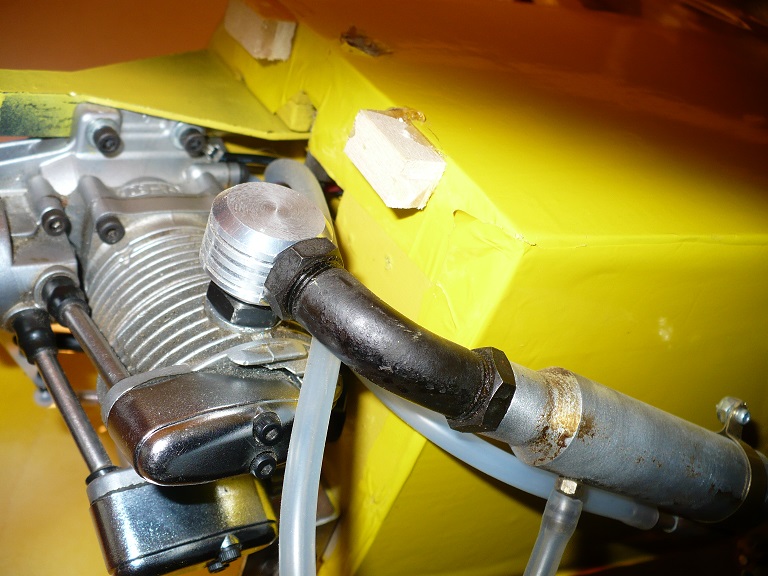
If you look at the hole on the firewall, that is the tank center line. Using the supplied mounts drops the engine down to where the center line is even with the spraybar on that engine I mounted. Right now it sits above the CL and to the left as it was only temporarily attached for the picture. In fact if you look at the back of the firewall in that last picture, thats the engine CL marking. The FG-11 is built on the .62 case, so any 4 stroke of that size will sit about the same, so I dont see it would be an issue. If you drop a 91 on it though, the spraybar will be below tank CL. I might just post up a pic of the 91 mounted to verify.
08-22-2014, 07:14 AM
#14
acdii, if you can find a 90 degree adapter for the exhaust pipe (I found one to fit my .80 off a Saito twin) you could probably run the muffler along the the bottom of the fuselage like I did in my Cub. The airplane is a SIG 1/5 scale Cub powered by a Saito FA.80 which is probably 15 years old. Here are some pictures.
Mike
Mike
08-22-2014, 08:40 AM
#15
Thread Starter
Thats a good idea, I will take a look to see if I can find one. The FG-11 is identical to the glow 62 main difference I can see is the carb and spark plug. Has the same muffler as my 100.
 08-22-2014, 04:08 PM
#17
Senior Member
Join Date: Jun 2007
Location: Freedom, PA
Posts: 574
Likes: 0
Received 0 Likes
on
0 Posts
These small gassers run hot and the aluminum mount is probably a good idea, how about Hanger 9's aluminum mount, it's longer and the bolt area is slotted so adjusting distance of drive washer to firewall is a easy task.
08-23-2014, 04:38 PM
#18
Thread Starter
Going to hit the LHS tomorrow to see if they have a longer metal mount, I can't make it work without modifying the FW. Other than that, the plane is built. Mount the engine, install the tank, and hook up the electronics for the ignition. Then I can glue in the windows and balance it.


Since I cam going gas and the supplied tank has a strange type of stopper that wont work with gas, I swapped in a 12oz Dubro. Will have to cut the tank support to fit the tank.


Since I cam going gas and the supplied tank has a strange type of stopper that wont work with gas, I swapped in a 12oz Dubro. Will have to cut the tank support to fit the tank.
08-24-2014, 05:32 PM
#19
Thread Starter
Well I found the perfect tank, same dimensions as the one that comes in the ARF. I thought the Dubro antivibration mount would work for the FG-11, Nope, the part that bolts to the firewall presses against the carb and doesnt fit right on the firewall, so wasted $39 on it, but will probably find a use for it for my other Gas engine. I wound up doing what I originally started out to do and that was to build up the firewall and move the T-nuts. I used the mount that came with the Saito and it fit perfectly, so motor is mounted, throttle cable is in, and works nice and smooth. All I have left is to mount the two switches, and balance it. Once I get it on the balance rig I can find out where to put the battery, then just have to set the throws. Then it's time to fire up the engine, get it run in a bit and get it in the air. I am leaving the cowl off until I have the engine run in, then once it is running good I will put it on.


x`
x`
08-25-2014, 06:46 AM
#20
My opinion has always been if the manufacturer recommends an aluminum mount there must be a good reason for it and not to ignore the recommendation. Isn't a few pennies or a little time worth if it prevents losing and airplane?
Last edited by FlyerInOKC; 08-25-2014 at 06:46 AM. Reason: Spelling
08-25-2014, 11:09 AM
#21
Thread Starter
If you look at my last post, you can see that is what I did. I got this thinking it would work without modifying the FW, but it would stick the engine out too far for it to work, so I built an extension and put the Saito mount on instead since I had to modify the T-nuts anyway. I think it fits perfectly now. Funny thing is the Saito is an exact match to the OS 52 on my LT-40, a near direct swap out.
I also paid too much for the mount, like nearly $10 more! Crap, at least I can find a use for it, the Magnum 91 will fit just fine on it.
I also paid too much for the mount, like nearly $10 more! Crap, at least I can find a use for it, the Magnum 91 will fit just fine on it.
08-25-2014, 05:30 PM
#23

Join Date: Jan 2007
Location: West Islip N.Y.
Posts: 623
Likes: 0
Received 0 Likes
on
0 Posts
I'm new to gas but from what I have read you want to keep the ignition as far as possible from the rx.
I've seen it mounted mostly on the engine box or firewall.
Or does it not matter any longer??
I've seen it mounted mostly on the engine box or firewall.
Or does it not matter any longer??
08-26-2014, 05:01 AM
#24
Thread Starter
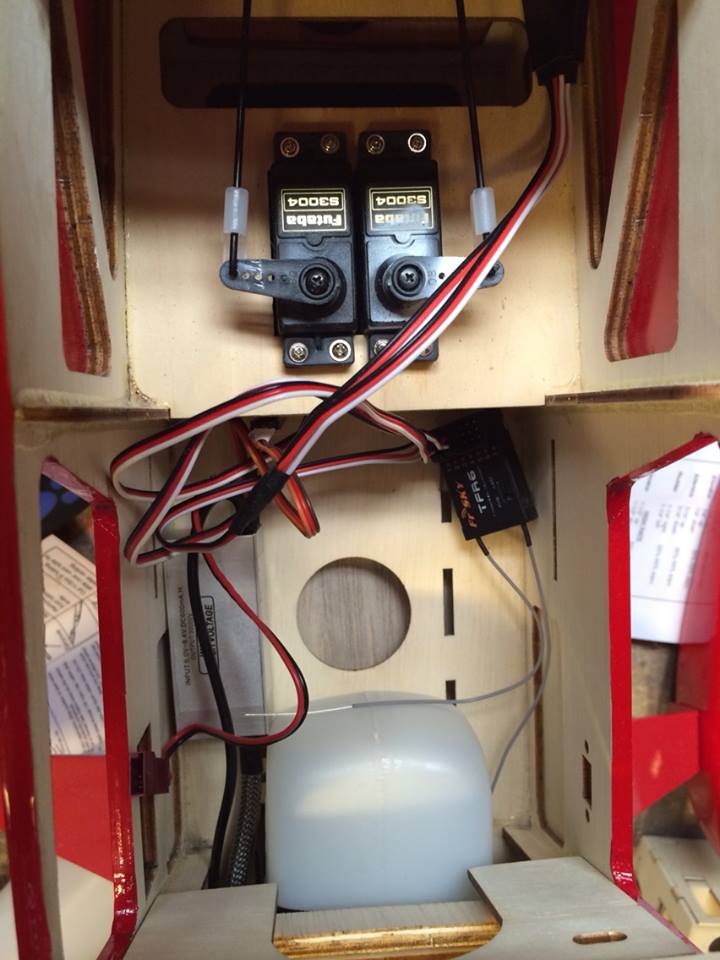
With 2.4 it isn't as much an issue as it is with FM. With that said, I still like to isolate the ignition as much as possible. The RX is mounted high and to the rear, just behind the left window, the ignition is on the floor on the right, and isolated with an Optokill switch, and a separate battery pack. The key to keeping interference low is good grounding, and lack of anything that can vibrate metal to metal. This is why I use a cable system for the throttle link, nothing to vibrate. Been flying a DLE20 for a few year now and never had a radio issue. For that one I used Nyrod(Golden rod) pushrods for throttle and choke. Since its in a 48120 with that overly long fuse, plenty of room to move the RX away from the ignition which is in the nose.
On the T-clips the ignition is more toward COG to help with the balance. I haven't balanced it yet, so unsure if it will be nose heavy yet, but comparing weights of engines, if I went with the Magnum 91 like I originally planned when I first saw this plane in Toledo, the Saito comes out lighter. The 91 also swings a 14" prop and from what I see of the Saito with the 13" prop, that 1/2" will be a grass clipper for sure. The 13" prop seems to be the perfect size for this plane. If this Gas Saito runs anything like the glow 100 I have, this will be one sweet flying plane.
BTW I weighed it with everything except the cowl and it is 7 pounds 2 OZ. It's the lightest of all my planes this size, including my LT-40.
08-26-2014, 06:31 AM
#25
Join Date: Jan 2007
Location: West Islip N.Y.
Posts: 623
Likes: 0
Received 0 Likes
on
0 Posts
Thanks for the info.Did you make the cable up for the throttle?
If so ,can you post on how you did it? Never mind I see what you did.
And you answered my question on prop size.
Thanks
If so ,can you post on how you did it? Never mind I see what you did.
And you answered my question on prop size.
Thanks
Last edited by Bcolici; 08-26-2014 at 07:14 AM.