


GP Super Stearman
 11-30-2014, 12:51 AM
#1851
Junior Member
Join Date: Jun 2012
Location: Kinchela, AUSTRALIA
Posts: 22
Likes: 0
Received 0 Likes
on
0 Posts
Hi KaP,
There's a fair bit of reading isn't there. I cut & pasted anything I thought may be important, including pictures, to a Word document so I didn't have to trawl through the whole thread again looking for stuff. There's some great ideas in there which helped me immensely.
Enjoy your build!
Mick
There's a fair bit of reading isn't there. I cut & pasted anything I thought may be important, including pictures, to a Word document so I didn't have to trawl through the whole thread again looking for stuff. There's some great ideas in there which helped me immensely.
Enjoy your build!
Mick
 11-30-2014, 07:09 AM
#1852

There is quite a lot to read through but it's worth it. What surprises me is how some of the same defects have carried through from the first production run. My covering was ok, some wrinkles but not bad. My cowl was cracked from the hardware shifting and the landing gear had rubbed against it as well as poking a very small hole in the covering of the top wing. The manual still has the same bad information referring to the location of the aileron links as well. The cowl is back ordered till mid February but I may be able to use the one I have by layering some fiberglass to the inside and spraying a clear coat on the outside to seal the cracks. The Keleo exhaust has a 5 to 10 week lead time so I'm in no rush to finish the plane anyway.
All in all though, I like the plane. I'm looking forward to spring when I can get it into the air. There is a guy in our club who has the PT-17 version and he says it's one of the best flying planes he's ever flown. He's been flying since 1974 and can grease the landing on any plane he fly's, except for the Stearman, he bounces it nearly every time.
All in all though, I like the plane. I'm looking forward to spring when I can get it into the air. There is a guy in our club who has the PT-17 version and he says it's one of the best flying planes he's ever flown. He's been flying since 1974 and can grease the landing on any plane he fly's, except for the Stearman, he bounces it nearly every time.
12-14-2014, 05:55 AM
#1853
Junior Member
Join Date: Dec 2014
Posts: 4
Likes: 0
Received 0 Likes
on
0 Posts
I got one.. I'm never flew before.. I'm a newbie. bought a simulator and start learning. no near club here. hope can fly soon. Hope buy a trainer first and visit clubs 300 miles away.. Reading all newbie post and first flys here at rcuniverse. thanks
just bought a 41cc 2stroke engine. what you think about. will fit?
just bought a 41cc 2stroke engine. what you think about. will fit?
Last edited by SebastianRC; 12-14-2014 at 07:08 PM.
12-16-2014, 08:52 PM
#1856
I'm sure it will fit fine. I've read through the entire thread and people have put everything from a 1.20 four stroke glow engine to a 50cc gasoline engine on this plane, I'm sure they all flew the plane just fine.
I would advise that if you have only ever flew a simulator or a trainer that you put this plane away for two or three years. This plane requires an advanced intermediate pilot who is comfortable flying heavier planes. Work your way up through trainers, low wing trainers then heavier scale planes before you attempt flying this plane. You will save yourself some money and grief.
I would advise that if you have only ever flew a simulator or a trainer that you put this plane away for two or three years. This plane requires an advanced intermediate pilot who is comfortable flying heavier planes. Work your way up through trainers, low wing trainers then heavier scale planes before you attempt flying this plane. You will save yourself some money and grief.
07-15-2015, 08:30 PM
#1857

My Feedback: (19)

Join Date: Feb 2004
Location: Raeford, North Carolina
Posts: 3,988
Likes: 0
Received 2 Likes
on
2 Posts
Hi Guys.
Like a bad penny, I have returned, through such a weird set of circumstances that you wouldn't even believe it. I HAVE to tell you this story, because I'm a writer, and I couldn't make this stuff up!
I have a scale GeeBee R2 model I acquired to take with me to book signings, but it was just too big and hard to manage in the book stores and comic-con events, etc., so I decided that I needed to move it out and make room. I put it up here in RCU for sale, and was willing to trade for anything cool in the way of hunting gear. A nice guy in CA contacted me about a possible trade for some hunting gear, but the dollar value wasn't that high, and I asked him if he had any fishing gear to throw into the deal. He did, but then he mentioned that he'd be willing to throw in a NIB GP Super Stearman ARF.
Now, you guys all know how I was kicking myself after I sold my baby in 2014 (2013?), and how I loved my GP SS Bipe.
Needless to say, I told him YES! Well, it arrived two days ago in the mail, and a quick check showed that it all seemed to be there, and in good shape. SO, here I am, back in the GP Super Stearman Bipe thread, reading my old posts and making my crib-notes to make building it go smoother than it did last time.
Revelations as I read:
#1: The Syssa 30cc single gasser fit that model perfectly. Syssa Aircraft is still in business, but I don't have much trust in the Syssa Aircraft company to be there with service or product when I need it. Perhaps it would be wiser to use a different brand of engine this time, and I'll hope I can find something that fits anywhere near as perfectly as that Syssa 30CC did. Special note: I now live the next town over from Valley View RC, so I think that my first engine research should be to check out their engines. I don't know if their 40CC twin will fit inside the cowl or not, or if the weight is too much for the 41 ounces the node would require for balancing the C.G. Not sure I want to go as small as their VV 20CC single.
#2: Do I want to install Robart pin hinges again, and go through the same fight with the lite ply plates that run through the center of the control surfaces, or maybe try some different hinges this time?
Those are my immediate thoughts. I'll try to do some posting while I work on this model again, and I hope to hear from some of the old regulars again, Like AceRC and Cromagnonman and CaptnJohn. It'll be a while until I've got my parts gathered, but this is the part of the build where we do the 90% planning and preparation. I think that number's a little inflated, because this model takes some serious building and hands-on attention, as I recall!
This thread is great, because I spent this afternoon reading through it, and making notes, and so much of it came back to me. I know it'll help me to avoid many of the problems that caused speed-bumps the first time I built this model. I won't have to cut up the tail as much or rebuild the stringers in the back; I can just install a few servo plates and some bracing instead. That took a long time and a lot of effort. And reinforcing the nose will be MUCH easier, with hindsight guiding me! And lots of photos! SO glad I posted so many, and SO glad that so many of you did as well. I'll almost feel like I'm cheating.
Almost.
Jim
Jim
07-15-2015, 11:23 PM
#1858
Junior Member
Join Date: Jun 2012
Location: Kinchela, AUSTRALIA
Posts: 22
Likes: 0
Received 0 Likes
on
0 Posts
G'day Jim!
Great to hear from you after so long. Hope you.ve been writing because I really enjoyed your books & would love to read more!
Sounds like you scored well with that deal. I gotta say you made fitting those pin hinges look easy on your video. When I did mine I thought 'what have I got myself into here?' This is only the 2nd plane I've built. I think my first drill hole veered off course straight through the covering which was a great start to building an expensive model. Heaps of Aussie vernacular was heard throughout our house after that one. But I soon worked out a system & with some careful Dremel work I gouged out those ply plates using an end mill type bit. I reckon one of those guide jigs you can buy would've been a big help but I couldn't wait for one to come from the US.
Ahh you've got it all ahead of you....so many decisions after reading all the great ideas on here (many which came from you)....cant say your not well informed like those poor buggers back on page 1!
Looking forward to hearing from you Jim. Best of luck with the build
Mick!
07-16-2015, 06:29 AM
#1859
My Feedback: (19)
Join Date: Feb 2004
Location: Raeford, North Carolina
Posts: 3,988
Likes: 0
Received 2 Likes
on
2 Posts
Hey, Mick! Long time no see!
I'm still writing. When my next book is coming out, well, that's another discussion entirely. I continue to plug along, and I'll leave it at that.
Being in Washington state is as close to magical as anyplace I've ever lived. I can't wait to get out there and dig in, with the hunting, fishing, and flying.
I know exactly what you mean about the drill veering off; the same thing happened to me. It was already perforated, so I cut the aileron open to see what the bl**dy h#ll was causing it. Right through the center of the whole piece ran a sheet of lite ply.
Oh.
I had to admit, it made for strength and lightness. So, I bought one of those Dremel chew-tools, looked like a drill bit with carbide chunks sealed to the sides and tip, and that went in through the hole and chewed into the lite ply, but even then I only left a hole big enough for the pin to fit, and from one pin to the next, it went off to one side or the other. Leaving it that way made for a good gluing position for each pin, and didn't affect the pivoting.
Right now I'm agonizing over what engine to put into it. That Syssa installation spoiled me; everything fit like a glove, and even the Pitts muffler was tucked away neatly behind the engine. D*mn, why did I sell it? I'm such an idiot!!!!
lol
I just went through the box thoroughly, and everything I'm concerned with is there; the pilots, the spinner hub, etc. I haven't found the package of 18 tubes for the radial push-rods yet, but they're probably in there somewhere. I haven't found the wood for the carrier handles yet, either. I still have to do some work on my bench to make it ready for modeling, so I can't spread out just yet. Also, I have to finish my RC Guys Pitts first. It's almost finished.
The cowling is just over eight inches across. A Valley View RC 40CC Twin might fit into it, but what a waste it would be, hiding that engine behind a faux radial. I was on their site last night and they have a single in the mid-30's (35?) that shows good measurements. It's also about half the price of the twin, and it certainly has more than enough power for this bird.
I should also mention that I'm seriously considering powering this Super Stearman with electric power. I know. Me, considering making it an electric, right? You could've blown me away with a feather when I found myself going through Tower's electric power section, looking at the 1.6 motors and setups. But think about all the parts of building, setting up, and maintaining this model it could un-complicate. I have to say, I can't dismiss it out of hand. For instance, I now live across the street from a HUGE, well-kept park here in Lakewood, Washington, and they fly RC right there in the park. But the gas and glow models have been banned. See what I mean? It's worth considering. I'll have to start checking the RCU Buy & Sell forum.
That's pretty much it for now. Going through my posts here, and scribbling notes for the build, making lists of the parts I'll need. 4.5-inch Sullivan Skylite wheels, for sure. JR ST126MG servos, of course. Sullivan tail gear for heavy models. I'll need five of the 24" servo extensions. Central Hobbies Carbon fiber linkage ends, 3/16" X 4-40 threads. Got a ton of Robart pin hinges out there. Sullivan 4-40 black locking clevises, and DuBro 493 adjustable control horns. My brain is starting to lock in on the build.
Looking good so far!
Jim
07-17-2015, 07:50 PM
#1860
My Feedback: (19)
Join Date: Feb 2004
Location: Raeford, North Carolina
Posts: 3,988
Likes: 0
Received 2 Likes
on
2 Posts
Okay, I'll be documenting my build of my big GP Super Stearman here. Hopefully a little better than I did the last one.
The one major difference is that I'm going full electric on this one, and I'm going to do it right. I've been researching the process of going electric for the past week, and I'm convinced it can be done right without breaking the bank. I'm also convinced now that there are a lot of self-proclaimed experts out there that are mostly lucky that their planes fly, because they don't really know what's inside their motors and why. I'll get into that later.
Here's what I bought, and I'm waiting for it to arrive: An AXI PM 5325/24 motor, and their 125 Amp Electronic Speed Control (ESC)
I'm still gathering parts for the build, so it'll be a while before I start in earnest on this Stearman, but I'll try to make sure those of you who are interested in building an electric bird can find some useful tips. I'm a late bloomer when it comes to electrics. I've flown and worked on my friends' models, but this my first. Still, I plan to do it right. I've seen some bad setups that still fly okay, so a carefully worked out setup should be a pleasure to fly once it's done.
I'll keep you posted as things progress. I've gotta dust off that camera, too.
Jim
09-24-2015, 09:27 PM
#1861
My Feedback: (19)
Join Date: Feb 2004
Location: Raeford, North Carolina
Posts: 3,988
Likes: 0
Received 2 Likes
on
2 Posts
I still need to dust off that camera, but I have been working on the GP Super Stearman, I should add; at a snail's pace. I had my foot operated on almost seven weeks ago, which left me drugged and groggy for a week or two, and weak and slowly recovering ever since then, pushing a knee scooter around. Kind of like powering a 1.20 size model with a .46 -- NOT great. It's slow going, for sure.
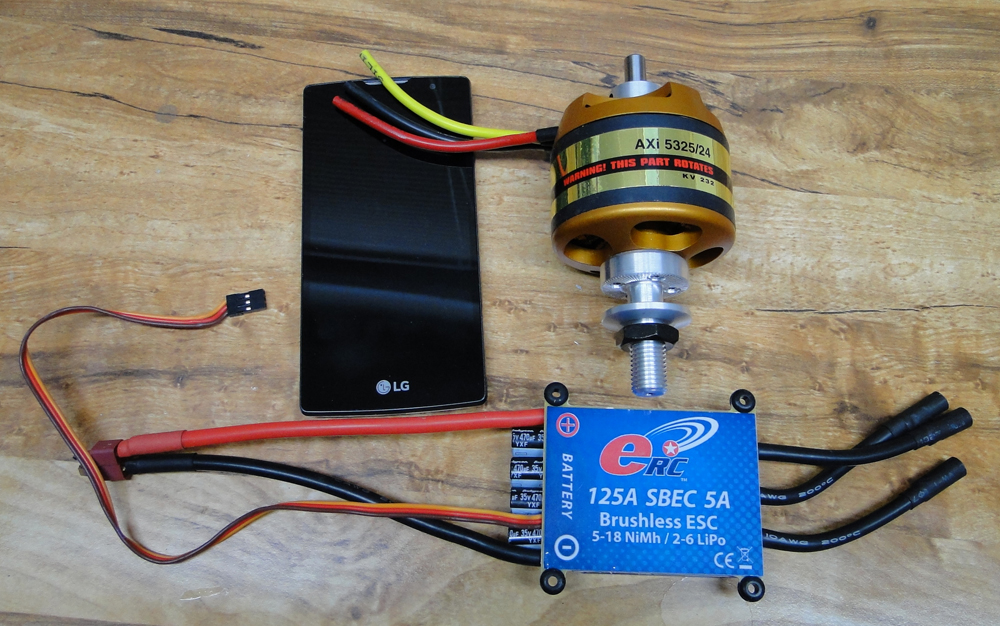
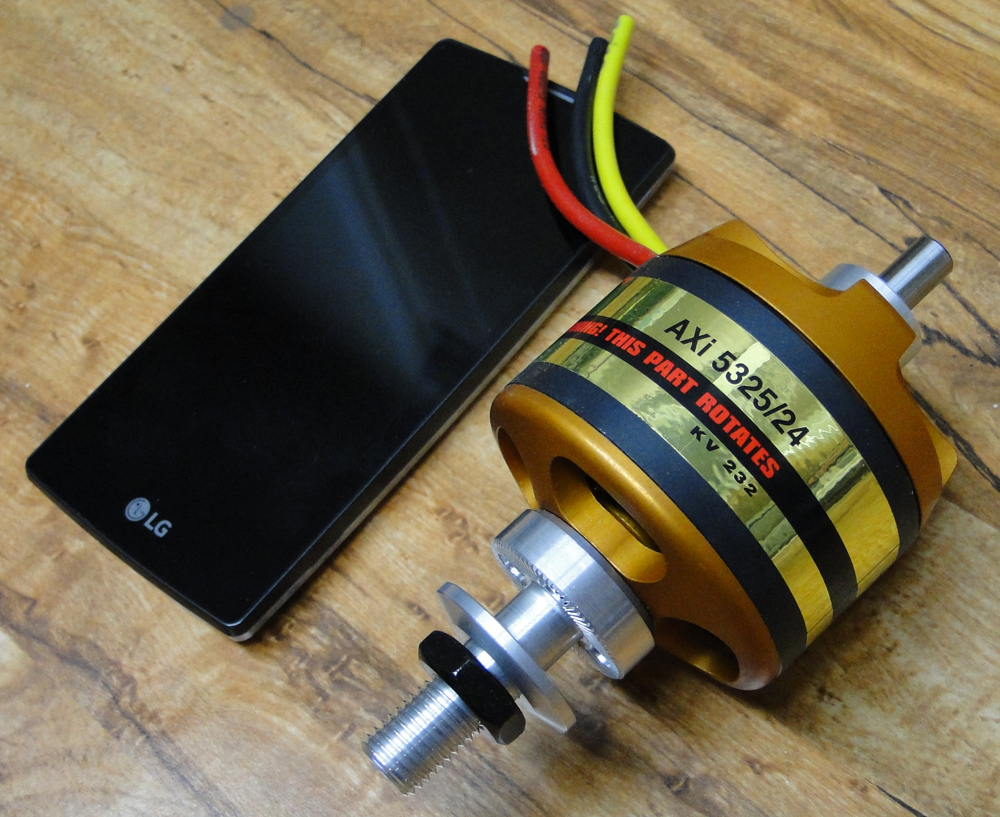
I assembled the JR ST126MG servos and worked on the fake radial engine. The fake radial is almost ready, but I'm still thinking about how to trim out the cooling holes for the electric motor. By the way, I DID go with the AXI 5325/24 electric motor, and I also went with a GP electric motor mount from Tower --the big one for the large motors. Turns out that was a lucky move. It has slots that match up EXACTLY with the stock T-nuts in the Super Stearman's firewall. I could claim it was all skill on my part, but I'm okay with just being lucky! Here's a photo of the motor and the speed control. To give you an idea of the size of this motor, I placed my full-size smartphone (LG Escape 2) next to it. After holding the little E-Flite 400 size motors between my thumb and index finger, this thing seems massive. It's really hard to just turn it over to the next magnet. On the speed control, the red and black wires you see are ten gauge wire to handle all the Amps. I bought 6mm bullet connectors for the wiring. Sorry, I forgot to write down where I bought them online. It was a place like Hobby King.
I took a HOT covering iron and stretched the covering on the whole plane. I did the same to all the control surfaces, and then I installed Robart pin hinges on all control surfaces. You may recall that the Super Stearman comes stock with CA hinges, which I equate to installing an expiration date on your plane. I went with the Robart standard size pin hinges this time. Last time I went with the large pins, and they worked out okay, but I ran into some problems with the fitting of the large pins. The standard size pins work much better on this model, though I increased the number of pin hinges I used on each surface by at least one or two.
Before moving ahead, I took this time while the control surfaces were loose, and attached my servo horns. It's always a royal pain to install servo horns after the control surfaces are attached to their wings/stabilizers/fins, etc. On the elevators, I used DuBro large scale double horns to use with the large ball links for smooth motion without any binding. I'll be using Central Hobbies carbon fiber linkage tubes with titanium ends. My preferred ends are the 3/16" X 4-40, attached with the JB Weld, which I've come to prefer over 30-minute epoxy, though I never had a single failure with the epoxy. I just like the consistency and ease of working with the JB Weld, and the pros all swear by the JB Weld. Cleans up easily too, with a small bit of paper towel. Here's a photo of the aileron linkage. The control horn shown here is a Robart ball-link control horn.

With control horns and Inter-aileron horns in place (I'm using the two-servo configuration on my ailerons), I moved on to attaching the elevators to the horizontal stabilizer with the pin hinges, and attaching the ailerons to all four wing panels in the same fashion. I laminated the bits of lite-ply provided with the kit to create the wing braces, and when those were dry I joined the lower wing halves using 30-minute epoxy. Using the strings they ran through the wings, I mounted my servos in the lower wing, and added servo extension wires. Next, I tossed the provided nylon wing pins into the trash, and installed 5/16" Oak dowels in the wing's leading edge. I'm sure the nylon pins would work just fine; I was just being myself!!
I struggle constantly to set up the perfect linkage, one that won't rattle or bind, and I've come very close several times, but here I finally came up with a combo that fills the bill. On my servo, I use a JR gold servo arm with 4-40 threaded holes, and I attach DuBro or Sullivan heavy duty Ball Link connectors to the arm. I already mentioned the Central Hobbies Titanium ends and carbon fiber rods, and finally at the aileron end I installed Robart 5/8" ball-link control horns (Sorry I wrote DuBro before. I used those on the elevators). The result is an assembly that's perhaps a little pricier than I'd like, but the big payoff here is that I'm completely confident these linkages will hold, come what may. Nothing worse than a linkage that comes apart on a hard-working bipe or 3D control surface during a grueling workout.
Things are off to a good start here, and I'm finally feeling healthy enough to spend more time at my building table.
Next time I'll tell you about my decision on which linkage configurations I'm using for the tail surfaces, and why.
Jim
I assembled the JR ST126MG servos and worked on the fake radial engine. The fake radial is almost ready, but I'm still thinking about how to trim out the cooling holes for the electric motor. By the way, I DID go with the AXI 5325/24 electric motor, and I also went with a GP electric motor mount from Tower --the big one for the large motors. Turns out that was a lucky move. It has slots that match up EXACTLY with the stock T-nuts in the Super Stearman's firewall. I could claim it was all skill on my part, but I'm okay with just being lucky! Here's a photo of the motor and the speed control. To give you an idea of the size of this motor, I placed my full-size smartphone (LG Escape 2) next to it. After holding the little E-Flite 400 size motors between my thumb and index finger, this thing seems massive. It's really hard to just turn it over to the next magnet. On the speed control, the red and black wires you see are ten gauge wire to handle all the Amps. I bought 6mm bullet connectors for the wiring. Sorry, I forgot to write down where I bought them online. It was a place like Hobby King.
I took a HOT covering iron and stretched the covering on the whole plane. I did the same to all the control surfaces, and then I installed Robart pin hinges on all control surfaces. You may recall that the Super Stearman comes stock with CA hinges, which I equate to installing an expiration date on your plane. I went with the Robart standard size pin hinges this time. Last time I went with the large pins, and they worked out okay, but I ran into some problems with the fitting of the large pins. The standard size pins work much better on this model, though I increased the number of pin hinges I used on each surface by at least one or two.
Before moving ahead, I took this time while the control surfaces were loose, and attached my servo horns. It's always a royal pain to install servo horns after the control surfaces are attached to their wings/stabilizers/fins, etc. On the elevators, I used DuBro large scale double horns to use with the large ball links for smooth motion without any binding. I'll be using Central Hobbies carbon fiber linkage tubes with titanium ends. My preferred ends are the 3/16" X 4-40, attached with the JB Weld, which I've come to prefer over 30-minute epoxy, though I never had a single failure with the epoxy. I just like the consistency and ease of working with the JB Weld, and the pros all swear by the JB Weld. Cleans up easily too, with a small bit of paper towel. Here's a photo of the aileron linkage. The control horn shown here is a Robart ball-link control horn.
With control horns and Inter-aileron horns in place (I'm using the two-servo configuration on my ailerons), I moved on to attaching the elevators to the horizontal stabilizer with the pin hinges, and attaching the ailerons to all four wing panels in the same fashion. I laminated the bits of lite-ply provided with the kit to create the wing braces, and when those were dry I joined the lower wing halves using 30-minute epoxy. Using the strings they ran through the wings, I mounted my servos in the lower wing, and added servo extension wires. Next, I tossed the provided nylon wing pins into the trash, and installed 5/16" Oak dowels in the wing's leading edge. I'm sure the nylon pins would work just fine; I was just being myself!!
I struggle constantly to set up the perfect linkage, one that won't rattle or bind, and I've come very close several times, but here I finally came up with a combo that fills the bill. On my servo, I use a JR gold servo arm with 4-40 threaded holes, and I attach DuBro or Sullivan heavy duty Ball Link connectors to the arm. I already mentioned the Central Hobbies Titanium ends and carbon fiber rods, and finally at the aileron end I installed Robart 5/8" ball-link control horns (Sorry I wrote DuBro before. I used those on the elevators). The result is an assembly that's perhaps a little pricier than I'd like, but the big payoff here is that I'm completely confident these linkages will hold, come what may. Nothing worse than a linkage that comes apart on a hard-working bipe or 3D control surface during a grueling workout.
Things are off to a good start here, and I'm finally feeling healthy enough to spend more time at my building table.
Next time I'll tell you about my decision on which linkage configurations I'm using for the tail surfaces, and why.
Jim
Last edited by PacificNWSkyPilot; 09-29-2015 at 09:31 PM.
09-25-2015, 02:50 PM
#1862
My Feedback: (19)
Join Date: Feb 2004
Location: Raeford, North Carolina
Posts: 3,988
Likes: 0
Received 2 Likes
on
2 Posts
Okay, I'll edit this post, and mention that I dug out my camera. With any luck at all, I'll have some more photos ready for you in the very near future.
I was in the local Ace Hardware today, and back in the corner, I found a small selection of balsa wood and basswood. There's not much there, and the guy says that he won't be stocking it once it's gone. I smell a lowball offer in the offing, one that will be accepted! I did purchase one sheet of the basswood. It's been there quite a while, because you should see how tight and smooth the grain is. I haven't seen sheets of basswood this nice in quite a few years. I think it'll be perfect for fabricating the hatch I'll be talking about in the next post.
Jim
Last edited by PacificNWSkyPilot; 09-29-2015 at 09:35 PM.
09-25-2015, 07:52 PM
#1863
My Feedback: (19)
Join Date: Feb 2004
Location: Raeford, North Carolina
Posts: 3,988
Likes: 0
Received 2 Likes
on
2 Posts
I'm back.
The big question I must deal with is whether the weight will end up the same as it did in my last GP Super Stearman, which I set up with a 30CC gas engine. I'm thinking it will be lighter, and that means I should keep the servos forward with this electric setup, which I believe will weigh less in the nose. So, I'll use the servo tray for the two elevator servos (JR St126MG's), and the rods will be the Central Hobbies carbon fiber rods with the 3/16" X 4-40 Titanium tips as described above. The elevators have the DuBro double horns for mounting a large ball-link between them, so there won't be any slop.
The rudder will have to wait until I learn where the CG falls. I can use the servo for the rudder as ballast if the tail comes out a little light. I was considering pull-pull for the rudder, but I'll probably just use a single carbon fiber rod.
What may turn out to be the most difficult part of this build is finding the ideal spot for mounting the batteries where they can be accessed and removed easily for charging, both at the field and at home. It's a pretty big plane, and the batteries will fit cross-ways in the fuselage. They're pretty chunky, but only about five or five and a half inches long. I've been playing with a chassis/cartridge setup that allows the batteries to slide out once the hatch is removed, but that presents its own set of daunting engineering challenges. I decided that putting a hatch big enough for two of the batteries can't be done vertically in the nose without risking the structural strength, so it will have to be a horizontal hatch. It'll have to be curved to match the fuselage curve, so it won't be a piece of cake, and once you take a good look at the nose, you soon see that the cockpit floor and front wall and the upper wing mount bracket anchors and interior formers and such really limit the spots you can cut open to make a hatch.
I'm still working at this, so if anyone has created a working system in theirs, I'd love to hear about it. As they say, imitation is the sincerest form of flattery, and I of course would be happy to steal and use your design if it's a good one!
The alternative is charging the batteries in the plane, and where battery fires during charging are a rarity these days, I've seen a few, and they're scary. I also try not to charge batteries at the highest rated charge; I'm just never in that much of a hurry to have something ready to fly right this minute.
But I thought it would be nice to be able to change out the batteries right at the field and fly again.
Jim
Last edited by PacificNWSkyPilot; 09-25-2015 at 09:08 PM.
08-03-2016, 10:36 AM
#1864
Senior Member
Posted these by mistake in the GP Super Sportsman thread , Anyway, This is my 12 year old Super Stearman that I just recovered. It had aquired the name of "Patches" because there were so many. Also new landing gear struts and other. Still same old Saito 1.80 to pull it around. still flys like a dream , my favorite airplane.
Last edited by stang151; 08-03-2016 at 07:29 PM.
The following users liked this post:
capt1597 (02-25-2022)
