


Wire Gauge for electric set-up
 01-19-2014, 04:46 AM
#1

Thread Starter
Join Date: Jan 2013
Location: Jacksonville, FL
Posts: 16
Likes: 0
Received 0 Likes
on
0 Posts
Have a twin engine plane with 2 40size motors. Have 2 4S 5000mah 50C batteries that I want to hook up in parallel using a "y" connector and EC5 plugs. What gauge wire is needed for this? I have plenty of 14ga silicone wire. Motors will probably only pull 25C or less. I'm new to electrics so would appreciate any information.
 01-19-2014, 05:55 AM
#2

Without knowing the make and model of the motors I would say they are capable of drawing 40 to 50 amps. Typically you would use a 50 or 60 amp electronic speed control (ESC) for each motor. Depending how you prop the motors will determine what amp draw you will realize using that battery set-up.
As far as the wire gauge , I use this as a guide:
50-65 amps, use 12 gauge
35-50 amps use 13 gauge
20-35 amps, use 14 gauge
15-20 amps, use 16 gauge
Usually I use 13 gauge wire for 46 size motors as the ESC's typically have 13 gauge wire on them from the factory. Check the gauge on the ESC wiring and don't go below that. Going larger is OK but you won't gain any advantage if the ESC wiring is a smaller gauge.
Also keep the wiring as short as possible and of equal lengths.
An arming switch is always a good idea to install on 40size and larger motors. It is a plug that is installed in a connector mounted on or in the plane.right before you are ready to fly and it arms the set-up (turns everything on) for safety.
Get yourself a watt meter or at least an amp meter so you can properly test the set-up.
Last edited by flyinwalenda; 01-19-2014 at 06:04 AM.
01-19-2014, 09:02 AM
#3
Senior Member
13GA is about optimum, unless the wire runs are longer than usual. If the batteries are close to the motor and ESC, with a 40 size motor, 14ga might be enough.
A lot depends on such things as prop size, which will have a great deal to do with the current draw. The motor KV rating is another major factor.
EC5 connectors may be overkill. If long wire runs from the battery to the ESC are involved, a capacitor bank may be needed. Castle (and others) make them.
01-19-2014, 12:27 PM
#4
Thread Starter
Join Date: Jan 2013
Location: Jacksonville, FL
Posts: 16
Likes: 0
Received 0 Likes
on
0 Posts
Thanks. The motors were already installed so don't know the make but was told that they were 40 size. The esc is a 70 amp, so I'm told, and looks to be a 10 x7 three blade prop. Wiring from the esc is 14ga and the run from the batteries is about 22 inches.
01-19-2014, 03:21 PM
#5
You should always keep the length between the ESC and the batteries close to the factory length of the ESC and LiPo leads. Longer leads will put more strain on the ESC and could cause failure. Two ways to avoid this.
One way is to mount the ESC's close to the batteries and extend the three leads to the motors. Make sure there is cooling for the ESC's also.
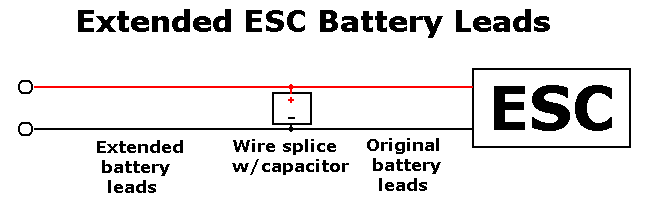
If you can't mount the ESC's close to the batteries then you can extend the battery leads but you should install a 220uF low ESR (equivalent series resistance) capacitor for every 4" of wire added to the ESC battery leads. The voltage of the cap should be the same as the ones on the ESC or a little higher than the battery voltage. They need to be low ESR and you won't find them at radio Shack. A real electronics store or somewhere like Newark Electronics will have them . Panasonic FM or Rubycon ZL are two with a low ESR rating.
You would solder them on as close to the ESC as possible and put them in parallel when adding more than one.

Here are some already made:
http://www.castlecreations.com/produ...-cap-pack.html
One way is to mount the ESC's close to the batteries and extend the three leads to the motors. Make sure there is cooling for the ESC's also.
If you can't mount the ESC's close to the batteries then you can extend the battery leads but you should install a 220uF low ESR (equivalent series resistance) capacitor for every 4" of wire added to the ESC battery leads. The voltage of the cap should be the same as the ones on the ESC or a little higher than the battery voltage. They need to be low ESR and you won't find them at radio Shack. A real electronics store or somewhere like Newark Electronics will have them . Panasonic FM or Rubycon ZL are two with a low ESR rating.
You would solder them on as close to the ESC as possible and put them in parallel when adding more than one.
Here are some already made:
http://www.castlecreations.com/produ...-cap-pack.html
01-19-2014, 03:42 PM
#6
Thread Starter
Join Date: Jan 2013
Location: Jacksonville, FL
Posts: 16
Likes: 0
Received 0 Likes
on
0 Posts
ok thanks. do this for both esc's, off of the Y at the wing. Lay out is: 2 batteries, Y 1 wire to the wing, Y to the esc's. Install caps b4 the Y or double (1 for each) after the Y( 22 inches total from bat to esc's). So 5 caps b4 or after the Y total of 10?
01-19-2014, 04:14 PM
#8
You make/install a parallel battery cable in the fuselage where the LiPo's will be located. This will connect the two lipo's together in parallel to the output connector of the cable. If you make your own cable you can add a second connector to the cable for the second ESC instead of using a "Y" .
Extend the red and black wires from each ESC down the wings and into the fuse where the parallel cable is.
Install an ECC plug on each end of the extended ESC wires and plug them into the parallel cable connectors(if you made your own cable) or into a "Y" harness connected to the parallel cable.
Then solder five (5) caps on each ESC as close to the ESC as possible..
Example of a factory made parallel battery cable:
01-19-2014, 04:22 PM
#9
Thread Starter
Join Date: Jan 2013
Location: Jacksonville, FL
Posts: 16
Likes: 0
Received 0 Likes
on
0 Posts
Thanks. Caps will be about 6 inches from each esc. Already made up the Y but due to configuration the battery connection access is in the nose and installation is thru the fuse. Will need to remove wing to charge the batteries. But once again, thanks.


