


Recondition this Ni-Mh battery?
 04-15-2018, 06:49 AM
#1

The battery in my Hovo 510 robotic vaccum is not holding a charge anymore for very long.
I thought maybe I could run in through the discharge/charge cycle a few times on my Venom PR2 charger.
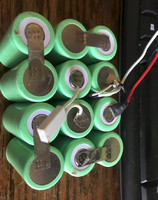
Here is a picture of it:

It measures 16V across the red and black terminals and 2.5 volts across the white and red terminals.
The RC2 does not have a plug that matches this, so I would have to rig something (stick sewing pins in the sockets and use alligator clips?
But, I don't know which terminals to hook up where. Anyone have any idea?
Thanks,
Steve
I thought maybe I could run in through the discharge/charge cycle a few times on my Venom PR2 charger.
Here is a picture of it:
It measures 16V across the red and black terminals and 2.5 volts across the white and red terminals.
The RC2 does not have a plug that matches this, so I would have to rig something (stick sewing pins in the sockets and use alligator clips?
But, I don't know which terminals to hook up where. Anyone have any idea?
Thanks,
Steve
 04-15-2018, 09:40 AM
#2

Hi Steve ,
Were this a "mission critical" battery , like one for an RC airplane's transmitter or receiver I'd be telling you to trash it before it trashes your plane . But where this is a robotic vacuum ("Roomba" type I assume ?) and the only danger is a crunchy floor , sure I'll share what I'd do ;
Disclaimer , if you , your bot , or the room it's to clean goes up in smoke remember free advice is worth every penny ya paid for it .
Id set up my charger outside , on a cement patio in case of fire (super tiny , almost non existent risk with Ni-Mh) and use the red and black wires disregarding the white . Red to + , Black to - , set your charger to cycle a 2200MAH battery (the stated rating on your battery's packaging) and let the charger have at it . It's my belief that the white is likely just a lower voltage "tap" that takes from one of the cells away from the full voltage ends of the battery . Oh , and as how to physically connect the battery to the charger ? The alligator clips and pins method would work provided you made darned sure to keep them from touching (shorting) , course on many occasions I've cannibalized different plugs to fit just such situations .
 04-15-2018, 06:35 PM
#4
Well, it finished it's 5-cycle charge/discharge, and then I gave it a charge. Now the robot has been running around the room for at least 20 minutes, and before it would not even go 5, so I think she may be back in action! This is great news, as a replacement battery pack is about $70 on Amazon!
Thanks for the help!
Steve
Thanks for the help!
Steve
04-16-2018, 10:55 AM
#5


Join Date: Feb 2018
Location: Detroit Michigan
Posts: 89
Likes: 0
Received 0 Likes
on
0 Posts
ok this is a 12 cell looks like a C size batter 2200mah so build on wont be 70$..might be around $15 .id use a nimh battery of same size and build my own..id even build one outa a LIfe A123 cell 5 cells.Unlikely the wakeup will last b4 ur at 5 mins runs again.
04-16-2018, 02:18 PM
#7
Welp, you're right, this time it only ran for about 5 minutes again. Could be the base stand charger isn't as good as hooking it up to the Venom charger, too.
These cells seem smaller than C-cell batteries. Any idea what they could be so I can build my own?
Steve
These cells seem smaller than C-cell batteries. Any idea what they could be so I can build my own?
Steve
04-16-2018, 02:43 PM
#10
I think I need something like this:
https://www.ebay.com/itm/12-pcs-Sub-...oAAOSwNuxXX9AG
or this
https://www.ebay.com/itm/12-pcs-Sub-...YAAOSwc-tY7ed6
Question: These batteries have tabs that appear spot-welded to one another. How is that done? Can I do it with a normal soldering iron and simply solder them down using solder?
Also I believe the white wire goes to a thermal sensor which is glued to the side of one of the batteries in the stack. There is also a white thing, now sticking up, that I don't know what it is. A fuse?
04-17-2018, 03:08 AM
#11

The batteries you linked have tabs already on them. Half the job is done for you. A good soldering iron with a good chisel tip will do fine for making you own pack.
I never seen that white piece on anything before. My guess is it's some type of thermal fuse...it gets too hot...battery connection will be disrupted.
I never seen that white piece on anything before. My guess is it's some type of thermal fuse...it gets too hot...battery connection will be disrupted.
04-17-2018, 12:38 PM
#13
I have purchased some the 3300 mAh sub-c batteries linked above. I will try my hand at making my own battery pack. It looks pretty easy. I will preserve the thermal sensor and the thermal fuse.
Steve
Steve
04-23-2018, 11:19 AM
#16
So my batteries came in and after a little soldering I have my new battery pack. Robot vaccum is back in service!
Thanks for the idea to just build my own battery pack. Waaaay cheaper than buying a replacement.
Steve
Thanks for the idea to just build my own battery pack. Waaaay cheaper than buying a replacement.
Steve
