


You Crashed! So what, REBUILD!
 02-10-2007, 07:50 PM
#1
Senior Member
Thread Starter
Join Date: Jan 2006
Location: Talladega, AL
Posts: 1,164
Likes: 0
Received 0 Likes
on
0 Posts
Some of you may have hear me talk about the crashed Avistar I have been working on. This plane has taken me quite a while to finish, But now that it is almost done, I feel I should post a thread bout it in order to help those new to the hobby who may suffer a crash.
Crashing is not the end of the world!
Even after a bad crash it is possible to rebuild. This Avistar has been a long rebuild, but not because of difficulty, more because of lack of time on my part. Rebuilding isn't hard, but it can take some time. If you're one of those who would rather be flying and just want to chuck your crashed plane in the trash, no one will stop you from doing that and buying a new ARF, but hopefully this will help some of those who are unsure of what to do and need a little help to figure it out.
This plane crashed in a very stupid way. Unfortunately, it would be very easy for a repeat of this crash to happen at any field. This plane originally belonged to a co-worker of mine. He had just gotten into the hobby and had about 20 or some flights on the plane. We were out at the local field one day and I had brought my stuff with me and looked like it was going to be a good day. I am still fairly new to the hobby and was in the process or learning to fly (and still am) and had brought my glider with that I was planning on training on (HOB 2T, pictures of it are still in my profile). Well, my glider ended up not wanting to leave the ground because the T-tail snapped on a bad hand launch (had a reedie on the front of the plane). I had worried about the tail a bit during building because it seemed a bit flimsy, but I hadn't read anything about anyone having problems with T-tails on that plane or any other so I thought it would of been fine. Anyways, my plane hit the ground in a rough way and the tail snapped. That ended my flying for the day.
Well, my co-worker was flying the Avistar around and offered to give me some stick time. I accepted and we refueled the plane and waited on the instructor to set his radio up and get himself ready for us. So we take the plane up and put in two for flights before the instructor needed to leave. Another one of the instructors at the field offered to take his place so we accepted and he started to hook his radio up. He has the same radio as the other instructor, and the same one my co-worker had. He checks everything out and rolls it to the line and goes to take it off for us. He gets it 5 or so feet in the air and a breeze rolls the plane slightly. He tried to compensate but sadly the ailerons were reversed. We had all missed it during preflight and the as he first added some to compensate for the wind and the plane rolled more in the wrong way, he thought it was still the wind and then over compensated. The plane rolled and fell into the ground. Snapped the wing in half, broke off the engine w/ the firewall, and snapped the rudder off. Was a real ugly crash with wood chips on the ground and the engine hanging form the plane by the throttle and fuel lines.
Well, that kinda ended the day for both of us. A few days later my co-worker goes out and buys himself a H9 Ultra Stick and sells me the airframe for cheap. The guy who we were buddy boxing with actually had an old Avistar wing that he gave us as an apology for the plane.
So that is about the gist story.
The fuselage wasn't badly damaged, but the wing is a mess. The second wing I got from the instructor was in one piece, but he couldn't remember where it came from and it looked a bit iffy so I did not want to fly with it.
So, Tally of the plane parts:
Broken fuse- firewall, rudder
Broken Wing- snapped in half, major rebuild
Second wing- looks a bit iffy
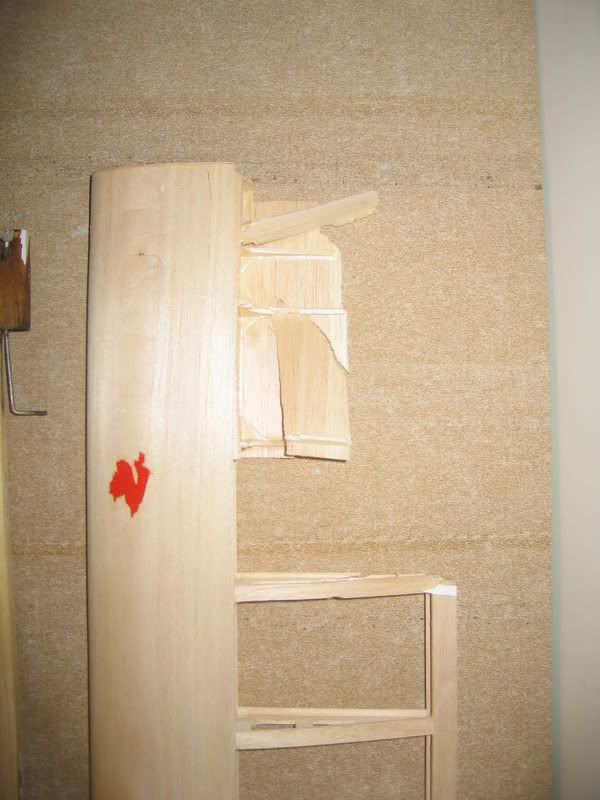
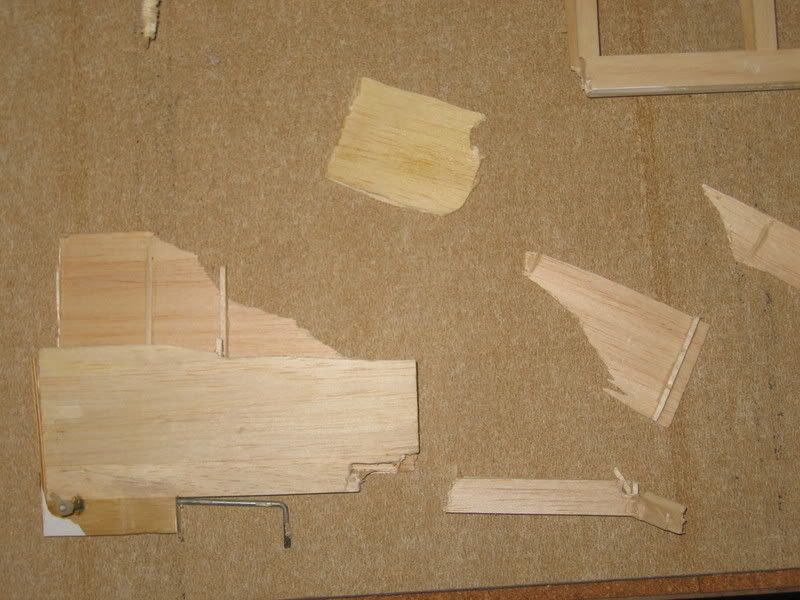
So first weekend I had some time I sit down and go through the wreckage. I strip the covering off of everything broken and this is what it looked like:
This is a picture of the wing that was actually in the crash looked like. It still does actually since I repaired the second wing since it was in better shape.
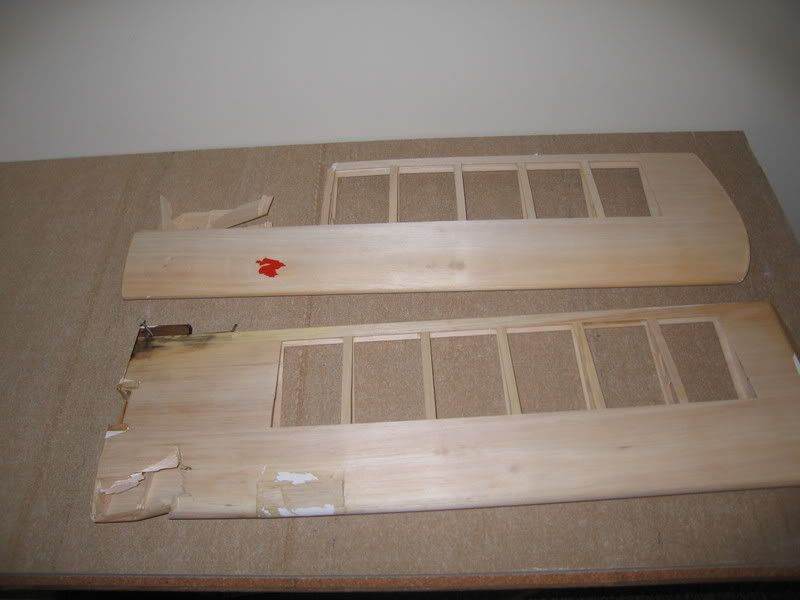
Another Picture of the first wing.

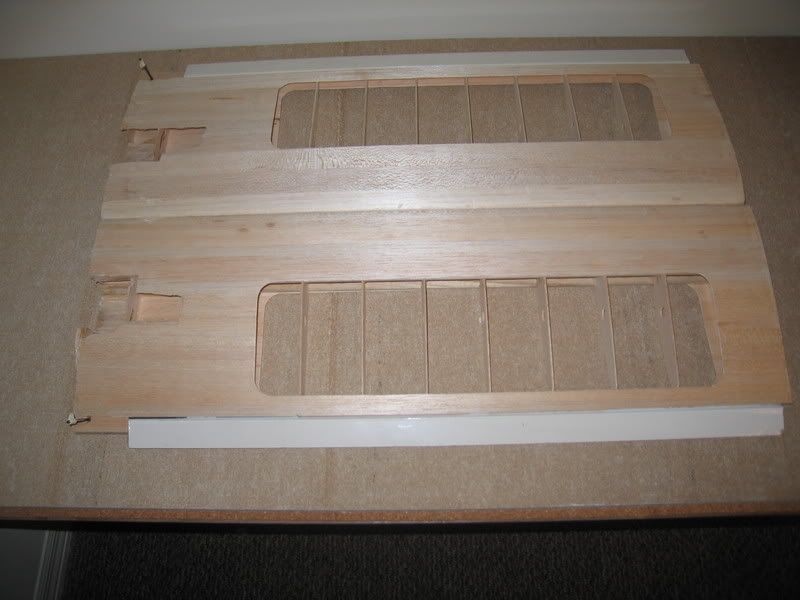
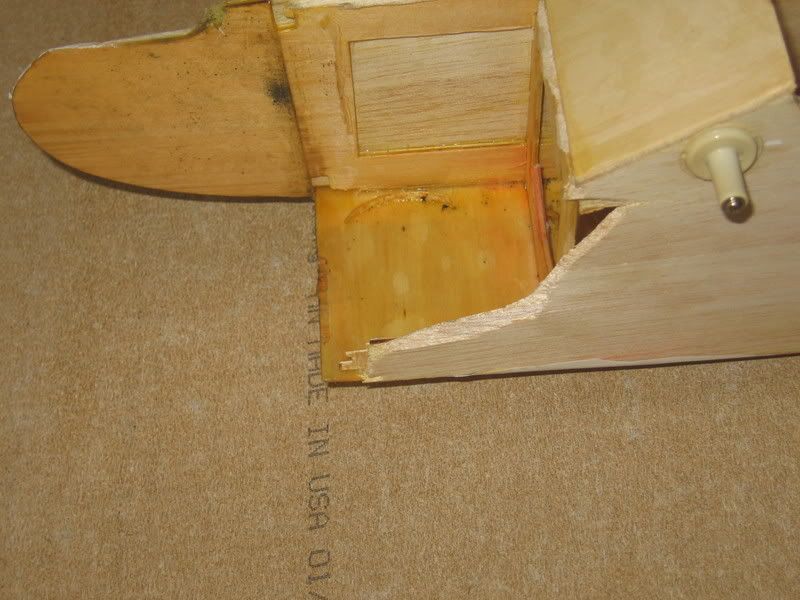
This is the second wing. I cut it apart after I pulled the covering off because I saw a block of balsa in the cutout where the servo should have been installed. Turns out it was a good thing I cut it open. The wing had been crashed before. Instead of actually doing a good repair, whoever fixed it just shoved balsa between the wing halves and pumped it full of epoxy. I had to cut the wing up pretty bad to get the bad repair out. It ended up looking a lot like the first wing, but since I had cut it open, it was still much easier to repair then the first wing would have been.
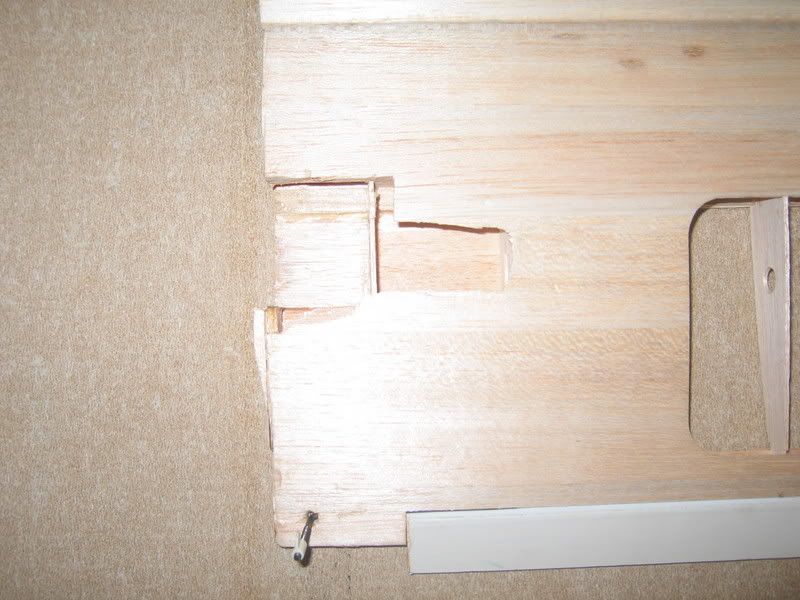
Picture of the pieces that the first wing was in.
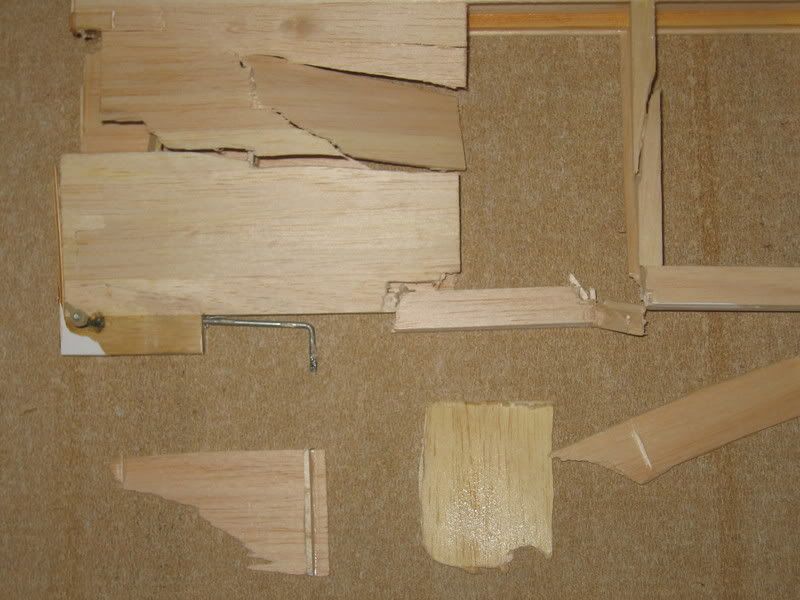
Another picture of the pieces of the first wing.

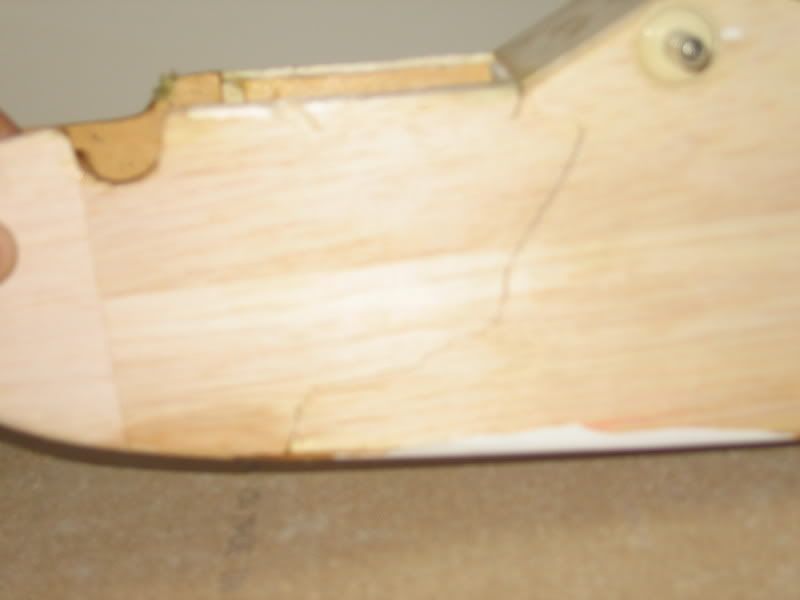
Random damage that is in the first wing.
More closeup damage on the first wing.
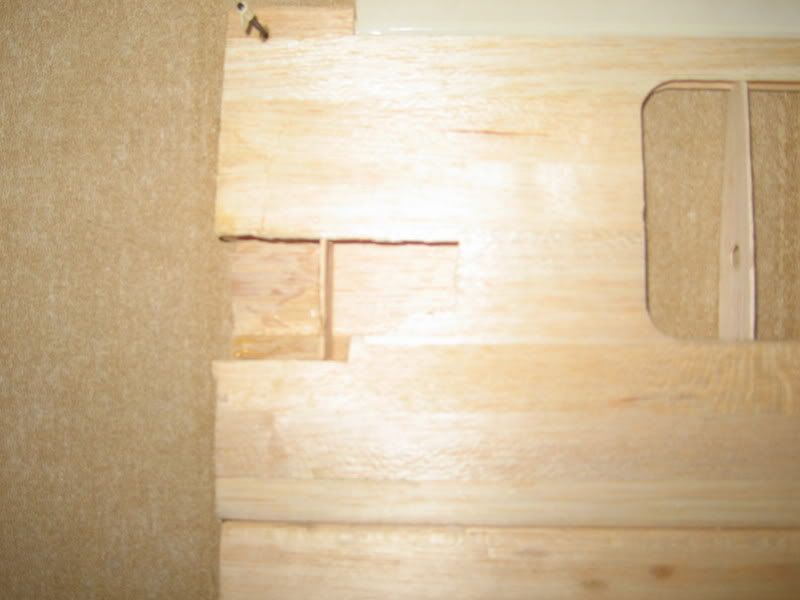
What the second wing looked like after I cut it in half and removed the balsa plug that had been put in it, But before stripping the covering off to get at the bad repairs that were around the wing joiner and first set of ribs.
Picture of the tail damage. I ended up pulling this covering off as well.
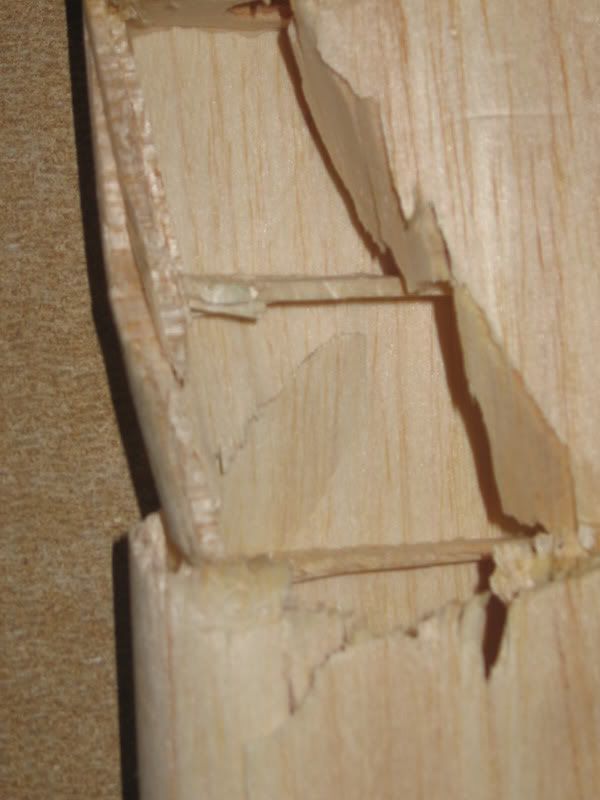
This picture shows another reason why I have avoided the first wing. It looks like there was some damage from fuel being soaked into the wing (ie, the black stuff.).
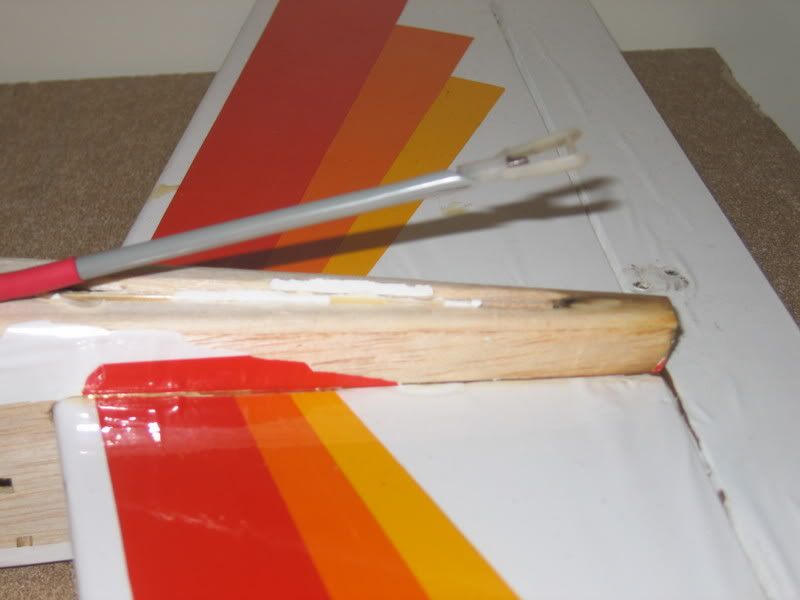
Rudder, it broke off on the landing.

Rudder fitted in place.

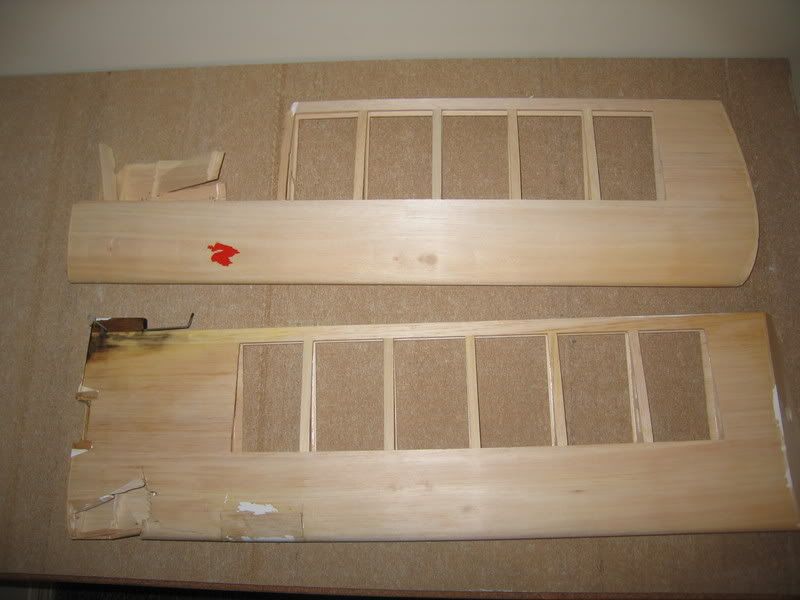
Wing peices.
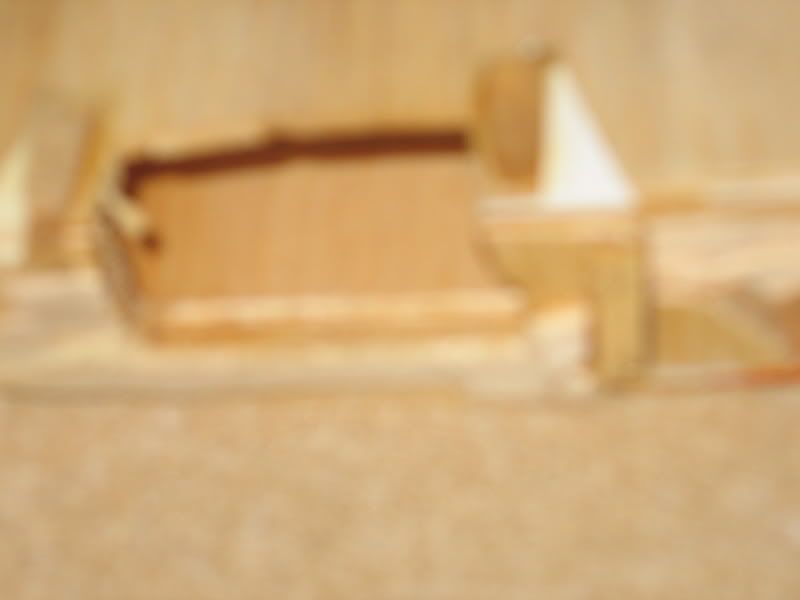
Pic of the center section of wing 2. You can't see the bad repair, but it was really bad. Sorry that it is blurry.
The whole fuse on the build table.
Front of the Fuse and the piece that broke off. You can see where the firewall should be.
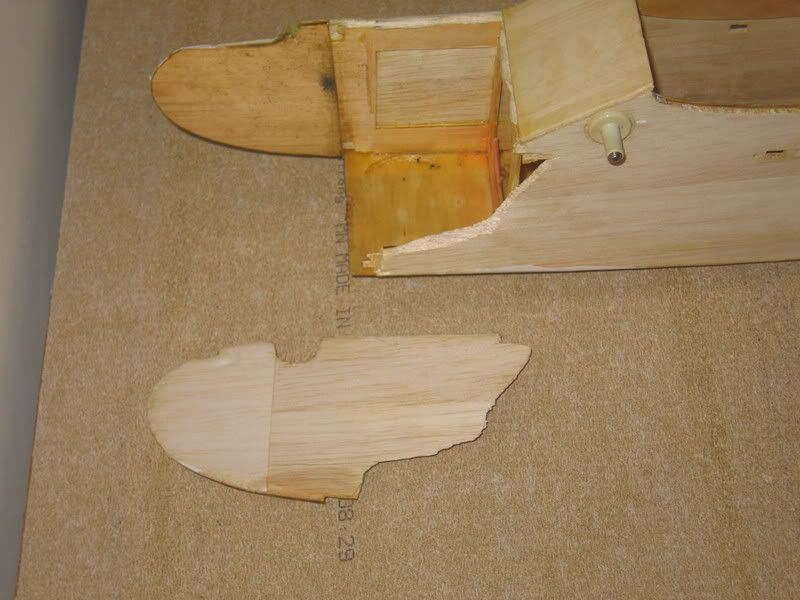
The broken piece fitted into the cracks.
Closeup of the break and missing firewall.
Another shot of the middle of the second wing.
Next post shall have info on the build.
Crashing is not the end of the world!
Even after a bad crash it is possible to rebuild. This Avistar has been a long rebuild, but not because of difficulty, more because of lack of time on my part. Rebuilding isn't hard, but it can take some time. If you're one of those who would rather be flying and just want to chuck your crashed plane in the trash, no one will stop you from doing that and buying a new ARF, but hopefully this will help some of those who are unsure of what to do and need a little help to figure it out.
This plane crashed in a very stupid way. Unfortunately, it would be very easy for a repeat of this crash to happen at any field. This plane originally belonged to a co-worker of mine. He had just gotten into the hobby and had about 20 or some flights on the plane. We were out at the local field one day and I had brought my stuff with me and looked like it was going to be a good day. I am still fairly new to the hobby and was in the process or learning to fly (and still am) and had brought my glider with that I was planning on training on (HOB 2T, pictures of it are still in my profile). Well, my glider ended up not wanting to leave the ground because the T-tail snapped on a bad hand launch (had a reedie on the front of the plane). I had worried about the tail a bit during building because it seemed a bit flimsy, but I hadn't read anything about anyone having problems with T-tails on that plane or any other so I thought it would of been fine. Anyways, my plane hit the ground in a rough way and the tail snapped. That ended my flying for the day.
Well, my co-worker was flying the Avistar around and offered to give me some stick time. I accepted and we refueled the plane and waited on the instructor to set his radio up and get himself ready for us. So we take the plane up and put in two for flights before the instructor needed to leave. Another one of the instructors at the field offered to take his place so we accepted and he started to hook his radio up. He has the same radio as the other instructor, and the same one my co-worker had. He checks everything out and rolls it to the line and goes to take it off for us. He gets it 5 or so feet in the air and a breeze rolls the plane slightly. He tried to compensate but sadly the ailerons were reversed. We had all missed it during preflight and the as he first added some to compensate for the wind and the plane rolled more in the wrong way, he thought it was still the wind and then over compensated. The plane rolled and fell into the ground. Snapped the wing in half, broke off the engine w/ the firewall, and snapped the rudder off. Was a real ugly crash with wood chips on the ground and the engine hanging form the plane by the throttle and fuel lines.
Well, that kinda ended the day for both of us. A few days later my co-worker goes out and buys himself a H9 Ultra Stick and sells me the airframe for cheap. The guy who we were buddy boxing with actually had an old Avistar wing that he gave us as an apology for the plane.
So that is about the gist story.
The fuselage wasn't badly damaged, but the wing is a mess. The second wing I got from the instructor was in one piece, but he couldn't remember where it came from and it looked a bit iffy so I did not want to fly with it.
So, Tally of the plane parts:
Broken fuse- firewall, rudder
Broken Wing- snapped in half, major rebuild
Second wing- looks a bit iffy
So first weekend I had some time I sit down and go through the wreckage. I strip the covering off of everything broken and this is what it looked like:
This is a picture of the wing that was actually in the crash looked like. It still does actually since I repaired the second wing since it was in better shape.
Another Picture of the first wing.
This is the second wing. I cut it apart after I pulled the covering off because I saw a block of balsa in the cutout where the servo should have been installed. Turns out it was a good thing I cut it open. The wing had been crashed before. Instead of actually doing a good repair, whoever fixed it just shoved balsa between the wing halves and pumped it full of epoxy. I had to cut the wing up pretty bad to get the bad repair out. It ended up looking a lot like the first wing, but since I had cut it open, it was still much easier to repair then the first wing would have been.
Picture of the pieces that the first wing was in.
Another picture of the pieces of the first wing.
Random damage that is in the first wing.
More closeup damage on the first wing.
What the second wing looked like after I cut it in half and removed the balsa plug that had been put in it, But before stripping the covering off to get at the bad repairs that were around the wing joiner and first set of ribs.
Picture of the tail damage. I ended up pulling this covering off as well.
This picture shows another reason why I have avoided the first wing. It looks like there was some damage from fuel being soaked into the wing (ie, the black stuff.).
Rudder, it broke off on the landing.
Rudder fitted in place.
Wing peices.
Pic of the center section of wing 2. You can't see the bad repair, but it was really bad. Sorry that it is blurry.
The whole fuse on the build table.
Front of the Fuse and the piece that broke off. You can see where the firewall should be.
The broken piece fitted into the cracks.
Closeup of the break and missing firewall.
Another shot of the middle of the second wing.
Next post shall have info on the build.
 02-10-2007, 08:34 PM
#2

Avoiding spar and/or leading edge repairs is the easier way to go. Of course they can be repaired but it takes more time and planning to get proper strength.
02-10-2007, 08:48 PM
#3
Senior Member
Thread Starter
Join Date: Jan 2006
Location: Talladega, AL
Posts: 1,164
Likes: 0
Received 0 Likes
on
0 Posts
Alright, Now for some info on the rebuild.
I actually started on the wing first. I worked on cleaning both wings up because I planned on building them both and using one to train on and build glider mount into the second one. I still plan on doing that, but it will take some time so I will work on that later. The wing started giving me some difficulties as one point so I started working on the firewall repair as well.
The wing repair started with me stripping the covering off and getting down into the nitty gritty of the wing. The epoxy used for the repair had gotten brittle, so it came out relatively easily. By the time I got done stripping the bad repair out of the wing I had removed about half of the sheeting on both side of the wing and the inner and second rib on each one. I went in and cut rib templates by standing the wing on its unbroken end and tracing the outline onto a cereal box. I cut for ribs and then grouped them together and sanded them together to get them all to the same shape. After I had sanded them down, I labeled each rib and sanded them individually to get them to fir into the wing. When I cut out the old ribs, I was careful to preserve the indentations in the leading and trailing edge. This made fitting the ribs in much easier.
After I had finished the ribs I worked on replacing the spar. The spar on this wing had a very weird shape. It was quite a challenge for me to find bass wood that was the correct shape, and I ended up using wood that was a bit smaller then the original. Since I was repairing the main spar (usually a death sentence for any wing) I cut the spar a little deeper into each wing so there would be good support across the middle of the wing. The spar sections I replaced on the top and bottom of the wing were different lengths so that should help to strengthen the wing as well. For a wing joiner I used the same piece of 1/4" ply that I used for the firewall replacement. I cut a piece as long as I could and it fit perfect. Once I had the pieces cut, I slid everything together and hit the wing joiner with a little bit of CA to hold it together. I attached the shear webs on the back side of the spar and across the font. I removed the top spar and then squirted the area full of gorilla glue. I used gorilla glue for this because of its strength and because of its light foaming action. The foaming is good and by suing it I feel very comfortable in the strength of this wing.
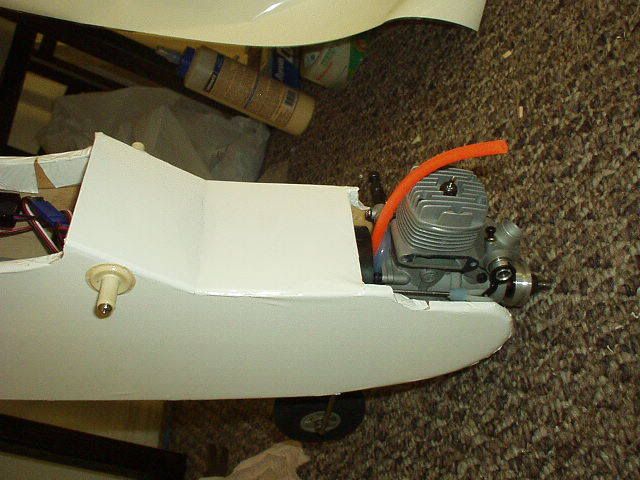
The Fuse was an easy repair. I just cut a new firewall (used pictures from the Avistar manual for the fuel opening) and used part of the old one I had to give me the position of the engine mount. I glued it in with epoxy and then fuel proofed the front of the plane with thinned down epoxy.
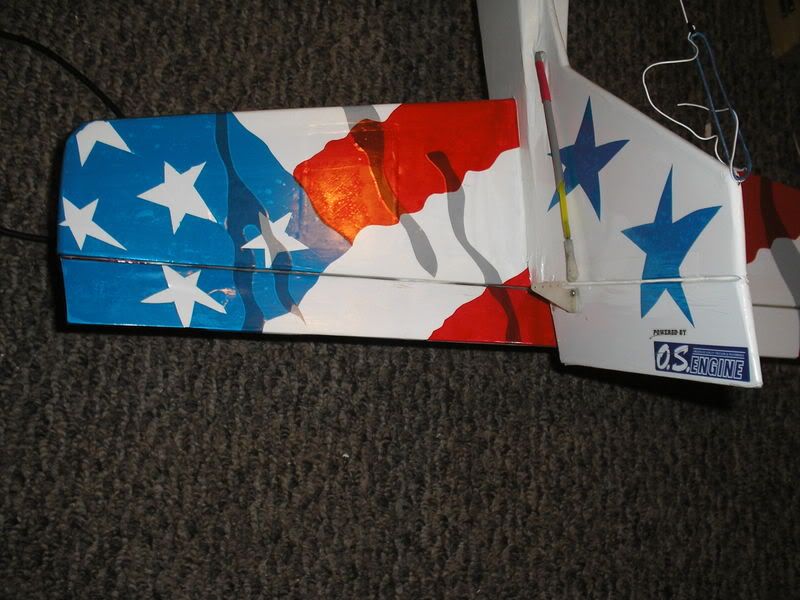
I glued the rudder in after I recovered the tail section. I added some triangle stock to the sides of the rudder for extra strength since I didn't have any hardwood thin enough to insert into the rudder as vertical pieces to add strength. I glued it in with epoxy as well.
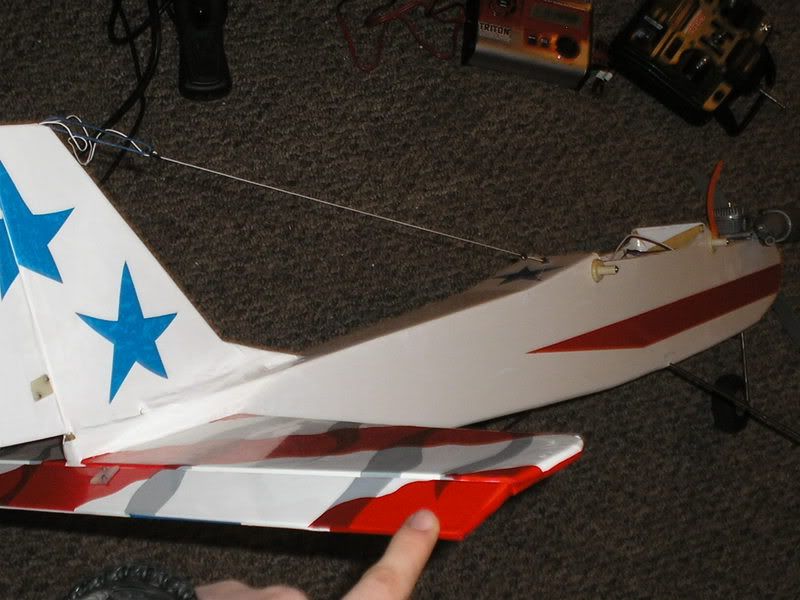
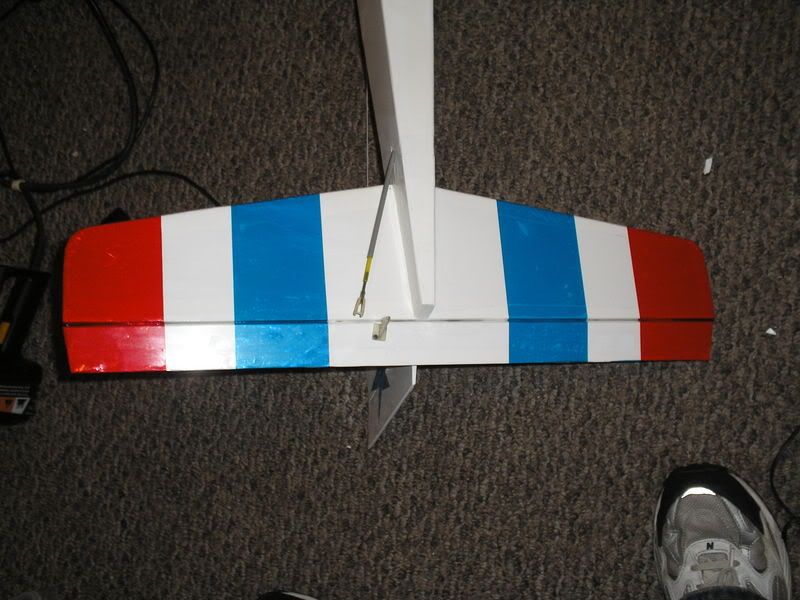
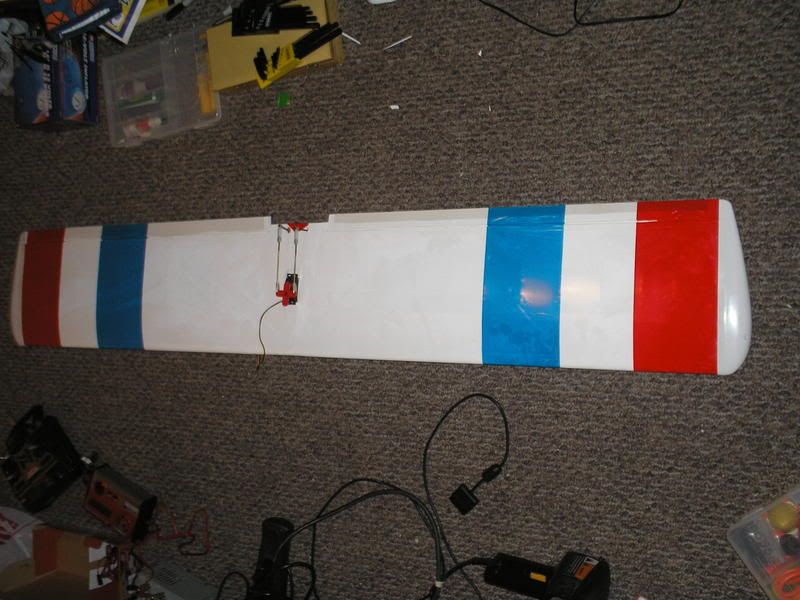
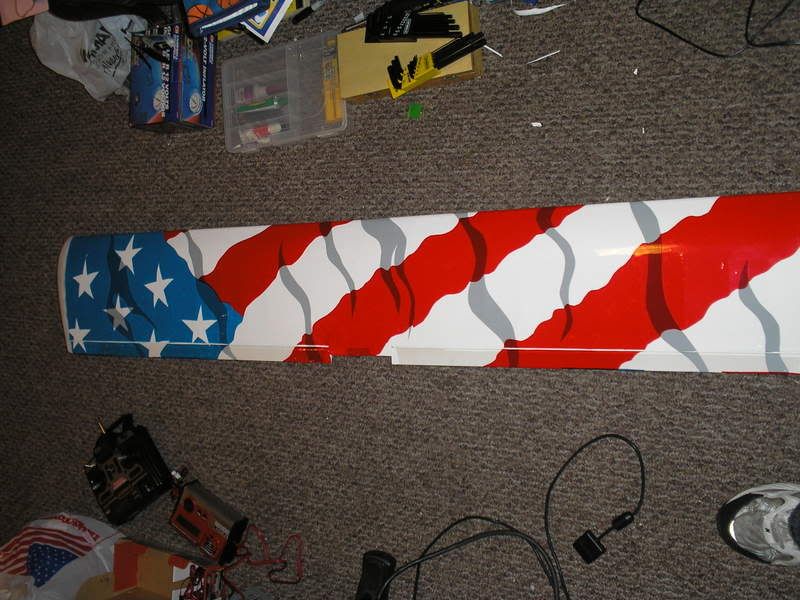
So that gives you an idea of how the repair went. Here are some pictures of what it looks like now. The fuse has its base color, and the wing is almost covered. I plan on using the 3D flag scheme from this thread:
http://www.rcuniverse.com/forum/m_60..._1/key_/tm.htm
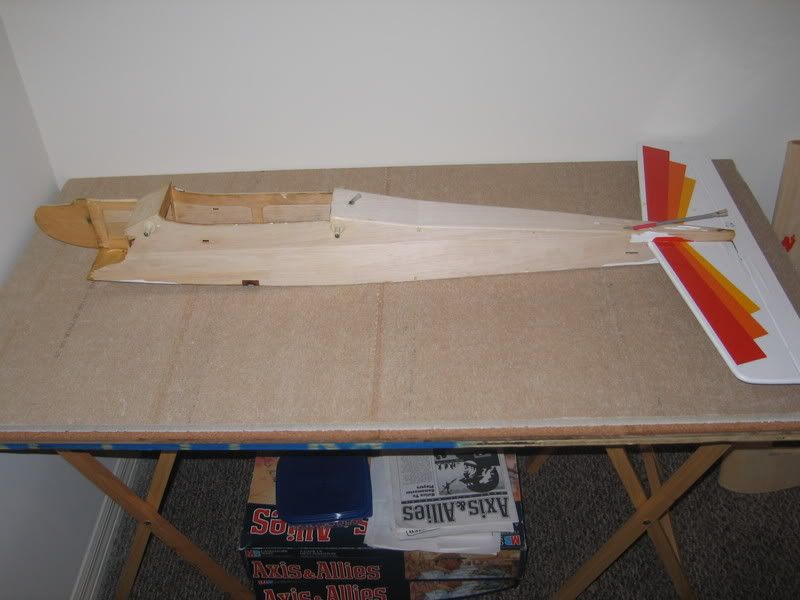
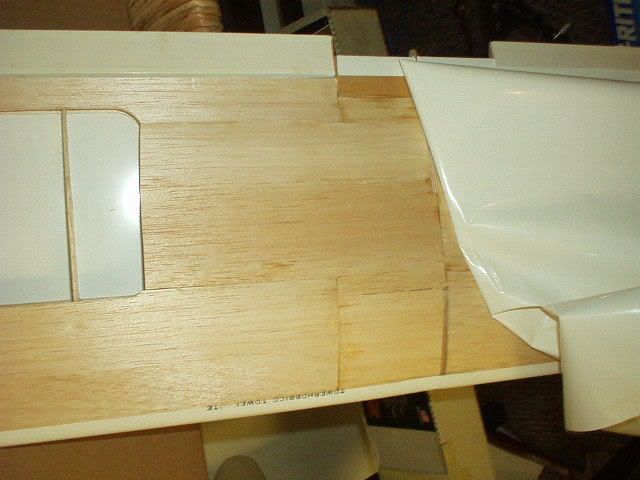
Picture of the wing totally repaired with partial covering.

Another picture of the wing.
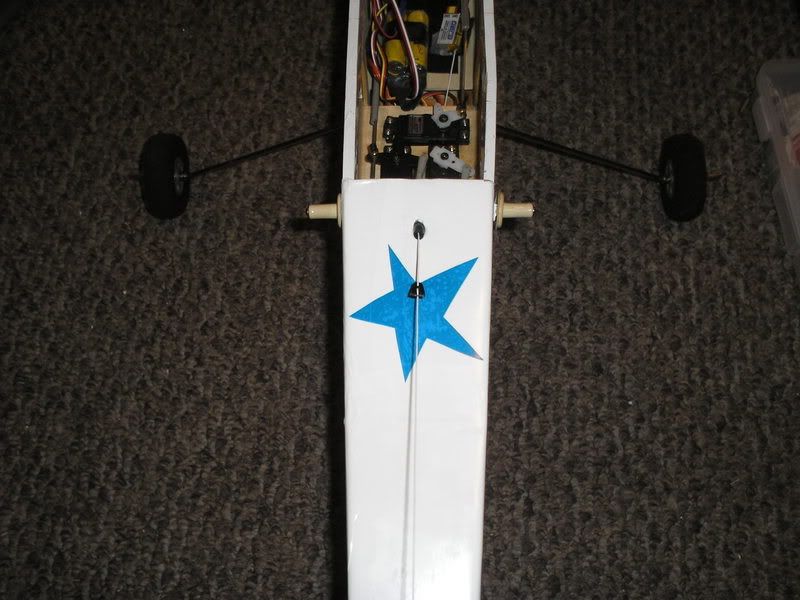
Front of the fuse
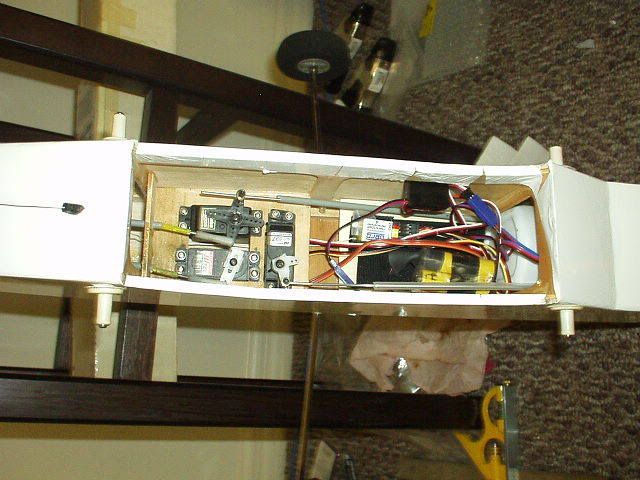
Picture of the radio bay.
Picture of the whole fuse.
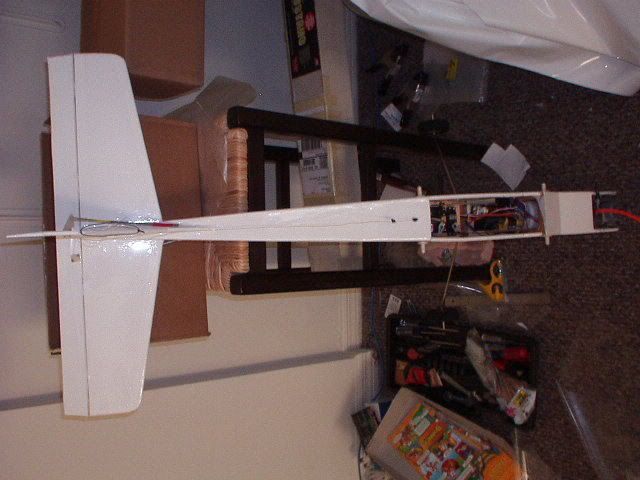
Another wing Picture.

Front of the fuse.

Another pic.

And another.

There ya go. I might have more pics floating around.
Any questions just ask.
I actually started on the wing first. I worked on cleaning both wings up because I planned on building them both and using one to train on and build glider mount into the second one. I still plan on doing that, but it will take some time so I will work on that later. The wing started giving me some difficulties as one point so I started working on the firewall repair as well.
The wing repair started with me stripping the covering off and getting down into the nitty gritty of the wing. The epoxy used for the repair had gotten brittle, so it came out relatively easily. By the time I got done stripping the bad repair out of the wing I had removed about half of the sheeting on both side of the wing and the inner and second rib on each one. I went in and cut rib templates by standing the wing on its unbroken end and tracing the outline onto a cereal box. I cut for ribs and then grouped them together and sanded them together to get them all to the same shape. After I had sanded them down, I labeled each rib and sanded them individually to get them to fir into the wing. When I cut out the old ribs, I was careful to preserve the indentations in the leading and trailing edge. This made fitting the ribs in much easier.
After I had finished the ribs I worked on replacing the spar. The spar on this wing had a very weird shape. It was quite a challenge for me to find bass wood that was the correct shape, and I ended up using wood that was a bit smaller then the original. Since I was repairing the main spar (usually a death sentence for any wing) I cut the spar a little deeper into each wing so there would be good support across the middle of the wing. The spar sections I replaced on the top and bottom of the wing were different lengths so that should help to strengthen the wing as well. For a wing joiner I used the same piece of 1/4" ply that I used for the firewall replacement. I cut a piece as long as I could and it fit perfect. Once I had the pieces cut, I slid everything together and hit the wing joiner with a little bit of CA to hold it together. I attached the shear webs on the back side of the spar and across the font. I removed the top spar and then squirted the area full of gorilla glue. I used gorilla glue for this because of its strength and because of its light foaming action. The foaming is good and by suing it I feel very comfortable in the strength of this wing.
The Fuse was an easy repair. I just cut a new firewall (used pictures from the Avistar manual for the fuel opening) and used part of the old one I had to give me the position of the engine mount. I glued it in with epoxy and then fuel proofed the front of the plane with thinned down epoxy.
I glued the rudder in after I recovered the tail section. I added some triangle stock to the sides of the rudder for extra strength since I didn't have any hardwood thin enough to insert into the rudder as vertical pieces to add strength. I glued it in with epoxy as well.
So that gives you an idea of how the repair went. Here are some pictures of what it looks like now. The fuse has its base color, and the wing is almost covered. I plan on using the 3D flag scheme from this thread:
http://www.rcuniverse.com/forum/m_60..._1/key_/tm.htm
Picture of the wing totally repaired with partial covering.
Another picture of the wing.
Front of the fuse
Picture of the radio bay.
Picture of the whole fuse.
Another wing Picture.
Front of the fuse.
Another pic.
And another.
There ya go. I might have more pics floating around.
Any questions just ask.
02-10-2007, 08:49 PM
#4
Senior Member
Join Date: Nov 2005
Location: Albuquerque,
NM
Posts: 112
Likes: 0
Received 0 Likes
on
0 Posts
Last year I crunched the wing of my LT-40 ARF.
At the time I didn't know how (or if) it could be repaired so I threw it away and bought a new wing.
After that, I built two kits; a 4*60 and an LT-25.
I could have easily repaired the LT-40 wing if I had the experience of kit building.
I've had a couple of bad landings (bad day - dumb thumbs) with the 4* but I just brought it home and fixed it!
Its still a fine flier!
Don't throw it away fix it!
Dave
02-11-2007, 07:33 AM
#6
Senior Member
My Feedback: (1)

Join Date: Sep 2004
Location: FrederickMD
Posts: 2,114
Likes: 0
Received 0 Likes
on
0 Posts
In the eigth picture above, it appears you repaired a cracked fuselage behind the firewall. You mentioned that you also replaced the fuselage. That can be a high stress area as its helping hold the firewall. Its not obvious from the picture if you already did, but if the underlying plywood is cracked, you might want to reenforce the cracked area of the fuselage with some fiberglass. Use some light weight cloth with 30 minute epoxy about 1 inch on either side of the crack. Use wax paper over it, and then squeeze out as much excess epoxy with a credit car as you can. The final repair adds almost no weight, but greatly increases the strength of the repaired area. If you can access it, do it to both sides.
Nice job on the rebuild. I picked up a Nexstar fuslage and wing for free from a club member that had crashed it. Not quite as much wing damage, but the fuselage repair was similar.
Brad
Nice job on the rebuild. I picked up a Nexstar fuslage and wing for free from a club member that had crashed it. Not quite as much wing damage, but the fuselage repair was similar.
Brad
02-11-2007, 12:33 PM
#7
Senior Member
Thread Starter
Join Date: Jan 2006
Location: Talladega, AL
Posts: 1,164
Likes: 0
Received 0 Likes
on
0 Posts
ORIGINAL: bkdavy
In the eigth picture above, it appears you repaired a cracked fuselage behind the firewall. You mentioned that you also replaced the fuselage. That can be a high stress area as its helping hold the firewall. Its not obvious from the picture if you already did, but if the underlying plywood is cracked, you might want to reenforce the cracked area of the fuselage with some fiberglass. Use some light weight cloth with 30 minute epoxy about 1 inch on either side of the crack. Use wax paper over it, and then squeeze out as much excess epoxy with a credit car as you can. The final repair adds almost no weight, but greatly increases the strength of the repaired area. If you can access it, do it to both sides.
Nice job on the rebuild. I picked up a Nexstar fuslage and wing for free from a club member that had crashed it. Not quite as much wing damage, but the fuselage repair was similar.
Brad
ya, your right Brad. I did do something to reinforce that joint, I just can't remember what. At least I hope I did. As you see I have already covered the fuse so If I didn't it will be hard for me to get back in there. I think I put some thin ply over the crack on the inside, but I'm not sure. I will keep an eye on that section when I am doing ground tests and on the first few flights. Thanks for pointing that out.


 02-19-2007, 12:27 PM
#10
Senior Member
My Feedback: (12)
Join Date: Sep 2004
Location: Diana,
TX
Posts: 654
Likes: 0
Received 0 Likes
on
0 Posts
You have done a great job with the repairs and the covering. It will be a great day for you when you maiden it.
Good luck, and keep us posted on the maiden and your progress in learning to fly.
Good luck, and keep us posted on the maiden and your progress in learning to fly.
03-09-2007, 03:13 PM
#12
Senior Member
Thread Starter
Join Date: Jan 2006
Location: Talladega, AL
Posts: 1,164
Likes: 0
Received 0 Likes
on
0 Posts
Thanks LD, safebet, and Tim.
It will indeed be a great day when I get it in the air. Haven't had the chance yet, Life has been busy.
No, that is all covering. I used Termagators method (I think I link to it somewhere, it can be found in the tips/tricks forum or search for "3d American flag".
I am very happy with the way it turned out. It should look really nice in the air.

 03-09-2007, 04:16 PM
#14
Senior Member
Thread Starter
Join Date: Jan 2006
Location: Talladega, AL
Posts: 1,164
Likes: 0
Received 0 Likes
on
0 Posts
ya, typing that all up took a while. it would have been a lot longer but I did not have access to the camera during most of the wing rebuild, otherwise there would have been more pics of how I went in and replaced the ribs and rebuilt the spar (which was a pain in the @$$).
Oh, It was asked earlier about the break int he nose of the fuse I repaired. Someone expressed some concern over the stress on that area from the engine. I have put about a half an hour on the engine on the plane and so far I have seen no indication of anything coming loose. the majority of that time was spent around half to full throttle, so it got a pretty good shake. I will continue to keep an eye on that area though. Thanks for the tip.
Oh, It was asked earlier about the break int he nose of the fuse I repaired. Someone expressed some concern over the stress on that area from the engine. I have put about a half an hour on the engine on the plane and so far I have seen no indication of anything coming loose. the majority of that time was spent around half to full throttle, so it got a pretty good shake. I will continue to keep an eye on that area though. Thanks for the tip.
03-10-2007, 08:51 PM
#15
Senior Member

Join Date: Jan 2007
Location: Hamilton,
OH
Posts: 1,029
Likes: 0
Received 0 Likes
on
0 Posts
sneasle. great job recovering that plane. I really like it. Where did you get that covering. Also how did you get the covering off? I just crashed mine this weekend and I am going to try and see if I can fix mine. Could you PM me with the info. So I don't forget what this was in? I don't want 10 million messages in my email saying there is a new response on the thread. Thanks for the help in advanced.
03-13-2007, 04:23 PM
#16
Junior Member
Join Date: Dec 2006
Location: Washington, NC
Posts: 9
Likes: 0
Received 0 Likes
on
0 Posts
Hey fellow crashers... I feel better being in such good company. I have been training for some time now with a nexstar and in fact took off the air brakes and flew several times reasonably well without the crutches. I put together a sig 4*60 arf and took it out for its maiden voyage and promptly dumb thumbed it into a tree. Not only did it destroy the plane, it broke the OS 91 in half right through the block. I was sick to my stomach. My wife said "are you through with this hobby now"..... For a while (maybe even still) I considered giving up. Would someone save me from my dispare and offer up some advice. Perhaps I need to stay with the trainer longer? I will say that 4* flew great before I lost orientation in the sky and I am tempted to get another and try again.
Thanks,
Tim
Thanks,
Tim
03-13-2007, 04:35 PM
#17
Definitely stay with the trainer for a bit longer. The 4*-60 is a big plane. If you are losing orientation on it you need to practice a bit more. Things WILL happen faster on the 4*. Since you totaled everything and to keep the wife happier try the 40 size. Cheaper parts. IMO if you only flew the Nexstar a few times without the "crutches" you have pushed it too soon beyond your limits. Sorry.[ ]
]
]


