


Bridi ESCAPE new build. any tricks or tips would be lovely !
 11-11-2015, 03:28 PM
#51

Thread Starter
My Feedback: (1)
Join Date: Sep 2004
Location: moline,
IL
Posts: 121
Likes: 0
Received 0 Likes
on
0 Posts
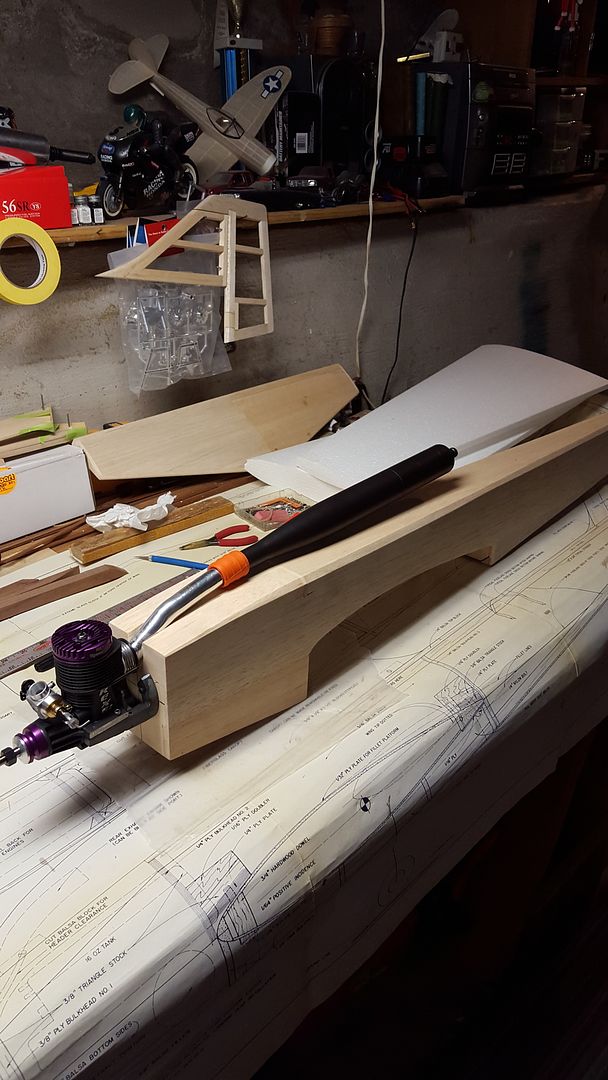
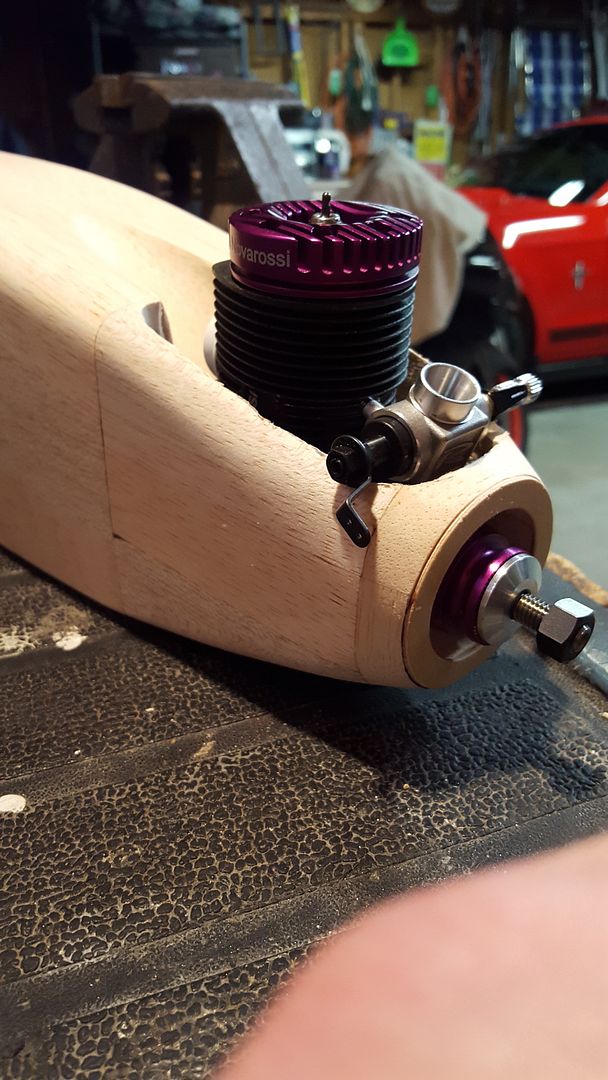
got the engine mounted today. need the right header but this one will let me rough mock and breakin the engine. also started the wings and got the retracts dropped into a hole. need to find some hardwood and make the mounts and get aileron servo holes made so I can sheet the wing this week. also got the stab built and joined and cut into the fuse. keeping a steady pace and little steps are helping from getting burned out as long as a step don't hold me up too long. its coming together nicely for an old kit with nothing that fits together !
~[URL=http://s852.photobucket.com/user/bikerboy2182/media/Mobile%20Uploads/20151109_180015_zps4lbrm7pg.jpg.html]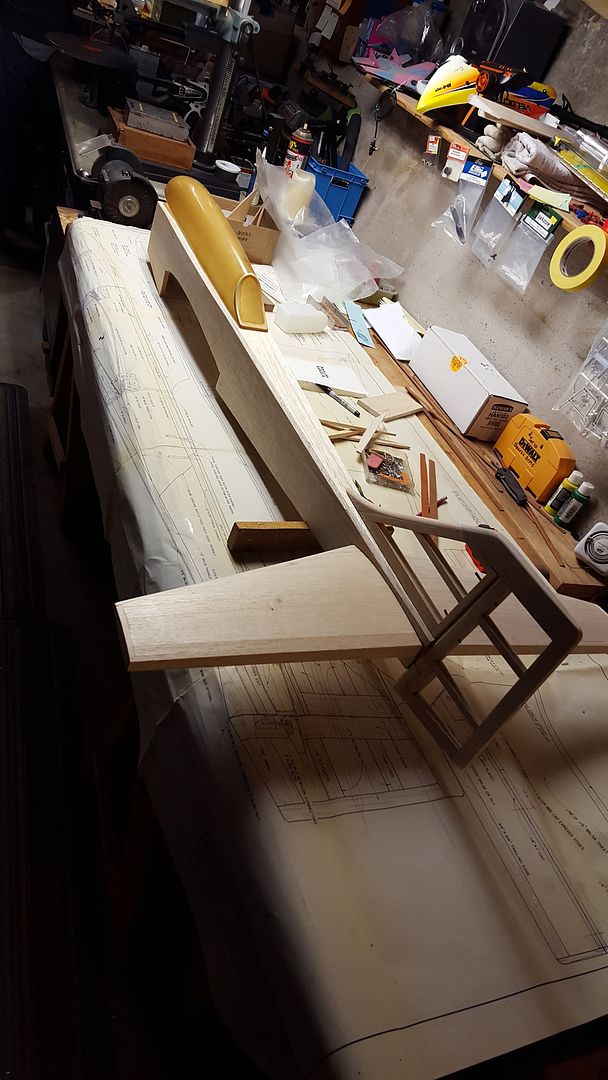 [/URL
[/URL


~[URL=http://s852.photobucket.com/user/bikerboy2182/media/Mobile%20Uploads/20151109_180015_zps4lbrm7pg.jpg.html]
[/URL
 11-11-2015, 07:05 PM
#52
My Feedback: (3)
Join Date: Apr 2008
Location: Montreal,
QC, CANADA
Posts: 5,200
Likes: 0
Received 5 Likes
on
5 Posts
Nice work!
If I may make a suggestion, you might want to leave more "breathing room" between the engine and the FW as well as a larger tunnel for the header. That area gets very hot and you are going to need to glass it solidly (6 oz) prior to paint. You'll want at least a 1/4" all around the header once glassed and painted so make an opening that offers a little more than 1/4" all around.
You can offset the engine from the FW by making some 1/8" ply rings that match the mount (with its cutout). I'd go at least 1/4" if not 3/8". This will help with rising your header across the FW as well. It's a simple matter to then build the cowl to suit the engine thrust washer position.
David
Last edited by doxilia; 11-12-2015 at 07:11 AM.
 11-15-2015, 07:43 AM
#57
Thread Starter
My Feedback: (1)
Join Date: Sep 2004
Location: moline,
IL
Posts: 121
Likes: 0
Received 0 Likes
on
0 Posts
Got the nose roughed. I need to find how to rework the throttle arm other then that it's good to go.


Last edited by nappyroots2182; 11-15-2015 at 07:48 AM.
11-15-2015, 08:19 AM
#58
Senior Member
It looks like there isn't enough room to fit the pushrod inside the nose. And turning the arm up would look kinda funny I suppose. Faring in a bubble around the throttle arm may be the only option.
11-15-2015, 08:24 AM
#59
Thread Starter
My Feedback: (1)
Join Date: Sep 2004
Location: moline,
IL
Posts: 121
Likes: 0
Received 0 Likes
on
0 Posts
I'll play with it today while my retract mounts are gluing up. I flipped the arm to go inside. It's now really close to the motor but after installing a ball link, it may be fine. Just a odd way to have a carb arm. Also I need to build a new fin and rudder. I've decided to seal and paint the plane instead of covering
11-15-2015, 08:30 AM
#60
My Feedback: (3)
Join Date: Apr 2008
Location: Montreal,
QC, CANADA
Posts: 5,200
Likes: 0
Received 5 Likes
on
5 Posts
This has been a common problem with the NR carb. Flattening the arm or flattening it slightly and reversing it should solve the problem by bringing the actuation close to the carb neck.
David
David
11-15-2015, 08:32 AM
#61
My Feedback: (3)
Join Date: Apr 2008
Location: Montreal,
QC, CANADA
Posts: 5,200
Likes: 0
Received 5 Likes
on
5 Posts
You could also just sheet the existing vertical on either side. The 1/8" extra thickness won't be detrimental. Might want to sand either side of the framework down a little to keep it closer to its original thickness.
you could also cover it in fabric and paint that or simply paint the MK/UC / works well.
David
you could also cover it in fabric and paint that or simply paint the MK/UC / works well.
David
Last edited by doxilia; 11-15-2015 at 08:35 AM.
11-15-2015, 08:50 AM
#62
Thread Starter
My Feedback: (1)
Join Date: Sep 2004
Location: moline,
IL
Posts: 121
Likes: 0
Received 0 Likes
on
0 Posts
Ya I thought about sanding and sheeting what I already had but might be easier to make new. It's not getting in the way of the build so I have time to weigh my options. I need to get on my wings so I can check cg and start placing servos. I really want to put a few mini servos behind the wing saddle for the tail servos.
 11-15-2015, 09:15 AM
#64
Thread Starter
My Feedback: (1)
Join Date: Sep 2004
Location: moline,
IL
Posts: 121
Likes: 0
Received 0 Likes
on
0 Posts
My buddy uses evercoat feather fill g2 to spray the whole plane. It's a thick primer really. Sand and paint. I'm going to try it. I don't feel like glassing the whole plane. He's done this many times and no issues so far. It's a interesting idea
11-15-2015, 10:31 AM
#65
Senior Member
Glassing is not the only option in regard to preparing the model for paint. Let me suggest you consider silkspan and dope for preparing the surface for paint. Filling paper is a little easier than filling glass and you don't have to worry about weave telegraphing through the paint. The technique is a little different than glassing because the paper should be applied damp, but isn't hard to learn.
Why do you want to sheet the fin and rudder? They look plenty strong from where I sit. The additional sheeting adds weight and unnecessary strength. I would simply cover with something like polyspan lite. Applies easily with the same dope (nitrate) as above. Fills easier than paper and shrinks with a heat gun. There are details in the prep for this method so if you choose this approach and are not sure how to do it, let me know and I'll walk you through it. The paper finish and paint can be applied about as light as monokote...... But of course that takes experience.
11-15-2015, 10:46 AM
#66
Thread Starter
My Feedback: (1)
Join Date: Sep 2004
Location: moline,
IL
Posts: 121
Likes: 0
Received 0 Likes
on
0 Posts
Well in just trying to build it with the techniques I pretty much know. I'm a body repair/painter by trade so filling the wood and painting seemed easiest to me. And it's cheap vs. Other materials I've priced out. I'm still trying to make it light add I know adding paint still add weight. But in my experience, lighter planes when trying to fly precise, just never seemed as solid to me. I'm not going to compete, I just want it smooth and shiney. I have allot of things to think about with all these techniques you guys know.
11-15-2015, 05:31 PM
#67
Senior Member
Ohhhh, ok. I thought that you were asking for "tricks of the trade" so to speak in the building and finishing. Since you know what to do, no need for any more tips. Fine with me
11-15-2015, 05:59 PM
#68
Thread Starter
My Feedback: (1)
Join Date: Sep 2004
Location: moline,
IL
Posts: 121
Likes: 0
Received 0 Likes
on
0 Posts
I didn't say I wasn't open to new ideas. But I need to do research and decide how I want to do it. I don't want to screw up trying something if I'm not certain I can do it a different way. I do appreciate the help, don't get me wrong. It's a big process and I've got time to figure it out.
11-15-2015, 06:05 PM
#69
Thread Starter
My Feedback: (1)
Join Date: Sep 2004
Location: moline,
IL
Posts: 121
Likes: 0
Received 0 Likes
on
0 Posts
Got links to silkspan and polyspan on ways to use them? I've never doped a plane but like the idea that there is a covering to help hold the plane tightly together
11-16-2015, 08:37 AM
#72
Thread Starter
My Feedback: (1)
Join Date: Sep 2004
Location: moline,
IL
Posts: 121
Likes: 0
Received 0 Likes
on
0 Posts
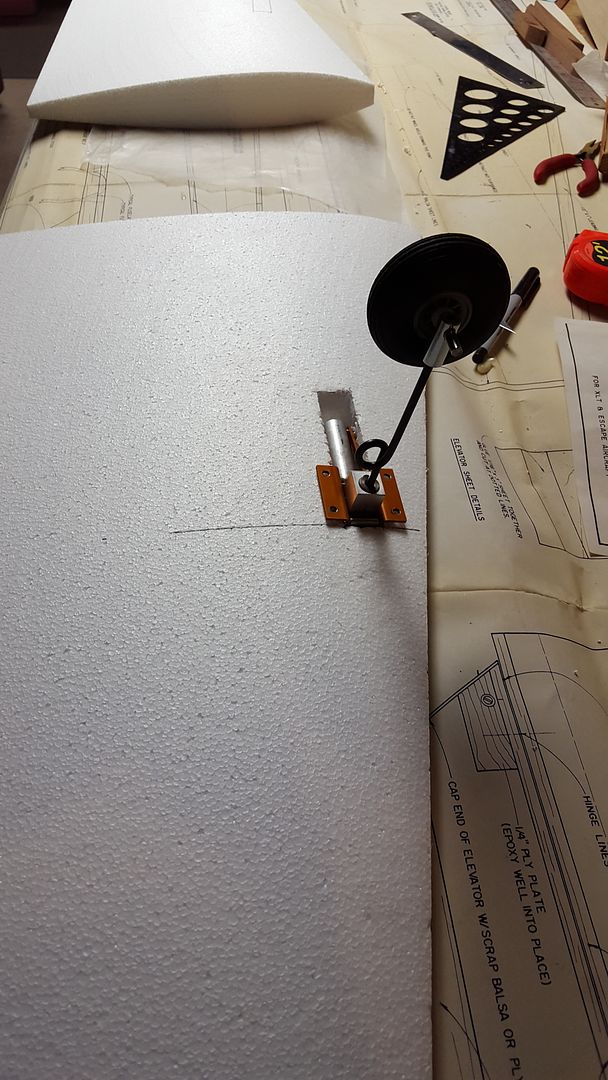
got the carb arm flipped to the inside. its too close now but with a ball link on it, I think itll work without much more grinding. now to get the proper header ordered up and finish the nose. got one side of the wings sheeted last nite. ill glue in the retract blocks and cut the aileron slots and wire ducts tonight.
~[URL=http://s852.photobucket.com/user/bikerboy2182/media/Mobile%20Uploads/20151115_104612_zpspotrebl3.jpg.html]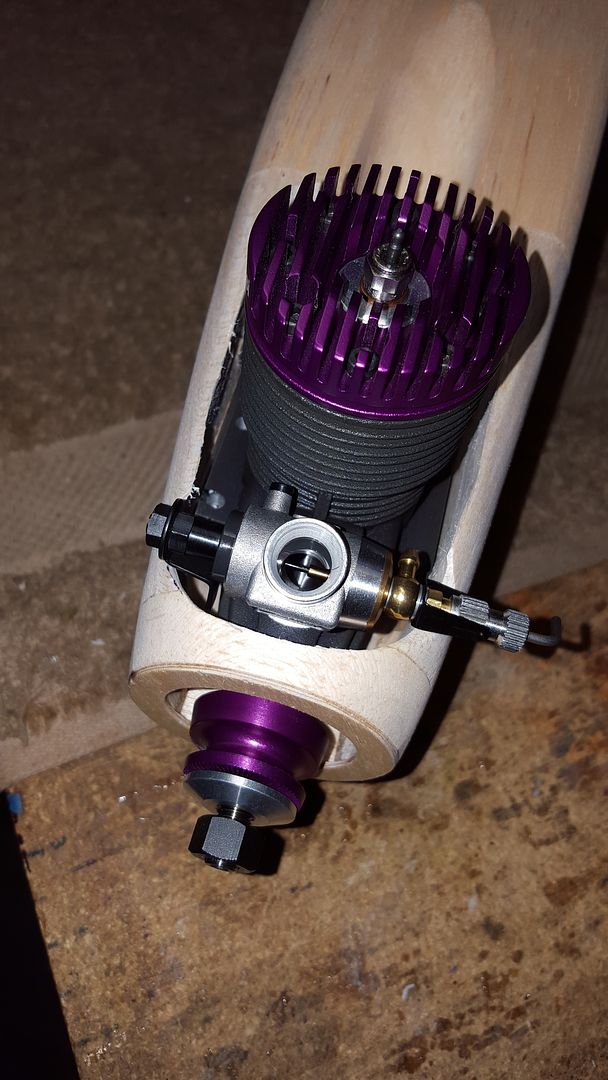 [/URL
[/URL
~[URL=http://s852.photobucket.com/user/bikerboy2182/media/Mobile%20Uploads/20151115_104612_zpspotrebl3.jpg.html]
[/URL
11-16-2015, 03:44 PM
#74
Thread Starter
My Feedback: (1)
Join Date: Sep 2004
Location: moline,
IL
Posts: 121
Likes: 0
Received 0 Likes
on
0 Posts
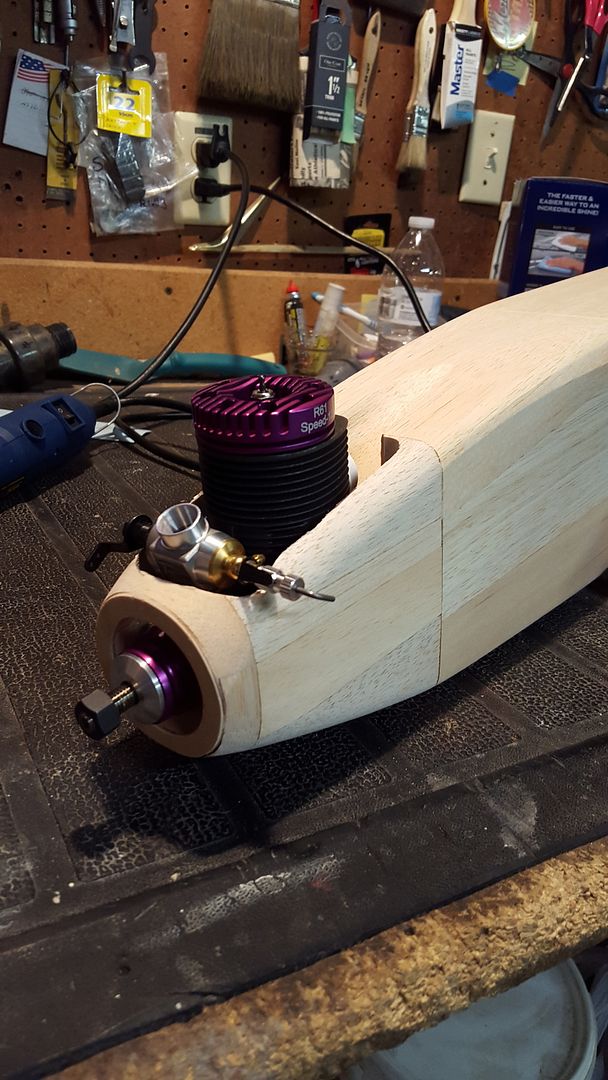
Sorry about the pic. The purple prop hub is just laying on the shaft. When assembled it's a perfect gap. The pic was only to show the throttle arm. I'll post another pic
11-16-2015, 04:20 PM
#75
Thread Starter
My Feedback: (1)
Join Date: Sep 2004
Location: moline,
IL
Posts: 121
Likes: 0
Received 0 Likes
on
0 Posts
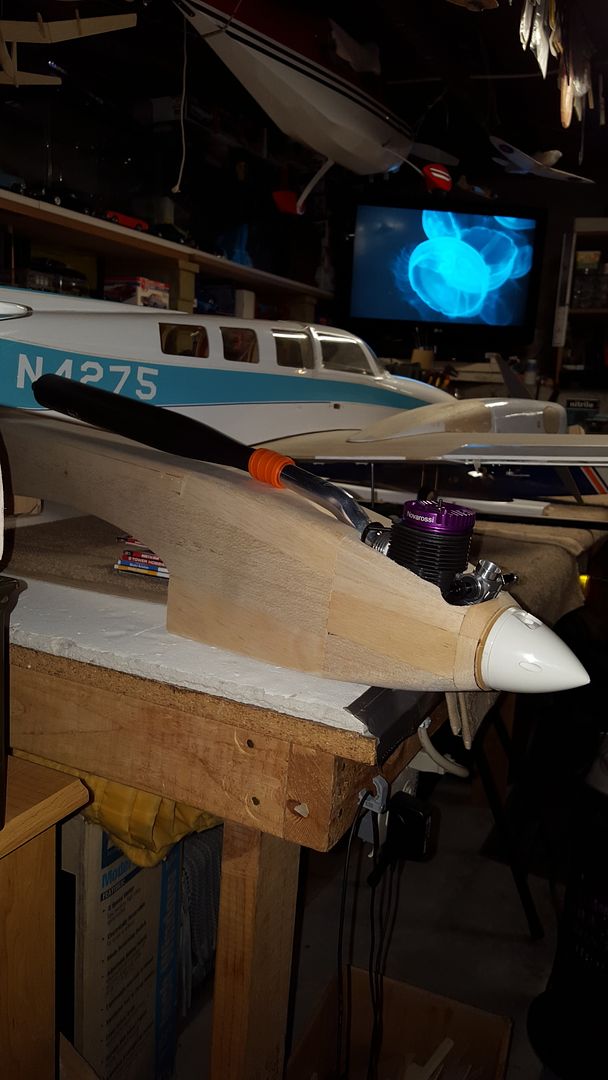
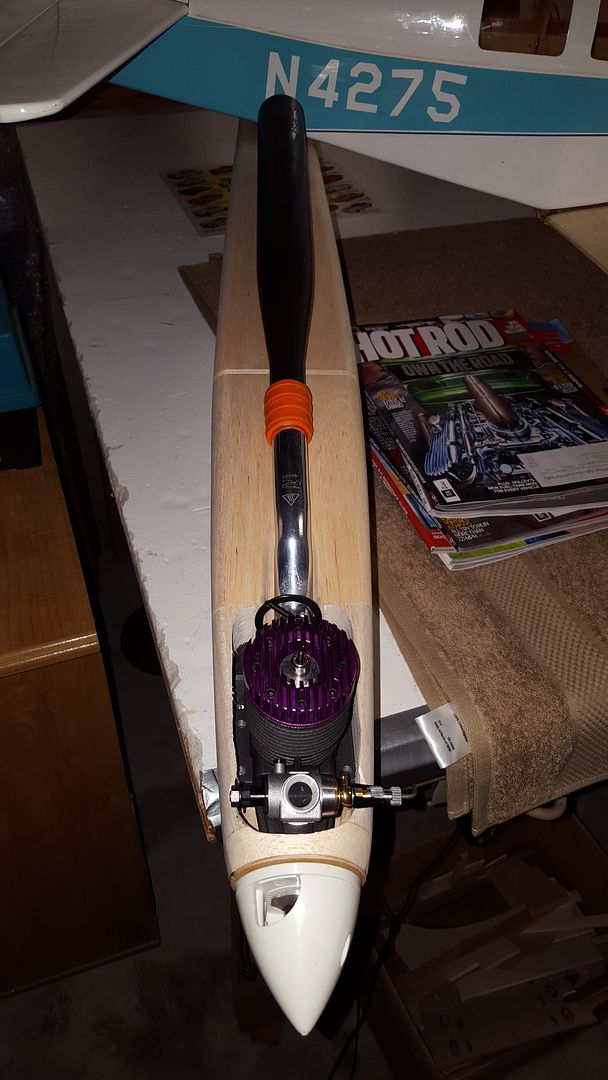
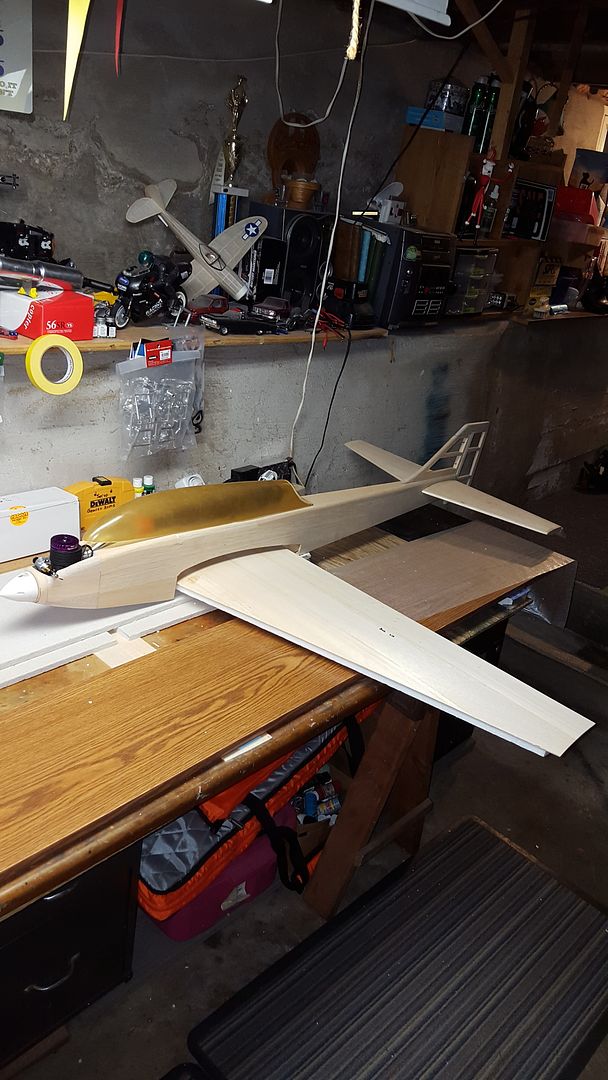
few updated pics. ive slowed down to keep from burning out. but sometimes I like to just stare at it to regain the motivation. nose is roughed in but needs cleaned up more
 [/URL
[/URL
 [/URL
[/URL
Last edited by nappyroots2182; 11-16-2015 at 04:58 PM.