


GP Tiporare
 10-07-2016, 08:58 AM
#1
Member
Thread Starter
My Feedback: (19)
Join Date: Jul 2003
Location: Portland,
OR
Posts: 67
Likes: 0
Received 0 Likes
on
0 Posts
I just picked up a Fiberglass GP Tiporare kit. Never build a kit with a Fiberglass fuse, any building tips of advice?
Like do I need to install bulkheads in the frame.
Bruce
Like do I need to install bulkheads in the frame.
Bruce
Last edited by Bruferrit; 10-07-2016 at 11:56 AM.
 10-07-2016, 08:29 PM
#2

Bruce,
You will need a Firewall, one bulkhead at the leading edge of the wing, and depending on the stiffness of the fuselage, you may need one at the trailing edge of the wing. However, normally when you install the 1/4 inch plywood for the wing hold down bolts to go through, the bulkhead behind the wing is unnecessary.
One of the hardest procedures with a glass fuselage is mounting the engine.
1. Decide if you want a side mounted or an up right mounted engine.
2. Cut a hole in the fuselage just large enough to get the engine into the fuselage. Make this hole as
small as possible. Once you have the engine mounting done, you will finish the cut out properly.
3. Mount the engine to a motor mount. (I prefer glass filled mounts and I tap the mount for
5/32 socket head bolts.
4. Make a 1/16 plywood ring to use as a spacer between the spinner backplate and the fuselage.
5. Put the engine and mount assembly into the fuselage. Place the 1/16 inch plywood spacer on to the propeller shaft along with the spinner backplate, prop, and spinner. Center the spinner on the front of the fuselage and tape it tight.
6. Push the firewall through the fuselage and against the rear of the motor mount. Carefully mark
the position of the motor mount on the firewall.
7. Remove the firewall and engine from the fuselage. Remove the engine from the motor mount.
8. Drill the bolt holes for the motor mount in the firewall. I use 5/32 socket head bolts and blind
nuts. Reinstall everything before you cinch down on the blind nuts. If everything fits correctly
tighten down the blind nuts.
9. Reinstall the assembly including the spinner spacer and spinner and tape everything like before.
Use some Vaseline to seal the blind nut threads to keep them clear of epoxy resin.
10. Using strips of glass cloth and 20 minute epoxy glue the firewall into the fuselage. Be sure to
go all the way around the firewall making a good seal to the epoxy glass fuselage. Once the
epoxy has cured, remove the engine assembly and glass the front side of the firewall and
engine compartment and use the epoxy to the fuel proof the firewall on both sides.
I am sure others will have their method for this. But this method works best for me.
Frank
10-08-2016, 02:50 AM
#3

Bruce,
Frank's way is the way I do all my fiberglass fuselages. I built three of the GP Tiporare.
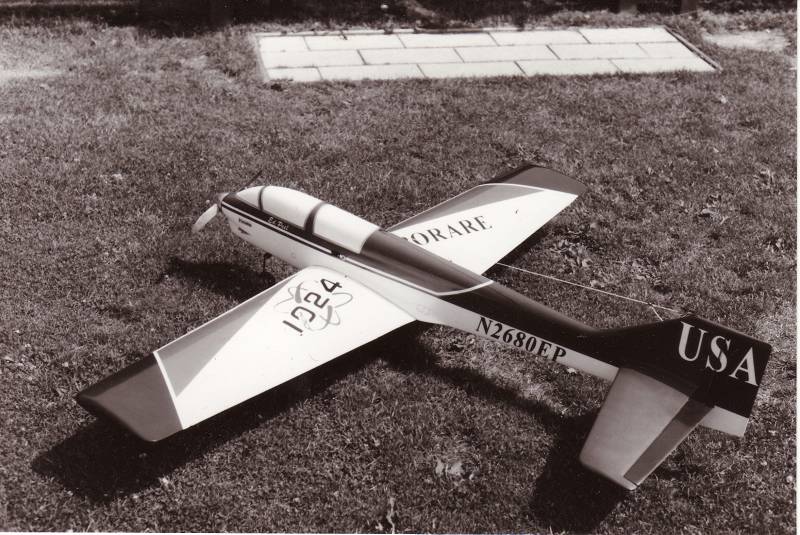
Good flying birds. It does hold the knife edge very well. This is a pic of my first one in '86 after my four year Navy stint.. Colors are red, white and blue. Good luck w/ your build
Frank's way is the way I do all my fiberglass fuselages. I built three of the GP Tiporare.
Good flying birds. It does hold the knife edge very well. This is a pic of my first one in '86 after my four year Navy stint.. Colors are red, white and blue. Good luck w/ your build

 10-08-2016, 06:47 PM
#6

My Feedback: (12)
I'm working on a Tipo Plus from RCAiir right now. Agree with everything that's been said. My word of advice is that before you cut anything find the reference line for the fuselage and mark it with a marker on both sides. You need a baseline to set your incidence for the wing and the stab. I am setting mine at 0 degrees for the stab and +1 for the wing. Engine is -2 and +2 right. Also, when you build, understand that your anhedral for the stab will depend on whether you side mount the pipe or run under the fuselage. Under the fuse is a 4.25 inch anhedral and side mount is 3" -2". See doxilla's thread. Contact me with any questions. Happy to help.
10-09-2016, 08:16 AM
#7
Member
Thread Starter
My Feedback: (19)
Join Date: Jul 2003
Location: Portland,
OR
Posts: 67
Likes: 0
Received 0 Likes
on
0 Posts
thank you for your insights on this bird. I am not going to jump right in and start this plane as there are some projects ahead of it (clean out garage, resetup work area, etc.).

