


KAOS AND RELATED PLANES AND INFO
 03-22-2018, 12:11 PM
#1151

Join Date: Dec 2016
Posts: 62
Likes: 0
Received 0 Likes
on
0 Posts
When I got out of the Hobby in 1999 I had to sell all my items, I needed the cash. Since I got back into it I have build the trainer, working on a Ugly Stik 60 now, I have 4 Kaos Kits, 2 40s and 2 60s, a Great Planes F15, a Corsair, A Sig Kougar (I think that's the Sig I have).. LOL PLUS over 20 engines, about 1/2 NIB and I have rebuilt 4 of the used ones so far. Gonna Build one of the Kaos 60s next. May have to ask you guys what engine I should use when I get working on it. I will post the build of that on here. Gonna need to fly a bit on the Stik before I would feel safe to fly the Kaos.. I LOVE the Stik and the Kaos!! My two most favorite RC airplanes!! I had them back in the 90s and it seems I just started back into it from 1999.. LOL
 03-24-2018, 06:34 AM
#1152


Kablake you will be very busy in RC with all that you have. But it will be fun busy.
RC Fanatic I'm glad I'm not the only one with trouble in these RC endeavors. Lol.
I got the engine installed. I think it came out good. Not too sure about the canopy. It is foam with iron on covering. I have it just sitting there. Thinking whether to go with a real canopy and a pilot figure. Or leave as is and glue this one in place.
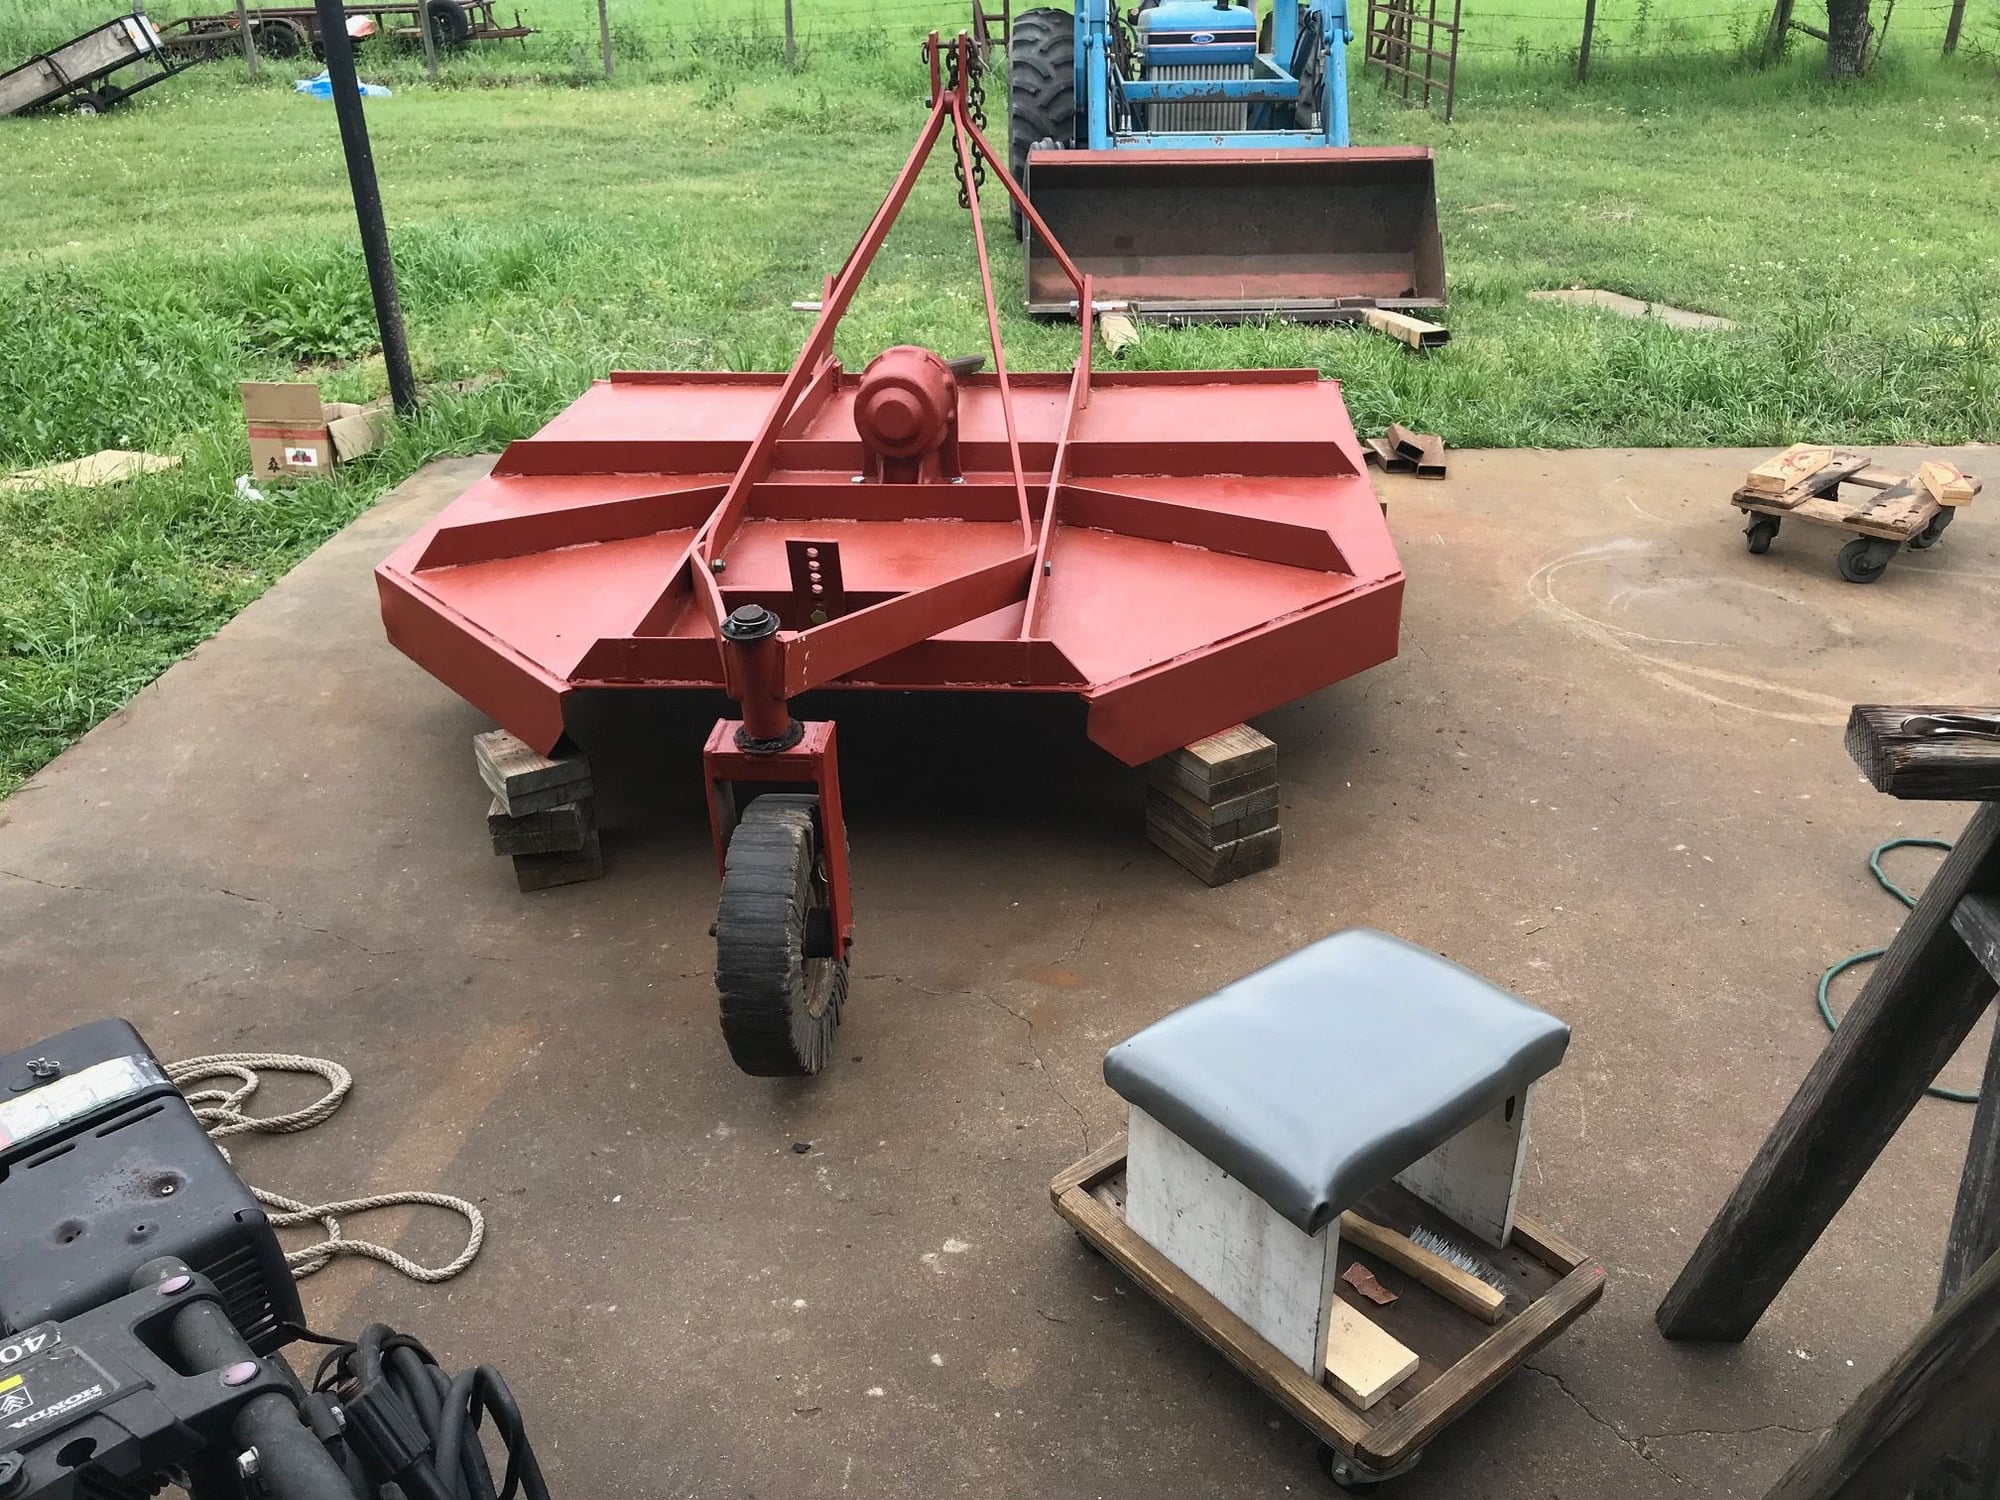
I have 80 welds holding my mower topside together. Today I will flip it over, lean it against a tree, tie it down and weld the final 30 welds on the bottom side. Then I can start putting it all back together. Green pastures ahead.
03-24-2018, 06:46 AM
#1153
Two problems I am having with this new update. One, how do you get your attachment to post after the text. I couldn't see a way to move it. Two, when I preview the post, the window where you edit your text cuts off some sentences at the end of the text and I can't get back to the end of the text. So I can't edit what is in preview. HUMMMM.
Checking this post I was able to get into edit text window and able to edit. So I'm thinking the problem is the picture posting before the text.
Checking this post I was able to get into edit text window and able to edit. So I'm thinking the problem is the picture posting before the text.
03-24-2018, 04:31 PM
#1154
Join Date: Dec 2016
Posts: 62
Likes: 0
Received 0 Likes
on
0 Posts
ETPilot,
Not sure if you know about this website.... Bunch of canopies..
Canopies : Park Flyer Plastics, Official Website of ParkFlyer Plastics Hobby Accessories ? Texas, USA
Not sure if you know about this website.... Bunch of canopies..
Canopies : Park Flyer Plastics, Official Website of ParkFlyer Plastics Hobby Accessories ? Texas, USA
03-25-2018, 04:27 AM
#1155
Thanks kablake. I am familiar with that site. They do have a good selection.
Welding on my mower is over. Now I need to buy new hardware and start putting it all back together. Working on this mower is like repairing a model airplane. Remove a stick here, a sheet there, clean and add new parts and glue back together. LOL.
Since I do a lot of maintenance on things, I am always looking for large cardboard sheets. I place then on the ground and lie on top when working on vehicle or equipment. When taking something apart I will layout the parts on the cardboard in order of disassembly and make notes for later reassembly. Anyway, I go to this furniture store in town. They have a fenced in areas for disposal of packing and shipping material. That is where I get large sheets of cardboard. But I also find wood, plywood pieces and reinforced plastic sheets and FOAM pieces.
On my latest trip there I found 2 large blocks of dense foam. Perfect for a 42� wing. I've been thinking of building a small EDF jet. So I'm going to give it a try. I have lots of foam pieces for practice cutting wing cores. I'm going to try this build after I finish the Kaos.
03-28-2018, 03:14 AM
#1157
Skyhawk any boxes I get from Amazon will be on the small size. Good starter for my wood burning stove. Work wise I look for the washer, dryer, refrigerator size. I cut the large panels and save a few in the shop. It is a never ending supply. This store sells lots of large appliances and furniture.
Well I finally finished my mower repair. I worked fast assembling the parts. Heavy rain was coming and it arrived overnight. The primer had not fully dried. I had to touch up a few areas. It's parked in the barn where it will dry a few days then I'll top coat it. Glad that job is over.
Now I'll clean up the shop and see where I left off on the Kaos. I'm not to far from finishing the build up to the covering phase.
03-28-2018, 09:16 AM
#1159
Join Date: Dec 2016
Posts: 62
Likes: 0
Received 0 Likes
on
0 Posts
Heck that Mower is looking better than your KAOS!! LOLOL Joking of course. I never lived anywhere that I needed a mower so large... Not even a riding one... I had the self propelled ones though.. 
ET, Do you have a large enough property to have your own flying field? That is one thing I would love....
And I love building things myself. I was an electronic technician and engineer for 30 years for uncle Sam, Dept of Defense. I never built mowers, more like complex electronic systems, to darn right simple little things that were usually more fun than the large jobs!! Although I did actually help build a 10 meter satellite dish. My last job I had there was back as a bench tech where I built prototypes for engineers that were at times VERY small with surface mount components, some barely as large as a grain of ground pepper. Had to use a magnifier to work on the things... But I was building prototypes for young engineers and with my 30 years experience I would try to tell them I saw something that would just not work. They ignored me, 2 days later it would come back and it needed a fix, just what I told them.. I eventually just let them do what they wanted and find their own errors.. LOL
03-29-2018, 04:20 AM
#1160
Building and fixing things is a challenge that stimulates the brain and keeps one young. Since young, I had this thing for building, fixing and airplanes. A lot of it is self taught. Great interest in general aviation. I have a Commercial Pilot license and an A&P license. I was an airplane and instrument instructor for a time. Worked on the B-58 Hustler in the USAF. INTERESTING AIRPLANE.
It sure has saved me thousands of dollars in maintaining what I�ve owned. Now, I am just a handyman for myself and 2 neighbor's who call with their problems. Keeps me busy enough.
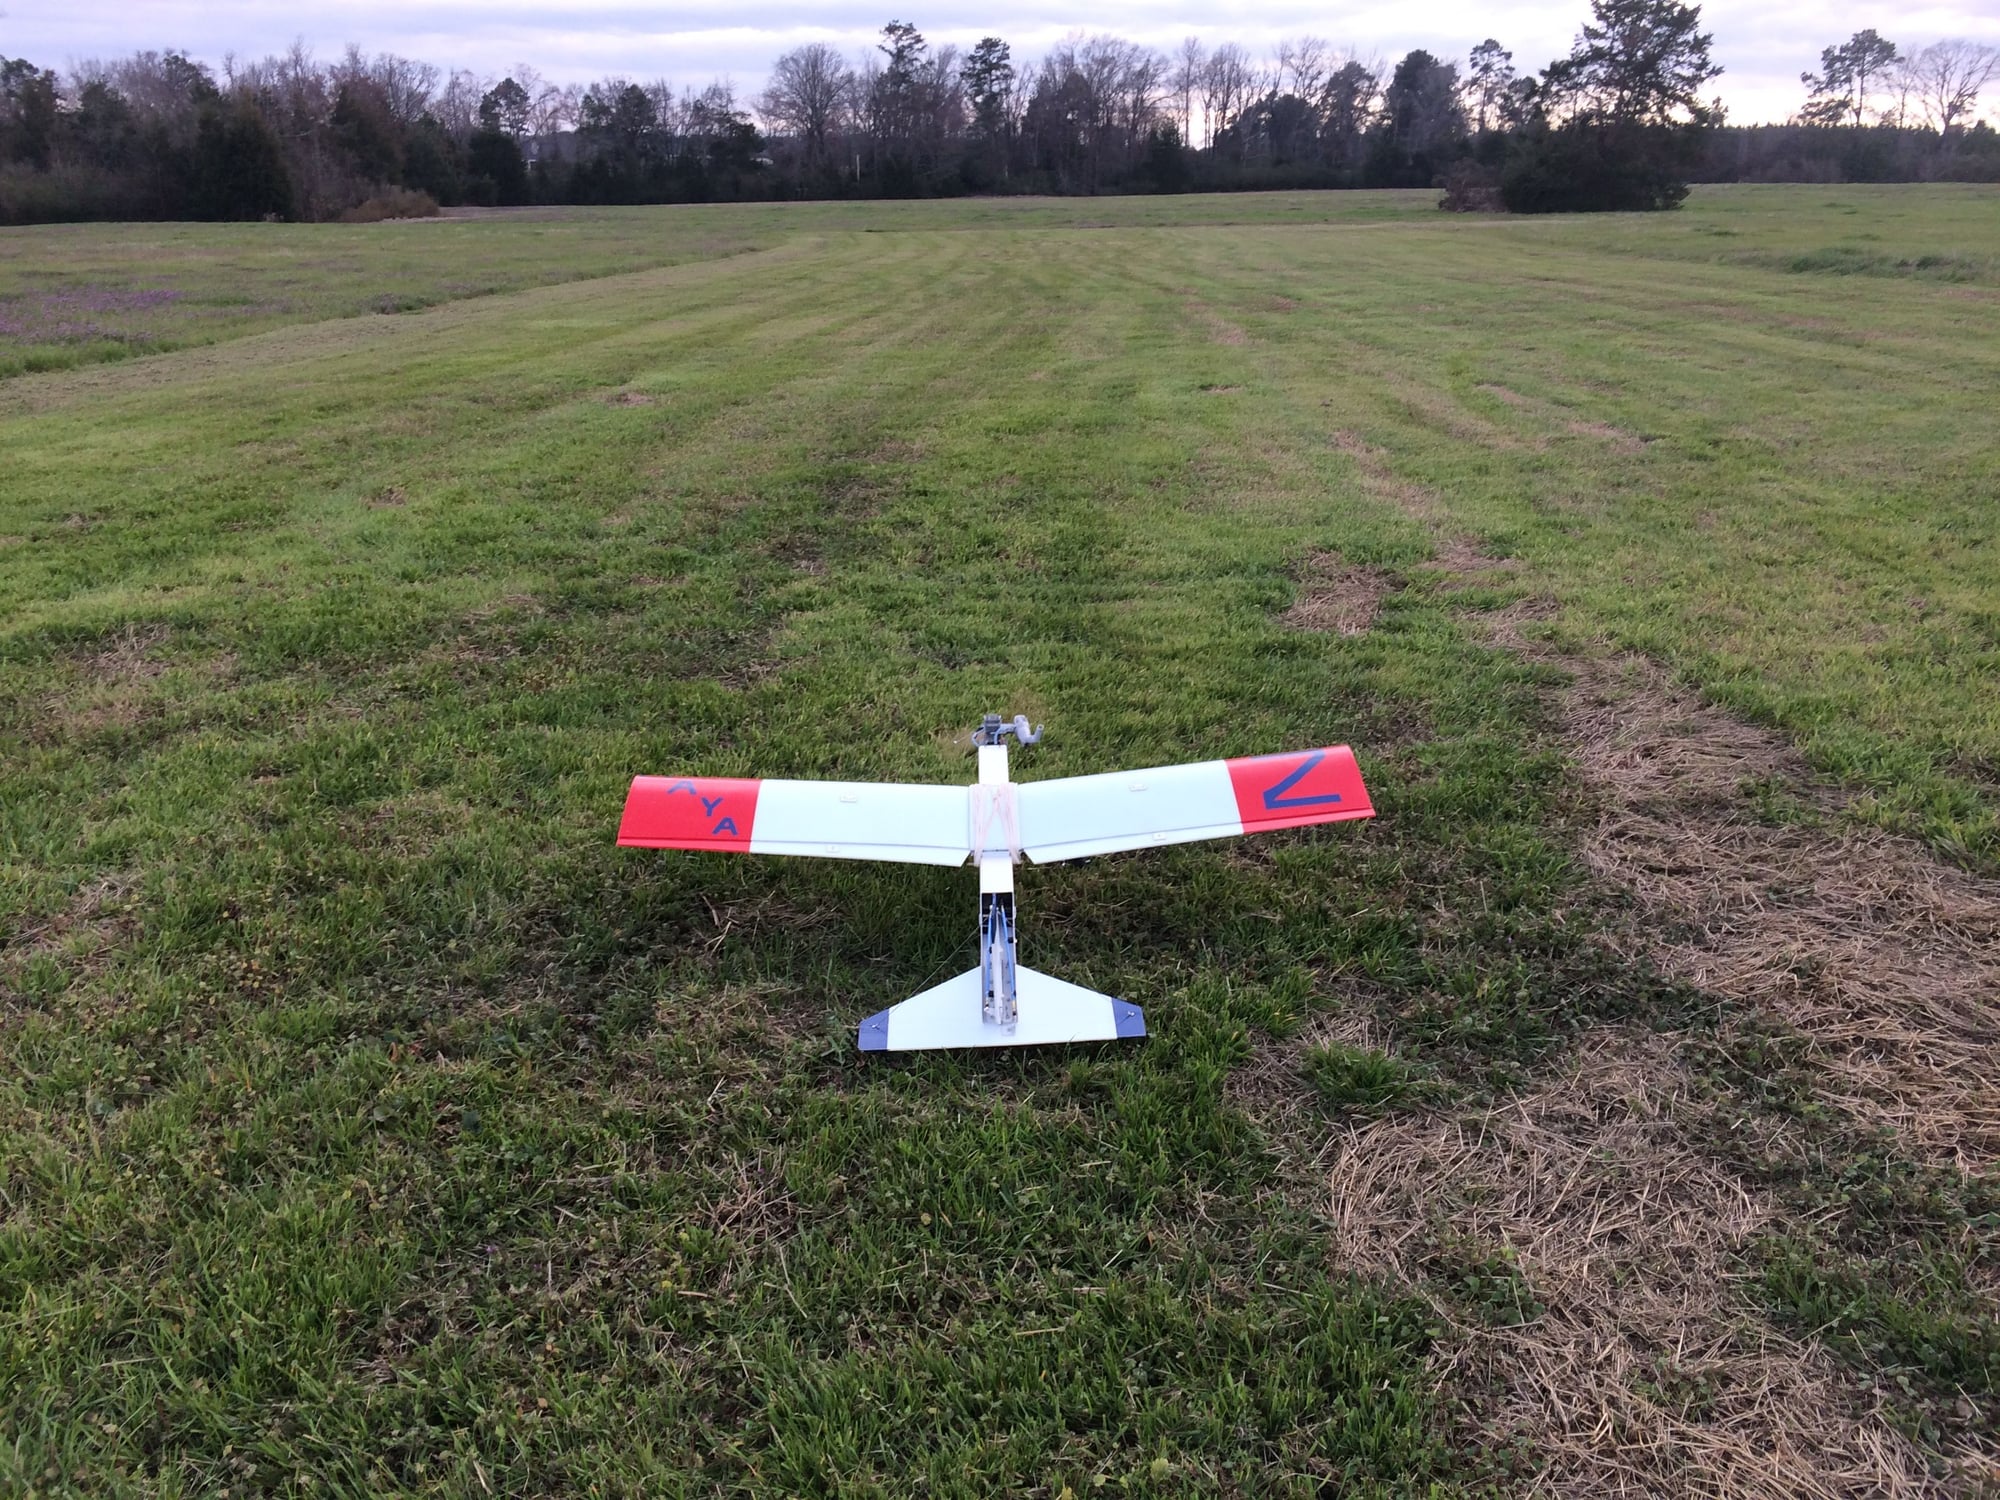
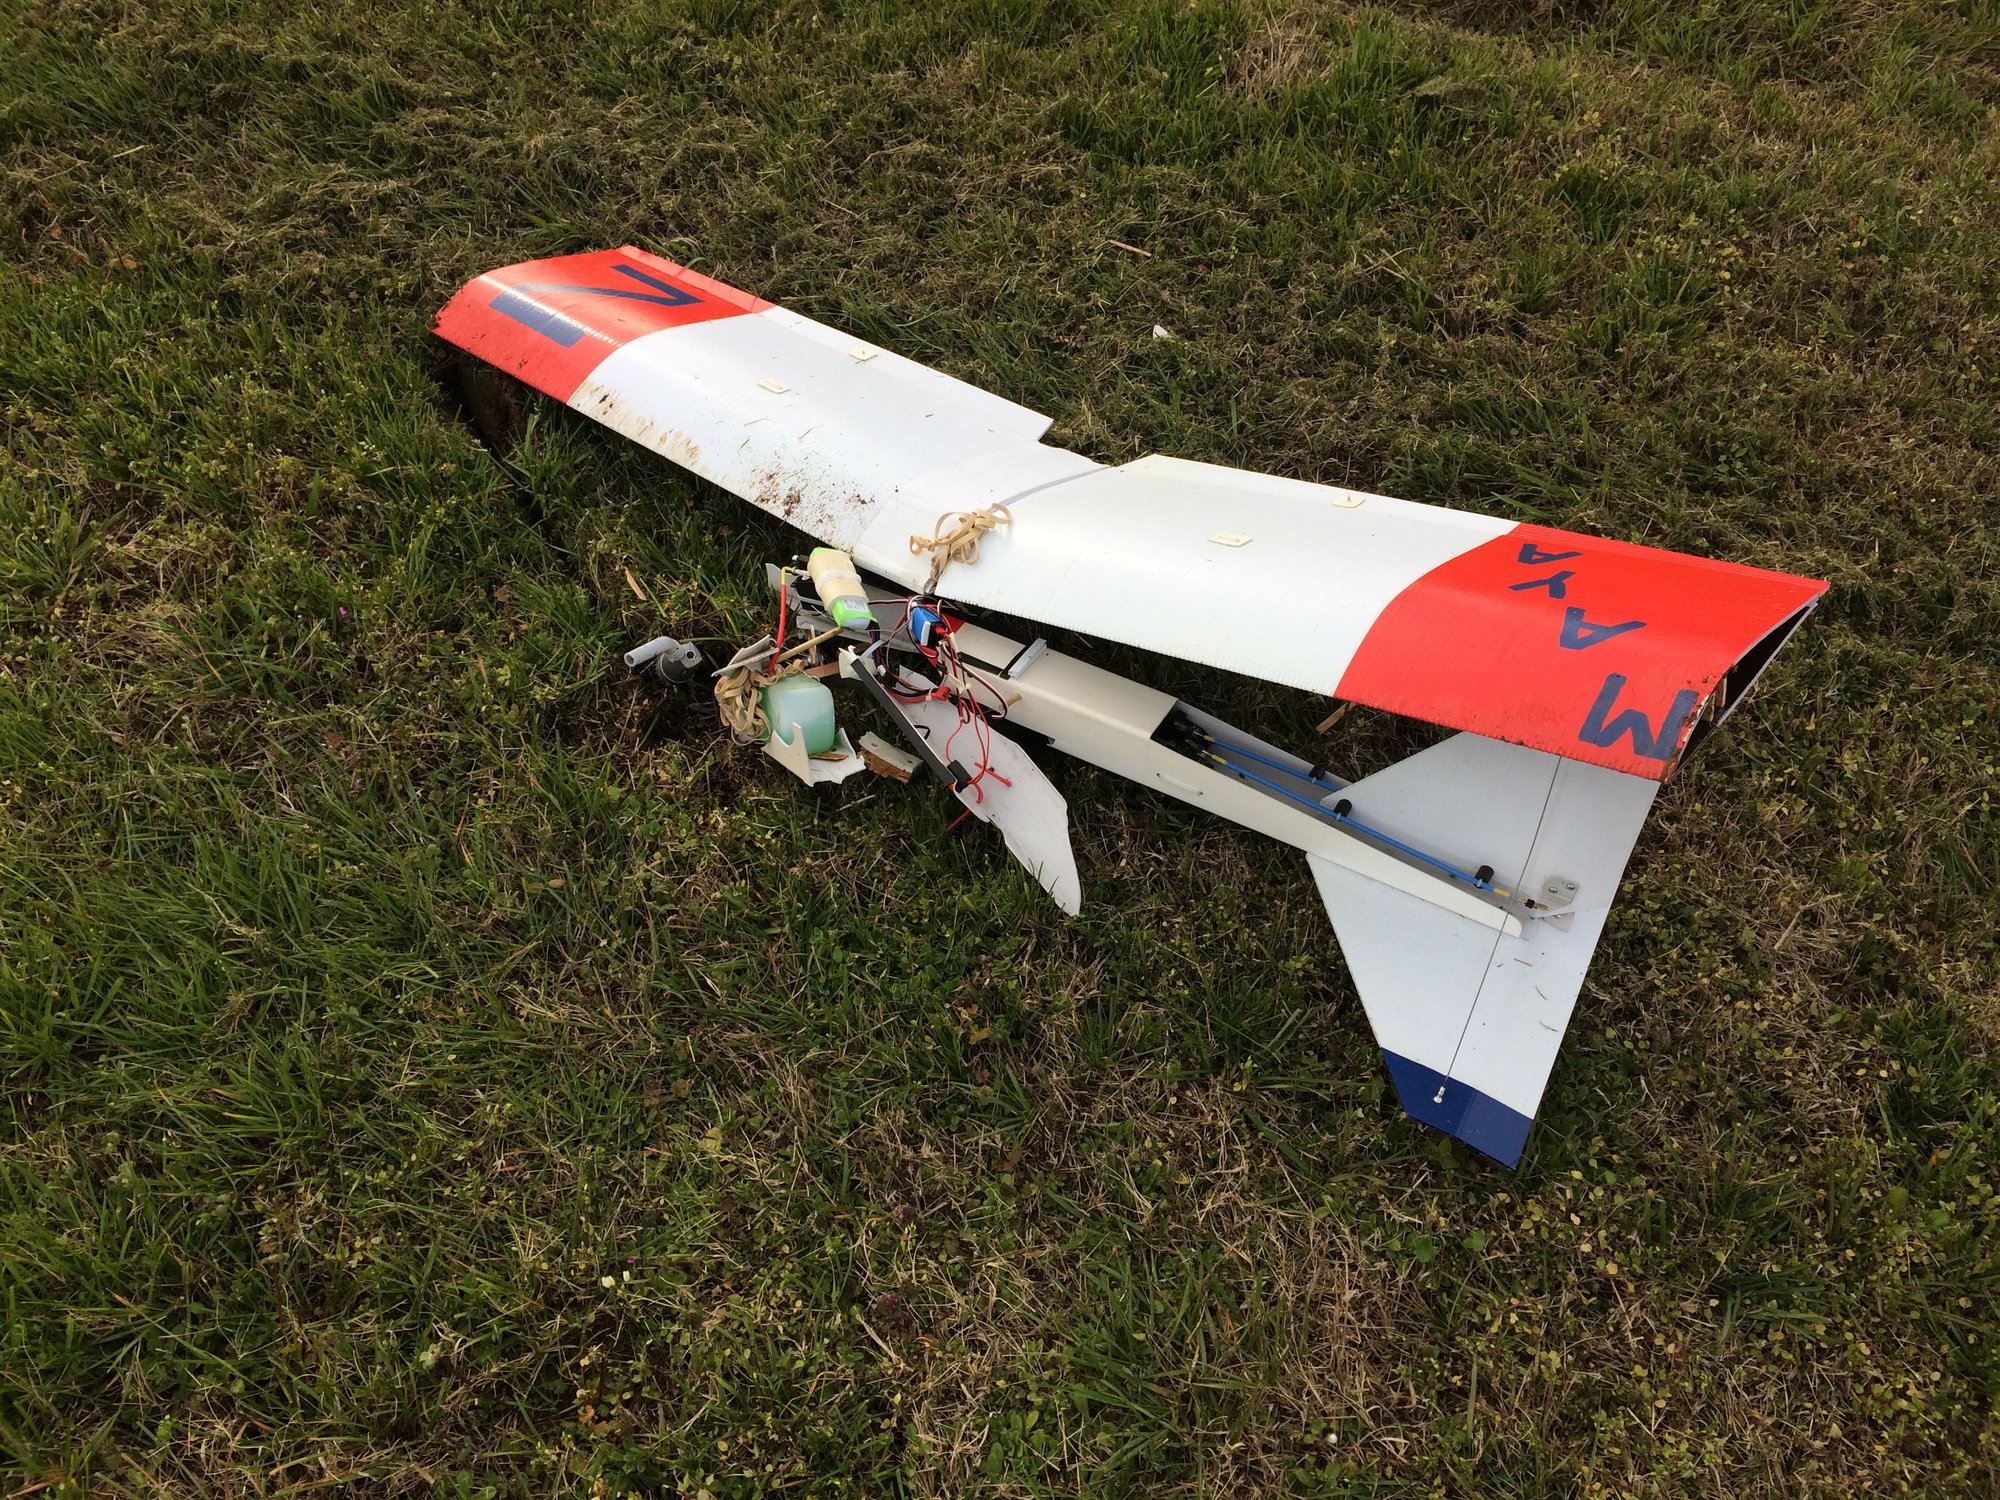
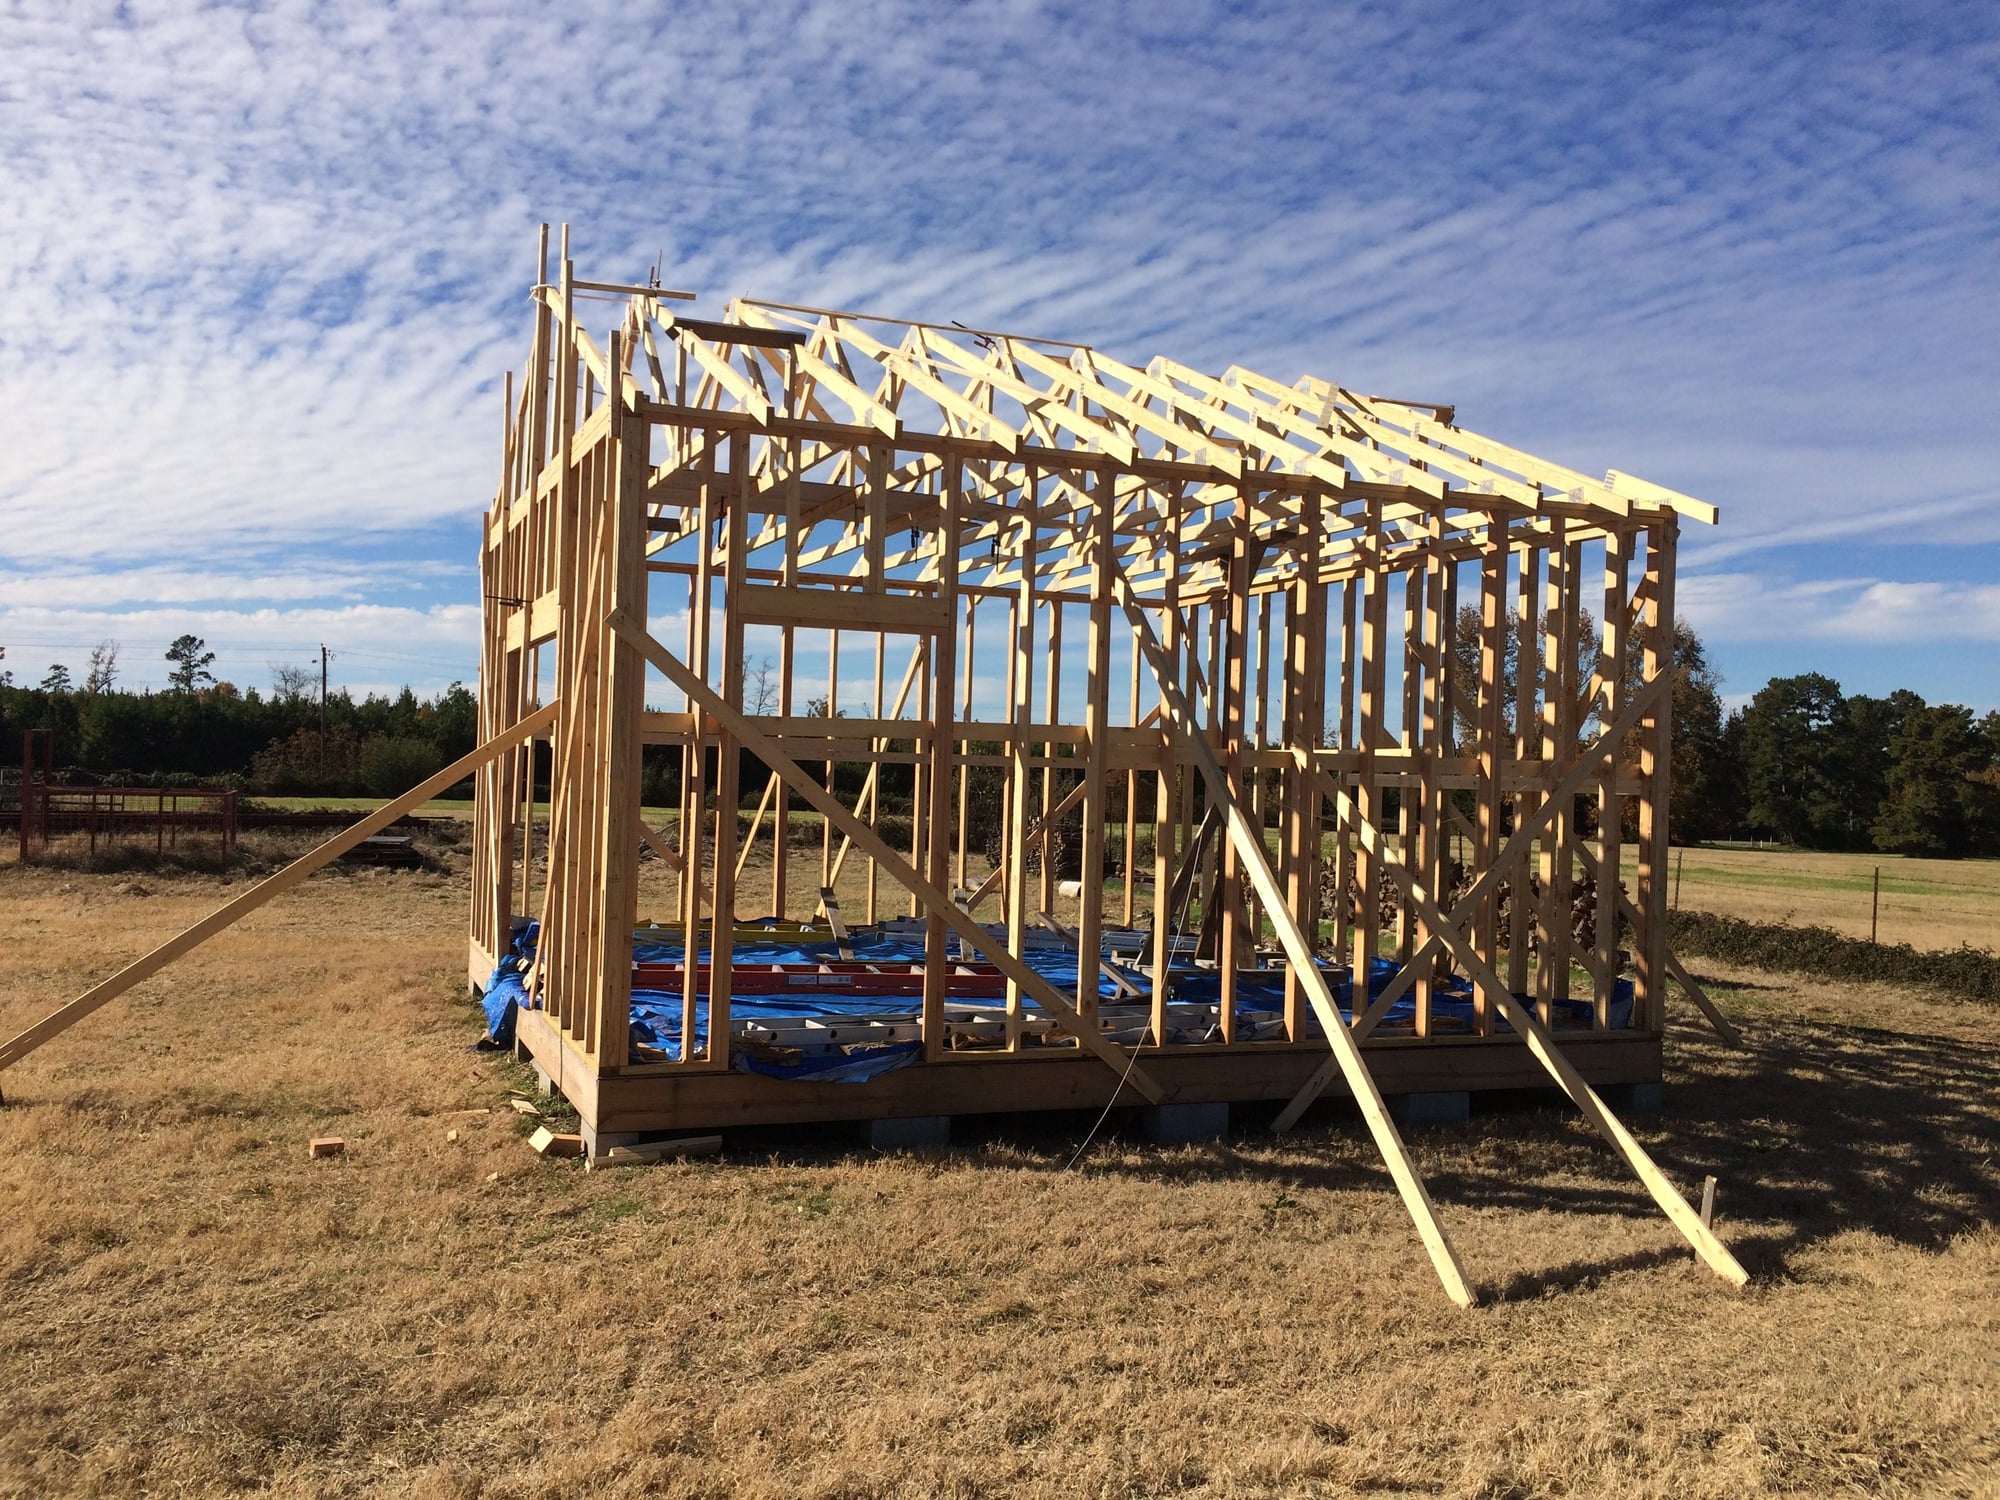
I do have a runway on my property. Here is my first airplane upon my return to RC. Jan 31, 2015. First flight, first crash. Screw on throttle arm came loose. No recent flying skill to try a recovery. Also my last major build completed a couple years back. I built it solo but hired out the shingle job. Too burnt out by then. I like the smaller jobs now. LOL.
It has been a rainy 2 days. Checked the Kaos to see what needs done. Working on it today as the weather moves out.
i still can't get the picture to attach after the text. Oh well!!!
03-29-2018, 07:35 AM
#1161
Thought I'd get started by doing a preliminary balance check. I placed all the tail parts and servos on the tail and placed the engine with muffler up front. The balance point came in �� short of the 30% mark. So looking good. I will do the same when I get to the wing and wing servos. I can move the engine forward or aft to help in the balance. I need to glue in the wing screw blocks so I can work with the wing.
I measured the horizontal stabilizer from its position to my forward center T pin and it came out perfectly centered. I hope it works out with the wing too.
 03-29-2018, 02:51 PM
#1163
Yes. OS GGT 15. Should power it good. I got the wing screw blocks glued in. Plus made the mounting holes for the elevator- rudder servos. Next I'll see how the wing attaches. Also need to make the main landing gear.
03-31-2018, 09:41 AM
#1164

Measure, measure and triple measure. This is a time consuming process and has to be perfect. Making sure wing and stabilizer is centered and aligned with fuselage. Also checked wing incidence. All checked really good. Then I added the wing dowel and its attach point. Have it epoxied and curing. Then I can add the wing screws and wing will be attached. I have an iPhone that has an angle finder. Worked great for this job but I double check with a mechanical angle finder. Making the main gear next.
03-31-2018, 09:46 AM
#1165
This new forum update is a real pain. I can't edit my post after doing a preview. When I go to the edit window, sentences from the post do not show up. I can't figure out to make corrections. Even posting the post then going to edit the sentences are missing. Real pain.
Last edited by ETpilot; 03-31-2018 at 09:49 AM.
04-05-2018, 09:30 AM
#1166

I've gotten pretty busy lately and have not had time to work on the Kaos. This morning I decided to add the wing screws. All went well at the beginning. I drilled and tapped the screw holes. Then added CA to harden the threads. Put the wing on then took it off. Finally I decided to check the wing incidence. It all checked out at 0*. Need to set wing at +�*. Then I went to take the wing off and I got my setback. One screw backed up a bit then stopped. Try as I could it would not back out and I knew it was going to break. I didn't see any means to easily get it out so I backed it out until it broke.
The broken piece was in there good. Tried pliers but could not get a good grip. Finally tried drilling it out and maybe retap the hole. That didn't work either. It was glued in good. Not sure how that happened. So I've set the plane aside for now. I'll probably cut the block of wood off and glued in another block then tap it. Just a minor setback. They happen. Other than that, it is looking good.
I have the H-stab held by wood dowels. Makes final install easy. The V-stab and rudder is just placed on the H-stab. I like to cover the surfaces before gluing in place.
04-06-2018, 03:25 PM
#1167
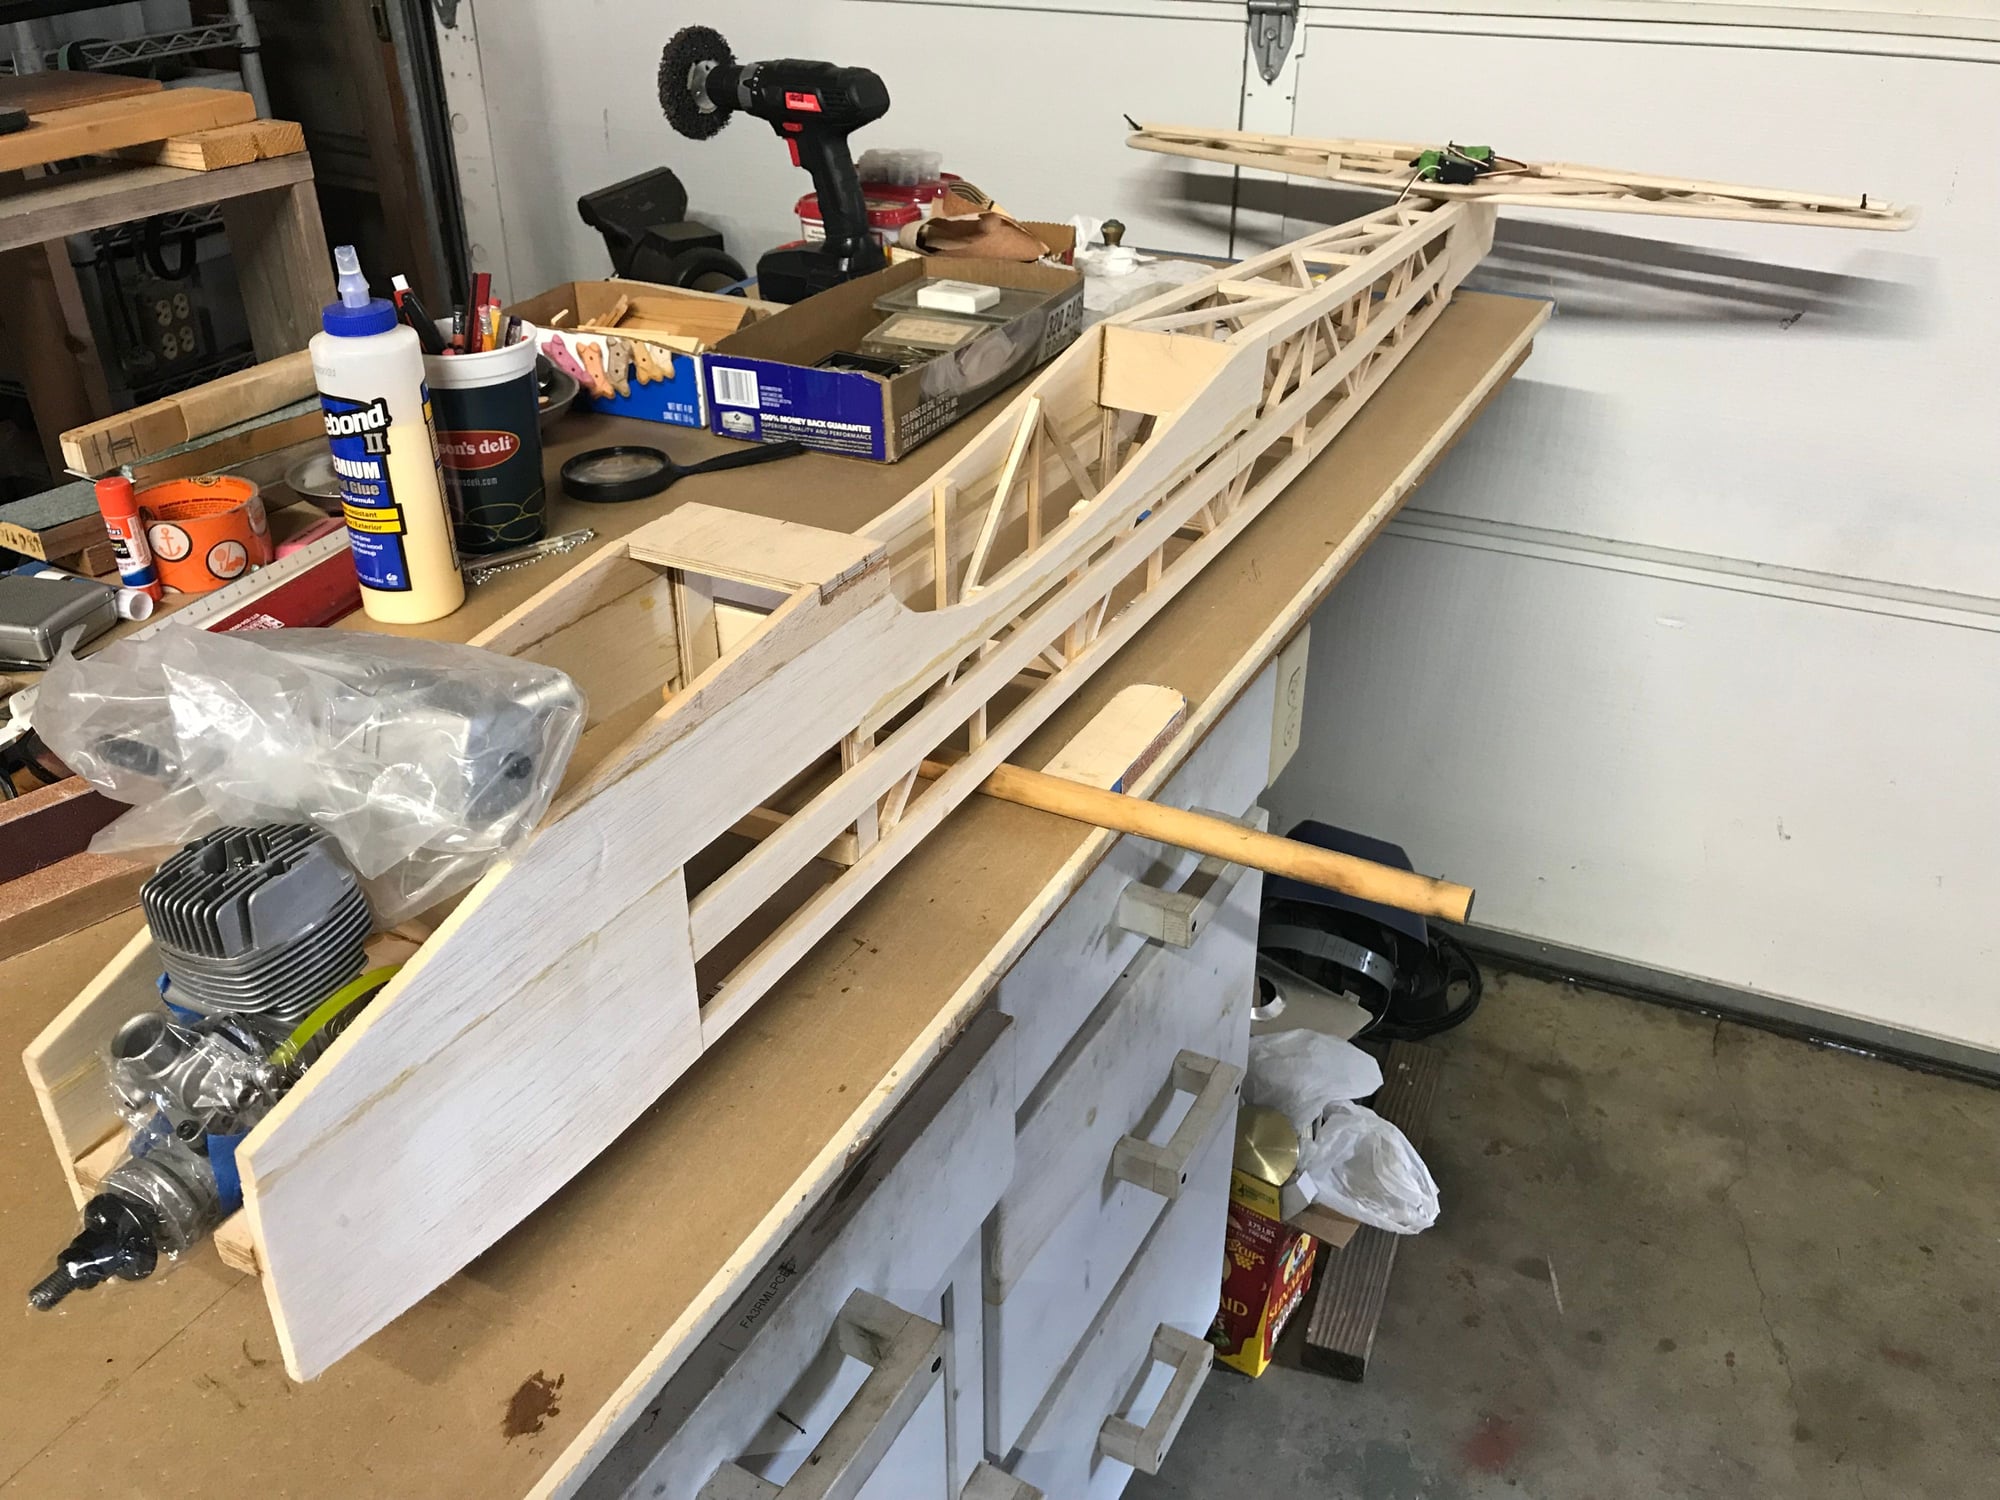
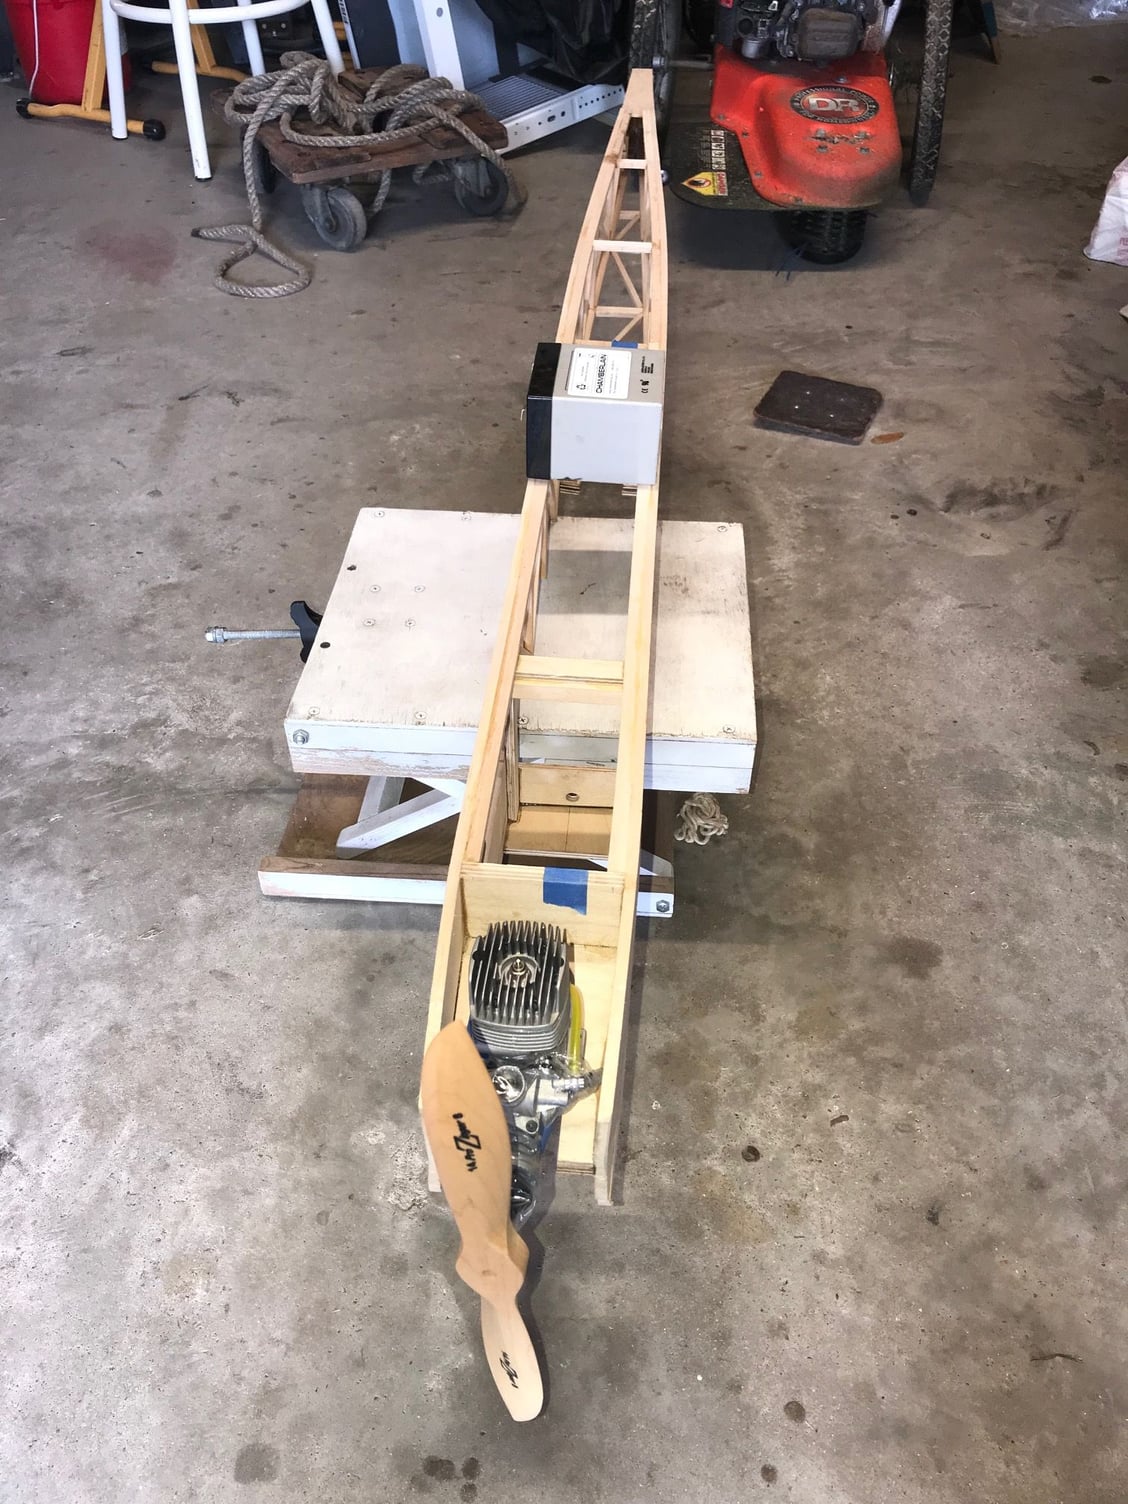
I cut the old wing screw block off the fuselage. I made another one and will epoxy it in place tomorrow. I then took some measurements for making the main landing gear. I used my adjustable table. This table is working good for model building. First picture I have the fuselage in level attitude and measured the prop clearance using a 14� prop. Using the measurements I made a cardboard landing gear. Another good use for cardboard. Second picture airplane is sitting on its main gear n tailwheel. Third picture is airplane in level attitude on its main gear. Should have good clearance.
When the wing block is epoxied and tapped, I'll attach the wing and see how the plane sits on its gear. Landing gear span is right at 18�. Just shy of 25% of wingspan. Should work out.
 04-06-2018, 05:31 PM
#1168
Join Date: Dec 2016
Posts: 62
Likes: 0
Received 0 Likes
on
0 Posts
I cut the old wing screw block off the fuselage. I made another one and will epoxy it in place tomorrow. I then took some measurements for making the main landing gear. I used my adjustable table. This table is working good for model building. First picture I have the fuselage in level attitude and measured the prop clearance using a 14� prop. Using the measurements I made a cardboard landing gear. Another good use for cardboard. Second picture airplane is sitting on its main gear n tailwheel. Third picture is airplane in level attitude on its main gear. Should have good clearance.
When the wing block is epoxied and tapped, I'll attach the wing and see how the plane sits on its gear. Landing gear span is right at 18�. Just shy of 25% of wingspan. Should work out.
04-06-2018, 05:59 PM
#1169

Sorry about your wing bolt. Amazing how such a simple task can end up being profound! Thin CA is a product I love and hate. It can get you into a lot of trouble really fast! I know they say not to do this, but when I put thin CA into my threads, I hit it with kicker. Then you know it has set off. Then I run my tap through it again. I suppose the best thing to do would be to put white glue in the threads, let it dry over night and then tap it again, but I am rarely that patient!
04-06-2018, 06:07 PM
#1170

If things go well, I may start posting the beginnings of my build soon. I am doing a .60 sized Killer. I built one before from a Blue Jay kit but crashed it. I still have the plans. I got a foam wing from Eureka aircraft. My plan is to built it to the outline, but otherwise I have my own way of doing these stik fuses. I will point those out as I go. Engine will be a .70 Surpass, unless I change my mind to an OS .65. For some reason this plane seems like it wants a 2-stroke! I also have a great set of retracts sitting here, so those will go in as well. The foam wing complicates this a bit, but not much. Retracts rip out of foam wings easily if not done properly. Primarily the maple rails need to be under the sheeting, and the area needs to be fiberglassed properly to spread out the loads and stresses. I first need to finish the Tr-motor. Specifically destined to irritate the E-flyers at my club!
04-07-2018, 04:11 AM
#1171
It�s a puzzling thing about that wing screw. I drill and tap them one at a time. Drill, tap, CA, let dry, tap again and test the screw. It had the most time to dry. Then I attached the wing and worked on the second screw. The second screw was good, so I attached the wing and did more work. The second screw came out easy. The first screw just got glued in place. I can't figure that one out. Checking the wing block and broken screw, that broken piece is really glued in. I can't even pry it from the threads. I'll have to give this task more drying time in the future. I don't use CA much.
When I got to use my rebuilt mower, first cutting was to the runway. It was in pretty bad shape. I need to finish cut it and repair some hog damage. The rest of the areas I needed mowed, some were close to 36� high. Good flying weather is here. Last night some powerful storms came thru. Tornado threats were many. In glad I got my mowing done.
vertical grimmace I'm looking forward to your build. I'm sure I will learn a lot.
04-07-2018, 07:04 AM
#1172
CA can be tricky sometimes. It can sit uncured for a long time. Whether accelerator is used or it gets very tightly compressed (like when you put the screw in) it may not be dry. It seems I have done this before, and I always use accelerator if I put CA in wooden threads.
What kind of wood do you use for your wing mounting blocks?
What kind of wood do you use for your wing mounting blocks?
04-07-2018, 09:34 AM
#1174
Join Date: Dec 2016
Posts: 62
Likes: 0
Received 0 Likes
on
0 Posts
It�s a puzzling thing about that wing screw. I drill and tap them one at a time. Drill, tap, CA, let dry, tap again and test the screw. It had the most time to dry. Then I attached the wing and worked on the second screw. The second screw was good, so I attached the wing and did more work. The second screw came out easy. The first screw just got glued in place. I can't figure that one out. Checking the wing block and broken screw, that broken piece is really glued in. I can't even pry it from the threads. I'll have to give this task more drying time in the future. I don't use CA much.
When I got to use my rebuilt mower, first cutting was to the runway. It was in pretty bad shape. I need to finish cut it and repair some hog damage. The rest of the areas I needed mowed, some were close to 36� high. Good flying weather is here. Last night some powerful storms came thru. Tornado threats were many. In glad I got my mowing done.
vertical grimmace I'm looking forward to your build. I'm sure I will learn a lot.
04-10-2018, 06:10 PM
#1175
Vertical Grimmace, I like to laminate 2 pieces of �� aircraft plywood to make up my wing bolt blocks. This has worked well for me.
Kablake your CA problem was worse than mine. I just cut the one block off and epoxied in a new one. I use as little CA as possible.
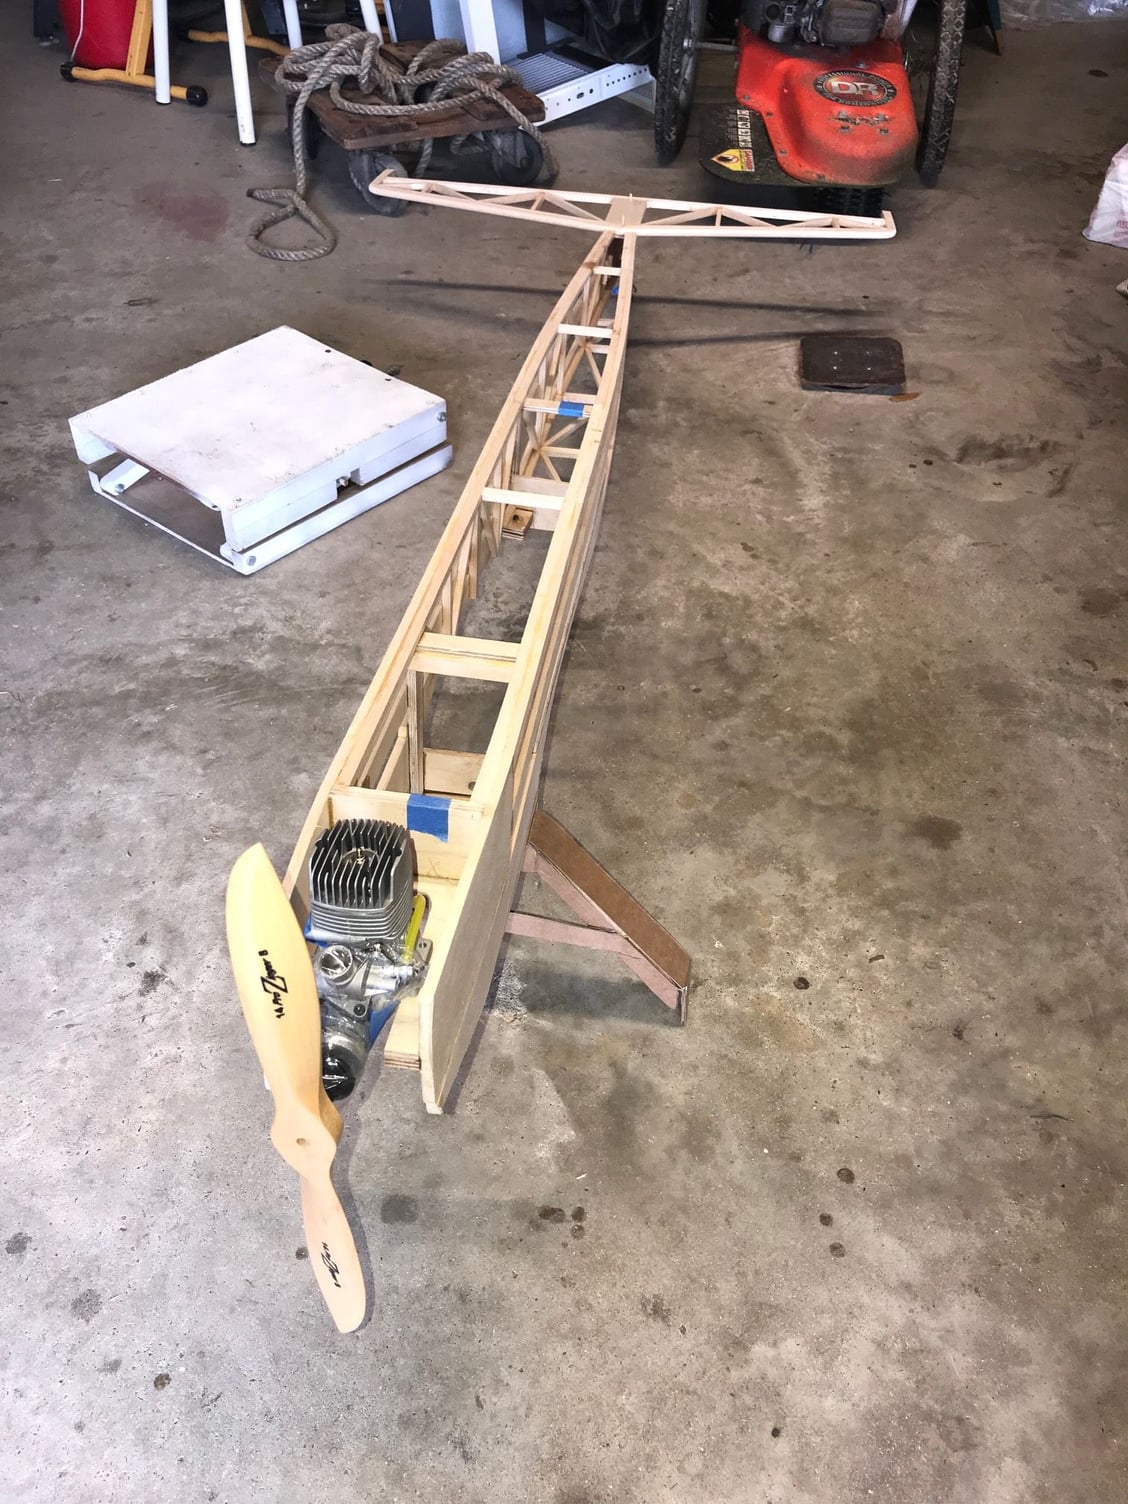
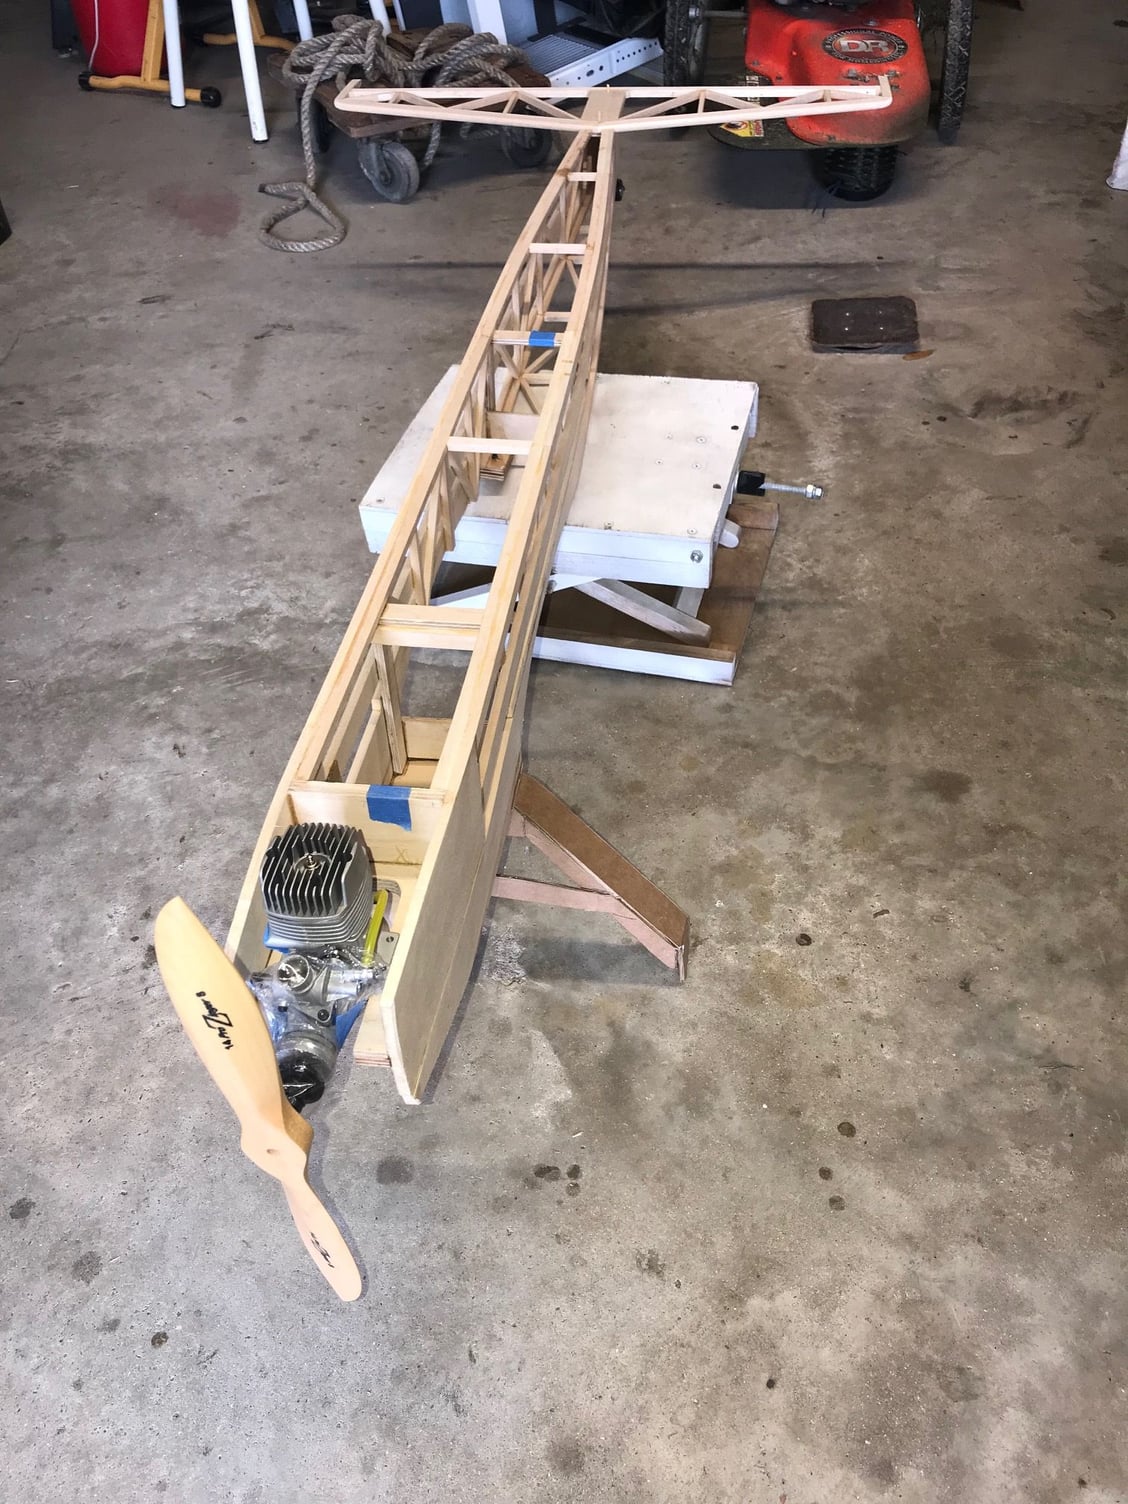
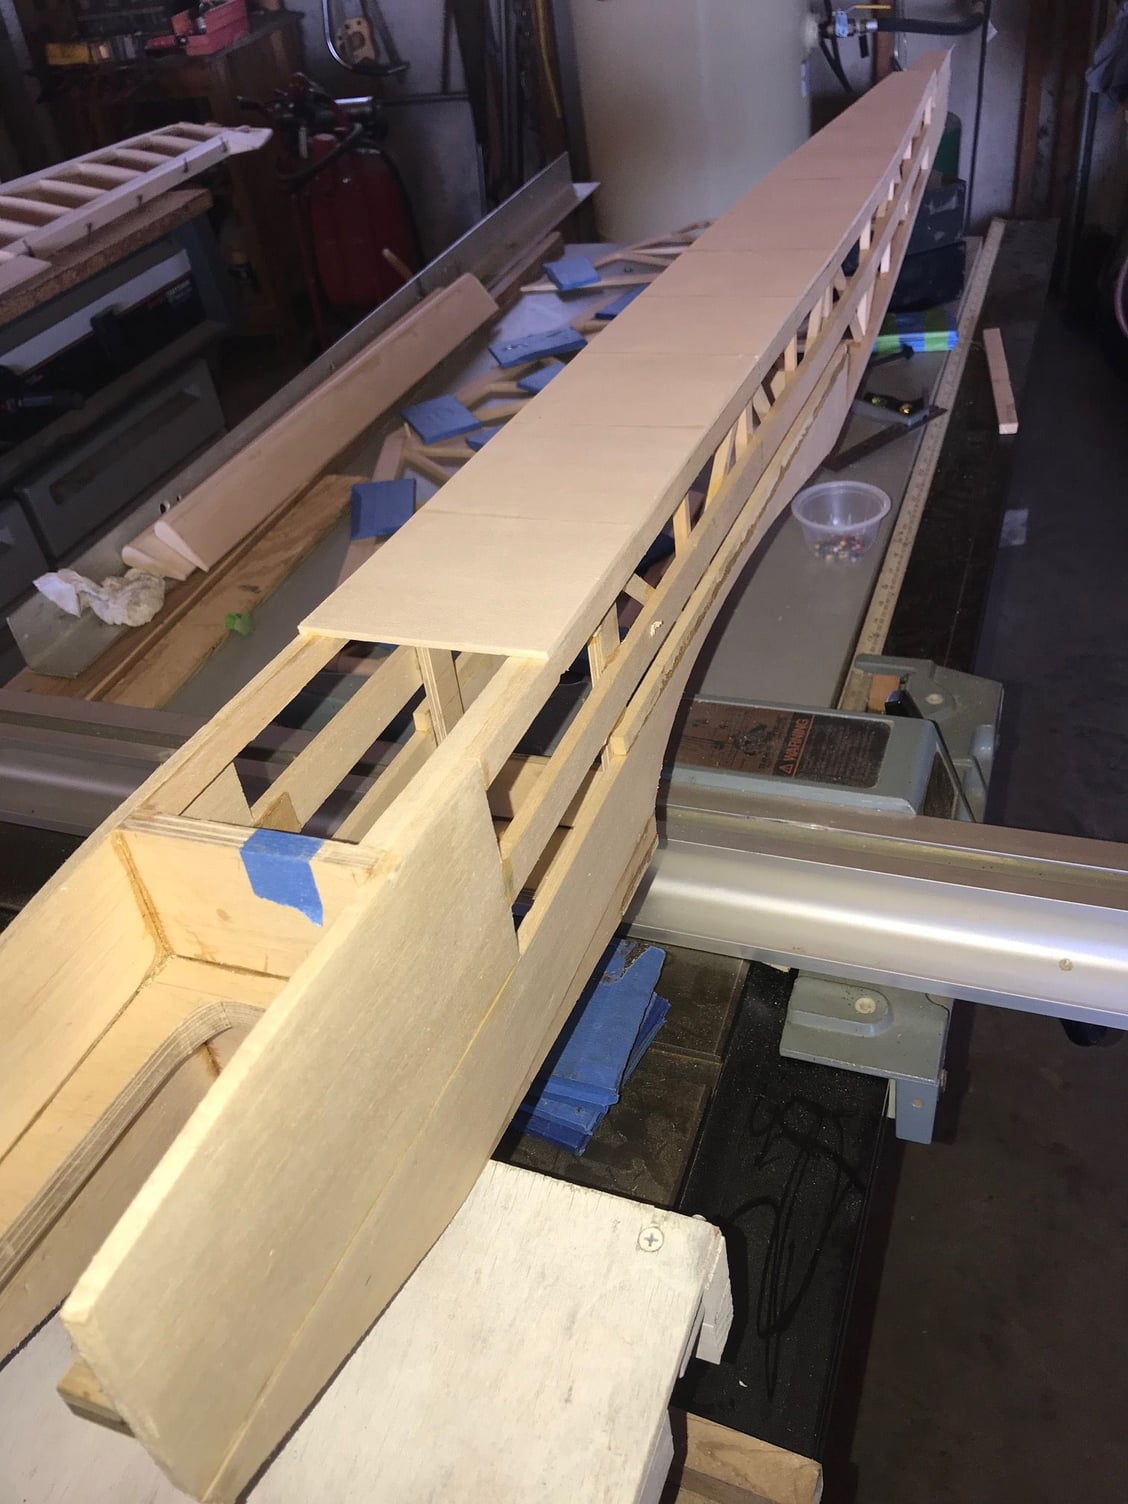
Here I thought that by now this build would have been finished. Things just keep getting in the way. I'm working a little less on this build. I finally added the top sheeting. The fuselage is super strong now. I still need to make that landing gear so I can move on.
Planning a trip to Florida so I'm working on that too. While there I want to spend one day at Top Gun. Never been there so good to go at least once. I need to get info on the event.