


Kevlar Live Hinges?
 01-15-2018, 10:35 AM
#1

Thread Starter

Join Date: Sep 2007
Location: Beeton, Ontario, CANADA
Posts: 1,337
Likes: 0
Received 5 Likes
on
4 Posts
Hi Guys! Need a grey area cleared up for me. Ive searched many of the other threads but can't seem to find the info I need. Im building a 7 foot long jet and I am going to be using live hinges. What I would like to know for sure! is what weight kevlar is used... I've read 2 oz(very hard to find) and others using 5.8oz which seems heavy to me. Also would like to know a layup schedule for it. ie.. Is the kevlar covered with a layer of 2-4oz?
Any help is appreciated. Here's a link to what I'm working on
https://www.rcgroups.com/forums/show...powered-WETJET
Any help is appreciated. Here's a link to what I'm working on
https://www.rcgroups.com/forums/show...powered-WETJET
 01-24-2018, 08:43 AM
#2
Hey,
Plenty of lightweight Kevlar options here: Aramid (Kevlar �) Fabric | Page 1 of 1
I use 1.7 laid on a bias, and sandwich it between layers of glass. If its too stiff for your liking, you can "sand" down through the hinge line glass, but obviously not through the Kevlar. I use a cut off wheel by hand and a straight edge.
Good luck
Red
 01-26-2018, 03:44 PM
#4
My Feedback: (3)

Join Date: Oct 2005
Location: san jose,
CA
Posts: 880
Likes: 0
Received 0 Likes
on
0 Posts
I used a triangle file but its a lot of work however gives good control to get clear outer layup right up to the kevlar.
But most lives hinges are not kevlar these days... they are polyester peel-n-ply. But same thing needs to be done to clear the outer layup. For most ARFs it looks like it is done with a mill of some kind set to a certain depth.
But most lives hinges are not kevlar these days... they are polyester peel-n-ply. But same thing needs to be done to clear the outer layup. For most ARFs it looks like it is done with a mill of some kind set to a certain depth.
01-26-2018, 05:34 PM
#10
Thread Starter
Join Date: Sep 2007
Location: Beeton, Ontario, CANADA
Posts: 1,337
Likes: 0
Received 5 Likes
on
4 Posts
That's even more interesting because the Red stripe is used to let you know that the PP is coated. But then again.. it just might be a companies thing.
The coated stuff I use has the Red stripes on it.
The coated stuff I use has the Red stripes on it.
01-26-2018, 05:37 PM
#11
Thread Starter
Join Date: Sep 2007
Location: Beeton, Ontario, CANADA
Posts: 1,337
Likes: 0
Received 5 Likes
on
4 Posts
But even though its coated.. you need to pull very hard to get it off.. and dont forget its on top when peeled off. Now if it were sandwiched between two layers of glass? well I think it would be very difficult to remove, coated or not.
02-13-2018, 01:06 PM
#13

My Feedback: (15)
Join Date: Jun 2004
Location: Bartlett,
TN
Posts: 174
Likes: 0
Received 0 Likes
on
0 Posts
Watch out for:
"Strongly hygroscopic Kevlar fibre is considered to provide an easy route for moisture ingress and led to the observed inhomogeneity in the plasticisation of specimens." ie moisture will lower the mechanical properties of kevlar and wick moisture into the structure.
That may be why the pros use Dacron. But, Dacron is also highly susceptible to UV damage. That,s why in cloth covered full scale after an adhesion and shrinking layer of paint is applied the next layer(s) are called silver. It is actually aluminum powder dissolved in butyrate dope to create a light barrier even cotton is subject to light damage or at least the glue used. Even that has its own problems as the layer with Al is where defoliation of paint begins. Al powder is almost a lubricant. IN full scale we are warned that it only takes f few hours for discernable UV damage to begin.
Some of the live hinge detachments we all hear about may have begun with UV damage since we often park our planes in the sun. If I ever build my own live hinge structure I was going to take a look at Stits high UV block high flex non Al light block layer.
Bla Bla Bla, but I also have many questions but will look and then post.
Charles
02-17-2018, 02:05 PM
#15
Thread Starter
Join Date: Sep 2007
Location: Beeton, Ontario, CANADA
Posts: 1,337
Likes: 0
Received 5 Likes
on
4 Posts
Watch out for:
"Strongly hygroscopic Kevlar fibre is considered to provide an easy route for moisture ingress and led to the observed inhomogeneity in the plasticisation of specimens." ie moisture will lower the mechanical properties of kevlar and wick moisture into the structure.
That may be why the pros use Dacron. But, Dacron is also highly susceptible to UV damage. That,s why in cloth covered full scale after an adhesion and shrinking layer of paint is applied the next layer(s) are called silver. It is actually aluminum powder dissolved in butyrate dope to create a light barrier even cotton is subject to light damage or at least the glue used. Even that has its own problems as the layer with Al is where defoliation of paint begins. Al powder is almost a lubricant. IN full scale we are warned that it only takes f few hours for discernable UV damage to begin.
Some of the live hinge detachments we all hear about may have begun with UV damage since we often park our planes in the sun. If I ever build my own live hinge structure I was going to take a look at Stits high UV block high flex non Al light block layer.
Bla Bla Bla, but I also have many questions but will look and then post.
Charles
"Strongly hygroscopic Kevlar fibre is considered to provide an easy route for moisture ingress and led to the observed inhomogeneity in the plasticisation of specimens." ie moisture will lower the mechanical properties of kevlar and wick moisture into the structure.
That may be why the pros use Dacron. But, Dacron is also highly susceptible to UV damage. That,s why in cloth covered full scale after an adhesion and shrinking layer of paint is applied the next layer(s) are called silver. It is actually aluminum powder dissolved in butyrate dope to create a light barrier even cotton is subject to light damage or at least the glue used. Even that has its own problems as the layer with Al is where defoliation of paint begins. Al powder is almost a lubricant. IN full scale we are warned that it only takes f few hours for discernable UV damage to begin.
Some of the live hinge detachments we all hear about may have begun with UV damage since we often park our planes in the sun. If I ever build my own live hinge structure I was going to take a look at Stits high UV block high flex non Al light block layer.
Bla Bla Bla, but I also have many questions but will look and then post.
Charles
Trevor
Last edited by Vettster; 02-17-2018 at 02:08 PM.
02-17-2018, 04:55 PM
#18
Vettster, Those "serrated scissors" are called "pinking shears". Their purpose is help keep fabric from unraveling. 70 years ago I watched my mother using her pinking shears, and she was very protective of them. I think my wife inherited them, and they are somewhere here in the house? They now make "rotary pinking shears". I use a rotary cutter for cutting glass cloth, but I've never used a rotary pinking cutter. Anyway, good luck.
 04-26-2019, 12:12 PM
#20
Hi,
Sorry to bring this year old thread again but this is an interesting topic for me follow and which I, unfortunately, only have just bumped into now.
Vettster, may I ask, please, whether you resin the peel ply at the hinge line also or do you let that part dry in which case how did you manage to keep that hinge line dry without going over with resin. It is a quite a thin line not to miss out.
Thanks
Reuben
 04-26-2019, 05:18 PM
#21
Thread Starter
Join Date: Sep 2007
Location: Beeton, Ontario, CANADA
Posts: 1,337
Likes: 0
Received 5 Likes
on
4 Posts
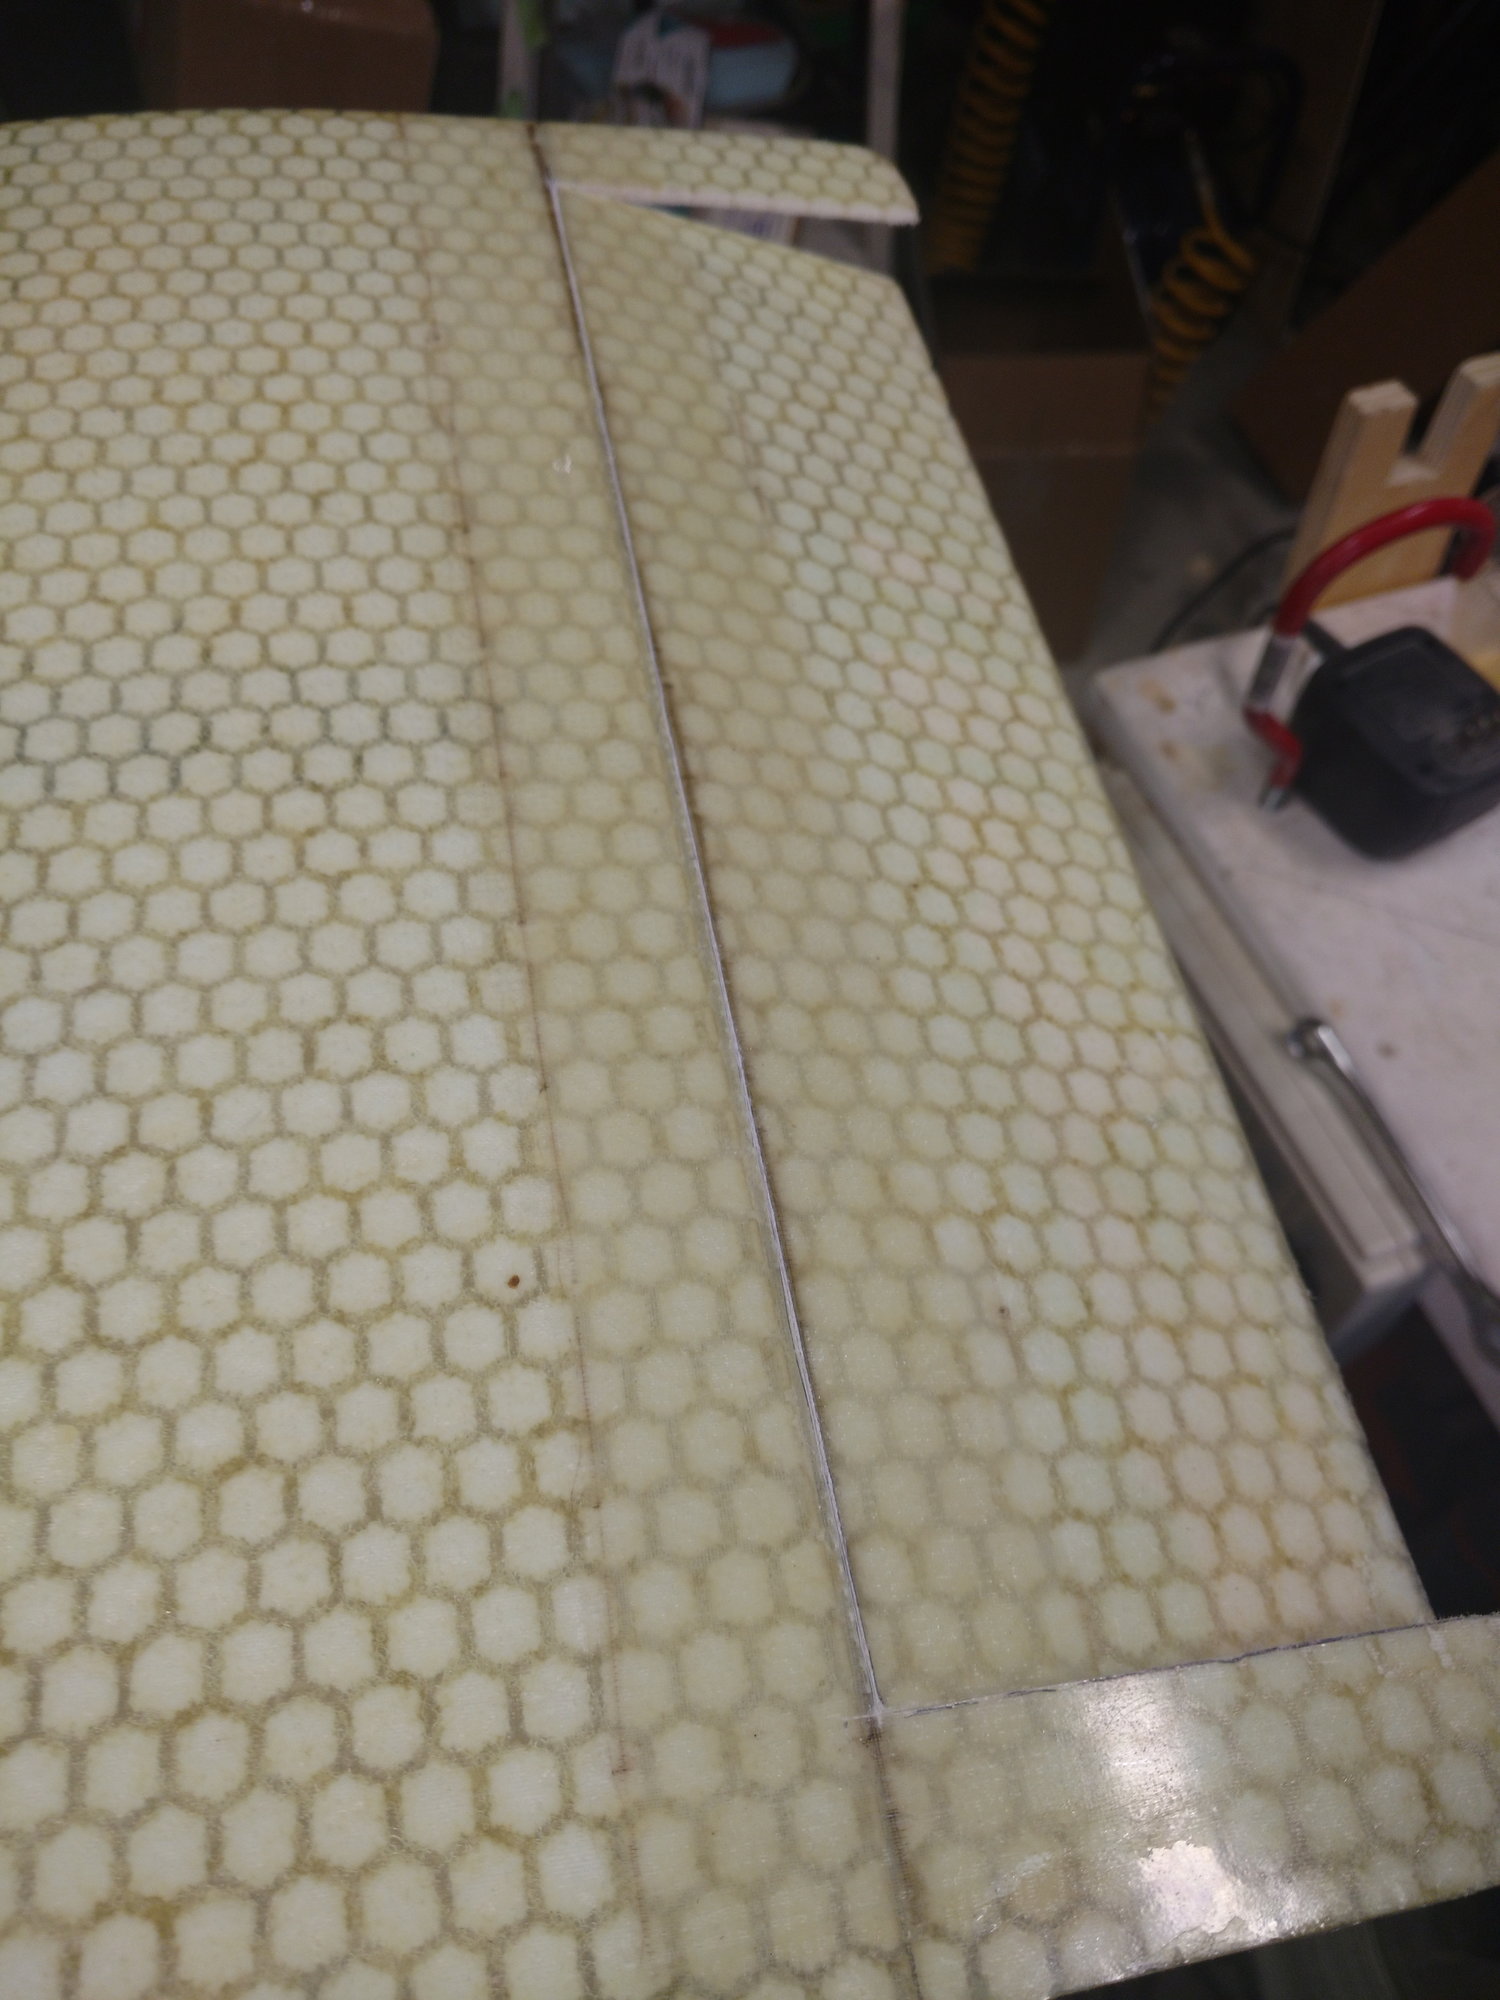
Hi Reuben... I lay up the peel ply in a sandwich. First my 4 oz outer skin
then a strip of 4 oz about 4" wide
then the Lancor soric(honeycomb looking stuff) cut to come up to the hinge line on both sides but about 1 mm apart.
then the PPly
then a 4" wide stip of 6oz
then cover it all with a layer of 4oz avoiding the hinge line. Same as the Lancor
My only regret was not running a fat marker line down the hinge line on the PP cause its hard to tell when your almost scribed to the PP. At that point after cutting the slots and your almost scribbed to the PP you will break it. Yes there will be a crunching sound as the resin breaks away from the PP and the 6 oz. The idea is that the 6 oz will shatter and even break all it strands but the pp will stay intact and do its job as a hinge.
Hope this helps
Last edited by Vettster; 04-26-2019 at 05:25 PM.
04-27-2019, 08:17 AM
#22
HI,
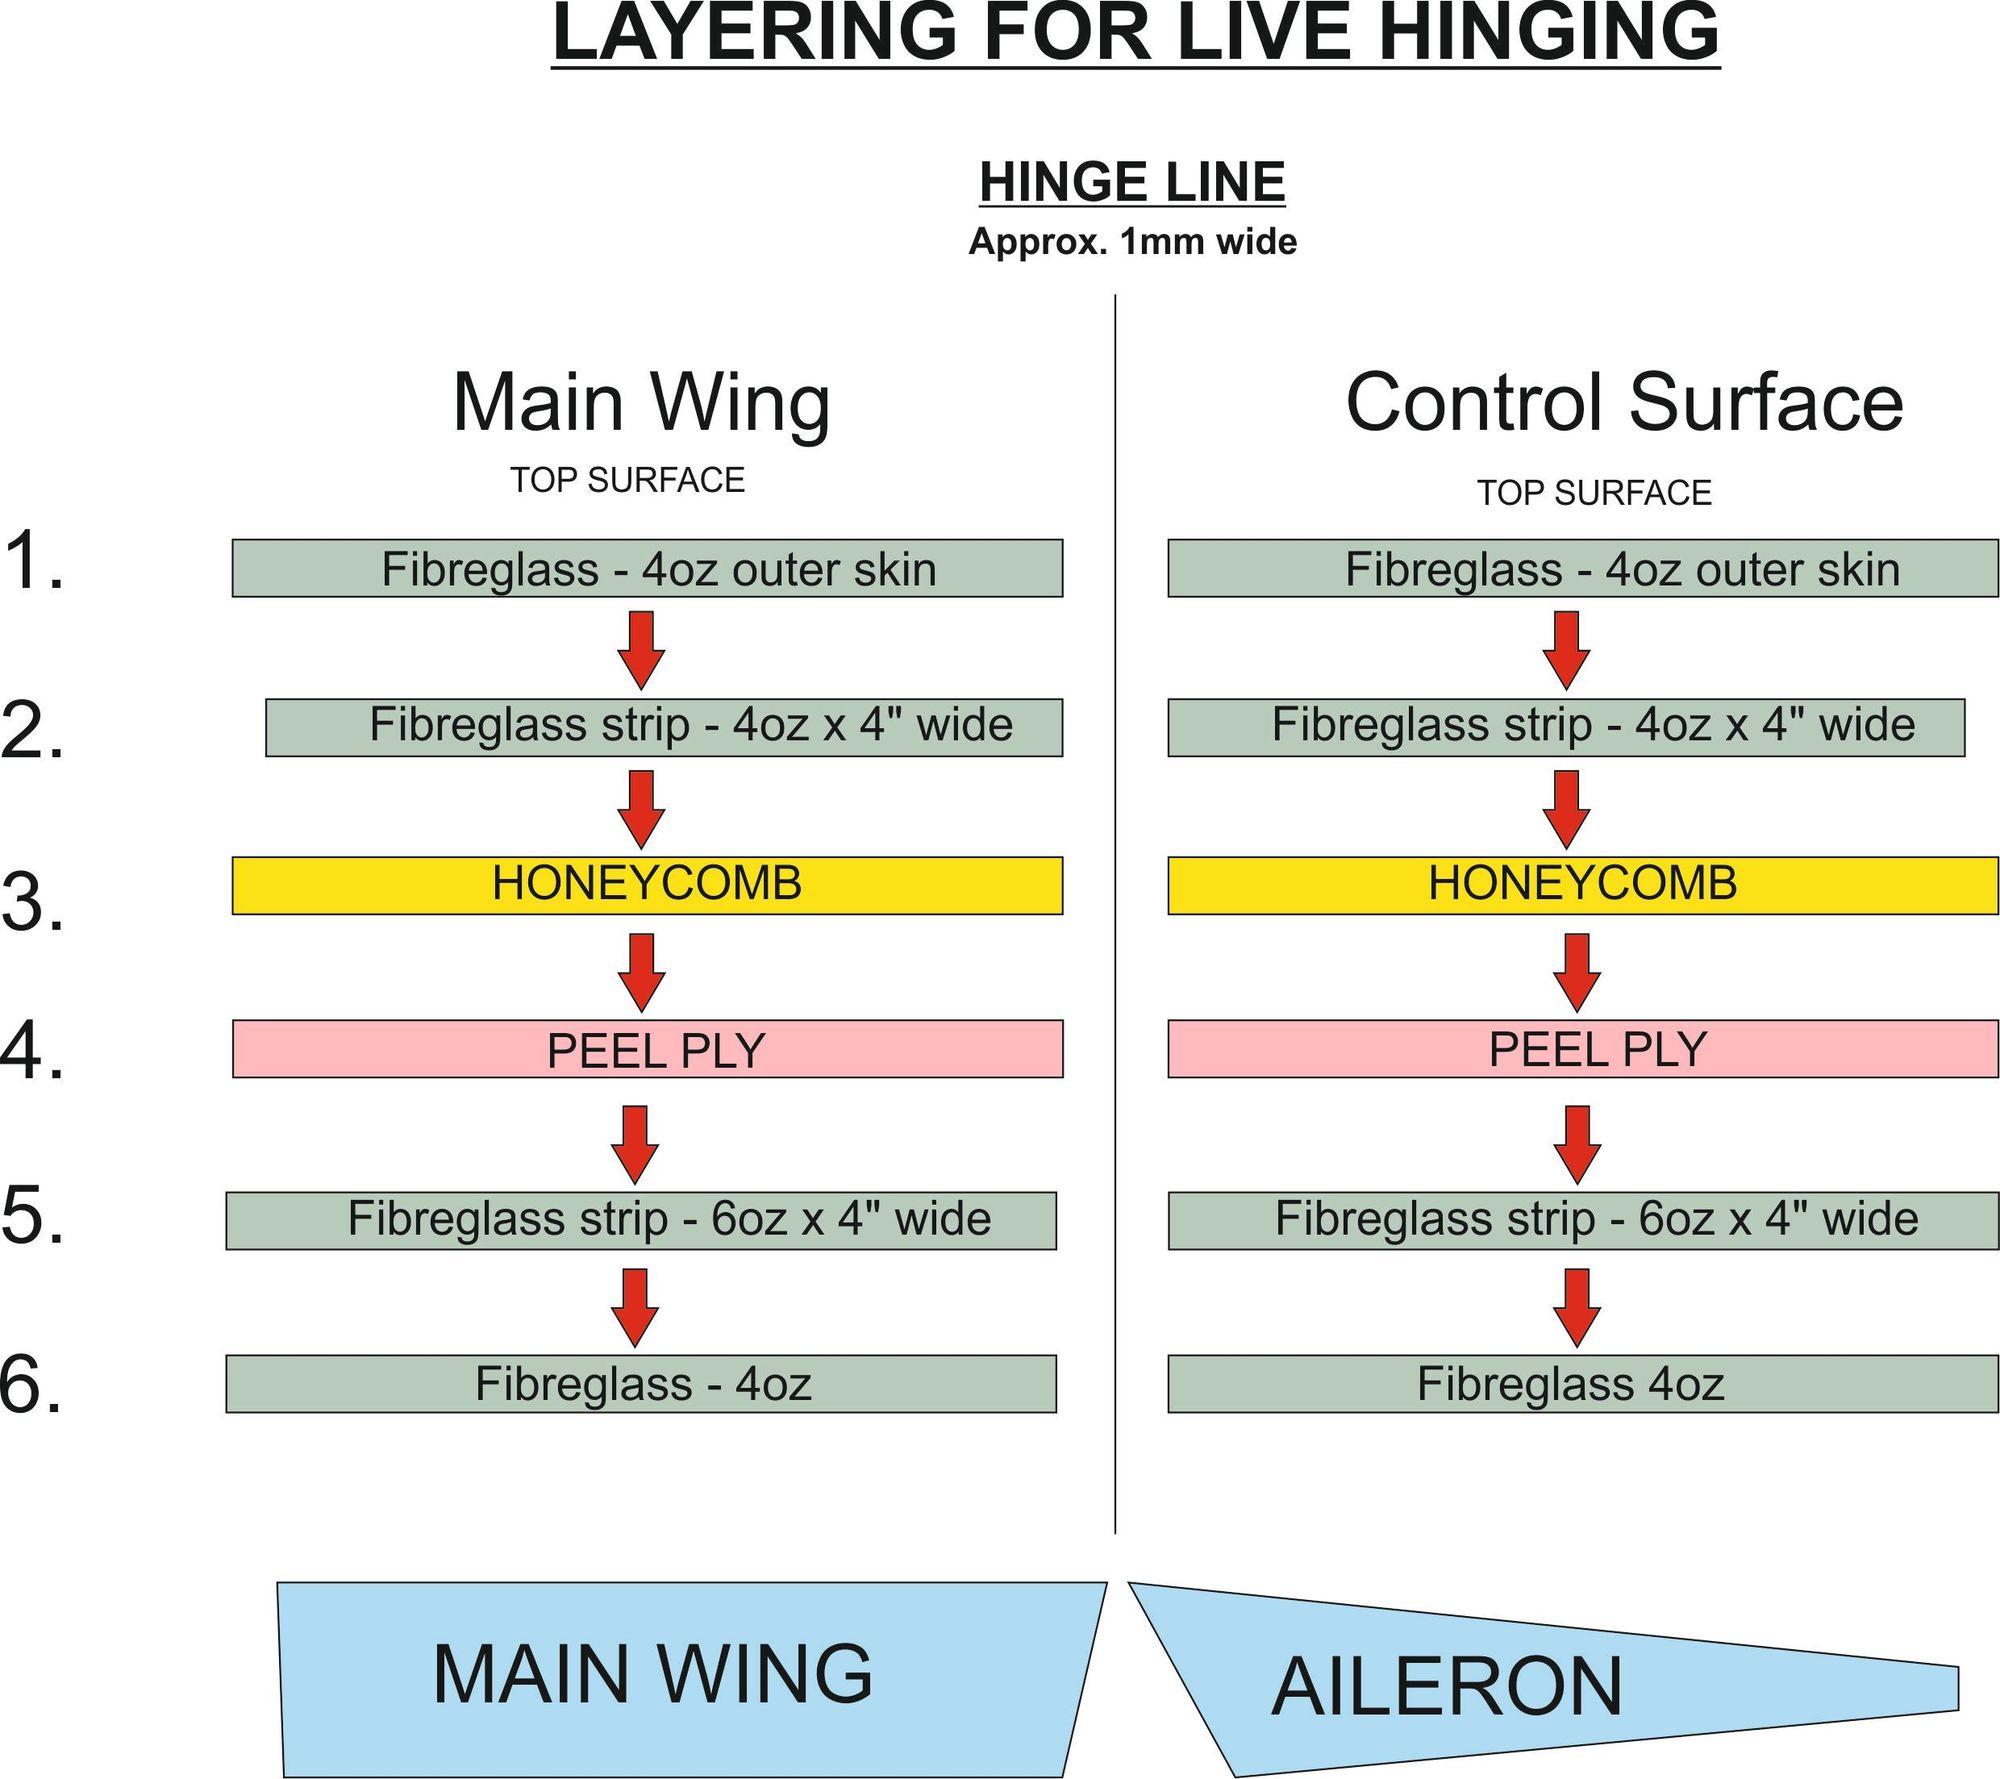
Thanks for your reply. To see if I understood you correctly I am enclosing a diagram of the layers you quoted. For ease of reference I also numbered them. Would appreciate it if you could go through it. Again, thanks.
Reuben
Thanks for your reply. To see if I understood you correctly I am enclosing a diagram of the layers you quoted. For ease of reference I also numbered them. Would appreciate it if you could go through it. Again, thanks.
Reuben
 04-27-2019, 08:55 AM
#25
Thread Starter
Join Date: Sep 2007
Location: Beeton, Ontario, CANADA
Posts: 1,337
Likes: 0
Received 5 Likes
on
4 Posts
Sorry its been awhile. Trying my best to remeber the order. your photo helps. Here's the order I used.
1
2
4
5
3
6
1, is a full sheet and bridges the hinge line. There is no separation
2, is 4" wide and bridges the hinge line. There is no separation
4, PP..is 4" wide and bridges the hinge line. There is no separation. Draw a dark line where the hinge will go
5, is 6 oz, 4" wide and bridges the hinge line. There is no separation
3, Honeycomb covers wing area and aileron with a 1mm gap at hinge line as this material is thick and needs to allow movement.
6, 4oz covers wing area and aileron with no gap. This can be cut later after vacuum to allow the aileron to rise.
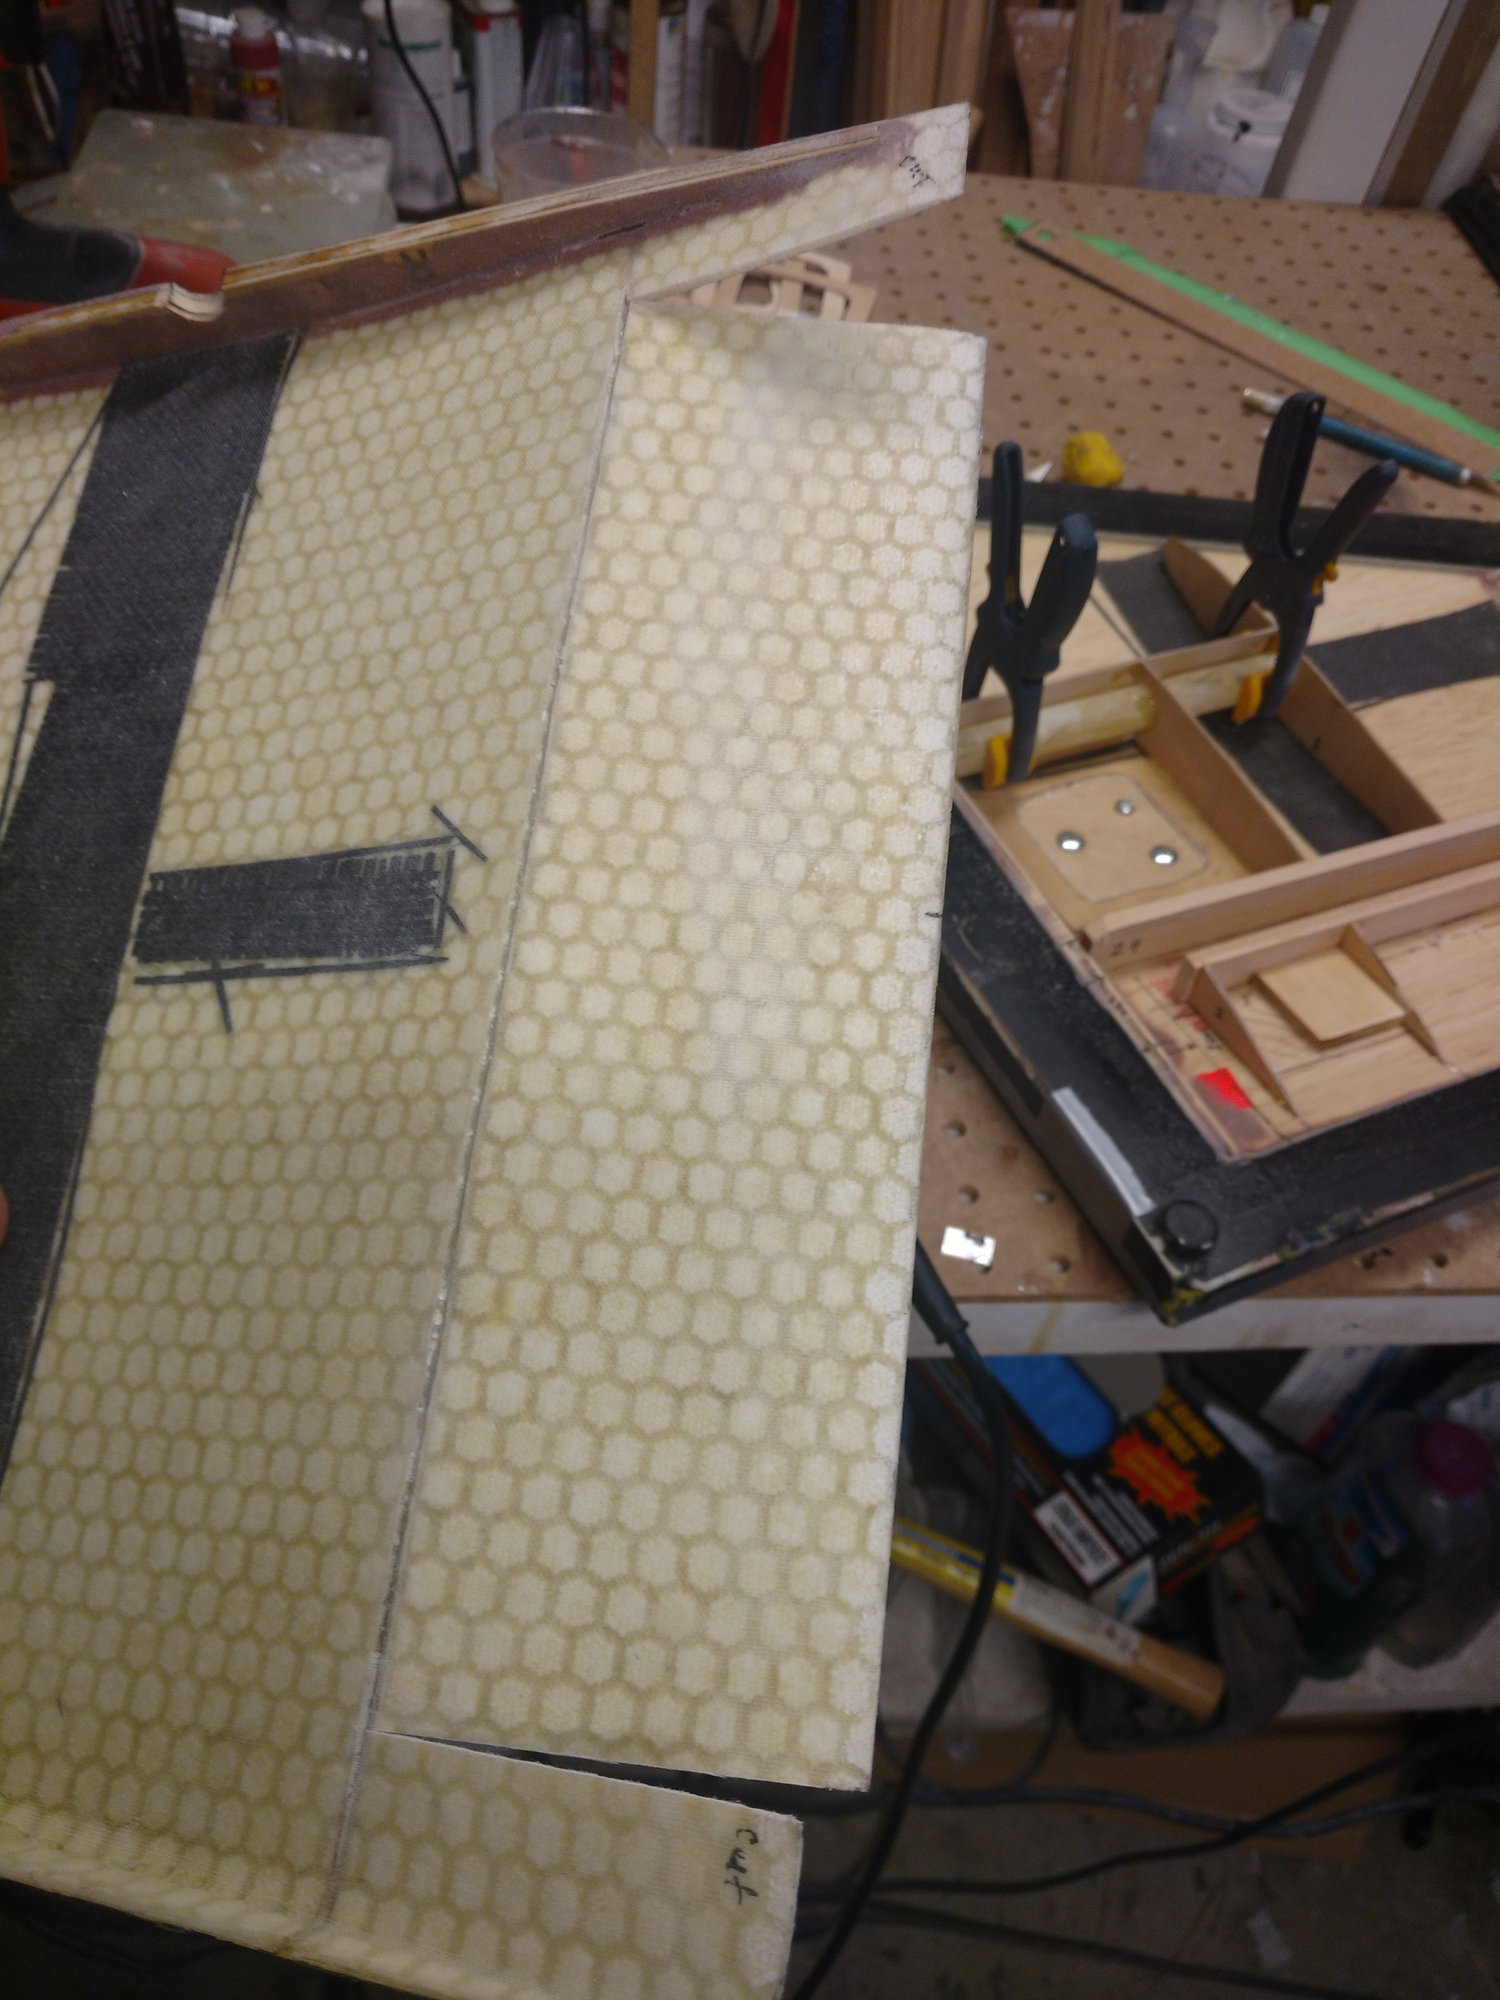
My idea here is to have all the strength in the 4oz strip/pp/6oz strip. I found this gave me a very ridged edge at the hinge line.
There's probably a better way to do this..but this worked for me. I also found it difficult to search for any information on this topic other than what people here have already posted here.
The tricky part is the offset cut (after you have glued the skins together) so that your aileron wont bind in the down position. If for example your hinge line is 2" up from the Trailing Edge then your cut on the bottom must be at least 2 1/8" to allow the bottom skin to slide under the lower skin. This will change depending on the wing. I found that I had to sand that area a lot to allow the part to slip under and ended up with a 3/16 gap. Had I made my cut further up..say 2 1/4 I MAY have avoided this gap. Again this depends on the wing. You will need a proper scribe to score the top for the hinge line. This will also cut the 30* angle you will need for the aileron to rise.
Also... If/when I do this again I will use 2oz Kevlar placed on a bias. The PP works but it just doesn't sit well with me and its easy to cut it by accident if you scribe to deep. Kevlar is near impossible to cut even when you want to. lol
If you like.. repost that picture in the order I have shown and I will double check your homework
Trevor . They can be found in the Tile department at homedepot.
1
2
4
5
3
6
1, is a full sheet and bridges the hinge line. There is no separation
2, is 4" wide and bridges the hinge line. There is no separation
4, PP..is 4" wide and bridges the hinge line. There is no separation. Draw a dark line where the hinge will go
5, is 6 oz, 4" wide and bridges the hinge line. There is no separation
3, Honeycomb covers wing area and aileron with a 1mm gap at hinge line as this material is thick and needs to allow movement.
6, 4oz covers wing area and aileron with no gap. This can be cut later after vacuum to allow the aileron to rise.
My idea here is to have all the strength in the 4oz strip/pp/6oz strip. I found this gave me a very ridged edge at the hinge line.
There's probably a better way to do this..but this worked for me. I also found it difficult to search for any information on this topic other than what people here have already posted here.
The tricky part is the offset cut (after you have glued the skins together) so that your aileron wont bind in the down position. If for example your hinge line is 2" up from the Trailing Edge then your cut on the bottom must be at least 2 1/8" to allow the bottom skin to slide under the lower skin. This will change depending on the wing. I found that I had to sand that area a lot to allow the part to slip under and ended up with a 3/16 gap. Had I made my cut further up..say 2 1/4 I MAY have avoided this gap. Again this depends on the wing. You will need a proper scribe to score the top for the hinge line. This will also cut the 30* angle you will need for the aileron to rise.
Also... If/when I do this again I will use 2oz Kevlar placed on a bias. The PP works but it just doesn't sit well with me and its easy to cut it by accident if you scribe to deep. Kevlar is near impossible to cut even when you want to. lol
If you like.. repost that picture in the order I have shown and I will double check your homework
Trevor . They can be found in the Tile department at homedepot.
Last edited by Vettster; 04-27-2019 at 09:15 AM.