


C152 mold
 10-04-2007, 01:53 PM
#26
Senior Member

Join Date: Mar 2007
Location: Greenville, SC
Posts: 174
Likes: 0
Received 0 Likes
on
0 Posts
That process will work - but it takes the long way around on several things (like curing time). I've never tried the sand method, so I can't comment on that.
Word of caution though; polyester gel coat is not necessarily compatible with epoxy resins. It is not a good idea to mix the two as you could get unpredictable results.
Word of caution though; polyester gel coat is not necessarily compatible with epoxy resins. It is not a good idea to mix the two as you could get unpredictable results.
 10-04-2007, 04:04 PM
#27

Thread Starter
Join Date: May 2006
Location: Melbourne, AUSTRALIA
Posts: 231
Likes: 0
Received 0 Likes
on
0 Posts
Ive started smoothing out the plug using epoxy/microballons mixed. So far its turning out all right. Once smooth and shaped, ill cover it in a layer of .010" glass. Ill add some epoxy/microballons mix if i missed any places that needed more shaping. Ill then spray a filler primer and get it smooth as possible. Then add scale detail.
If you dont use the sand method, what do you use to build up the thickness of the mold to give it stiffness?
You stated polyester gelcoat might not be compatible with epoxy resins, but about normal polyester resin and epoxy resin??
Im planning to use polyester resin for the mold as i have 4 litres of it, but unless u guys highly recomend to epoxy resin, i might have to change my mind.
When using polyester resin, would high temp mold release wax be ok, or should i use PVA?
10-05-2007, 12:06 AM
#28
Member
Join Date: Apr 2007
Location: ChristchurchCanterbury, NEW ZEALAND
Posts: 61
Likes: 0
Received 0 Likes
on
0 Posts
Anything can be used to build up the thicknes from dried beans (They have to be really dry) to the little polystyrene balls you put in beanbags. Sand, Rice, Beans, Polystyrene (Epoxy only), I've even used timber both in lengths and sawdust. They all work and save you lots of resin and make things lighter.
Don't mix polyester and epoxy anything as they won't mix nicely. Poluester resin also shrinks as it cures and continues to shrink long after it has cured. so your parts will get smaller and smaller.
Wax or PVA, Use both. You'll be waxing that mold about a dozen times before you ever use it anyway. Then before each part is pulled you need to blow the mold down to remove any dust, Wax then apply PVA.
10-05-2007, 12:17 PM
#29
Senior Member
Join Date: Mar 2007
Location: Greenville, SC
Posts: 174
Likes: 0
Received 0 Likes
on
0 Posts
yeah - polyester anything and epoxy anything are not designed to work well together (note: "Bondo" fillers are polyester based). I almost exclusively use polyester tooling gelcoat and polyester resin for my molds. If the mold doesn't have much shape to it to have inherent stability (for instance half a mold rudder), after the initial layup of the mold has mostly cured, I will glass in steel reinforcement. I've used everything from a welded truss to pieces of 1/2" all thread to keep the mold rigid. In other cases, such as a mold half for a sailboat hull that has a lot of depth, I use no reinforcement as the complex geometry of the mold is plenty to keep it stiff.
Hull mold without reinforcement:
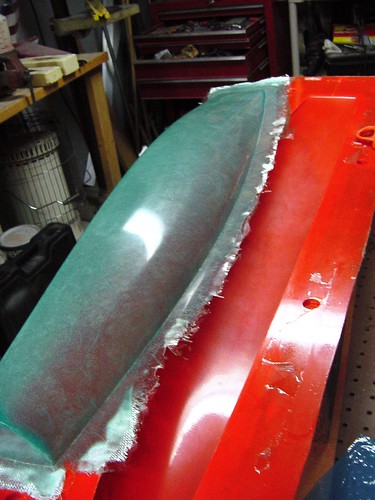
rudder mold with 1/2" all-thread reinforcement:
Hull mold without reinforcement:
rudder mold with 1/2" all-thread reinforcement:
10-16-2007, 11:19 PM
#30
Thread Starter
Join Date: May 2006
Location: Melbourne, AUSTRALIA
Posts: 231
Likes: 0
Received 0 Likes
on
0 Posts
done some more work on my plugs
went out and bought some of that polyurethane foam...works heaps better, a lot less time sanding and had a better finish.
the whole engine cowling plug is done with this foam.
ive also epoxy/microballons alot of the fuselage and have fiberglassed the aft fuse with .010" fiberglass
went out and bought some of that polyurethane foam...works heaps better, a lot less time sanding and had a better finish.
the whole engine cowling plug is done with this foam.
ive also epoxy/microballons alot of the fuselage and have fiberglassed the aft fuse with .010" fiberglass
11-09-2007, 06:35 PM
#31
Thread Starter
Join Date: May 2006
Location: Melbourne, AUSTRALIA
Posts: 231
Likes: 0
Received 0 Likes
on
0 Posts
I've complete some more on my plugs. So far i have learnt some valuable lessons. The fuselage is 36" long and i only have 7 bulkheads. I should've use twice that to make it more accurate and easier to sand. Also, i should've used polyurthane foam from the start, but i didnt know you could buy it from fiberglass suppliers.
My fuselage is about 36" long, whats the best material to use as a parting board??
Also, i want to put rivets and panel lines on my plug. Whats the best way of doing this?
What would stop wax from building up in the panel lines and rivets on my mold?
My fuselage is about 36" long, whats the best material to use as a parting board??
Also, i want to put rivets and panel lines on my plug. Whats the best way of doing this?
What would stop wax from building up in the panel lines and rivets on my mold?
11-30-2007, 04:07 PM
#32
Join Date: Jul 2003
Location: Des Moines, WA
Posts: 137
Likes: 0
Received 0 Likes
on
0 Posts
Hey, your plugs are looking good. I hope you sell a few on eBay. :-) Anyhow, I would use Masonite for the parting board. It looks like particle board, only thinner. You should be able to find it at a home improvement store.
12-08-2007, 05:21 AM
#33

Hi gosk8ing
Nice project you have after one mount I will start moulding my Cessna 152 ,if you want I can post some pics here of my work
This is the first pice before moulding
Nice project you have
after one mount I will start moulding my Cessna 152 ,if you want I can post some pics here of my work This is the first pice before moulding
12-08-2007, 06:03 PM
#34
Thread Starter
Join Date: May 2006
Location: Melbourne, AUSTRALIA
Posts: 231
Likes: 0
Received 0 Likes
on
0 Posts
Hey fokke,
That would be great if you posted more photos here!! It would be great to see how we do things differently. Its nice to see that you built the fin into the fuselage. I thought it would be too much work so i didnt bother. I also see that youve done a wing saddle. Thats probably a safer design, but because i wanted mine as scale as possible, my wings are going to be bolted onto the side of the fuslage with the wing struts supporting them (like the full scale).
What size is your Cessna 152?? Mines a 69"/175cm wingspan and is going to be powered by an E-Flite 46.
12-09-2007, 01:14 AM
#35
Thread Starter
Join Date: May 2006
Location: Melbourne, AUSTRALIA
Posts: 231
Likes: 0
Received 0 Likes
on
0 Posts
Slowly getting there...alot of sanding.Theres a pic of my carbon fibre wing struts. Because they were easy to crack (by squeezing them to hard), i decided to fill them up with a low density foam.
12-09-2007, 04:16 AM
#36
Hi gosk8ing that fuse is not mine. I've taken only to make the mould. I don't have wings yet, but I'm going to make them soon. I have a lot of experience whit the similar technology that is why the work is not difficult for me - it's a pleasure. Meazurement of the plane is: wings - 169sm.; fuse 120sm.
My plane will be E - power whit engine 550W, reg-40A, bat-2000mah
My plane will be E - power whit engine 550W, reg-40A, bat-2000mah
01-11-2008, 10:14 PM
#37
Thread Starter
Join Date: May 2006
Location: Melbourne, AUSTRALIA
Posts: 231
Likes: 0
Received 0 Likes
on
0 Posts
After a month or two, I have finally got motivated to continue my plug. Today I went out and bought some filler primer to start spraying my plug. This is the first time I've done spraying so the paint job isnt the best. It also didnt help that the paint manufacturer recommended a 1.5mm - 1.8mm tip and I only had a 1mm tip. The first couple of coats came out rough, but the third coat turned out ok (I guess because I added more thinners). The plug looks bumpy, but thats just the paint job. Once sanded it should look a lot better.
01-27-2008, 03:46 PM
#39
Thread Starter
Join Date: May 2006
Location: Melbourne, AUSTRALIA
Posts: 231
Likes: 0
Received 0 Likes
on
0 Posts
When I sprayed the plug, I left it out in the sun to dry and probably for a bit to long. The cheap expandable foam under the fibreglass expanded and blew a bit of the fibreglass out.
I have left this project for the time being. Dont know if Ill come back to it, but since it was my first plug, I have learnt a lot.
I am currently building a P47 Thunder plug (wingspan 51"). Thought I would go something a bit smaller. It is to be powered by something between .25 to .40 (not sure yet).
I have built the plugs in 2 halves, so there is no need to manufactuer a parting board. (just use flat mdf or something...easy). Ive used poly urethane expanding foam for the build up. Ill post photos soon.
01-27-2008, 04:34 PM
#40
Hmmm interesting ........
the mdf is more better ,for me ........
I'll wait the pics very interesting method
this is my topic of building full composite Messerschmitt 109
http://www.rcuniverse.com/forum/m_5311706/tm.htm
the mdf is more better ,for me ........
I'll wait the pics
very interesting methodthis is my topic of building full composite Messerschmitt 109
http://www.rcuniverse.com/forum/m_5311706/tm.htm
02-11-2008, 02:30 AM
#44
Thread Starter
Join Date: May 2006
Location: Melbourne, AUSTRALIA
Posts: 231
Likes: 0
Received 0 Likes
on
0 Posts
Been working a bit more. I had problems building the halves, so in the end, I just decided to join the halves together.
The basic shape is now done and the whole plug is glassed. Now I have to decide what scale detail I want to add to the plug before priming.
The basic shape is now done and the whole plug is glassed. Now I have to decide what scale detail I want to add to the plug before priming.
03-09-2008, 02:50 AM
#46
Thread Starter
Join Date: May 2006
Location: Melbourne, AUSTRALIA
Posts: 231
Likes: 0
Received 0 Likes
on
0 Posts
I bought a scale 1:48 P-47 Razorback plastic model to help me with the scale detail.
I've done the cutout aft of the pilot, scaled from the plastic model. Since the canopy on the plastic model is quite thick, the cutout seems to be deeper than what I think is scale. Im not able to find any photos, so Im not able to compare it to anything.
Anyone got any photos???
I've done the cutout aft of the pilot, scaled from the plastic model. Since the canopy on the plastic model is quite thick, the cutout seems to be deeper than what I think is scale. Im not able to find any photos, so Im not able to compare it to anything.
Anyone got any photos???
05-24-2008, 01:21 AM
#47
Thread Starter
Join Date: May 2006
Location: Melbourne, AUSTRALIA
Posts: 231
Likes: 0
Received 0 Likes
on
0 Posts
Its been a few months, but i have finlly got back into it. Ive sprayed a couple of coats of filler primer and then sanded it back. One more coat and i think it should be done.
