


How do you create panel lines and rivet / screws for a mold ??
 05-07-2009, 11:49 PM
#1
Member
Thread Starter
Join Date: Nov 2002
Location: SydneyNSW, AUSTRALIA
Posts: 49
Likes: 0
Received 0 Likes
on
0 Posts
I have made a master plug for an FB-111A
What is the most stable surface to work with to create panel lines and all the screw heads?
Regards
David
What is the most stable surface to work with to create panel lines and all the screw heads?
Regards
David

 METAL DUCT TAPE.. THEY MAKE AN EXTA THICK VERTION FOR SANDBLASTING.. CAN DO PANELS JUST LIKE THE FULL SIZE JET.
05-11-2009, 03:04 PM
METAL DUCT TAPE.. THEY MAKE AN EXTA THICK VERTION FOR SANDBLASTING.. CAN DO PANELS JUST LIKE THE FULL SIZE JET.
05-11-2009, 03:04 PM
#7

wow.. looks good. One thing you can try, since you seem to have a smooth and blemish free surface. Lay 1/64" wide "chart tape" and lay it on the surface were your panel lines will need to be. Then spray 3 or 4 light coats of primer down, and remove the tape. Instant panel lines. then you can use a sharpened brass tube of the correct size for rivets, and the same tube w/ a small jewelers size screw driver inserted into the tube for the screw heads.
05-11-2009, 05:27 PM
#8
Member
Thread Starter
Join Date: Nov 2002
Location: SydneyNSW, AUSTRALIA
Posts: 49
Likes: 0
Received 0 Likes
on
0 Posts
Thanks for the feedback
Not a raised line but a scribed line with the screw heads made using a tool as you suggested
I need is to make a permanent panel line & screw heads in the mold.
If you try and scribe a line on fibreglass, then it raises all the fine glass hairs
WHat would be a more stable / better surface to work with ????
Cheers
David
05-11-2009, 11:50 PM
#9


Join Date: Feb 2007
Location: Norco, CA
Posts: 938
Likes: 0
Received 0 Likes
on
0 Posts
Hey David, I was in another thread and someone provided this link
http://www.tompierce.net/190/html/pa...rf_details.htm
which I believe is an excellant example. I was so amazed at this guys detail work I saved his web pages on my computer.
Bryan
http://www.tompierce.net/190/html/pa...rf_details.htm
which I believe is an excellant example. I was so amazed at this guys detail work I saved his web pages on my computer.
Bryan
05-12-2009, 10:13 AM
#10
ORIGINAL: David de Botton
Thanks for the feedback
Not a raised line but a scribed line with the screw heads made using a tool as you suggested
I need is to make a permanent panel line & screw heads in the mold.
If you try and scribe a line on fibreglass, then it raises all the fine glass hairs
WHat would be a more stable / better surface to work with ????
Cheers
David
David,
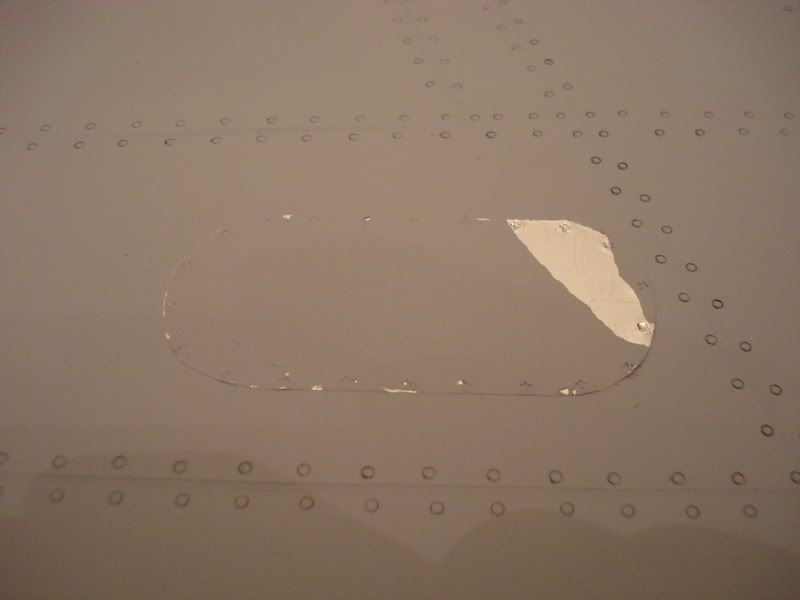
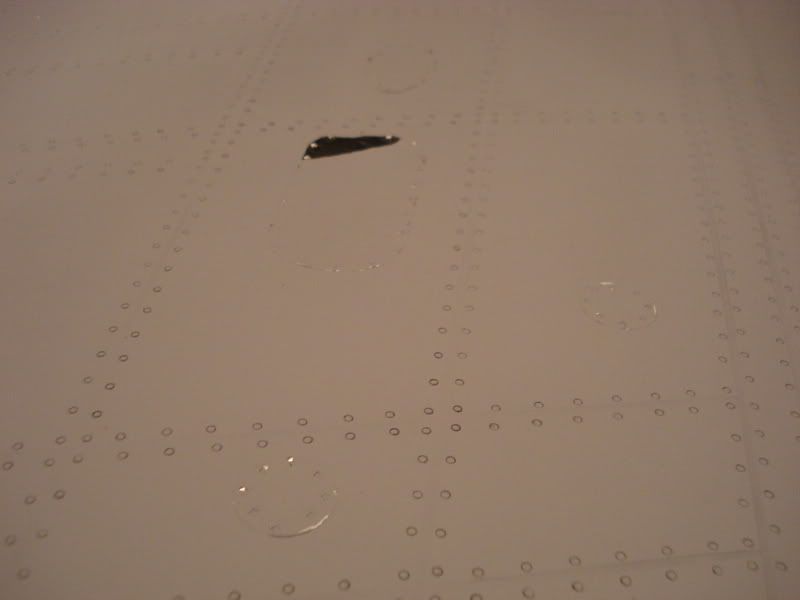
dont know if i clarrified or not.. but the 1/64" chart tape is peeled off the plug after the primer has dried. When you peel it off, it leaves a nice then recessed panel line. Here's a pic using the techniques i posted:
 05-13-2009, 05:22 PM
#11
My Feedback: (3)
Join Date: Oct 2003
Location: Crowley, TX
Posts: 36
Likes: 0
Received 0 Likes
on
0 Posts
Have a look at this site http://www.su27.de/ click on index to get started...lots of pictures...shows excellent scale detail work using aluminum tape
05-13-2009, 05:33 PM
#12
Member
Thread Starter
Join Date: Nov 2002
Location: SydneyNSW, AUSTRALIA
Posts: 49
Likes: 0
Received 0 Likes
on
0 Posts
Harolds work is outstanding.
He actually covered the fuselage with individual alloy sheet pieces.
Like many others I have followed that project. project
He actually covered the fuselage with individual alloy sheet pieces.
Like many others I have followed that project. project
05-15-2009, 02:58 PM
#13
Member
My Feedback: (6)

Join Date: May 2009
Location: Springfield,
MO
Posts: 75
Likes: 0
Received 0 Likes
on
0 Posts
You already have the forms, and in reality, that is where any detail should be made. For the panel lines, one must have extreme patience, and commitment to the details! All you need is potter's clay. (modeling clay) I use a roller to flatten the clay to the desired thickness. Using a long straight edge, thin as possible, and a pizza cutter dampened frequently, cut as many strips as possible from the clay, the longer the better. This strip you desire would be 1/16th by 1/32", or less if you're good. Lay these into your molds, and secure them with your index and middle fingers running their length. Moisten your fingers occasionally, and be sure to press them together so as to force the clay onto the surface. For the screw, or rivet, heads, find a scale size brass screw (if possible), hold it with a set of needle-nose vise grips, and heat it with your soldering iron, holding into place in the mold. THIS TAKES TIME! Nothing in life, that's worthwhile, is easy. You will be very proud of your acheivement when your next plug comes out!
Keep your head up and on a swivel.
Keep your head up and on a swivel.
05-20-2009, 03:17 PM
#14
ORIGINAL: Skratchbilt
You already have the forms, and in reality, that is where any detail should be made. For the panel lines, one must have extreme patience, and commitment to the details! All you need is potter's clay. (modeling clay) I use a roller to flatten the clay to the desired thickness. Using a long straight edge, thin as possible, and a pizza cutter dampened frequently, cut as many strips as possible from the clay, the longer the better. This strip you desire would be 1/16th by 1/32", or less if you're good. Lay these into your molds, and secure them with your index and middle fingers running their length. Moisten your fingers occasionally, and be sure to press them together so as to force the clay onto the surface. For the screw, or rivet, heads, find a scale size brass screw (if possible), hold it with a set of needle-nose vise grips, and heat it with your soldering iron, holding into place in the mold. THIS TAKES TIME! Nothing in life, that's worthwhile, is easy. You will be very proud of your acheivement when your next plug comes out!
Keep your head up and on a swivel.
why would you use clay in the mold surface, as when you go to pull the part from the mold, your going to pull the clay off as well, so you'll have to redo the lines everytime..
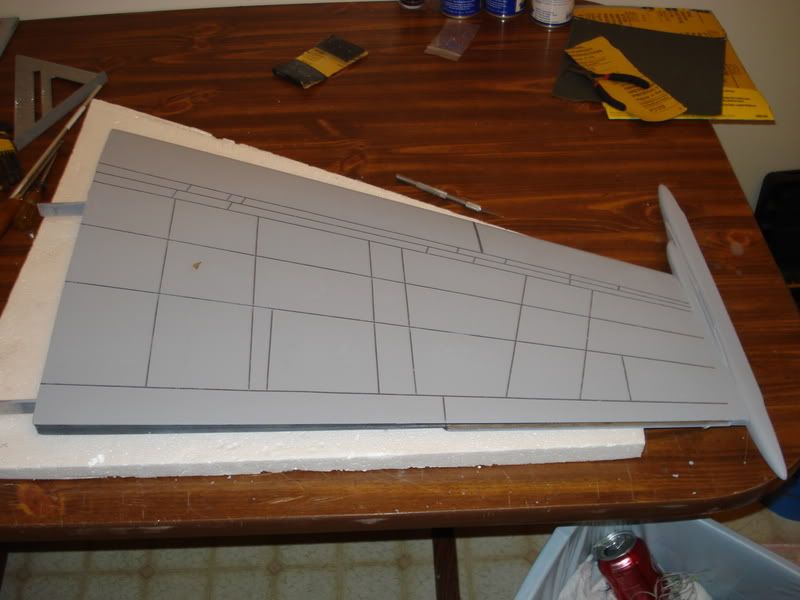
With the tape and paint method, you just lay the tape on your plug, paint the plug, put your rivet / screw detail into the paint, peel the tape"panel lines" wetsand. polish and wax the plug, then start your molding process. Its pretty easy, as it took me less than 4 hours to layout all the panel lines on a 1/7 scale F-18. The rivets and screw detail took the better part of an entire week.
