


A Ringmaster Bi-Plane
 04-17-2014, 03:20 PM
#151

Thread Starter

Yea no wing overs for a few months
Well I an Home from hospital.
Surgey went well
A bit hopped up on pain meds, but I dont feel but just a little bit of pain almost gone
Carpal tunnel right hand still hurts like heck deal with that later
Arthritis in hands hips and knee is nasty They took me off my meds for that and can't start again for 2 months Got to tell people I cant shake hands
Nerve pain in upper body dropped way down in few hours and now the fire in my legs has nearly
My laptop crashed the night before going in.
just got to call Dell and get it reloaded back to factory fresh ROOTKIT Cant fix that wipe drive and restore to factory fresh the set up again
using Wifes
We have a RN here where we are staying so in good hands
I am in a hard neck brace for 2-3 months no anti inflamation meds for 2 months as they interfere with the bone grafts healing. They used as much as the could salvage from neck and the cadaver
And yes the surgeon said it is easier to fix cervical than lumbar. That will also be done later
Got to get my wife fixed up some now She is also a mess getting old is hard
GOD IS GOOD AND WISER THAN US. It was hard to accept all of this and loss of apartment. But he has us just where we need to be for now
This is not how I normaly post I watch spelling and punctuation as best I know how but that will be later
thanks all of you
 04-17-2014, 07:30 PM
#152

Yea no wing overs for a few months. Well I an Home from hospital. Surgery went well. A bit hopped up on pain meds, but I dont feel but just a little bit of pain almost gone. Carpal tunnel right hand still hurts like heck deal with that later. Arthritis in hands hips and knee is nasty They took me off my meds for that and can't start again for 2 months Got to tell people I can't shake hands. Nerve pain in upper body dropped way down in few hours and now the fire in my legs has nearly....
My laptop crashed the night before going in; just got to call Dell and get it reloaded back to factory fresh. ROOTKIT, can't fix that; wipe drive and restore to factory fresh the set up again. Using Wife's.
We have a RN here where we are staying so in good hands. I am in a hard neck brace for 2-3 months no anti inflammation meds for 2 months as they interfere with the bone grafts healing. They used as much as the could salvage from neck and the cadaver. And yes the surgeon said it is easier to fix cervical [neck bones] than lumbar. That will also be done later.
Got to get my wife fixed up some now She is also a mess getting old is hard. GOD IS GOOD AND WISER THAN US. It was hard to accept all of this and loss of apartment. But he has us just where we need to be for now. This is not how I normaly post I watch spelling and punctuation as best I know how but that will be later. Thanks all of you
Originally Posted by Psalm 37:25 (World English Bible)
"I have been young, and now am old, yet I have not seen the righteous forsaken, nor his children begging for bread."
04-20-2014, 08:14 AM
#154
Thread Starter
But I am still a ways from being able to travel. But feeling good, Not using any pain meds now, and walking 5 blocks now. And then I go nap! I have not been able to walk that far in over a year now.
Swallowing still hurts a lot. Off of my athritis med and anti inflammatory meds for two months so my hands hurt like hell. Next sucker that wants to shake my hand might get Jack Slapped
I am using my CPAP machine For the first time in years (I admit I should always have used it). My upper chest is sore and the passages are still very angery at being pushed out of the way during surgery. So my breathing during sleep was extremely bad. I stopped breathing at least once a minute. Wife was exhausted with the noise I was making when I stopped. I used it the first time yesterday after I took my after walk nap. slept and hour and then said lets go dancing. I feel good, A little two step and a Rumba. Lets dance.
I had a great sleep with the CPAP last night. Time to dance all day and all night. But I think I will pass on doing the Twist though.

And getting a bit of plane building done. 3rd coat of finish epoxy sanded on my little wing tip plug. I don't know if I need to spray it with primer paint or just paint. It is a plug for a PoP mold for four fiber glass tips. Feels smooth to my fingers and finger nails. Last sand paper was 180 grit.

Ken
Swallowing still hurts a lot. Off of my athritis med and anti inflammatory meds for two months so my hands hurt like hell. Next sucker that wants to shake my hand might get Jack Slapped
I am using my CPAP machine For the first time in years (I admit I should always have used it). My upper chest is sore and the passages are still very angery at being pushed out of the way during surgery. So my breathing during sleep was extremely bad. I stopped breathing at least once a minute. Wife was exhausted with the noise I was making when I stopped. I used it the first time yesterday after I took my after walk nap. slept and hour and then said lets go dancing. I feel good, A little two step and a Rumba. Lets dance.
I had a great sleep with the CPAP last night. Time to dance all day and all night. But I think I will pass on doing the Twist though.
And getting a bit of plane building done. 3rd coat of finish epoxy sanded on my little wing tip plug. I don't know if I need to spray it with primer paint or just paint. It is a plug for a PoP mold for four fiber glass tips. Feels smooth to my fingers and finger nails. Last sand paper was 180 grit.
Ken
Last edited by flyingagin; 04-20-2014 at 08:29 AM.
04-20-2014, 08:41 AM
#155
Glad to see Ken, you are in good hands and your wife is looking after you.
Regarding painting your wood plug, depends on the paint. Some paints require a primer to properly bond to the plug material. Main thing is a paint that will allow you to put the mold releasing agent to that is compatible with both the mold release and resin, which doesn't break down, so the resin doesn't stick to it.
Workmanship on the mold looks good, though.
You're going to have one sharp looking plane when all is said and done.
04-20-2014, 09:09 AM
#156
Thread Starter
Thanks George. It feels good to be even a little functional.
Here is what I got from a really great builder in Florida
So I still have some work to do. Will have to send the wife out with some one to get me some finer sand paper.
Ken
Here is what I got from a really great builder in Florida
Hold it against light where you can see the reflection of the surface. PoP will yield a glass finish but anything in or on the surface will show. When you pull the PoP you will know with out a doubt because of the (literally) glass finish to the surface. For me the final sanding needs to be wet sanded with a much finer grit, I would say 300-400. And to really make sure of a smooth surface mix up a last batch of finishing resin, with a good brush ready, warm the resin and apply quickly. This (warmed resin) will flow out to a glass surface finish, no sanding, no paint, and no primer required.
Ken
05-07-2014, 07:04 AM
#157
Thread Starter
No pics to post. Still working on 2 different planes at the same time. Both projects are at the educating me stage.
On the other I am learning to laminate Parts. Made molds and will laminate up L.E. and T.E. for a stab and elevator half's on my GLT. Stymied at the moment while I try to find parts for my parts steaming vessel.
On the RM I am still at the wing tip stage.
I have the tip plug made (see above post). I made a test PoP mold with a no good tip. The PoP mold and plug separated wonderfully just fell apart from each other. So that part is mastered.
I then left the PoP mold in the car on the dash for 2 days to bake and dry. Cars are great ovens.
I then picked up the cheapest Carnuba car paste wax at Wally world they had $10. I waxed the PoP mold 3 times and the applied fiber glass and finishing risen to the inside of the mold. I did not even try to do a good job with laying the cloth. I know it is going to be tricky. The mold is back in the car baking. This really just another release test.
The real deal tip is WAS almost ready. WAS. I made a rig to hold my risen cup in hot water. Mixed up some resin in the cup that was in near 200 degree water. The risen was super thin. Thought this would make a real nice butter coat (right term???) to apply over the resined and well sanded tip plug. As soon as the risen was applied to the plug it got thick almost instantly.
I think it should sand out out good though tomorrow. Then I will just keep going to some 800 sand paper. And then I will wax it a few time with the Carnuba car wax before pouring PoP around it.
One more area where I am not yet up to the required standards is the PoP. On the test PoP mold I noticed little pits that I am sure are poorly mixed PoP or air bubbles.
So really it is more learning and stepping my game up a few notches than actual building. afterwards there will be progress to report.
Ken
05-07-2014, 08:16 AM
#158
You're into an area that I've never even thought of entering, and I'm finding it positively fascinating. Really wanna see some pics if/when you get a chance, but no biggie. I'm taking notes of what you're doing and how well each step works.
Lucky you - Texas - great for car-ovens. Virginia, not so much yet.
Lucky you - Texas - great for car-ovens. Virginia, not so much yet.
05-07-2014, 09:07 AM
#159
Thread Starter

I am experimenting and guessing as much as anything Dave. But when I do figure it out I will sum it up here. And I intend to take the new found skills and knowledge straight to the GLT's cowling And some other planes as well.
Ken
05-07-2014, 12:47 PM
#160
Thread Starter
My test glass tip came out of the mold. It took some effort but did not damage the PoP mold. The test piece was only 1 layer of 4 ounce crows foot weave cloth, except I did have a narrow piece at the very tip wrapping around.
Several observations.
I think the fiber glass / risen need to set longer.
The PoP mold needed more waxing.
I will need 3 layers, maybe 4 of cloth.
And I did not get good wet out.
I cleaned the PoP mold again. Waxed the snot out of it so that I had a paste in it. I then took my heat gun and heated it enough for the wax to penetrate into the mold.
I will wax it a few times with extended periods between.
This is only a test mold. No parts out of it will be usable. But I am going to go for 3 layers cloth and try to treat it just like it was the real deal.
Ken
05-08-2014, 04:44 PM
#161
Thread Starter
Yesterday I prepared a new test. better waxing of the mold, better laying of the cloth. more cloth.
Then I was liberal with the resin and tried to work it in to the cloth better.
So today I pulled the part out of the mold.
Bye bye mold, it cracked and chunks came off of it. It was just a test mold any way.
The glass part came out with a lot of resistance, and ruined the mold.
So raw unpainted PoP ain't going to work!
The glass tip is terrible. Even though I tried to lay the cloth in better and more of it. It was real difficult to position in the depth of the mold. And this is a much more shallow mold than the real tip mold.
I am going to have to change tactics. But at least I leaned what not to do.
I got three choices I think.
#1 give up on glass wing tips and make 3 more wooden tips............Not happening (at least not yet). This was supposed to be a learning experience to enable me to make parts for other planes.
#2 make another PoP mold and paint it to seal it. then because there is 0 chance I can manipulate the cloth in as deep and narrow a mold as the real tip mold will be, I can pour the PoP mold full of silicon to make a male mold that I can the lay my cloth up on the outside, and wet the cloth out real good. After wich I can then press the the male silicon mold and cloth / resin into the female PoP mold. Not rea sure such a complex thing is with in my abilities.
#3 Use the wooden plug as a male mold. Just lay up class on it, After making sure I can get good release of the glass tips. Paint the male wooden mold and wax the snot out of it.
Any way here are a couple of pics of the real poor glass tips..
Ken
05-09-2014, 03:11 AM
#162
... (learning what subject matter I don't ever want to get into doing) ...
Yeah, you're wayyyyyy beyond me.
Yeah, you're wayyyyyy beyond me.
05-09-2014, 06:52 AM
#163

Instead of more cloth which will make it heavier, how about inserting a balloon over the mold. Years ago, the makers of "Hobbypoxy" came up with a method called "Easy Does It" or something like that. Basically, after you put the cloth and resin on the mold, you push an inflated balloon over it...letting some air out as you do it. Done properly you have the balloon push out all the air bubbles as well as apply even pressure to the entire structure.
George
Edit: Guess I should add that you continue to let air out of the balloon until you just have the deflated balloon over the structure. The balloon is left on the structure until the epoxt cures.
George
Edit: Guess I should add that you continue to let air out of the balloon until you just have the deflated balloon over the structure. The balloon is left on the structure until the epoxt cures.
Last edited by gcb; 05-09-2014 at 06:57 AM.
05-09-2014, 07:09 AM
#164
Thread Starter
Sounds like an excellent ideal with the balloon.
After trying to lay cloth in the test mold I found laying exactly where I want to be a very tough thing. The test mold is about 1/2 as deep as the real tip is.
But I will see if I can and then use the balloon. Right now I am still prepping the real tip. The Paint is not yet ready for sanding. And it is cloudy here so no car oven to speed things up.
Thanks for the Balloon suggestion George.
Ken
09-16-2014, 05:26 PM
#165
Thread Starter
This has been a bit of a longish pause in the build. Sorry about that. A awful lot of personal water has gone under the bridge. Being basically homeless stops all leisure projects.
We now have a new roof, abit I think it is also temporary. No ideal at this point how long or where we will end up at. It is all in God's hands, and that is where my trust is.
I have carved out a work area in the garage. Have all of my tools set up. My oak computer desk that I build on has been mounted on heavy duty castor that I had stashed away. It presently gets hotter than the sun it seems out there, so early morning work. Don't dar open the garage door, the skeeters might suck so much blood I would pass out. They are bad here.
But I am able to work. I worked on the tail feathers of my other project last week. Laminated bass and balsa to form the stab T.E. That was fun and I learned a lot.
So this week it is RM Bi-plane time. Having fun already.
The wing tips are on for good, epoxy. Yeah that is for good.
They are rough shaped in. I have to mark the center all the way around and the start doing a bunch of carving and block sanding to final shape.
Then I think is time I finalized the lead outs.
It will not be finnished for the flyathon. to bad as that is only an hour away from. Next year God willing it will see the air.
Ken
By the way, my camera crapped out. It wont meter the exposure correctly. So for now use my computers camera. So not the best quality or shot composition.
09-17-2014, 08:45 AM
#166
Thread Starter
The wing tips, all four of 'em are final shaped.
And yes I remembered my dust mask this time sanding.
Now to the lead outs, and leadout guide. The guide will be adjustable back and forth, and also up and down. Aod at least that is what I am planning. When I get into the nitty gritty we will see how much of that I can accomplish.
Computer cam shot of the tips
Ken
09-17-2014, 10:49 AM
#167
Thread Starter
Ok A question guys.
My bell crank is cut from 1/8" carbon fiber sheet. The lead outs are .027 lead outs.
I installed a 5/32" od 1/8" id brass tube at each end flush on both sides with the plate. Inside of that is a piece of 1/8" od brass tube that is free to rotate. It is a bit taller than the in brass insert. I have rounded the inside off. Is that suffecient to avoid damage to the lead out wires that loop thru this?
Ken
09-17-2014, 10:58 AM
#168
Hey Ken, as far as I can see there's no problem with your tubing for the wires - although the opposite might be more to the point. Over the years I've had to replace a couple cranks because the wires cut into them - - wires were OK, crank wasn't. Leadout wires are TOUGH, apparently they're quite a bit tougher than aluminum cranks. How I solved it (at least, they've managed to hold up now for almost 30 years) was to use one of the lipped brass tubes that you normally use for servo mounting. I drilled the crank hole big enough to take that tube, then folded the bottom (straight side) of the tube back. It rotates inside the crank hole, along with the leadout wires.
Seems to work just fine.
Seems to work just fine.
09-17-2014, 11:09 AM
#169
Thread Starter
Yeah Dave, lead out wire is tuff stuff. I know it it cut thru the carbon plate in nothing flat.
Well it now has 2 brass tubs to cut thru, and the inner rotates. At least I hope it will rotate with the lead outs. A drop of ATF might help that.
Ok back at it.
Ken
Well it now has 2 brass tubs to cut thru, and the inner rotates. At least I hope it will rotate with the lead outs. A drop of ATF might help that.
Ok back at it.
Ken
09-17-2014, 07:17 PM
#170
Thread Starter
2 things
Is it ok if the lead outs do not go past the wings. They end right about at the ends of the , maybe a little less once termintated. I can always make another set. I have the cable in a drawer.
2nd issue. The lead out terminations at the bell crank are hitting the fuse. Cant move or revers the bc. I can make shorter terminations but they will still hit. I may just make the holes bigger,that is the simplest. That coupled with some sort of guides
Ken
09-18-2014, 06:38 AM
#171
2nd issue. The lead out terminations at the bell crank are hitting the fuse. Cant move or revers the bc. I can make shorter terminations but they will still hit. I may just make the holes bigger,that is the simplest. That coupled with some sort of guides
Ken
Ken
HOWEVER, is your aim is to get your movement & control maximized AND keep your appearance as clean as possible, you're going to need to re-design your belcrank so it doesn't hit the sides anymore. It might look something like this:
Forgive the crudity of the drawing - took about 3 minutes using MS Paint, but I think you get the idea. I had to do this same thing many years ago when I was building my Skylarks. The belcranks kept beating up the first rib inside the wings and they'd eventually jam when the slot they were creating got big enough. I just built my own belcranks (thus keeping the near 90 degree elevator deflection that I like with the Skylark) and went with that. Only thing you have to do with a design like this is to make sure you bend the crank up a bit on the "up" side so the rod to the elevators doesn't get hung up on it when you deflect for down elevator.
Of course, you're making the belcrank out of carbon sheet which probably doesn't bend real well, so you'll have to cant the whole mount a few degrees instead, which will give you a "low" leadout and a "high" leadout, but I don't think that's really much of an issue either.
Just some ideas.
Last edited by skylark-flier; 09-18-2014 at 06:40 AM.
09-18-2014, 03:41 PM
#172
Thread Starter
I see what you are saying Dave. Have not had a chance to mess with anything.
I will make some measurements and drawings to see what I can do. I may live with larger holes. I can also make internal guide ways and put some shrink over to smooth things. Will look more in depth tomorrow.
Ken
I will make some measurements and drawings to see what I can do. I may live with larger holes. I can also make internal guide ways and put some shrink over to smooth things. Will look more in depth tomorrow.
Ken
09-19-2014, 08:11 AM
#173
Thread Starter
I opened up the belly (just remove some screws) for a better look. Made some drawings of fuse belly area where the B.C. is.
Laid the B.C. with a small post thru it at the pivot point. Played with the full rang of motion so I could see what I was up against.
Conclusions
#1 I am an IDIOT
.................Those are the very steps I should have done when I first started to pencil out this bird .......DUHHHH
#2 I can resolve this issue. Just need to open up the lead out exit area a bit, but selectively. Open towards the center of the B.C. and up.
Also redo the lead outs. Use smaller brass tubing to swag the cables and make them long enough to exit the sides of the fuse, even when that line is fully in the fuse as the opposite line is pulled. And do a much smother wrap of the folded over lead out wire end. Then I can partially close up the holes, leaving just enough area to play nice.
Got to wait till next Wednesday to get the small tubing.
So will work on the lead out guide. I did a scrap balsa mock up, so I have some ideal of what is needed. The intent is to be fully adjustable.
Line spacing apart
Lines spacing fore and aft
And line position up and down.
I have ideal that I got to play with to get it work and achieve minimum wight and screws.
Ken
09-19-2014, 10:15 AM
#174
Thread Starter
Had plans to go out in the car and take of some things. But there has been localized flooding. Went thru some yesterday that came up to the floor pan. A bit scary. So there was now way I was going out today in areas I did not know flooding wise.
So I have been working on the plane today off and on.
Cooked some lunch. Beans and rice in the belly. The garage is going to be a dangerous place to be!
2 shots are when I figured out I had a problem and enlarged the exit holes.
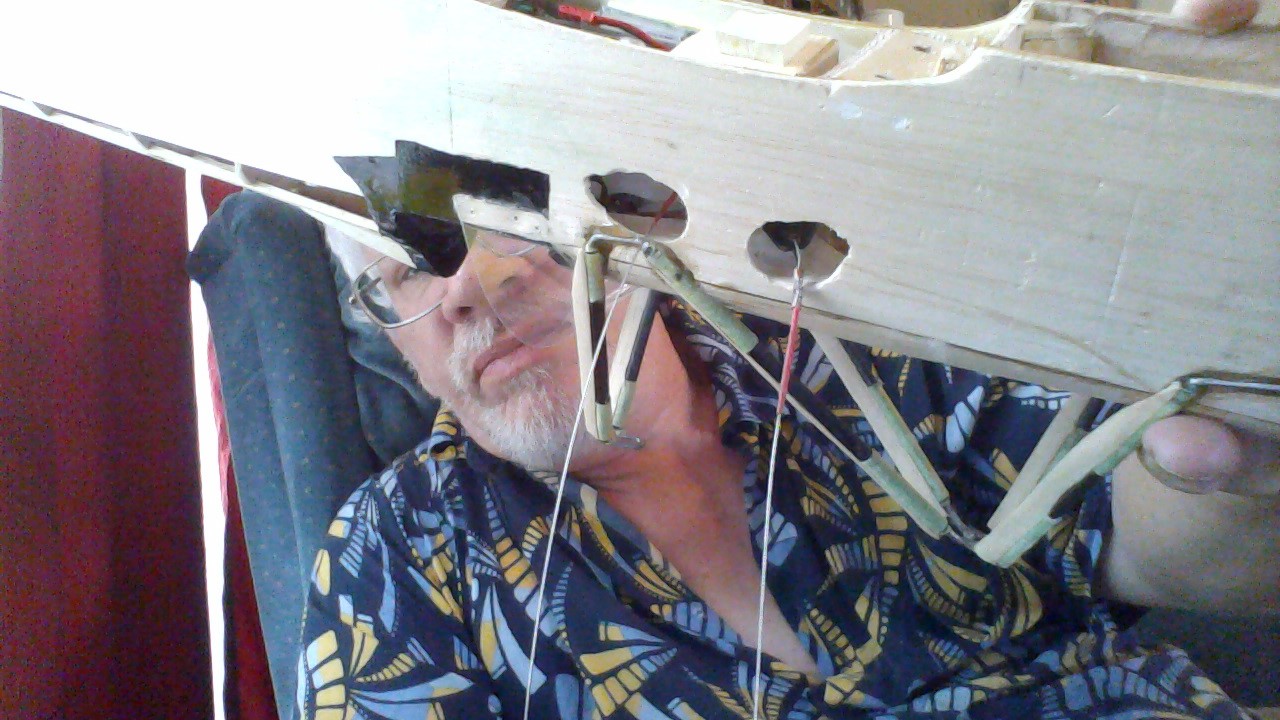
Thees 2 are after I realized I could relocate verticaly the B.C. That helps a bunch. I just reversed the pivot rod. I can adjust things so I split the difference vertical some.

The last is an ideal posted by John on the BHOTR I will play with also.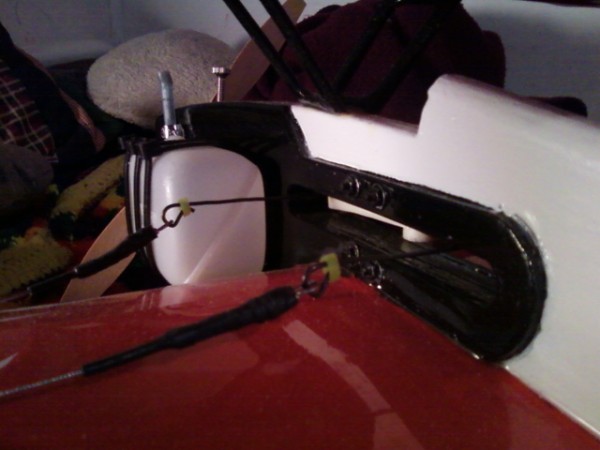
Ken
So I have been working on the plane today off and on.
Cooked some lunch. Beans and rice in the belly. The garage is going to be a dangerous place to be!
2 shots are when I figured out I had a problem and enlarged the exit holes.
Thees 2 are after I realized I could relocate verticaly the B.C. That helps a bunch. I just reversed the pivot rod. I can adjust things so I split the difference vertical some.
The last is an ideal posted by John on the BHOTR I will play with also.
Ken
Last edited by flyingagin; 09-19-2014 at 10:21 AM.
10-05-2014, 02:47 PM
#175
Thread Starter
It will be some time before I can resume building again
The story of this year is homelessness.
once again we are packing EVERYTHING up and putting it in storage.
Even though my Social Security Disability has been approved it will be several months till the check is in the mail so to speak. I got it on only the second appeal.
And where we were staying the lady is a diagnose paranoid schizophrenia. She has gone around the bend, and it is now to dangerous to stay there at night. So we had a choice of some friends living room or sleep in the car at wally world. We choice our friends. We will only be there till we are 100% packed and stored. And then we will head about 3-4 hours north of here to wait for the payments to start. Then we will figure what we can afford and where we go.
So obviously all building is on hold.
Last Wednesday I did fly (twice) my little CL plane. Had issues with the dizzies, but it has a throttle via 2.4 rx so I landed. Had fun.
So sorry guys. This is not the kind of post you want to read. But it is why the inactivity again.
Eventually I will be able to work on this plane again. Be nice to fly it next. But I don't know. I don't have a clue about future living conditionss. But ya know I have built and worked on the kitchen table with the wifes blessings, So build will happen again.
Ken
Again my apologies for a downer post, but I thought some of you would like to know. AND WE ARE SAFE.
We sure covet your prayers.

