


Easy to Fly Trainer
 11-12-2014, 11:30 AM
#26

Thread Starter
Join Date: Nov 2005
Location: Lincoln,
NE
Posts: 167
Likes: 0
Received 0 Likes
on
0 Posts
I found that plan. After much experimentation on tile % I was able to print out and tape together a useable copy. The plan states hardwood for mount but I wondered about pine. Now I know pine will work.
 11-12-2014, 11:40 AM
#28
Thread Starter
Join Date: Nov 2005
Location: Lincoln,
NE
Posts: 167
Likes: 0
Received 0 Likes
on
0 Posts
I would emphasize that the control sensitivity of a basic trainer begins with the line spacing at the handle. You want an unresponsive feel at the endle, so the line spacing for a 1/2 A trainer should be about the same distance as your middle two fingers....an inch and a half or so. The same spacing at the bellcrank gives you a 1 to 1 ratio. Next, the elevator push rod needs to pivot as close as practical to the bell crank's pivot point...aim for the inner hole on a Carl Goldberg bellcrank.
Do not use "1/2A "control horns, use a medium or tall horn on the elevator. The total amount of elevator movement only needs to be 10 degrees either side of neutral if the CG of the plane is set at 20 - 25% of the wing chord. The idea is to have just enough pitch control to gradually take off, fly some laps and then have a easy time off allowing the plane to land. More control can be "dialed in" later, once the pilot gets bored with doing basic laps. APC sells a 6 x 2 pitch prop to help keep the lap times to a manageable pace.
The Goldberg Lil Wizard was the absolute easiest trainer I ever flew. It was well matched with a Cox .049 and a 6x2 prop to keep the speed down. It was a thrill to be able to fly on 26 foot long dacron lines at the time because my only other experience flying was with those awful RTF plastic planes that came with much shorter line.
Thanks to a very knowledgeable hobby shop owner in Auburn Washington , [Harvey Wagner]...he set me up with the "trainer package" that I described here.
11-12-2014, 11:43 AM
#29
Thread Starter
Join Date: Nov 2005
Location: Lincoln,
NE
Posts: 167
Likes: 0
Received 0 Likes
on
0 Posts
The best trainer I know of is a sheet of coroplast with a .049 engine screwed to it. It can be flown with 25 feet of Spiderline fishing string.
http://www.balsabeavers.com/informat...ans/manwin.pdf
http://www.balsabeavers.com/informat...ans/manwin.pdf
11-14-2014, 10:21 AM
#31
Thread Starter
Join Date: Nov 2005
Location: Lincoln,
NE
Posts: 167
Likes: 0
Received 0 Likes
on
0 Posts
11-15-2014, 12:23 PM
#32
11-21-2014, 09:55 PM
#37
My Feedback: (2)

Join Date: Feb 2003
Location: Palm Bay, FL
Posts: 1,046
Likes: 0
Received 0 Likes
on
0 Posts
I used cherry for the hardwood in my Guillows trainer as that's what I had handy.
In case you missed it, there's another thread on the Guillows trainers here:
http://www.rcuniverse.com/forum/cont...ame-plane.html
-Ron
In case you missed it, there's another thread on the Guillows trainers here:
http://www.rcuniverse.com/forum/cont...ame-plane.html
-Ron
Last edited by grotto2; 11-21-2014 at 09:59 PM.
11-23-2014, 02:49 PM
#38
Thread Starter
Join Date: Nov 2005
Location: Lincoln,
NE
Posts: 167
Likes: 0
Received 0 Likes
on
0 Posts
11-23-2014, 03:33 PM
#39

Join Date: Jun 2014
Location: Hudson Valley. New York. USA
Posts: 283
Likes: 0
Received 2 Likes
on
2 Posts
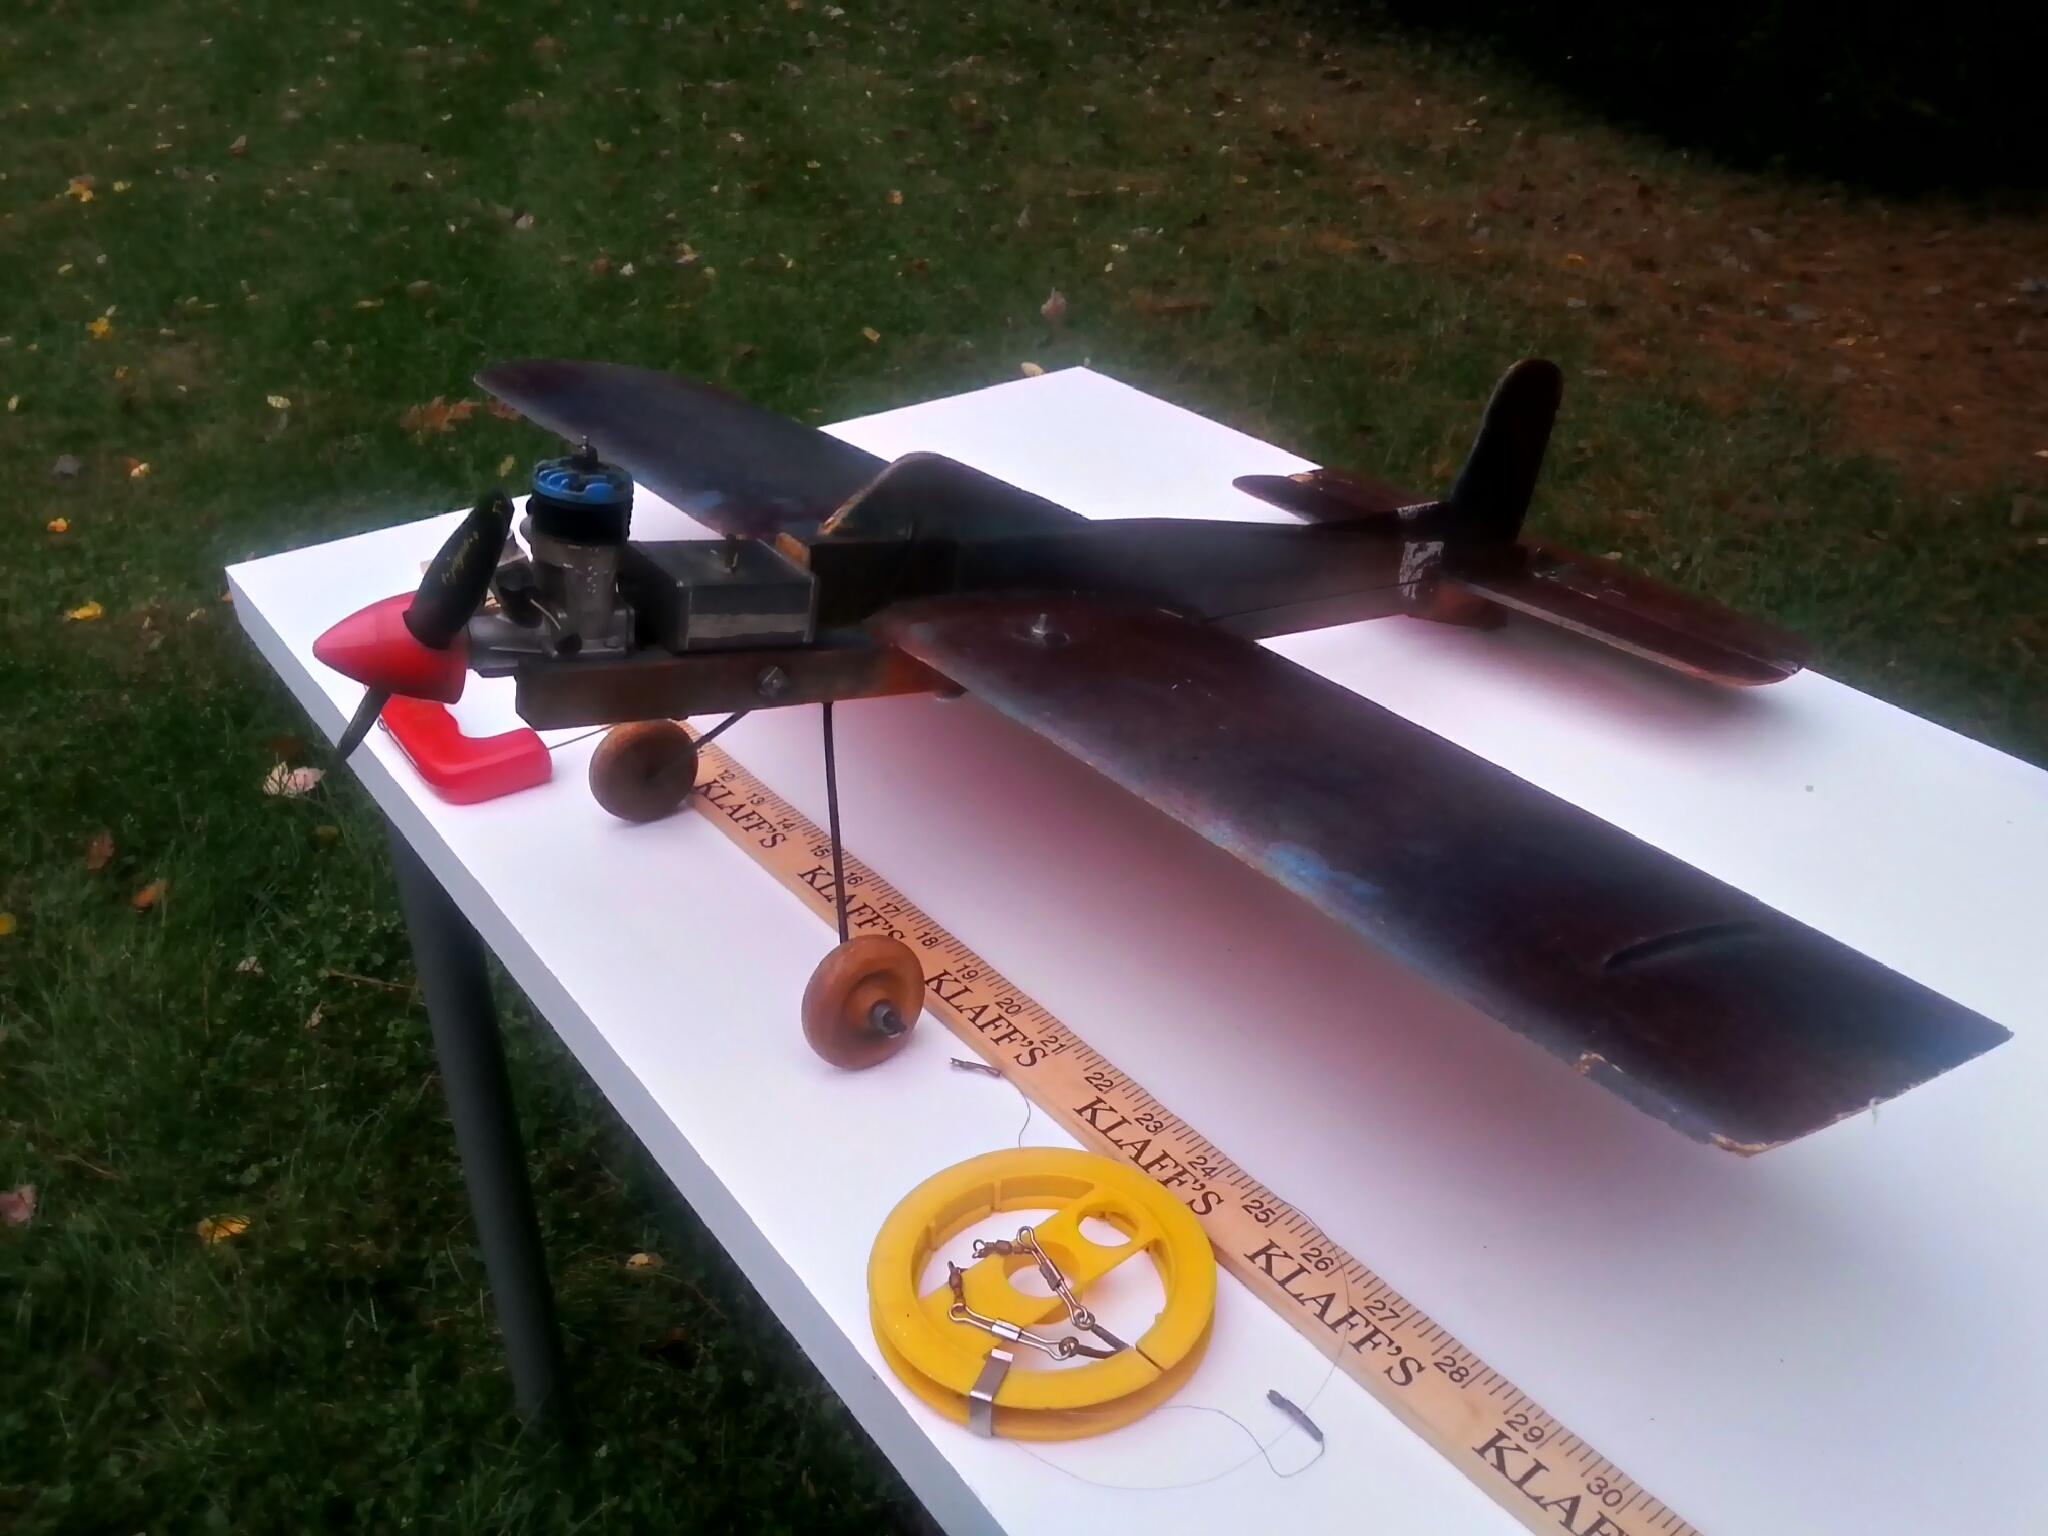
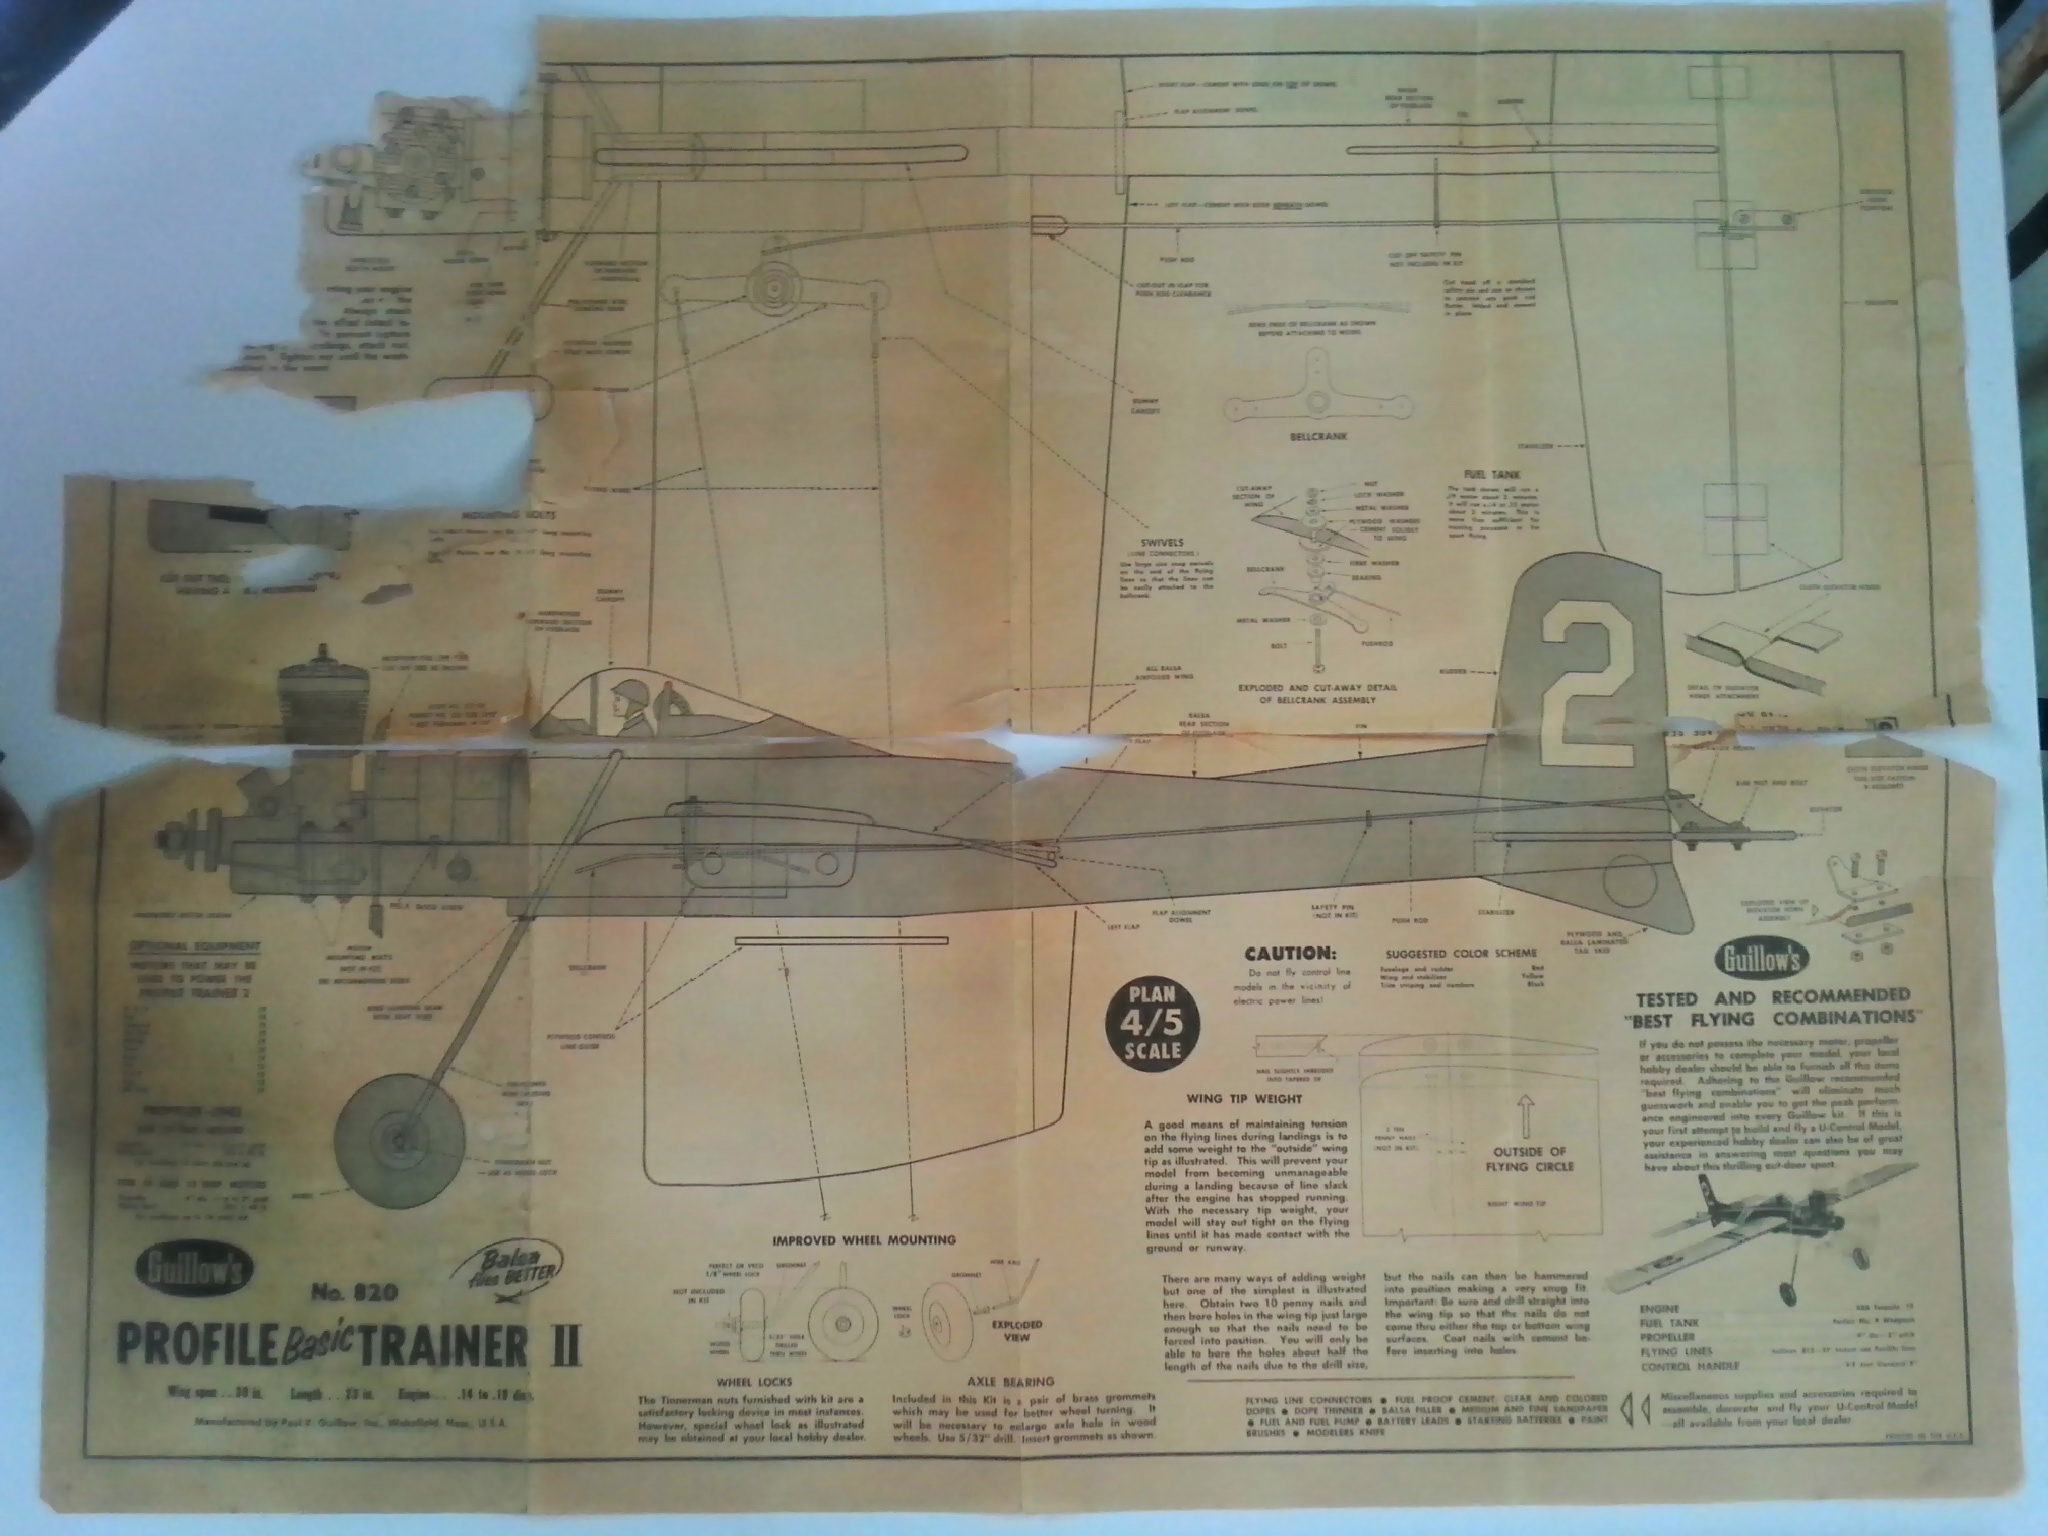
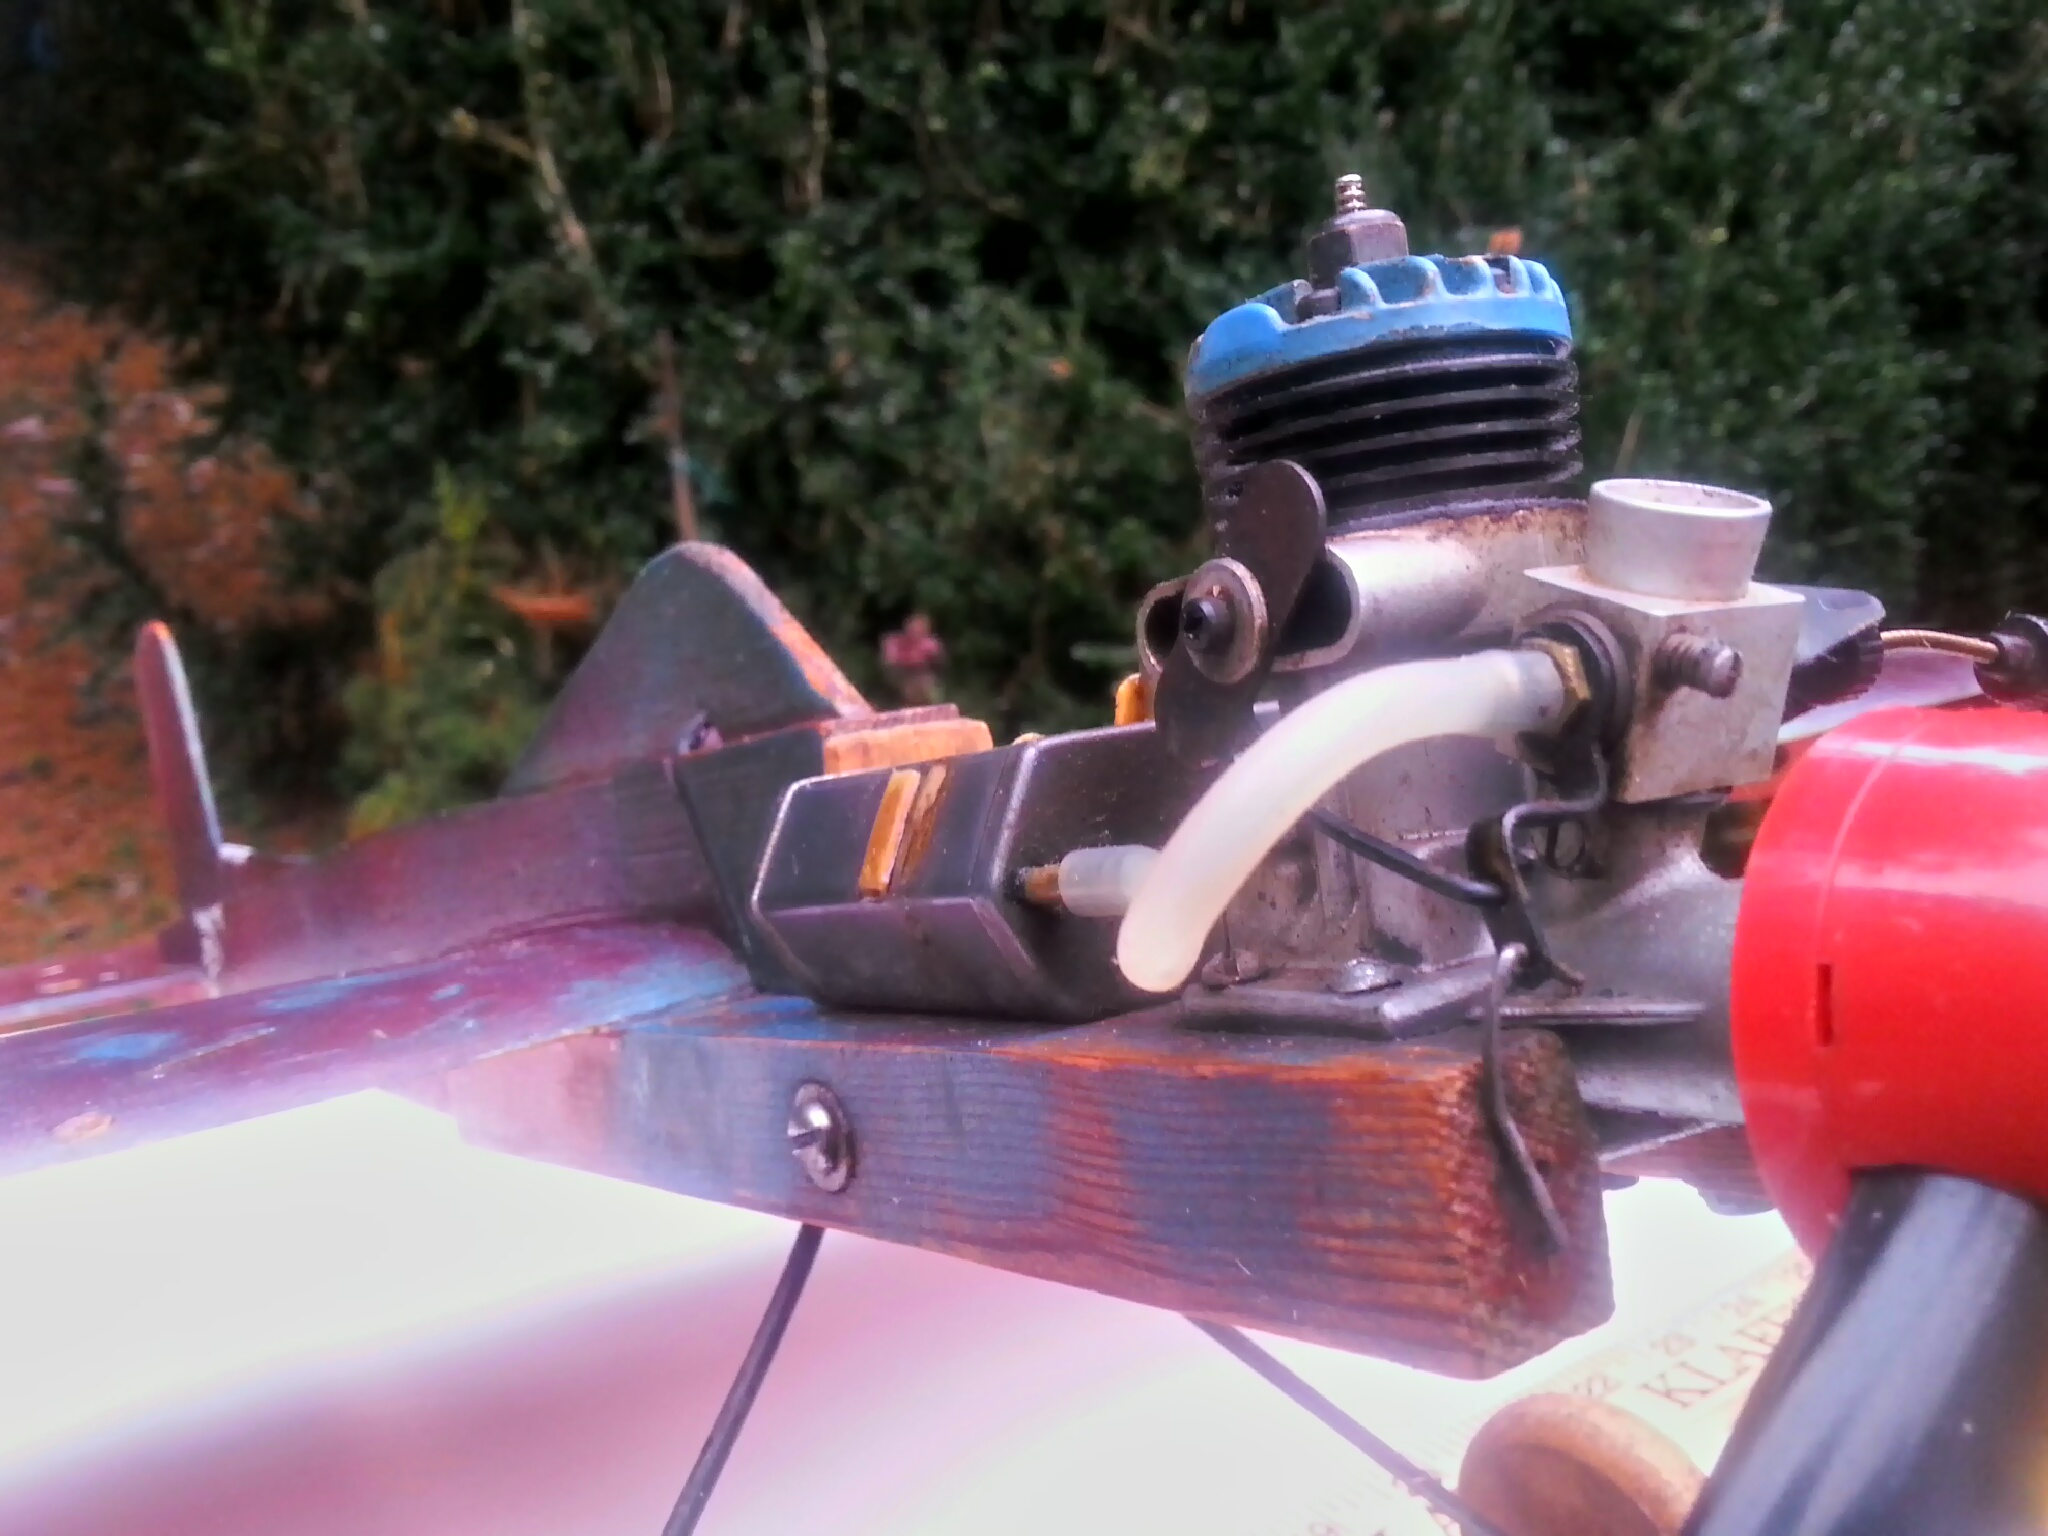
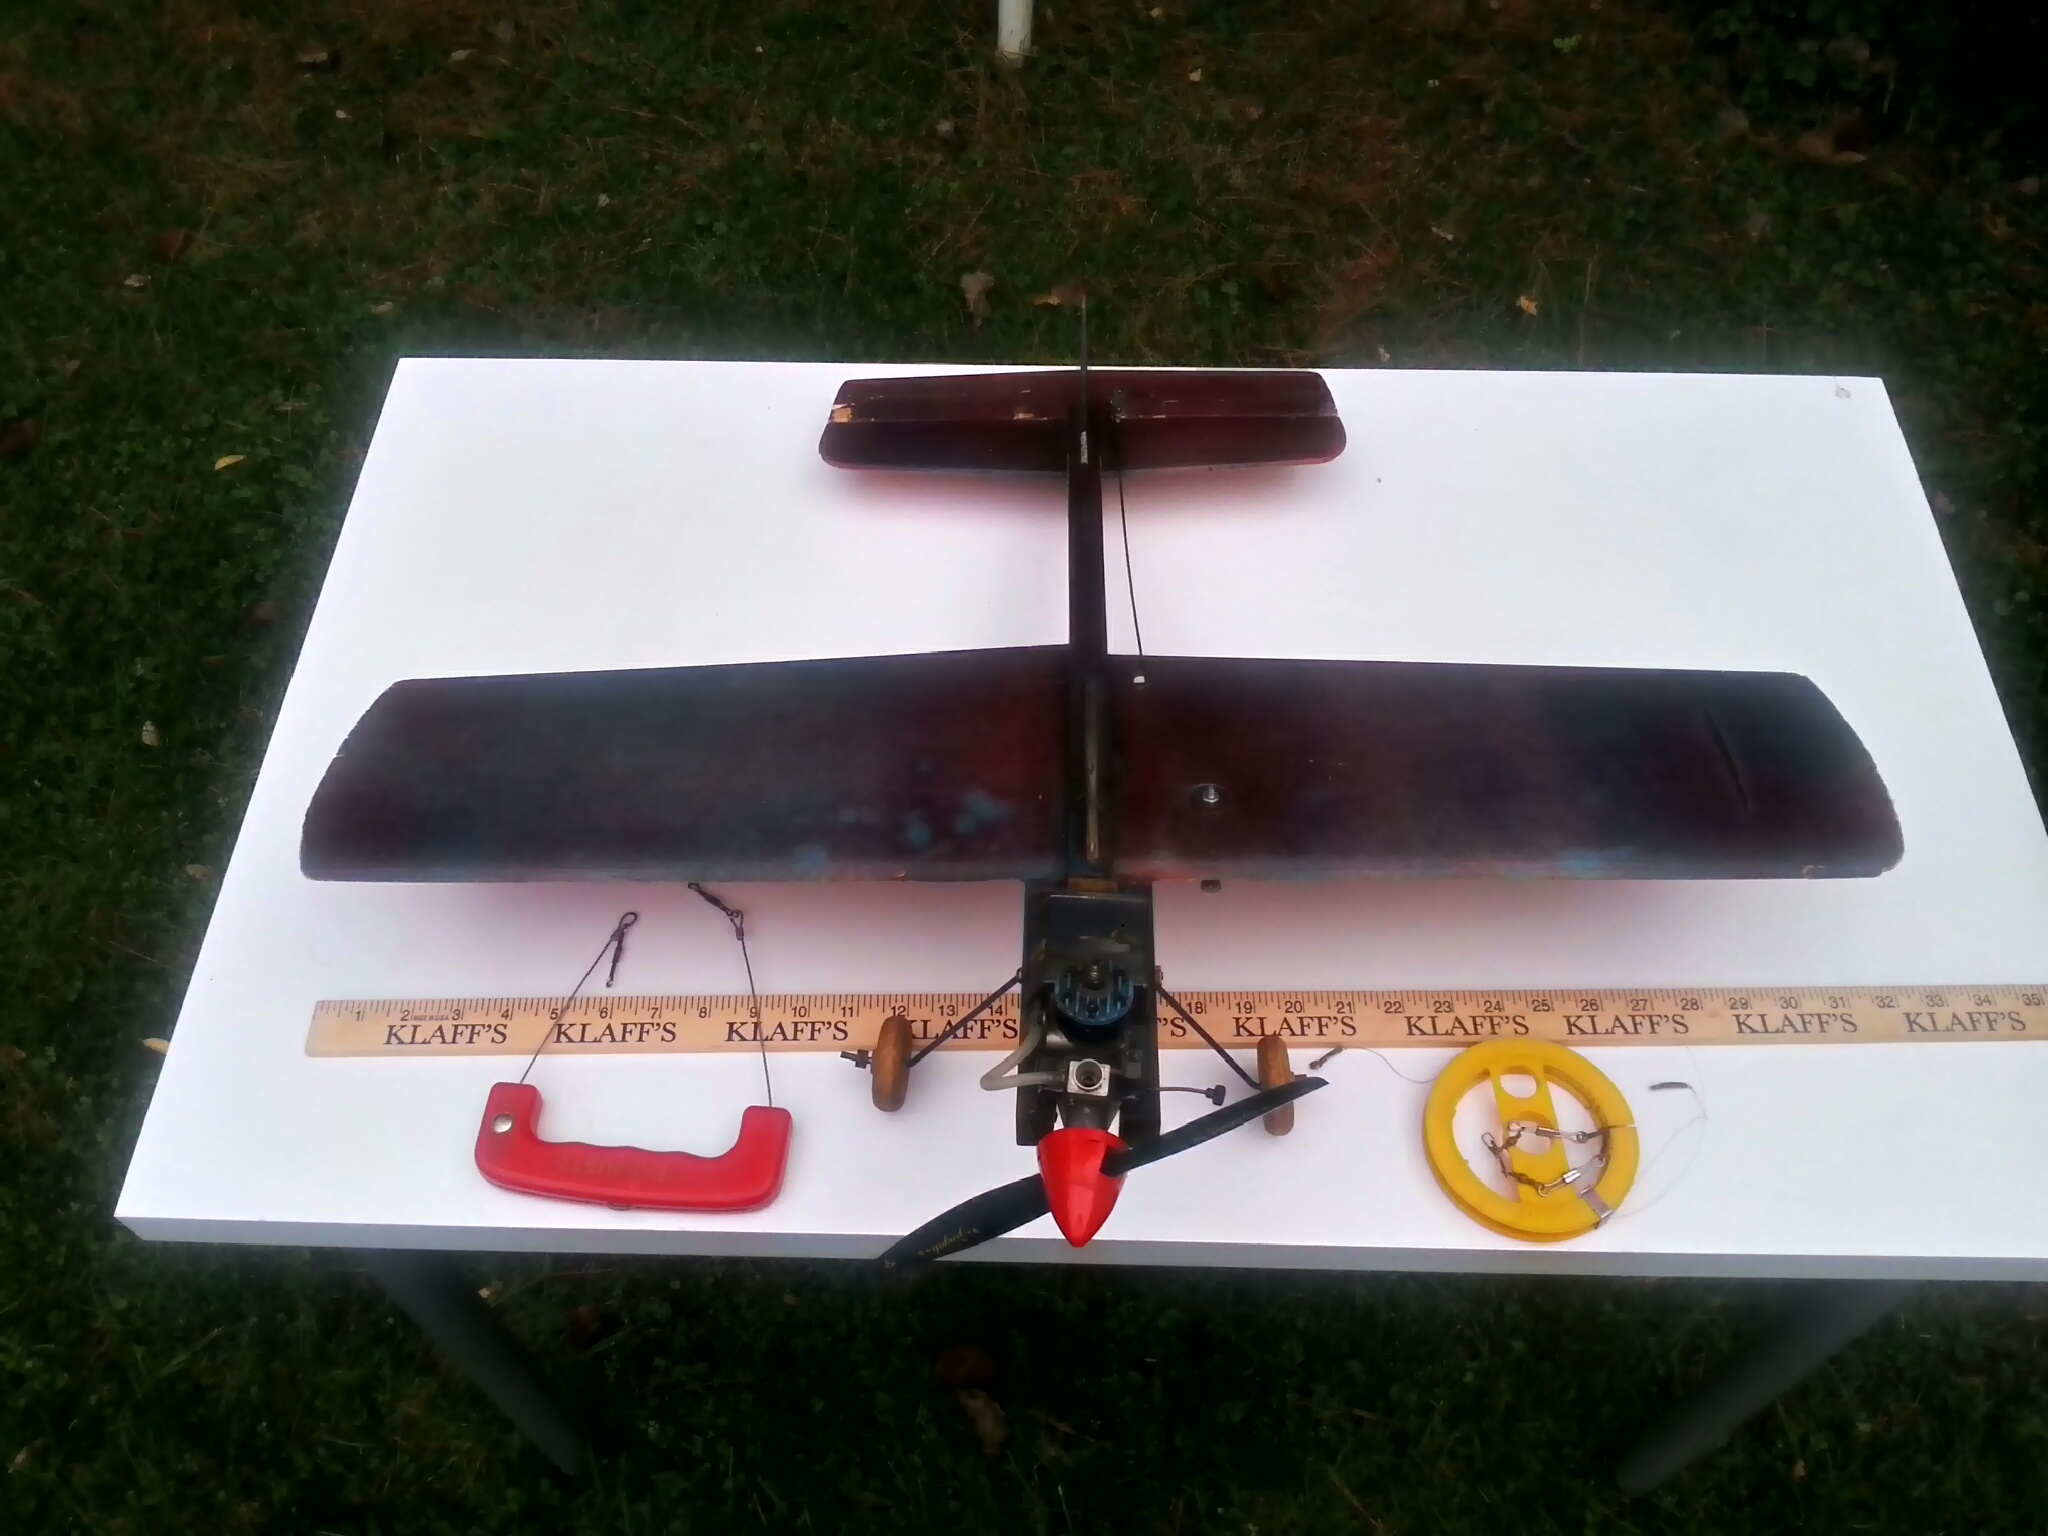
Great Thread. I picked up a #2 in a lot sale, bought it from a genuine NASA engineer, so it has to be good. If anyone wants me to take dimensions and post a digital file from the tattered original plans. The plans were not in good enough shape to meet Outerzone standards, I think.
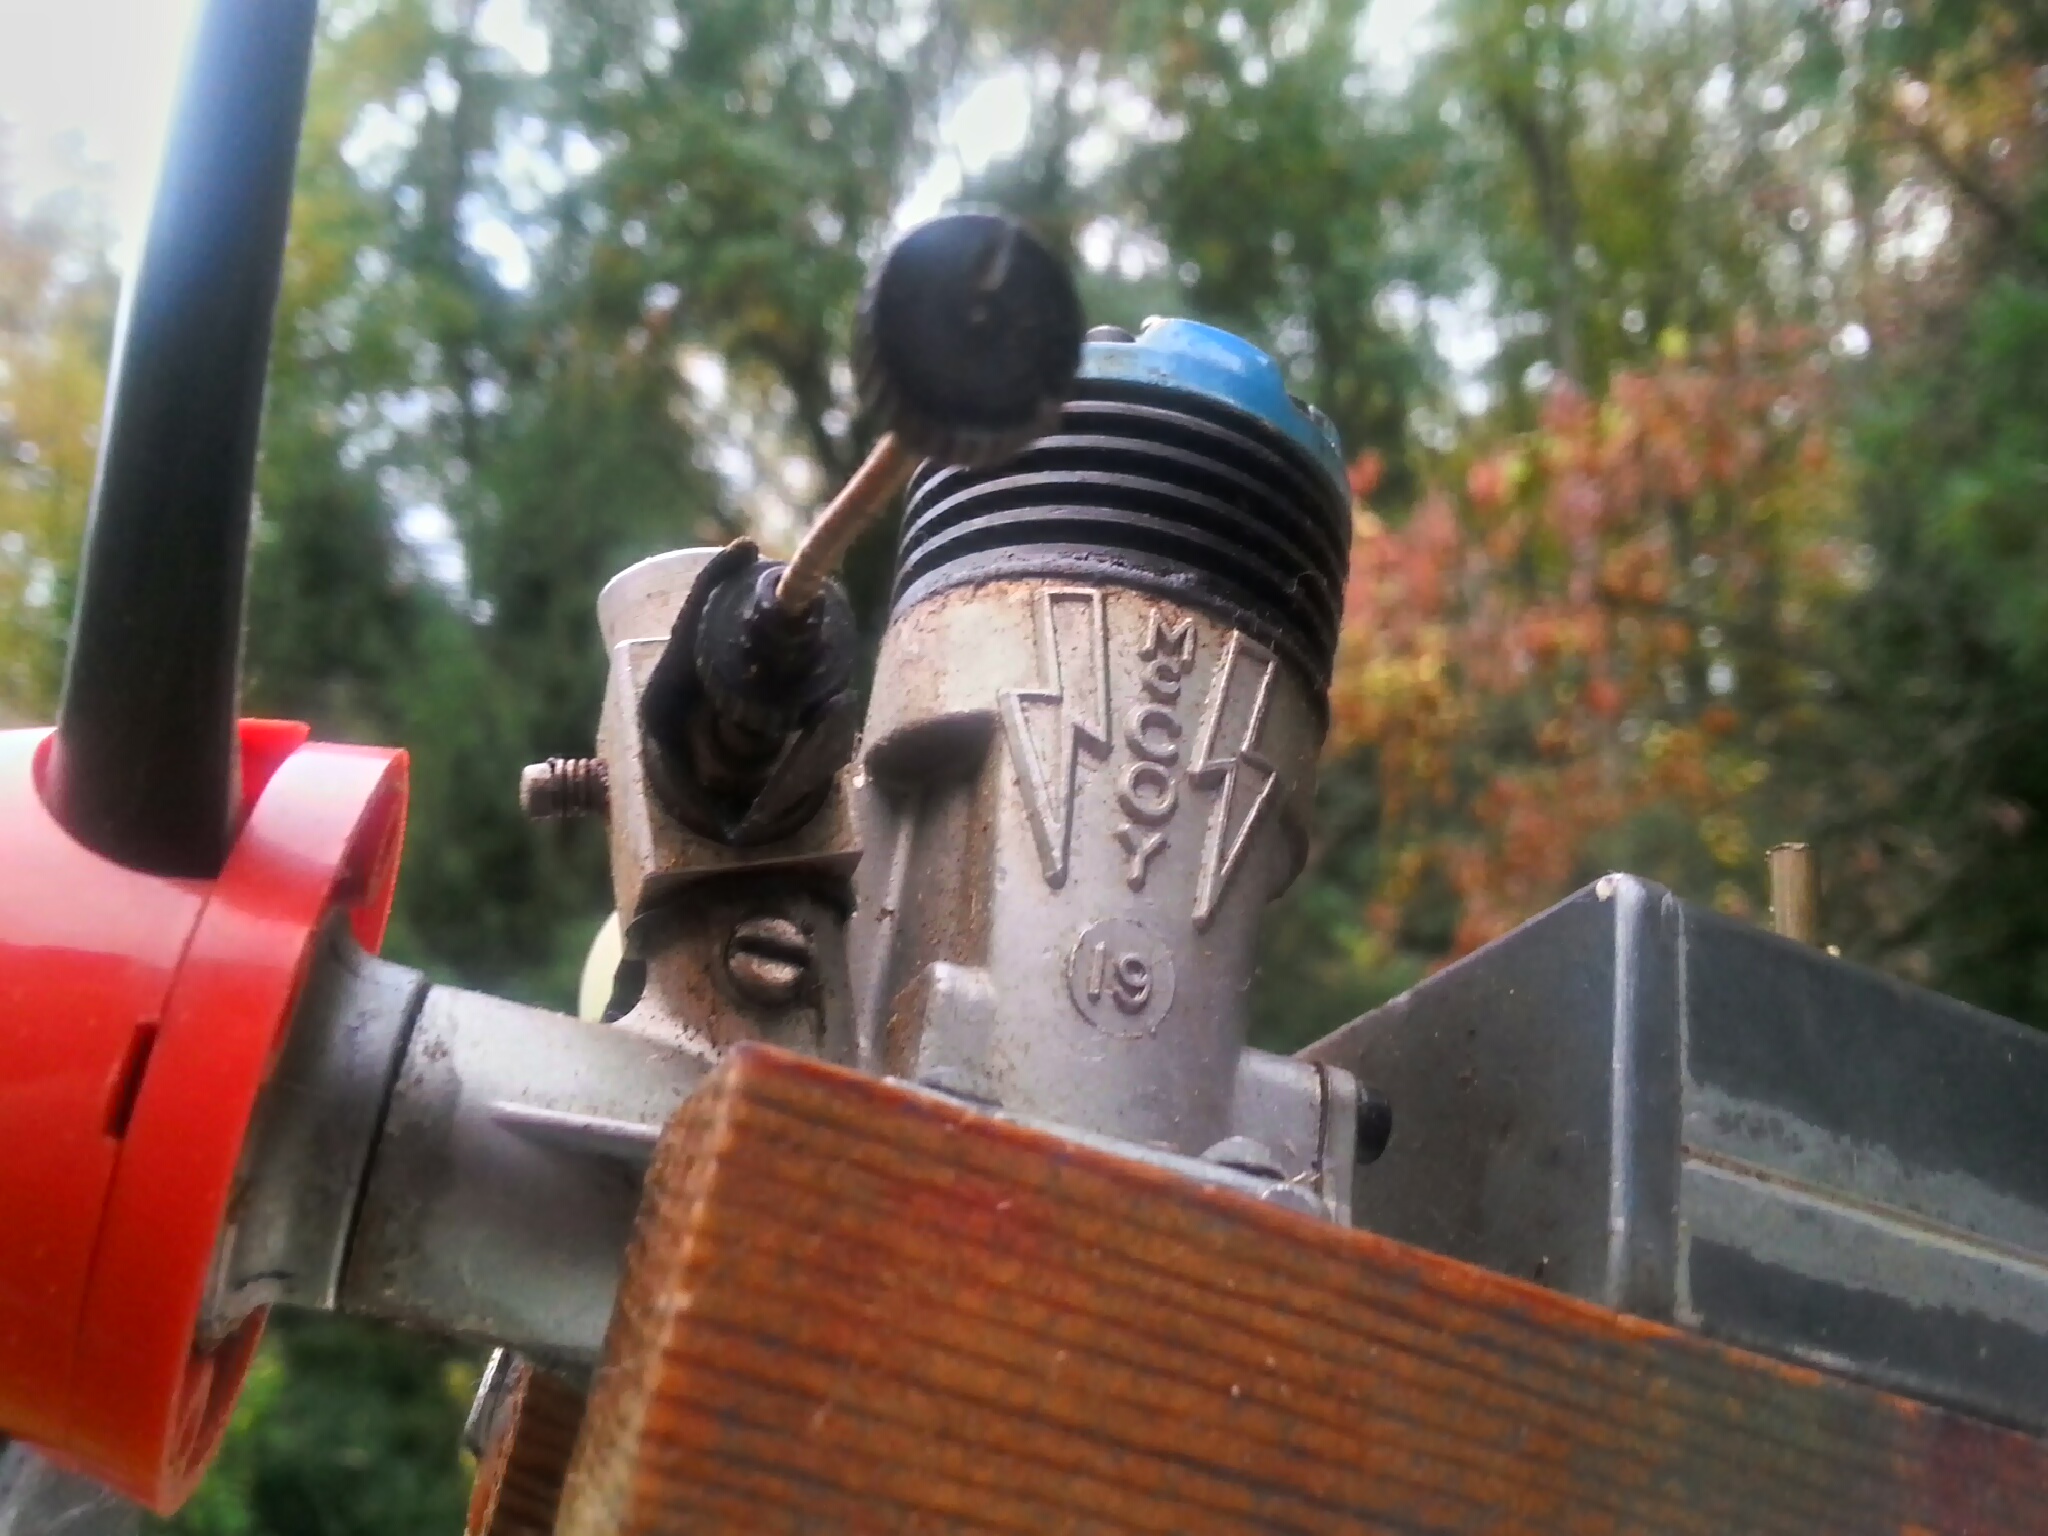
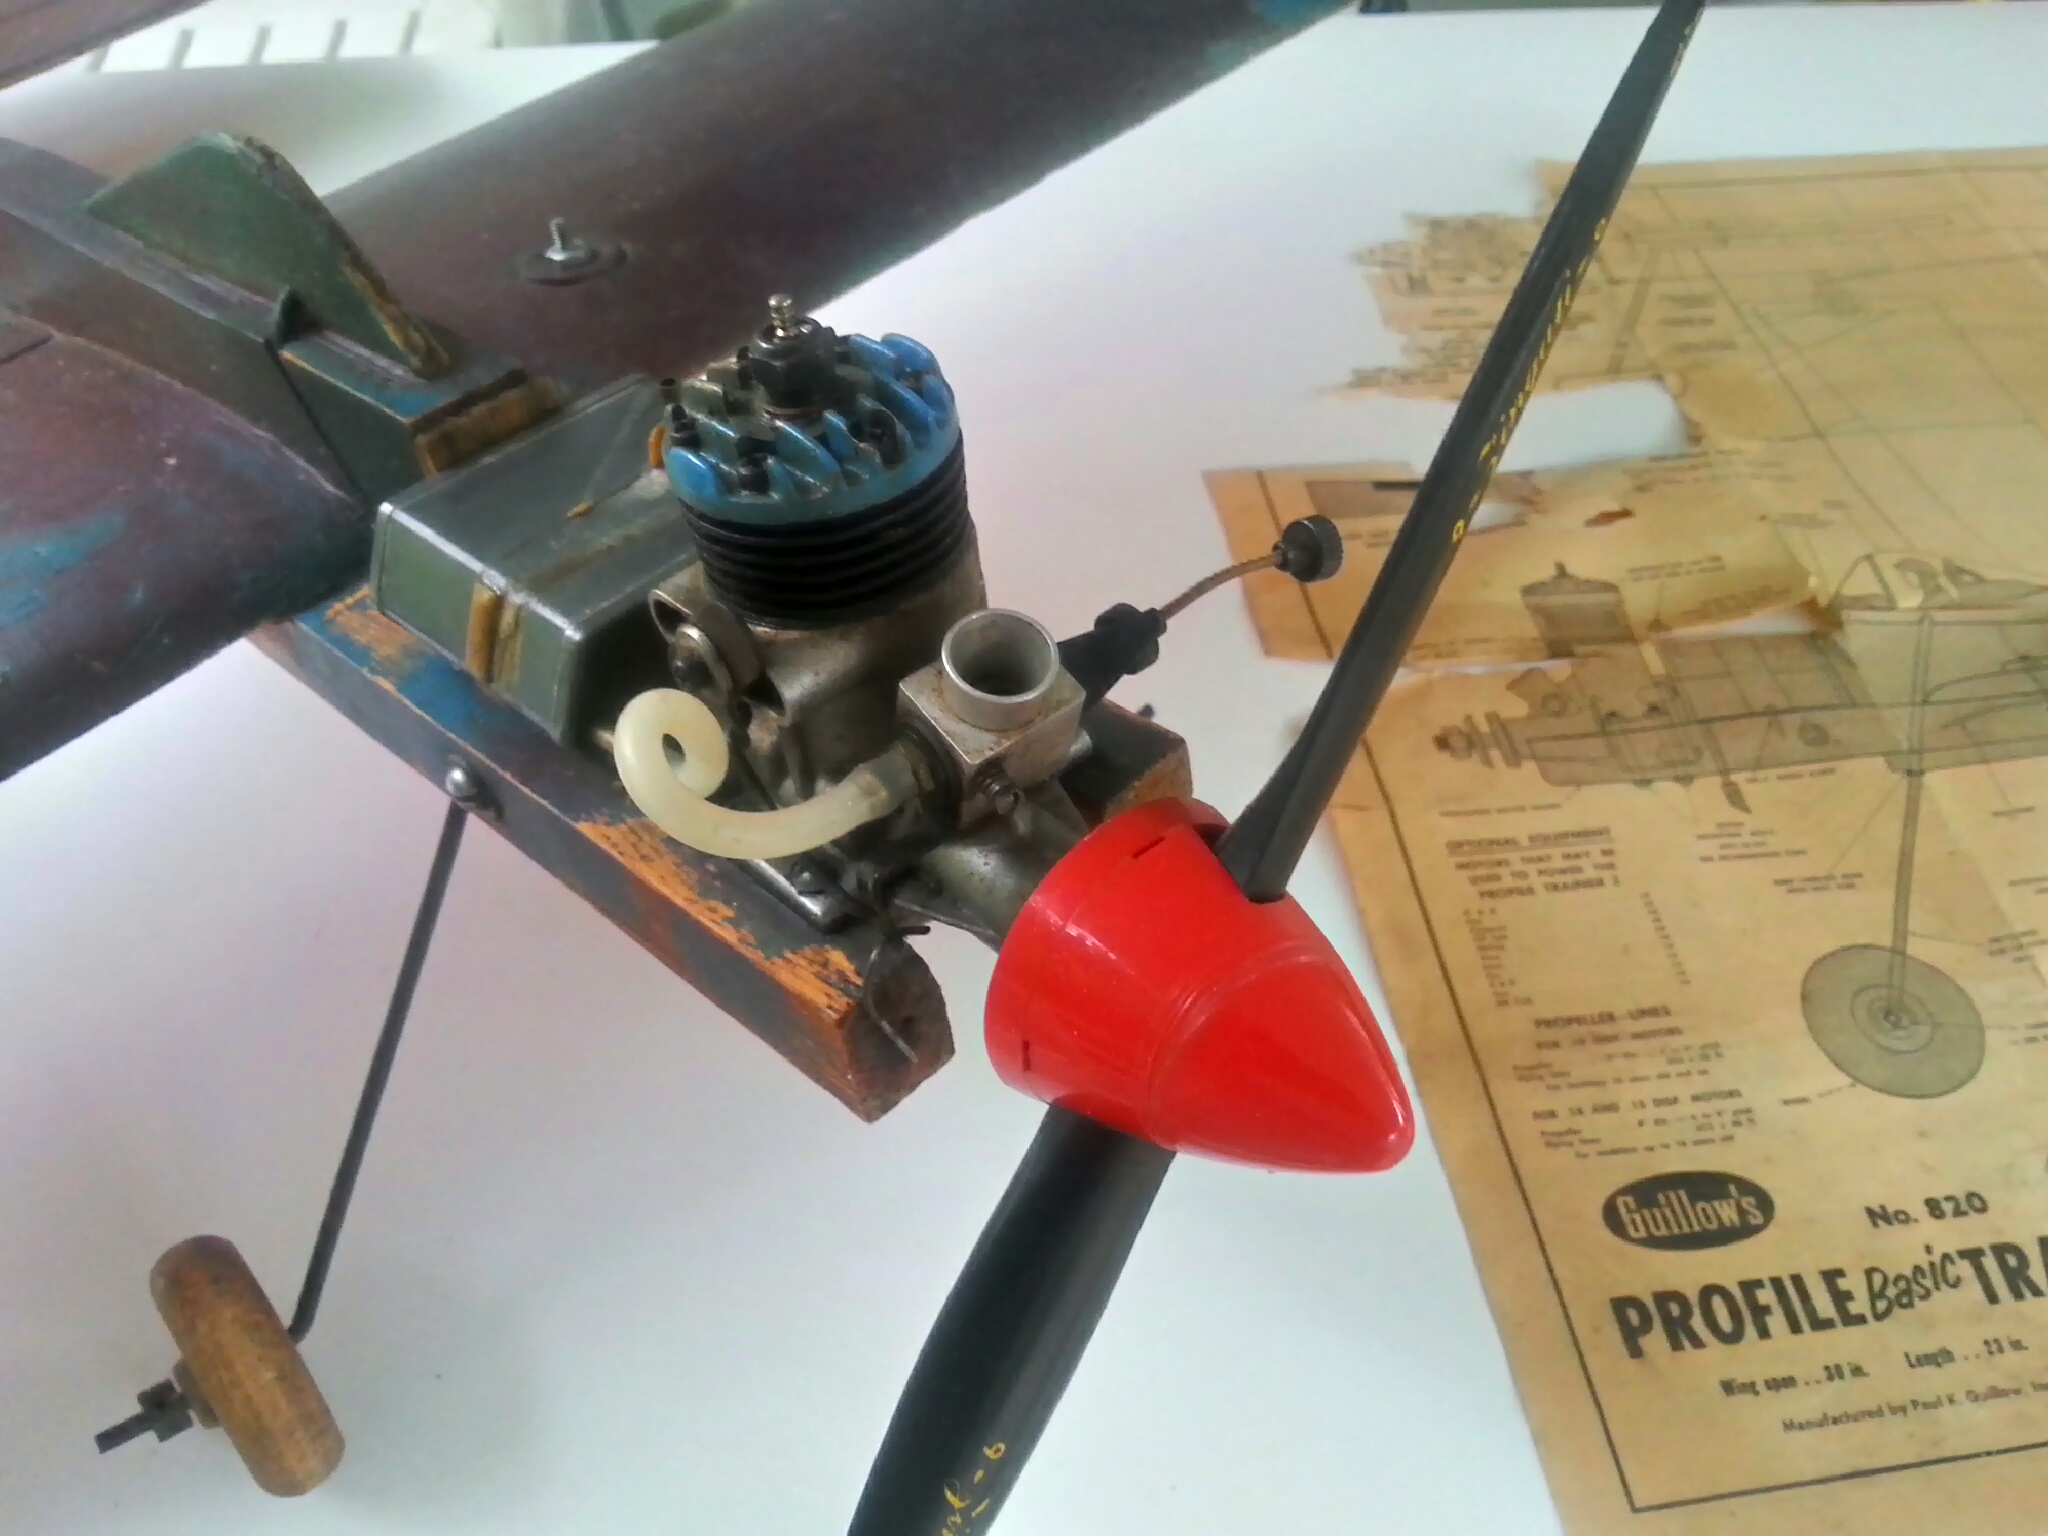
My #2 has a McCoy Blue Head .19, looks to be in good condition - carburetor RC model with exhaust baffle.
Wood finished in the finest deck stain, I think.
Cheers,
Peter
My #2 has a McCoy Blue Head .19, looks to be in good condition - carburetor RC model with exhaust baffle.
Wood finished in the finest deck stain, I think.
Cheers,
Peter
Last edited by BrightGarden; 11-23-2014 at 04:36 PM.
11-23-2014, 10:03 PM
#40
Peter,
I regret that we've all overlooked the best way, bar none, to learn or teach CL is to team with a current CL flier.
Many handles have a front hoop or some device to attach the lines, forward of the flier's fingers. The "instructor" takes off the model, and the trainee joins 'him' at the center. Instructor moves flying hand to the outer front structure, trainee steps in front of instructor, grasps handle by its proper grip, and rides along without making any input for a few laps.
Sorta like a buddy-box RC training situation... When the instructor has confidence the trainee won't destroy the model, he can ease 'his' grip over the front of the handle to let the trainee get used to it. That is, to ride along, NOT to let go. Like the RC over-ride function, the instructor can immediately arm-wrestle as needed if the trainee freezes.
Trainee needs to be indoctrinated to a few facts-of-life before such a 2-up flight. Footsteps, for instance... Walk the guy through some way to make smooth steps to keep up with the model - make sure 'he' gets it. STRESS that the instructor has absolute fall-back command if any difficulty arises - NOT to arm-wrestle, iow. To TELL the instructor if there's any sign of dizziness BEFORE wobbling and stumbling to everyone's dismay. Agree on communication, e.g., instructor asks 'have you got it?' (without releasing the handle. just relaxing and riding along on it..) AND, instructor says, loudly and firmly, ' I got it!' when 'he' has to save a situation.
The instructor might also benefit from practicing stepping with someone else who's flying on the same handle... It is not like solo flying, or with 2 separate flier/model combos in the same flight.
(Apostrophes to placate ungrammatical PC tyrants, if any.)
Last edited by Lou Crane; 11-23-2014 at 10:06 PM.
11-23-2014, 10:36 PM
#41
Join Date: Jun 2014
Location: Hudson Valley. New York. USA
Posts: 283
Likes: 0
Received 2 Likes
on
2 Posts
Peter,
I regret that we've all overlooked the best way, bar none, to learn or teach CL is to team with a current CL flier.
Many handles have a front hoop or some device to attach the lines, forward of the flier's fingers. The "instructor" takes off the model, and the trainee joins 'him' at the center. Instructor moves flying hand to the outer front structure, trainee steps in front of instructor, grasps handle by its proper grip, and rides along without making any input for a few laps.
Cheers PG
11-24-2014, 08:12 AM
#42
Thread Starter
Join Date: Nov 2005
Location: Lincoln,
NE
Posts: 167
Likes: 0
Received 0 Likes
on
0 Posts
There is a Guillow's Rat Racer kit on ebay for $300, it is very similar to this plane.
11-24-2014, 02:37 PM
#43
I'd be surprised if that's how the plans show it, but could be. Left wing would tend to roll up when you fly right to left: counter-clockwise. It tends to roll the model away from you.
We use tipweight to do the same thing, in effect. It balances the half of the weight of the lines that hangs from the inboard tip guides, and gives a slight tendency to roll away.
For a trainer, it is safe to do it that way, but it works against you when the model is inverted. Tipweight, or a slightly longer inboard wing panel, or some of both is much more useful for a model that can stunt.
Besta luk!
11-24-2014, 03:25 PM
#44
Senior Member
The flaps add a good bit of lift. The orientation of the flaps is to give more lift on the inside wing to help the model roll outward a little to keep lines tight. Tip weight in the outboard wing is needed as well. Couldn't say how much.
11-24-2014, 03:56 PM
#45

It is exactly how it is on the plans. In level flight you want it to roll to the outside, for a trainer. That plane is designed for learning how to fly controline, only level flight and not much more. It's not meant to do much more than climb and dive. Loops, inverted, lazy eights, you shouldn't even try. You take off, you fly level laps, the engine cuts out and you land. When I think about it, that actually is fun. Do that a hundred times and you're ready for nice stunt trainer like a Ringmaster or Skyray 35. I learned on Cox Pt 19, it was a dog, but I learned how to fly controline. Best suggestion I've heard yet is if you can find someone who knows how to fly Controline who can help you with those first flights. Smaller tanks which give shorter flights are a good idea until you get used to it.
11-24-2014, 05:35 PM
#46
Thread Starter
Join Date: Nov 2005
Location: Lincoln,
NE
Posts: 167
Likes: 0
Received 0 Likes
on
0 Posts
Tip weight is 2 ten penny nails as per the plans.
12-14-2014, 10:14 AM
#49


Join Date: Oct 2002
Location: Chilliwack, BC, CANADA
Posts: 12,425
Likes: 0
Received 22 Likes
on
19 Posts
If the goal is to have a setup where you can transfer the handle back and forth then stick to the 1/2A or at most something in the .09 to .10 size range. Even a .15 powered model will have enough line pull that trying to transfer the handle back and forth can be a big safety issue when the fliers are not used to doing something like that.
A good trainer option would be something like a profile Ringmaster or any of the flat profile scale models that came from Top Flite way back when. The key to making them into a good trainer is to go with a more forward CG location and to use the holes on the bellcrank and elevator horn that result in a minimal elevator throw. If suitable hardware and hatches are provided the pushrod can be re-located to the holes that provide more travel later on as they move on to doing aerobatics.
12-18-2014, 04:49 PM
#50

Kids usually learn flying quicker than adults. During the "basic" trainer phase, you get used to minimum control while going round and round. During this time you also hopefully get over the "dizzy" part. If there is a nearby club or at least an experienced flyer, they usually have a basic trainer you can "borrow" to learn on. Plan "B" IMHO would be something like the Skyray or Osborne Platter with external controls so they can be adjusted. This can be done at the handle IF you have an adjustable handle. As mentioned in a previous response, you probably won't spend much time with this plane.
The next plane should be more maneuverable. My suggestion would be a Skyray 35 or one of the other profiles. I mention Skyray 35 because all of the ribs are the same so replacement when (not if) you have to fix it is easier.
Of course we all have our favorites due to our own experiences. Good luck, whichever way you go.
George

