


Dynaflite PT Rebuild....AGAIN!!!
 01-04-2012, 10:00 AM
#1

Thread Starter
My Feedback: (38)

Join Date: Sep 2010
Location: Stratford,
WI
Posts: 45
Likes: 0
Received 0 Likes
on
0 Posts
The history of this plane goes way back and is somewhat entertaining.
Back in 2003, while flying my first PT-23 in formation with a friend's Northrop A-17, he tagged a tree with the left wingtip and the result was catastrophic. After salvaging through the remains, he handed me the two pilot figures from the Northrop stating "These will look really nice in that PT-26 you're building". He was right. However, in the fallof 2006,after just a season of flying on my new PT-26, I found myself making a dead-stick approach in Owatonna,MN. I nursed the plane over the edge of the field, all looked well until the left wingtip just barely touched a bush off the end of the runway. The resulting crash resulted in the first rebuild on this airframe.
Fast forward to 2011.After sitting in the corner for a few years, I finally finished the rebuilt on the PT-26. Not wanting to make a new mold to makea new greenhouse canopy, I converted it back to be a PT-19. The first weekend of June I took itand put the first 2 flights on it since the rebuilt. The very nextweekend, on the 3rd flight of the day (5th flighttotal), the engine suddenly flamed-out during amanuever. Ok, I was onthe downwind leg with plenty of altitudeon a calm day. This should be no problem. I made a text book descending approach, turned final, dropped the flaps, had the field made, then the plane suddenly yawed left, flipped and flopped in on it's back the same way it did in Owatonna. As I approached the plane, I saw what caused my troubles, a single thistle weed/bush that stood 3' taller than all the surrounding tall grass. Just tall enough to reach up and grab the left wingtip.
So now I'm back in the shop, rebuilding the PT again, and my friend has his two pilot figures back .
.
Back in 2003, while flying my first PT-23 in formation with a friend's Northrop A-17, he tagged a tree with the left wingtip and the result was catastrophic. After salvaging through the remains, he handed me the two pilot figures from the Northrop stating "These will look really nice in that PT-26 you're building". He was right. However, in the fallof 2006,after just a season of flying on my new PT-26, I found myself making a dead-stick approach in Owatonna,MN. I nursed the plane over the edge of the field, all looked well until the left wingtip just barely touched a bush off the end of the runway. The resulting crash resulted in the first rebuild on this airframe.
Fast forward to 2011.After sitting in the corner for a few years, I finally finished the rebuilt on the PT-26. Not wanting to make a new mold to makea new greenhouse canopy, I converted it back to be a PT-19. The first weekend of June I took itand put the first 2 flights on it since the rebuilt. The very nextweekend, on the 3rd flight of the day (5th flighttotal), the engine suddenly flamed-out during amanuever. Ok, I was onthe downwind leg with plenty of altitudeon a calm day. This should be no problem. I made a text book descending approach, turned final, dropped the flaps, had the field made, then the plane suddenly yawed left, flipped and flopped in on it's back the same way it did in Owatonna. As I approached the plane, I saw what caused my troubles, a single thistle weed/bush that stood 3' taller than all the surrounding tall grass. Just tall enough to reach up and grab the left wingtip.
So now I'm back in the shop, rebuilding the PT again, and my friend has his two pilot figures back
.
 01-04-2012, 10:21 AM
#2
Thread Starter
My Feedback: (38)
Join Date: Sep 2010
Location: Stratford,
WI
Posts: 45
Likes: 0
Received 0 Likes
on
0 Posts
My plan is to rebuilt this plane as a PT-23. I have done several of these PT's (4 previously) and am hoping this will be last one I build for awhile. I love these planes, they fly great, but I'm getting tired of seeing them on my workbench. The PT-23 is my favorite variant so I thought I'd make my "last" PT my favorite. The first picture shows a very crude idea of the finished plane. My apologies but I have zero skills when it comes to picture editing. I'm not trying to make this plane a scale showpiece but rather just an everyday flier warbird, so I "borrowed" a color scheme from a Vultee BT-13.
However, before I start converting the nose, I need to repair the wing. If I can't get the wing back in one piece and straight, there's no need to do anymore work on this plane. So first I removed all the components from the wing, servos, landing gear, wiring, etc. Next I stripped the Stits fabric off. I thought this was going to be a tough process but it actually came off without too much trouble. Now, with the frame bare, I could assess the total damage.
01-04-2012, 10:36 AM
#3
Thread Starter
My Feedback: (38)
Join Date: Sep 2010
Location: Stratford,
WI
Posts: 45
Likes: 0
Received 0 Likes
on
0 Posts
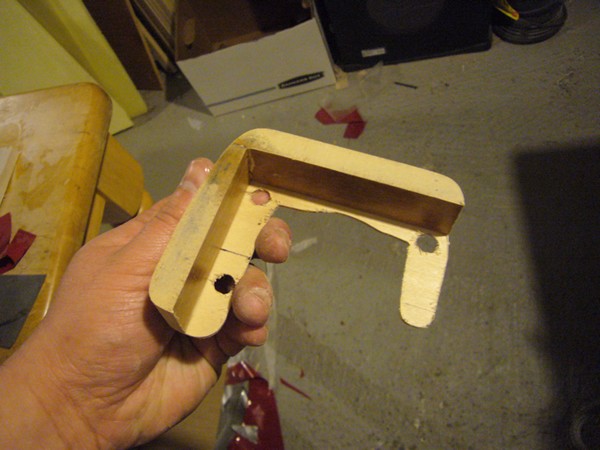
After assessing the wing, I started preparing it for reassembly. I cut back the sheeting from the break, as well as the leading edge. I cleaned up the broken edges of the spars and removed the shards of rib that remained. Ialso removed the wingtips. They were not damaged in the crash, but were warped and dinged from hanger rash so I thought it was time for a new set.
I used scraps of wood and various weights to hold the wing panels aligned and at the proper incidences. Then I glued in a piece of 1/4" x 3/8" spruce across the break in the top and bottom spars. After double checking the alignment, I continued to strengthen the joint by adding a new leading edge, trailing edge sheeting, and an 1/8" balsa shear web that spans both rib bays. I removed the weights and the wing once again was in 1 piece. A quick glance down the wing revealed that the wing seems straight with no apparent twists.
This joint will still receive a balsa filler block between the top and bottom spars and 1/8" lite ply shear web along the back side of the spars.
 01-04-2012, 07:59 PM
#5
Join Date: Feb 2006
Location: Sarasota,
FL
Posts: 124
Likes: 0
Received 0 Likes
on
0 Posts
I need a new windshield for my Dynaflite PT-19 then I am done restoring. I actually have an extra wing for it. An old modeler became a flying angel lately and his son passed the wing onto me. I was fortunate to obtain it.
 01-05-2012, 07:27 AM
#7
Thread Starter
My Feedback: (38)
Join Date: Sep 2010
Location: Stratford,
WI
Posts: 45
Likes: 0
Received 0 Likes
on
0 Posts
I was thinking last night that this might be a good chance to try doing nav lights for the first time. For the life of me, I can't figure out were the landing light on a PT-19/23/26 is. Does anyone know where it is and/or have a picture of it?
01-05-2012, 07:48 AM
#8
Great source of pictures http://www.airliners.net/photo/Fairc...e6a892e51909e4 looks to be under the right wing
01-05-2012, 07:56 AM
#9
Thread Starter
My Feedback: (38)
Join Date: Sep 2010
Location: Stratford,
WI
Posts: 45
Likes: 0
Received 0 Likes
on
0 Posts
Thanks Rapture, that's what I was looking for. But darn it, I didn't want to have to build a retractable unit. I will have to think on this some more.
01-05-2012, 09:22 AM
#10
Your welcome! I picked up this kit this fall from a guy on here for $225, I hope to start it this winter yet but I have a P-47 on the board yet and 2 arf's to assemble(don't want to say build, it makes the world go off balance ) I saw an old ad from MA mag and the kit cost like $120 back in 97' Glad to see your rebuilding, if you need any parts traced I can do that from my kit.
) I saw an old ad from MA mag and the kit cost like $120 back in 97' Glad to see your rebuilding, if you need any parts traced I can do that from my kit.
01-05-2012, 09:51 AM
#11
Thread Starter
My Feedback: (38)
Join Date: Sep 2010
Location: Stratford,
WI
Posts: 45
Likes: 0
Received 0 Likes
on
0 Posts
ORIGINAL: raptureboy
Your welcome! I picked up this kit this fall from a guy on here for $225, I hope to start it this winter yet but I have a P-47 on the board yet and 2 arf's to assemble(don't want to say build, it makes the world go off balance) I saw an old ad from MA mag and the kit cost like $120 back in 97' Glad to see your rebuilding, if you need any parts traced I can do that from my kit.
Your welcome! I picked up this kit this fall from a guy on here for $225, I hope to start it this winter yet but I have a P-47 on the board yet and 2 arf's to assemble(don't want to say build, it makes the world go off balance
) I saw an old ad from MA mag and the kit cost like $120 back in 97' Glad to see your rebuilding, if you need any parts traced I can do that from my kit.
Thanks for your offer on templates. The one rib I need for my rebuild Ican manage to make without a template. And though part of me says to have a complete set of templates on hand, I've been playing with these PT's for 15 years, it's time to do something different.
01-09-2012, 09:01 AM
#12
Thread Starter
My Feedback: (38)
Join Date: Sep 2010
Location: Stratford,
WI
Posts: 45
Likes: 0
Received 0 Likes
on
0 Posts
Continueing on the rebuild. A piece of 1/8" balsa was glued in place between the spars and leading edge then cut and filed to shape to form the forward rib. I also took this time to clean up the top of the top spar and bottom of the bottom spar and reinforce both with some carbon fiber laminate.
I then was able to resheet the front section and shape the leading edge.
After that I cleaned up the back side of the spars and cut a web out of 1/8" lite ply. That was then epoxied to the spars.
I decided to give the nav lights system a go. My plan is to only do the red and green nav lights, no strobes or landing light. I stopped at Radio Shack and stocked up on components then started wiring. I tried a couple different wiring schemes, batteries, diodes, flux capacitors, regulators, and potentially a couple banana peels but finally got a working system.They seemed a bit dim but will give them a try outside.
I then was able to resheet the front section and shape the leading edge.
After that I cleaned up the back side of the spars and cut a web out of 1/8" lite ply. That was then epoxied to the spars.
I decided to give the nav lights system a go. My plan is to only do the red and green nav lights, no strobes or landing light. I stopped at Radio Shack and stocked up on components then started wiring. I tried a couple different wiring schemes, batteries, diodes, flux capacitors, regulators, and potentially a couple banana peels
but finally got a working system.They seemed a bit dim but will give them a try outside.
01-09-2012, 09:03 AM
#13
Thread Starter
My Feedback: (38)
Join Date: Sep 2010
Location: Stratford,
WI
Posts: 45
Likes: 0
Received 0 Likes
on
0 Posts
Finished off a little more this weekend. Was able to get the first new wingtip built. I also fitted it with a mounting block for the LED nav light. Nothing overly special or scale, just a piece of balsa rounded off till it looked about right.I also replaced a section of sheeting that was looking a little tough, then smeared then bottom side with lightweight spackle to help smooth everything out.
I played around a little bit morewith my nav light system. I picked up some brighter LED's to compare and do some tests outside in the sunlight.The original trial utilized LED's with about 650mcd brightness. I mounted them on a piece of 1" foam board and took it outside in the sunlight. Once the sun hit it, the LED's were almost impossible to see at about 3 yds
 . Then I wired up one of the new LED's that has a brightness of 7000mcd. In direct sunlight it was still quite visible at 20 yds.
  Unfortunately Radio Shack only carries these bright ones in white. I tried covering them with a tinted lense, but at distance they still appeared white. So the final LED's will have to be ordered online, where I can order them that bright and in the colors I need.
01-17-2012, 07:35 PM
Unfortunately Radio Shack only carries these bright ones in white. I tried covering them with a tinted lense, but at distance they still appeared white. So the final LED's will have to be ordered online, where I can order them that bright and in the colors I need.
01-17-2012, 07:35 PM
#14
Thread Starter
My Feedback: (38)
Join Date: Sep 2010
Location: Stratford,
WI
Posts: 45
Likes: 0
Received 0 Likes
on
0 Posts
Was able to get a night to work on this one again and got the wing finished up. The missing aft rib section was recreated using 1/4" x 1/2" balsa then carved to the proper curve. The second wingtip was assembled and shaped and nav light mount installed. A couple patches of sheeting followed by truing up the trailing edge using a straight edge. I then smeared a coat of lightweight spackle over the wing and set aside to dry overnight. Tomorrow I will hit it with the orbital sander and it should pretty much be ready for Monokote.
01-19-2012, 07:52 AM
#15
Thread Starter
My Feedback: (38)
Join Date: Sep 2010
Location: Stratford,
WI
Posts: 45
Likes: 0
Received 0 Likes
on
0 Posts
I got the wing finish sanded using 220 grit on my orbital sander. Then I sprayed theinside of flaps, landing gear mounts. and hinge lines with silver paint. I'm kind ofcheating here since I don't wantto rehinge the surfaces. Since I won't be able to get the Monokote down in the hinge lines the paint is a substitute. Hopefully it won't be too noticable.
Once the paint dried, I started making up the wiring harness for the wing. I'm trying something new here, D-Sub connectors. I've seen some modelers on RCScaleBuilder.com use them to eliminate multiple connectors between the wing and fuse, and thought this was a good plane to try them out on. So far, I like them. I also considered Ashlok connectors, but the D-Sub's were 1/10th of the price and available at my local Radio Shack.Once I ran the wires through the wing, the wing is officially ready for Monokote.
Once the paint dried, I started making up the wiring harness for the wing. I'm trying something new here, D-Sub connectors. I've seen some modelers on RCScaleBuilder.com use them to eliminate multiple connectors between the wing and fuse, and thought this was a good plane to try them out on. So far, I like them. I also considered Ashlok connectors, but the D-Sub's were 1/10th of the price and available at my local Radio Shack.Once I ran the wires through the wing, the wing is officially ready for Monokote.
03-16-2012, 06:43 AM
#17
Thread Starter
My Feedback: (38)
Join Date: Sep 2010
Location: Stratford,
WI
Posts: 45
Likes: 0
Received 0 Likes
on
0 Posts
Where I left on this thread 2 months ago, I was going full throtle trying to get this plane done for our club's Mall Show on February 4th. In that time I was able to get the wing about 90% Monokoted and the fuse converted and Monokoted. Here is a run-down on the fuse conversion:
- removed the nose sheeting
- Cut the engine box off flush with the front bulkhead. A new 1/4" plywwod firewall was cut and epoxied into the main fuse box at this point.
- New front bulkhead cut and glued into place
- New 3/32" balsa front sheeting
- Front ring cut from 1/2" balsa and carved to shape
- all cockpit detailing and surrounding sheeting removed
- New 1/4" balsa cockpit floors installed as well as new 3/32" balsa sheeting
- The whole nose/cockpit area got smeared with lightweight spackle
- The next morning I hit it with my orbital sander, cut the new cockpit openings,and it was ready for Monokote.
At this point (about a week before our show) I realized I was going to fall short of my target. I set this project aside to tie-up some loose ends on some other planes.
03-16-2012, 07:09 AM
#18
Thread Starter
My Feedback: (38)
Join Date: Sep 2010
Location: Stratford,
WI
Posts: 45
Likes: 0
Received 0 Likes
on
0 Posts
After being distracted by other projects and household stuff for over a month, I decided it was time to get this project done. So this week I tossed the PT back up on my workbench. I was able to get the Monokoting done and the Wolf Stinger 25 engine mounted. The dummy radial needs to be built and mounted before I can completely finish the nose, so that is the next step.
03-16-2012, 07:15 AM
#19
Thread Starter
My Feedback: (38)
Join Date: Sep 2010
Location: Stratford,
WI
Posts: 45
Likes: 0
Received 0 Likes
on
0 Posts
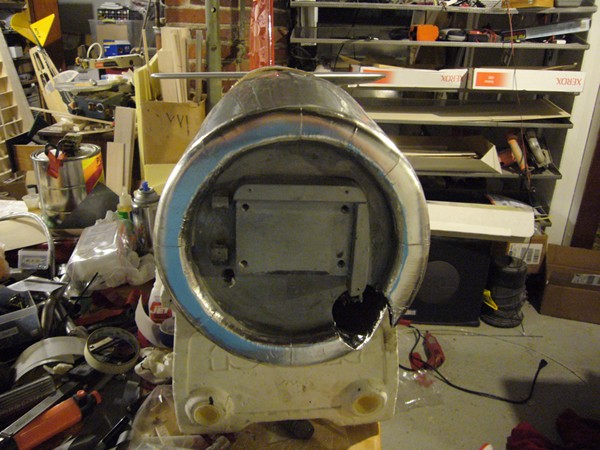
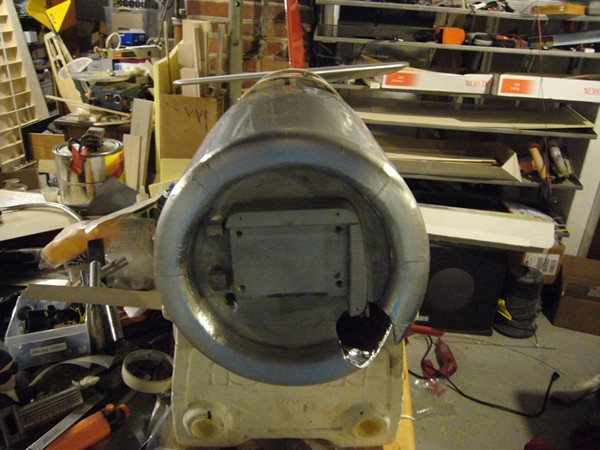
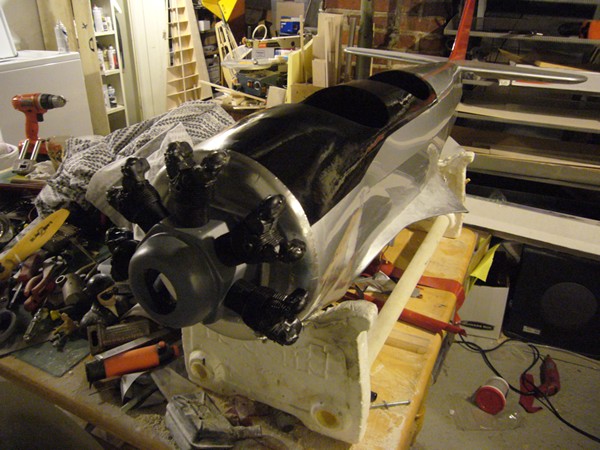
While the pit crew was napping, I started working on the dummy radial.
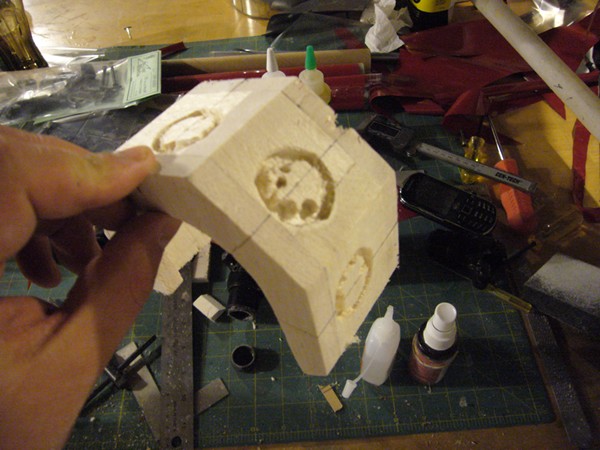
First I cut a 7-sided polygon from 3/8" balsa to form the backside of the crankcase. Then hollowed out the center to clear the Wolf engine.
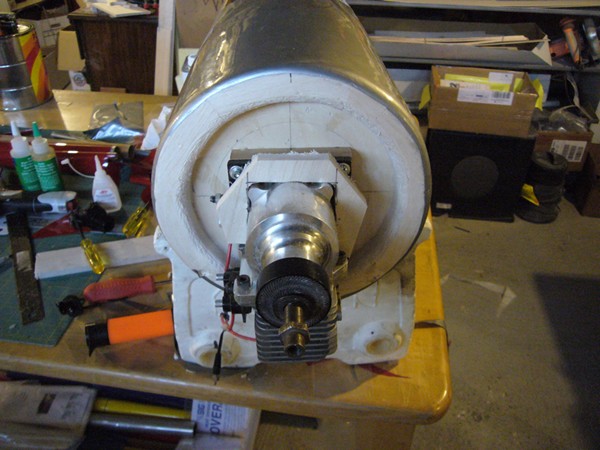
I cut a second 3/8" polygon for the front side and again cut clearence for the wolf engine. Then cut 3/8" x 1-1/2" balsa pieces to fit between the two polygons to form the flat sides of the crankcase. I then test-fit it on the airframe and made sure there was proper clearance for the Wolf engine. I also tossed one of the Williams Brothers cylinders on it to check the overall size.

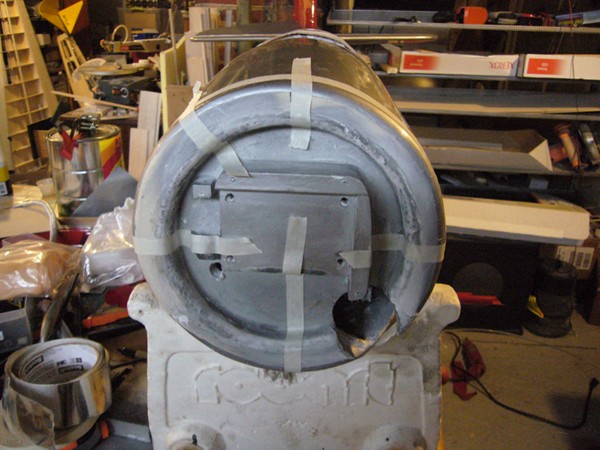
Then I started working on mounting it. A piece of 1/16" ply was cut to be 1/2" bigger all the way around than the engine mount. I then cut out the center to clear the Wolf engine.I screwed this ply plate to a couple pieces of 1/2" x 7/8" MDF and sanded them smooth around the perimeter.

While still screwed to the ply mount, I glued these MDF pieces to the firewall.
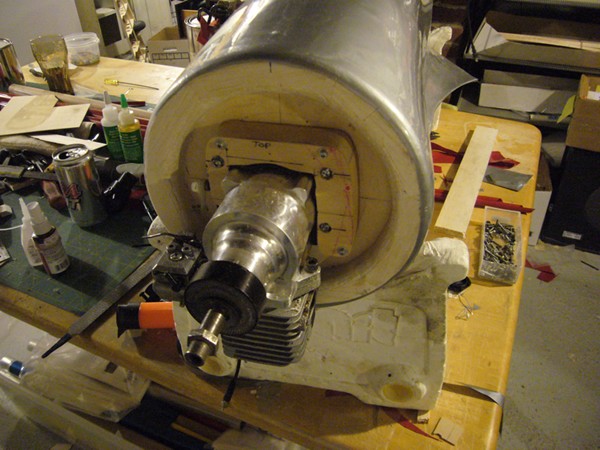
A dremel with router attachment made quick work of cutting recessed rings for the cylinder heads to glue into.They are a bit rough but will get filled with glue.
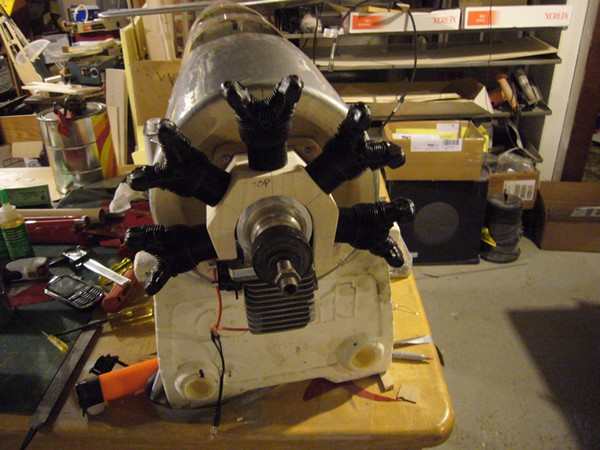
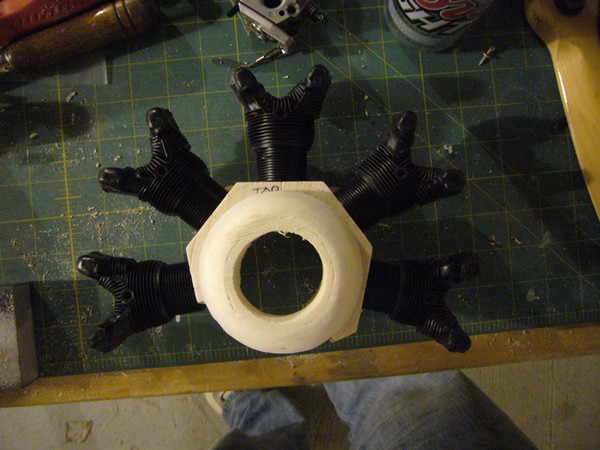
The crankcase was then slid over the Wolf engine and glued to the plywood mounting plate. I was excited to see what the finished engine would look like, so I set the dummy cylinders in place. For the cylinders, I am using (5) Williams Brothers 1/5 scale Wasp cylinders.
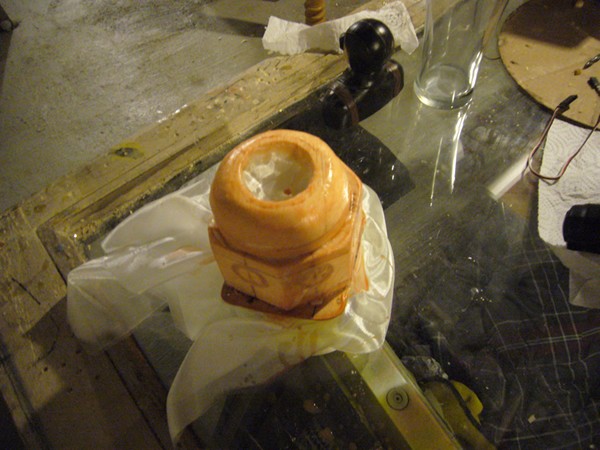
The final piece was the front of the crankcase. I cut two rings, one from 3/8" balsa the other from 3/4" balsa, that had a 3-1/2" outer diameter and 1-3/4" inner diameter. The 3/8" balsa ring was cut to clear the last bit of the Wolf engine then was glued to the 3/4" balsa ring. The two together were sanded to shape to creat the front of the crankcase then glued to the existing assembly.
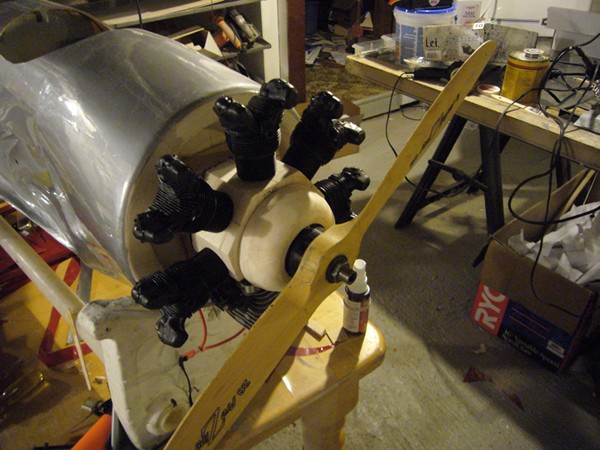
I'm happy with the finished product so I removed the radial and the cylinders to finish the crankcase with fiberglass. Unfortunately I was out of lacquer, so I figured some extra Stits Poly-Brush would do the trick this time. Tomorrow I will sanding and priming and filling to get it ready for paint. Meanwhile, the firewall area of the fuse can now be sealed off.
 03-19-2012, 07:31 AM
#20
NIce job! I was following this a while back when you started, just to see how you fixed the wing. didn't think I would need the info so soon. I snapped the wing on my GP Ryan STM yesterday on a botched landing[:@] I bounced it and the left wing dropped a little before touching down again, and snapped it off clean just beyond the gear[:'(] I was always thinking of redoing the covering in Solartex so now I guess I get the chance. I would rather be starting my PT-19 instead. [&o] Cool idea on the conversion to a PT-23
03-22-2012, 06:17 AM
#21
Thread Starter
My Feedback: (38)
Join Date: Sep 2010
Location: Stratford,
WI
Posts: 45
Likes: 0
Received 0 Likes
on
0 Posts
Little by little it's getting closer to the finish line. Two nights ago I cleaned up the nose for the last time then sealed it. I shot it with some chrome spray paint to give it a silver color then painted a thin coat of epoxy over the entire surface.
Last night I applied the aluminum front ring. I used hardware store aluminum furnace tape for this. First I masked off the back edge then middle panel breaks. I'm doing the nose in 8 panels, panel breaks at every 45 degrees. I use the masking tape as an edge to cut against, it also makes removing the excess easy.
Each panel is applied to the front surface first.
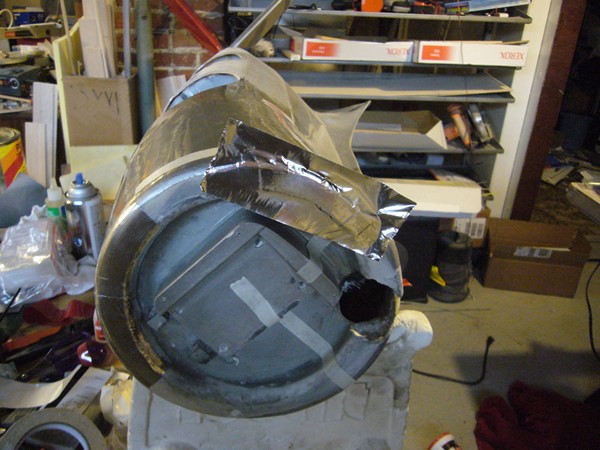
Then smoothed down around the curves.
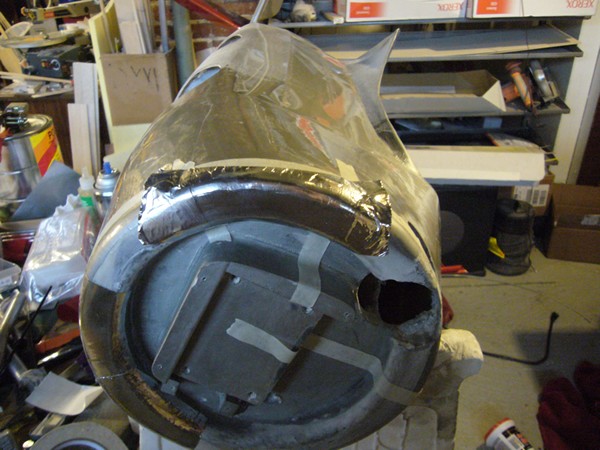
The excess is trimmed away using the masking tape as a guide, then the edges are burnished down good.
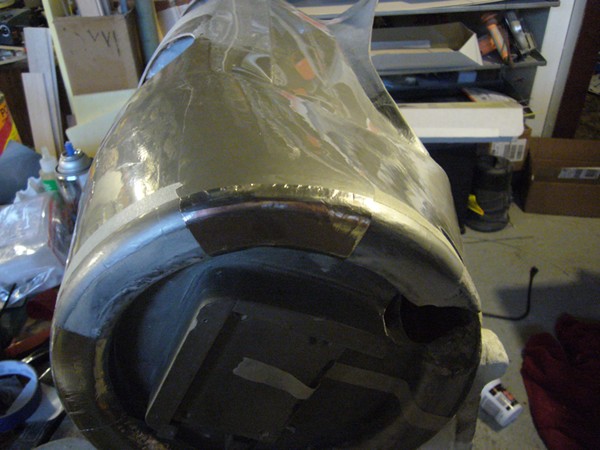
All 8 panels applied.
To make them look more weathered, I scuffed them using a Scoth-Brite pad.
At this point I had to do one more thing I hate. My epoxy coating on the nose never completely set-up
 and was still a little tacky. So I doused the area with baby powder and rubbed it in with a dry acid brush. Hopefully that will take care of it for me.
I masked off the top of the fuse for the anti-glare paint, and scuffed the monokote until it was dull with a sanding sponge.
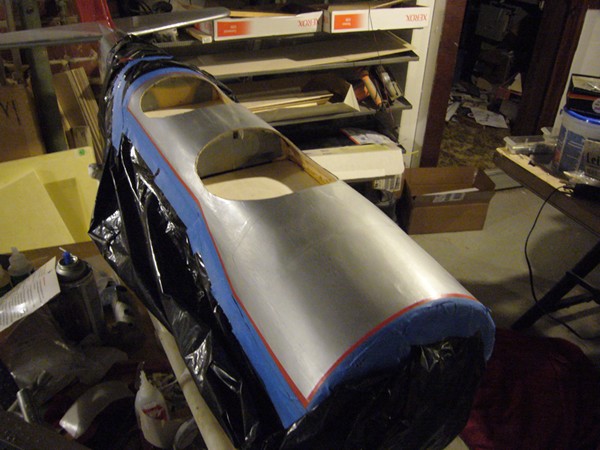
The anti-glare was painted with flat black spray paint.

I had to see what it all looked like with the dummy radial in place. The black anti-glare paint wasnot dry so it looks a bit shiny in this pic. Also note that the crankcase for the radial has been primed and sanded but, still needs the proper color applied.
 03-23-2012, 05:27 AM
#23
Thread Starter
My Feedback: (38)
Join Date: Sep 2010
Location: Stratford,
WI
Posts: 45
Likes: 0
Received 0 Likes
on
0 Posts
ORIGINAL: N1EDM
Hi Dynamic.
I've always been curious about painting Monokote. What type of paint did you use, and how well will it hold up? Did you have to use any primer or treatment other than scuffing up the Monokote??
Thanks,
Bob
Hi Dynamic.
I've always been curious about painting Monokote. What type of paint did you use, and how well will it hold up? Did you have to use any primer or treatment other than scuffing up the Monokote??
Thanks,
Bob
03-23-2012, 05:46 AM
#24
Thread Starter
My Feedback: (38)
Join Date: Sep 2010
Location: Stratford,
WI
Posts: 45
Likes: 0
Received 0 Likes
on
0 Posts
A little more work finished last night. No pictures (can't find my camera charger) but it was mostly odds and ends anyway. Engine, muffler, and throtle servo reinstalled. Overhauled the carb then mounted it and set-up the throtle linkage. Ran the lines for fuel and smoke. Control horns mounted on both elevators and the rudder. Made-up and installed the rudder and both elevator pushrods. Installed tailwheel. Sprayed the crankcase for the dummy radial light gray and the cylinder heads dark gray.