


Refurbishment of my 40-yr old CG Sr. Falcon
 11-11-2014, 03:23 AM
#1

Thread Starter
The time has come, the Walrus said, to speak of many things ... and this time it's the refurbishment/restoration of my #1 favorite flying plane, my 1974-built CG Sr. Falcon. She's actually just the second RC plane I ever flew, #1 being my 1973-built SIG Kadet (the original), and has been in the air almost constantly ever since.This was my lady in the fall of 1974: 
She's never had what you'd call a "crash" but she HAS suffered over the decades from my dumb-thumbs - the most notable dumb-thumb episode being in 1979 when she survived one of my less-than-stellar landings, but lost some of her nose in the deal. At that time all I did was bring her home, cut the damaged wood away, remount the engine on her side, reseal what was left of the nose and it was back to flying. After 40 years of use and abuse, and with her 3rd engine, 2nd radio and 2nd covering, this was my lady this past summer:


Finally, in September I had to take her off-line when the firewall separated from the fuse sides. It was finally time to fix the nose, hopefully properly, and this thread is intended to follow that process, and I'm hoping others will chime in with some ideas on how to go about this. I'm thinking that the more eyes on this, the better she'll be at the end. I'm in no hurry, got all winter to get the job done - and my 7 other planes can carry the load while the Falcon's convalescing.
She's never had what you'd call a "crash" but she HAS suffered over the decades from my dumb-thumbs - the most notable dumb-thumb episode being in 1979 when she survived one of my less-than-stellar landings, but lost some of her nose in the deal. At that time all I did was bring her home, cut the damaged wood away, remount the engine on her side, reseal what was left of the nose and it was back to flying. After 40 years of use and abuse, and with her 3rd engine, 2nd radio and 2nd covering, this was my lady this past summer:
Finally, in September I had to take her off-line when the firewall separated from the fuse sides. It was finally time to fix the nose, hopefully properly, and this thread is intended to follow that process, and I'm hoping others will chime in with some ideas on how to go about this. I'm thinking that the more eyes on this, the better she'll be at the end. I'm in no hurry, got all winter to get the job done - and my 7 other planes can carry the load while the Falcon's convalescing.
 11-11-2014, 03:55 AM
#2

I'll follow your rebuild, Dave.
When you find that "special airframe", it's worth the effort to bring it back to like new condition.
I trained a student on a Senior Falcon, years ago, I remember that his model flew extremely well.
I never built the RC version, but I did build a similar looking Falcon, in the control line version. It flew well, too.
11-11-2014, 06:15 AM
#3
Thread Starter
Hey, Tom!! Well, getting to it - first order of business was actually to do a bit of main gear repair. After 40 years of landing on rough ground the mains were rather "bent" back, nearly 30-degrees from vertical. They were also somewhat flattened and I had to add a tail skid to her because of that, a long time ago. She sits higher now again, and with the mains back straight there should be less weight on the nose wheel. That strut was actually bent to the side from stresses, and will be replaced with a whole new (longer) strut.
Then, the tear-down of the nose began:


She's a mess, no doubt about that. 1st & 3rd pic show a bit of the original white monokote from 1974 that is still under the 2001 monokote - rather yellowed now. I was originally going to simply cut the outside layer of both sides at the score mark in pic 1, but as the first (left) side started getting cut apart I started seeing a lot of oiled wood in the lower frontal area of the fuel tank compartment. Most, if not all, seems to be from exhaust oil getting in the nose wheel hole, but I'm going to have to replace that inner balsa sheet - probably with ply which should help to help strengthen the nose extension.
Original engine bearers inside the compartment & the ply above them is just fine, surprisingly.
At the same time, I laminated 2 pieces of 1/8" ply together and cut the new firewall:
Couldn't believe it, the darn thing fit over the old hardwood bearers PERFECTLY, the first time, with no trimming necessary. The scrollsaw-gods are smiling on me (for a change). After this pic was taken I used my dremel to remove the rest of the lower inner balsa lamination. BTW, I've got a cheapie digital camera that doesn't always take great pics - sorry 'bout the quality of some of the pics in this.
Then, the tear-down of the nose began:
She's a mess, no doubt about that. 1st & 3rd pic show a bit of the original white monokote from 1974 that is still under the 2001 monokote - rather yellowed now. I was originally going to simply cut the outside layer of both sides at the score mark in pic 1, but as the first (left) side started getting cut apart I started seeing a lot of oiled wood in the lower frontal area of the fuel tank compartment. Most, if not all, seems to be from exhaust oil getting in the nose wheel hole, but I'm going to have to replace that inner balsa sheet - probably with ply which should help to help strengthen the nose extension.
Original engine bearers inside the compartment & the ply above them is just fine, surprisingly.
At the same time, I laminated 2 pieces of 1/8" ply together and cut the new firewall:
Couldn't believe it, the darn thing fit over the old hardwood bearers PERFECTLY,
Last edited by skylark-flier; 11-11-2014 at 06:20 AM.
11-11-2014, 06:39 AM
#4
Sometimes, things "Back in the Day" weren't as good as now. Back then, if I had a fuel soaked firewall, I'd toss the model.
Now, as an "adult", I tend to fix the problems.
Nice work, so far, Dave.
Now, as an "adult", I tend to fix the problems.
Nice work, so far, Dave.
 11-11-2014, 05:05 PM
#6
Thread Starter
Hey, welcome to the fray combatpigg - that fuel tank is a dubro 10-oz tank and was actually built into the compartment from the bottom back in 1979, when I turned the engine on her side after the "unfortunate bout of dumb-thumbs". It rests right up against the hardwood bearers AND the floor of the compartment - no foam anywhere in there, and is tight against the sides. This is the very first time that it's been out again, and it'll probably never go back in.
In the "getting ahead of myself" department (which I'm really good at): I'm looking at a possible "issue" in the near future concerning the steering for the nose wheel. You can see the link there on the left side of the fuse. The new nosegear sits lower on the firewall (trying to raise the nose a bit for rough-grass-ground taxiing) which is why the new firewall has a "tab" on the bottom that the old one didn't have, and the old fuel tank will block the path for the steering linkage. Like you said, it's already tight - linkage CAN'T go around the tank, has to go over it ... UNLESS ... I can find a narrower/taller tank that will fit in between the original hardwood engine bearers. I've got no hesitation to thin them down if I have to but I don't want to actually eliminate them - they count for a lot of the strength/rigidity of the fuse front. That bracing ply that's there right now can go too, no problem. Will spend a bit of tonight hunting for that and hoping I find one. Tower's got a huge selection though and I'm sure to find something I can live with.
Spent the day today "running into town" (75 miles one-way) to get a couple sheets of 12x12x1/8" ply for what I can see coming with those sides. Also saw some 1/64" stuff and picked up a pair of 6x12" sheets of that too. Nothing specific comes to mind for it, except maybe sheeting under the fuse - might be lighter than balsa. I dunno.
Also in the getting ahead of myself dept - I have no idea what I'm going to do to recover her when the time comes. I'm seriously thinking about SIG Koverall & dope vs monokote. A long-time issue with the Falcon has been the bottom of the horizontal stab, and the constant hole repair that I've been doing. The field I fly from is fabulous - 600' deep, 3000' long with cow, hay & corn fields surrounding for a long, long way in near any direction. However, the actual surface was graded with a bulldozer bucket 25 yrs ago, then seeded. It's nowhere even close to smooth in some places so I use a gravel access road that the town put in for their garage as a runway. Gravel & monokote are not friendly toward each other. A couple of my other planes have koverall and it's never even been dented by flying stones - may go that route with the Falcon too. Again, I dunno.
That first pic, img-0004 shows the general surface of the field, Falcon's out on the left, turning for landing. This pic shows the gravel access road and a bit more of the field
Last edited by skylark-flier; 11-11-2014 at 05:14 PM.
11-12-2014, 02:30 AM
#7
That nose sterring will require planning I'm sure that you will come up with something.
I'd stock up, too, if I had a150 mile round trip to the LHS. That's quite a trip to pick up supplies.
Your field looks like a nice area to fly. Lots of open space.
I'd stock up, too, if I had a150 mile round trip to the LHS. That's quite a trip to pick up supplies.
Your field looks like a nice area to fly. Lots of open space.
11-13-2014, 09:02 AM
#8
Thread Starter
Things are coming along just fine. Got the inner side liners cut and fitted - really worked out well, I'm kinda surprised. Used the original engine mount (much cleaned and buffed) but cut off the sides to give me a bit more room inside the engine compartment - one of those "why not" things, and it looks pretty good. New nose strut's mounted on the firewall too:

These pics show all the new wood (so far) just fitted - nothing (except engine mount & strut mount) is glued, or screwed, yet:


To me, that's the most amazing part of the whole thing so far - it stays together without being glued. I've never managed to gets cuts that close that simple friction works like this. Still have a fair amount of cutting/shaping to do (3rd pic) before I actually glue anything and that 2" spinner is probably going to get replaced with a 2.5".
Still not sure of exactly what I'm going to do about the fuel tank and steering rod situation. I could put a 8oz oval tank in and it would just fit inside the compartment - between the original hardwood bearers. The same tank - 10 oz - would be too long and I'd have to cut the bulkhead that sits at the rear of the fuel tank compartment so it could fit, extending into the compartment in front of the wing holddown.
 Here's where that "hidden" compartment is. No idea what it was for originally, possibly a rcvr battery?
These pics show all the new wood (so far) just fitted - nothing (except engine mount & strut mount) is glued, or screwed, yet:
To me, that's the most amazing part of the whole thing so far - it stays together without being glued. I've never managed to gets cuts that close that simple friction works like this. Still have a fair amount of cutting/shaping to do (3rd pic) before I actually glue anything and that 2" spinner is probably going to get replaced with a 2.5".
Still not sure of exactly what I'm going to do about the fuel tank and steering rod situation. I could put a 8oz oval tank
Last edited by skylark-flier; 11-13-2014 at 01:45 PM.
11-13-2014, 01:44 PM
#9
Thread Starter
Argh!! I messed up - "hidden" compartment is correct in this pic:  Basically, it's just an odd bulkhead in the radio compartment - I suspect it to be a 1967-era intended battery location, but I could easily be wrong. Anyway, nothing has ever been in this little cubbyhole - up until now, maybe.
11-16-2014, 03:17 AM
#12
Thread Starter
Hi AA5BY, good to have you here. Yeah, it really is somewhat of a love affair. Also, the farther I go, the more I find that needs to have a bit of attention paid to it. Latest "find" is loose sheeting on the fuse bottom behind the landing gear mount. That'll get fixed today.
Didn't get much done yesterday, shopping day with my other half - but I got to make an unscheduled stop at the LHS and they'd just gotten a new shipment of "2&4-stroke fuel", so I walked out with 2 gallons along with a few other goodies.
Bought a half-dozen new control rods too - gonna go completely around that original fuel tank. The idea I'm going to try is to bend them to go around, solder 2 together to reach the servo, and I'll have solid "no give" control of the nose wheel again.
Need to take a couple pics of the nose before I start sanding all that wood down again - she's pretty massive right now. All the side sheeting is finished and VERY rough cut, starting the bottom today. Originally, the engine was mounted on hardwood bearers using blind nuts and the bottom was a balsa block that was sanded to shape. That metal mount means I'll need access to the bottom for reinstalling the engine mount after fibreglassing, and holding the nuts in place when I remount the engine so I'm planning to simply sheet-up the entire bottom, one strip at a time and leave slots open for a nut driver to get into there. Would look something like this:
BTW, the spinner DID get replaced with a 2.5" (per original plans) and the new nose ring's all in place and aligned, which makes the nose look even MORE massive right now. Gotta tell ya, there's a lotta new balsa & ply up front - gonna take my belt sander to do the initial sanding. Yeah, I see a lot of sawdust in my immediate future.
Yeah, Tom - that new rcvr battery just MIGHT go in that compartment - which, BTW, really was built there for the battery. Checked the plans to be sure. Right now the old one is way back in the fuse, behind the LG mount for CG purposes. This new nose is actually lighter, even with all the extra wood that's in there right now, and she won't sit on her wheels - tail keeps dropping. I may need that extra weight in the forward area for CG.
Well guys, it's off to the horses, then down to the shop. Later.
11-16-2014, 01:04 PM
#13
Thread Starter
Hokay! Today saw the rest of the bottom sheeting put together, but it's not anything close to contoured yet. The access slots at the bottom of the engine compartment came out just fine: 
 , the steering rod is in place above the original fuel tank (which is sealed back into its compartment)
  , and it's time to remove the engine and mounts for the MASSIVE sanding job to begin
  .
.
It doesn't show too well on that last pic but there IS another ring right behind the spinner, sized right to the spinners dimensions. Gap between the ring and the spinner rear is 3/32".
Also, with all the wood in place, she's sitting on her wheels again - but just barely, nose is extremely light. Once it's all sanded down she'll probably be back on her tail again. Got the fuse marked with a magic marker at the recommended CG, wheels touch the ground 3/4" behind the mark so, assuming I get the CG in the right place (shouldn't be a problem) she's going to be very light on her nose wheel.
It doesn't show too well on that last pic but there IS another ring right behind the spinner, sized right to the spinners dimensions. Gap between the ring and the spinner rear is 3/32".
Also, with all the wood in place, she's sitting on her wheels again - but just barely, nose is extremely light. Once it's all sanded down she'll probably be back on her tail again. Got the fuse marked with a magic marker at the recommended CG, wheels touch the ground 3/4" behind the mark
11-17-2014, 03:29 AM
#15
Thread Starter
Yeah, me too. My prime purpose here is to keep myself straight on what I'm doing - just in case I have to do it again some time in the future. That battery compartment is a case in point - I remember now that when the new radio went in (2001) I put the battery farther back to get some of the weight off the nose at that time, but I didn't remember it a week ago.
Of course, I don't remember breakfast either.
I'm thinking of rebuilding (actually, NEW building) the top hatch over the fuel tank. There's really nothing wrong with the old one (that I know of) but I could build a new one to fit the new nose area better. Who knows? By the time I get back from the horses today I'll probably have it all decided (or not).
11-17-2014, 03:37 AM
#16
I'm thinking of rebuilding (actually, NEW building) the top hatch over the fuel tank. There's really nothing wrong with the old one (that I know of) but I could build a new one to fit the new nose area better. Who knows? By the time I get back from the horses today I'll probably have it all decided (or not).
I used to worry about how this or that would be built. Now, I may see an upcoming problem, but I just figure it out when I get there, instead of worrying about it.
Breakfast ? I don't remember what I had, either.
 11-17-2014, 11:25 AM
#17
Thread Starter
Soooooo, after 4 hours of a vibrator sander and 60-grit sandpaper, today I look like a balsa snowman and the Falcon's actually beginning to look like a plane again. Got the nose sanded to the point it looks like a nose again, now I'm beginning a bit of "fill the gap" - mostly under the firewall and right at the front nose ring, to bring the #2 ring the rest of the way to the nose ring.
Latest pics:


 Right after the pics were taken I got out the compressor and blew 3 lbs of balsa dust off her - she's all clean now.
Yeah, "seat of the pants" - I like that, describes me perfectly but I never thought about it before. You're right, I also tend to fret a bit about how this or that's gonna work and then, when I get there, it all seems to come together just right. One day I'll actually realize that I've been doing this (building planes) for 59 years and I'll learn to quit fretting. Still haven't decided about the hatch but I'm leaning toward simply putting new sides on it to match the new Falcon sides, re-monokote (decided I'm too used to the present pattern) and go.
Had to go out this morning to buy a LONG allen-wrench set. I've wanted one for a long time anyway, but there was NO WAY that I was going to get the bottom screws out of the motor mount without it.
So, once the filling is done she'll get the whole engine compartment fibreglassed (resin), then the final sand, re-monokote, get the new batteries for the radio (probably just before Christmas) and go fly her (most likely between Christmas and New Year). Yeah, I fly year-round, always have. This past year I actually flew Christmas day, New Years Eve day and New Years day - all 3. It'd be great to repeat that little trick.
Latest pics:
Yeah, "seat of the pants" - I like that, describes me perfectly but I never thought about it before. You're right, I also tend to fret a bit about how this or that's gonna work and then, when I get there, it all seems to come together just right. One day I'll actually realize that I've been doing this (building planes) for 59 years and I'll learn to quit fretting. Still haven't decided about the hatch but I'm leaning toward simply putting new sides on it to match the new Falcon sides, re-monokote (decided I'm too used to the present pattern) and go.
Had to go out this morning to buy a LONG allen-wrench set. I've wanted one for a long time anyway, but there was NO WAY that I was going to get the bottom screws out of the motor mount without it.
So, once the filling is done she'll get the whole engine compartment fibreglassed (resin), then the final sand, re-monokote, get the new batteries for the radio (probably just before Christmas) and go fly her (most likely between Christmas and New Year). Yeah, I fly year-round, always have. This past year I actually flew Christmas day, New Years Eve day and New Years day - all 3. It'd be great to repeat that little trick.
Last edited by skylark-flier; 11-17-2014 at 11:32 AM.
11-17-2014, 12:14 PM
#18
I did some refurbishing, too.
These are my 6 month old Kadet Senior Sport wheel pants. They may be almost new, but they had seen better days. LOL
I hope they can remained undamaged a little longer, this time.")
These are my 6 month old Kadet Senior Sport wheel pants. They may be almost new, but they had seen better days. LOL
I hope they can remained undamaged a little longer, this time.
11-17-2014, 09:44 PM
#19
Thread Starter
I have no doubt they'll make it this time - they'll be mounted on a plane that doesn't like to clap its hands/wings. I saw the pics on your thread - that plane's positively outstanding. Can't wait to see the graphics.
Well, all doubt is removed concerning the hatch cover - it's going to get "modified" a bit. Seems the fuse is about 3/16 wider now than original in that area and the cover kinda looks like a beenie on top of it - it just ain't right. Gonna sand down the sides, add a bit of balsa to match the present contours of the fuse and then re-cover it, bit I'm thinking of re-coloring the hatch to match the plane sides (white with trans-green over it) - would kinda look like this up-top of the hatch & wing: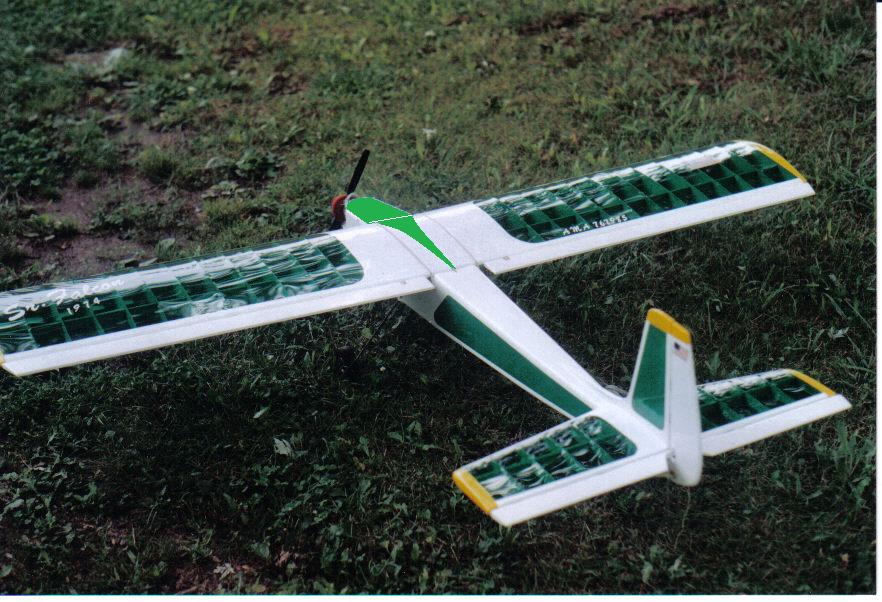 At the same time I'll sweep it forward along the front-sides, like it was all those years ago but maybe just a bit more sweep - kinda like this:
  Right now it's simply cut off at the firewall.
Well, all doubt is removed concerning the hatch cover - it's going to get "modified" a bit. Seems the fuse is about 3/16 wider now than original in that area and the cover kinda looks like a beenie on top of it - it just ain't right. Gonna sand down the sides, add a bit of balsa to match the present contours of the fuse and then re-cover it, bit I'm thinking of re-coloring the hatch to match the plane sides (white with trans-green over it) - would kinda look like this up-top of the hatch & wing:
11-18-2014, 12:42 AM
#20
Thanks. I found some graphics last night, but I'll wait a couple weeks to order.
I have a friend that lives in Winchester Va, that does them for me.
I like the new design for the hatch cover. Will you use magnets to hold it in place ?
I have a friend that lives in Winchester Va, that does them for me.
I like the new design for the hatch cover. Will you use magnets to hold it in place ?
11-18-2014, 10:58 AM
#21
Thread Starter
No kidding! Winchester's where my nearest LHS is located.
I have my doubts that magnets would hold the hatch down, but that might be my "old and set-in-my-ways" attitude coming out. The hatch was designed with a tab on each side, it's held by a screw through each side of the fuse and through that tab. Definitely gonna stick with that idea. It ended up that I built a whole new hatch though - once I got the monokote off the original it was obvious that the front end of the old hatch was no better off than the firewall was. It really was a mess.
Here's the "beenie weenie" effect with the old hatch: Once I took the monokote off, this is what I saw:
  The blue is what's left of the 1974 monokote and that oil-soaked hole in the top is from the ORIGINAL 1974 fuel filler tube - forgot it was even there. You can see the anchor tabs here too.
Anyway, built the new hatch and it's all rough sanded to the contour of the plane. She's actually starting to look like a Sr. Falcon again:
 If you blow up that last pic you can see the line on the top of the hatch that shows where the firewall is. I cut forward of that line with the idea that the hatch will cover the firewall, as it did with the original set-up, but I could cut it at the line to get a bit more sweep on the front edges. I forgot about the engine needle valve cut-out - it limits the forward sweep I can give those sides.
Actually, I'm quite happy with it as it is. All I've really got to do now is drill a hole in the firewall for the pressure line, insert lines into both the pressure & engine feed holes, and stink up the house with fibreglass resin for the afternoon. Then, once that's cured I can do my monokote thing, spray the engine compartment with white Lustrekote, re-install the engine and wait for the batteries to arrive.
I have my doubts that magnets would hold the hatch down, but that might be my "old and set-in-my-ways" attitude coming out. The hatch was designed with a tab on each side, it's held by a screw through each side of the fuse and through that tab. Definitely gonna stick with that idea. It ended up that I built a whole new hatch though - once I got the monokote off the original it was obvious that the front end of the old hatch was no better off than the firewall was. It really was a mess.
Here's the "beenie weenie" effect with the old hatch:
Anyway, built the new hatch and it's all rough sanded to the contour of the plane. She's actually starting to look like a Sr. Falcon again:
Actually, I'm quite happy with it as it is. All I've really got to do now is drill a hole in the firewall for the pressure line, insert lines into both the pressure & engine feed holes, and stink up the house with fibreglass resin for the afternoon. Then, once that's cured I can do my monokote thing, spray the engine compartment with white Lustrekote, re-install the engine and wait for the batteries to arrive.
11-18-2014, 02:42 PM
#22
Looks like you have the nose figured out. It looks good.
My friend is Gary Sibert. He owns Decal-it. http://www.decal-it.com/ Keep him in mind, if you need graphics.
At one time, he owned a hobby shop. I assume that it was in Winchester.
I'm talking to him now, about the graphics on my Kadet. He's done most of my graphics for a long, long, time.
My friend is Gary Sibert. He owns Decal-it. http://www.decal-it.com/ Keep him in mind, if you need graphics.
At one time, he owned a hobby shop. I assume that it was in Winchester.
I'm talking to him now, about the graphics on my Kadet. He's done most of my graphics for a long, long, time.
11-18-2014, 02:53 PM
#23

Join Date: Mar 2013
Location: Winnipeg,
MB, CANADA
Posts: 751
Likes: 0
Received 0 Likes
on
0 Posts
Starting to look like a brand new airframe Dave, nice work. I don't know if you have already mentioned it, but what size of motor do you have on it and what is the wingspan? It looks like a fun little plane, I sure liked my CG Freedom 20(except all the lit ply).
Calvi
Calvi
11-19-2014, 08:48 AM
#24
Thread Starter
Looks like you have the nose figured out. It looks good.
My friend is Gary Sibert. He owns Decal-it. http://www.decal-it.com/ Keep him in mind, if you need graphics.
At one time, he owned a hobby shop. I assume that it was in Winchester.
I'm talking to him now, about the graphics on my Kadet. He's done most of my graphics for a long, long, time.
My friend is Gary Sibert. He owns Decal-it. http://www.decal-it.com/ Keep him in mind, if you need graphics.
At one time, he owned a hobby shop. I assume that it was in Winchester.
I'm talking to him now, about the graphics on my Kadet. He's done most of my graphics for a long, long, time.
Starting to look like a brand new airframe Dave, nice work. I don't know if you have already mentioned it, but what size of motor do you have on it and what is the wingspan? It looks like a fun little plane, I sure liked my CG Freedom 20(except all the lit ply).
Calvi
Calvi
Tom, thankyou VERY MUCH for the tip to Gary - I surely do appreciate it, and he'll be seeing a bit of business from me rather shortly. I WILL tell him you sent me. I think it took me about 3 minutes to find his physical location (yeah, I'm a bit slow with computers) - things are getting better and better for me today; found a graphics source, found a LHS that I had no idea existed - and it's nearly next door to one of my favorite grocery outlets, about 5 blocks away. I can see it now, trips to Winchester are going to have more stops from now on.
Gotta tell ya, I've been making my own decals for a long time but the ink doesn't seem to really last more than a couple years before it starts fading or turning colors. Gary's equipment probably does a whole lot better than my 10-yr old inkjet printer. Yeah, he'll see lots of 1-off's from me.
Hi Calvin, glad to see you here. Yeah, I'm actually rather happy with it. I'm no kind of "showcase" builder, unlike Tom - you GOTTA see his planes, they're OUTSTANDING - but most of my planes last nearly forever, the Falcon being a case in point. She's my 4th oldest still flying airplane, passed 40 years old a month ago. She was #5 but I retired my 1973-built SIG Kadet last winter, in favor of my new Kadet Mk-II.
The Sr. Falcon's got a wingspan of 69" and this one flies rather nicely with my trusty dusty OS .46LA driving an 11x6 prop. The last engine I had in her was actually better and more powerful, an ancient Fox .45 (iron piston), but the crankshaft pin broke and I can't get a replacement from anywhere I've found so I had to go back to the LA. This plane is an original kit-built, and at the time I bought her the box listed her as an advanced trainer, designed for .35-.45. If I remember right, the last incarnation of the kit listed her as a sport aircraft with .45-.60 recommended. Gotta say, if the last incarnation was anything like my "early days" version, a .60 would put her in a class with the space shuttle.
Sprayed the engine compartment with white Lustrekote this morning. As soon as it dries the monokote starts going on, then she get's all put back together again.
Getting close.
11-21-2014, 01:19 PM
#25
Thread Starter
Done! Well, actually 98% done - still have to tweak the throttle positioning on the servo but that'll have to wait until I get the new batteries, and it'll be done at the flying field anyway. The ones in the xmtr right now are DEAD-DEAD-DEAD. Oh well, they lasted 13 years anyway.
Odd thing is, I've got 3 xmtrs (and rcvrs, on active airplanes - the blue Butterfly, maroon MidStar-40 & white Eagle-II) that date to the late 1980's and all 3 batteries (originals) are still running just fine. Guess they don't build 'em like they used to.
Anyway, here's my lady with something she hasn't had in 35 years - a whole nose:


Oh! Yeah - one other minor item still to do. The CG is 7/8" behind the rear-most recommended CG location, only maybe about 1/4" in front of the wheels. There was so much "dead weight" wood in the nose before that when I built the new one it's not nearly as heavy. Gonna have to add a few ounces of lead to the front of the fuel tank compartment. No problem but this is the first time I've ever had a plane that wasn't nose-heavy. She's gonna fly GOOD!!
Odd thing is, I've got 3 xmtrs (and rcvrs, on active airplanes - the blue Butterfly, maroon MidStar-40 & white Eagle-II) that date to the late 1980's and all 3 batteries (originals) are still running just fine. Guess they don't build 'em like they used to.
Anyway, here's my lady with something she hasn't had in 35 years - a whole nose:
Oh! Yeah - one other minor item still to do. The CG is 7/8" behind the rear-most recommended CG location, only maybe about 1/4" in front of the wheels. There was so much "dead weight" wood in the nose before that when I built the new one it's not nearly as heavy. Gonna have to add a few ounces of lead to the front of the fuel tank compartment. No problem but this is the first time I've ever had a plane that wasn't nose-heavy. She's gonna fly GOOD!!