


Extreme Flight Vanquish 2m Build Thread
 06-27-2012, 12:05 PM
#1051
Senior Member
ORIGINAL: cmoulder
OS 33?
BTW- my copy arrived yesterday. I think my gasoline conversion will be around 9# 6 ozs...nice!
Thot of starting a different thread in the regular Pattern forum but it's too much like work so I'll just take notes in case EF wants them
 06-27-2012, 12:20 PM
#1052
Senior Member
Join Date: Jan 2005
Location: CALGARY,
AB, CANADA
Posts: 238
Likes: 0
Received 0 Likes
on
0 Posts
ORIGINAL: rgreen24
Flyer 88, not sure if you have Lowes in Canada or home depot, but the both sell excellent Velcro for batteries.
Flyer 88, not sure if you have Lowes in Canada or home depot, but the both sell excellent Velcro for batteries.
But really want the velcro straps with the buckle. Those are coming from the slow boat, but at $2 per pair I'll wait.
Cheers
Flyer88


 06-27-2012, 01:19 PM
#1055

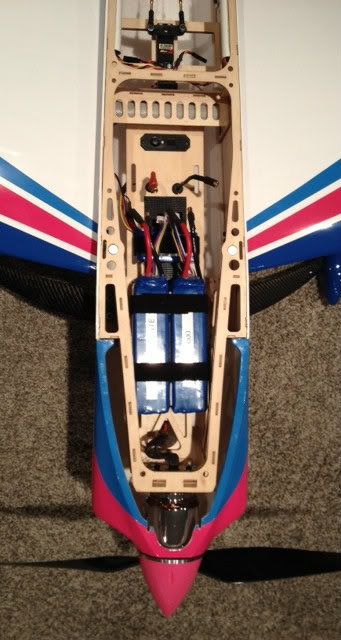
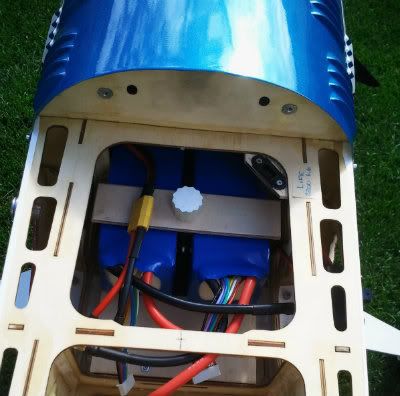
battery position looks similar to my own. Do your main flight pack batteries really connect in back like that? Isn't your ESC near the nose and doesn't that make for some very long battery->ESC leads? If so, you should look into getting a CapPack or something similar to buffer the connection to the ESC, long battery->ESC connections are a great way to fry an ESC (info from Schultze, Castle, and Jeti all agree here).
Peter+
Peter+
06-27-2012, 01:37 PM
#1056
Senior Member
Join Date: Jan 2005
Location: CALGARY,
AB, CANADA
Posts: 238
Likes: 0
Received 0 Likes
on
0 Posts
I got one.
But from what I understand they are more for 3D pilots that are hammering the throttle creating allot of spikes that the ESC's don't like to deal with.
I might be able to get rid of maybe 1 or 2 inches max. The back of the ESC is right at the firewall. So maybe 7-8" of wire
Page 36 has a picture of my esc location.
06-27-2012, 01:48 PM
#1057
Senior Member
Join Date: Jan 2005
Location: CALGARY,
AB, CANADA
Posts: 238
Likes: 0
Received 0 Likes
on
0 Posts
It's maybe more like 9" of wire, just measured. I'll see how it goes. I have the same set-up (esc) on my 12s Yak with more wire and no problems.
06-27-2012, 02:04 PM
#1058
Given the cost of these planes + their equipment, I prefer to be conservative.
Here's the info from Schultze:
Peter+
Here's the info from Schultze:
electronic speed controllers have been designed to operate correctly with a cable
length between battery and controller at a maximum of 20 cm (7 inches) each lead. In some installations it
will be necessary to increase the length of the battery cables. In this case it is necessary to install additional low-ESR decoupling capacitors. The installation of these additional capacitors allows the increase
in length of the battery cables up to 30 cm (12“)
max. (12“ pos.+ 12“ neg. cable) or up to 50 cm (20
inches) max. when using side by side soldered
packs, depending on motor load.
06-27-2012, 03:11 PM
#1059

Join Date: Jul 2006
Location: Ossining,
NY
Posts: 2,819
Likes: 0
Received 0 Likes
on
0 Posts
All those open bullet connectors are a disaster waiting to happen.
Reverse polarity or short at any one point and some very nasty finger burns can result. I have seen it, and it ain't pretty.
Deans, Anderson Power Poles (APP) or EC connectors offer some measure of safety.
Reverse polarity or short at any one point and some very nasty finger burns can result. I have seen it, and it ain't pretty.
Deans, Anderson Power Poles (APP) or EC connectors offer some measure of safety.
06-27-2012, 05:18 PM
#1062
Senior Member
Join Date: Oct 2011
Location: Stewartsville, NJ
Posts: 415
Likes: 0
Received 0 Likes
on
0 Posts
ORIGINAL: pvogel
battery position looks similar to my own. Do your main flight pack batteries really connect in back like that? Isn't your ESC near the nose and doesn't that make for some very long battery->ESC leads? If so, you should look into getting a CapPack or something similar to buffer the connection to the ESC, long battery->ESC connections are a great way to fry an ESC (info from Schultze, Castle, and Jeti all agree here).
Peter+
06-27-2012, 05:55 PM
#1063
Join Date: Jul 2006
Location: Ossining,
NY
Posts: 2,819
Likes: 0
Received 0 Likes
on
0 Posts
ORIGINAL: Flyer88
Hey Bob post some pics of your work, so we can critique your work for once.😉
Hey Bob post some pics of your work, so we can critique your work for once.😉
Most recent is the Caelestia thread which you indicated you've been following. Some photos on pages 4 and 5, I think.
06-27-2012, 07:24 PM
#1064
ORIGINAL: danamania
Peter, you'll like this. When I first set-up my Vanquish, I added the then new CapPack between the Ice2 HV80 and the CC series ''Y'' connector: this wiring ran over the LiPos and with the wires running aft out of the LiPos, up and over them to meet the ''Y.'' The CapPack cut the ripple voltage in half and I thought I had done real good! It turns out I over-engineered all this and a few of the D1 guys suggested that I could reduce needless weight by shortening the leads and losing the CapPack and all those extra Deans Ultras! I explained why I had the CapPack and while that was agreed to, they said I wouldn't need it at all if the batteries were turned around and the wiring shortened. Well I had to sleep on all that but did their bidding shortly after the first contest of the season. As the flying days warm here in the NE, we start losing performance to the warmer, less dense air. Time to lose the weight before the Summer heat set in, I made peace with all that and got it done. Haven't looked back and went on to find more weight to remove, LOL. The more I teased Bob M about his incessant weight whittling, the more I myself became ''assimilated'' and started to emulate these pattern guys and their comical antics with plane parts. The last straw will surely be when I get a postage scale LOL, but I still cling a little bit to my sport flyer roots!
ORIGINAL: pvogel
battery position looks similar to my own. Do your main flight pack batteries really connect in back like that? Isn't your ESC near the nose and doesn't that make for some very long battery->ESC leads? If so, you should look into getting a CapPack or something similar to buffer the connection to the ESC, long battery->ESC connections are a great way to fry an ESC (info from Schultze, Castle, and Jeti all agree here).
Peter+
battery position looks similar to my own. Do your main flight pack batteries really connect in back like that? Isn't your ESC near the nose and doesn't that make for some very long battery->ESC leads? If so, you should look into getting a CapPack or something similar to buffer the connection to the ESC, long battery->ESC connections are a great way to fry an ESC (info from Schultze, Castle, and Jeti all agree here).
Peter+
Peter+
06-27-2012, 07:43 PM
#1065
Senior Member
Dana,
WHEN you decide to get a scale, ebay usually has escali's for around 40$ with about a 6 kg capacity. Digital, whole gram res. Partial gram res costs more. Mixing epoxy with precision becomes QED.
WHEN you decide to get a scale, ebay usually has escali's for around 40$ with about a 6 kg capacity. Digital, whole gram res. Partial gram res costs more. Mixing epoxy with precision becomes QED.
06-27-2012, 10:12 PM
#1066


Join Date: Mar 2004
Location: Orange County,
CA
Posts: 5,312
Likes: 0
Received 0 Likes
on
0 Posts
ORIGINAL: cmoulder
All those open bullet connectors are a disaster waiting to happen.
Reverse polarity or short at any one point and some very nasty finger burns can result. I have seen it, and it ain't pretty.
Deans, Anderson Power Poles (APP) or EC connectors offer some measure of safety.
All those open bullet connectors are a disaster waiting to happen.
Reverse polarity or short at any one point and some very nasty finger burns can result. I have seen it, and it ain't pretty.
Deans, Anderson Power Poles (APP) or EC connectors offer some measure of safety.
FWIW if you use the bullets correctly there is little chance of reverse polarity. I use the female on the positive (red hot female) and black male bullet on negative. I slip a piece of tubing over the male when disconnected. I've run several boats set up with 10S2P (4x5S 6,000mAh packs = 10S voltage and 12,000 mAh capacity. Lasts almost 2 minutes of all out running!!) using 6 and 8 mm bullets. Never once had an issue with them. I have around 30 packs set up this way with zero issues.
I have moved to using Anderson Power Poles on most all my planes and helis now. Crimping makes for a very solid connection and it is fast and easy to do. No more soldering!! The 45 amp APP are more than up to the task. I have never had one even slightly warm to the touch upon landing, which means no loss in the plug. I am a believer now. Plus I can get all the stuff local here in SOCAL at will call. How easy is that?
06-28-2012, 12:31 AM
#1068
Join Date: Jul 2006
Location: Ossining,
NY
Posts: 2,819
Likes: 0
Received 0 Likes
on
0 Posts
ORIGINAL: MTK
Dana,
WHEN you decide to get a scale, ebay usually has escali's for around 40$ with about a 6 kg capacity. Digital, whole gram res. Partial gram res costs more. Mixing epoxy with precision becomes QED.
Dana,
WHEN you decide to get a scale, ebay usually has escali's for around 40$ with about a 6 kg capacity. Digital, whole gram res. Partial gram res costs more. Mixing epoxy with precision becomes QED.
For the smaller stuff I use [link=http://www.amazon.com/DigiWeigh-SCALE-Stamp-Counting-Shipping-Shipments/dp/B005V0RP2A/ref=sr_1_25?ie=UTF8&qid=1340872033&sr=8-25&keywords=digiweigh+scales]this[/link] which has 1kg capacity and 0.1g resolution and doesn't cost too much.
06-28-2012, 04:46 AM
#1069
Senior Member
Join Date: Jan 2005
Location: CALGARY,
AB, CANADA
Posts: 238
Likes: 0
Received 0 Likes
on
0 Posts
I agree.
I have been using this setup on larger electrics since the beginning without any problems.
Only thing I would like to do is shorten my leads up a bit so there is less weight and mess.
I have been using this setup on larger electrics since the beginning without any problems.
Only thing I would like to do is shorten my leads up a bit so there is less weight and mess.
 06-28-2012, 09:32 AM
#1072
My Feedback: (282)
Join Date: Dec 2001
Location: Tampa, FL
Posts: 728
Likes: 0
Received 0 Likes
on
0 Posts
Perfect weather this morning, so I was able to maiden the new Vanquish today. Actually I got in 3 flights.
First flight:
The first flight required 2 clicks of right aileron, 1 click down elevtaor, and 2 clicks right rudder. My Futaba 12Z tx has the trims set for 3 steps per click. CG was tail heavy some. Handling was very smooth and landed nicely. Reduced aileron through 3%, increased elevator through 3%, increased aileron expo by 5%. Wheel pants were loose. I am running the Dualsky 6360-12T motor on a APC 20x13E prop. Batteries were my older set and the power was not quite what I expected, more power is needed. Motor temp was 119 F. Motor ran flawless.
Second flight:
Moved the 2nd set of batteries more forward by about 1/2". CG felt better. Power was better as well. The 2nd set of batteries are much newer. Wing incedence is set at 4 deg positive, needs to be increased. I will reset to 6 degrees positive. Full power verticals had no pull to the canopy. Knife Edge had no coupling. This could change when I change the incidence. Added 3% more up and down elevator throw. Lost 1 wheel pant during the flight. Removed the other wheel pant will fly without them for now.
Third Flight:
Spent most of this flight doing slow rolls, point rolls, stall turns, and spins. The Vanquish has a nice break in the spin, stops when sticks are released. Inverted flight requires some down elevator. I will adjust the radio parameters as I go along.
I hope to get the following adjustments done today and fly again tomorrow.
Change prop to APC 20.5x14E prop.
Move 850 LiFe battery from behind the firewall to behind the flight packs.
Move the flight packs forward more.
Increase the wing incidence to 6 degree's positive.
Recheck the Stab incidence.
Download the datalog from the CC ESC.
Flight time was 8 minutes, but I did not pay attention to how much I put back into the packs. Cell voltages were about 3.76 each after the flights.
06-28-2012, 09:37 AM
#1073
Senior Member
Join Date: Oct 2011
Location: Stewartsville, NJ
Posts: 415
Likes: 0
Received 0 Likes
on
0 Posts
Congrats! It sounds like you like your new Vanquish. Glad that your maiden flights were successful. Wheel pants are a PITA on grass LOL!
06-28-2012, 09:47 AM
#1074
My Feedback: (282)
Join Date: Dec 2001
Location: Tampa, FL
Posts: 728
Likes: 0
Received 0 Likes
on
0 Posts
ORIGINAL: danamania
Congrats! It sounds like you like your new Vanquish. Glad that your maiden flights were successful. Wheel pants are a PITA on grass LOL!
Congrats! It sounds like you like your new Vanquish. Glad that your maiden flights were successful. Wheel pants are a PITA on grass LOL!
My last pattern plane (and contest) was in 1998 flying Masters class. While my IMAC planes fly well, I have never flown any IMAC plane that was as good as a pattern plane. I do like the Vanquish and was comfortable with it right away. From the limited time I have on it, it is smooth and very predictable. I did do some snaps, but I was on high rate rudder and full rudder was way too much. Not worried about that aspect yet. Going into the garage now to make my changes.
06-28-2012, 10:17 AM
#1075
Senior Member
ORIGINAL: danamania
Wheel pants are a PITA on grass LOL!
Wheel pants are a PITA on grass LOL!
They don't have to be. Consider gluing the pant to the strut. I use and recommend an 8-32 aluminum flathead bolt as axle material. That's what I use.... been doing it for many years now. The installation includes a blind nut inside the pant wall and the strut is chamfered/countersunk to accept the flathead. I also add an ally nut to the pant's opposite wall such that when the axle/bolt is installed, the whole pant is captured by the bolt.
Strong and secure, very inexpensive, very neat appearance and super lightweight. Try it! The down side is that IF you break a pant, you'll have to grind the remnants off the strut which is no biggie in reality
Curious if anyone weighed the struts and mounting hardware, axles and pants of the stock parts. I suspect that some weight savings can be had there