


BJ Craft G2 Essence
 02-12-2015, 07:23 AM
#26
Junior Member
Join Date: Nov 2014
Location: South Korea
Posts: 29
Likes: 0
Received 0 Likes
on
0 Posts
Guys
I also got an Invitation. and now putting it together. Right after I got it, I talked with BJ (Byung Joon) on the phone. I also overact about the size of the fuselage. I joke him like I ordered you a F3A plane, but send me a tuna with the wings… He said, this fuselage will be the maximum size for the balance with the wings, and also the last size for the mess production with the present materials as long as the rule of 5kg regulation.
As you know, it’s not an easy job for producing this size of the volume with lighter weight in the production line.
Actually this G2 fuselage platform is the last word in BJ Craft based on the all experiences during the last 5 years in mess production.
Right after receiving the plane, everybody focus on the big size of the fuselage for the time being,, but as he would post on the Korean F3A forum previously, you will get the bottom of the G2 design concept. Why he named Generation II(G2) for this version.
There are many new things in it. He said, he will announce the main concept of G2 in English in his web site soon. Let’s wait and see. What he is going to say about G2.
Sungho
 02-14-2015, 11:42 AM
#28
Hi Guys,
Well, yesterday Alex Shim met up with me and delivered an Essence for me to build. I'm going to go ahead and run through the usual build process and post lots of pics for you.
I won't have any wing, stab, canalizer, or rudder pics out of the bags until tomorrow. I agree with B.J.'s recommendation and am being very patient in opening the bags. Poke a few small pinholes in the bags and let them "breathe" and adjust to the humidity for at least two days. This will help reduce any chances of warpage. Remember that these are coming from a very humid environment and, especially in winter time, you are probably in a much drier spot with low relative humidity. It won't kill you to wait a couple days. There's enough to get started on with the fuse etc.
Now,
On to the pics!
First, let me highlight the shipping container. Anyone who has received a BJ Craft airplane knows that his shipping crates are excellent and do a great job of protecting things. He's taken it to another level with this one. The container is double walled. He has the usual shipping crate as in the past, but adds another wall to it. Good thing! Have a look at the box after receipt from DHL!

The outer shell was damaged, but upon opening it was completely unscathed. No penetration of the inner crate. Here's a pic after I removed the packing material and wings etc so I could get a good look at the inside. No damage, thankfully!

Everything is neatly packed and wrapped as usual. There were even a few nice surprises visible in the parts bag.

I'll have more on that later, but he includes some templates for motor mounts (YAY!!!) and he even included a prototype FR4 mount for the Pletty Advance 30-10 which he may offer as an option in the future. I will try that one out for sure!
You've all seen some of the pics posted showing the size of the fuselage. Yep, it's big! The pics posted previously don't really show the true scale. Those in D7 that know me will be able to get a scale cue from this pic. I'm not a small guy....

First, let me say that the workmanship and finish is outstanding. The paint really pops and it is a beautiful airplane. I think he is using a different paint or clear coat since it really has a nice shine and finish. The glass work is, as usual, superb and very very light. I agree with B.J. in that this is probably the limit for fuselage volume with today's F3A rules. I have no idea how he can produce such a large fuselage and maintain the low weight. I'll put up the full weight numbers after I unpack everything.
Well, yesterday Alex Shim met up with me and delivered an Essence for me to build. I'm going to go ahead and run through the usual build process and post lots of pics for you.
I won't have any wing, stab, canalizer, or rudder pics out of the bags until tomorrow. I agree with B.J.'s recommendation and am being very patient in opening the bags. Poke a few small pinholes in the bags and let them "breathe" and adjust to the humidity for at least two days. This will help reduce any chances of warpage. Remember that these are coming from a very humid environment and, especially in winter time, you are probably in a much drier spot with low relative humidity. It won't kill you to wait a couple days. There's enough to get started on with the fuse etc.
Now,
On to the pics!
First, let me highlight the shipping container. Anyone who has received a BJ Craft airplane knows that his shipping crates are excellent and do a great job of protecting things. He's taken it to another level with this one. The container is double walled. He has the usual shipping crate as in the past, but adds another wall to it. Good thing! Have a look at the box after receipt from DHL!
The outer shell was damaged, but upon opening it was completely unscathed. No penetration of the inner crate. Here's a pic after I removed the packing material and wings etc so I could get a good look at the inside. No damage, thankfully!
Everything is neatly packed and wrapped as usual. There were even a few nice surprises visible in the parts bag.
I'll have more on that later, but he includes some templates for motor mounts (YAY!!!) and he even included a prototype FR4 mount for the Pletty Advance 30-10 which he may offer as an option in the future. I will try that one out for sure!
You've all seen some of the pics posted showing the size of the fuselage. Yep, it's big! The pics posted previously don't really show the true scale. Those in D7 that know me will be able to get a scale cue from this pic. I'm not a small guy....
First, let me say that the workmanship and finish is outstanding. The paint really pops and it is a beautiful airplane. I think he is using a different paint or clear coat since it really has a nice shine and finish. The glass work is, as usual, superb and very very light. I agree with B.J. in that this is probably the limit for fuselage volume with today's F3A rules. I have no idea how he can produce such a large fuselage and maintain the low weight. I'll put up the full weight numbers after I unpack everything.
Last edited by shannah; 02-14-2015 at 11:46 AM.
02-14-2015, 12:38 PM
#29
Here are some more pics and details on the Fuselage.
First, the workmanship really is nice. The layup is very clean

Sorry about the sideways pic, I see that this is an ongoing issue with posting images in RCU. It looks like if you take a picture with an iPhone in vertical orientation rather than landscape horizontal it automatically defaults to laying the pic on its side with no way to correct it. Even rotating the picture on my PC before uploading it doesn't help.... Oh well
He uses the same construction technique as on the other planes for the glass work.
The Canalizer is not attached to the canopy, as was the case with the Episode. The Canalizer bolts directly into the molded cradle on the fuse. It uses three bolts to secure it in place. The blind nuts are pre-installed and it looks ready to use.


The chin cowl fits great. It is held in place with a couple bolts from inside and two pins at the back of the cowl. You can also see that the landing gear mounts from the bottom into pre-installed blind nuts. Another nice improvement since this makes it much easier and faster to mount the landing gear than on previous models.


The fuselage has an interesting "dorsal fin" on the bottom of the fuselage.


The canopy mounts in a different method as in the past models. The Nuance used a traditional front latch, the Episode used spring loaded side mounts, and this one uses the traditional tension rod. You slide the rod ends forward to disengage the latch features on the rear of the canopy. It is very simple and high reliability.


First, the workmanship really is nice. The layup is very clean
Sorry about the sideways pic, I see that this is an ongoing issue with posting images in RCU. It looks like if you take a picture with an iPhone in vertical orientation rather than landscape horizontal it automatically defaults to laying the pic on its side with no way to correct it. Even rotating the picture on my PC before uploading it doesn't help.... Oh well
He uses the same construction technique as on the other planes for the glass work.
The Canalizer is not attached to the canopy, as was the case with the Episode. The Canalizer bolts directly into the molded cradle on the fuse. It uses three bolts to secure it in place. The blind nuts are pre-installed and it looks ready to use.
The chin cowl fits great. It is held in place with a couple bolts from inside and two pins at the back of the cowl. You can also see that the landing gear mounts from the bottom into pre-installed blind nuts. Another nice improvement since this makes it much easier and faster to mount the landing gear than on previous models.
The fuselage has an interesting "dorsal fin" on the bottom of the fuselage.
The canopy mounts in a different method as in the past models. The Nuance used a traditional front latch, the Episode used spring loaded side mounts, and this one uses the traditional tension rod. You slide the rod ends forward to disengage the latch features on the rear of the canopy. It is very simple and high reliability.
Last edited by shannah; 02-14-2015 at 12:49 PM.
 02-15-2015, 05:52 PM
#33
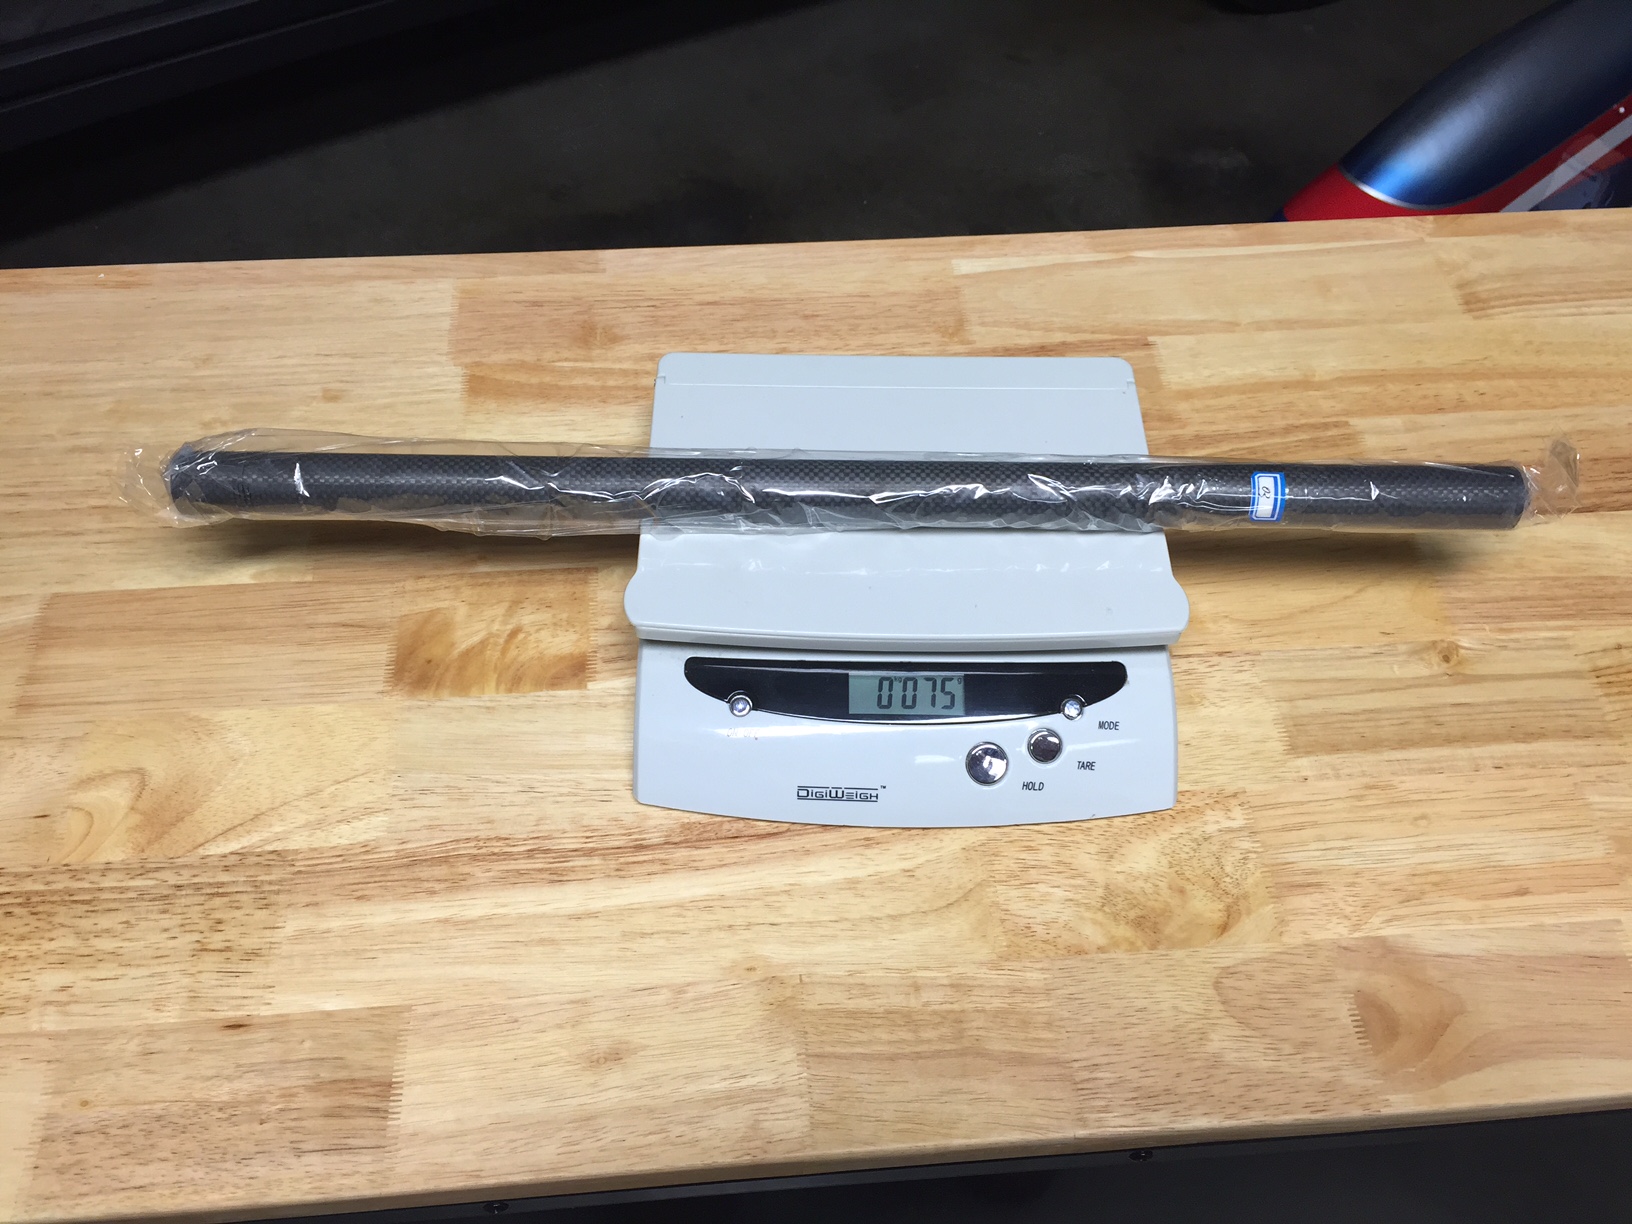
Here is some weight information. I didn't get anything else done on it today since it was about 80 degrees, clear blue sky, and very little wind. Guess where I spent my afternoon....
Fuselage with Chin Cowl and Canopy: 1160g
Left Stab: 70g
Right Stab: 75g
Stab tubes: 15g
mount for pletty advance: 20g
foam board stiffener: 5g
L&R Landing gear, pants, wheels, axles, mounting screws: 170g
Canalizer: 75g
R WIng: 290g
L Wing: 300g
Rudder: 75g
wing tube and anti rotation rod and screws: 75g
02-15-2015, 06:05 PM
#34
Comparing the weight to the Episode, it is surprisingly close. The Essence may be only about 100g heavier for the same elements, The Episode fuselage weighed 1100g and the Essence weighs 1160 for a much larger fuse. Great job for such a nice finish
02-16-2015, 07:28 AM
#36

My Feedback: (41)
Hi Robert retail price is $2200
They can be made available as a drop ship direct from the factory. Otherwise we are probably looking at a May/June rollout.
Note that some very prominent fliers are testing these models. We'll make sure they are good to go.
As always you can expect great quality and light airframes from BJ Craft.
We are the exclusive North American dealer and you can contact me anytime to discuss getting one at 800 591 2875 or email me at [email protected]
We'll do our best to get these in the air for the 2015 North American season.
Thanks, Mike Mueller
02-16-2015, 05:06 PM
#38
One thing that didn't really show up in my earlier pics was the method that B.J. uses for the film covering. He carefully overlapped the coloring pieces from the LE back so that no edges are exposed to the wind and cannot peel up. That is how I used to do my own monokote jobs, but I only did straight lines...  This method is a lot more work in trimming and cutting the pieces and takes much more time than just applying the trim colors on top of the base color. But the result is a more durable and better finish. He has very small overlap seams and the covering job really looks great.

This method is a lot more work in trimming and cutting the pieces and takes much more time than just applying the trim colors on top of the base color. But the result is a more durable and better finish. He has very small overlap seams and the covering job really looks great. 02-20-2015, 08:20 AM
#41
My Feedback: (41)
One thing that didn't really show up in my earlier pics was the method that B.J. uses for the film covering. He carefully overlapped the coloring pieces from the LE back so that no edges are exposed to the wind and cannot peel up. That is how I used to do my own monokote jobs, but I only did straight lines... This method is a lot more work in trimming and cutting the pieces and takes much more time than just applying the trim colors on top of the base color. But the result is a more durable and better finish. He has very small overlap seams and the covering job really looks great.
This method is a lot more work in trimming and cutting the pieces and takes much more time than just applying the trim colors on top of the base color. But the result is a more durable and better finish. He has very small overlap seams and the covering job really looks great.Mike
Last edited by mups53; 02-20-2015 at 04:43 PM.
02-21-2015, 10:34 AM
#42
Sorry for the delay in posting, I have been taking pics as I have been going and didn't have a chance to sit down and post some details.
Starting with the flying stab, I figured I would re-iterate some of the building information as it was shown on the BiSide. The moving stab on the Essence is identical in construction to the BiSide. The installation is straightforward and fairly easy.
First, install the main stab tube socket in the fuselage. I had a very small amount of paint overspray in the hole which had to be removed. So I wrapped some 220 grit sand paper around the stab tube itself and lightly sanded so that the tube socket would slide in place.
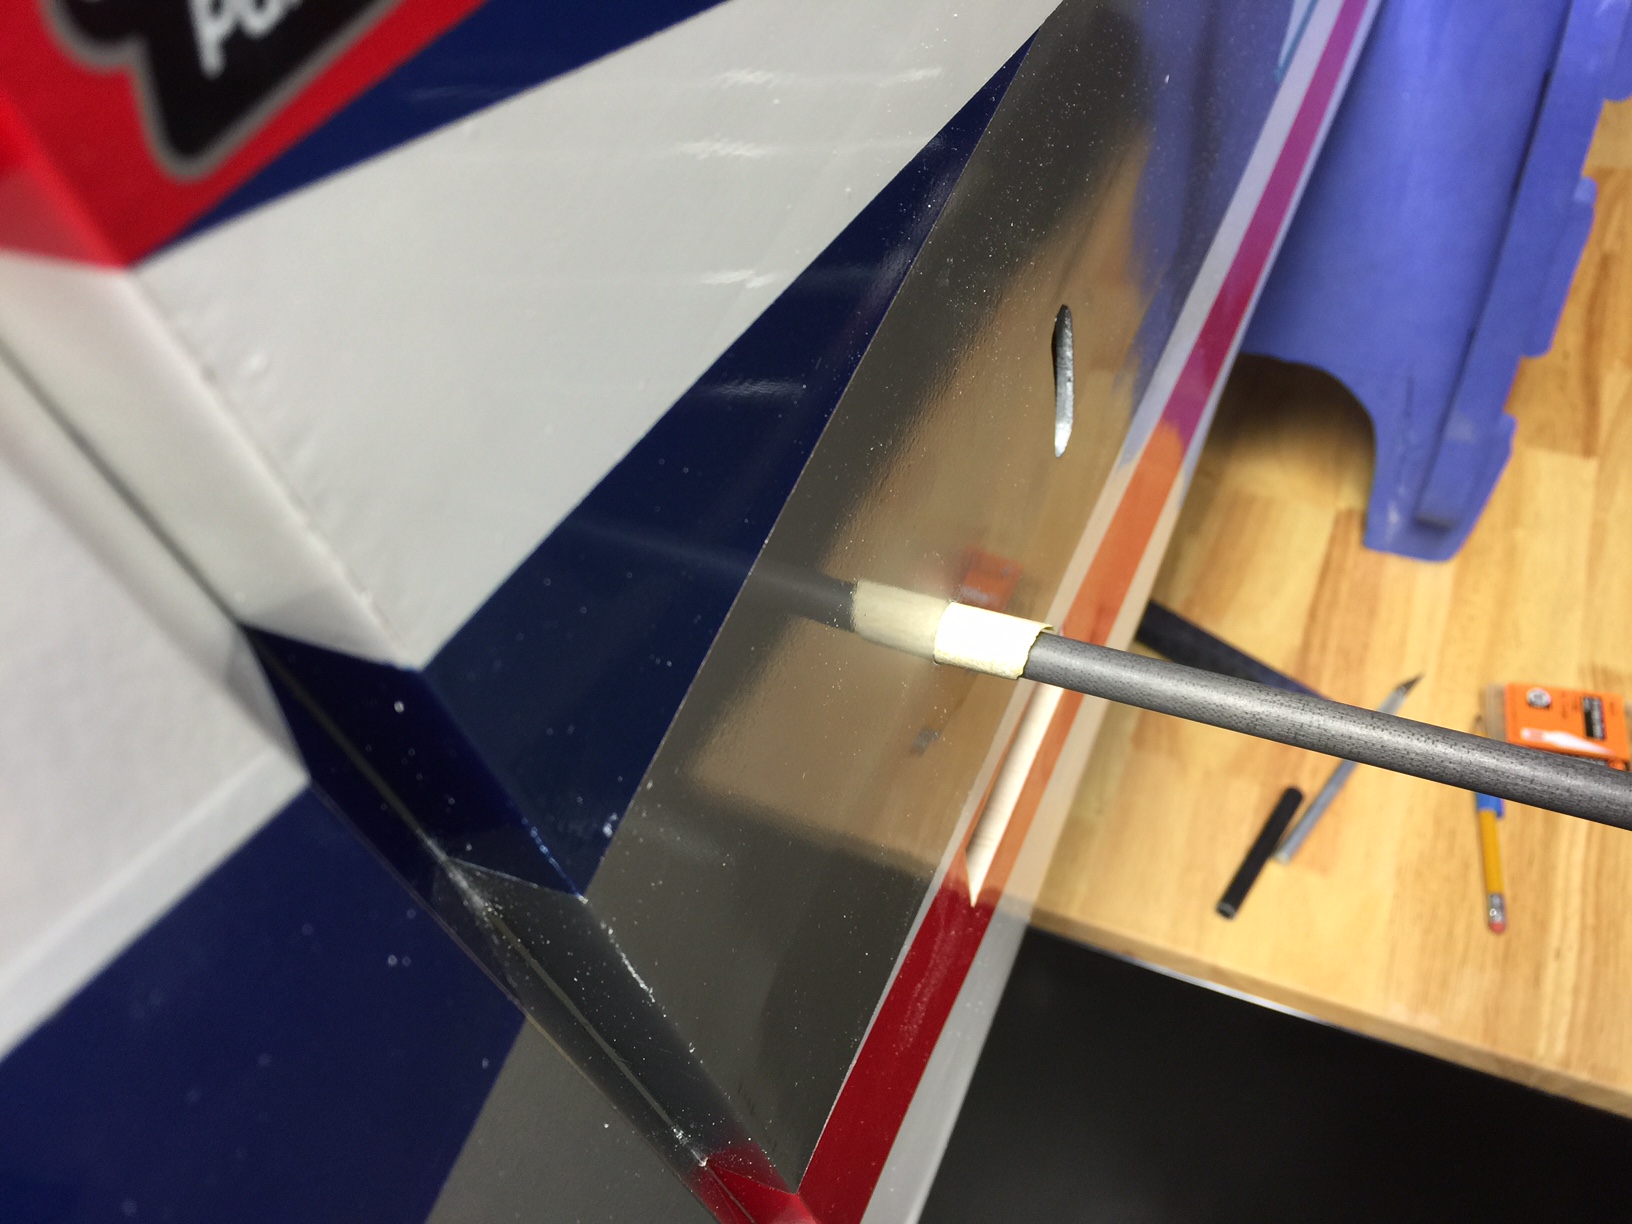
Check the alignment of the tube socket at this time. This is really the only chance to set up the alignment of the stab to the wing, so it really should be checked. Mine was very square so, tip to tip, so I didn't have to make any adjustment. Minor sanding of one side of the socket hole in the fuse should be enough to take care of any minor misalignment since these are all jig built and should be very straight.
A good way to double check alignment and to hold everything in place while you glue the main socket is to use the supplied wooden disks which mount over the leading edge stab tube. These allow you to install the stab halves and slide the halves up against the fuselage. The disks help "clamp" the stab halves in place so that you can check alignment and tack the tube socket in place. Be careful not to get any glue on the stab tube!!


Next, I observed that the slot for the elevator control horn is pre-cut in the stab. Another nice touch and extra added detail. On the BiSide, you needed to use a jig to locate and cut the slot in the stab, but it was already done on the Essence. You simply need to cut the film covering and slide in the control horn. I kept it out while I did the installation setup of the stab, and glued it in later.

Before I installed the stab halves, I decided to line the root with adhesive backed felt material, like I did on my BiSide. This seems to work well and helps to keep the wind from whistling through the tail.


Next, make sure you install the fiberglass bearing washers on the stab tube. Be careful, they can easily be misplaced or lost. If you happen to lose them, you can make your own from any 1mm smooth faced material.

Next I glued in the control horn. I always use Hysol 9462 for critical things like control horns, motor mounts and other things requiring a fail safe glue joint. It's worth the extra cost.

Starting with the flying stab, I figured I would re-iterate some of the building information as it was shown on the BiSide. The moving stab on the Essence is identical in construction to the BiSide. The installation is straightforward and fairly easy.
First, install the main stab tube socket in the fuselage. I had a very small amount of paint overspray in the hole which had to be removed. So I wrapped some 220 grit sand paper around the stab tube itself and lightly sanded so that the tube socket would slide in place.
Check the alignment of the tube socket at this time. This is really the only chance to set up the alignment of the stab to the wing, so it really should be checked. Mine was very square so, tip to tip, so I didn't have to make any adjustment. Minor sanding of one side of the socket hole in the fuse should be enough to take care of any minor misalignment since these are all jig built and should be very straight.
A good way to double check alignment and to hold everything in place while you glue the main socket is to use the supplied wooden disks which mount over the leading edge stab tube. These allow you to install the stab halves and slide the halves up against the fuselage. The disks help "clamp" the stab halves in place so that you can check alignment and tack the tube socket in place. Be careful not to get any glue on the stab tube!!
Next, I observed that the slot for the elevator control horn is pre-cut in the stab. Another nice touch and extra added detail. On the BiSide, you needed to use a jig to locate and cut the slot in the stab, but it was already done on the Essence. You simply need to cut the film covering and slide in the control horn. I kept it out while I did the installation setup of the stab, and glued it in later.
Before I installed the stab halves, I decided to line the root with adhesive backed felt material, like I did on my BiSide. This seems to work well and helps to keep the wind from whistling through the tail.
Next, make sure you install the fiberglass bearing washers on the stab tube. Be careful, they can easily be misplaced or lost. If you happen to lose them, you can make your own from any 1mm smooth faced material.
Next I glued in the control horn. I always use Hysol 9462 for critical things like control horns, motor mounts and other things requiring a fail safe glue joint. It's worth the extra cost.
Last edited by shannah; 02-21-2015 at 11:27 AM.
02-21-2015, 10:39 AM
#43
I next installed the stiffener in the fuselage. It is very light and made from foam board. Take care, tested a piece with regular CA and I think it isn't able to be glued with CA. Use either foam safe CA or some other foam safe glue. It fits very snugly so there isn't any large gap to fill.
I installed mine and ran a stream of thin foam safe CA. It should do fine. It adds some extra stiffness to the big sides of the fuselage.

I installed mine and ran a stream of thin foam safe CA. It should do fine. It adds some extra stiffness to the big sides of the fuselage.
02-22-2015, 11:03 AM
#44

My Feedback: (3)
It looks like they are becoming available for sale, both the Essence and Invitation
They just showed up on Hobbynet's website
www.hobbynet-jp.com/japan/index.html
They just showed up on Hobbynet's website
www.hobbynet-jp.com/japan/index.html
02-22-2015, 02:41 PM
#48
My Feedback: (3)
As soon as I saw the pictures of the Akiba scheme Essence, I emailed Mike.
And just for good measure, I asked to add the new Fantasista 110 (sight unseen) to the order.
Will wait for Mike to get them.
Thinking of trying the OS F3A belt drive in the Essence ... No reason why.
02-23-2015, 01:43 AM
#49

Join Date: Sep 2013
Location: New Zealand
Posts: 46
Likes: 0
Received 0 Likes
on
0 Posts
Wow is all I can say about BJCRAFT 's new model called the Essence..
I've had 40 flights on this model and I still look forward to my next day's flying session..
It's Powered with an O.S belt drive motor which has heaps of Touque and a very linear power curve , It's also very kind on battery power..
The Essence is like flying an Avanced Nuance that flys F easily, a very easy model to fly..
Mixes so far is only 3% down elevator to low throttle for the down lines as I like a forward CG
Well done BJ on taking the time to develop the next generation of pattern plane and look forward to flying it In Australia next week at the Australian Masters..
Picture is of My farther Ewan and son Sean who also loves flying..
02-23-2015, 02:29 AM
#50
Hi Hamish,
Hope you all are keeping well.
That picture could have been taken in the midlands here in Ireland.
I really like the lines on those new Fuz's - a big improvement aesthetically.
You going to the WC's this year ??
Brian
Hope you all are keeping well.
That picture could have been taken in the midlands here in Ireland.
I really like the lines on those new Fuz's - a big improvement aesthetically.
You going to the WC's this year ??
Brian