


Galactika datum line?
 02-21-2016, 03:57 PM
#1

Hi,
Anyone have an Oxai Galactika?
I just got my Galactika EP delivered and was thinking of the datum line.
It got some info from the dealer but I'm not sure if all info apply to Galactika since the info is for Galactik.
It should probably apply for Galactika also but I can not be sure.
Factory setup according to the info I got is this:
Elevator (stab): 0 degrees
T-canard: -0.3 to -0.8 degrees
Wing: +0.6 degrees
Engine: -1.5 degrees down, 2.5 degrees right
CG for Galactika is 212 millimeter (basically same as Galactik 210 millimeter)
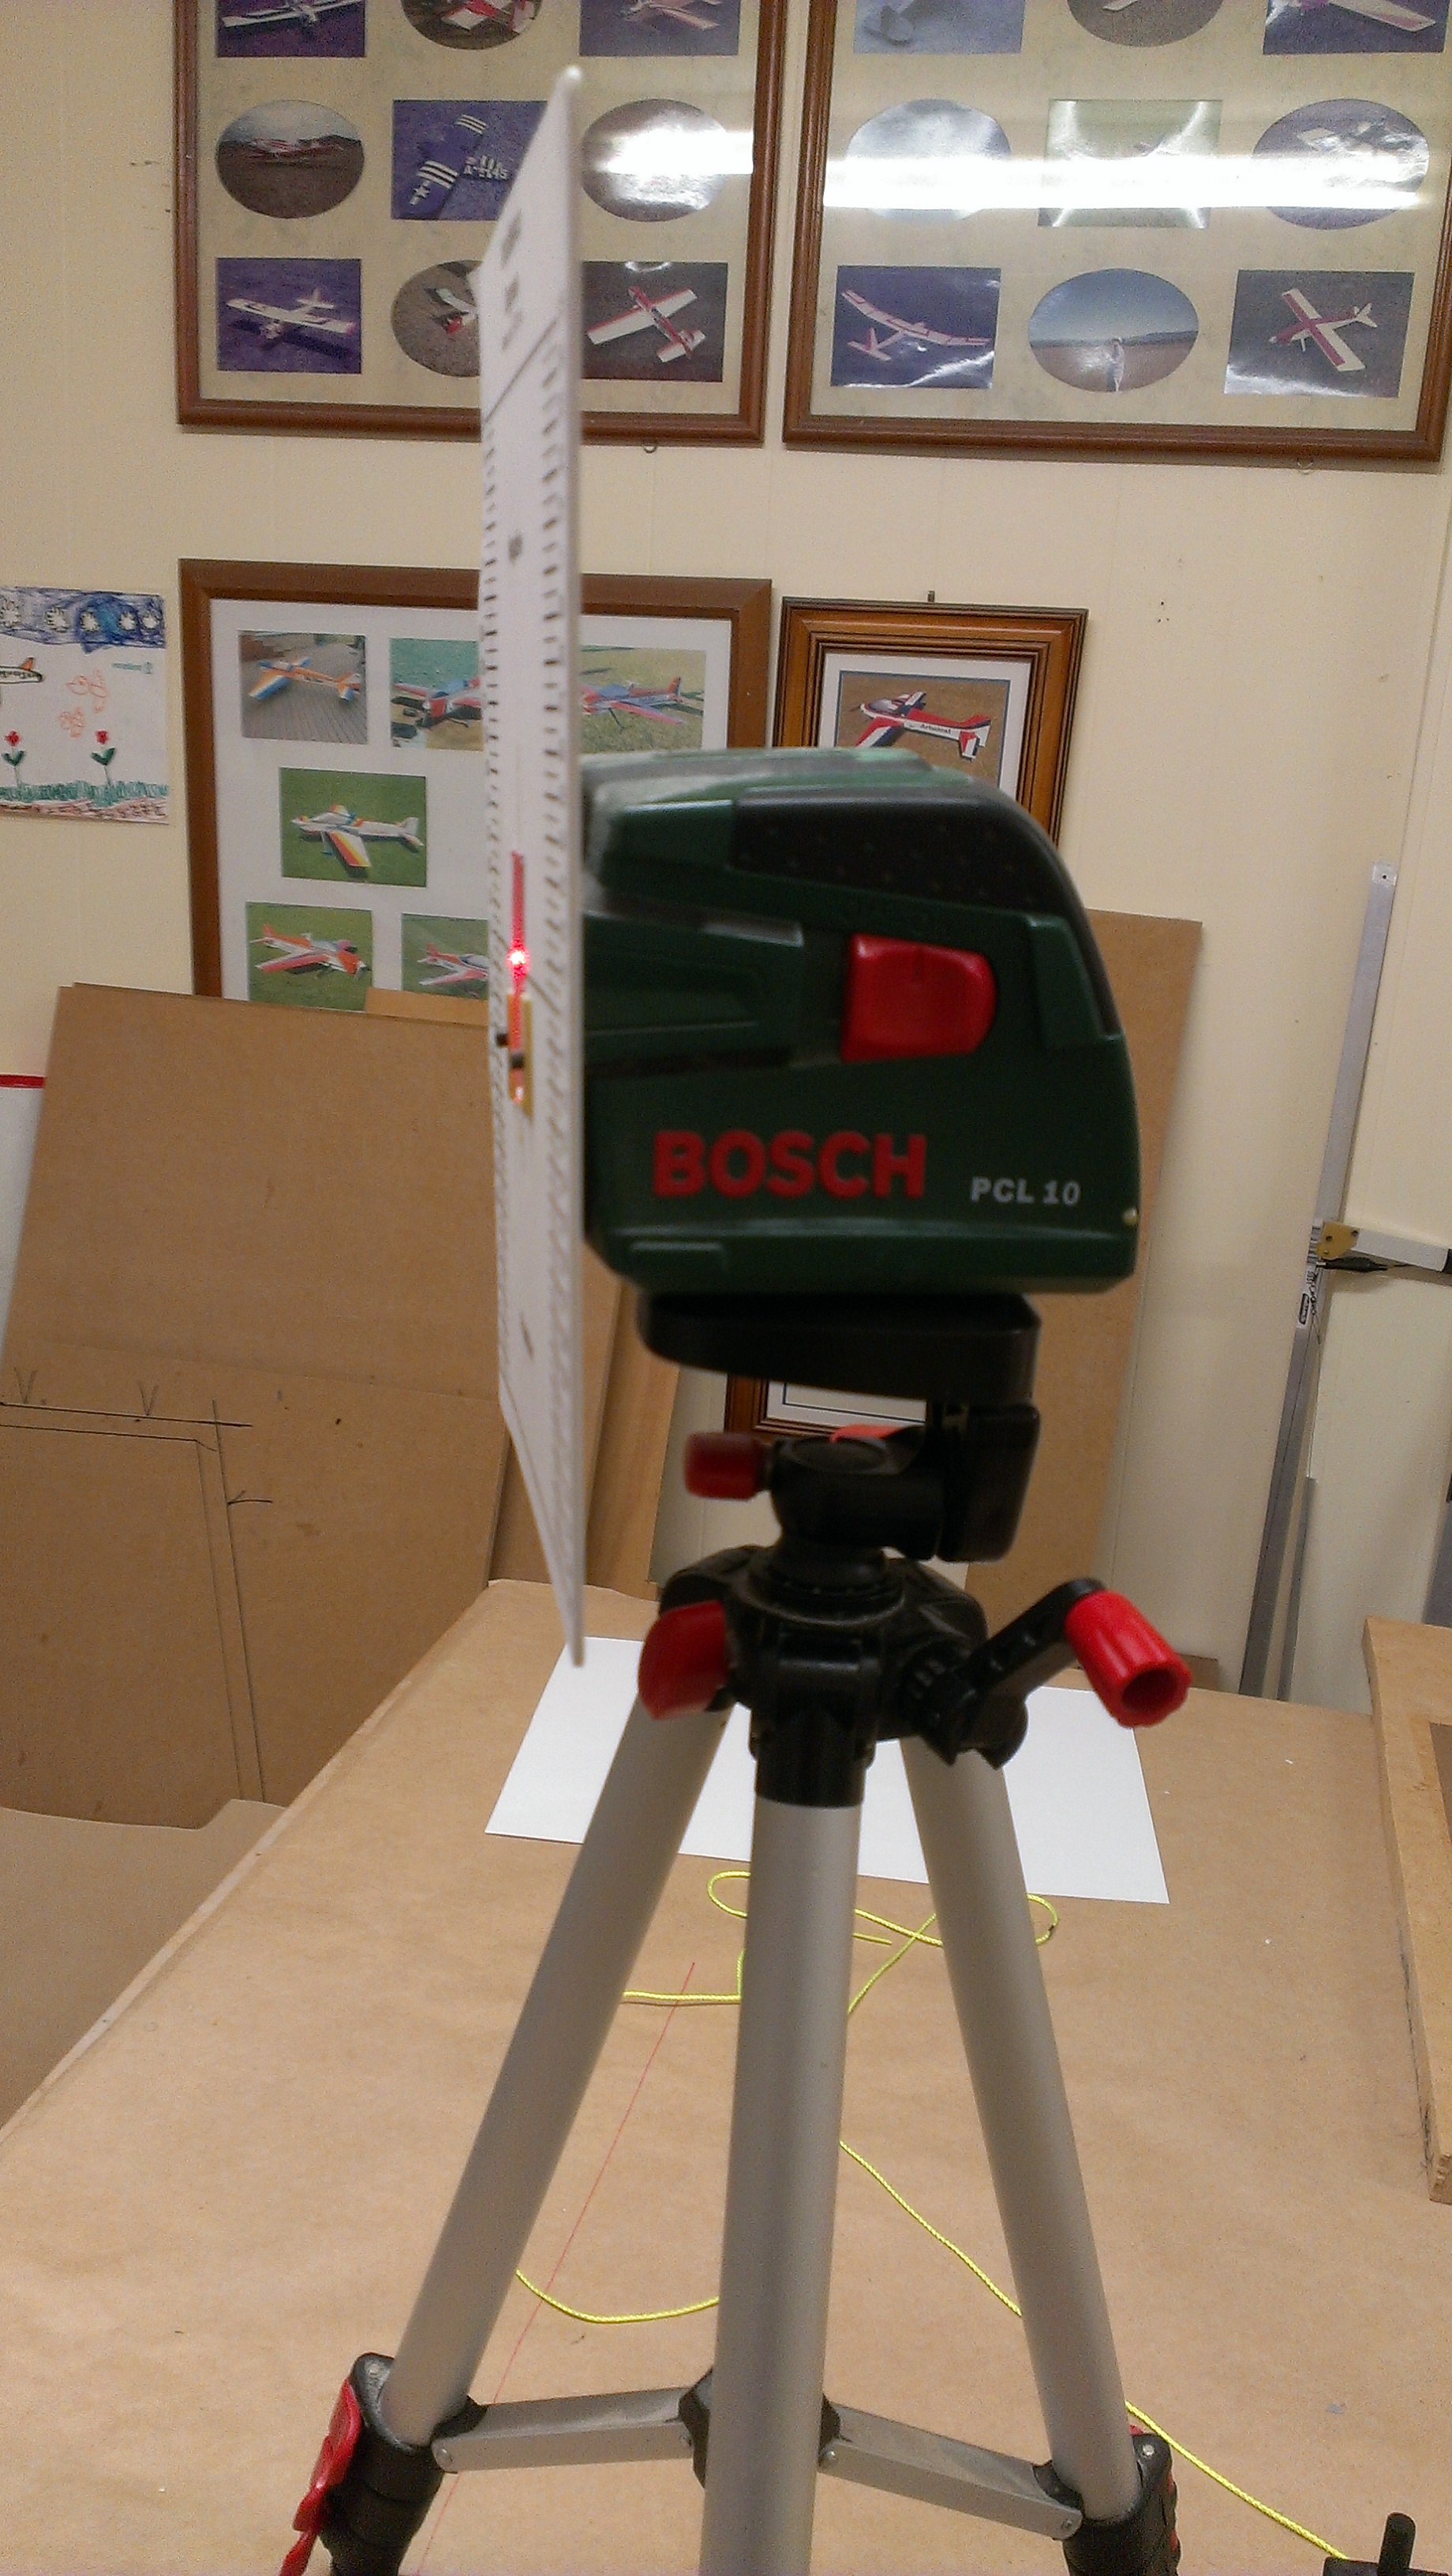
I'm going to to check the factory setup but need a good datum line. Probably need to get some laser measure device so I can get some datum line that way.
I suppose I will take the center of nose cone and see if I can get some useable from that point and back to the stab.
It would for sure not have hurt if Oaxi would have sent some vital info about this with the plane. If a setup is going to be usable one has to have a reliable and repetable datum line. I found an image of Galactik side view over at Flying Giants that Mike Mueller posted that maybe is usable to work with - see picture below.
Since the fixed T-canard seems to have -0.3 to -0.8 degrees incidence (see above) it could maybe be possible to use that as a datum line/reference.
Galactika has nice factory installed adjustable wing and stab incidence.
Any advice appreciated.
My Galactika had a transport damage when it arrived to my door Feb 17. A 90 mm (3.5 inch) crack on top of fuselage between the top wing and fin. I decided to repair it myself and will then have a professional car spray paint company do the color spray and clearcote spray. I'm waiting for the blue color code from Oxai. The compensation for transport damage is settled with the dealer to my satisfaction.
If anyone is interested in an assemby thread when I have reparied the fuselage and it has been painted just let me know.
/Bo
Anyone have an Oxai Galactika?
I just got my Galactika EP delivered and was thinking of the datum line.
It got some info from the dealer but I'm not sure if all info apply to Galactika since the info is for Galactik.
It should probably apply for Galactika also but I can not be sure.
Factory setup according to the info I got is this:
Elevator (stab): 0 degrees
T-canard: -0.3 to -0.8 degrees
Wing: +0.6 degrees
Engine: -1.5 degrees down, 2.5 degrees right
CG for Galactika is 212 millimeter (basically same as Galactik 210 millimeter)
I'm going to to check the factory setup but need a good datum line. Probably need to get some laser measure device so I can get some datum line that way.
I suppose I will take the center of nose cone and see if I can get some useable from that point and back to the stab.
It would for sure not have hurt if Oaxi would have sent some vital info about this with the plane. If a setup is going to be usable one has to have a reliable and repetable datum line. I found an image of Galactik side view over at Flying Giants that Mike Mueller posted that maybe is usable to work with - see picture below.
Since the fixed T-canard seems to have -0.3 to -0.8 degrees incidence (see above) it could maybe be possible to use that as a datum line/reference.
Galactika has nice factory installed adjustable wing and stab incidence.
Any advice appreciated.
My Galactika had a transport damage when it arrived to my door Feb 17. A 90 mm (3.5 inch) crack on top of fuselage between the top wing and fin. I decided to repair it myself and will then have a professional car spray paint company do the color spray and clearcote spray. I'm waiting for the blue color code from Oxai. The compensation for transport damage is settled with the dealer to my satisfaction.
If anyone is interested in an assemby thread when I have reparied the fuselage and it has been painted just let me know.
/Bo
Last edited by bem; 02-21-2016 at 04:19 PM.
 02-23-2016, 12:04 AM
#2
Hi,
If I can trust that the nose cone is -1.5 degrees down I might use that as a reference.
Do You think I can trust that?
I have some old Hangar 9 Angel-Pro Digital Incidence meter but I was thinking of buying some better incidence measuring tool now for my Galactika.
Is there some real precision tool out there?
I think that I will follow advice here:
http://www.ckaero.net/blog/2015/10/1...d-cg-location/
Digital Angle Gauge (WR300 Type 1) seem a good
http://www.wixey.com/anglegauge/
Resolution: 0.1 degrees
Accuracy: +/- 0.1 degrees
Repeatability : +/- 0.1 degrees
$37.99
I think I will buy 3 Wixey WR300 Type 1 then so I can have one on nose ring (measuring 1,5 degree down angle as reference, one attached to incidence bar for measure wing and one attached to incidence bar for measure stab incidence - all at the same time so I do not need to move around the Wixey WR300 Type 1.
I think I can use my the Hangar 9 Angel Pro alu incidence bars and its side plastic V-clamps, and attach the Wixey WR300 Type 1 to that when measure wing and stab incidence.
/Bo
Last edited by bem; 04-20-2016 at 01:20 AM.
02-23-2016, 02:36 AM
#3

The Robart incidence meter bar is much better than the Hangar 9, the clamps are a tight fit and there's no slop in the joints.
I don't think it's a good idea to use 3 Wixeys. The display may oscillate a bit from let's say 0 to +0.1 or -0.1, so if you have 3 Wixeys all the erros may add up and give you an incorrect value.
I used the Wixey but i recently found a much more accurate angle meter. It's called TLL-90S, it has 0.001� resolution and high accuracy (0.005�). It's a bit pricey (around 180$ now) and a bit heavier than the Wixey though.
With a bit of work, it is possible to remove the heavy aluminium casing and build a light support for the electronic components inside, but so far it seems to work well as it is.
If i remember correctly, the Wixey was around 120g and the TLL-90S is around 180g.
I bought the TLL-90s here: http://www.ebay.com/itm/331536106382
I hope this helps.
Last edited by Alex Voicu; 02-23-2016 at 02:43 AM.
02-23-2016, 08:27 AM
#4
From my experience
The repeatable accuracy of .1 tenth of a degree is as good as it gets for measuring light composite and wood models, unless your dealing with metal this is almost as good as it gets.The weight of the Tll-90 is counter productive for our use I think , add the bar weight to that and your over 250 grams for critical measurement I don't think it`s possible.
A new Robart Bar set up is the best, not perfect( a titanium machined tool setup would be awesome but...it`s the best we have for this use)
The Wixley 300 type 1 (the best one) do not buy the other offerings they are substandard. It`s under 60grams ,it`s light , and the best repeatability of all I have tried.
.1tenth on a stab is about 1/64" the weight of the bar/meter can deform light surfaces and cause twice that amount of measurement inaccuracy in just deformation alone while checking.
The most important thing about these tools is repeatability. knowing what it was when you measured it last, taking measurements from three surfaces , and making sure they duplicate your last 3 read outs as the standard for your re adjustment. Thrust , Wing, and Stab. I throw in my Canopy base, but molded fuses are not always precise here either. SO I try to use four standard measurements when I can.
I have 3 wixley 300`s I check them against themselves often and against a known zero baseline. But I only use one at a time Because I want the known standard of that meter, if I have a doubt I pull out #2 and recheck . I have my meters numbered 1-3 for accuracy and repeatability.
#3will drift a tenth the others are rock solid. these dudes sell for about $35.00 so having a few is good.
I have an article in the wings for my website on tools for setup and how to use them . I have some new products to use for this purpose releasing shortly.
Bem ,Your datum line is only the standard you choose to use to measure the fuse, pick one , and that is the new standard for base measurement. there is no set in stone datum line unless dealing with a Bipe I build this standard into my designs for easy setup and trimming. but it`s not always easy to find on other models.
Bryan H.
The repeatable accuracy of .1 tenth of a degree is as good as it gets for measuring light composite and wood models, unless your dealing with metal this is almost as good as it gets.The weight of the Tll-90 is counter productive for our use I think , add the bar weight to that and your over 250 grams for critical measurement I don't think it`s possible.
A new Robart Bar set up is the best, not perfect( a titanium machined tool setup would be awesome but...it`s the best we have for this use)
The Wixley 300 type 1 (the best one) do not buy the other offerings they are substandard. It`s under 60grams ,it`s light , and the best repeatability of all I have tried.
.1tenth on a stab is about 1/64" the weight of the bar/meter can deform light surfaces and cause twice that amount of measurement inaccuracy in just deformation alone while checking.
The most important thing about these tools is repeatability. knowing what it was when you measured it last, taking measurements from three surfaces , and making sure they duplicate your last 3 read outs as the standard for your re adjustment. Thrust , Wing, and Stab. I throw in my Canopy base, but molded fuses are not always precise here either. SO I try to use four standard measurements when I can.
I have 3 wixley 300`s I check them against themselves often and against a known zero baseline. But I only use one at a time Because I want the known standard of that meter, if I have a doubt I pull out #2 and recheck . I have my meters numbered 1-3 for accuracy and repeatability.
#3will drift a tenth the others are rock solid. these dudes sell for about $35.00 so having a few is good.
I have an article in the wings for my website on tools for setup and how to use them . I have some new products to use for this purpose releasing shortly.
Bem ,Your datum line is only the standard you choose to use to measure the fuse, pick one , and that is the new standard for base measurement. there is no set in stone datum line unless dealing with a Bipe
I build this standard into my designs for easy setup and trimming. but it`s not always easy to find on other models. Bryan H.
Last edited by flyncajun; 02-23-2016 at 09:21 AM.
02-23-2016, 12:01 PM
#5
Hi Bryan,
Maybe you have a different Wixey, but mine is type 1 and it's certainly not under 60g as you suggested. The weight is 120g, as you can see in the image below.

Sure, the Wixey is a bit lighter but not by that much and the TLL-90S should be a lot more accurate (� 0.005� compared to � 0.1�).
I initially set my incidences with the Wixey but when checking them later with the TLL i found a 0.4 degrees difference in one of the stabs. I usually measure both wings, then both stabs and start over. I do this 4-5 times to make sure i have accurate, repetable values for all incidences.
Maybe you have a different Wixey, but mine is type 1 and it's certainly not under 60g as you suggested. The weight is 120g, as you can see in the image below.
Sure, the Wixey is a bit lighter but not by that much and the TLL-90S should be a lot more accurate (� 0.005� compared to � 0.1�).
I initially set my incidences with the Wixey but when checking them later with the TLL i found a 0.4 degrees difference in one of the stabs. I usually measure both wings, then both stabs and start over. I do this 4-5 times to make sure i have accurate, repetable values for all incidences.
02-23-2016, 01:22 PM
#6
Join Date: Oct 2003
Location: Wollongong, AUSTRALIA
Posts: 58
Likes: 0
Received 0 Likes
on
0 Posts
The bar, clamps and mirror on my homemade system weighs 82 gms. The laser sits on the bench at a fixed distance from the mirror and the beam is reflected back to the scale. One division on the scale is 0.05 degrees incidence and you can interpolate to half that. Seems to work pretty well for me. I measure incidences at root and tip 2 or 3 times and find them to be repeatable.


02-23-2016, 02:59 PM
#7
Hi all,
Thanks for the answers so far. It will be helpful for me.
I ordered 3 Wixey WR300 Type 1 today. I will use one at the time as suggested and compare them against each other so I can hopfully track any deviations in accuracy in any of them.
I also ordered today a Xicoy Digital weight, balance and angle meter, and Angle sensor mounts (base for the Xicoy angle sensors).
I think I take Your advice and skip my Hangar 9 Angel-Pro metal bar+V-clamps and get the similar Robart instead since it seems to have better V-clamps.
Bryan, it is interesting and good You will offer tools for setup. I'm sure it is welcome. I will read with interest Your article when it is published on Your website.
/Bo
Last edited by bem; 02-23-2016 at 03:03 PM.
02-23-2016, 09:56 PM
#8
Hi Bryan,
Maybe you have a different Wixey, but mine is type 1 and it's certainly not under 60g as you suggested. The weight is 120g, as you can see in the image below.
Sure, the Wixey is a bit lighter but not by that much and the TLL-90S should be a lot more accurate (� 0.005� compared to � 0.1�).
I initially set my incidences with the Wixey but when checking them later with the TLL i found a 0.4 degrees difference in one of the stabs. I usually measure both wings, then both stabs and start over. I do this 4-5 times to make sure i have accurate, repetable values for all incidences.
I`m sorry I was wrong, you are correct! that meter is 120 grams
I don't know why I remembered 60 grams ,that number is from another meter I have.
Now, I will buy one of the new meters Thanks for sharing.
CW
Your setup looks very interesting!
Bryan
02-24-2016, 03:11 AM
#9
You're welcome Bryan, i'm glad to hear you are going to try the TLL-90S. It gave me the possibility to measure some fine details, like the 0.08 degrees of twist i had in my right wing. I'm sure you'll like it.
Regarding the actual incidence measuring procedure, it is really important to have the incidence bar parallel to the fuselage center line (seen from above). This is crucial if you are trying to measure the incidence on a pair of anhedral stabs, because the large anhedral angle (usually around 5 degrees) makes the leading and trailing edges significantly higher at the root and lower at the tip. If the bar is not aligned properly the angle meter will give you a misleading value.
The wing dihedral is much lower but it can still make a difference. Since the incidence bar is usually around half a meter away from the fuselage, it's not always easy to tell if it's properly aligned.
What i usually do is align the fuselage centerline with one of the seams between the wooden floor tiles. These seams are quite straight and parallel to each other and it's much easier to align the incidence bar with one of the seam lines nearby than trying to align it with the imaginary fuselage centerline.
02-24-2016, 07:34 AM
#10
I look forward to trying it out!
Yes parallel is very important
The reason I moved away from Anheadral stabs is, they are almost impossible to measure accurately, easily
The most important Measurement on any pattern plane is in the stabilizer /elevator.
Bryan
Yes parallel is very important
The reason I moved away from Anheadral stabs is, they are almost impossible to measure accurately, easily
The most important Measurement on any pattern plane is in the stabilizer /elevator.
Bryan
04-17-2016, 05:01 PM
#11
Hi,
I have flown my Galactika now with factory default setting. Only 5 flights on Saturday in not so good weather with low cloud ceiling and rainclouds around the field but it was no rain coming down where I was, and also rather cold, light to moderate winds.
I need to do some changes, but I'm little unsure how I should consider the T-canaliser incidence.
Factory setup is supposed to be:
Engine: -1.5 degrees down, 2.5 degrees right
Elevator (stab): 0 degrees
T-canard: -0.3 to -0.8 degrees
Wing: +0.6 degrees
I have this (not changed any factory setting yet as I wanted to see how it flew with it):
Engine: -1.5 degrees down (2.5 degrees right maybe - I have not measured yet)
Both nosering and motor shaft is at -1,5 degrees down.
Elevator (stab): both at 0,1 degrees
T-canard: - 1,4 degrees
Wing: both at +0.1 degrees
I have measured with Wixey WR300 Type 1 and Robart metal bar+V-clamps.
I have measured everyting several times with same results. Also measured serveral times with a second Wixey WR300 Type 1 and got same results.
I have CG at Oxai recommended 212 millimeter (8.346 inches) from wing leading edge where wing root and fuselage meet - it is exactly on center of wing carbon tube.
I have some right trim and some up trim to get the plane to fly level right now.
I will try to increase wing incidence to + 0.6 degrees and set stab incidence to 0 degrees to start with.
What bothers me is that T-canalizer will still be at (minus) -1.4 degrees if I do above. Factory recommend it to be between -0,3 to -0.8 degrees.
It is at least - 0.6 degrees to much if I leave the T-canalizer as it is.
The T-canalizer on Oxai Galactika is huge so it has probably rather big impact flight characteristics so to be as much as (minus) -0,6 degrees from factory max limit might be just to much?
What would You do in this situation?
/Bo
Last edited by bem; 04-21-2016 at 07:23 PM.
04-18-2016, 11:33 PM
#12
Hi,
I have thought of a second alternative to to problem in the previous post:
If I make the downthrust 0.6 less so it will be -0.9 degrees (instead of 1.5 as recommended by Oaxi) I will get the T-canalizer incidence to be -0,8 degrees (range -0,3 to -0.8 is recommended by Oxai).
Then the present +0.1 degrees incidence on the wings will be +0.7 (and I then adjust it down to 0,6 as the Oxai recommended) and the present +0.1 degrees on stabs will be +0.7 (and I then adjust it down to 0 degrees as recommended by Oxai).
Not sure what route could be best to try.
In the end I might of course end up with different then Oxai recommended incidences and motor down trust and that is OK if plane flies as I prefer. But I have a disire to be able to repeat Oxaii factory setup.
We will se in the end what the values might be when I have trimmed the plane to my taste (might take about 100 flights).
I would like to be able to repeat Oxai factory setup as a starting point, but I can obviously not according to my measurments.
It is either a) T-canard incidence that will be outside specification by at least -0.6 degrees (0.6 to much negative incidence). or b) motor downthrust that is 0.6 degrees less then by Oxai recommended (-0.9 instead of -1.5 degrees) on my two alternatives.
A third alternative would be to change T-canard incidence by moving up slightly the leading edge by 0.6 degrees. The T-canalizer is fixed incidence from factory but removable so it would be possible to change the T-canalizer leading edge front pin /hole just a bit up, so I get 0.6 degrees less negative incidence.
I'm I to stubborn to try to reach as close as Oxai factory setup?
Since I have motor shaft 90 degrees to nosering (exactly) it mean I have motorshaft at 1.5 degrees down when nosering has that also.
Everyting is an assumption that if nosering has from factory 1.5 degrees down one can at same time have T-canalizer within factory range -0.3 to -0.8.
Is that maybe an assumption I can not expect to be correct despite Oxai say the factory setup is that from factory? Nosering and T-canalizer is fixed from factory so for me it would be natural to think that I could repeat the factory setup when I measure.
If it would not have been for the T-Canalizer that it is out of the factory incidence range by -0.6 degrees accordning to my measurment I would have adjusted wing and stab incidence to factory settings with motor down trust -1.5 degrees.
I see no reason why I should not be able to repeat factory setup with the tools that I have (Wixey WR300 Type 1 and Robart metal bar+V-clamps), asssuming the plane left the factory with factory setup.
I have also a Xicoy Digital (weight, balance) and angle meter, that has 3 digital angle sensors with resolution of 0,1 degrees.
Thanks for any input.
/Bo
Last edited by bem; 04-21-2016 at 07:26 PM.
04-19-2016, 12:46 PM
#13

Join Date: Aug 2005
Location: Sydney, AUSTRALIA
Posts: 1,341
Likes: 0
Received 0 Likes
on
0 Posts
I see no reason why I should not be able to repeat factory setup with the tools that I have (Wixey WR300 Type 1 and Robart metal bar+V-clamps), asssuming the plane left the factory with factory setup.
I have also a Xicoy Digital (weight, balance) and angle meter, that has 3 digital angle sensors with resolution of 0,1 degrees.
Thanks for any input.
/Bo
I have also a Xicoy Digital (weight, balance) and angle meter, that has 3 digital angle sensors with resolution of 0,1 degrees.
Thanks for any input.
/Bo
You have the tools to perform accurate and repeatable measurements so have some fun playing with the settings.
Cheers,
Jason.
04-19-2016, 11:38 PM
#15
With respect to the "assumption" that the factory setup is correct, I'd like to quote Michael Caton in the 1997 movie The Castle "Tell him he's dreaming son".
You have the tools to perform accurate and repeatable measurements so have some fun playing with the settings.
Cheers,
Jason.
You have the tools to perform accurate and repeatable measurements so have some fun playing with the settings.
Cheers,
Jason.
Yes, that was more or less what I suspected. It is better to assume the reverse that I can not trust or assume any settings from factory is (still) correct at my desk when I'm trying to check/repeat it.
Yes, I have all the tools so it is not that difficult to set wing and stab incidence to what Oxai say as a good starting point.
I think I got little blinded by the build quality and finish of the plane and it is easy too think that Oaxi at factory made some effort also to have the factory settings to the values they say is factory settings. My own check with my tools show this is not the case, so it is just to move ahead now and make the adjustments myself and out flying more to start the process of trimming and if needed do some adjustments here and there as trimming process progress. My last F3A plane Mythos Pro did not have wing incidence adjustment (it has only adjustable stab) from factory and I did not mount any wing adjusters, if flew well with factory fixed wing incidence.
But now I will try to take full advantage of the adjustable wing incidence with my Galactika.
/Bo
Last edited by bem; 04-20-2016 at 01:17 AM.
04-20-2016, 02:03 AM
#16
Join Date: Jan 2009
Location: NEWCASTLE, AUSTRALIA
Posts: 342
Likes: 0
Received 0 Likes
on
0 Posts
Hi Bem,
I fly the Galactik and for the first 10 flights I had the OXAI set up.
I have found that it needed a tiny bit of up trim to fly level at the desired speed which may I say it is quiet slow compared to other planes I flown.
I have increased the wing to .9 degrees and moved the CoG back to 220 mm.The T-can incidence doesn't matter so much.
It flies like its on rails...simply awesome
Ps I would be very grateful if you can post some photos of your fix work .
kind regards
Mavros
04-20-2016, 04:58 AM
#17
Hi Mavros!
Great to hear another Galactik/Galactika flyer.
On the first flight at take off with my Galactika felt "noseheavy" immediately - rather much up elevator to just have it flying level.
I moved back the battery a little but the plane felt about same, a tendency to dive, so some up trim was needed the first flights when I made me familiar with the plane.
I have the Center of Gravity (CG) now at 212 millimeterI (set up with Xicoy CG Meter with the digital weight sensors).
The 10 cell LiPo flightbattery is very much forward in fuselage. I will see if battery can be moved little more to the rear permanently later. Galactika seemed not so much affected when I moved the battery about 50 mm to rear at one flight.
You write You need some up trim, ity is good to know it may be a tendency.
It is also good to know that the T-canard incidence may not be superimportant despite the T-canard is huge.
My Galactika flies very well at lower speeds and it has plenty of power at full power.
I use Hacker Q80-14XS with Falcon 21x14 V2 Electric carbon prop.
I tried some spins and it was kind of hard to get into stalled condition, but it was just some quick tests.
I checked the weight yesterday of my Galactika with two different methods:
1) With Xicoy CG Meter with the digital weight sensors:
a) weight without flightbattery 3879 gram.
b) weight with flight battery (ThunderPower Prolite+ G8 25C 5000 mAh) 5037 gram.
2) With a precision calibrated scale (that has been used at F3A competition):
a) weight without flightbattery 3867 gram,
b) weight with flight battery 5020 gram.
I was a little disappointed that the weight was over 5000 gram.
I use the recommended Futaba servos on all control surfaces and I use S.BUS 2 for everything.
I have a Scorpion Backup Guard onboard (37 gram).
I have a Futaba/Robbe 150A current sensor (F16789) onboard (19 gram).
I use Jeti/Hacker Master Mezon 90 with BEC (140 gram), and I use the BEC set at 6 volt.
I do not use the wheelpants.
I have strengthened the landing gear plywood/carbon plate since it was way to weak with no glue on the sides at underside of the mounting plate where it meet fuselage inside (the reinforcement added some grams, maybe 20 gram).
In my view I could hardly ended up with much lighter plane.
I can shorten the flight battery wiring in the plane a little and I could shorten the rudder servo servo lead in the tail by 10 cm to save a few grams.
What weight has Your Galactik?
I have taken photos during my assembly and I could make an assembly thread here if You want (I might start a new thread then).
I could do that next week (do not have time this week).
Then You can also add some information in my thread about Your Galactik if You want. It is nice to have as much info as possible gathered about one plane, other people here at RCU may like it, hopefully.
I will then show how I have set up my plane with the Wixey WR300 Type 1 and Robart metal bar+V-clamps and the Xicoy Digital weight, balance and angle meter.
/Bo
Last edited by bem; 04-21-2016 at 07:13 PM.
04-20-2016, 04:00 PM
#18
Hi Bem
In your first post you were trying to determine what to use for a datum. In post #11 you measured the wing and stab at 0.1 degrees so a so called zero zero set up. I assume that you used the 1.5 degrees down thrust as your reference to measure the flying surface incidences. With a zero zero set up you will require up elevator to put the wing into positive to fly level as you have found. To remove the up elevator trim you could decrease the elevator incidence or increase the wing incidence.
If you crank some up into the stab you will effectively change the sit of the fuse and this will result in less down thrust and less negative on the canaliser. So if the wing is now sitting 1.0 degrees in level flight you will have 0.5 down thrust and - 0.4 on the canaliser. This would seem to be a good starting point for further trimming.
If you leave the elevator and increase the wing incidence to 1.0 then the sit of the fuse is unchanged and you still have 1.5 down thrust and - 1.4 on the canaliser.
It would be interesting to know how CPLR sets up his Galactika. I assume he is flying a Oxai built model that come out of the same mould as yours. So the relationship between the canaliser and nose ring (thrust angles) is fixed. However there are options to change thrust angles but the spinner will not be aligned with nose ring.
So it is possible to use the canaliser as your datum and set every thing else to this. But the question is at what angle should it be in level flight. Only CPLR can answer this. It is interesting that you were given a range of -0.3 to-0.8 degees. If you operate in this range by altering the wing and stab incidences then this would give a range of 0.4 to 0.9 degees down thrust assuming the spinner is aligned with the nose ring. This should be adequate to get the model dialed in. The stated 1.5 degrees down thrust is just confusing and should be ignored.
I only have 20 flights on my Galactik and my set up is 0.5 down thrust, wing 1.0 and stab 0.0. I did cut the nose to install a contra but was very carefull to maintain the design down thrust. Before cutting I measured the right thrust at 1.5 degrees. For some reason the Galactik/Galactika needs a lot of positive on the wing. Some have speculated that it is due to the large sweep angle on the wing. I still have a lot of trimming to do but it flys great and it shouldn't take long once I get it flying again.
With 5000mah Zippy Compacts I'm sitting on about 4950g and CG at 210mm or maybe a fraction further back.
Out of the box with the stabs at zero I had 1.6 down thrust and - 1.5 on the canaliser. I didn't measure the wing. I had to add a large amount of positive. I started at 1.25 but the model climbed so I'm at 1.0 now. May have to take a little more out. I'm leaving the stab alone at this stage to maintain the 0.5 down at this stage.
David
Last edited by bandicootf16; 04-20-2016 at 04:08 PM.
04-20-2016, 06:31 PM
#19
Join Date: Jan 2009
Location: NEWCASTLE, AUSTRALIA
Posts: 342
Likes: 0
Received 0 Likes
on
0 Posts
Hi Bem,
My Galactik weights 4950 g
It is powered by YS175 CDI , all futaba servos and Emcotec DPSI regulator with 2xLRP batteries for receiver.
I have an APC carbon prop coming and for comp I can remove one battery which will reduce the weight down to 4830 g.
I have also stregthened the undercarriage area.
rgds
Mavros
04-21-2016, 05:04 AM
#20
Hi Bem
In your first post you were trying to determine what to use for a datum. In post #11 you measured the wing and stab at 0.1 degrees so a so called zero zero set up. I assume that you used the 1.5 degrees down thrust as your reference to measure the flying surface incidences. With a zero zero set up you will require up elevator to put the wing into positive to fly level as you have found. To remove the up elevator trim you could decrease the elevator incidence or increase the wing incidence.
In your first post you were trying to determine what to use for a datum. In post #11 you measured the wing and stab at 0.1 degrees so a so called zero zero set up. I assume that you used the 1.5 degrees down thrust as your reference to measure the flying surface incidences. With a zero zero set up you will require up elevator to put the wing into positive to fly level as you have found. To remove the up elevator trim you could decrease the elevator incidence or increase the wing incidence.
Yes I use the 1.5 degree down trust as the reference (since the nosering should have that and I thought that is rather reliable and is the same on all Galactika coming out from the mould at Oaxi.
Seems more natural to remove any up-trim with more positive incidence on the wing. It is after all the main lifting surface, and just leave the other surfaces as stabilizing and control (ideally the stab should not provide much or any lift, just a stabilizing and control surface to change attitude.
If you crank some up into the stab you will effectively change the sit of the fuse and this will result in less down thrust and less negative on the canaliser. So if the wing is now sitting 1.0 degrees in level flight you will have 0.5 down thrust and - 0.4 on the canaliser. This would seem to be a good starting point for further trimming.
Only flights and careful evaluation what to be changed to correct undesired flight behavior can determine what incidence on wing and stab will be in the end and what down- (and right-) trust the plane flies best with. But to start with I will test now with as close as possible factory recommended settings as a starting point.
It would be interesting to know how CPLR sets up his Galactika. I assume he is flying a Oxai built model that come out of the same mould as yours. So the relationship between the canaliser and nose ring (thrust angles) is fixed. However there are options to change thrust angles but the spinner will not be aligned with nose ring.
I prepared the motor mount to be easy to change engine angle. I have 0,1 millimeter titanium shims I can control this with, just to built up with some washer(s)/shimms between the nosering and engine mount to get desired trust direction change. Spinner will of course be slightly out of alignment but I left 1.8 millimeter free space betten nosering and backplate of spinner just to leave room for some tilting of engine in direction needed (if needed).
So it would be not problem at all for me to change engine direction.
So it is possible to use the canaliser as your datum and set every thing else to this. But the question is at what angle should it be in level flight. Only CPLR can answer this. It is interesting that you were given a range of -0.3 to-0.8 degees. If you operate in this range by altering the wing and stab incidences then this would give a range of 0.4 to 0.9 degees down thrust assuming the spinner is aligned with the nose ring. This should be adequate to get the model dialed in. The stated 1.5 degrees down thrust is just confusing and should be ignored.
Just curious - did You not get any Oxai factory incidence and motor/engine down trust values with Your Galactik plane?
I only have 20 flights on my Galactik and my set up is 0.5 down thrust, wing 1.0 and stab 0.0. I did cut the nose to install a contra but was very carefull to maintain the design down thrust. Before cutting I measured the right thrust at 1.5 degrees. For some reason the Galactik/Galactika needs a lot of positive on the wing. Some have speculated that it is due to the large sweep angle on the wing. I still have a lot of trimming to do but it flys great and it shouldn't take long once I get it flying again.
What did You use as reference line on Your Galactik?
It is good to know that I probably also need to increase wing positive incidence, and that should not be any surprise for me. After all Galactik and Galactika is almost same plane just slightly different wing (and maybe stab) and the T-Canard has little different shape on Galactika compared to Galactik.
With 5000mah Zippy Compacts I'm sitting on about 4950g and CG at 210mm or maybe a fraction further back.
Out of the box with the stabs at zero I had 1.6 down thrust and - 1.5 on the canaliser. I didn't measure the wing. I had to add a large amount of positive. I started at 1.25 but the model climbed so I'm at 1.0 now. May have to take a little more out. I'm leaving the stab alone at this stage to maintain the 0.5 down at this stage.
David
Yesterday evening i set the incidences on my Galactika.
A have now (measured everthing twice to be sure it was repetable, and it was):
1.5 degree down trust on engine shaft (as reference line)
Both wing half: + 0.6 degrees
Stab: 0 degees (but unfortunately the right stab half has +0.2 degree incidence when the left as 0 degrees. To bad that each stab half is not individually adjustable, only whole stab as one unit is adjustable for incidence)
T-canard: -1.2 degrees
I will testfly this setup on Friday evening if weather permit.
Yesterday I got the 4 mm Jeti anti spark that i will mount on the cable to battery, I will fix that this evening.
/Bo
Last edited by bem; 04-21-2016 at 07:15 PM.
04-21-2016, 05:25 AM
#21
Hi Bem,
My Galactik weights 4950 g
It is powered by YS175 CDI , all futaba servos and Emcotec DPSI regulator with 2xLRP batteries for receiver.
I have an APC carbon prop coming and for comp I can remove one battery which will reduce the weight down to 4830 g.
I have also stregthened the undercarriage area.
rgds
Mavros
My Galactik weights 4950 g
It is powered by YS175 CDI , all futaba servos and Emcotec DPSI regulator with 2xLRP batteries for receiver.
I have an APC carbon prop coming and for comp I can remove one battery which will reduce the weight down to 4830 g.
I have also stregthened the undercarriage area.
rgds
Mavros
Your Galactik has nice light weight, although You have to carry fuel also that adds to your Galactika flying weight.
I had hoped to get flying weight of my plane under 4900 gram but it was not possible.
The Master Mezon 90 ESC is rather heavy (140 gram), there is a lighter Mezon 90 Light 125 gram that has no metal mounting base.
I use ThunderPower ProLite+ Power Series 25C 5000 mAh LiPo, weight about 1150 gram with bullet connectors attached on battery leads.
I did not know APC is making carbon props also today. I use Falcon 21x14 V2 electric carbon prop with Falcon 82 mm electric vented carbon spinner, both extremely light.
/Bo
Last edited by bem; 04-21-2016 at 05:43 AM.
04-21-2016, 04:19 PM
#22
Hi bem
I don't receive any documentation with my Galactik. I just assumed that Oxai supplied them that way. Was the side view you posted supplied with your aircraft. For what it's worth I did a few measurements from the side view. I got
Stab 0.0
Canaliser -0.9
down thrust 1.5
wing -1.6
Except for the wing these numbers seem to make sense.
Did you mean that your canaliser was now measuring - 1.2 degrees.
The Zippy 5000 mAH 25C lipos are nice and light at 1100 grams. I have the Mezon 130 light. A little heavy but I needed the weight to get the CG right.
Like you I used down thrust as my reference but set it at 0.5 down. I guess in reality the stab becomes the reference. This sets the fuse angle in level flight and can be used to adjust the down thrust and canaliser incidence. So I set the stab to give 0.5 down thrust then worked on the wing to control altitude. Sounds like you will be doing the same but will use the design 1.5 down thrust.
What motor are you using. I have a RS CRS with the Hacker 54 3DL.
Good luck with your trimming on Friday.
David
04-22-2016, 06:24 AM
#23
No, the sideview I posted in my first post was a view I found somewhere on RCU or RCGroups that I believe came from Mike Mueller at F3A Unlimited.
T-Canard on my Galactika has now -1.2 degrees when rest is set at Oxai recommended settings.
Before I started assembly of my Galactika I checked a Galactik assembly thread over at Flying Giants
http://www.flyinggiants.com/forums/s...ad.php?t=87621
There I found out thet Galactik has a tendency to be tailheavy and I was hesitant to place the rudder servo in the tail at first but I got assurance from the person that started that thread that it should be no problem to mount the rudder servo in the tail, and so I did.
I mounted my Master Mezon ESC as far forward as I could to be sure I had enough weight in the front, just in case.
Do You have the rudder servo in the tail or is it in front of fuselage with pull pull wires?
Like you I used down thrust as my reference but set it at 0.5 down. I guess in reality the stab becomes the reference. This sets the fuse angle in level flight and can be used to adjust the down thrust and canaliser incidence. So I set the stab to give 0.5 down thrust then worked on the wing to control altitude. Sounds like you will be doing the same but will use the design 1.5 down thrust.
What motor are you using. I have a RS CRS with the Hacker 54 3DL.
What motor are you using. I have a RS CRS with the Hacker 54 3DL.
I use Hacker Q80-14XS with Falcon 21x14 V2 electric carbon prop.
Thanks. Just before I typed this it was a heavy hail rain where I'm now, but the flying field is 20 km away and I expect weather to be better there (it usually is). It is cold here today so I have to bring out my winter clothes again (just put them away...). I think it will be good enough weather little later in the evening so hopefully I will get up in the air this evening.
/Bo
Last edited by bem; 04-22-2016 at 06:27 AM.
04-22-2016, 02:07 PM
#24
Hi,
I'm back from this evening trimming flights.
It was rather windy when I arrived at the field and it had been raining shortly before I arrived I could see on the wet ground.
I made about 10 flights (some where shorter so I just went up and checked if plane was flying level with no trim needed).
Plane did initially dive i little and slowly dropped left wing in level flight.
So I first tested to get plane to fly level by increasing wing incidence bit by bit but to be honnest not much happened, some influence but not much influence on the diving tendency. So I decided to get some negative incidence on the stab to get the nose up. So I changed the stab incidence with a long hex driver through the hole on underside fuselage in front of tail wheel, where this is adjusted. I believe I turned one turn on the screw and then made a testflight. Much better, even climbed just slightly. I descided to decrease the wing incidence slightly to correct that and I did that and made som testflights to fine tune until the plane flew perfctly straight and level and wing was also staying level now. Zero trim on all control surfaces on transmitter and all control surfaces alligned. Tested to move the battery forward and back and it is not sensitive on this plane in my opinion, but I will test much more to gradually find the proper place for the battery in low, mid and high wind.
At least I have the plane roughly trimmed in now so I can work on fine tuning from here.
I'm impressed with the stability of the plane and the same time the ease and soft changes it can make in pitch, roll and yaw (as far as I have noticed so far). It has stability almost like an arrow but is at the same time rather effortless in changing directions as desired etc.
I have rather modest elevator up and down, 8 degrees up and 8.5 degrees down. On aileron it is 8 degrees up and down. Rudder I have max possible on high rate for stall turn and spinn, and for normal flight it is 30% of max. I have also max on elevator (for spin and snap) and that is 17 degrees up and 17.5 degrees down. For aileron on snap it is also 17 degrees.
I have set the throws with help of the Xicoy Digital (weight, balance) and angle meter, that has precision of 0.1 degrees (if one select degrees as unit, one can set millimeter insestead if one want that).
I have 4 conditions set in my Futaba 14MZ:
Condition 1 - normal flight with low throws.
Condition 2 - stall turn that allows max thrown possible on rudder.
Condition 3 - spinn that allows max throws possible on elevator and rudder.
Condition 4 - snap that allows max throws possible on elevator, rudder and aileron.
All this will need to be fine tuned as I fly more.
I have only one mix and that is 1 % down on elevator on low throttle (where brake is on also) so vertical downlines can stay more vertical.
I tested some this evening and I need to increase it a just little, maybe 2% will be OK.
I tested some knife edge also the last flight for the evening and I'm to say the least impressed how effortless it flew on both left and right knife edge, and to my surprise tracked very straight. The rudder effectiveness is amazing on thes Galactika in my opinion (at least compared to MythoS Pro that i have also).
I stopped flying when the sun hit the horizon and I saw the moon rising on the sky. It started to be rather cold also by then (minus 1 degree when i left the field - I had to have my winter cap on, I had hoped to not need to use it anymore this spring).
On one landing i saw "something" bouncing out from the tail - it turned out to be the rubber ring on the Oxai original tail wheel that had got loose. I had CA glue with me so I was able to glue the rubber ring on the rim and it has stayed in place after this fix.
I drove home very satisfied with the evening testflights, I felt I progressed to a good starting point for further fine tuining in the trimming process.
Tomorrow Saturday and also on Sunday we have gathered a group here in Sweden to get a thorough review of the P-17 Schedule. An international F3A judge will have a theoretical review and then we will fly with our planes also and get feedback from the judge and the other participants. This wil be very good starting point for this season w�th the new Schedule.
I have to go to bed now, need to go up early in the morning.
/Bo
Last edited by bem; 04-29-2016 at 05:33 AM.
04-23-2016, 09:30 PM
#25
Hi Bo
You certainly achieved a lot in one session.
I did some comparisons from the Oxai site
Length. 1993/1991mm
Wing span. 1940/1866mm
Wing area. 59.1/64.4 dm^2
Stab area. 18.3/19.3 dm^2
The first figures are for the Galactika. So the two are quite different. The canaliser of the Galactika looks huge. The Galactik canaliser measures 600mm span and 317 mm cord.
I put the rudder servo in the tail but used the Futabs BLS173SVi which is only 28 grams so saves 20 grams. It still has 7.6 kg torque at 7.4 volts. I have the Mezon BEC set at 8.0 volts so torque is probably closer to 8 kg which is plenty.
I have a 450ma lipo connected via a switch to the Rx. No reg or anything thing else so the BEC keeps the Lipo topped up and the lipo provides a back up in case of a BEC or main battery problem.
You could save a few grams by removing the back up guard and the robbe/Futaba current sensor. It would put you under 5000g and you might be able to add the wheel pants. Planes just don't look right without wheel pants. The Mezon gives lots of info via the Jeti Box at the end of a flight. I use 55mm wheels and fly from a rough old strip with wheel pants without problems.
The Xicoy CG machine and angle sensors sound nice however it is a little expense. Accuracy is supposed to be 1gram so it is interesting the it read 17 grams higher than the calibrated scale. I guess you had the model sitting level during the measurement.
It must be hard keeping track of 4 flight conditions. You could reduce it to 3 by using a VTR on the rudder so you get only a small travel around centre the maximum at full stick for stall turns.
It will be interesting to see your final incidence settings when you get a chance.
I have the same problem on my stabs as you. The right stab has 0.3 more incidence. I needed some right aileron trim so the left wing is now 1.1 degrees and the right 1.0 degrees with no aileron trim. The difference my be less than 0.1 degrees but that's as much accuracy as I can measure.
David