


Oxai Galactika unboxing, assembly, setup, maiden etc.
 05-20-2016, 12:20 AM
#76

Join Date: Jan 2009
Location: Johannesburg, SOUTH AFRICA
Posts: 122
Likes: 0
Received 0 Likes
on
0 Posts
Hi, the mixes are sufficiently small that I don't notice them when flying. Normal rudder corrections are sufficiently small that the change in elevator when making those corrections is not noticeable. Same applies with rudder to aileron. Again the mixes are so small that applying rudder during integrated rolling stuff does not noticeably change the roll rate. Airspeed has a far bigger impact on roll rate and elevator feel as compared to the impact of very small mixes. I have had planes where the mixes were much greater, and one could then notice the changes. Not the case with the Galaktika.
 05-20-2016, 01:55 AM
#77
cartercq,
Thanks for the clarification. I was little unsure if the mixes, although very small, could have any noticeable impact on the general flying.
I have not noticed any impact so far, so it will probably be OK for me also as it is for You.
/Bo
Thanks for the clarification. I was little unsure if the mixes, although very small, could have any noticeable impact on the general flying.
I have not noticed any impact so far, so it will probably be OK for me also as it is for You.
/Bo
05-20-2016, 02:15 AM
#78
Those stick position triggers for snap condition should work, but also try triggering it with elevator and aileron as compared to rudder. You can also try bringing the activation point down to around 80% of stick travel. Using rudder and elevator could result in accidental activation of the snap mode when doing the likes of aggresive integrated rolls. Far less likelihood of that happening if you activate with elevator and aileron. Try both and let us know which you prefer.
I was thinking about the activation of Snap Condition:
I use activation by elevator+rudder throws.
You suggested to try activation with elevator+aileron throws, and see of that is better for the reason You mentioned.
The reason I choosed activation by elevator+rudder throws is the sequence I use for Snap (inverted snap as example):
1. Quick max down elevator.
2. Followed by almost simultaneous quick max rudder, just a fraction after elevator input (not exactly same moment as elevator input, but almost).
3. Followed by almost simultaneous quick max aileron, just a fraction after rudder input (not exactly same moment as rudder input, but almost).
4. Less elevator input.
5. Neutral of all flight surfaces to stop the rotation.
So my thinking is that since I have rudder input before aileron input I thought that it would be better to get into activation earlier (elevator+rudder) then it would be with elevator+aileron that would be little later in the timeline.
Maybe it does not matter since it is so quick sequence (all happen within a second).
/Bo
Last edited by bem; 05-20-2016 at 05:09 AM.
05-21-2016, 04:24 AM
#79
Hi,
After thinking how I should best repair the transport damage on top of fuselage behind T-canard (that happened when the plane was shipped to me) I was ready yesterday evening to do the repair.


I have a glass fibre boat that I now and then need to fix some dents in the white gelcoat on, and the easiest (and also one of the best methods) to repair such dents is to apply gelcoat in the dent but tiny more then the dent itself, then apply electric tape over it and make sure the tape is smooth to the surface making the gelcoat follow the surface and float just little over the edge of the dent making it almost seamless.
So this was the method I decided to use on my Galactika repair also, except I would use clear epoxy instead since I wanted strength also in the crack.
Things needed:
1) Thin clear epoxy (not "glue"), I used Deluxe Materials Aeroepoxy. It has the right "thickness" for this type of useage, not too thin and not to thick.
2) Electric tape, thin and flexible so it can follow the curvature of the surface, and it should be slightly transparent so You can see when it is applied on the surface that it is has adhered to the surface correct and no air bubbles underside the tape.
3) A needle to apply the epoxy in the crack.
4) A hobby knife also so the crack can be "opened" just so slightly, basically just move the tip of the blade in the crack to widen it just so You can see the crack clearly and the epoxy can find it's way into the crack better and fill it.

I first used the hobby knife to clean/widen the crack as described above. Then some aceton over the crack and nearby surface so it was "clean".
The Aeroepoxy was mixed with 3 part epoxy and 2 part hardener. After mixing the two parts in a small jar and let the air bubbles disappear I was ready.
Using a magnifiing glass so I could see very clear the crack and using the needle I applied small amount of epoxy gradually in the crack, slightly more epoxy (higher) then the crack itself.
When I was finished I put a piece of electric tape over the crack and used one finger to smoothen it out making sure no air bubble underside tape. I let it dry over night, with the tape still on.

This morning I removed the tape and voila - a perfect seamless fill/repair, just as I wanted it to be. No sanding is needed, it is so close to be flat with the surface that You hardly can feel with a finger the repair.

I will apply two layers of 25 gram glass fibre on inside fuselage later this evening to strengthen the cracked area little more (the crack was through the laminate so one can see from inside a vague line where the crack on outside is/was).
I have thought if I would:
a) repaint and clearcoat the blue part where the repair has been done, or
b) put some "decal" over the repair.
Maybe it will be a Swedish flag with shape from narrow to wider following the curvature of the blue stripe, and try to get the flag appear moving in the wind (wavelike) and have the flag, yellow part, fade a little in the front. Then put my Swedish registration number (25 mm hight) in silver color just under the flag, on the purpule stripe on the fuselage.
I think the "flag" decal, on both sides meeting on top of fuselage, will be easiest and add less weight then repaint+clearcoat the blue stripe.
Something like this below that I made in Photoshop - what do You think? Ugly?
I need to find a decal maker who can make this (I have not checked yet who might be able to do such work for me).

/Bo
After thinking how I should best repair the transport damage on top of fuselage behind T-canard (that happened when the plane was shipped to me) I was ready yesterday evening to do the repair.
I have a glass fibre boat that I now and then need to fix some dents in the white gelcoat on, and the easiest (and also one of the best methods) to repair such dents is to apply gelcoat in the dent but tiny more then the dent itself, then apply electric tape over it and make sure the tape is smooth to the surface making the gelcoat follow the surface and float just little over the edge of the dent making it almost seamless.
So this was the method I decided to use on my Galactika repair also, except I would use clear epoxy instead since I wanted strength also in the crack.
Things needed:
1) Thin clear epoxy (not "glue"), I used Deluxe Materials Aeroepoxy. It has the right "thickness" for this type of useage, not too thin and not to thick.
2) Electric tape, thin and flexible so it can follow the curvature of the surface, and it should be slightly transparent so You can see when it is applied on the surface that it is has adhered to the surface correct and no air bubbles underside the tape.
3) A needle to apply the epoxy in the crack.
4) A hobby knife also so the crack can be "opened" just so slightly, basically just move the tip of the blade in the crack to widen it just so You can see the crack clearly and the epoxy can find it's way into the crack better and fill it.
I first used the hobby knife to clean/widen the crack as described above. Then some aceton over the crack and nearby surface so it was "clean".
The Aeroepoxy was mixed with 3 part epoxy and 2 part hardener. After mixing the two parts in a small jar and let the air bubbles disappear I was ready.
Using a magnifiing glass so I could see very clear the crack and using the needle I applied small amount of epoxy gradually in the crack, slightly more epoxy (higher) then the crack itself.
When I was finished I put a piece of electric tape over the crack and used one finger to smoothen it out making sure no air bubble underside tape. I let it dry over night, with the tape still on.
This morning I removed the tape and voila - a perfect seamless fill/repair, just as I wanted it to be. No sanding is needed, it is so close to be flat with the surface that You hardly can feel with a finger the repair.
I will apply two layers of 25 gram glass fibre on inside fuselage later this evening to strengthen the cracked area little more (the crack was through the laminate so one can see from inside a vague line where the crack on outside is/was).
I have thought if I would:
a) repaint and clearcoat the blue part where the repair has been done, or
b) put some "decal" over the repair.
Maybe it will be a Swedish flag with shape from narrow to wider following the curvature of the blue stripe, and try to get the flag appear moving in the wind (wavelike) and have the flag, yellow part, fade a little in the front. Then put my Swedish registration number (25 mm hight) in silver color just under the flag, on the purpule stripe on the fuselage.
I think the "flag" decal, on both sides meeting on top of fuselage, will be easiest and add less weight then repaint+clearcoat the blue stripe.
Something like this below that I made in Photoshop - what do You think? Ugly?
I need to find a decal maker who can make this (I have not checked yet who might be able to do such work for me).
/Bo
Last edited by bem; 05-23-2016 at 01:02 AM.
05-21-2016, 03:23 PM
#80
Hi,
It was OK weather, although overcast and rain hanging in the air, so I was out flying this evening. Drained three 95Ah 12 volt AGM batteries
These AGM batteries can take the punishment very well in the type of discharge we use them for when charging at the field. They are more expensive but is much better then traditional lead acid (wet) 12 volt batteries. I have used so many such traditional 12 volt batteries in the past and they never survived long. The 95 Ah AGM batteries I use is really good. It is 4 years warranty on them. It is the 3rd season with these AGM batteries now and still going strong,
Overcast this evening but still flyable, just a few drops of rain now and then:
The three AGM batteries, each 95 Ah, I use at the field:

The spot on the airfield where I fly, that is a designated "model flying area" (although not allowed by the regulation at the field to be cut more then two times a year at specific time - but we are allowed to use the full scale grass runway also) allow me to fly in any direction facing to South, East, North or West. Depending where the sun is d�ring the day and evening I can choose desired flying area. This allow me to practice in any wind direction if I want, and I often fly with wind blowing towards me because that is the hardest to master and wind compensate for.
I have also a sunshield that I made so I can fly with the sun in my face if I want. It works very good to block the sun with this sunshield made of 4 mm plexiglas covered on one side with rather dark car sunsheild. So one can see the model pass behind the sunshield rectangle but at the same time sun is blocked. The stand is a mountain bike stand that one use when you do maitenance/repair and have it mounted in this stand for easier access.
Airfield to South:

Airfield to East:

Airfield to North:

Airfield to West:

The airfield is a culture reserve, the purpose it to preserve the field, buildings etc as it was originally when this airfeld was a Swedish Airforce war airfield (nr 16) during second World war. It was then many Squadrons of bombers, SAAB B-17 dive bombers, stationed here at the field. Also many other military planes has flown from this airfield like P51 Mustang, Fiat CR42, Caproni Ca313, Fieseler Storch, Junkers JU-52 and many other planes. This airfield was very strategic after Norway was invaded 1940-1945 by Germany. This airfield is just 120 km from Norwegian border.
Some ot the planes that has flown from the airfield when it was a Swedish Airforce war field:
SAAB B17 dive bomber:
http://www.avrosys.nu/aircraft/Bomb/157-b17/157B17.htm
http://www.youtube.com/watch?v=o2S6EZbujdw
One B17 is restored and flying even today (and it visited the old airfield here some years ago)
http://www.youtube.com/watch?v=5KSEJe4GhwQ
P51 Mustang (briefly after WW2):
http://www.avrosys.nu/aircraft/Jakt/114j26/114J26.htm
http://www.youtube.com/watch?v=hSkWjA7WOtw
Caproni Ca313 twin engine bomber (wood... also known as flying coffin...):
http://www.avrosys.nu/aircraft/Spani...s16/211S16.htm
Fiat CR42 biplane fighter:
http://www.avrosys.nu/aircraft/Jakt/110j11/110J11.htm
etc.
Then when prop era ended and Jet age came this grass airfield was not needed anymore and later it became a civil airfield (and still is) but now also a culture reserve with aim to preserve this last remaining military war airfield from WW2 for future generations to visit and get a feeling how things was back then. Runways, gun towers, buildings etc are all restored to original condition.
Since it is somewhat "delikat" area now with culture reserve I fly only electric planes here so nobody can complain about noice.
I have been flying at this airfield since 1973 when I learned to fly RC (when I was 12 years old).
Sunshield easy to fold and unfold, the tube i a telescopic aluminium boathook. The sunshield rectangle is 250 x 250 millimeter 4 mm plexiglas covered with dark car sunshield plastic film.


/Bo
It was OK weather, although overcast and rain hanging in the air, so I was out flying this evening. Drained three 95Ah 12 volt AGM batteries
These AGM batteries can take the punishment very well in the type of discharge we use them for when charging at the field. They are more expensive but is much better then traditional lead acid (wet) 12 volt batteries. I have used so many such traditional 12 volt batteries in the past and they never survived long. The 95 Ah AGM batteries I use is really good. It is 4 years warranty on them. It is the 3rd season with these AGM batteries now and still going strong,
Overcast this evening but still flyable, just a few drops of rain now and then:
The three AGM batteries, each 95 Ah, I use at the field:
The spot on the airfield where I fly, that is a designated "model flying area" (although not allowed by the regulation at the field to be cut more then two times a year at specific time - but we are allowed to use the full scale grass runway also) allow me to fly in any direction facing to South, East, North or West. Depending where the sun is d�ring the day and evening I can choose desired flying area. This allow me to practice in any wind direction if I want, and I often fly with wind blowing towards me because that is the hardest to master and wind compensate for.
I have also a sunshield that I made so I can fly with the sun in my face if I want. It works very good to block the sun with this sunshield made of 4 mm plexiglas covered on one side with rather dark car sunsheild. So one can see the model pass behind the sunshield rectangle but at the same time sun is blocked. The stand is a mountain bike stand that one use when you do maitenance/repair and have it mounted in this stand for easier access.
Airfield to South:
Airfield to East:
Airfield to North:
Airfield to West:
The airfield is a culture reserve, the purpose it to preserve the field, buildings etc as it was originally when this airfeld was a Swedish Airforce war airfield (nr 16) during second World war. It was then many Squadrons of bombers, SAAB B-17 dive bombers, stationed here at the field. Also many other military planes has flown from this airfield like P51 Mustang, Fiat CR42, Caproni Ca313, Fieseler Storch, Junkers JU-52 and many other planes. This airfield was very strategic after Norway was invaded 1940-1945 by Germany. This airfield is just 120 km from Norwegian border.
Some ot the planes that has flown from the airfield when it was a Swedish Airforce war field:
SAAB B17 dive bomber:
http://www.avrosys.nu/aircraft/Bomb/157-b17/157B17.htm
http://www.youtube.com/watch?v=o2S6EZbujdw
One B17 is restored and flying even today (and it visited the old airfield here some years ago)
http://www.youtube.com/watch?v=5KSEJe4GhwQ
P51 Mustang (briefly after WW2):
http://www.avrosys.nu/aircraft/Jakt/114j26/114J26.htm
http://www.youtube.com/watch?v=hSkWjA7WOtw
Caproni Ca313 twin engine bomber (wood... also known as flying coffin...):
http://www.avrosys.nu/aircraft/Spani...s16/211S16.htm
Fiat CR42 biplane fighter:
http://www.avrosys.nu/aircraft/Jakt/110j11/110J11.htm
etc.
Then when prop era ended and Jet age came this grass airfield was not needed anymore and later it became a civil airfield (and still is) but now also a culture reserve with aim to preserve this last remaining military war airfield from WW2 for future generations to visit and get a feeling how things was back then. Runways, gun towers, buildings etc are all restored to original condition.
Since it is somewhat "delikat" area now with culture reserve I fly only electric planes here so nobody can complain about noice.
I have been flying at this airfield since 1973 when I learned to fly RC (when I was 12 years old).
Sunshield easy to fold and unfold, the tube i a telescopic aluminium boathook. The sunshield rectangle is 250 x 250 millimeter 4 mm plexiglas covered with dark car sunshield plastic film.
/Bo
Last edited by bem; 05-22-2016 at 01:59 AM.
05-22-2016, 02:42 PM
#81
Hi,
I made some flying today also, about 15 flights in the afternoon.
Weather not so good - it was like this:

So it was in and out of the "rain hangar" (tarpaulin) several times, but it was OK to fly despite the instable weather.
I have reached little higher levels now in practising the P-17 Schedule. I can fly it without thinking what is next manouvre and the manouvres start to settle in the spinal cord so to speak. For me it is needed to practise rather intense to get the manouvres to stick in my mind and to get a good flow in the flying. In this phase I do not bother about small misstakes (that is for later fine adjustments) but I of course take mental note of things I see that is less good and try to avoid to repeat same misstakes next flights.
I have well over 100 flights now on my Galactika, and it was about was I expected to be needed until I was satisfied with all triming and adjustments.
I'm rather satisfied how the plane files, but it has been rather much work to reach where I'm now, and thanks for the very good advice I have got on things I asked about here in this thread.
It will no go into second phase with flying the P-17 Schedule more focused and improve the flying as much as possible. The only thing I will do on the plane, as time permits, is to get it little lighter, and I have the list what I can do to reduce weight rather much without too much work:
http://www.rcuniverse.com/forum/elec...l#post12209182
I forgot before to tell it was little more about the airfield where I fly:
1) It is actually one more plane at the airfield, it is a Zlin Z 526F Trener Master (retractable landing gear) from 1972.
Here is a photo of that plane:
https://upload.wikimedia.org/wikiped...0px-SE-XLC.JPG
2) And there is another very unique attraction at the field also, in one of the buildings. A former Swedish Airforce "Viggen" simulator that was used to train Swedish Airforce pilots on flying SAAB 37 Viggen multirole jet (fighter/attack/reconnaissance). Fully functional simulator with working G-suit.
Viggen is a rather large single seat jet:
Length 16,3 meter, wingspan 10,6 meter, height 5,8 meter, max speed Mach 2, empty weight 9,5 ton, max take off weight 18 ton, engine Volvo Aero RM8A (P&W JT8D) 80 000 horsepower. 329 planes was built in various versions. It was in service from 1971 to 2005, and was replaced by SAAB JAS 39 "Gripen".
Video with the the only Viggen in flying condition today handeled by Swedish Historic Flight:
https://www.youtube.com/watch?featur...&v=PVstkTfJzn0
/Bo
I made some flying today also, about 15 flights in the afternoon.
Weather not so good - it was like this:
So it was in and out of the "rain hangar" (tarpaulin) several times, but it was OK to fly despite the instable weather.
I have reached little higher levels now in practising the P-17 Schedule. I can fly it without thinking what is next manouvre and the manouvres start to settle in the spinal cord so to speak. For me it is needed to practise rather intense to get the manouvres to stick in my mind and to get a good flow in the flying. In this phase I do not bother about small misstakes (that is for later fine adjustments) but I of course take mental note of things I see that is less good and try to avoid to repeat same misstakes next flights.
I have well over 100 flights now on my Galactika, and it was about was I expected to be needed until I was satisfied with all triming and adjustments.
I'm rather satisfied how the plane files, but it has been rather much work to reach where I'm now, and thanks for the very good advice I have got on things I asked about here in this thread.
It will no go into second phase with flying the P-17 Schedule more focused and improve the flying as much as possible. The only thing I will do on the plane, as time permits, is to get it little lighter, and I have the list what I can do to reduce weight rather much without too much work:
http://www.rcuniverse.com/forum/elec...l#post12209182
I forgot before to tell it was little more about the airfield where I fly:
1) It is actually one more plane at the airfield, it is a Zlin Z 526F Trener Master (retractable landing gear) from 1972.
Here is a photo of that plane:
https://upload.wikimedia.org/wikiped...0px-SE-XLC.JPG
2) And there is another very unique attraction at the field also, in one of the buildings. A former Swedish Airforce "Viggen" simulator that was used to train Swedish Airforce pilots on flying SAAB 37 Viggen multirole jet (fighter/attack/reconnaissance). Fully functional simulator with working G-suit.
Viggen is a rather large single seat jet:
Length 16,3 meter, wingspan 10,6 meter, height 5,8 meter, max speed Mach 2, empty weight 9,5 ton, max take off weight 18 ton, engine Volvo Aero RM8A (P&W JT8D) 80 000 horsepower. 329 planes was built in various versions. It was in service from 1971 to 2005, and was replaced by SAAB JAS 39 "Gripen".
Video with the the only Viggen in flying condition today handeled by Swedish Historic Flight:
https://www.youtube.com/watch?featur...&v=PVstkTfJzn0
/Bo
Last edited by bem; 05-24-2016 at 02:34 PM.
05-23-2016, 02:20 PM
#82
Hi,
I had my Galactika with me in the car to work today and made about 10 flights after work.
It was "tarpaulin" weather. And later in the evening thunder was starting in vicinity and it came closer to the airfield. I decided it was too dangerous to be out on the airfield and it sure was flashes very close. I saw one flash over the hangars and the burglar alarm went on after that. I still had my plane out on the field, so I thought how I would get it of the field. I drove out with my car and fast as hell got the plane and the rest of the stuff in the car and drove of the field. Then I remembered I had put end-markers out on the field for the flying sector. I waited a little and then drove out with the car and got them. By then rain had started so I headed for home.
/Bo
Last edited by bem; 05-24-2016 at 01:25 PM.
05-24-2016, 02:19 PM
#83
Hi,
I had my Galactika with me in the car to work today also but weather was very bad - rain (actually skyfall), hard gusty winds and cold.
On my way home I drove to the airfield to see if weather was to improve but it got even worse and thunder was over the airfield also so it was only to drive home and carry everything from car into the house again.
I will see if I have time to fly tomorrow instead.
It is strange how much energy one has when it comes to flying. I almost never feel tired when I do things in this hobby - building/assembly or flying. Even if it is much to do sometimes. I think it is what some say positive stress. You just feel good about it. I know rather good my weaknesses and strengts in flying by now. On the negative side nowadays is that it takes longer time to learn new Schedules/manouvres but on the positve side is that I have still reasonably easy to concentrate on the flying even if I fly rather many flights when I'm out flying. In general one negative thing is that I have no other flyer in my club that fly pattern so I have no person to discuss or get feedback from on my flying. That is a rather big disadvantage if one want to progress in F3A flying.
But we have every year here in F3A Sweden a gathering (1-2 days), early in spring, something we name "judge course" where we have one International F3A judge show us the current P-Schedule (and A-Schedule, named Nordic Schedule here in Nordic countries) and he comment things that is important. Then we go out flying the Schedule and the judge (and the other flyers) watch the flights and give feedback on the flying. For me this is a good chance to improve a little on my flying.
Photo below is from this years gathering in April 22-23.
I'm nr 3 guy from the left with my Galactika in front of me. Pilots and planes from left:
Alexander Moberg (a young promising flyer, despite only 19 years old he has already competed in F3A World Championship, 2015) with his plane Oxai Zeque, Edvard Kall (F3A Sweden chairman) with his Aerocompet Arixtra, then it is me Bo Edstrom with my Galactika and last many times Swedish F3A Champion (12 or 13 times) Anders Johansson with his Sebart MythoS Pro.
Missing in the photo is the international FAI F3A judge Bengt-Erik Soderstrom that was teacher at the course.

/Bo
I had my Galactika with me in the car to work today also but weather was very bad - rain (actually skyfall), hard gusty winds and cold.
On my way home I drove to the airfield to see if weather was to improve but it got even worse and thunder was over the airfield also so it was only to drive home and carry everything from car into the house again.
I will see if I have time to fly tomorrow instead.
It is strange how much energy one has when it comes to flying. I almost never feel tired when I do things in this hobby - building/assembly or flying. Even if it is much to do sometimes. I think it is what some say positive stress. You just feel good about it. I know rather good my weaknesses and strengts in flying by now. On the negative side nowadays is that it takes longer time to learn new Schedules/manouvres but on the positve side is that I have still reasonably easy to concentrate on the flying even if I fly rather many flights when I'm out flying. In general one negative thing is that I have no other flyer in my club that fly pattern so I have no person to discuss or get feedback from on my flying. That is a rather big disadvantage if one want to progress in F3A flying.
But we have every year here in F3A Sweden a gathering (1-2 days), early in spring, something we name "judge course" where we have one International F3A judge show us the current P-Schedule (and A-Schedule, named Nordic Schedule here in Nordic countries) and he comment things that is important. Then we go out flying the Schedule and the judge (and the other flyers) watch the flights and give feedback on the flying. For me this is a good chance to improve a little on my flying.
Photo below is from this years gathering in April 22-23.
I'm nr 3 guy from the left with my Galactika in front of me. Pilots and planes from left:
Alexander Moberg (a young promising flyer, despite only 19 years old he has already competed in F3A World Championship, 2015) with his plane Oxai Zeque, Edvard Kall (F3A Sweden chairman) with his Aerocompet Arixtra, then it is me Bo Edstrom with my Galactika and last many times Swedish F3A Champion (12 or 13 times) Anders Johansson with his Sebart MythoS Pro.
Missing in the photo is the international FAI F3A judge Bengt-Erik Soderstrom that was teacher at the course.
/Bo
Last edited by bem; 05-24-2016 at 03:00 PM.
05-25-2016, 03:13 PM
#84
Hi,
I squeezed in flights this evening between 7 PM and 10 PM. It was actually flyable so late because no clouds on the sky to hide the sun at sunset.
I think it was about 12 flights. The grass at the airfield, the full scale runway where I start and land, is rather long now so at start/take off I can hear the prop smashing through the blades of grass. When I get home I have to wipe off the prop outer edges with a wet cloth.
The skin/finish on Galactika is very fragile and the stab has now rather much dents caused by start/take offs from the grass field where it is also some debris like grain of sand between the grass that get blown by the prop wash against the stab leading edge and underside (mostly). I think I will have to tape the stabs leading edge so it will survive this summer.
The flying was rather OK and I decided to experiment little with CG since I thought the plane was little too slugish in the air. I wanted little more precise and direct control while flying and not so much down elevator in inverted flying. So I moved the CG just sligtly back in very small steps and eventually found a "sweet spot" where the plane was more vivid and it also behave better in 45 degree up line with 1/2-1/1-1/2 rolls in opposite directions. Snap is also easier, I feel I have the plane more in my hands so to speak. I just measured and it is 10 millimeter I moved the flight batterypack to rear.
I think I will keep it there for now.
I think the flight battery is slightly little too hot after flights. So I think it is time to to make the battery tray lighter by making "holes" in it that will save weight and at the same time allow air to cool the battery little better through the lightening holes.
The tailwheel/gear is still intact after my resolder I did some weeks ago.The tiny, small and as it seems little frigile tailwheel is still OK and is very stable sideways after my solder of a M2 washer as inner support on the tailwheel axle.
The landing gear mounting plate reinforcement i did when I assembeled my Galactika is also working fine.
Since it has been rather humid lately when I have flown I decided about a week ago to brush on Deluxe Materials "Aerocote" (a 2-component clear finish) on the wing root plywood ribs because I had noticed they where rather wet after the plane had spent several,hours out in high humidity (rain/drizzle etc) despite under tarpaulin.
I also have glued the rear wing bolt plywood washers on inside fuselage, that one do after the wing incidence if finally adjusted and tested to be as good as it can be.
Some photos below taken this evening at the field.

Nice weather this evening - clear blue sky.

One fun effect of the sun shining on the Galactika wing at a specific angle is that some shadows was visable of the ribs inside the wing. On above photo it can bee seen outer ribs but I could also see mostly all ribs as tiny shadows when looking at the wing from about 90 degrees to side of where the sun was shining on the wing.

Finnished flying for the evening - nice sunset in the background.
/Bo
I squeezed in flights this evening between 7 PM and 10 PM. It was actually flyable so late because no clouds on the sky to hide the sun at sunset.
I think it was about 12 flights. The grass at the airfield, the full scale runway where I start and land, is rather long now so at start/take off I can hear the prop smashing through the blades of grass. When I get home I have to wipe off the prop outer edges with a wet cloth.
The skin/finish on Galactika is very fragile and the stab has now rather much dents caused by start/take offs from the grass field where it is also some debris like grain of sand between the grass that get blown by the prop wash against the stab leading edge and underside (mostly). I think I will have to tape the stabs leading edge so it will survive this summer.
The flying was rather OK and I decided to experiment little with CG since I thought the plane was little too slugish in the air. I wanted little more precise and direct control while flying and not so much down elevator in inverted flying. So I moved the CG just sligtly back in very small steps and eventually found a "sweet spot" where the plane was more vivid and it also behave better in 45 degree up line with 1/2-1/1-1/2 rolls in opposite directions. Snap is also easier, I feel I have the plane more in my hands so to speak. I just measured and it is 10 millimeter I moved the flight batterypack to rear.
I think I will keep it there for now.
I think the flight battery is slightly little too hot after flights. So I think it is time to to make the battery tray lighter by making "holes" in it that will save weight and at the same time allow air to cool the battery little better through the lightening holes.
The tailwheel/gear is still intact after my resolder I did some weeks ago.The tiny, small and as it seems little frigile tailwheel is still OK and is very stable sideways after my solder of a M2 washer as inner support on the tailwheel axle.
The landing gear mounting plate reinforcement i did when I assembeled my Galactika is also working fine.
Since it has been rather humid lately when I have flown I decided about a week ago to brush on Deluxe Materials "Aerocote" (a 2-component clear finish) on the wing root plywood ribs because I had noticed they where rather wet after the plane had spent several,hours out in high humidity (rain/drizzle etc) despite under tarpaulin.
I also have glued the rear wing bolt plywood washers on inside fuselage, that one do after the wing incidence if finally adjusted and tested to be as good as it can be.
Some photos below taken this evening at the field.
Nice weather this evening - clear blue sky.
One fun effect of the sun shining on the Galactika wing at a specific angle is that some shadows was visable of the ribs inside the wing. On above photo it can bee seen outer ribs but I could also see mostly all ribs as tiny shadows when looking at the wing from about 90 degrees to side of where the sun was shining on the wing.
Finnished flying for the evening - nice sunset in the background.
/Bo
Last edited by bem; 05-26-2016 at 12:08 AM.
05-26-2016, 01:28 PM
#85
Hi,
It was flying also today after work, I think it was about 12 flights (lost count). The weather was not so pleasant - overcast and rain hanging in the air (started when I loaded plane in the car to drive home), hard gusty winds and cold (for this time of year). But I had clothes (winter jacket, winter cap and gloves) with me... so it was not that bad.
I placed the flying sectors (I have 3 poles white/red and streamers at top, that I place on the field 150 m in front of me and 260 meters to left and right) so the wind was blowing towards me, the hardest (at least for me) so I get more demanding conditions to practice P-17 Schedule in.
it was rather risky landings in the hard and gusty winds, it was first at very close to ground (below 0.5 meter or so) that the plane calmed down and I felt I had good control and for a smoth touch down.
Flying in hard and gusty winds do not bother me but the landings and near ground in such conditions are little scary then (for me at least). All went well today, nothing broken. All is charged now and I have check over the plane so no problems that I did not notice at the field. Maybe more flying tomorrow if time permit.
/Bo
Last edited by bem; 05-26-2016 at 01:33 PM.
05-26-2016, 06:55 PM
#86

Join Date: Jan 2009
Location: NEWCASTLE, AUSTRALIA
Posts: 342
Likes: 0
Received 0 Likes
on
0 Posts
Hi Bem,
Just wondering if you had any troubles adjusting the tail plane incidence on your Galactika.
My galactik Oxai adjustment was imposible to screw in or out .....Given up at the end and moved the wing incidence all the way up.
regards
Just wondering if you had any troubles adjusting the tail plane incidence on your Galactika.
My galactik Oxai adjustment was imposible to screw in or out .....Given up at the end and moved the wing incidence all the way up.
regards
05-27-2016, 12:11 AM
#87
On my Galactika the adjustment screw in the tail for stab incidence adjustment was very hard to turn the very first time I was trying to adjust with the hex screw that one use there in the tail. I had to use considerable force to get the screw loose so I could turn it. After this it is easier to turn the screw,
It is M2.5 hex screw in my Galactika, and I use a dedicated hex 2.5 screwdriver with long shaft for this task.
Maybe You need to make a special screwdriver with a T-handle so You can get good leverage effect, and then try to use quick hard force when trying to get the screw to "loosen". Maybe some suitable "agent" (that do not attack the plastic (nylon?) that is the incidence mechanism to get some "lubricant" in the threads?
/Bo
Last edited by bem; 05-27-2016 at 04:33 AM.
05-28-2016, 03:05 AM
#88
The stab adjuster on my Galactik is also super tight. However I did get it to move and was able to adjust the stab incidence. However even with a 120mm driver I could not reach the bolt. I had to adjust it with the hatch removed using a ball driver. Even with a long enough driver it would be almost impossible to find the bolt with the hatch in place. Some sort of guide tube would be needed. It is a pain to get the hatch off so easier to adjust the wing.
David
David
05-29-2016, 12:14 PM
#89
The stab adjuster on my Galactik is also super tight. However I did get it to move and was able to adjust the stab incidence. However even with a 120mm driver I could not reach the bolt. I had to adjust it with the hatch removed using a ball driver. Even with a long enough driver it would be almost impossible to find the bolt with the hatch in place. Some sort of guide tube would be needed. It is a pain to get the hatch off so easier to adjust the wing.
David
David
In my Galactika a hex screwdriver with 110 mm shaft is enough to reach the adjustment screw.
It would be rather easy to make a guidance tube of carbon tube with proper inner diameter so the long shaft hex screwdriver would be guided directly on to the top of hex adjustmentscrew.
I have a special way of moving the hex screwdriver when it is inserted in the adjustment hole on underside of fuselage in the tail so I know where I'm with the tip of the screwdriver. It is fairly easy to hit the top of the screw then.
I agree that the hatch over the tail servo where also the incidence adjustment screw can be seen and accessed is tricky to remove (and to mount back). I did some grinding on one side so it is little easier to get it back on. At first I could not figure out how one was supposed to get the hatch on after I had attached the linkage on servoarm to rudder horns. But on closer inspection I could see where it prevented to be mounted I grined away some glass on lower part of the hatch (that bow about 90 degrees flush with fuselage). Then with rudder deflected full in one direction make it possible to slide it over the linkage and mount it back rather easy.
I'm little surprised how they could made the hatch so complicated to remove and mount back. This is a thing to improve on Galactika, in case Oaxi will go into production with their models again.
/Bo
Last edited by bem; 05-30-2016 at 10:28 PM.
05-29-2016, 01:03 PM
#90
Hi,
I was out on friday May 27 and made some flights but the weather was terrible. Overcast, windy, cold (for this time of year) and it was drizzle most of the time. So it was tarpaulin weather. I do not fly, at least not practice flights, when it is raining or drizzle because I do not want water to be able to enter the ESC or anyting else of electronic nature in the plane. Transmitter one can use a cover for if one want to fly in rain or drizzle. In competition it might be needed to fly in rain but frankly I'm not sure it is safe when flying electric plane with ESC (unless you tape the air inlet for the ESC cooling or do other arrangment to be sure no water can reach the ESC).
Anyway, after some rather long time of drizzle it was some sunbeams visable and then an incredible rainbow formed on the sky in front of me at the airfield. I have never seen so beautiful rainbow in my life. I took a photo of it below (I had to take two photos since it was so wide and then mount them together on Photoshop). This must be seen in real life, it can not be described in words or with a photo really but here is the photo:

Little later the sky cleared up enough to start flying and here I'm ready for a start and take off from the main grass runway:

Officially we enter "summer" on Wednesday June 1 here and I hope we will have warmer and more sun soon. It is somewhat of a struggle with the elements to try to fly when the weather is so instable as it has been much of the spring this year. Much time is wasted just waiting at the airfield for weather to be OK for flights (in my case no rain or drizzle). I'm an outdoor guy that like to be out (running/skiing etc, and flying RC) so it is no problem really to be out even in bad weather for me except rain/drizzle when it comes to flying.
Oh, I lost the rubber on the tail wheel rim on my Galactika on Friday, despite the rubber tyre had been glued with CA to the rim.
Ayone know where to buy such tiny tailwheel that Oxai use on their plane, this one below?
It is 20 mm diameter blue plastic, 5 spoke, 5.2 mm width, 2 mm axle hole.


I use an old Sebart (too large diameter) tailwheel as replacement for the moment until I find same Oxai tailwheel to buy.
I think I will glue the rubber tyre then to the rim with some glue the RC car guys use, I think ZAP "RT" might work.
ZAP say "perhaps the very best R/C Tire Glue on the market today".
At the bottom of this page it is decribed:
http://www.zapglue.com/#!specialty/c10sn
/Bo
I was out on friday May 27 and made some flights but the weather was terrible. Overcast, windy, cold (for this time of year) and it was drizzle most of the time. So it was tarpaulin weather. I do not fly, at least not practice flights, when it is raining or drizzle because I do not want water to be able to enter the ESC or anyting else of electronic nature in the plane. Transmitter one can use a cover for if one want to fly in rain or drizzle. In competition it might be needed to fly in rain but frankly I'm not sure it is safe when flying electric plane with ESC (unless you tape the air inlet for the ESC cooling or do other arrangment to be sure no water can reach the ESC).
Anyway, after some rather long time of drizzle it was some sunbeams visable and then an incredible rainbow formed on the sky in front of me at the airfield. I have never seen so beautiful rainbow in my life. I took a photo of it below (I had to take two photos since it was so wide and then mount them together on Photoshop). This must be seen in real life, it can not be described in words or with a photo really but here is the photo:
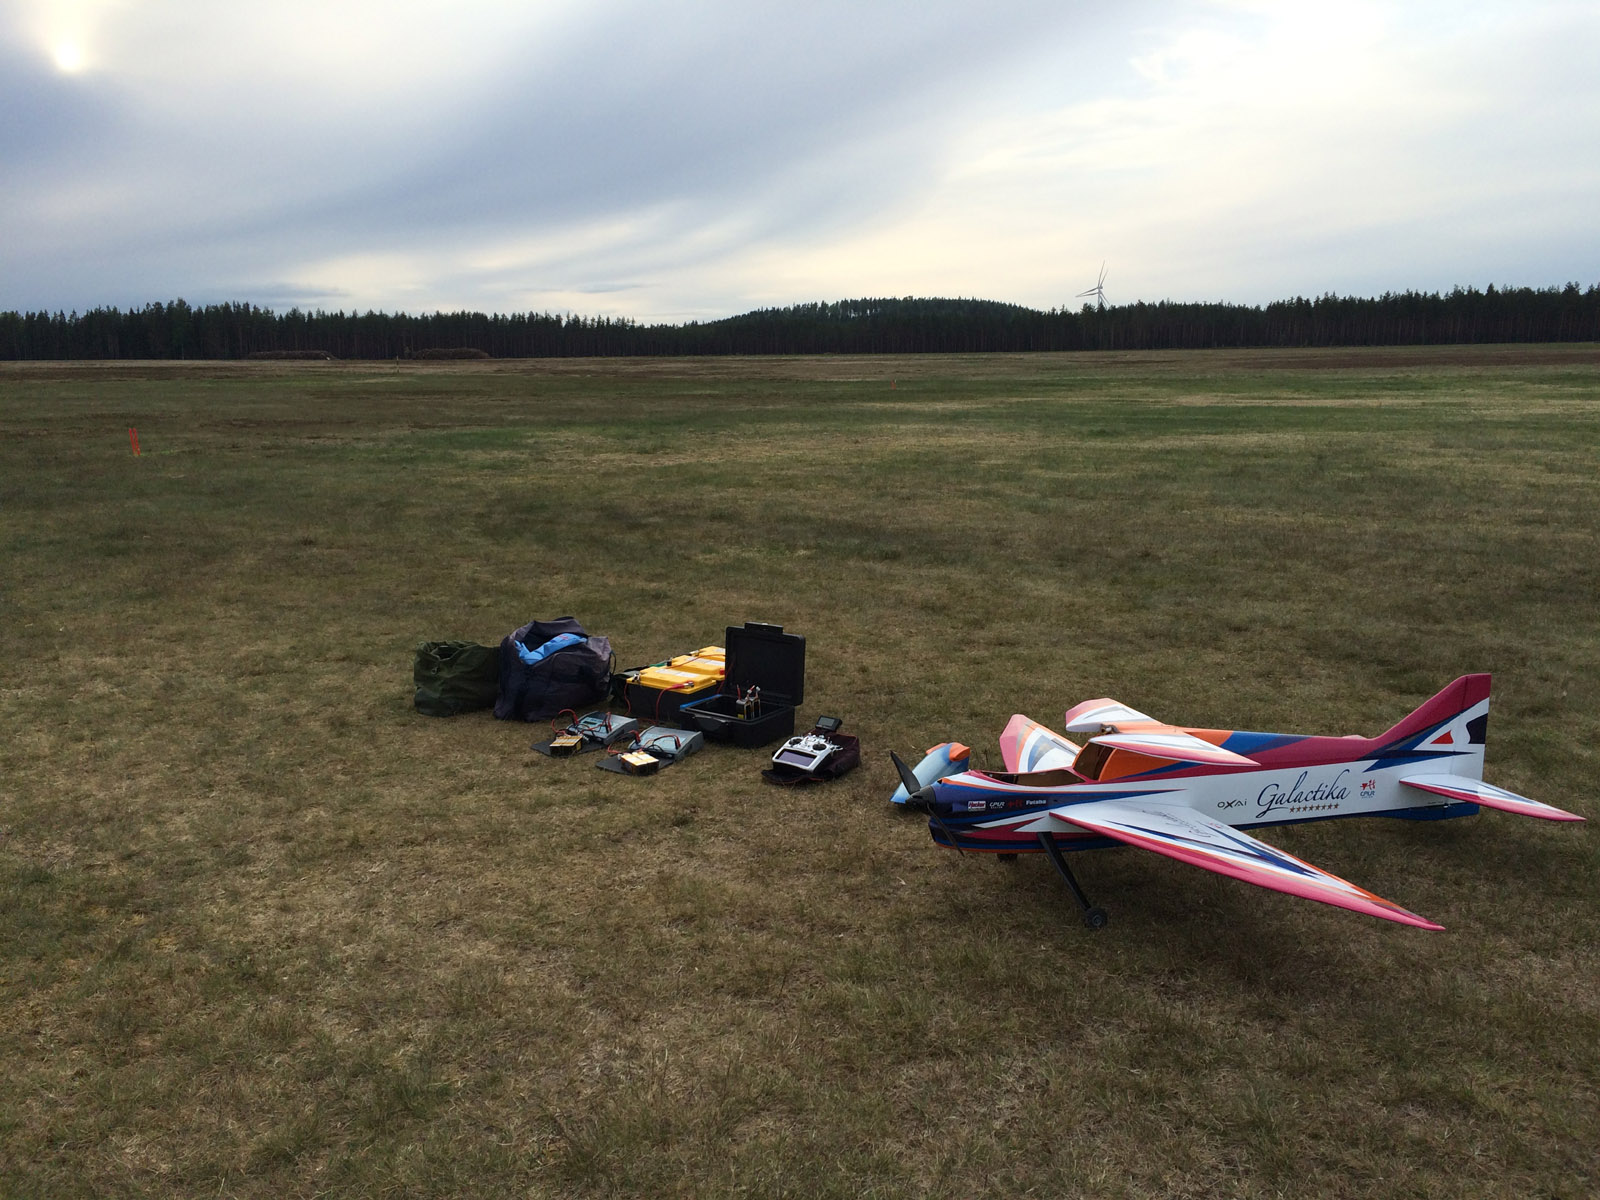
Little later the sky cleared up enough to start flying and here I'm ready for a start and take off from the main grass runway:
Officially we enter "summer" on Wednesday June 1 here and I hope we will have warmer and more sun soon. It is somewhat of a struggle with the elements to try to fly when the weather is so instable as it has been much of the spring this year. Much time is wasted just waiting at the airfield for weather to be OK for flights (in my case no rain or drizzle). I'm an outdoor guy that like to be out (running/skiing etc, and flying RC) so it is no problem really to be out even in bad weather for me except rain/drizzle when it comes to flying.
Oh, I lost the rubber on the tail wheel rim on my Galactika on Friday, despite the rubber tyre had been glued with CA to the rim.
Ayone know where to buy such tiny tailwheel that Oxai use on their plane, this one below?
It is 20 mm diameter blue plastic, 5 spoke, 5.2 mm width, 2 mm axle hole.
I use an old Sebart (too large diameter) tailwheel as replacement for the moment until I find same Oxai tailwheel to buy.
I think I will glue the rubber tyre then to the rim with some glue the RC car guys use, I think ZAP "RT" might work.
ZAP say "perhaps the very best R/C Tire Glue on the market today".
At the bottom of this page it is decribed:
http://www.zapglue.com/#!specialty/c10sn
/Bo
Last edited by bem; 05-29-2016 at 10:24 PM.
05-29-2016, 02:05 PM
#91
Hi,
It was first competition for this season in F3A and Nordic (basically Advanced A-18 Schedule) classes here in Sweden. We had also guests from Denmark and Norway competing in both classes.
It was 10 pilots in F3A class and 5 pilots in Nordic class.
The competition is by tradition our "spring" competition and is held during May, this year it was late in May.
Name of this competition is Trollhattan Aero Cup (TOC) - the competition is held just outside town Trollhattan and the club Trollhattans model flying club is host.
I have been flying in Nordic/Advanced before so this is my first year in FAI F3A class. It is a rather big step up to F3A class, at least for me, especially as much time of spring was spent assemble my Galactika and trim it in. I have not done that much P-17 Schedule practice, at least not as much I would prefer before the first competition for the year. I have been flying i FAI F3A class before but it was many years ago,
But it is fun to just participate and meet other flyers at the competition. Just to watch other top flyers fly learn me much and it is no problem to ask some other pilot watch a flight and get some comments what they see can be improved for the future. I got some tips on some manouvres to improve on that I was not aware of. The F3A class was crammed with top flyers from Norway, Denmark and Sweden so my goal was not to take the jumbo place if possible (I took eventually 8th place).
The weather on Saturday was overcast (no rain) with moderate winds blowing in towards the pilots. Sunday was totally overcast with too low ceilings for flying until about one o'clock in the afternoon when it was enough ceiling, so we managed one round in each class before it was too late. With total 3 rounds during the two days and 2 best rounds counted as result.
The competion was well organized by the club and Contest Director. It was hot meals served for lunch each day at the field that was very appreciated. The whole competion was held in a very friendly and helpful atmosphere, as usual.
Place 1-3 in the F3A class - from left to right Anders Johansson 3rd, Henning Jorkjend 1st, Ole Kristensen 2nd:

Place 1-3 in Nordic (A-18) class - from left to right Ketil Strommen 3rd, Espen Kvien 1st, Tomas Johansson 2nd:

In next post is the planes that was in use by the competitors.
/Bo
It was first competition for this season in F3A and Nordic (basically Advanced A-18 Schedule) classes here in Sweden. We had also guests from Denmark and Norway competing in both classes.
It was 10 pilots in F3A class and 5 pilots in Nordic class.
The competition is by tradition our "spring" competition and is held during May, this year it was late in May.
Name of this competition is Trollhattan Aero Cup (TOC) - the competition is held just outside town Trollhattan and the club Trollhattans model flying club is host.
I have been flying in Nordic/Advanced before so this is my first year in FAI F3A class. It is a rather big step up to F3A class, at least for me, especially as much time of spring was spent assemble my Galactika and trim it in. I have not done that much P-17 Schedule practice, at least not as much I would prefer before the first competition for the year. I have been flying i FAI F3A class before but it was many years ago,
But it is fun to just participate and meet other flyers at the competition. Just to watch other top flyers fly learn me much and it is no problem to ask some other pilot watch a flight and get some comments what they see can be improved for the future. I got some tips on some manouvres to improve on that I was not aware of. The F3A class was crammed with top flyers from Norway, Denmark and Sweden so my goal was not to take the jumbo place if possible (I took eventually 8th place).
The weather on Saturday was overcast (no rain) with moderate winds blowing in towards the pilots. Sunday was totally overcast with too low ceilings for flying until about one o'clock in the afternoon when it was enough ceiling, so we managed one round in each class before it was too late. With total 3 rounds during the two days and 2 best rounds counted as result.
The competion was well organized by the club and Contest Director. It was hot meals served for lunch each day at the field that was very appreciated. The whole competion was held in a very friendly and helpful atmosphere, as usual.
Place 1-3 in the F3A class - from left to right Anders Johansson 3rd, Henning Jorkjend 1st, Ole Kristensen 2nd:
Place 1-3 in Nordic (A-18) class - from left to right Ketil Strommen 3rd, Espen Kvien 1st, Tomas Johansson 2nd:
In next post is the planes that was in use by the competitors.
/Bo
Last edited by bem; 05-29-2016 at 10:35 PM.
05-29-2016, 02:49 PM
#92
Planes that was used by the pilots in the competition (TAC 2016). All electric motors except two planes.
/Bo
Naruke:
Ascent EP-Bip (OS OMR-4043-172 belt transfer)
BJ Craft:
Episiode
Essence
Agenda (Contra, V3)
Sebart:
MythoS Pro
Wind S Pro (two)
Oxai:
Axiome (two, both YS engines)
Galactika
Krill:
Spark Evo II
Spark
Extreme Flight:
2M Vanquish
CA Models:
Genesis
JM Composite
Elexant


/Bo
Naruke:
Ascent EP-Bip (OS OMR-4043-172 belt transfer)
BJ Craft:
Episiode
Essence
Agenda (Contra, V3)
Sebart:
MythoS Pro
Wind S Pro (two)
Oxai:
Axiome (two, both YS engines)
Galactika
Krill:
Spark Evo II
Spark
Extreme Flight:
2M Vanquish
CA Models:
Genesis
JM Composite
Elexant
Last edited by bem; 05-29-2016 at 10:45 PM.
05-29-2016, 03:44 PM
#93
Hi,
On my way home from the competition I took a break at a rest area at the road. It is a nice Swedish Airforce SAAB 37 Viggen jet on a pedestal there.
Specification of Viggen plane and video - see my post #81 above:
http://www.rcuniverse.com/forum/elec...l#post12216564
/Bo


On my way home from the competition I took a break at a rest area at the road. It is a nice Swedish Airforce SAAB 37 Viggen jet on a pedestal there.
Specification of Viggen plane and video - see my post #81 above:
http://www.rcuniverse.com/forum/elec...l#post12216564
/Bo
Last edited by bem; 05-30-2016 at 11:33 PM.
05-30-2016, 11:31 PM
#95
The reason to make the stab incidence screw so very hard to turn I can not understand. If I compare with my MythoS Pro it is not much force needed to turn the adjustement screw (in each stabs). That one want it to be somewhat hard to turn the adjustment screw I can understand but not to this degree that is it on some Galactik/Galactika.
I doubt they use any CA for the stab adjustment mechanism fastening in the tail. Probably epoxy, that would be my best guess.
My best guess is that the white plastic adjustment mechanism in the tail is made of nylon. Maybe try a drop of fine oil on the screw thread that can hopefully seek into the threads in the nylon body, perhaps then it can be easier to loosen/turn the adjustment screw.
Maybe the (nylon) pieces that is suppose to be movable against each other has got stuck with some glue by misstake during Oaxi assembly.
/Bo
Last edited by bem; 05-31-2016 at 02:44 AM.
06-02-2016, 02:28 AM
#97

Join Date: Aug 2005
Location: Sydney, AUSTRALIA
Posts: 1,341
Likes: 0
Received 0 Likes
on
0 Posts
06-02-2016, 04:12 AM
#99
Join Date: Aug 2005
Location: Sydney, AUSTRALIA
Posts: 1,341
Likes: 0
Received 0 Likes
on
0 Posts
The MK tail wheel assemblies of old used to be an O-ring and that's what I use on the tail wheels I produce. The tail wheel pictured looks the same as what I have in stock and they are moulded in some way not an O-ring. The surface that contacts the ground is flat.
Cheers,
Jason.
Cheers,
Jason.