


Homelite 26cc gas engine conversion help
 08-06-2015, 12:03 PM
#76
Several considerations drove my use of the hole saw and mandrel. One was that I had all the material at hand, since I used the insert from the Sullivan starter, and I already had the hole saw set. But, most important to me was that the shaft for the hole saw mandrel had flats on it for the drill motor chuck to tighten down on to keep it from slipping; and that the nut securing the hole saw to the mandrel, in combination with the hole saw being keyed to the mandrel, made the hole saw to mandrel combination slip-proof.
And so, it is what works for me; other approaches will work as well for many people. Good luck with them.
Sincerely, Richard
 08-07-2015, 10:17 AM
#77

All good points. I didn't mean to offend nor belittle your idea. It is a good one.
Sierra Bravo: Since you are getting close, I'll mention the starting procedure. First close the choke tightly and open the throttle fully, and make absolutely sure the ignition is off. (In your case, with the magneto, that means that the magneto grounding wire will be NOT connected when it is "ON" to start. You connect the magneto wire to ground to kill the engine.) Then hand flip the engine while watching the fuel line. You should see the fuel advance with each flip of the prop. When the fuel reaches the carb, give it two or three more flips, then stop. If you don't see fuel being pulled up to the engine, you either have an air leak in your fuel system, or something wrong with the carb. Anyway, then turn the ignition on, close the choke firmly shut, open throttle to about 1/2, and give it a spin with the starter. As soon as the engine starts for a moment, stop spinning it. Then retard the throttle to just above idle, open the choke, and spin it again until it starts. Then, once the engine warms fully up, you can start tuning it. You tune for highest rpm on the high speed needle, then richen it about a screwdriver blades width, and tune the low speed needle for best idle and transition to full throttle. One needle affects the other, so you may have to go back and forth on the needles to get it dialed in. Start with both needles about 1 1/2 to 1 3/4 turns out from lightly seated.)
AV8TOR
08-07-2015, 11:25 AM
#78
 All your help is very much appreciated. I have added your startup tips to my files also. Thanks.
 Sincerely, Richard
08-07-2015, 12:26 PM
#79

Thread Starter

Join Date: Mar 2015
Location: Charlotte, NC
Posts: 90
Likes: 0
Received 0 Likes
on
0 Posts
thanks for the start up tips av8tor.
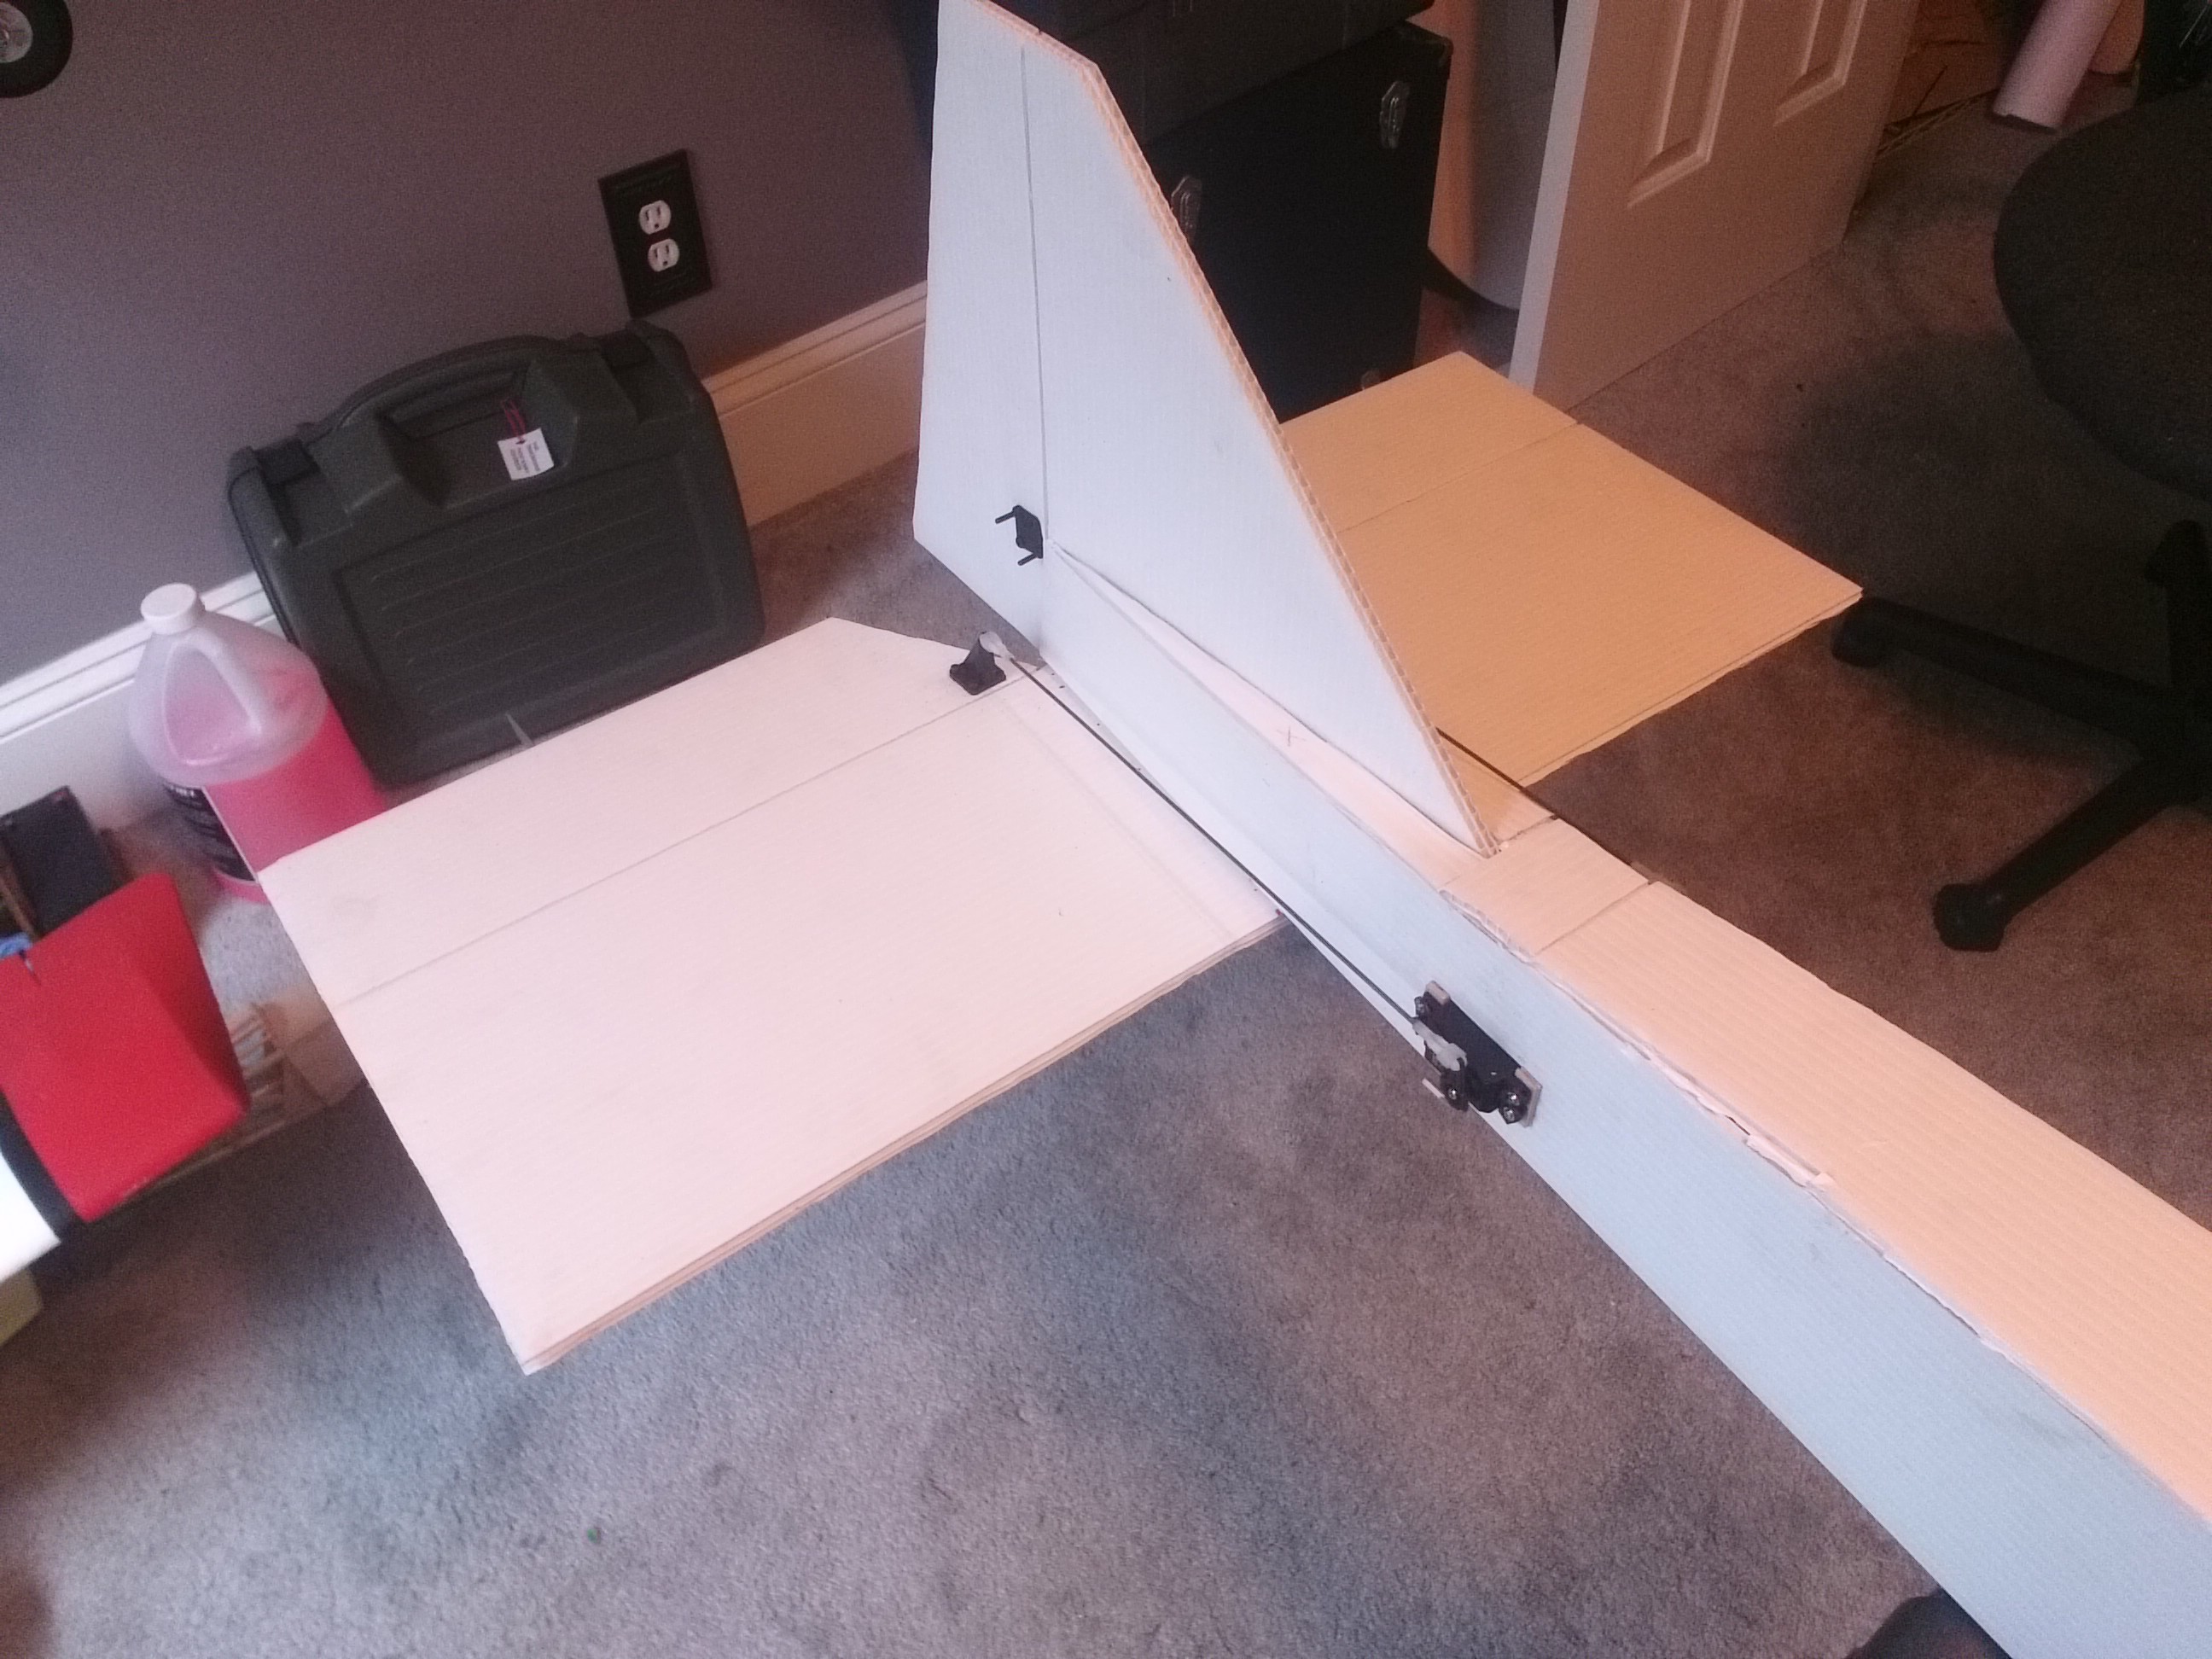
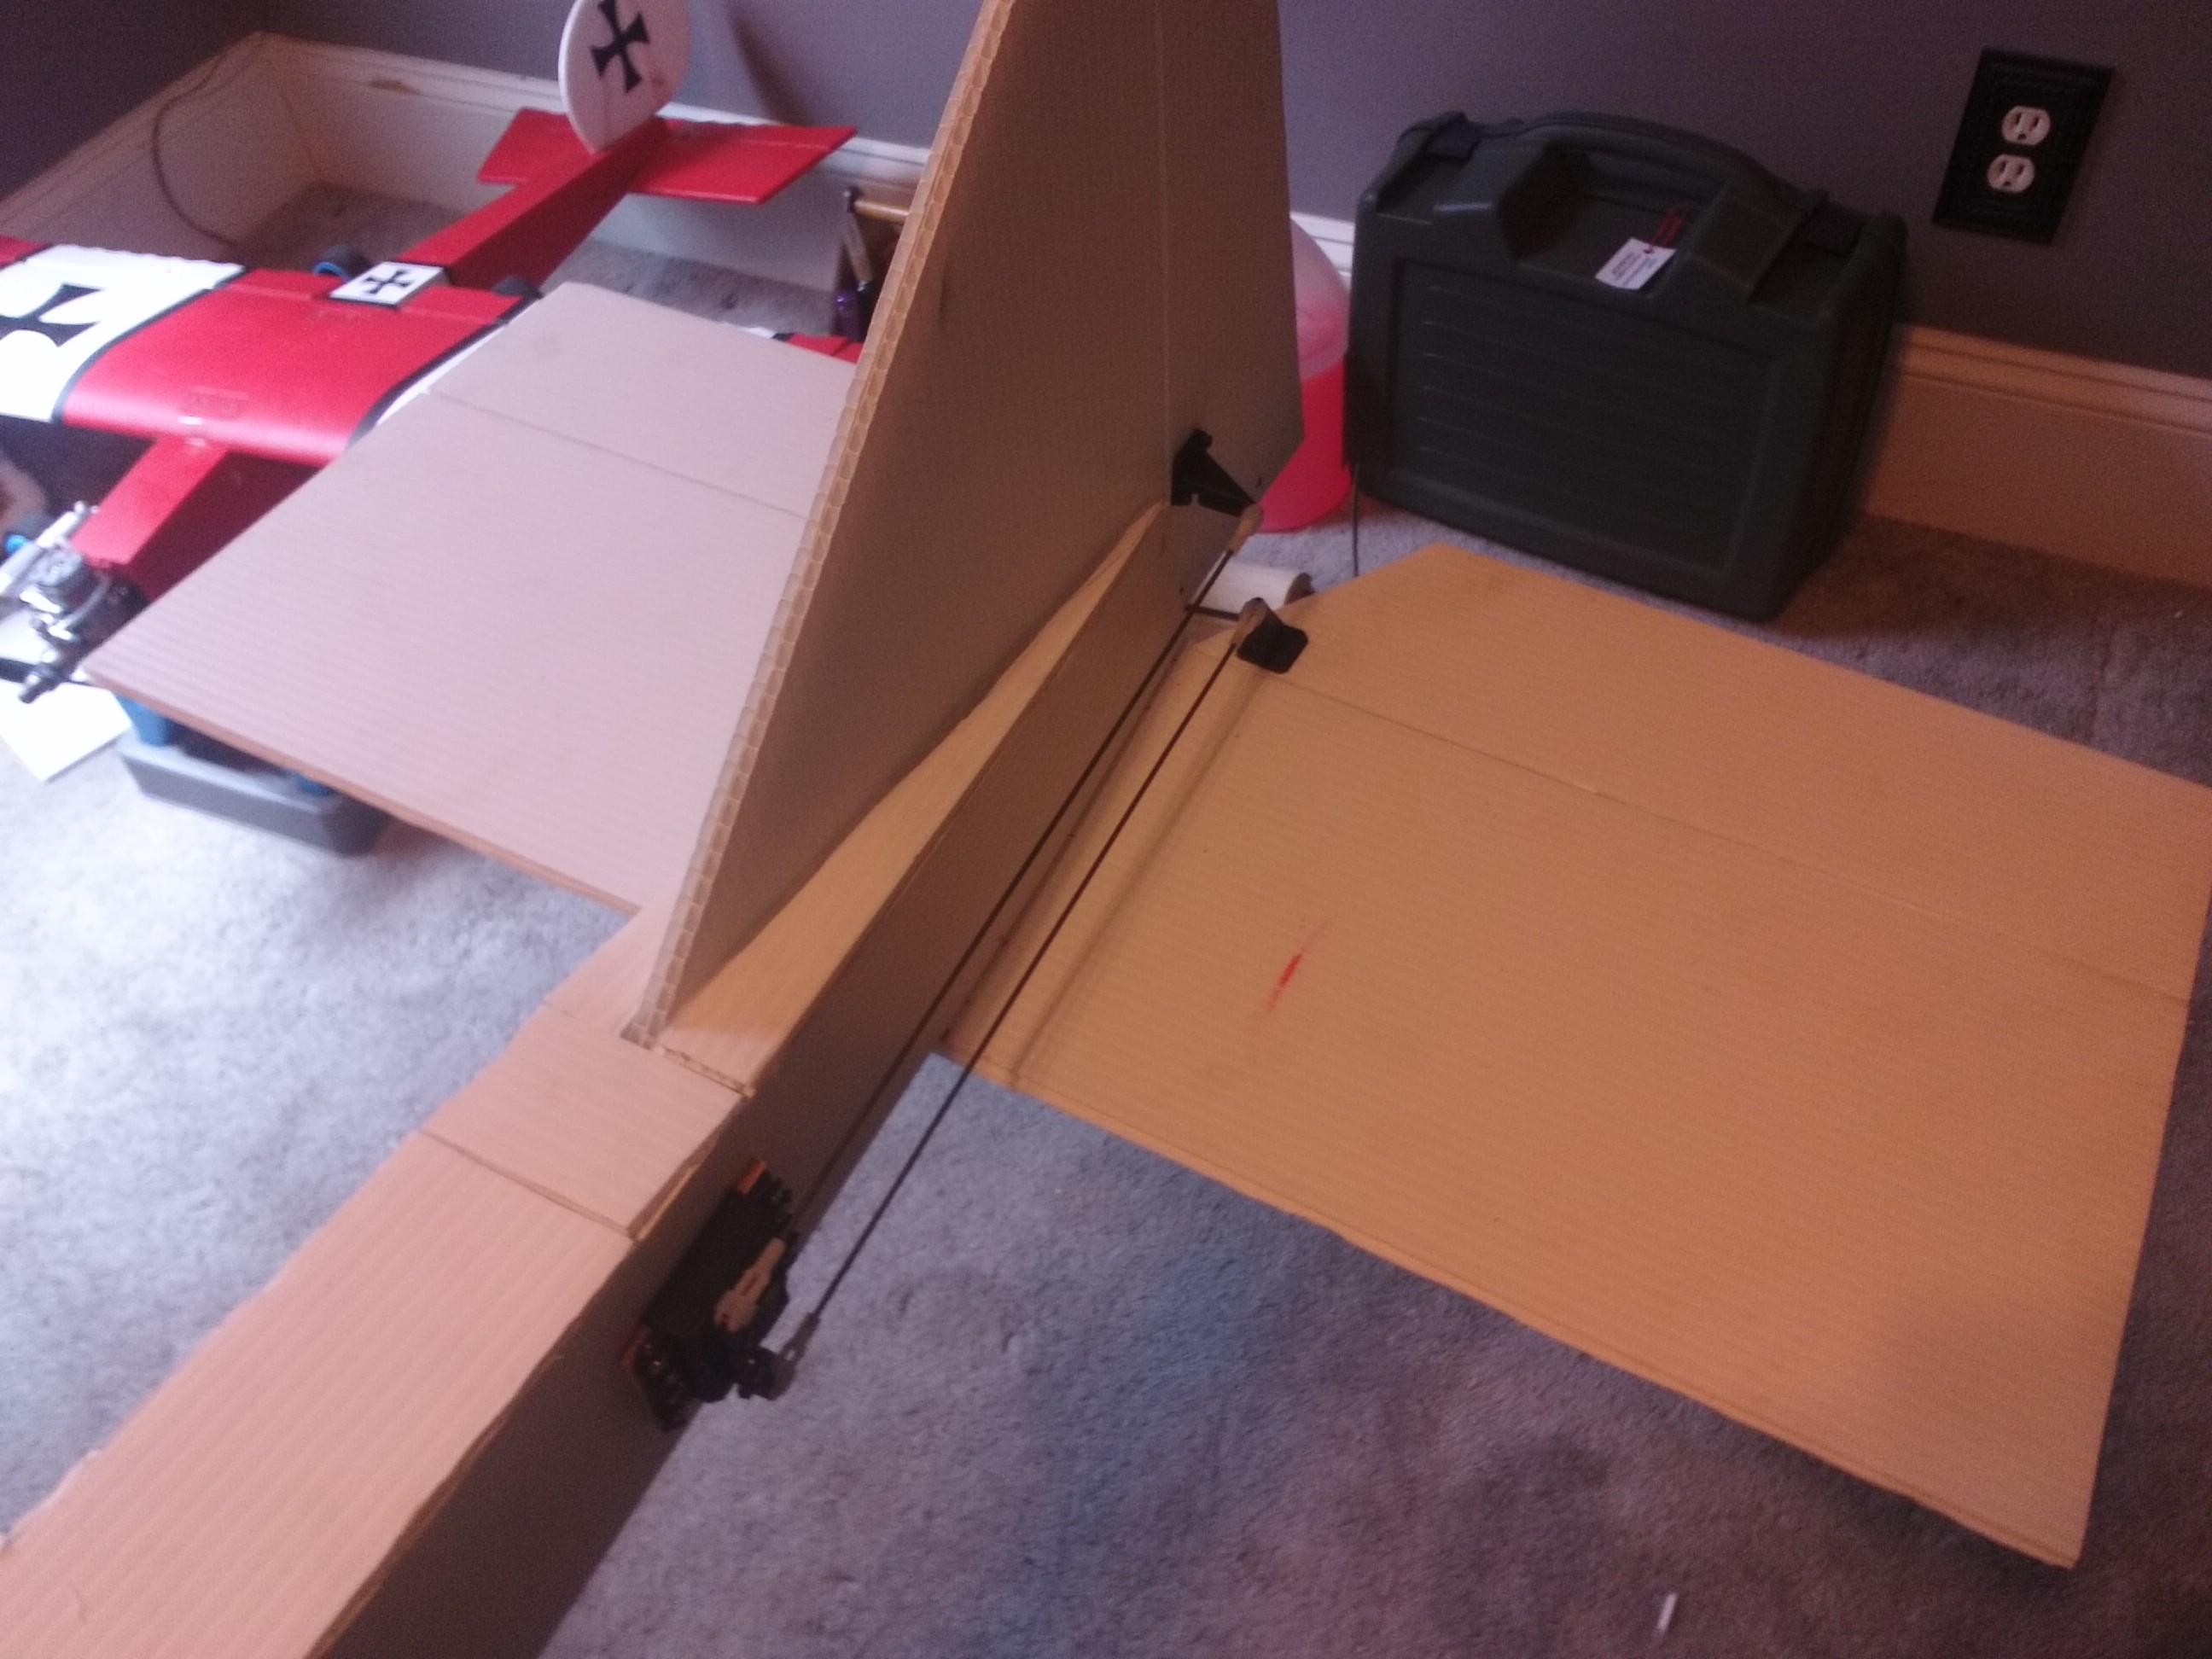
I got the servos installed and hooked up and here is what the(for the most part) finished tail section of the fuselage looks like.

I'm going to buy some white electrical tape to made the edges of the plane look cleaner since right now they aren't very nice. Hopefully tomorrow i'll be able to install the motor
-Sam
I got the servos installed and hooked up and here is what the(for the most part) finished tail section of the fuselage looks like.
I'm going to buy some white electrical tape to made the edges of the plane look cleaner since right now they aren't very nice. Hopefully tomorrow i'll be able to install the motor
-Sam
08-07-2015, 01:22 PM
#80
Well, on an engine with electronic ignition, if the engine is accessible I have another preferred starting technique. Once you have fuel to the carb, open the throttle and then hold your thumb tightly over the carb while turning the engine over by hand. When you feel your thumb (or finger) get wet, stop. Then turn the ignition on, set the throttle just above idle, and give it a hard flip. Doing it this way they will usually start on the first or second flip, and surprise the hell out of everyone at your field. This will also work with some magneto engines, but a lot of magneto engines are better started with an electric starter, the Homelites being among them.
Sierra: Nice progress on the plane! I also see a good old "Ugly Stik" in the background. Do you fly it? I have a Giant Ugly Stik with a 50cc twin cylinder gas engine on it and I love it!
AV8TOR
Sierra: Nice progress on the plane! I also see a good old "Ugly Stik" in the background. Do you fly it? I have a Giant Ugly Stik with a 50cc twin cylinder gas engine on it and I love it!
AV8TOR
08-07-2015, 03:30 PM
#81
Thread Starter
Join Date: Mar 2015
Location: Charlotte, NC
Posts: 90
Likes: 0
Received 0 Likes
on
0 Posts
I imagine your second method is something like what Flite test did in this video(skip to around 3:45 to see what I mean) and that had a magneto star. Also the second way to start the engine sounds really similar to priming(and hand starting) a glow engine where you cover the carb while at full throttle to draw in fuel then go to idle but instead of turning on ignition you connect the glow plug starter and start flipping. As for grounding the ignition coil cant I connect the cables from the ignition coil to a small switch like this and when I want to start the engine I would flip the switch.
Also I still do fly the ugly stick, pretty much every time I go out to the field because it's such a good flier. I use it to practice some basic acrobatic maneuvers like loops, rolls, inverted, and stall turns.
If I get the engine mounted tomorrow then I post some photos.
-Sam
Also I still do fly the ugly stick, pretty much every time I go out to the field because it's such a good flier. I use it to practice some basic acrobatic maneuvers like loops, rolls, inverted, and stall turns.
If I get the engine mounted tomorrow then I post some photos.
-Sam
08-08-2015, 03:09 PM
#83
Thread Starter
Join Date: Mar 2015
Location: Charlotte, NC
Posts: 90
Likes: 0
Received 0 Likes
on
0 Posts
On the radio shack page for the product it says that it's toggle switch. But I didn't link to the radio shack page because for some reason there was no photo of the switch. But as long as a normal toggle switch will work then I'll pick one up next time I go to radio shack.
-Sam
-Sam
08-11-2015, 11:25 AM
#84
Thread Starter
Join Date: Mar 2015
Location: Charlotte, NC
Posts: 90
Likes: 0
Received 0 Likes
on
0 Posts
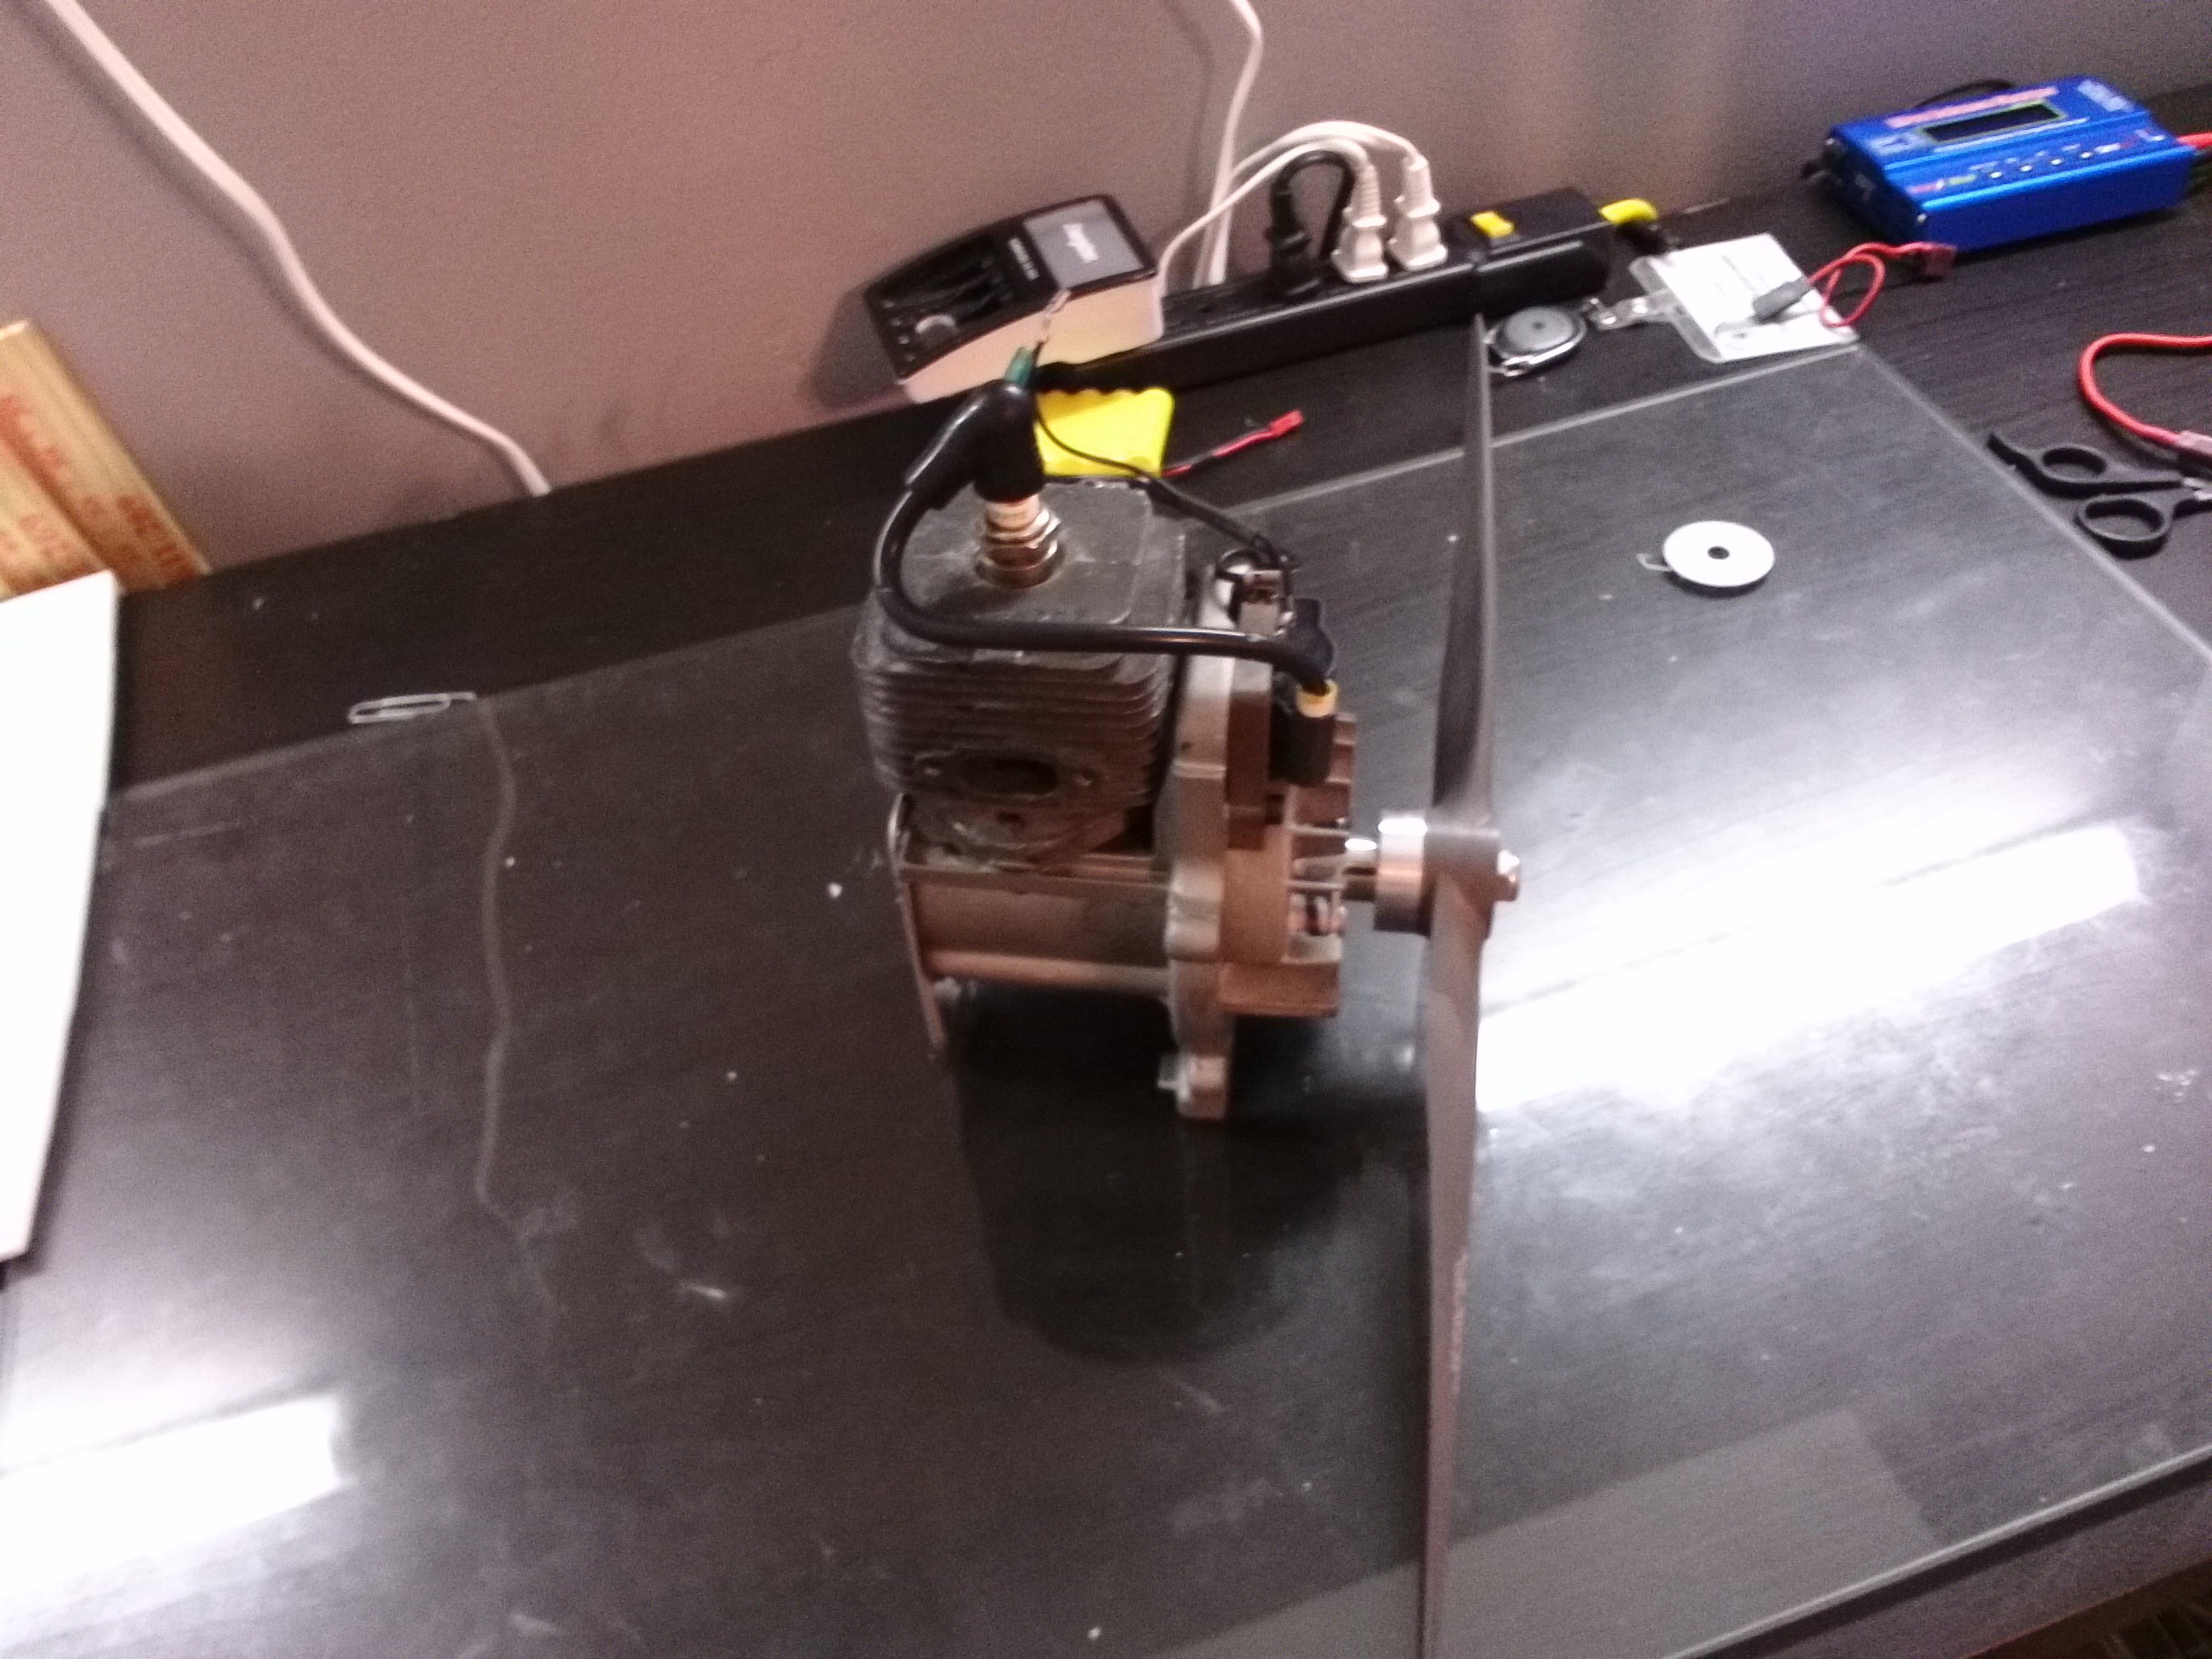
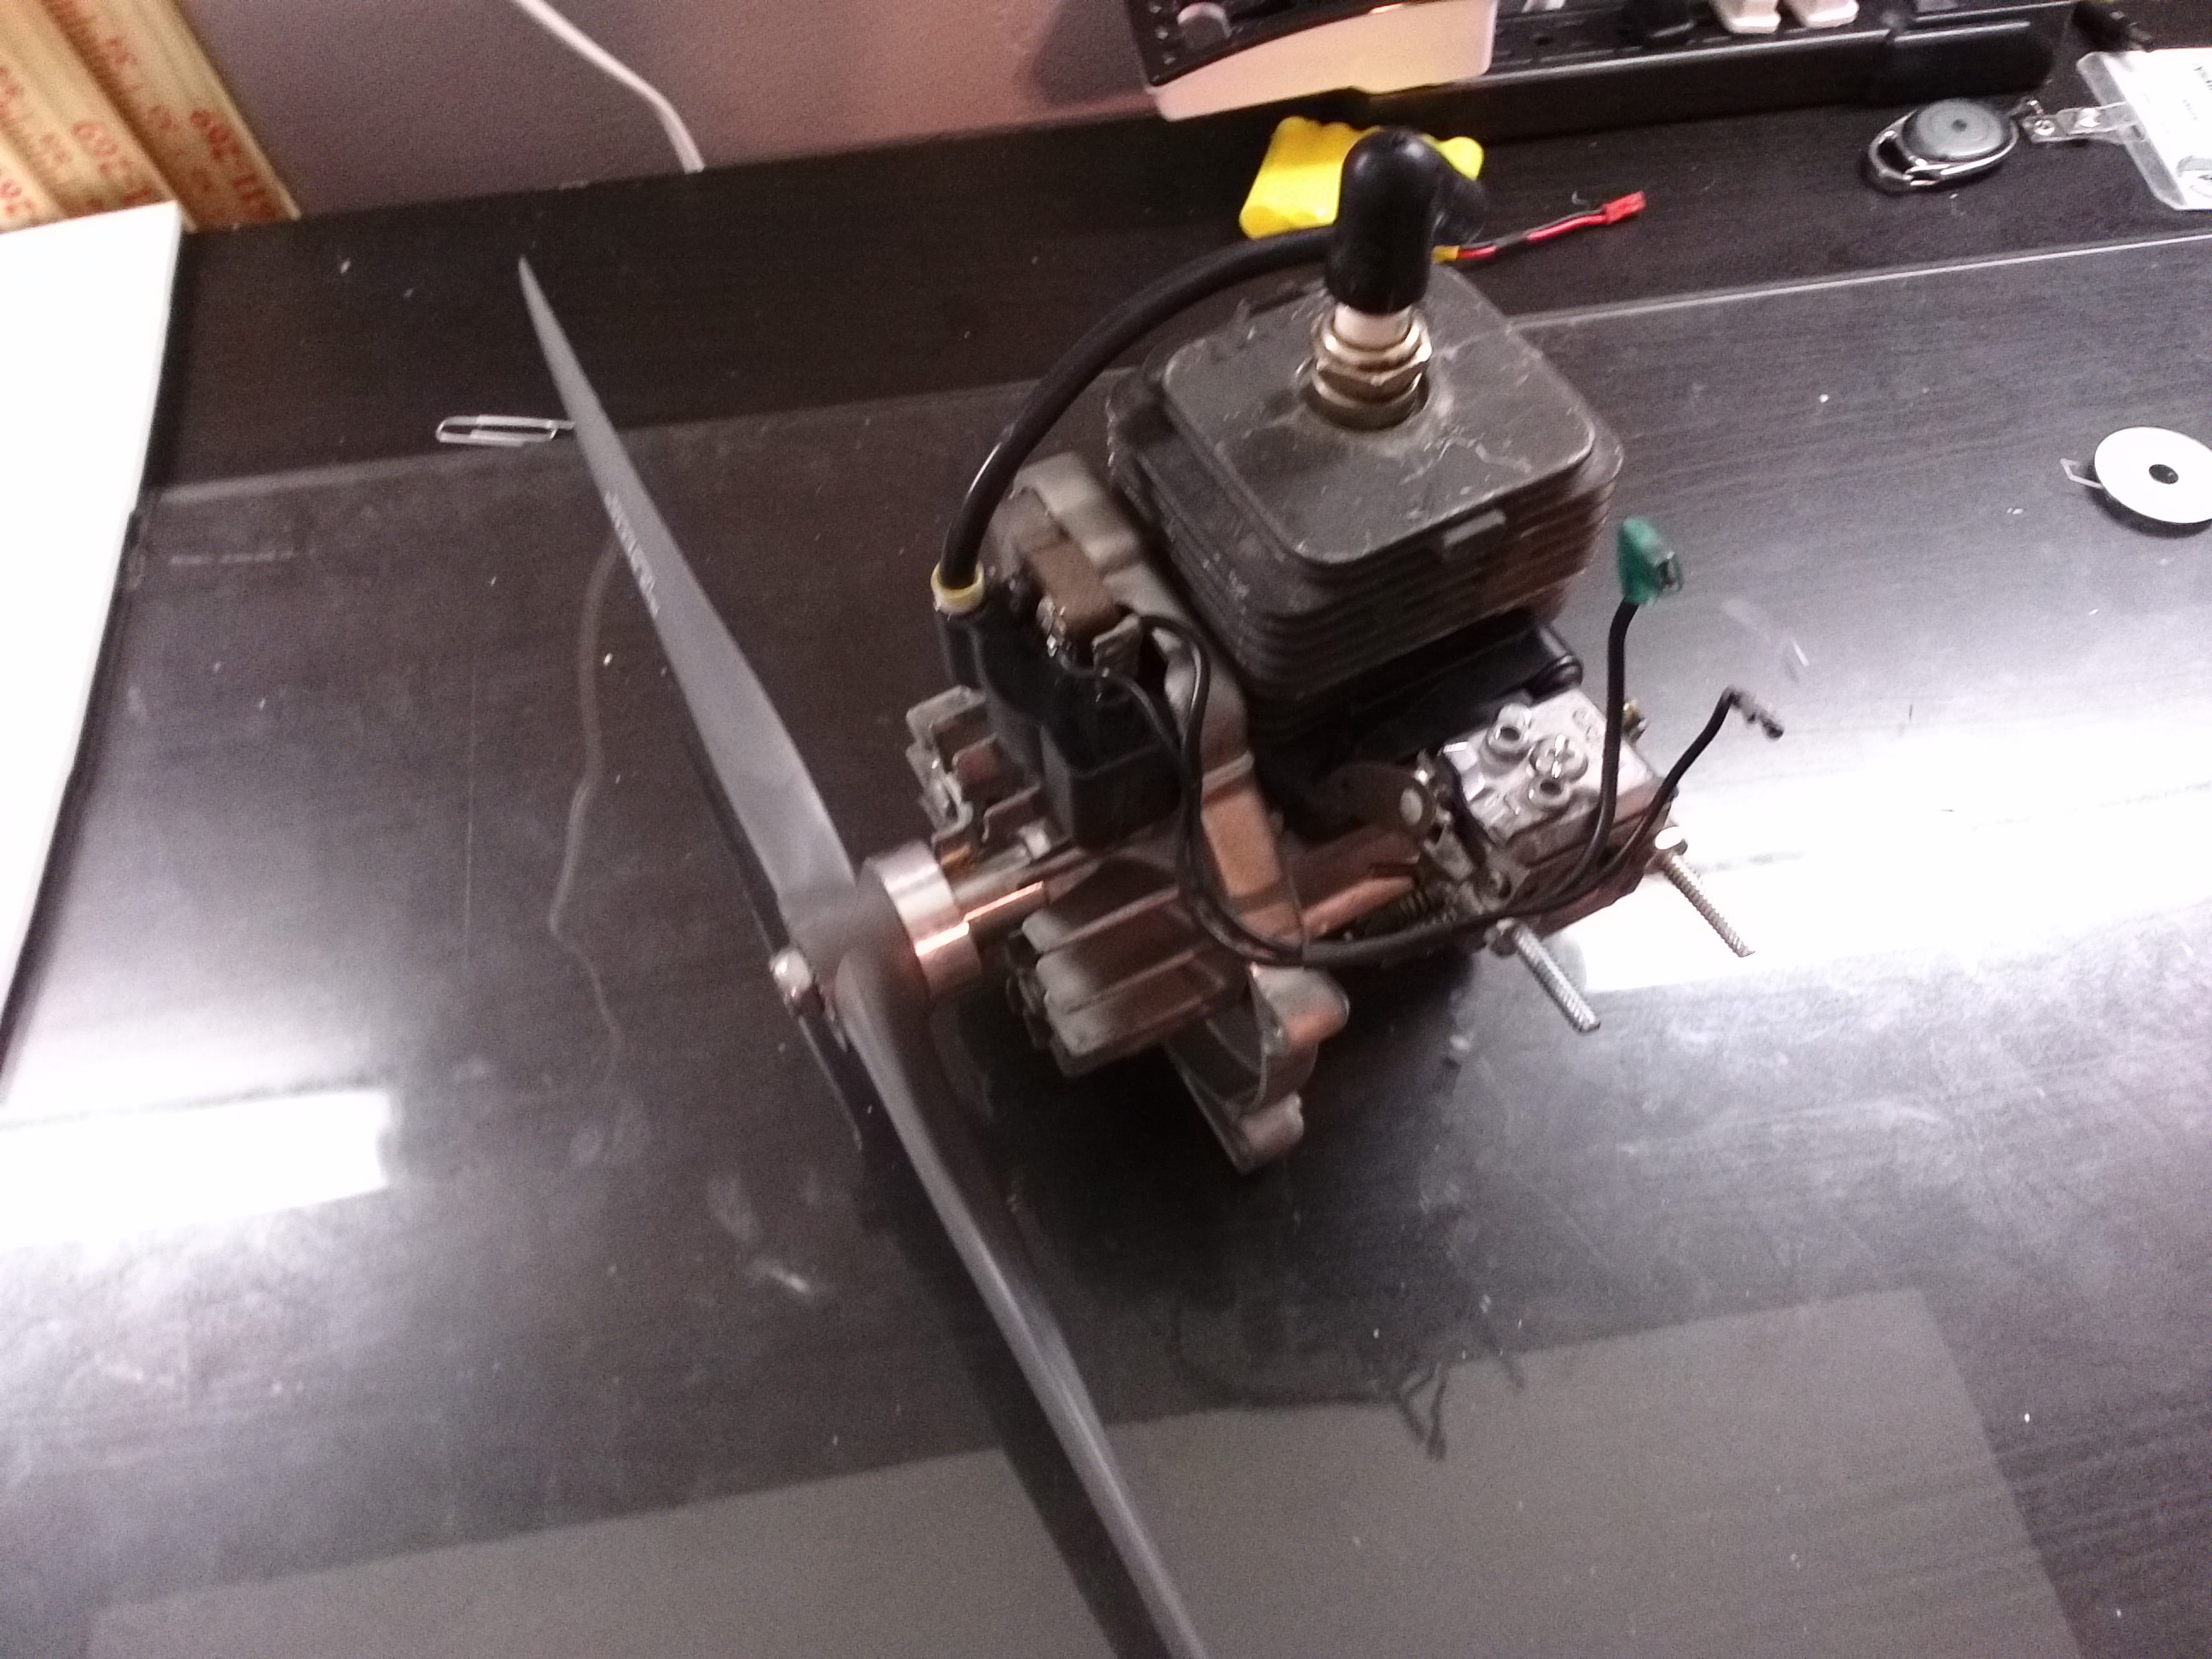
I got the shaft threaded the prop installed and put some new oil on the piston. I got some photos of the prop installed but not mounted to the airframe.
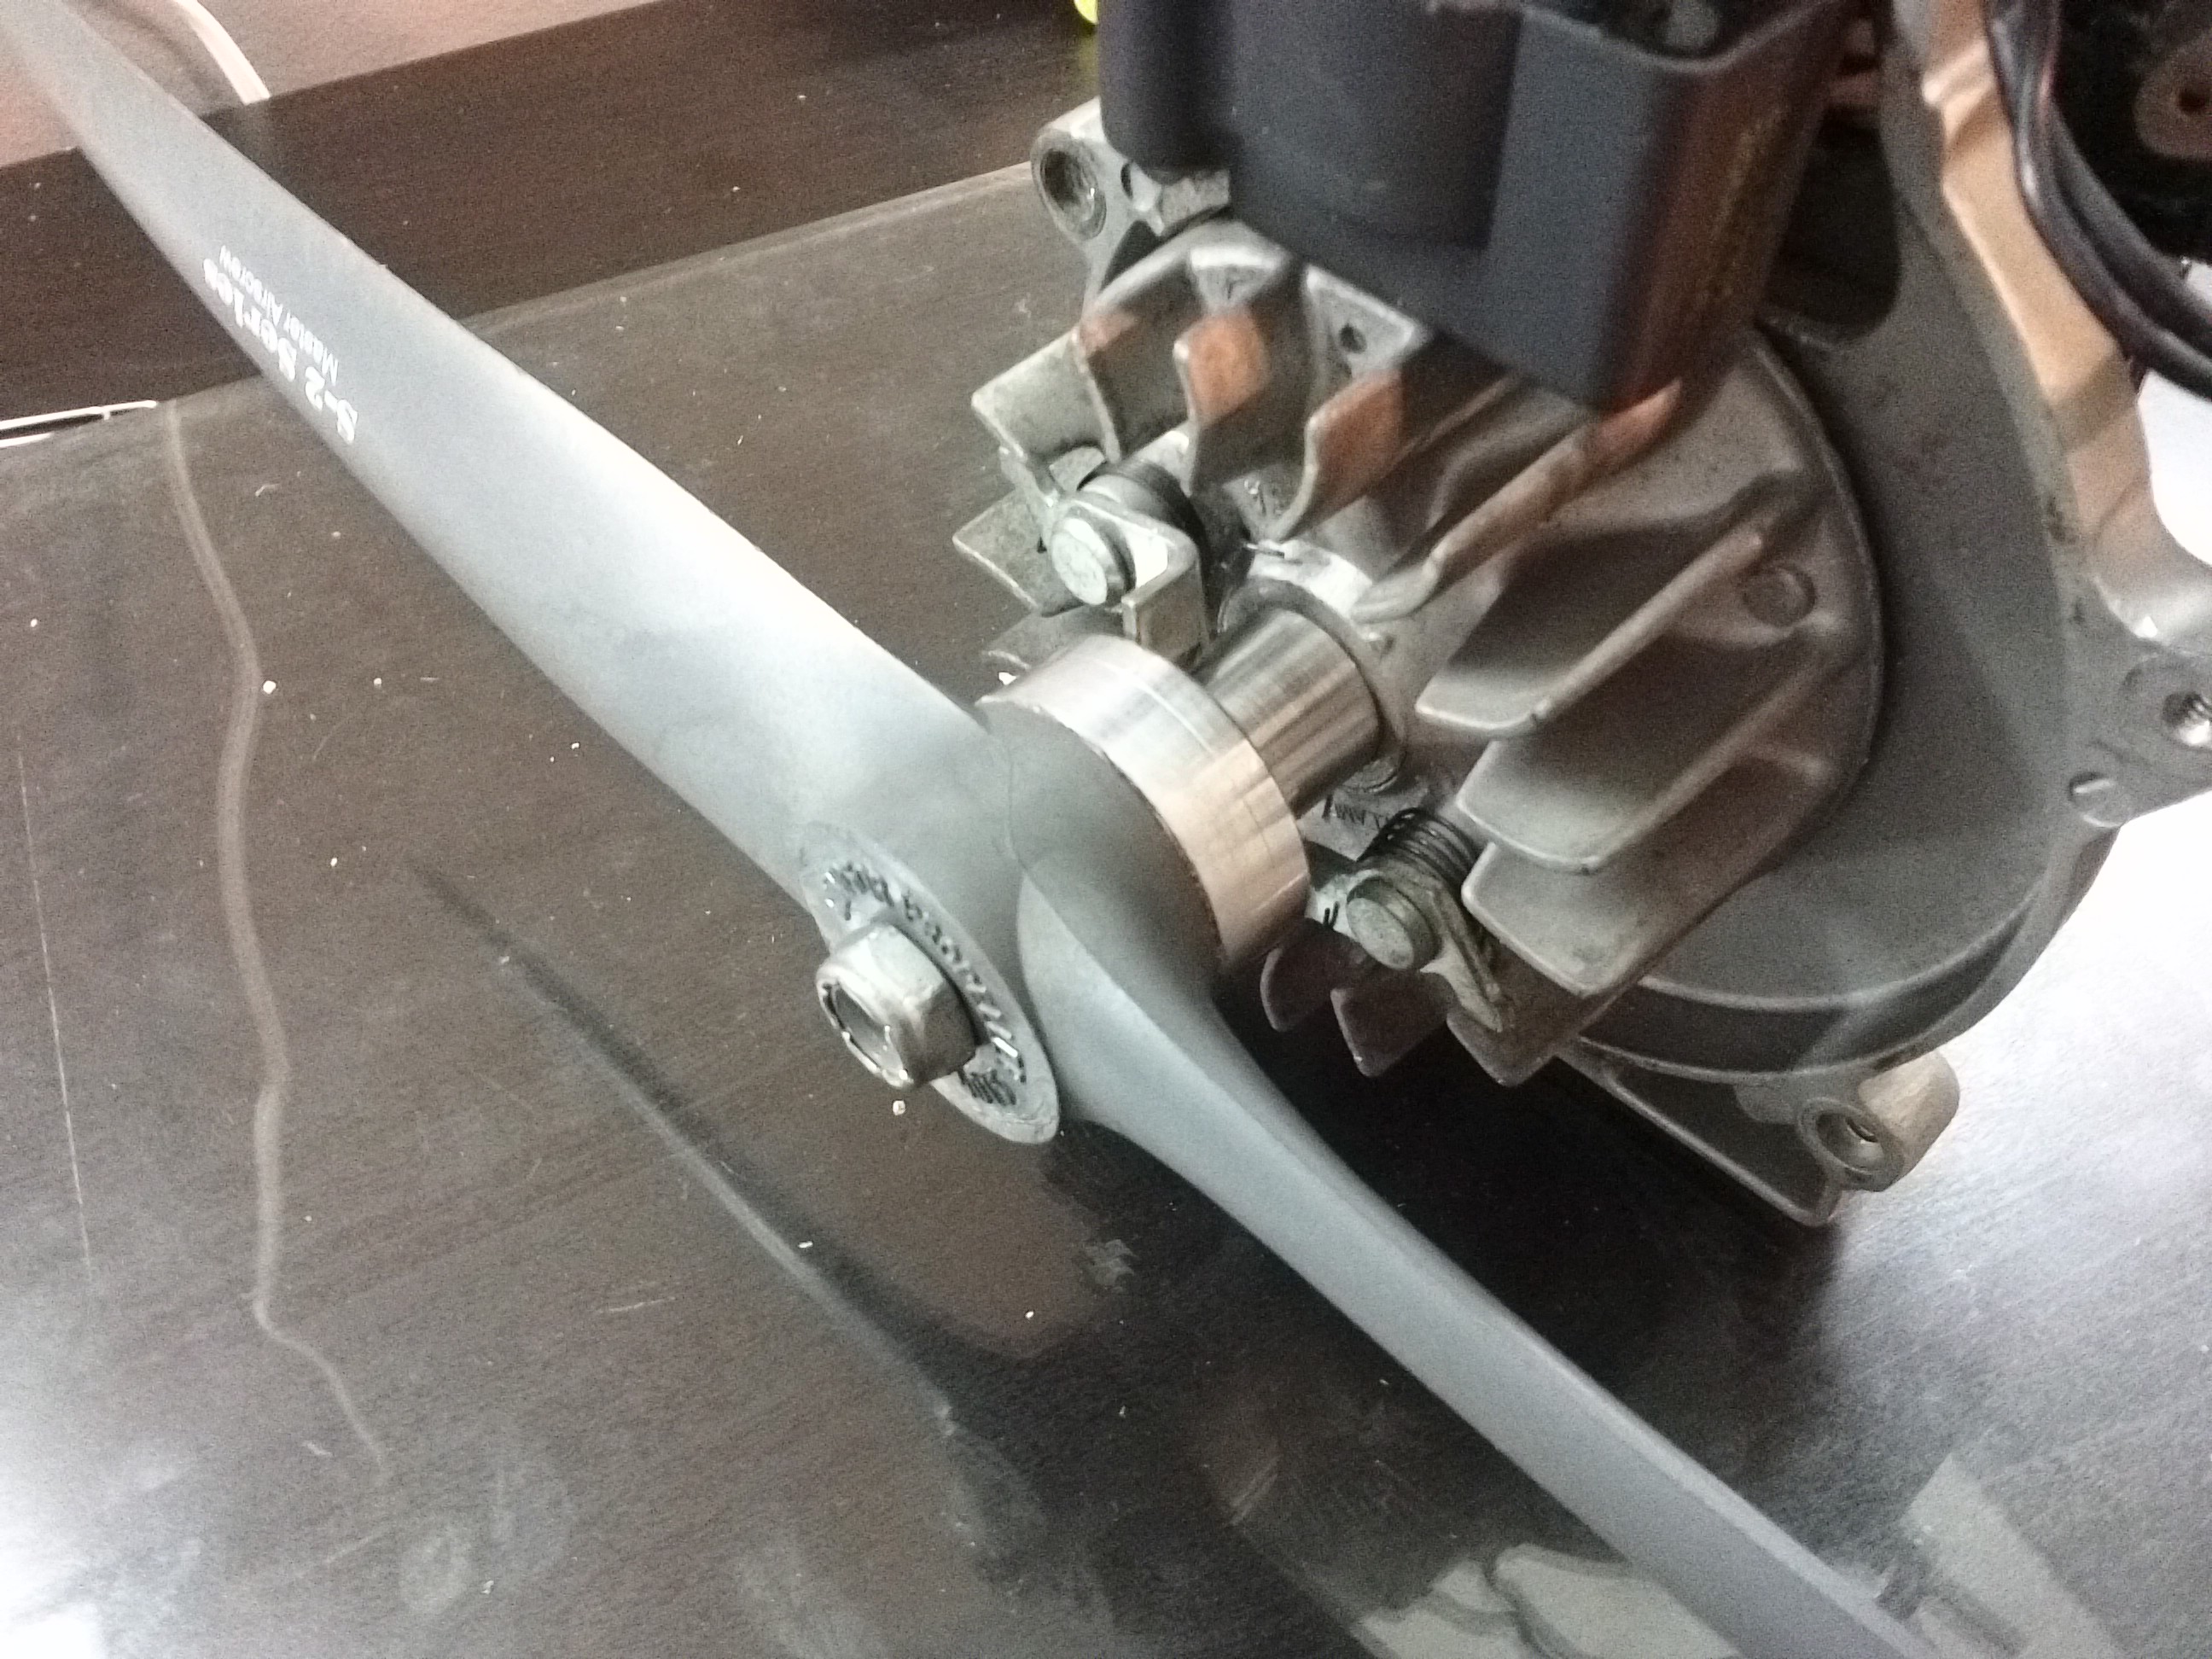
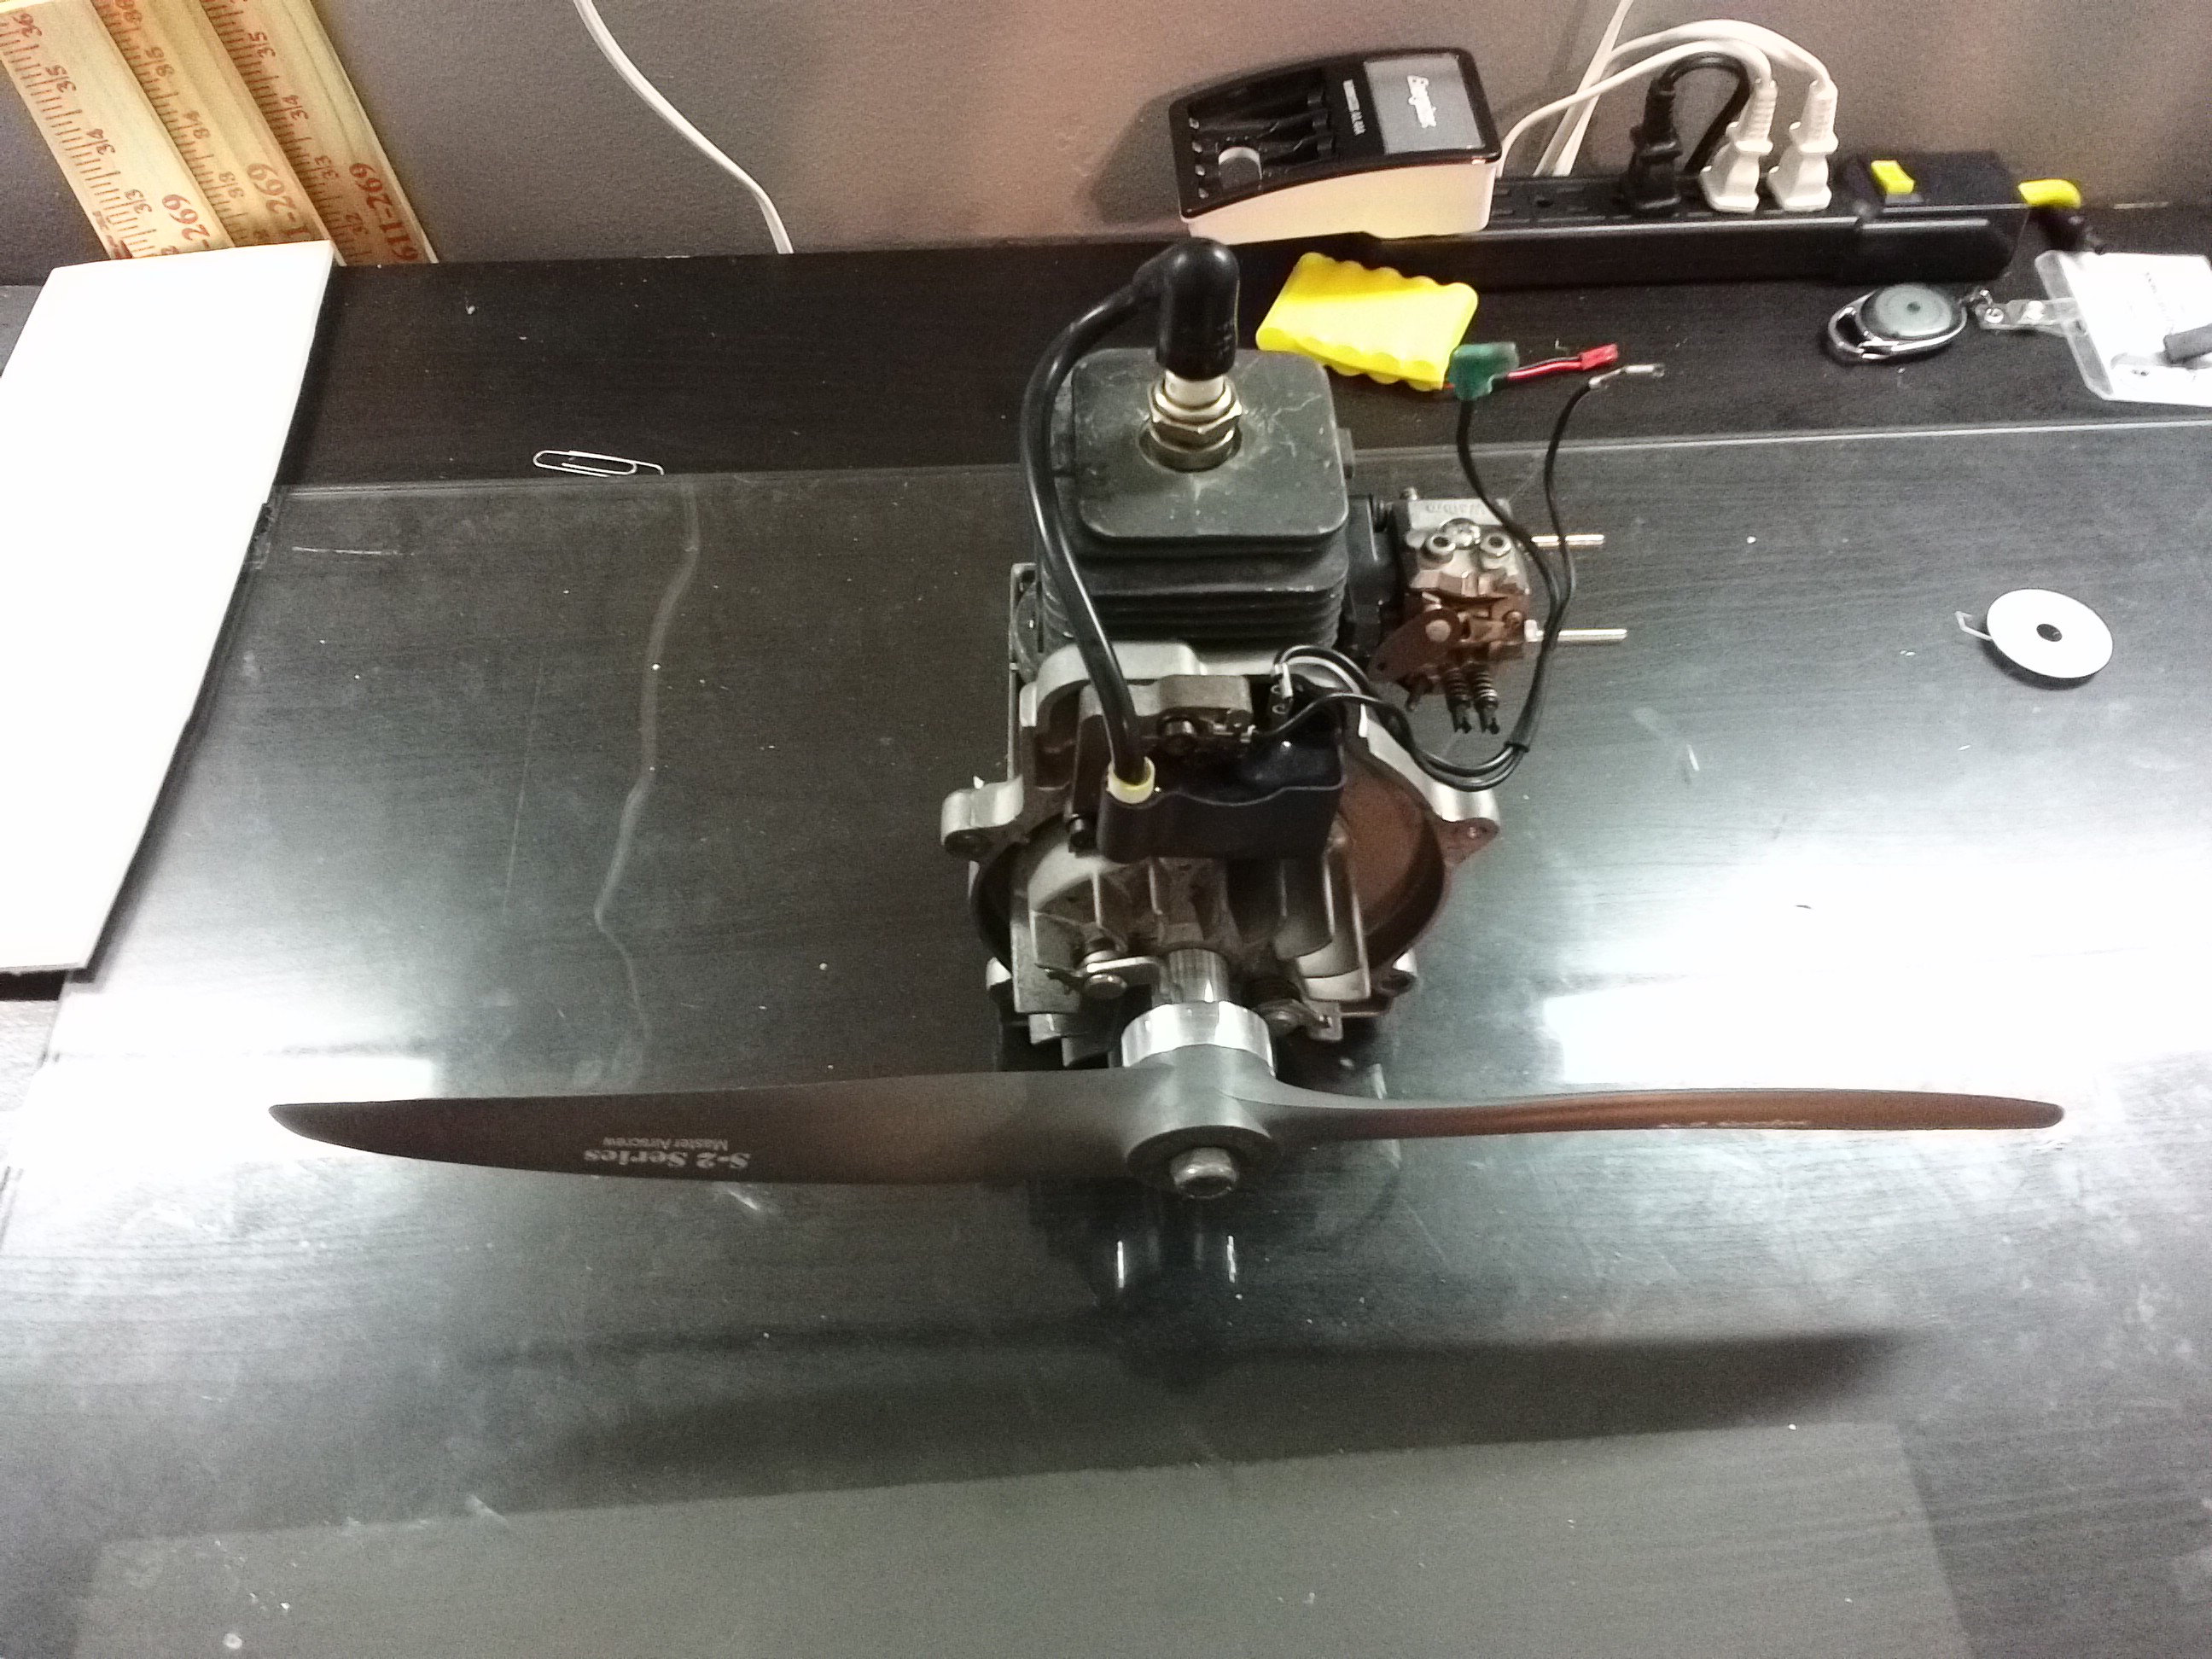
The locking nut does not thread all the way so I probably have to go back to the machine shop to get the hub trimmed down a bit. I could also sand down the center of the prop to make it thinner.
-Sam
The locking nut does not thread all the way so I probably have to go back to the machine shop to get the hub trimmed down a bit. I could also sand down the center of the prop to make it thinner.
-Sam
08-11-2015, 12:47 PM
#85
Don't modify the prop; that's dangerous. Wouldn't it just be easiest to get a longer prop mounting stud?? You really need a large flat washer under that nut against the prop anyway.
If all else fails the Top Flite or Zinger props are thinner at the hub....
AV8TOR
If all else fails the Top Flite or Zinger props are thinner at the hub....
AV8TOR
Last edited by av8tor1977; 08-11-2015 at 12:51 PM.
08-11-2015, 05:12 PM
#86
Thread Starter
Join Date: Mar 2015
Location: Charlotte, NC
Posts: 90
Likes: 0
Received 0 Likes
on
0 Posts
Yeah i though that moding the prop is a bad idea due to is getting badly unbalenced and losing strength. The engines crankshaft is the prop mounting shaft so i cant make it longer. I have a flat washer( you can seee it in a photo) but if i put if on there would'nt be enough thread for the nut. I'll have to look into a topflite prop if I cant find another solution.
-sam
-sam
08-16-2015, 05:50 AM
#87
I got the shaft threaded the prop installed and put some new oil on the piston. I got some photos of the prop installed but not mounted to the airframe.
The locking nut does not thread all the way so I probably have to go back to the machine shop to get the hub trimmed down a bit. I could also sand down the center of the prop to make it thinner.
-Sam
The locking nut does not thread all the way so I probably have to go back to the machine shop to get the hub trimmed down a bit. I could also sand down the center of the prop to make it thinner.
-Sam
While you are at the machine shop, have them cut down the fins on the flywheel, but NOT below the hub level. The prop hub is plenty thick, I suggest you thin in down enough to allow the use of the thick washer and the locknut. Radio Shack here in Guilford is out of business, but Ace hardware or true Value should have toggle switches. JMHA.
Sincerely, Richard
08-16-2015, 04:21 PM
#88
As I understand it, your crankshaft goes all the way through the prop hub and then becomes the means for attaching the propeller. An easy fix is to just have the machinist cut off the shaft 3/4" past the end of the flywheel when it is mounted. Then you can obtain and screw a stud into the prop hub adapter, long enough to engage the prop hub by at least 3/4", and also long enough to allow mounting of your propeller, a proper flat washer, and propeller nut.
AV8TOR
AV8TOR
08-16-2015, 04:32 PM
#89
Thread Starter
Join Date: Mar 2015
Location: Charlotte, NC
Posts: 90
Likes: 0
Received 0 Likes
on
0 Posts
now I see what you meant. I'll either do that make the top of the hub thinner like spaceworm said. I did find a source for the coroplast for the wings. My local piedmount plastics sells 4'x8' 2mil sheets of coro for $11 a sheet. To save some waight I'm going to make the wing out of 2 mil coro not 2 and 4mil coro like the plans said. I plane to mount the motor with some round 3/4" spacers and the bolts coming from behind the firewall.
-Sam
-Sam
08-17-2015, 07:53 PM
#91

My Feedback: (1)
Join Date: Aug 2004
Location: moree, AUSTRALIA
Posts: 102
Likes: 0
Received 0 Likes
on
0 Posts
A little bit of advice sierra-bravo, when building a spad they tend to come out tailheavy so there for use the mounting postion of engine to balance the plane so you won't have weight in the front that you don't want.
08-18-2015, 04:20 AM
#92
now I see what you meant. I'll either do that make the top of the hub thinner like spaceworm said. I did find a source for the coroplast for the wings. My local piedmount plastics sells 4'x8' 2mil sheets of coro for $11 a sheet. To save some waight I'm going to make the wing out of 2 mil coro not 2 and 4mil coro like the plans said. I plane to mount the motor with some round 3/4" spacers and the bolts coming from behind the firewall.
-Sam
-Sam
Sincerely, Richard
08-18-2015, 10:00 AM
#93
Thread Starter
Join Date: Mar 2015
Location: Charlotte, NC
Posts: 90
Likes: 0
Received 0 Likes
on
0 Posts
Theoretically 2mil coroplast would weight half as much a 4mil coroplast but I doubt thats true. As for the wing making it out of 2mil coro would make it lighter but by how much I dont know. If 2mil coro did weigh half as much as 4mil coro then a all 2mil wing would weigh 1/3 less then an 2&4mil wing
I think
-Sam
I think
-Sam
08-18-2015, 02:59 PM
#94
Theoretically 2mil coroplast would weight half as much a 4mil coroplast but I doubt thats true. As for the wing making it out of 2mil coro would make it lighter but by how much I dont know. If 2mil coro did weigh half as much as 4mil coro then a all 2mil wing would weigh 1/3 less then an 2&4mil wing
I think
-Sam
I think
-Sam
Sincerely, Richard
08-24-2015, 07:08 PM
#95
Thread Starter
Join Date: Mar 2015
Location: Charlotte, NC
Posts: 90
Likes: 0
Received 0 Likes
on
0 Posts
So i didnt really do much more on the plane or the motor. I did have a question though. If the outlet holes were drilled in the muffler but no outlet tubes were installed would it make much of a differnce to the power or sound of the motor. Im not going to run the muffler without tubes but it was just something I was wondering about. Also generaly how loud are 30cc converted homelites with 16" props because I'm not sure if my flying field has a sound limit or not.
-sam
.-sam
08-28-2015, 11:58 AM
#96
It would be a little louder without the tubes, power would probably be not much different. I wouldn't do it myself. The noise shouldn't be an issue, they have a lower exhaust note than glow engines and generally aren't as offensive a sound as perceived by most people. An 18 x 6 prop will probably lower the rpms a bit and make it quieter, and would really be a better prop for your SPAD anyway.
AV8TOR
AV8TOR
