


HBK2 metal head instal ?
 01-22-2008, 06:50 PM
#1
Member
Thread Starter
Join Date: Oct 2007
Location: Putnam,
CT
Posts: 44
Likes: 0
Received 0 Likes
on
0 Posts
I purchased the central holder set #EK5-0208.
I have it almost assembled, I just can't figure out where the brass pieces that have a flange on it and the plain silver washer go.
My best quess on it would be where the blade grips attach to the feathering shaft. And if it does, is it installed on the inside or outside of the holder.
I'm using the stock grips for now if this will help.
I loked at the HBK2 manual and it does not show those parts anywhere.
 01-22-2008, 06:56 PM
#2
Senior Member
Join Date: Aug 2007
Location: Edmonton,
AB, CANADA
Posts: 7,441
Likes: 0
Received 0 Likes
on
0 Posts
the ones with flanges typically go up against bearings so they should be between the main holder and the blade grips right up against the blade grips (and the bearing there). the other washer goes up against the flanged one I believe. Let me take a look when I get home and I"ll post a picture for you.
01-22-2008, 08:01 PM
#3
Member
Thread Starter
Join Date: Oct 2007
Location: Putnam,
CT
Posts: 44
Likes: 0
Received 0 Likes
on
0 Posts
I think I got you correct.
Wide side of flange goes into holder, then the blade grip goes on.
But there is the rubber gromet that has to go between the grip and the holder, wich to me looks funny when you have it fully assembled.
The pic will help me out a great deal when you get the chance.
Wide side of flange goes into holder, then the blade grip goes on.
But there is the rubber gromet that has to go between the grip and the holder, wich to me looks funny when you have it fully assembled.
The pic will help me out a great deal when you get the chance.
01-22-2008, 11:24 PM
#4
Senior Member
Join Date: Aug 2007
Location: Edmonton,
AB, CANADA
Posts: 7,441
Likes: 0
Received 0 Likes
on
0 Posts
Here is an [link=http://www.buzzflyer.co.uk/ESKY-CNC-Alloy-Head-Build-Guide.asp]install guide[/link] for the entire head. It shows what you're interested in half way down, better pictures than i can take anyway.
01-23-2008, 05:39 AM
#5
Member
Thread Starter
Join Date: Oct 2007
Location: Putnam,
CT
Posts: 44
Likes: 0
Received 0 Likes
on
0 Posts
Thanks for the guide, but it still does not show the brass flanged pieces.
The guide shows a couple of washers on each side of the holder between the grip and the rubber gromet, but no flanged piece.
If thats the way it is supposed to go, it does not fit right. I still have an exsposed feathering shaft and the grips are real loose when I tighten both screws on the feathering shaft.
The only way I see it getting any snugger, I will have to add more washers.
01-23-2008, 11:38 AM
#6
Member
Join Date: Oct 2007
Location: Newberg,
OR
Posts: 89
Likes: 0
Received 0 Likes
on
0 Posts
I've got an assembled K2 CNC head, but can't figure out what this piece is you're talking about. Between the blade grips and the shaft need to be the two washers and the rubber o-ring... Do your blade grips have the bearings installed?
Is it possible for you to upload a few macro pictures of what you've got so far, and the flanged part especially?
Is it possible for you to upload a few macro pictures of what you've got so far, and the flanged part especially?
01-23-2008, 01:17 PM
#7
Senior Member
Join Date: Aug 2007
Location: Edmonton,
AB, CANADA
Posts: 7,441
Likes: 0
Received 0 Likes
on
0 Posts
ORIGINAL: wolverine1267
Thanks for the guide, but it still does not show the brass flanged pieces.
The guide shows a couple of washers on each side of the holder between the grip and the rubber gromet, but no flanged piece.
If thats the way it is supposed to go, it does not fit right. I still have an exsposed feathering shaft and the grips are real loose when I tighten both screws on the feathering shaft.
The only way I see it getting any snugger, I will have to add more washers.
01-23-2008, 01:45 PM
#8
Member
Thread Starter
Join Date: Oct 2007
Location: Putnam,
CT
Posts: 44
Likes: 0
Received 0 Likes
on
0 Posts
I'll post a couple of pics when I get out of work.
But yes I do have the bearings in the grips along with the 2 washers and bearing on the out side of the grip (Blade side), and 2 regular washers between the grip and the holder.
I hope when I post the pic, it will be easier to exsplain whats wrong.
But yes I do have the bearings in the grips along with the 2 washers and bearing on the out side of the grip (Blade side), and 2 regular washers between the grip and the holder.
I hope when I post the pic, it will be easier to exsplain whats wrong.
01-23-2008, 03:02 PM
#9
Member
Join Date: Dec 2007
Location: South Jordan, UT
Posts: 94
Likes: 0
Received 0 Likes
on
0 Posts
[link=http://www.twf-sz.com/china/download/manual/EK1H-E016.rar]Here[/link] you will find a much more comprehensive manual for the HBK2. It includes pictures of installing a complete aluminum upgrade kit. The manual is in .rar format, so you'll need to be able to decompress a .rar archive, and the manual itself is in .pdf format.
01-23-2008, 03:08 PM
#10
Member
Join Date: Dec 2007
Location: South Jordan, UT
Posts: 94
Likes: 0
Received 0 Likes
on
0 Posts
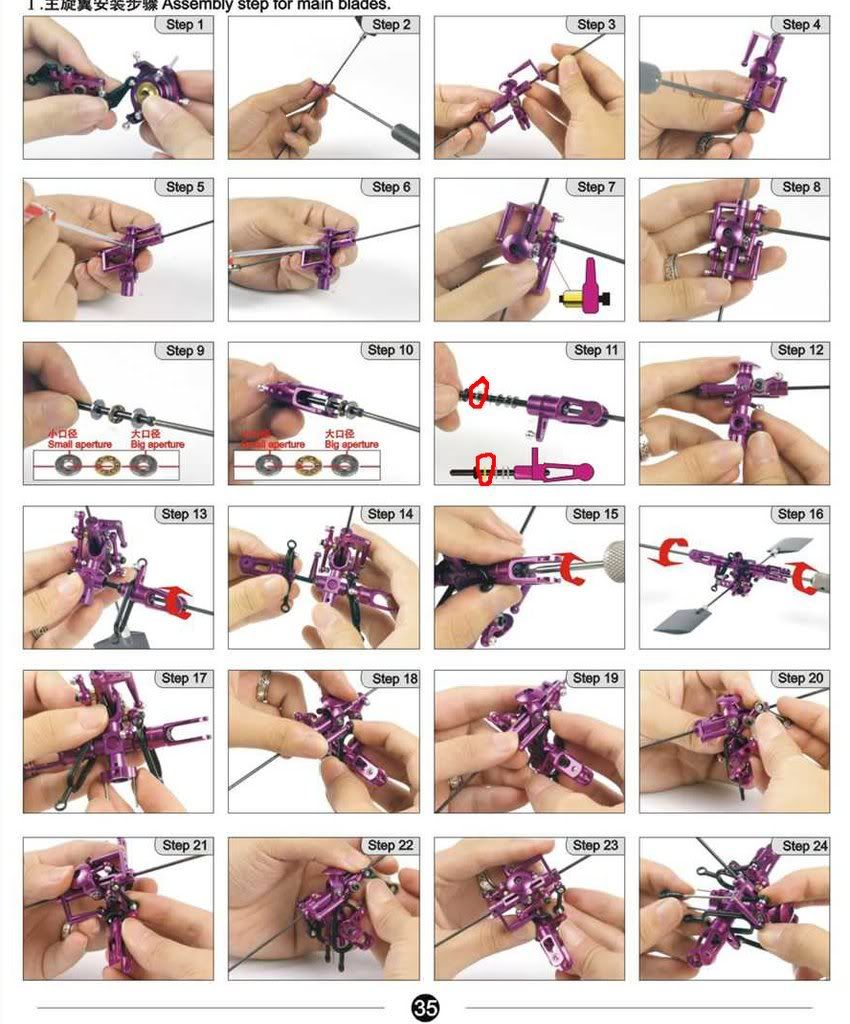
I don't know if this is going to work or not, but I'm attempting to attach a pic of just the page that shows the answer... Step 11 should be what you're looking for.

01-23-2008, 04:43 PM
#12
Member
Thread Starter
Join Date: Oct 2007
Location: Putnam,
CT
Posts: 44
Likes: 0
Received 0 Likes
on
0 Posts
Great Guide, but it till does not show the flanged pieces I was talking about.
I'll be home in a hour to post the pics of all the parts that came wit my kit.
And I definetly don't have all those washers in my kit.
I'll be home in a hour to post the pics of all the parts that came wit my kit.
And I definetly don't have all those washers in my kit.
01-23-2008, 06:40 PM
#13
Member
Join Date: Dec 2007
Location: South Jordan, UT
Posts: 94
Likes: 0
Received 0 Likes
on
0 Posts
The brass piece is the second one from the left... the one next to the rubber grommet. It goes with the flanged side against the grommet, and the recessed side toward the washers.
BTW, if you haven't yet, download the guide from the link in the post above. It's much easier to see the picture from the orginal pdf file. You can open it in a browser window and zoom in on it much better than the picture I posted.
BTW, if you haven't yet, download the guide from the link in the post above. It's much easier to see the picture from the orginal pdf file. You can open it in a browser window and zoom in on it much better than the picture I posted.
01-23-2008, 07:31 PM
#14
Member
Thread Starter
Join Date: Oct 2007
Location: Putnam,
CT
Posts: 44
Likes: 0
Received 0 Likes
on
0 Posts
I did look at it close, and it did not look like what I have.
Below is a couple of pics of the flybar and the holder with the parts I had left over.
I know thee is one bearing part missing from the pic, but it's still in the grip.
But that was evrything I got plus the feathering shaft and screws.
My XB8-TQ was much easier than this.
I hope I don't regret moving on to Heli's,
By the way I tsill have an XB8 left.

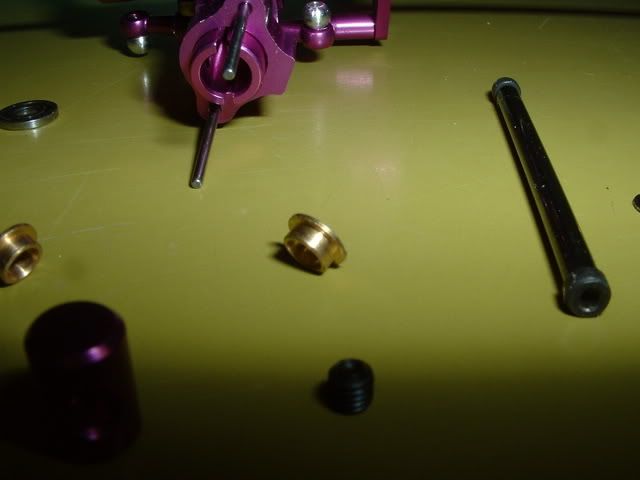
[size=5][size=3]Wow!!! I didn't think the pics would come out that Good......
Below is a couple of pics of the flybar and the holder with the parts I had left over.
I know thee is one bearing part missing from the pic, but it's still in the grip.
But that was evrything I got plus the feathering shaft and screws.
My XB8-TQ was much easier than this.
I hope I don't regret moving on to Heli's,
By the way I tsill have an XB8 left.
[size=5][size=3]Wow!!! I didn't think the pics would come out that Good......
01-23-2008, 08:17 PM
#15
Member
Join Date: Dec 2007
Location: South Jordan, UT
Posts: 94
Likes: 0
Received 0 Likes
on
0 Posts
That is the piece from step 11. The one second from the left, that goes next to the rubber grommet. The narrow side goes toward the grommet, the wide side toward the washers.
If that piece isn't installed, there won't be enough space between the blade grips and the servo actuator that surrounds the blade grip. It'll cause the servo actuator to rub on the blade grip which is a very bad thing.
If that piece isn't installed, there won't be enough space between the blade grips and the servo actuator that surrounds the blade grip. It'll cause the servo actuator to rub on the blade grip which is a very bad thing.
01-23-2008, 08:22 PM
#16
Member
Thread Starter
Join Date: Oct 2007
Location: Putnam,
CT
Posts: 44
Likes: 0
Received 0 Likes
on
0 Posts
How come they do not show it?
I'll try it that way but i'm gonna need a few washes to take up the slop.
It just jon't look right instlalled.
If anyone could help me over a lanline it would be helpful.
I'll try it that way but i'm gonna need a few washes to take up the slop.
It just jon't look right instlalled.
If anyone could help me over a lanline it would be helpful.
01-23-2008, 08:25 PM
#17
Member
Join Date: Dec 2007
Location: South Jordan, UT
Posts: 94
Likes: 0
Received 0 Likes
on
0 Posts
It is shown in step 11, it's just very hard to see. Look at the diagram at the bottom of the picture in step 11. From left to right, it goes: rubber grommet, the piece you're wondering about (narrow side toward the rubber), then three washers.
01-23-2008, 08:30 PM
#18
Member
Thread Starter
Join Date: Oct 2007
Location: Putnam,
CT
Posts: 44
Likes: 0
Received 0 Likes
on
0 Posts
This things ready for the dumpster.
No instuctions is killing me !!!!
The basic Heli is a breeze to work with, the upgrades see to be more difficult.
I don't want to disrespect E-SKY but info on the upgrades will be helpful.
No instuctions is killing me !!!!
The basic Heli is a breeze to work with, the upgrades see to be more difficult.
I don't want to disrespect E-SKY but info on the upgrades will be helpful.
01-23-2008, 09:09 PM
#19
Member
Join Date: Dec 2007
Location: South Jordan, UT
Posts: 94
Likes: 0
Received 0 Likes
on
0 Posts
Yeah, I hear ya... I put my metal upgrade kit on before I found any of the pictures or the better HBK2 online manual, and had the exact same problem.. figuring out where that darn brass piece went. I left it off until I found the picture guide. Mine is installed as per the picture guide now, and it seems to work well.
Just make sure that your swash plate has complete freedom of movement before you hook up the servo pushrods.
You also might want to use blue (removable) LockTite thread locking compound on all the screw-to-metal connections. I didn't initially, and ended up having a crash due to a screw coming loose.
01-23-2008, 09:21 PM
#20
Member
Thread Starter
Join Date: Oct 2007
Location: Putnam,
CT
Posts: 44
Likes: 0
Received 0 Likes
on
0 Posts
I added the washers that were missing.
Seems it's working ok. wirhot those brass pieces.
And yes, I always use loc=tite on metal-metal.
Seems it's working ok. wirhot those brass pieces.
And yes, I always use loc=tite on metal-metal.
01-23-2008, 11:52 PM
#22
Member
Join Date: Oct 2007
Location: Newberg,
OR
Posts: 89
Likes: 0
Received 0 Likes
on
0 Posts
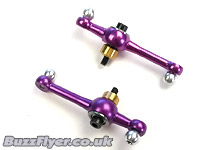
Hmmmm.... I dunno SB364... Those brass pieces look like they below on the inside of the washout arms. I don't have those up on the blade grip area. I've some pics and will post again in a little bit with them.
 01-24-2008, 12:05 AM
#24
Member
Join Date: Dec 2007
Location: South Jordan, UT
Posts: 94
Likes: 0
Received 0 Likes
on
0 Posts
The ones on the arms are different. I know it's confusing, but the ones shown in Druss's picture are different from the ones shown in step 11, and wolverine1267's pic.
If you look closely at Wolverine's picture, you can see that he has the brass colored part from Druss's picture correctly installed. The pieces Wolverine has labeled as his mystery pieces are 100% guaranteed to be step 11 piece I have circled in the above diagram.
We're making this much harder than it has to be, guys.
01-24-2008, 12:08 AM
#25
Senior Member
Join Date: Aug 2007
Location: Edmonton,
AB, CANADA
Posts: 7,441
Likes: 0
Received 0 Likes
on
0 Posts
Now this is starting to bug me. I agree with you that it's not the right piece, it's even packaged in the bag with the feathering shaft. I'm going to take my stock cnc head apart (came assembled from the esky factory) to find out for sure.