


Modkat (Kingcat like design and build)
 01-12-2007, 09:44 PM
#226
Senior Member
Thread Starter
My Feedback: (1)

Join Date: Jun 2005
Location: Antelope Valley,
CA
Posts: 825
Likes: 0
Received 0 Likes
on
0 Posts
Fuse Plug 8
Summary
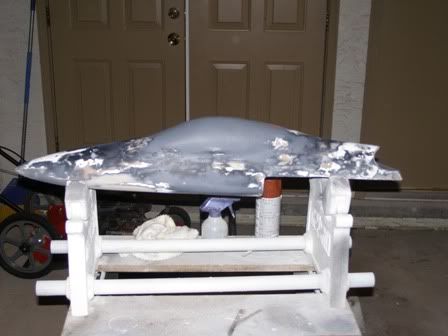
I've finally got all of the low spots filled and can begin fine tuning the shape. The biggest hurdle was figuring out an easy way to make both halves symmetrical. I found that the easiest way wo achieve this was to use a profile gauge. You have to get one!
Construction
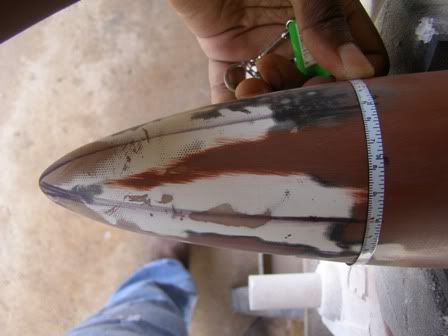
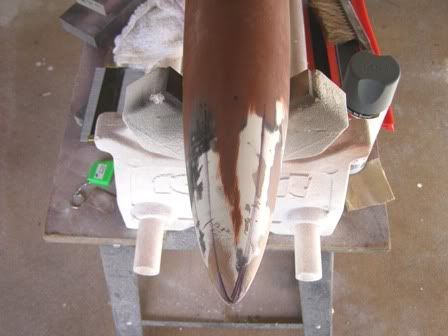
The plug doesn't look pretty right now, but there is not a low spot or pin hole on it (figure 1). Now it was time to start making both sides symmetrical. First, I worked on just one side getting all of the contours just right. I decided to draw lines down the nose 1 inches apart around the circumference (figure 2).
Figures 1 & 2
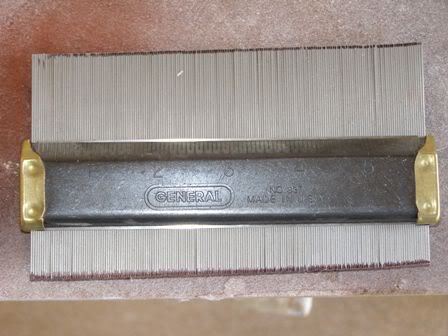
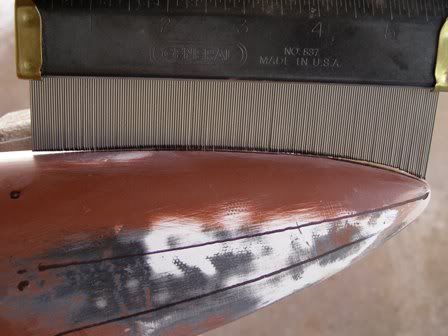
Next, I took measurements of the contours from the good side using a profile gauge (figures 3 & 4) and sanded the other side to match it (figure 5). In fig 5, there is a bulge in the center of the curve. This was sanded out a little at a time until it was perfect. The same technique was used for the nose area until it was uniform (figure 6).

Figures 3 & 4
Figures 5 & 6
Lastly, I hit it with another coat of primer to check my work and it's pretty darn close [sm=thumbup.gif].
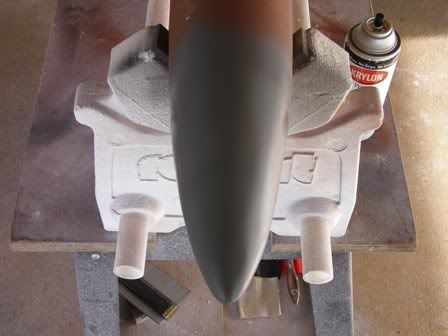
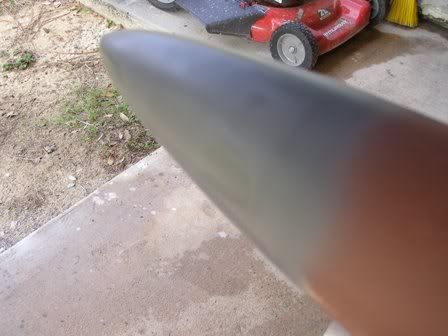
Finished Nose Views
Back to Sanding!
Mods
Summary
I've finally got all of the low spots filled and can begin fine tuning the shape. The biggest hurdle was figuring out an easy way to make both halves symmetrical. I found that the easiest way wo achieve this was to use a profile gauge. You have to get one!
Construction
The plug doesn't look pretty right now, but there is not a low spot or pin hole on it (figure 1). Now it was time to start making both sides symmetrical. First, I worked on just one side getting all of the contours just right. I decided to draw lines down the nose 1 inches apart around the circumference (figure 2).
Figures 1 & 2
Next, I took measurements of the contours from the good side using a profile gauge (figures 3 & 4) and sanded the other side to match it (figure 5). In fig 5, there is a bulge in the center of the curve. This was sanded out a little at a time until it was perfect. The same technique was used for the nose area until it was uniform (figure 6).
Figures 3 & 4
Figures 5 & 6
Lastly, I hit it with another coat of primer to check my work and it's pretty darn close [sm=thumbup.gif].
Finished Nose Views
Back to Sanding!
Mods


 01-22-2007, 07:38 PM
#228
Senior Member
Thread Starter
My Feedback: (1)
Join Date: Jun 2005
Location: Antelope Valley,
CA
Posts: 825
Likes: 0
Received 0 Likes
on
0 Posts
ORIGINAL: bob27s
[8D] Just peeking in
Is that snow or sanding dust ?
[8D] Just peeking in
Is that snow or sanding dust ?
 ].
].
 01-24-2007, 05:54 PM
#230
Senior Member
Thread Starter
My Feedback: (1)
Join Date: Jun 2005
Location: Antelope Valley,
CA
Posts: 825
Likes: 0
Received 0 Likes
on
0 Posts
ORIGINAL: tomcatman
Kelvin, great project!! Any idea on how soon this kat will maiden? Regards,
Richie
Kelvin, great project!! Any idea on how soon this kat will maiden? Regards,
Richie
The long pole for this project is the fuse plug. Once that's done, the maiden is not far behind. I expect sometime in Feb.
Mods
02-02-2007, 09:20 AM
#231
Member
Join Date: Oct 2006
Location: VereenigingGauteng, SOUTH AFRICA
Posts: 42
Likes: 0
Received 0 Likes
on
0 Posts
Once you have made your seamless hatch and you are doing the fill / sand thing, how do you prevent the filling and priming from glueing the hatch to the fuselage. In my experiance it seaps into the crack and forms a strong bond between the two making it very dificult to seperate them, and often destroying the invisible seam. I have even tried putting a sheet of thin mylar between the two, but the edge gets sanded and the next fill / prime glues the two parts again. [&o]
How would you handle a radius between the bottom and the back or front. Would you fill and sand to shape on the fuselage or on the canopy?
Dale
How would you handle a radius between the bottom and the back or front. Would you fill and sand to shape on the fuselage or on the canopy?
Dale
02-02-2007, 01:01 PM
#232
Senior Member
Thread Starter
My Feedback: (1)
Join Date: Jun 2005
Location: Antelope Valley,
CA
Posts: 825
Likes: 0
Received 0 Likes
on
0 Posts
ORIGINAL: JetNoise
Once you have made your seamless hatch and you are doing the fill / sand thing, how do you prevent the filling and priming from glueing the hatch to the fuselage. In my experiance it seaps into the crack and forms a strong bond between the two making it very dificult to seperate them, and often destroying the invisible seam. I have even tried putting a sheet of thin mylar between the two, but the edge gets sanded and the next fill / prime glues the two parts again. [&o]
How would you handle a radius between the bottom and the back or front. Would you fill and sand to shape on the fuselage or on the canopy?
Dale
You're right about the paint and filler seaping into the seam. My plan is to go around the perimeter with a sharp razor blade again to separate the hatch and fuse. I'll probably end up doing the seamless hinge technique on a much smaller scale if any damage occurs during the initial separation. The gap was so big that I had to do the seamless hatch early to shape the contours before the fill/sand process began. I made sure not no add any filler to the seam, but there is quite a bit of paint in there. The seam line is barely visible and I've been using Krylon primer to check the contours so it's pretty thin.
Mods
02-02-2007, 01:26 PM
#233
Senior Member
Thread Starter
My Feedback: (1)
Join Date: Jun 2005
Location: Antelope Valley,
CA
Posts: 825
Likes: 0
Received 0 Likes
on
0 Posts
How would you handle a radius between the bottom and the back or front. Would you fill and sand to shape on the fuselage or on the canopy?
02-05-2007, 04:05 PM
#234
Senior Member
My Feedback: (1)
Join Date: Dec 2004
Location: New Zealand
Posts: 398
Likes: 0
Received 0 Likes
on
0 Posts
I cant contain my self any longer..............we need pictures-updates!!!!!!!! right guys?
Considering you have a beautiful new baby girl is no excuse! hahaha
yes I'm joking!!...take as long as you need kelvin.
I popped into www.eglinaeromodellers.org site to have alook around, you have some interesting models there, and the luxury of a tarsealed strip.....the Modkats going to love it!
All the best to you and your family
Ants
02-06-2007, 01:42 AM
#235
Member
Join Date: Oct 2006
Location: VereenigingGauteng, SOUTH AFRICA
Posts: 42
Likes: 0
Received 0 Likes
on
0 Posts
ORIGINAL: Mods-R-Me
I'm not really sure what you're asking here[sm=confused.gif]
How would you handle a radius between the bottom and the back or front. Would you fill and sand to shape on the fuselage or on the canopy?
Any ideas on how to model this radius would be most welcome.
Thanks.
Dale
02-07-2007, 07:31 AM
#236
Senior Member
Thread Starter
My Feedback: (1)
Join Date: Jun 2005
Location: Antelope Valley,
CA
Posts: 825
Likes: 0
Received 0 Likes
on
0 Posts
ORIGINAL: Ayrtonsenna
I cant contain my self any longer..............we need pictures-updates!!!!!!!! right guys?
Considering you have a beautiful new baby girl is no excuse! hahaha
yes I'm joking!!...take as long as you need kelvin.
I popped into www.eglinaeromodellers.org site to have alook around, you have some interesting models there, and the luxury of a tarsealed strip.....the Modkats going to love it!
All the best to you and your family
Ants
Mods
02-12-2007, 01:48 AM
#239
Senior Member
Thread Starter
My Feedback: (1)
Join Date: Jun 2005
Location: Antelope Valley,
CA
Posts: 825
Likes: 0
Received 0 Likes
on
0 Posts
It is a bit difficult to explain, but if you have a look at the picture of the Mirage F1 cockpit, you will see the radius indicated by a red arrow.
Any ideas on how to model this radius would be most welcome.
Thanks.
Dale
Any ideas on how to model this radius would be most welcome.
Thanks.
Dale
ORIGINAL: starwoes
where is the update [:@][:@][:@][:@] lol
i love this stuff.
where is the update [:@][:@][:@][:@] lol
i love this stuff.
__________________________________________________ __________________________________________________ ________________
As Promised: Update
I'm starting a new plug. The reasons for this are:
1. The dimensions are out of tolerance from the CAD drawings by 1/8 of an inch in some places. In order to sand the problem areas out, I have to burn down to the foam fillers (figures 1 & 2).
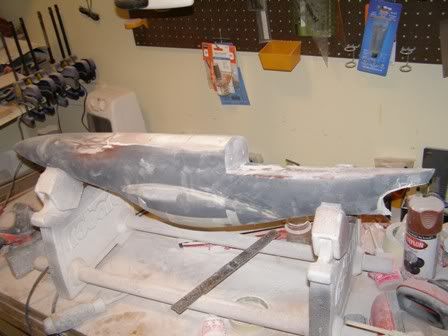
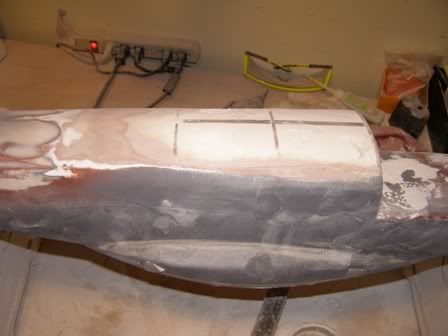
Figure 1 & 2
2. The plug was glassed too early
3. The foam fillers absorbed moisture from the spackle and humidity
All of the above problems can be traced back to a few basic errors that can be solved rather easily.
Problem 1: After the foam filler blocks were hot-wired and the spackle was added, I didn't take the time out to make it perfect BEFORE the fiberglass was added. Whenever the plug was almost to the correct shape, it seemed that the more I sanded the more out of shape the plug became. Turns out the filler foam compressed way too much, so getting the shape just right was not possible.
Solution: [link=http://www.dow.com/styrofoam/index.htm]Bluecore high density insulation foam[/link]. This stuff resists moisture, has a very low compressibility factor, and comes in almost any thickness desired. The problem is it's not available in my area [
], but I found a guy online ([link=http://www.rcfoam.com/cart.php?target=category&category_id=72]RCFoam.com[/link]) that sells it in 2", 3", 4" thicknesses. Problem 2: I've spent the past 2 and 1/2 weeks trying to get the canopy shape right and almost lost my mind trying. The problem is the CAD model was flawed so the plug formers were flawed as well (figure 3).
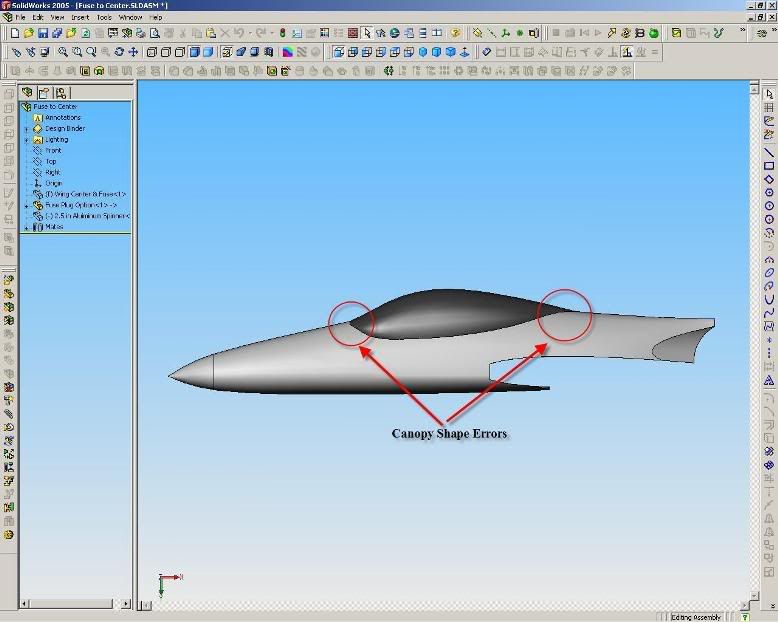
Figure 3
Solution: I went back into the CAD model fixing the canopy flaws and made the plug a little more perfect by adding lateral guides on each side(figures 4-7). I found that it was difficult to get both side right without using many templates. The side former should eliminate the need for them.
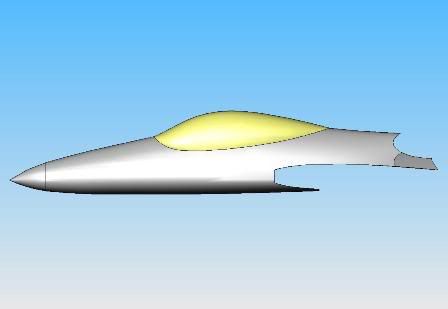

Figures 4 & 5
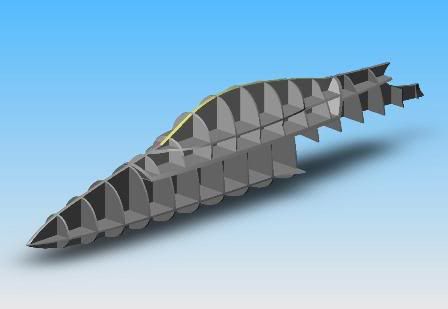
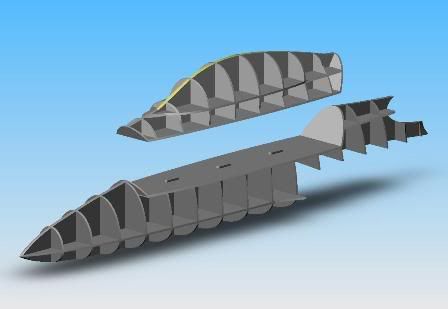
Figures 6 & 7
Problem 3: BONDO IS THE ENEMY! Continuously adding and sanding Bondo is almost like chasing your tail. There has to be an easier way to fill the weave and add a thick sandable layer to achieve a uniform shape.
Solution: [link=http://www.evercoat.com/productDetail.aspx?pID=171]Feather Fill G2 Polyester Spray Filler[/link] (thanks jsf125). G2 is basically sprayable Bondo so I can fill the weave and get a thick uniform sandable layer to work with since it's also high build. Using this I figure I'll be sanding down and not building up tons of filler.
Bottom-line
Plug #2 looks promising and I even took a week off work to catch up on lost time. The foam should be here tomorrow and the formers should be here by Tuesday. Oh, and I will update the thread at least once a week. Even if the pics look eerily similar....
More to come,
Mods
02-12-2007, 02:17 AM
#240

My Feedback: (1)
That's too bad about your first plug Kelvin. Your computer modeling skills are impressive! The rendering looks so realistic. It would be nice if you could find a CAD/CAM system to directly machine the molds, but that would cost many kilobucks.
02-12-2007, 01:26 PM
#241
Member
My Feedback: (12)
Join Date: Oct 2002
Location: Pasco,
WA
Posts: 72
Likes: 0
Received 0 Likes
on
0 Posts
Wow!! Look at that awesome CAD work!![8D].....just amazing! You are going to have to give me a lesson in lofting, cuz I need one real bad!!

Later,
Brandon
Later,
Brandon
02-12-2007, 04:32 PM
#242
Senior Member
Thread Starter
My Feedback: (1)
Join Date: Jun 2005
Location: Antelope Valley,
CA
Posts: 825
Likes: 0
Received 0 Likes
on
0 Posts
ORIGINAL: jsf125
Wow!! Look at that awesome CAD work!![8D].....just amazing! You are going to have to give me a lesson in lofting, cuz I need one real bad!!
Later,
Brandon
Wow!! Look at that awesome CAD work!![8D].....just amazing! You are going to have to give me a lesson in lofting, cuz I need one real bad!!
Later,
Brandon
Mods
02-12-2007, 04:36 PM
#243
Senior Member
Join Date: Oct 2005
Location: Maple Heights,
OH
Posts: 127
Likes: 0
Received 0 Likes
on
0 Posts
i've worked with SolidWorks since 2001. I even get paid to use it...go figure...(i wonder sometimes) and I must say your work here is impressive. My models are usually done in "solids" and I'm just getting acquainted with surfaces...good stuff.
Anyhow, i get a free copy of Desktop Engineering and in the recent issue, they are touting this "great" surface modeling software called ICEM Surf. Seems this software would have had the problem u encountered licked from the start.
Many car/airplane manufacturing companies seem to use it. any thoughts on this software? I plan on evaluating it shortly. Good luck with your project.......
...(i wonder sometimes) and I must say your work here is impressive. My models are usually done in "solids" and I'm just getting acquainted with surfaces...good stuff.Anyhow, i get a free copy of Desktop Engineering and in the recent issue, they are touting this "great" surface modeling software called ICEM Surf. Seems this software would have had the problem u encountered licked from the start.
Many car/airplane manufacturing companies seem to use it. any thoughts on this software? I plan on evaluating it shortly. Good luck with your project.......
02-12-2007, 06:42 PM
#244
Senior Member
Thread Starter
My Feedback: (1)
Join Date: Jun 2005
Location: Antelope Valley,
CA
Posts: 825
Likes: 0
Received 0 Likes
on
0 Posts
ORIGINAL: starwoes
i've worked with SolidWorks since 2001. I even get paid to use it...go figure...(i wonder sometimes) and I must say your work here is impressive. My models are usually done in "solids" and I'm just getting acquainted with surfaces...good stuff.
Anyhow, i get a free copy of Desktop Engineering and in the recent issue, they are touting this "great" surface modeling software called ICEM Surf. Seems this software would have had the problem u encountered licked from the start.
Many car/airplane manufacturing companies seem to use it. any thoughts on this software? I plan on evaluating it shortly. Good luck with your project.......
i've worked with SolidWorks since 2001. I even get paid to use it...go figure
...(i wonder sometimes) and I must say your work here is impressive. My models are usually done in "solids" and I'm just getting acquainted with surfaces...good stuff.Anyhow, i get a free copy of Desktop Engineering and in the recent issue, they are touting this "great" surface modeling software called ICEM Surf. Seems this software would have had the problem u encountered licked from the start.
Many car/airplane manufacturing companies seem to use it. any thoughts on this software? I plan on evaluating it shortly. Good luck with your project.......
?Mods
02-12-2007, 07:13 PM
#245
Senior Member
Join Date: Oct 2005
Location: Maple Heights,
OH
Posts: 127
Likes: 0
Received 0 Likes
on
0 Posts
i am in the beginning stages of ICEM and i must confess i am extremely excited about it. One big car manufacturing company is so enthralled with it, they managed to convince the ICEM company to make it compatible with Catia where no additional translation is needed. 1 to 1...move from ICEM to Catia seamlessly. Well, Catia belongs to Dassault Systemes' just like SolidWorks, add ons in SolidWorks should work great..i assume.....it seems promising and I'll share any findings that i come across..........
02-14-2007, 12:56 PM
#246
Member
My Feedback: (12)
Join Date: Oct 2002
Location: Pasco,
WA
Posts: 72
Likes: 0
Received 0 Likes
on
0 Posts
ORIGINAL: Mods-R-Me
Here you go. Check post [link=http://www.rcuniverse.com/forum/m_4588489/mpage_2/key_/tm.htm]#42[/link]
Mods
ORIGINAL: jsf125
Wow!! Look at that awesome CAD work!![8D].....just amazing! You are going to have to give me a lesson in lofting, cuz I need one real bad!!
Later,
Brandon
Wow!! Look at that awesome CAD work!![8D].....just amazing! You are going to have to give me a lesson in lofting, cuz I need one real bad!!
Later,
Brandon
Mods
Hey thanks Mods. This helps a lot.
Brandon
02-16-2007, 01:05 AM
#247
Senior Member
Thread Starter
My Feedback: (1)
Join Date: Jun 2005
Location: Antelope Valley,
CA
Posts: 825
Likes: 0
Received 0 Likes
on
0 Posts
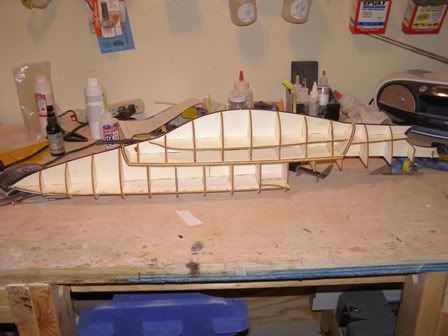
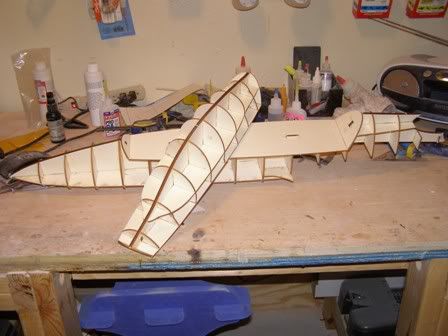
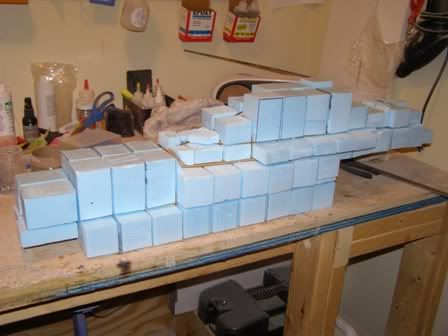
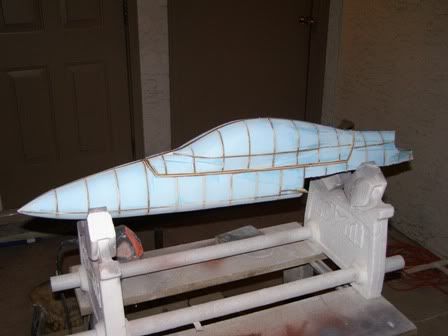
Fuse Plug#2-1
The fuse plug is coming along nicely. The Bluecore foam is truly extraordinary. It is extremely dense which makes it very easy to sand. With the first plug, it took nearly a week to get to this point and with minimal gouging. Since I'm using the same technique as before, I'll just submit pics without a write up.
More to come,
Mods
02-22-2007, 12:54 AM
#248
Member
My Feedback: (12)
Join Date: Oct 2002
Location: Pasco,
WA
Posts: 72
Likes: 0
Received 0 Likes
on
0 Posts
Nice work Mods,
You got it this time! I just thought I would mention something that helped me when I did the filling and sanding on the Suppressor. I colored the exposed, outside, edge of the bulkheads so I could tell immediately when I started sanding them. This just helped me maintain symmetry and the original profile. I knew that I wanted to sand the blue foam extensively, but I really didn't want to alter the profile of the bulkhead stations, but rather use the blue foam to create a smooth transition between the bulkheads. Sometimes I would get so carried away with sanding that I would significantly alter the bulkhead’s profile while sanding the foam[X(]! I figured this out soon enough and changed my ways. Hope this helps
keep up the excellent work,
Brandon
p.s. I am still trying to find time to work on mine!! [sm=drowning.gif][sm=spinnyeyes.gif][sm=punching.gif] LOL
You got it this time!
I just thought I would mention something that helped me when I did the filling and sanding on the Suppressor. I colored the exposed, outside, edge of the bulkheads so I could tell immediately when I started sanding them. This just helped me maintain symmetry and the original profile. I knew that I wanted to sand the blue foam extensively, but I really didn't want to alter the profile of the bulkhead stations, but rather use the blue foam to create a smooth transition between the bulkheads. Sometimes I would get so carried away with sanding that I would significantly alter the bulkhead’s profile while sanding the foam[X(]! I figured this out soon enough and changed my ways. Hope this helpskeep up the excellent work,
Brandon
p.s. I am still trying to find time to work on mine!! [sm=drowning.gif][sm=spinnyeyes.gif][sm=punching.gif] LOL
02-22-2007, 09:56 PM
#249
Senior Member
Thread Starter
My Feedback: (1)
Join Date: Jun 2005
Location: Antelope Valley,
CA
Posts: 825
Likes: 0
Received 0 Likes
on
0 Posts
ORIGINAL: jsf125
Nice work Mods,
You got it this time! I just thought I would mention something that helped me when I did the filling and sanding on the Suppressor. I colored the exposed, outside, edge of the bulkheads so I could tell immediately when I started sanding them. This just helped me maintain symmetry and the original profile. I knew that I wanted to sand the blue foam extensively, but I really didn't want to alter the profile of the bulkhead stations, but rather use the blue foam to create a smooth transition between the bulkheads. Sometimes I would get so carried away with sanding that I would significantly alter the bulkhead’s profile while sanding the foam[X(]! I figured this out soon enough and changed my ways. Hope this helps
keep up the excellent work,
Brandon
p.s. I am still trying to find time to work on mine!! [sm=drowning.gif][sm=spinnyeyes.gif][sm=punching.gif] LOL
Nice work Mods,
You got it this time!
I just thought I would mention something that helped me when I did the filling and sanding on the Suppressor. I colored the exposed, outside, edge of the bulkheads so I could tell immediately when I started sanding them. This just helped me maintain symmetry and the original profile. I knew that I wanted to sand the blue foam extensively, but I really didn't want to alter the profile of the bulkhead stations, but rather use the blue foam to create a smooth transition between the bulkheads. Sometimes I would get so carried away with sanding that I would significantly alter the bulkhead’s profile while sanding the foam[X(]! I figured this out soon enough and changed my ways. Hope this helpskeep up the excellent work,
Brandon
p.s. I am still trying to find time to work on mine!! [sm=drowning.gif][sm=spinnyeyes.gif][sm=punching.gif] LOL
. I'll write an update tonight because I'm very close to getting one side of the plug just right. Then it's just a matter of getting the other side to look just like it (SOUNDS easy, right?).Mods
02-22-2007, 10:18 PM
#250
Kelvin,
You don't need paint for that, I've used ordinary felt markers for that in the past. Just sand until you see the marker ink disappearing and you know you have just touched the former.
Mark
You don't need paint for that, I've used ordinary felt markers for that in the past. Just sand until you see the marker ink disappearing and you know you have just touched the former.
Mark