


Modkat (Kingcat like design and build)
 02-22-2007, 11:30 PM
#251
Senior Member
Thread Starter
My Feedback: (1)

Join Date: Jun 2005
Location: Antelope Valley,
CA
Posts: 825
Likes: 0
Received 0 Likes
on
0 Posts
ORIGINAL: mmattockx
Kelvin,
You don't need paint for that, I've used ordinary felt markers for that in the past. Just sand until you see the marker ink disappearing and you know you have just touched the former.
Mark
Kelvin,
You don't need paint for that, I've used ordinary felt markers for that in the past. Just sand until you see the marker ink disappearing and you know you have just touched the former.
Mark
__________________________________________________ _______________
Fuse Plug #2-2
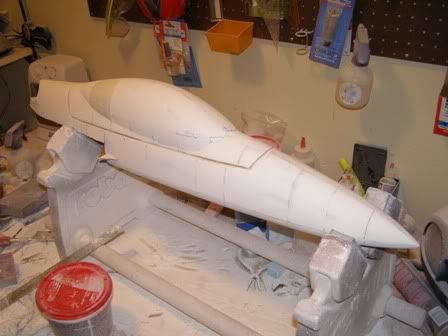
I've finally reached the first milestone in plug #2 with getting half of it just about right. I found that the best technique was to sand the spackle until I start seeing the bulkhead through the spackle and one more stroke would expose it. Then stop and "hunt for shadows". I pick up the plug and cast light on it from many different angles looking for shadows. Once I find one, I use fine sand paper to remove the shadow. Works pretty well.
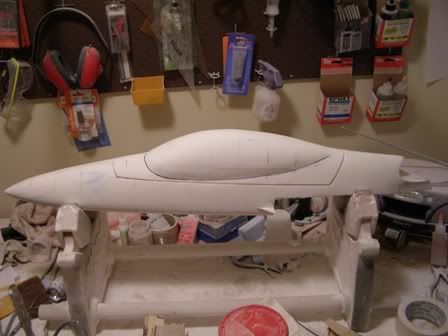
Side View of Plug & Canopy Line ([&:] I took extra pains to make sure this section was correct [&:])
Air Scoop Close-up (This took more time than I'm willing to admit
 )
)More to come,
Mods
 02-22-2007, 11:39 PM
#252
Senior Member
My Feedback: (1)

Join Date: Mar 2005
Location: Mesa,
AZ
Posts: 442
Likes: 0
Received 0 Likes
on
0 Posts
Mods you should stop writing this thread and write a book, your skill, your methods and your attention to detail is amazing. This is like a how to to create and build your own world class model.
02-28-2007, 09:23 PM
#253
Senior Member
Thread Starter
My Feedback: (1)
Join Date: Jun 2005
Location: Antelope Valley,
CA
Posts: 825
Likes: 0
Received 0 Likes
on
0 Posts
Fuse Plug #2-3
Well, still sanding. Good news is that the plug is almost there. Maybe I can glass the plug this weekend.
Mods
Well, still sanding. Good news is that the plug is almost there. Maybe I can glass the plug this weekend.
Mods
02-28-2007, 11:53 PM
#254
Senior Member
My Feedback: (50)
Join Date: Mar 2002
Location: Mira Mesa, CA
Posts: 5,405
Likes: 0
Received 0 Likes
on
0 Posts
This is how Kelvin "rolls"...World class ALL THE WAY.
I probably could not even build one of these but I will buy one anyway just to have--
I have never seen a thread like this and Kelvin has my utmost respect
Open the 5 foot shed and get the thing in the air Mr Mods! [X(]
I probably could not even build one of these but I will buy one anyway just to have--
I have never seen a thread like this and Kelvin has my utmost respect
Open the 5 foot shed and get the thing in the air Mr Mods! [X(]
03-04-2007, 11:57 PM
#255
Senior Member
Thread Starter
My Feedback: (1)
Join Date: Jun 2005
Location: Antelope Valley,
CA
Posts: 825
Likes: 0
Received 0 Likes
on
0 Posts
ORIGINAL: Razor-RCU
This is how Kelvin "rolls"...World class ALL THE WAY.
I probably could not even build one of these but I will buy one anyway just to have--
I have never seen a thread like this and Kelvin has my utmost respect
This is how Kelvin "rolls"...World class ALL THE WAY.
I probably could not even build one of these but I will buy one anyway just to have--
I have never seen a thread like this and Kelvin has my utmost respect
__________________________________________________ _________________
Fuse Plug #2-4
Summary
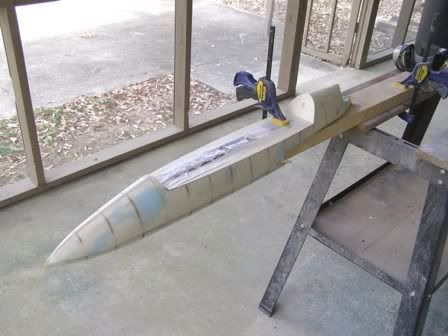
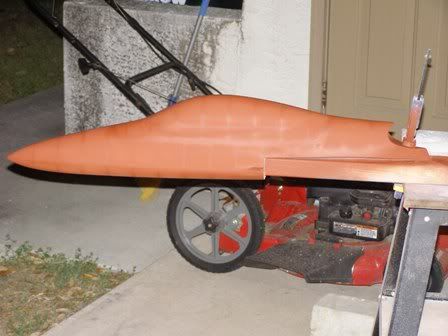
This weekend was very productive having glassed the entire plug and starting the rough sanding stage using [link=http://www.handsontools.com/store/show_product/?product_id=18823045]Evercoat Featherfill G2[/link]. This stuff is awesome! I really expected a Bondo type of material (i.e. very chalky and hard to sand). G2 is the exact opposite being that it can be applied with a spray gun, dries in 30 min, completely fills fiberglass weave with only two coats, sands easier, and sands to an almost a satin finish. This is my new favorite material; thanks jsf125!
Construction
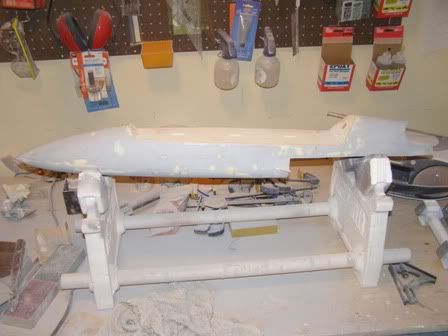
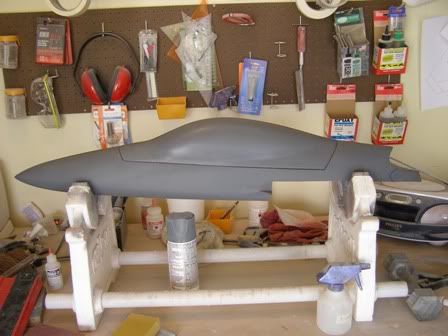
Here's a shot of the fuse plug prior to glassing (figure 1). I noticed that even though the formers are not visible then the plug is in this state, once the glass is applied they jump out and become easily visible, but still remain flush with the fuse sides (figure 2). This is important because if the formers are very pronounced prior to glassing, they may stick out once glassing is complete.
Figures 1 & 2
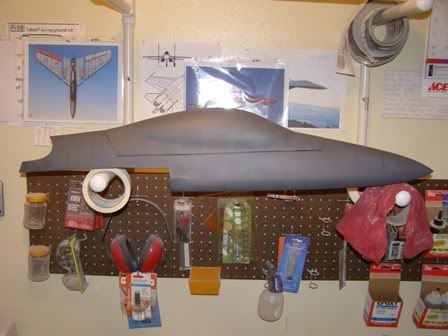
Shot of the plug after the Featherfill is applied (figure 3). My spray gun became very temperamental during the application of the second coat so I had to apply the last few coats with an acid brush. After two hours of sanding here's a pretty nice looking product (figure 4). My plan is to repeat the technique used earlier on the spackle by "hunting the shadows" and removing them with fine sandpaper. So far it's working pretty well.
Figures 3 & 4
More to come,
Mods
03-12-2007, 12:05 PM
#256
Member
My Feedback: (12)
Join Date: Oct 2002
Location: Pasco,
WA
Posts: 72
Likes: 0
Received 0 Likes
on
0 Posts
Hey Mods,
Very nice work there! I knew you would like the Feather Fill. I have mad a little progress on my project, but not much. It looks like you will be ready to make some molds here very soon, in the not so distant future![8D] Keep us posted!!
Brandon
aka jsf125
Very nice work there! I knew you would like the Feather Fill.
I have mad a little progress on my project, but not much. It looks like you will be ready to make some molds here very soon, in the not so distant future![8D] Keep us posted!!Brandon
aka jsf125
03-12-2007, 12:35 PM
#257
Senior Member
Thread Starter
My Feedback: (1)
Join Date: Jun 2005
Location: Antelope Valley,
CA
Posts: 825
Likes: 0
Received 0 Likes
on
0 Posts
ORIGINAL: jsf125
Hey Mods,
Very nice work there! I knew you would like the Feather Fill. I have mad a little progress on my project, but not much. It looks like you will be ready to make some molds here very soon, in the not so distant future![8D] Keep us posted!!
Brandon
aka jsf125
Hey Mods,
Very nice work there! I knew you would like the Feather Fill.
I have mad a little progress on my project, but not much. It looks like you will be ready to make some molds here very soon, in the not so distant future![8D] Keep us posted!!Brandon
aka jsf125
__________________________________________________ ______________________________________________
Fuse Plug #2-5
Summary
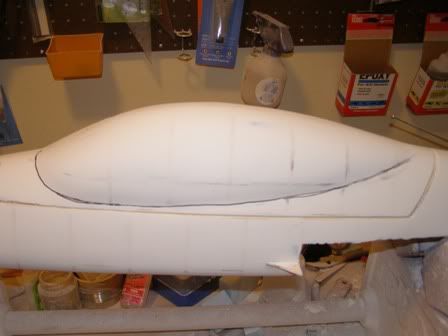
Most of the big work is done and both sides are nearly symmetrical. Still have to make the canopy hinge lines and epoxy fairings.
Construction
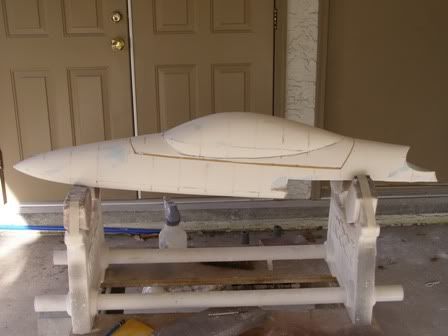
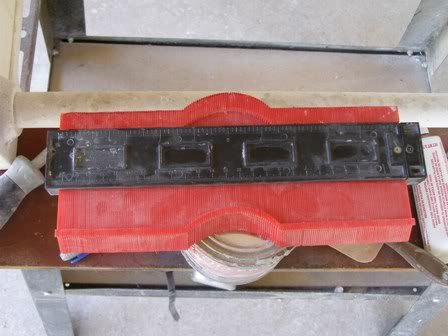
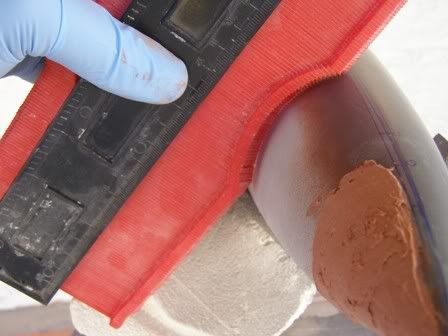
First, one half of the plug was made just right. A line was drawn on the center keel and marked in 1 inch increments (figure 1). Using a contour gauge the curvature was transferred to the other side and corrections were made (figures 2-4).
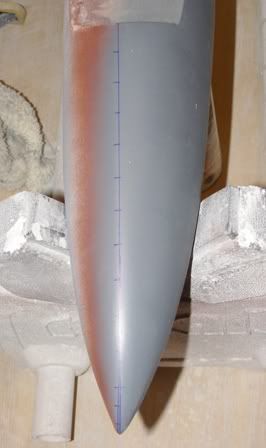
Figures 1 & 2
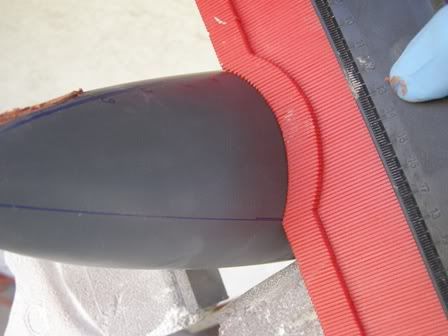
Figures 3 & 4
After about an hour, here is the result 90% true.
More to come,
Mods
03-22-2007, 08:16 PM
#259
Senior Member
Thread Starter
My Feedback: (1)
Join Date: Jun 2005
Location: Antelope Valley,
CA
Posts: 825
Likes: 0
Received 0 Likes
on
0 Posts
Fuse Plug #2-6
Hey guys, still sanding. I did join the canopy and fuse using the "seamless hatch" technique as before (figure 1). One side is done now I have to make the other side just like it . Then, it's on the make the epoxy fairings. Lastly, the molds! Looking ahead to the future, I purchased a full instrumentation kit from [link=http://www.eagletreesystems.com]eagletreesystems [/link] (figure 2). I've been drooling over this for years but never had the funds to get it. This system can monitor everything: airspeed, altitude, RX voltage, RPM, engine temp, attitude, G-force, GPS position imposed on a 3-D Google Earth map, and more. Best of all, it can TM all this information down to a small screen attached to the TX. I can even download all the info at the end of a flight and play it back on the PC . All this will come in handy for the Modkat prototype because I'll be able to prove the flight envelope with actual data.
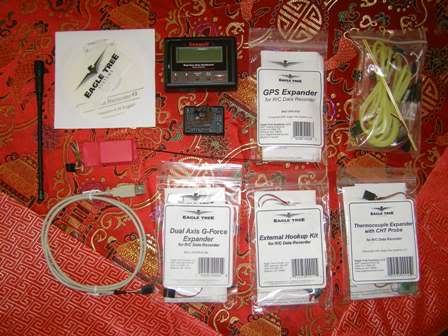
Figures 1 & 2
More to come,
Mods
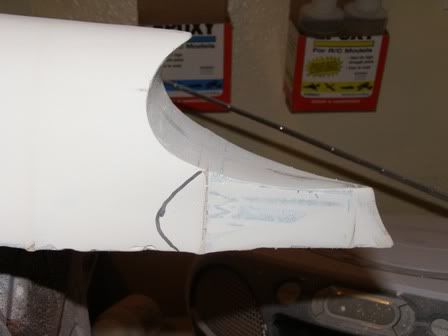
Hey guys, still sanding. I did join the canopy and fuse using the "seamless hatch" technique as before (figure 1). One side is done now I have to make the other side just like it
. Then, it's on the make the epoxy fairings. Lastly, the molds! Looking ahead to the future, I purchased a full instrumentation kit from [link=http://www.eagletreesystems.com]eagletreesystems [/link] (figure 2). I've been drooling over this for years but never had the funds to get it. This system can monitor everything: airspeed, altitude, RX voltage, RPM, engine temp, attitude, G-force, GPS position imposed on a 3-D Google Earth map, and more. Best of all, it can TM all this information down to a small screen attached to the TX. I can even download all the info at the end of a flight and play it back on the PC . All this will come in handy for the Modkat prototype because I'll be able to prove the flight envelope with actual data.Figures 1 & 2
More to come,
Mods
04-09-2007, 12:06 AM
#261
Senior Member
Thread Starter
My Feedback: (1)
Join Date: Jun 2005
Location: Antelope Valley,
CA
Posts: 825
Likes: 0
Received 0 Likes
on
0 Posts
ORIGINAL: mcdonald77
I know your busy, but do you have any updates? I
I know your busy, but do you have any updates? I
Thanks for asking,
Mods
04-11-2007, 11:54 PM
#262
Senior Member
Thread Starter
My Feedback: (1)
Join Date: Jun 2005
Location: Antelope Valley,
CA
Posts: 825
Likes: 0
Received 0 Likes
on
0 Posts
Finally got some time to work on the Modkat. Nobody told me being a father was so time consuming
__________________________________________________ _____________________________
Fuse Plug #2-7
Summary
The rough fuse plug shaping is done. Now it's on the epoxy fairings. I could of CAD'd these in to begin with but the compound curves on the body would have made them susceptible to hangar rash. The build up approach does require more sanding, but if you have a good technique it should not take that long. I stumbled on a great "how to" thread on this process a while back a study it constantly for inspiration. It's good reading, check it out: [link=http://www.rcuniverse.com/forum/m_1311032/mpage_1/key_wing+fillets/tm.htm]Epoxy Fairings How to Guide[/link].
Construction
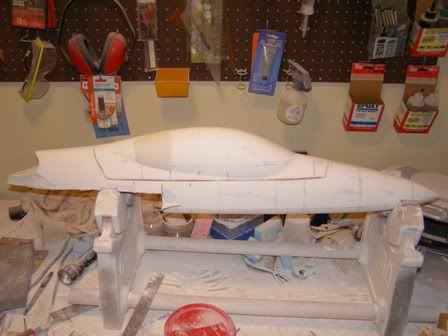
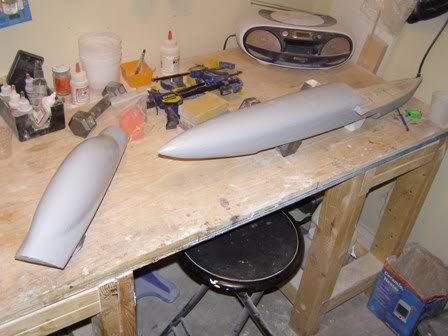
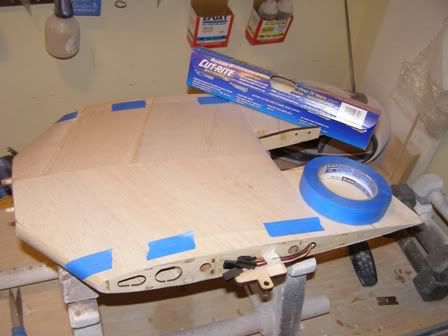
Here is a shot of the plug mounted to the wing center (figures 1) and a shot of the huge gap between them (figure 2).
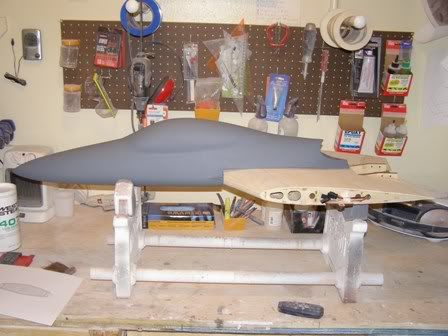
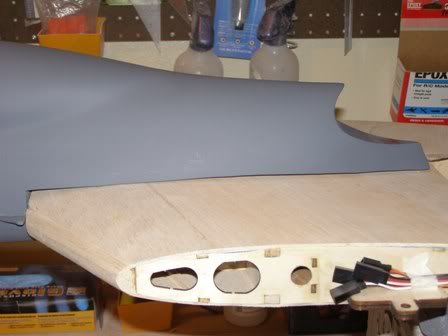
Figures 1 & 2
The area where the plug meets the wing center is true and perpendicular to the center of the plug. The wing center is off in a few places, so I decided to cover the true portion of the fuse plug with Monokote (figure 3). Next, I used a CAD generated template to cut out the upper section of Monokote that will be in contact with the wing center (figure 4).
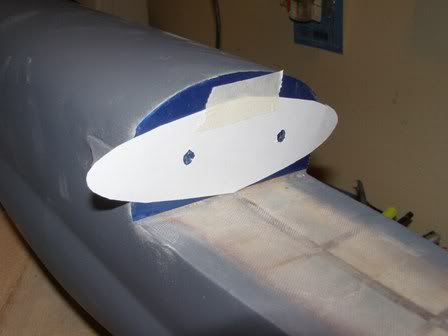
Figures 3 & 4
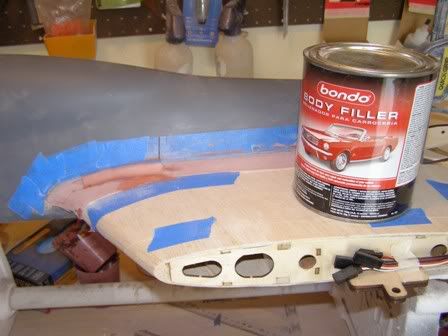
Then, I covered the wing center with waxed paper to protect it from the epoxy filler (figure 5). Followed by, remounting the fuse plug to the wing center and drawing the basic shape of the fairing (figure 6).
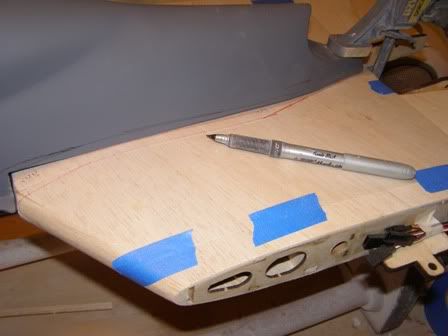
Figures 5 & 6
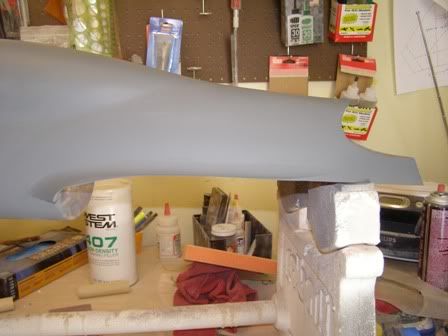
For the filler I used West Systems Epoxy with their 407 fairing filler mixed to the consistency of peanut butter (figure 6). Lastly, I applied a thick coat of filler to the area on the wing center outlined earlier and finalized the shape using a spare servo horn ran along the edge (figure 8).
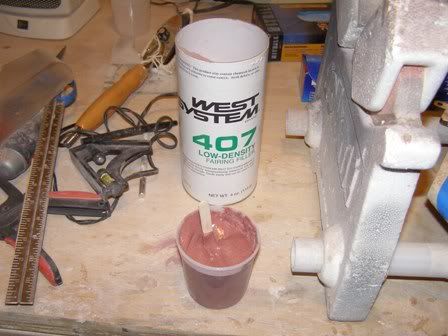

Figures 7 & 8
Semi-finished product
More to come,
Mods
__________________________________________________ _____________________________
Fuse Plug #2-7
Summary
The rough fuse plug shaping is done. Now it's on the epoxy fairings. I could of CAD'd these in to begin with but the compound curves on the body would have made them susceptible to hangar rash. The build up approach does require more sanding, but if you have a good technique it should not take that long. I stumbled on a great "how to" thread on this process a while back a study it constantly for inspiration. It's good reading, check it out: [link=http://www.rcuniverse.com/forum/m_1311032/mpage_1/key_wing+fillets/tm.htm]Epoxy Fairings How to Guide[/link].
Construction
Here is a shot of the plug mounted to the wing center (figures 1) and a shot of the huge gap between them (figure 2).
Figures 1 & 2
The area where the plug meets the wing center is true and perpendicular to the center of the plug. The wing center is off in a few places, so I decided to cover the true portion of the fuse plug with Monokote (figure 3). Next, I used a CAD generated template to cut out the upper section of Monokote that will be in contact with the wing center (figure 4).
Figures 3 & 4
Then, I covered the wing center with waxed paper to protect it from the epoxy filler (figure 5). Followed by, remounting the fuse plug to the wing center and drawing the basic shape of the fairing (figure 6).
Figures 5 & 6
For the filler I used West Systems Epoxy with their 407 fairing filler mixed to the consistency of peanut butter (figure 6). Lastly, I applied a thick coat of filler to the area on the wing center outlined earlier and finalized the shape using a spare servo horn ran along the edge (figure 8).
Figures 7 & 8
Semi-finished product
More to come,
Mods
04-12-2007, 12:55 AM
#263

My Feedback: (19)

Join Date: Apr 2002
Location: Cleveland,
OH
Posts: 5,576
Likes: 0
Received 0 Likes
on
0 Posts
ORIGINAL: Mods-R-Me
Finally got some time to work on the Modkat. Nobody told me being a father was so time consuming
Mods
Finally got some time to work on the Modkat. Nobody told me being a father was so time consuming
Mods
Wait till the kids try and "help daddy" too !! [&:]
04-14-2007, 03:00 PM
#264
Senior Member
Thread Starter
My Feedback: (1)
Join Date: Jun 2005
Location: Antelope Valley,
CA
Posts: 825
Likes: 0
Received 0 Likes
on
0 Posts
ORIGINAL: bob27s
Oh..... well then let me tellya! It takes me longer to build an ARF than it use to take me to build a scale kit !
Wait till the kids try and "help daddy" too !! [&:]
ORIGINAL: Mods-R-Me
Finally got some time to work on the Modkat. Nobody told me being a father was so time consuming
Mods
Finally got some time to work on the Modkat. Nobody told me being a father was so time consuming
Mods
Wait till the kids try and "help daddy" too !! [&:]
 The way of things to come?
__________________________________________________ _______________________
Fuse Plug #2-8
I can't believe that I got two good shop days in a row [sm=thumbup.gif]. To start, I sanded the base coat of filler to shape (figures 1 & 2).
Figures 1 & 2
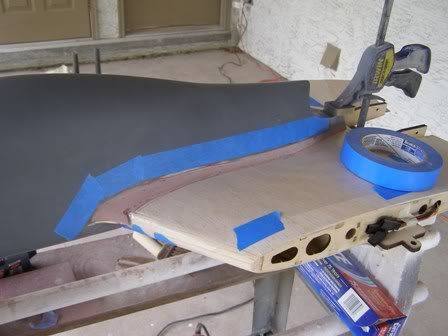
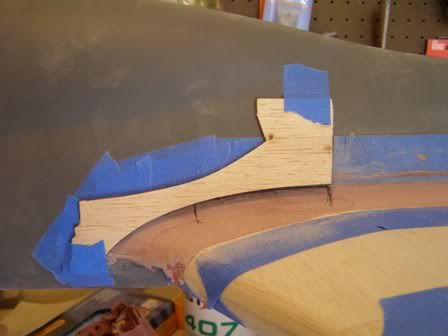
Then, it was time to tackle the huge gap where the front of the wing center meets the fuse plug. First, I covered the area around the wing center with blue tape (figure 3). Second, I applied Monokote to the fuse where the wing center mounts (figure 4). The fuse is true, therefore I only want filler on the front of the wing center.
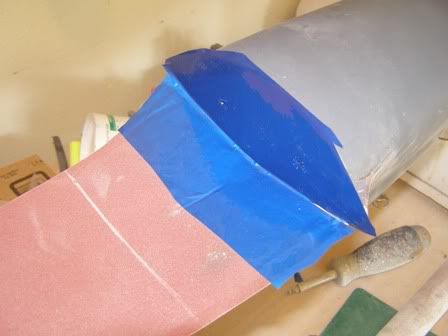
Figures 3 & 4
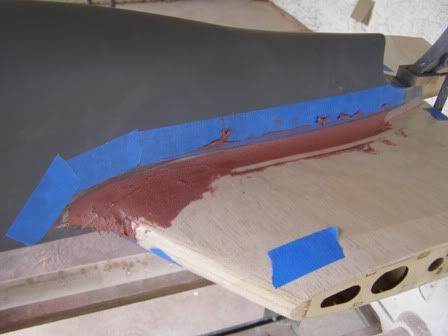
Third, I mixed a thick batch of epoxy and micro-balloons and applied it to the front of the wing center before mounting the fuse plug (figure 5). After the epoxy cured, I removed the fuse plug and sanded it to shape (figures 6 & 7). To shape the fairings I modified a Bondo spreader using CAD images as guides (figure 8).
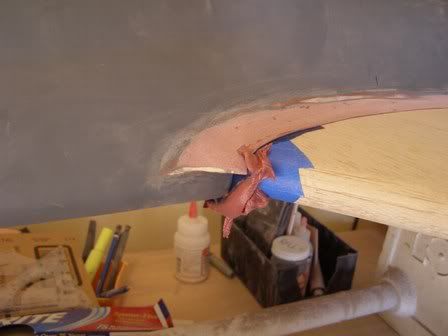
Figures 5 & 6
Figures 7 & 8
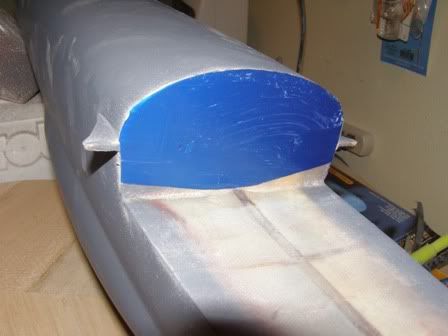
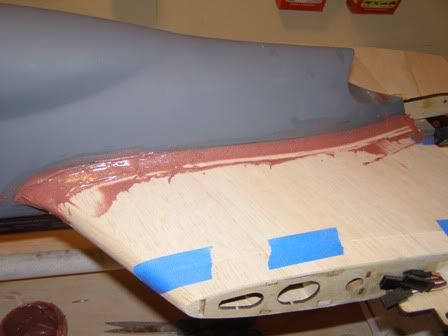
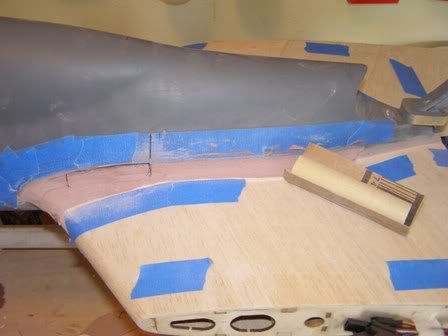
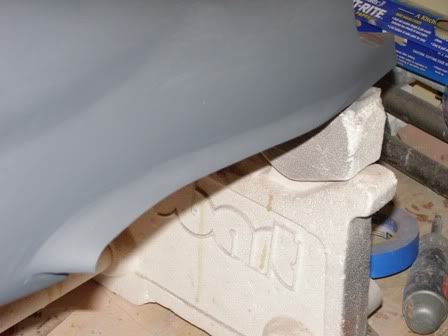
Lastly, I taped off the area around the wing saddle area, applied the epoxy, and shaped it with the spreader (figures 9 & 10).
Figures 9 & 10
More to come,
Mods

 04-15-2007, 04:47 PM
#266
Senior Member
Thread Starter
My Feedback: (1)
Join Date: Jun 2005
Location: Antelope Valley,
CA
Posts: 825
Likes: 0
Received 0 Likes
on
0 Posts
ORIGINAL: Sparhawk
Very cool!
Very cool!
________________________________________________
Fuse Plug #2-9
Summary
I'm starting to see daylight with the fuse plug. Still some fine tuning required, but most of the work is done. Then, I'm spraying it with epoxy primer and the wet sanding begins!
Construction
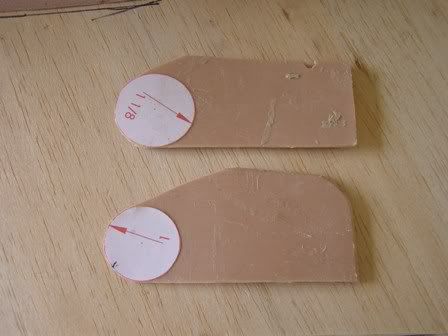
First, I rough sanded with a 1 inch diameter wooden dowel wrapped in 60 grit sandpaper (figure 1). This is why the 1.125 inch spreader was used in the earlier post. This gave me 0.125 inches of over fill to play with. Next, I made a shape template out of scrap balsa and a French curve (figure 2). Then, the template was used to fine tune the leading edge shape (figure 3). A little Bondo was used to fill in the low spots only because epoxy would have taken too long to cure (figure 4).
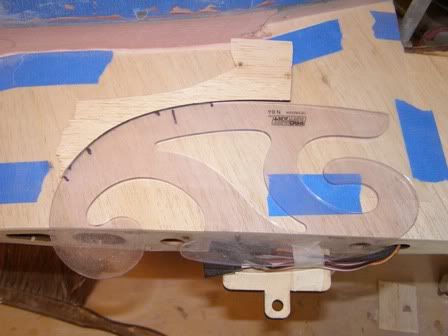
Figures 1 & 2
Figures 3 & 4
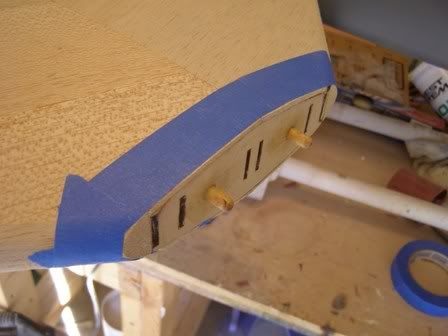
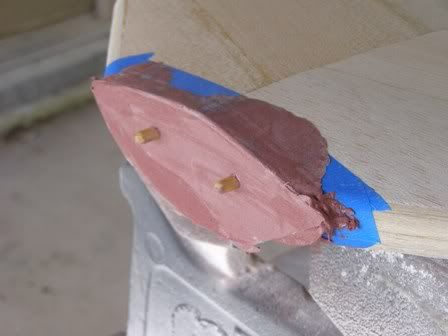
Next, I turned the plug over and drew the basic saddle shape on the fuse (figure 5). Then, I carefully cut the shape out with a Dremmel Tool (figure 6).
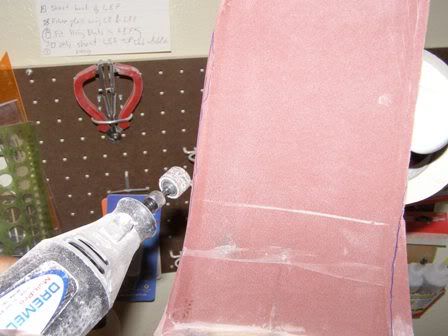
Figures 5 & 6
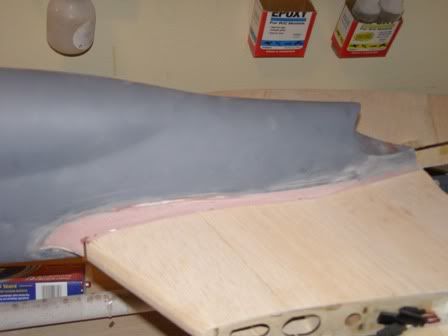
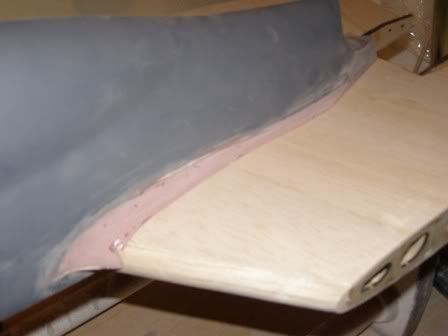
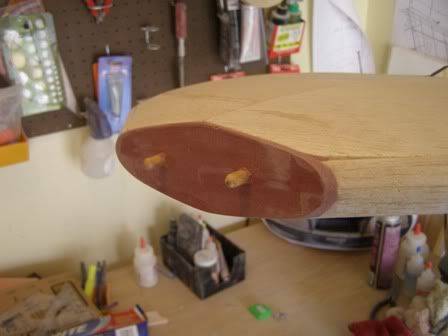
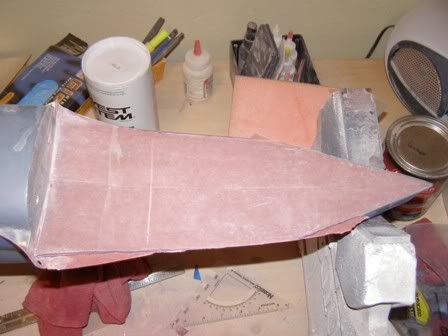
After about 10min on sanding and two coats of paint; here's the outcome (figures 7 & 8). Still requires some fine tuning, but most of the work is done.
Figures 7 & 8
More to come,
Mods
04-15-2007, 06:59 PM
#267
Member

Join Date: Feb 2006
Location: Sedro Woolley ,
WA
Posts: 73
Likes: 0
Received 0 Likes
on
0 Posts
I check the thread every couple of days, I am also on the waiting list. I bought one of those .46 bobcats and it sucked complete ass. I wished it was more like the BVM bobcat. a few days later I came upon this thread. I cant wait to get my hands on this!!!!
KEEP UP THE GREAT WORK!
Jason
KEEP UP THE GREAT WORK!
Jason
04-15-2007, 09:14 PM
#268
I am always watching Kelvin. You are doing some pretty nice work, just keep it up and the end will be here sooner than you think!
Spar
Spar
04-15-2007, 10:09 PM
#269
My Feedback: (1)

Join Date: May 2005
Location: Tulsa OK
Posts: 609
Likes: 0
Received 0 Likes
on
0 Posts
ORIGINAL: Mods-R-Me
Thanks, I was wondering if anyone was following this thread [sm=confused.gif].
Thanks, I was wondering if anyone was following this thread [sm=confused.gif].
04-16-2007, 09:58 AM
#270
Junior Member
Join Date: Jul 2004
Location: Morgantown,
KY
Posts: 1
Likes: 0
Received 0 Likes
on
0 Posts
ORIGINAL: ArmedZagi
I'm always here.. although I think this is first time I've posted on it. [&:]
ORIGINAL: Mods-R-Me
Thanks, I was wondering if anyone was following this thread [sm=confused.gif].
Thanks, I was wondering if anyone was following this thread [sm=confused.gif].
Great job!!!!!
04-16-2007, 10:04 AM
#271
Member

Join Date: Sep 2004
Location: , PERU
Posts: 60
Likes: 0
Received 0 Likes
on
0 Posts
Thanks, I was wondering if anyone was following this thread [sm=confused.gif].
Congrats for the patience and job
wm
________________________________________________
 04-16-2007, 10:52 PM
#275
Senior Member
My Feedback: (13)
Join Date: Jun 2004
Location: Merced, Ca.,
CA
Posts: 2,118
Likes: 0
Received 0 Likes
on
0 Posts
Mods: Sure we are following your progress, but its hard to comment and compair things from my/our level of abilities compaired to your stuff. Keep it all coming, extreemly interesting bud. ENJOY