


Modkat (Kingcat like design and build)
 09-13-2010, 08:03 PM
#351
Senior Member
Thread Starter
My Feedback: (1)

Join Date: Jun 2005
Location: Antelope Valley,
CA
Posts: 825
Likes: 0
Received 0 Likes
on
0 Posts
ORIGINAL: LGM Graphix
So......... any progress with this one or is it dead in the water?
I hope all the crappy chinese bobcat copies haven't put this one on the shelf, a nice quality one like it looks like you're doing would be awesome.
So......... any progress with this one or is it dead in the water?
I hope all the crappy chinese bobcat copies haven't put this one on the shelf, a nice quality one like it looks like you're doing would be awesome.
 . The cnc machine is just about done. Had major set back last month when the nema 34 steppers were locking up. Had to convert my motors to AC servos ($1000+). Here's a pics of where I'm at now. I can update the machine progress here if you want? Anyone interested in DIY CNC?
 09-16-2010, 12:42 AM
#353
Senior Member
Thread Starter
My Feedback: (1)
Join Date: Jun 2005
Location: Antelope Valley,
CA
Posts: 825
Likes: 0
Received 0 Likes
on
0 Posts
ORIGINAL: smoknrv4
Hey Mods did you ever finish that AKM su 27, I would like to find out how the stabilators worked.
Hey Mods did you ever finish that AKM su 27, I would like to find out how the stabilators worked.
PS. If you think the flanker was cool you should see what I'm going to build after it's done
 .
10-01-2010, 12:17 PM
.
10-01-2010, 12:17 PM
#354

My Feedback: (3)
Join Date: Sep 2003
Location: Nashville,
NC
Posts: 138
Likes: 0
Received 0 Likes
on
0 Posts
I just found this thread. All I can say is "AWESOME." You have done some amazing work. I have tried my hand at designing planes. And I too, decided to build a cnc machine to cut my own parts. This thread just gives me more inspiration. Keep up the good work. Looking forward to more updates.
10-24-2010, 04:09 PM
#355
Senior Member
Thread Starter
My Feedback: (1)
Join Date: Jun 2005
Location: Antelope Valley,
CA
Posts: 825
Likes: 0
Received 0 Likes
on
0 Posts
ORIGINAL: Mike2735
I just found this thread. All I can say is ''AWESOME.'' You have done some amazing work. I have tried my hand at designing planes. And I too, decided to build a cnc machine to cut my own parts. This thread just gives me more inspiration. Keep up the good work. Looking forward to more updates.
I just found this thread. All I can say is ''AWESOME.'' You have done some amazing work. I have tried my hand at designing planes. And I too, decided to build a cnc machine to cut my own parts. This thread just gives me more inspiration. Keep up the good work. Looking forward to more updates.
__________________________________________________ __________________________________________________ _
It has been almost four years since my last "Modkat" related post, but that will change soon.......My machine is just about done. Still have to do a few odds and ends to seal everything up, but that won't take more than a few weeks. I'm shooting for late November as my "official" return to RCU.
For those of you who have been waiting; thank you for your patience.
Kelvin
10-24-2010, 06:36 PM
#356
My Feedback: (3)
Join Date: Sep 2003
Location: Nashville,
NC
Posts: 138
Likes: 0
Received 0 Likes
on
0 Posts
Thank you for the offer. I will take you up on it. I have been at a little of a stand still. I just bought a house with a 30'X50' shop on the property and am closing part of that in for my workshop. As soon as that is done, I will get back on my CNC machine.

 11-12-2010, 03:58 PM
#359
Senior Member
My Feedback: (3)
Join Date: Jan 2008
Location: El Paso, TX
Posts: 278
Likes: 0
Received 0 Likes
on
0 Posts
ORIGINAL: LGM Graphix
so.... did you read the last few posts to find out what he's been up to over the last 3 years?
ORIGINAL: mshay
so is the modcat done yet its been 3 years?
so is the modcat done yet its been 3 years?
11-12-2010, 05:39 PM
#360
Senior Member
Thread Starter
My Feedback: (1)
Join Date: Jun 2005
Location: Antelope Valley,
CA
Posts: 825
Likes: 0
Received 0 Likes
on
0 Posts
ORIGINAL: mshay
nope but refer to my previous post, i asked is the modcat done? not what have you been up to the past 3 years.
ORIGINAL: LGM Graphix
so.... did you read the last few posts to find out what he's been up to over the last 3 years?
ORIGINAL: mshay
so is the modcat done yet its been 3 years?
so is the modcat done yet its been 3 years?
Stay Tuned. Shouldn't be long now.
01-31-2011, 12:38 AM
#362
Senior Member
Thread Starter
My Feedback: (1)
Join Date: Jun 2005
Location: Antelope Valley,
CA
Posts: 825
Likes: 0
Received 0 Likes
on
0 Posts
Mods-R-Me's Official Return to RCU!
I don't know how many of you are still following this, but the CNC Machine is done. Here are a few shots of my new manufacturing base.
Modkat construction will resume immediately with machining of the fuse plug. I am still debating on whether to go full composite or with the original plan of composite fuse and build-up wings/body. What do you guys think?
Kelvin
 01-31-2011, 09:15 AM
#365
ORIGINAL: Mods-R-Me
Mods-R-Me's Official Return to RCU!
I don't know how many of you are still following this, but the CNC Machine is done. Here are a few shots of my new manufacturing base.
Modkat construction will resume immediately with machining of the fuse plug. I am still debating on whether to go full composite or with the original plan of composite fuse and build-up wings/body. What do you guys think?
Kelvin
Kelvin,
I think the project is great, the CNC looks awesome, but at this point, I can't help but think you'd be much further ahead with a different design. Since the inception of this project, there has been many more bobcat / kingcat copies come out, most recently the "Tornado" from Modellbau USA. The airplane is being sold for $475 with fuel tank and retracts. I think the market on this design is pretty saturated at this point unfortunately. The nice thing, is with your CNC, you can do almost any airplane design you want.
I'm not trying to be discouraging, just being honest, if you hope to make any sales, you will either need a ridiculously low price (which IMO would not be worth it to you to do them unless you can make some money) or you will need a unique subject again.
Either way, I am still following this thread, I think it's very cool and again, I'm not trying to be discouraging, I'm just not 100% sure what your intent was with this airplane, whether it be to just do it for yourself, or to try to sell some in the end. Yours definitely looks better (from your earlier hand made plugs) but I just don't know that there will be much of a market for it today.
Jeremy
01-31-2011, 09:26 AM
#366
Senior Member
Thread Starter
My Feedback: (1)
Join Date: Jun 2005
Location: Antelope Valley,
CA
Posts: 825
Likes: 0
Received 0 Likes
on
0 Posts
ORIGINAL: LGM Graphix
Kelvin,
I think the project is great, the CNC looks awesome, but at this point, I can't help but think you'd be much further ahead with a different design. Since the inception of this project, there has been many more bobcat / kingcat copies come out, most recently the ''Tornado'' from Modellbau USA. The airplane is being sold for $475 with fuel tank and retracts. I think the market on this design is pretty saturated at this point unfortunately. The nice thing, is with your CNC, you can do almost any airplane design you want.
I'm not trying to be discouraging, just being honest, if you hope to make any sales, you will either need a ridiculously low price (which IMO would not be worth it to you to do them unless you can make some money) or you will need a unique subject again.
Either way, I am still following this thread, I think it's very cool and again, I'm not trying to be discouraging, I'm just not 100% sure what your intent was with this airplane, whether it be to just do it for yourself, or to try to sell some in the end. Yours definitely looks better (from your earlier hand made plugs) but I just don't know that there will be much of a market for it today.
Jeremy
ORIGINAL: Mods-R-Me
Mods-R-Me's Official Return to RCU!
I don't know how many of you are still following this, but the CNC Machine is done. Here are a few shots of my new manufacturing base.
Modkat construction will resume immediately with machining of the fuse plug. I am still debating on whether to go full composite or with the original plan of composite fuse and build-up wings/body. What do you guys think?
Kelvin
Mods-R-Me's Official Return to RCU!
I don't know how many of you are still following this, but the CNC Machine is done. Here are a few shots of my new manufacturing base.
Modkat construction will resume immediately with machining of the fuse plug. I am still debating on whether to go full composite or with the original plan of composite fuse and build-up wings/body. What do you guys think?
Kelvin
Kelvin,
I think the project is great, the CNC looks awesome, but at this point, I can't help but think you'd be much further ahead with a different design. Since the inception of this project, there has been many more bobcat / kingcat copies come out, most recently the ''Tornado'' from Modellbau USA. The airplane is being sold for $475 with fuel tank and retracts. I think the market on this design is pretty saturated at this point unfortunately. The nice thing, is with your CNC, you can do almost any airplane design you want.
I'm not trying to be discouraging, just being honest, if you hope to make any sales, you will either need a ridiculously low price (which IMO would not be worth it to you to do them unless you can make some money) or you will need a unique subject again.
Either way, I am still following this thread, I think it's very cool and again, I'm not trying to be discouraging, I'm just not 100% sure what your intent was with this airplane, whether it be to just do it for yourself, or to try to sell some in the end. Yours definitely looks better (from your earlier hand made plugs) but I just don't know that there will be much of a market for it today.
Jeremy
01-31-2011, 07:30 PM
#368

My Feedback: (11)

Join Date: Dec 2003
Location: RR#7 Aylmer,
ON, CANADA
Posts: 1,291
Likes: 0
Received 0 Likes
on
0 Posts
A "Labour Of Love" if you will. Nice to see your passion Kelvin, very impressive set-up too. I'll be watching!
I just spent a couple of hours today going thru this thread, to catch up, very interesting.
I just spent a couple of hours today going thru this thread, to catch up, very interesting.
02-22-2011, 01:35 AM
#369
Senior Member
Thread Starter
My Feedback: (1)
Join Date: Jun 2005
Location: Antelope Valley,
CA
Posts: 825
Likes: 0
Received 0 Likes
on
0 Posts
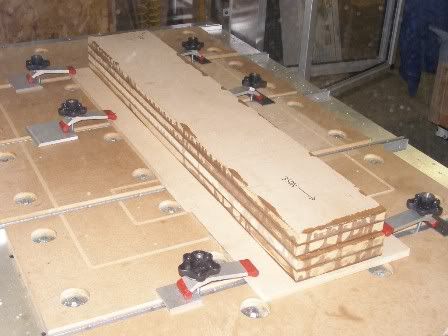
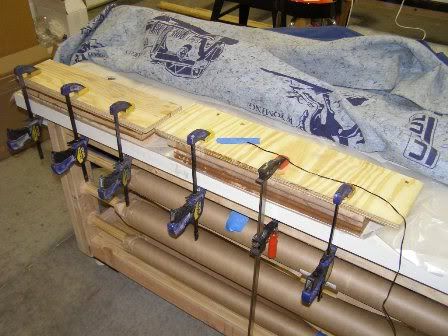
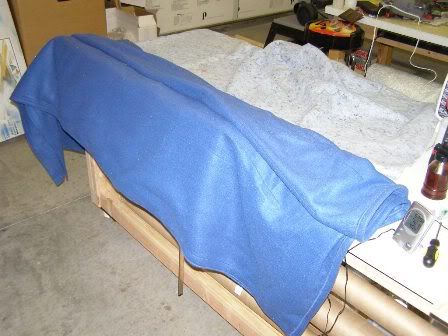
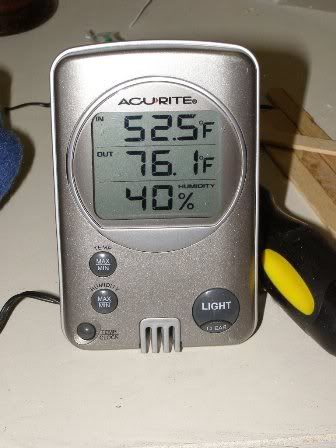
Fuse Plug #2.1-0
Today was all about machining the fuse plug. I decided to use Multi-Density Fiberboard (MDF) as a plug material due to its low cost and ease of machining. My only problem was Lowe's did not carry 3in thick sheets of it. This required me to laminate multiple sheets of 0.75in MDF to get the proper thickness (figure 1). I used laminating epoxy as the bonding agent then clamped the sheets together and let sit for 12 hours at 85 degrees (figure 2).
My shop is not climate controlled, so you may ask "how did you get the plug to 85 degrees when ambient is below 50? Two words: electric blanket (figures 3 and 4). Picked it up from Wal-Mart for $35.00.
The roughing phase took 2 hours and total machine time was just under 3.5 hours (figures 5 and 6).
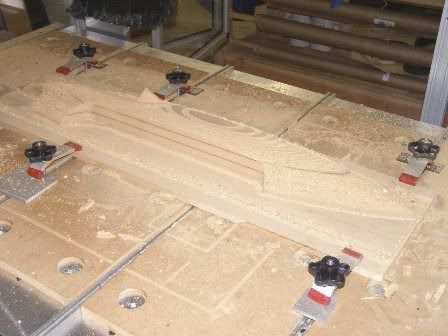
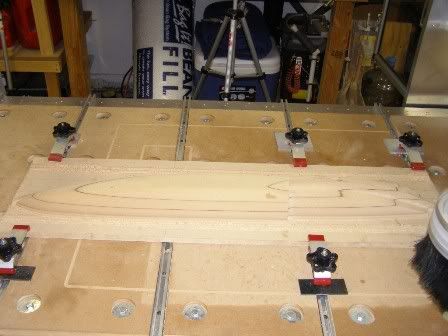
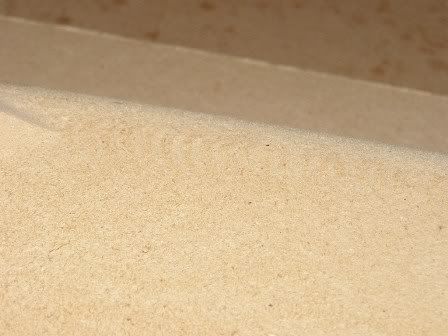
Here's a shot of the finished plug (figure 7). It's accurate within 0.001in and only requires a light sanding to remove the VERY small tooling marks (figure 8) [8D].
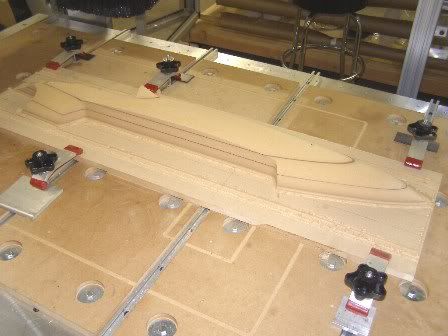
What's Next?
1. Sleep
2. Machine the Fuse Right Side
3. Machine Both Sides of Canopy
4. Eat?
[youtube]http://www.youtube.com/watch?v=b4mg4d8BfWM[/youtube]
Today was all about machining the fuse plug. I decided to use Multi-Density Fiberboard (MDF) as a plug material due to its low cost and ease of machining. My only problem was Lowe's did not carry 3in thick sheets of it. This required me to laminate multiple sheets of 0.75in MDF to get the proper thickness (figure 1). I used laminating epoxy as the bonding agent then clamped the sheets together and let sit for 12 hours at 85 degrees (figure 2).
My shop is not climate controlled, so you may ask "how did you get the plug to 85 degrees when ambient is below 50? Two words: electric blanket (figures 3 and 4). Picked it up from Wal-Mart for $35.00.
The roughing phase took 2 hours and total machine time was just under 3.5 hours (figures 5 and 6).
Here's a shot of the finished plug (figure 7). It's accurate within 0.001in and only requires a light sanding to remove the VERY small tooling marks (figure 8) [8D].
What's Next?
1. Sleep
2. Machine the Fuse Right Side
3. Machine Both Sides of Canopy
4. Eat?
 02-22-2011, 06:26 PM
#372
Senior Member
Thread Starter
My Feedback: (1)
Join Date: Jun 2005
Location: Antelope Valley,
CA
Posts: 825
Likes: 0
Received 0 Likes
on
0 Posts
Glad to see some progress again. I'm still on board and would love to get a kit when they are available. I wouldn't mind doing beta testing either
I am still onboard
02-23-2011, 10:15 PM
#373
Senior Member
Thread Starter
My Feedback: (1)
Join Date: Jun 2005
Location: Antelope Valley,
CA
Posts: 825
Likes: 0
Received 0 Likes
on
0 Posts
Fuse Plug #2.1-1
Right Side's Done!
What's Next?
1. Machine the Fuse Right Side - Check
2. Machine Both Sides of Canopy
3. Epoxy soak CNC'd parts
4. Join fuse and canopy halves
5. Spray light coat of primer and make small repairs
6. Make mold
Right Side's Done!
What's Next?
1. Machine the Fuse Right Side - Check
2. Machine Both Sides of Canopy
3. Epoxy soak CNC'd parts
4. Join fuse and canopy halves
5. Spray light coat of primer and make small repairs
6. Make mold
04-08-2011, 09:36 PM
#374
Senior Member
Thread Starter
My Feedback: (1)
Join Date: Jun 2005
Location: Antelope Valley,
CA
Posts: 825
Likes: 0
Received 0 Likes
on
0 Posts
Fuse Plug #2.1-2
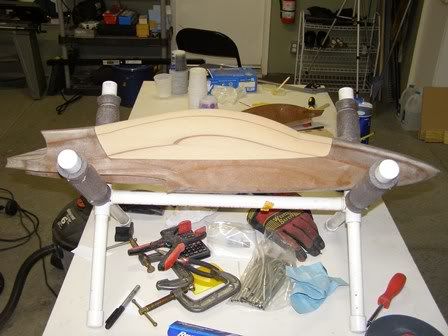
Fuse plug is joined ad ready for canopy lines!
The last month has been a learning experience. Having a CNC machine is awesome, but operator error still prevails [&:]. It cut the models 99% accurate (even the errors). I noticed several errors in the plug and attributed them first to the machine and could find nothing wrong. Turns out that the model contained errors and they were so small I didn't notice. The errors were minor so I decided to fix them manually rather than cut a new plug. Below is a play-by-play of the process.
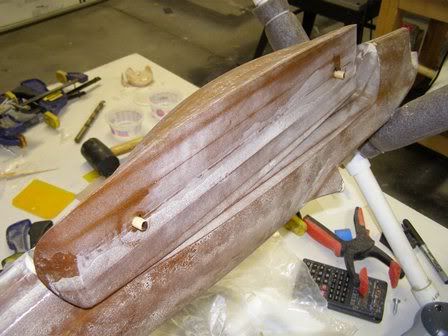
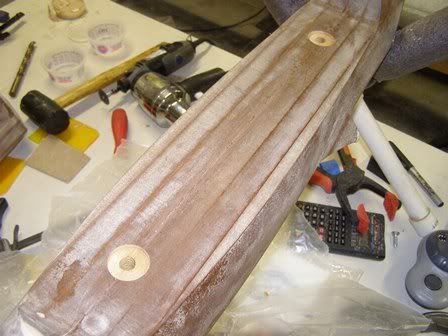
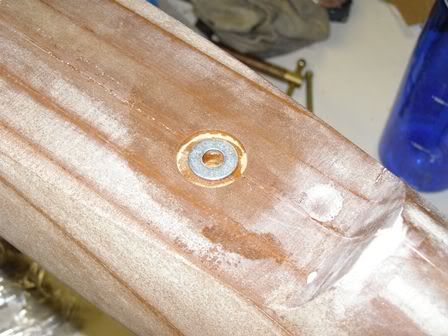
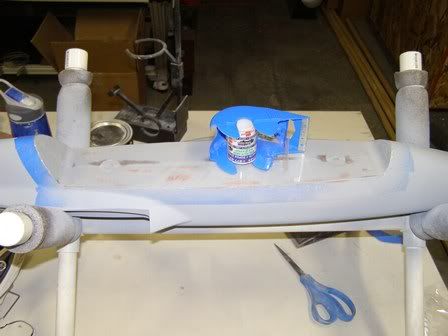
First, I epoxy soaked the fuse and canopy to give the primer a good bonding surface (figure 1). Second, I joined both halves with a THIN layer of epoxy and colloidal silica (figure 2).
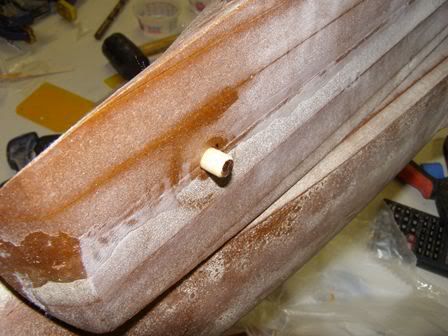
Then, I used 0.25in dowels as alignment pins for the canopy (figures 3 & 4). Next, I routed a few large holes in the fuse and used 0.25in washers as receivers (figures 5 & 6).
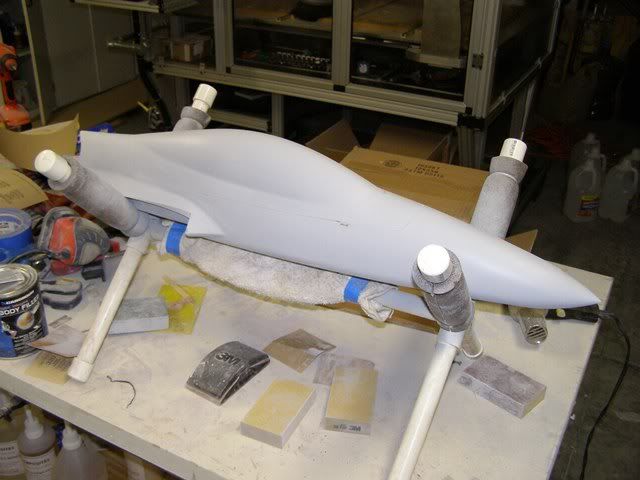
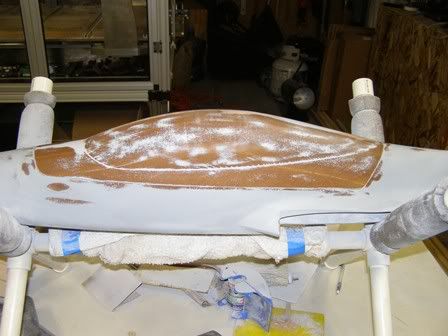
Finally, the whole fuse was sprayed with Duratec High build primer only to be sanded completely off and reapplied right afterwards (figures 5 & 6). The first coat was to fill in the millions of tiny pinholes left on the MDF surface.
Fuse Plug #2.1-3
Now time the dreaded canopy seam [:@]. Last time, I mixed the filler way too think and couldn't sand it off. This killed my last plug four years ago and I didn't want to make the same mistake again. This time, I used packing tape as a epoxy barrier (a lot thinner compared to painter tape). Next, I mixed a very thin set of epoxy and silica paste. There wasn't much of a seam to begin with since the model was CNC cut, but did it anyway for giggles. Then, the canopy was clamped to the fuse and allowed to dry (figures 7 & 8).
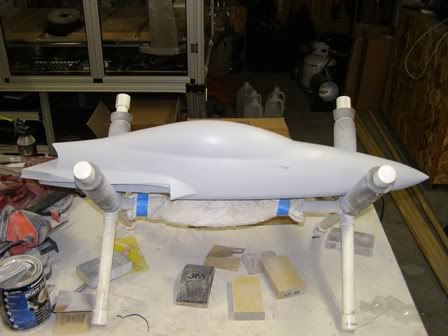
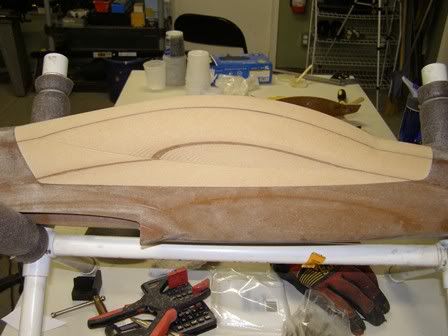
After some light sanding here it is ready for canopy lines.
I'm torn between the F-16 and F-15E canopies. The F-16 is simpler, but I like the look of the 2 seat-er fighter/bomber. What do you guys think?
What's Next?
1. Machine the Fuse Right Side -Check
2. Machine Both Sides of Canopy -Check
3. Epoxy soak CNC'd parts -Check
4. Join fuse and canopy halves -Check
5. Spray light coat of primer and make small repairs -Check
6. Make Canopy Lines
6. Make mold
Fuse plug is joined ad ready for canopy lines!
The last month has been a learning experience. Having a CNC machine is awesome, but operator error still prevails [&:]. It cut the models 99% accurate (even the errors). I noticed several errors in the plug and attributed them first to the machine and could find nothing wrong. Turns out that the model contained errors and they were so small I didn't notice. The errors were minor so I decided to fix them manually rather than cut a new plug. Below is a play-by-play of the process.
First, I epoxy soaked the fuse and canopy to give the primer a good bonding surface (figure 1). Second, I joined both halves with a THIN layer of epoxy and colloidal silica (figure 2).
Then, I used 0.25in dowels as alignment pins for the canopy (figures 3 & 4). Next, I routed a few large holes in the fuse and used 0.25in washers as receivers (figures 5 & 6).
Finally, the whole fuse was sprayed with Duratec High build primer only to be sanded completely off and reapplied right afterwards (figures 5 & 6). The first coat was to fill in the millions of tiny pinholes left on the MDF surface.
Fuse Plug #2.1-3
Now time the dreaded canopy seam [:@]. Last time, I mixed the filler way too think and couldn't sand it off. This killed my last plug four years ago and I didn't want to make the same mistake again. This time, I used packing tape as a epoxy barrier (a lot thinner compared to painter tape). Next, I mixed a very thin set of epoxy and silica paste. There wasn't much of a seam to begin with since the model was CNC cut, but did it anyway for giggles. Then, the canopy was clamped to the fuse and allowed to dry (figures 7 & 8).
After some light sanding here it is ready for canopy lines.
I'm torn between the F-16 and F-15E canopies. The F-16 is simpler, but I like the look of the 2 seat-er fighter/bomber. What do you guys think?
What's Next?
1. Machine the Fuse Right Side -Check
2. Machine Both Sides of Canopy -Check
3. Epoxy soak CNC'd parts -Check
4. Join fuse and canopy halves -Check
5. Spray light coat of primer and make small repairs -Check
6. Make Canopy Lines
6. Make mold