


Modkat (Kingcat like design and build)
 04-17-2007, 10:05 PM
#276

My Feedback: (3)

Join Date: Mar 2002
Location: Norman,
OK
Posts: 88
Likes: 0
Received 0 Likes
on
0 Posts
Mods, I watch for any new posts on this thread on a daily basis. Waiting in great anticipation for your release of this fabulous piece of artistry. I signed up for your pre-order list prior to your website creation. Should I sign up again there to keep my place or were you able to transfer that at the time of your website coming online? Thanks in advance, Rick

 04-18-2007, 07:48 PM
#278
Senior Member
Thread Starter
My Feedback: (1)

Join Date: Jun 2005
Location: Antelope Valley,
CA
Posts: 825
Likes: 0
Received 0 Likes
on
0 Posts
Thanks guys for checking in. Here is the Modkat pre-order list as of 18 April 07:
1. Rlpagemd
2. Jinzo
3. Timandchoc757
4. Sparhawk
5. Turbinecrazy
6. Arck
7. TBWood
8. Ayrtonsenna
9. Lomcevak Duck
10. Bob27
11. C. Mosa
12. J. Widner
13. macdonald77
If I missed anyone or if others would like to be added, please let me know.
Mods
1. Rlpagemd
2. Jinzo
3. Timandchoc757
4. Sparhawk
5. Turbinecrazy
6. Arck
7. TBWood
8. Ayrtonsenna
9. Lomcevak Duck
10. Bob27
11. C. Mosa
12. J. Widner
13. macdonald77
If I missed anyone or if others would like to be added, please let me know.
Mods
04-18-2007, 11:10 PM
#279
Thanks Mods. Makes me feel better knowing that I'm still there. It says something for your design that so many people want to pre order a plane that has never been flown and still in the prototype phase. I imagine a lot more of us are going to want one when they see the finished product and get the first flight reports.
04-19-2007, 04:14 AM
#280
Senior Member
My Feedback: (1)
Join Date: Dec 2004
Location: New Zealand
Posts: 398
Likes: 0
Received 0 Likes
on
0 Posts
I'm going to be very proud to represented MRM, possibly having the first Madcat in NEW ZEALAND!
Always watching kelvin......
Wishing you and your family all the best.
Ants
Always watching kelvin......
Wishing you and your family all the best.
Ants
04-20-2007, 06:17 PM
#281
Senior Member
Thread Starter
My Feedback: (1)
Join Date: Jun 2005
Location: Antelope Valley,
CA
Posts: 825
Likes: 0
Received 0 Likes
on
0 Posts
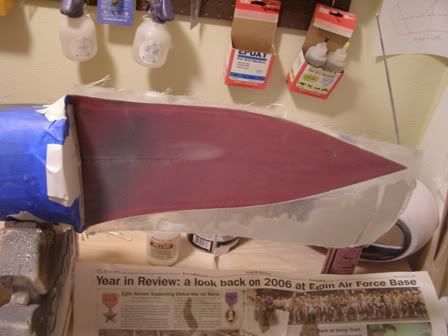
Fuse Plug #2-10
Got the bottom of the fairings done using the same technique as before (figures 1-6).
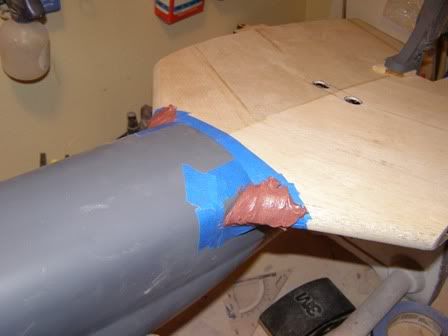
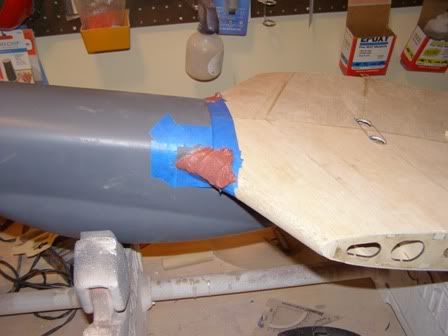
Figures 1 & 2
Figures 3 & 4
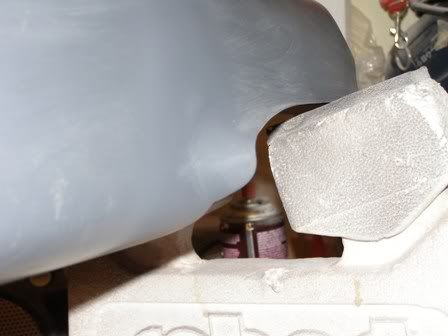
Figures 5 & 6
The constant sanding and shaping has made them very thin is some places. This is bad because the plug will require a little coaxing out of the mold. The thin portions would surely break off in the process. To prevent this, the fairing will be fiberglassed (this weekend) with heavy weight cloth on the top and bottom.
More to come,
Mods
Got the bottom of the fairings done using the same technique as before (figures 1-6).
Figures 1 & 2
Figures 3 & 4
Figures 5 & 6
The constant sanding and shaping has made them very thin is some places. This is bad because the plug will require a little coaxing out of the mold. The thin portions would surely break off in the process. To prevent this, the fairing will be fiberglassed (this weekend) with heavy weight cloth on the top and bottom.
More to come,
Mods
 04-20-2007, 07:09 PM
#283
Senior Member
Thread Starter
My Feedback: (1)
Join Date: Jun 2005
Location: Antelope Valley,
CA
Posts: 825
Likes: 0
Received 0 Likes
on
0 Posts
ORIGINAL: arck
Hey Mod, your job is amazing but, I was wondering if that radio continuous working,,,he he,,,
Hey Mod, your job is amazing but, I was wondering if that radio continuous working,,,he he,,,
 .
04-22-2007, 05:21 PM
.
04-22-2007, 05:21 PM
#284
Senior Member
Thread Starter
My Feedback: (1)
Join Date: Jun 2005
Location: Antelope Valley,
CA
Posts: 825
Likes: 0
Received 0 Likes
on
0 Posts
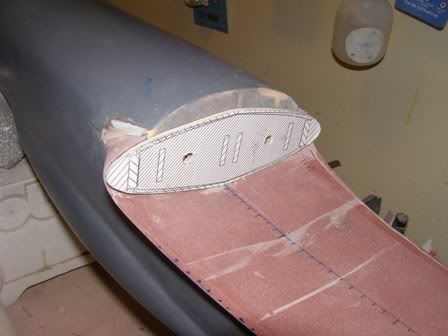
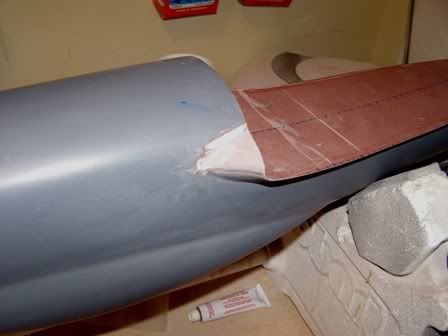
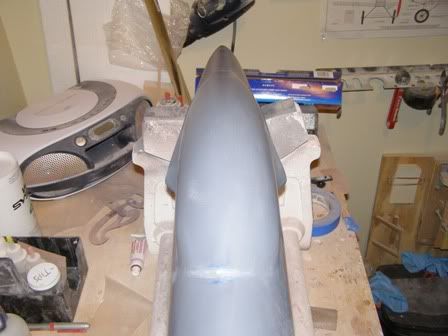
Fuse Plug #2-11
Summary
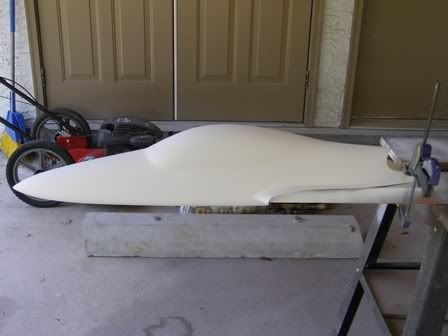
Today, I glassed the fairings and applied the first coat of epoxy primer on the plug. Now, the fairings are very rigid. I can't bend or break them no matter how hard I try . Next, I have to wet sand the plug smooth, separate the hatch from the fuse, and one last coat of primer. Then, several coats of black enamel followed by MOLDS!!!!!!!!!!
Construction
First, the fairings area was outlined with painters tape (Figure 1). Then, I applied one layer of heavy weight fiberglass to the top and bottom of the wing saddle area (Figures 2 & 3). Followed by feathering the fiberglass to a fine edge (Figure 4). This was NOT fun. Even with 60 grit sandpaper it took 2 hours [:@][&:].
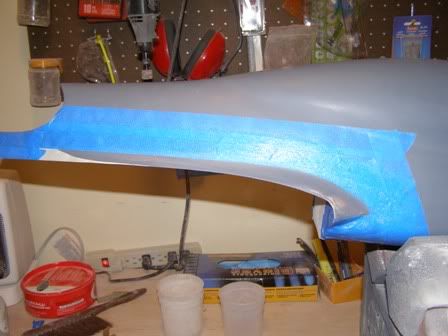
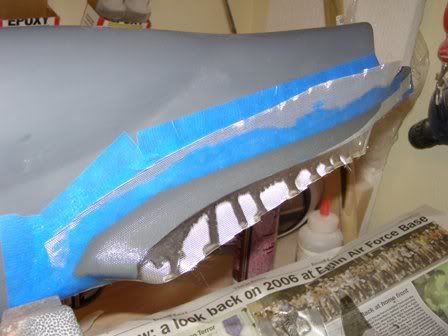
Figures 1 & 2
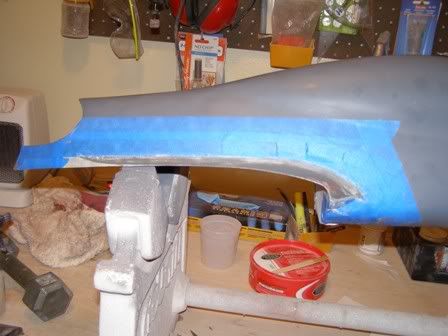
Figures 3 & 4
One last shape check with the grey Krylon primer (Figure 5). Here's the plug with a few thick coats of white epoxy primer (Figures 6-8).
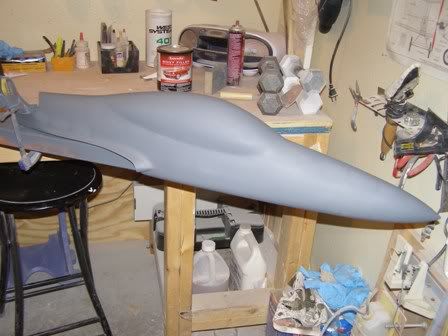

Figures 5 & 6
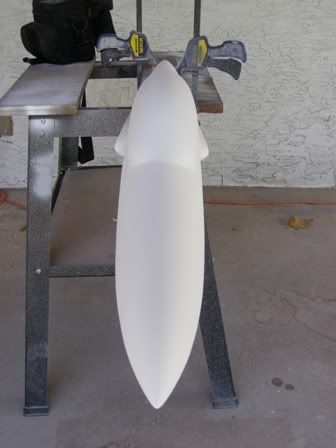
Figures 7 & 8
More to come,
Mods
Summary
Today, I glassed the fairings and applied the first coat of epoxy primer on the plug. Now, the fairings are very rigid. I can't bend or break them no matter how hard I try
. Next, I have to wet sand the plug smooth, separate the hatch from the fuse, and one last coat of primer. Then, several coats of black enamel followed by MOLDS!!!!!!!!!!Construction
First, the fairings area was outlined with painters tape (Figure 1). Then, I applied one layer of heavy weight fiberglass to the top and bottom of the wing saddle area (Figures 2 & 3). Followed by feathering the fiberglass to a fine edge (Figure 4). This was NOT fun. Even with 60 grit sandpaper it took 2 hours [:@][&:].
Figures 1 & 2
Figures 3 & 4
One last shape check with the grey Krylon primer (Figure 5). Here's the plug with a few thick coats of white epoxy primer (Figures 6-8).
Figures 5 & 6
Figures 7 & 8
More to come,
Mods
 04-22-2007, 07:50 PM
#287
Senior Member
Thread Starter
My Feedback: (1)
Join Date: Jun 2005
Location: Antelope Valley,
CA
Posts: 825
Likes: 0
Received 0 Likes
on
0 Posts
ORIGINAL: Sparhawk
Sweet Kelvin. I am half thinking of getting a Wren 44 to put on thtail of this little beasty!!
Spar
Sweet Kelvin. I am half thinking of getting a Wren 44 to put on thtail of this little beasty!!
Spar
Mods
05-04-2007, 07:16 AM
#288
Senior Member
Thread Starter
My Feedback: (1)
Join Date: Jun 2005
Location: Antelope Valley,
CA
Posts: 825
Likes: 0
Received 0 Likes
on
0 Posts
Update: I found a new job in Yuma, Arizona so MRM-RCModels will be changing location AND setting up in a much bigger facility [sm=teeth_smile.gif][sm=shades_smile.gif][sm=49_49.gif][sm=regular_smile.gif]. Regretfully, there will be only a few Modkat updates for the next 3-4 weeks. Once the new shop is up, construction will resume.
Mods
Mods

 05-05-2007, 11:28 AM
#291
Senior Member
Join Date: May 2003
Location: NA,
NJ
Posts: 398
Likes: 0
Received 0 Likes
on
0 Posts
Just finished leafing through the pictures... [sm=spinnyeyes.gif]
Obviously very very impressive work! As a SW user myself I can really appreciate the cad work you did here. Like I said, impressive.
I do have one quip.... As I see it the prop is awfully close to the TE of the wing. It looks to me like it would hurt performance some and make a hell of a racket while flying. Shame though that the only way to cure that would be cutting a hole in the trailing edge... [:'(]
I truly hope that this isn't the case but have you tried to test this setup? Try to find a solution? Or maybe it really doesn't matter all that much since the Jett isn't so quiet itself. [sm=50_50.gif]
Just my -$0.02
Obviously very very impressive work! As a SW user myself I can really appreciate the cad work you did here. Like I said, impressive
.I do have one quip.... As I see it the prop is awfully close to the TE of the wing. It looks to me like it would hurt performance some and make a hell of a racket while flying. Shame though that the only way to cure that would be cutting a hole in the trailing edge... [:'(]
I truly hope that this isn't the case but have you tried to test this setup? Try to find a solution? Or maybe it really doesn't matter all that much since the Jett isn't so quiet itself. [sm=50_50.gif]
Just my -$0.02
 05-05-2007, 11:06 PM
#293


This thing is looking great, I'm very impressed, I only wish it was bigger, like bobcat sized. I'd be all over one for turbine use if it was bigger. But I'm very impressed, great job, I can't wait to see the first one pulled from the molds!
05-06-2007, 03:02 PM
#294
Senior Member
Join Date: May 2003
Location: NA,
NJ
Posts: 398
Likes: 0
Received 0 Likes
on
0 Posts
ORIGINAL: Strykaas
erazz, you mean it is possible to dramatically improve the noise made by using a thinner notch in the wing of the Force one ?
erazz, you mean it is possible to dramatically improve the noise made by using a thinner notch in the wing of the Force one ?
I'm trying to say that I feel that there will be a lot of noise and that IMHO the only way to reduce that noise would be to move the TE away from the prop.
Tell the truth I really don't now what will happen. Hopefully I'm just plain wrong! But I've learned that the different air pressures experienced by the prop when it sits close to the TE causes noise (and not the good kind of noise).
05-06-2007, 05:48 PM
#296
Senior Member
Thread Starter
My Feedback: (1)
Join Date: Jun 2005
Location: Antelope Valley,
CA
Posts: 825
Likes: 0
Received 0 Likes
on
0 Posts
ORIGINAL: LGM Graphix
This thing is looking great, I'm very impressed, I only wish it was bigger, like bobcat sized. I'd be all over one for turbine use if it was bigger. But I'm very impressed, great job, I can't wait to see the first one pulled from the molds!
This thing is looking great, I'm very impressed, I only wish it was bigger, like bobcat sized. I'd be all over one for turbine use if it was bigger. But I'm very impressed, great job, I can't wait to see the first one pulled from the molds!
That's right, a CNC machine. This will drastically reduce plug manufacturing time and costs. The rig will also be available for to modelers for custom CNC machining. The customer will provide the CAD models and pricing will be based on cut time. Been wanting to do this for years, but never had the space.....till now.
Just finished leafing through the pictures...
Obviously very very impressive work! As a SW user myself I can really appreciate the cad work you did here. Like I said, impressive .
I do have one quip.... As I see it the prop is awfully close to the TE of the wing. It looks to me like it would hurt performance some and make a hell of a racket while flying. Shame though that the only way to cure that would be cutting a hole in the trailing edge...
I truly hope that this isn't the case but have you tried to test this setup? Try to find a solution? Or maybe it really doesn't matter all that much since the Jett isn't so quiet itself.
Just my -$0.02
Mods
05-07-2007, 07:14 PM
#298
Senior Member
Thread Starter
My Feedback: (1)
Join Date: Jun 2005
Location: Antelope Valley,
CA
Posts: 825
Likes: 0
Received 0 Likes
on
0 Posts
ORIGINAL: Strykaas
Any chance you will document this project (by itself) on these pages too [8D] ? That's too coool !
That's right, a CNC machine
05-08-2007, 04:40 AM
#299
Mods,
The following forum section should fit nicely : "All Forums >> RC Airplanes >> Projects that I had better put aside if I want to finish the started ones, especially the Ak models Su-27" [&:]
Hehe just kidding, seriously I would have started there : "All Forums >> RC Airplanes >> Scratch Building, Aircraft Design, 3D/CAD". It seems to fit prefectly !
The following forum section should fit nicely : "All Forums >> RC Airplanes >> Projects that I had better put aside if I want to finish the started ones, especially the Ak models Su-27" [&:]
Hehe just kidding
, seriously I would have started there : "All Forums >> RC Airplanes >> Scratch Building, Aircraft Design, 3D/CAD". It seems to fit prefectly !

