


Advanced 'SI' style Hydro.
 05-28-2011, 06:05 PM
#1
Senior Member
Thread Starter
Join Date: Aug 2010
Location: Beachmere, AUSTRALIA
Posts: 166
Likes: 0
Received 0 Likes
on
0 Posts
Will be starting on this build shortly, just getting materials together.
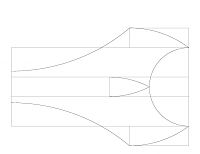
Basic top profile, will be finishing complete plans as soon as I can.
Will be for gas motors 25cc+.
Overall 45" long by 30" wide with inside edges of front sponsons sitting at 20"
Hopefully it will be stable enough but I can always tweak the plans before I start any cutting.
Any feed back from you guys is much apreciated!
 05-29-2011, 02:14 PM
#3
Senior Member
Thread Starter
Join Date: Aug 2010
Location: Beachmere, AUSTRALIA
Posts: 166
Likes: 0
Received 0 Likes
on
0 Posts
Will get this one done anddialed inbefore I muck around with any other projects
Finished off most of the plan yesterday, waiting to pick up a main deck sheet .
Just found out no ink in printer too!lol
So cant even print the smaller pieces for cutting till I fix that!
Finished off most of the plan yesterday, waiting to pick up a main deck sheet .
Just found out no ink in printer too!lol
So cant even print the smaller pieces for cutting till I fix that!
 06-02-2011, 02:40 AM
#5
Senior Member
Join Date: Apr 2007
Location: Cape Town, , SOUTH AFRICA
Posts: 822
Likes: 0
Received 0 Likes
on
0 Posts
That looks fast even in wire frame format. Can not wait to see it real life. Any problem if I copy and paste that drawing? Please
Cobus
Cobus
07-01-2011, 01:31 PM
#7
Senior Member
Thread Starter
Join Date: Aug 2010
Location: Beachmere, AUSTRALIA
Posts: 166
Likes: 0
Received 0 Likes
on
0 Posts
Have done a little so thought I had better update with some pics so far.
Check fitting everything before going near the glue.
Deck.

Sponson main pieces, interlocked under deck braces.


Tub sides.

Check fitting everything before going near the glue.
Deck.
Sponson main pieces, interlocked under deck braces.
Tub sides.
 07-01-2011, 08:10 PM
#9
Senior Member
Thread Starter
Join Date: Aug 2010
Location: Beachmere, AUSTRALIA
Posts: 166
Likes: 0
Received 0 Likes
on
0 Posts
Cheers mate!
Have a few more bits to cut/sand then Ican start thinking about glueing.
Have changed the ride surface angle as the original sponson angle was a bit deep.
Have a few more bits to cut/sand then Ican start thinking about glueing.
Have changed the ride surface angle as the original sponson angle was a bit deep.
 07-04-2011, 01:08 PM
#11
Senior Member
Thread Starter
Join Date: Aug 2010
Location: Beachmere, AUSTRALIA
Posts: 166
Likes: 0
Received 0 Likes
on
0 Posts
Underdeck braces are glued down, finished glueing one of the sponsons minus the ride surface sheet. Will glue that on once I seal the inside.

 07-10-2011, 05:42 PM
#12
Senior Member
Thread Starter
Join Date: Aug 2010
Location: Beachmere, AUSTRALIA
Posts: 166
Likes: 0
Received 0 Likes
on
0 Posts
Well the sponsons and tub are now sealed inside.
I also used some 1" cloth tape to reinforce the joins, the transom is double layered to beef it up a bit.

 07-18-2011, 07:46 PM
#13
Senior Member
Thread Starter
Join Date: Aug 2010
Location: Beachmere, AUSTRALIA
Posts: 166
Likes: 0
Received 0 Likes
on
0 Posts
Sponsons and tub are closed up and have some sanding to finish before hitting it with some resin.
I left slight overhangs on the rear of all the ride surfaces as well.


 10-03-2011, 08:16 PM
#15
Junior Member
Join Date: Sep 2011
Location: fontana, CA
Posts: 22
Likes: 0
Received 0 Likes
on
0 Posts
Looks bad dude , but i think its going to be unstable in front at 50 + mph , i would give the top a stealth design and bring it clear to the rear of it increasing hieght as it gets to the rear and finish with a tail to stabalize it , dude this would help keep the nose down prevent it from wanting to dance on its sponces at 50 mph + , the air flow would force it to stay stable , just picture it in a wind tunnel with your minds eye.
10-05-2011, 08:21 AM
#16
Senior Member
Thread Starter
Join Date: Aug 2010
Location: Beachmere, AUSTRALIA
Posts: 166
Likes: 0
Received 0 Likes
on
0 Posts
I understand what you are saying, however the 'SI' style hydro's seem to do fine.
The under deck braces will also slightly increase the the distance the airflow has to travel giving a 'very tiny' upside down wing effect on the front.
The added bonus with airboats is you can also trim the engine angle to keep the front down at higher speeds, trimming the engine atitude has a far greater effect on how the hull rides when under power. JMO.
If all else fails I do have plenty of carving foam in the shed to do something similar to what your saying!
Thanks for your input and ideas, I will definately keep them in mind once its ready for first tests!
07-09-2012, 10:05 PM
#17
Senior Member
Thread Starter
Join Date: Aug 2010
Location: Beachmere, AUSTRALIA
Posts: 166
Likes: 0
Received 0 Likes
on
0 Posts
I see I had been a bit slack with the updates for this one, I have been on to other re-builds etc. but now that I have resumed this project I better add something for you guys!
Older pic. of it sitting together.

Outside sealed with resin.

Highfilling the ride surfaces for sanding.
Starting the engine stand.

Cutouts to lighten it up.


Older pic. of it sitting together.
Outside sealed with resin.
Highfilling the ride surfaces for sanding.
Starting the engine stand.
Cutouts to lighten it up.
07-24-2012, 03:10 AM
#18
Senior Member
Thread Starter
Join Date: Aug 2010
Location: Beachmere, AUSTRALIA
Posts: 166
Likes: 0
Received 0 Likes
on
0 Posts
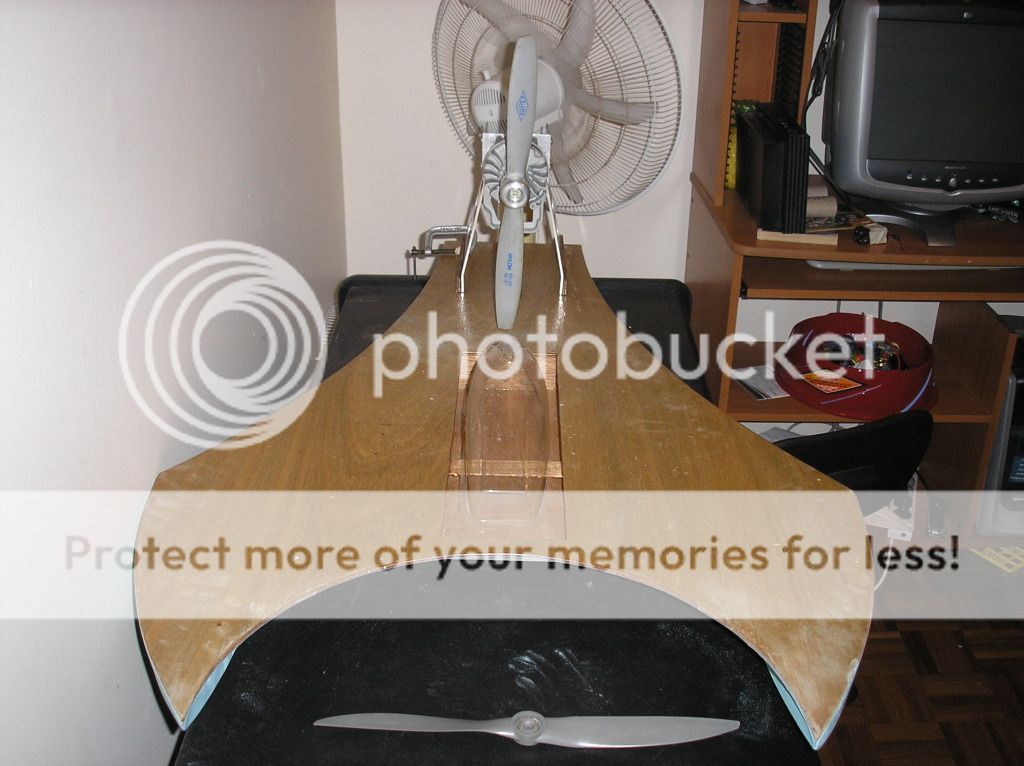
Engine brackets are done, bolted it together with the crank case to sit it on the hull for a couple more pics. for you guys! 


 07-27-2012, 04:20 AM
#21


ORIGINAL: Ozpulse
Cheers mate, still a bit to do yet but its getting there!
Cheers mate, still a bit to do yet but its getting there!
I actually dug my SI copy 3-pointer off the shelf to rebuild it. These 3-pointers just look fast sitting there. I'm looking forward to the videos!
07-29-2012, 03:05 PM
#22
Senior Member
Thread Starter
Join Date: Aug 2010
Location: Beachmere, AUSTRALIA
Posts: 166
Likes: 0
Received 0 Likes
on
0 Posts
Thanks buddy, just hope it stays on the water long enough on the first runs to get it dialled in properly!


