


Bob Cat Copy Falcon 120 Jet

 01-17-2012, 01:09 AM
#4202


I think the dia prop that the DLE will require will make this a no go for ground clearance, for something like this you will need a fast turning course pitch prop for it to work at its optimum.
Mike
Mike
01-17-2012, 04:16 AM
#4203
Senior Member
Join Date: Apr 2005
Location: Houston,
TX
Posts: 139
Likes: 0
Received 0 Likes
on
0 Posts
ORIGINAL: BaldEagel
I will try to give an unbiased opinion and advise.
Futaba have an 8 channel set that can be upgraded to 14 channels with a simple down load of some firmware off their site, this is done by an SD card that slots in the back, it also means that you can share or download set ups from the 12FG, 14 and 18 channel Tx's, belive me the more channels you have the better, especially with twin ailerons, twin flaps, twin elevators and twin rudders, these all can be trimmed individually with a set up that uses seperate channels per surface or you can combine them and set them both to trim off one trim lever, and doing it this way means no matchboxes required, this will be all the radio you will need even for the future Helio.
Servos: Hitec 5425's 5426 or up wards for flaps and ailerons will be sufficient.
Peronally I don't like LiPo's in jets, I use A123's in pairs with no regulator, 3.3volt per cell, that is less current than a fully charged 5 cell Nimh, but the Amp capacity is way over any Nimh, two batteries plugged straight into a switch and on to the Rx no need for any power box.
Hope this helps.
Mike
i am new to trying to use all these extra channels, but now that i just got my first jet , i can see where lots of channels go in a hurry .
ok, not sure how this works , 8 channel radio , with physically only , 8 switches , so if you get software upgrade now you have 18 channels ,
i presume you get a 18 channel receiver to go in plane ? , is this correct ?
so does that mean you only use the extra 10 channels on program mix channels , where you can mix them in with the original 8 channels ?
also does the futaba 8 channel radio have any plans for telemetry in its future , are is this only on the top dollar futaba radio's ?
ok, thanks
01-17-2012, 04:26 AM
#4204
The 8FG is upgraded to 14 channels, 12 proportional and two switched, the extra channels can be assigned to the side slider (2) and the rotary knobs on the top of the front face, but what you can also do is assign two aileron servos to separate channels so you can switch them to move in combination in the same direction (reflex essential for crow braking) two separate channels for elevator servos so that centre can be fine tuned, but twice the power and good for redundancy, that's six channels, flaps and crow braking i.e. flaps down and ailerons up can be assigned to the side slider, both flaps on separate channels for redundancy and power, that's eight channels and we still have the retracts and wheel brakes to contend with.
The 14 channel Futaba Rx works with this unit as does the S-Bus system that's capable of 18 channels.
As far as I know there are not plans for telemetry for the FG8.
Hope that answers your questions.
Mike
The 14 channel Futaba Rx works with this unit as does the S-Bus system that's capable of 18 channels.
As far as I know there are not plans for telemetry for the FG8.
Hope that answers your questions.
Mike
01-17-2012, 04:30 AM
#4205
One other thing if you get a Boomerang type of airframe like the Bob Cat Copy Falcon you also have to contend with two rudders, again easier to set up on two separate channels so that servo reverser,s are not needed.
Mike
Mike
01-17-2012, 04:37 AM
#4206

My Feedback: (4)

Join Date: Apr 2005
Location: Latrobe,
PA
Posts: 2,326
Likes: 0
Received 0 Likes
on
0 Posts
ORIGINAL: rcfun2005
looking for hardware / modifications for quickly removing tail boom for travel ?
i think there was reference in previous post about this , but i did not find it ? any one remember ?
thanks
looking for hardware / modifications for quickly removing tail boom for travel ?
i think there was reference in previous post about this , but i did not find it ? any one remember ?
thanks
ORIGINAL: bhoges17
Anyone try a DLE 20CC it her? Perfect size gas motor but wont be a real screamer. My field wont allow jets.
Anyone try a DLE 20CC it her? Perfect size gas motor but wont be a real screamer. My field wont allow jets.
I'm with BaldEagal on this one. You need more RPM, and less size.
01-17-2012, 06:11 AM
#4207
Senior Member
Join Date: Apr 2005
Location: Houston,
TX
Posts: 139
Likes: 0
Received 0 Likes
on
0 Posts
ORIGINAL: Dr Honda
I've had a couple people ask about the hardware mods. In a different thread, the question was posted about how hard is it to assemble the Falcon/Tornado at the flying field. My response was it only takes about 5 minutes.
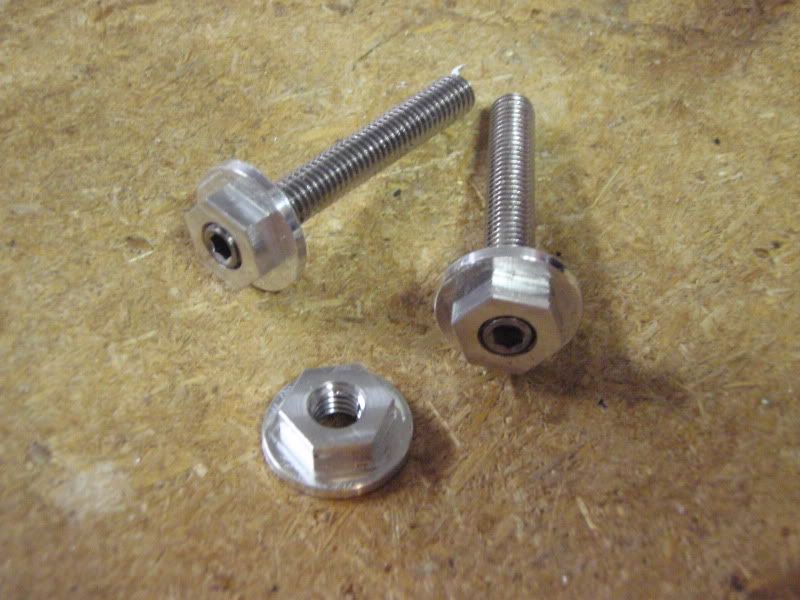
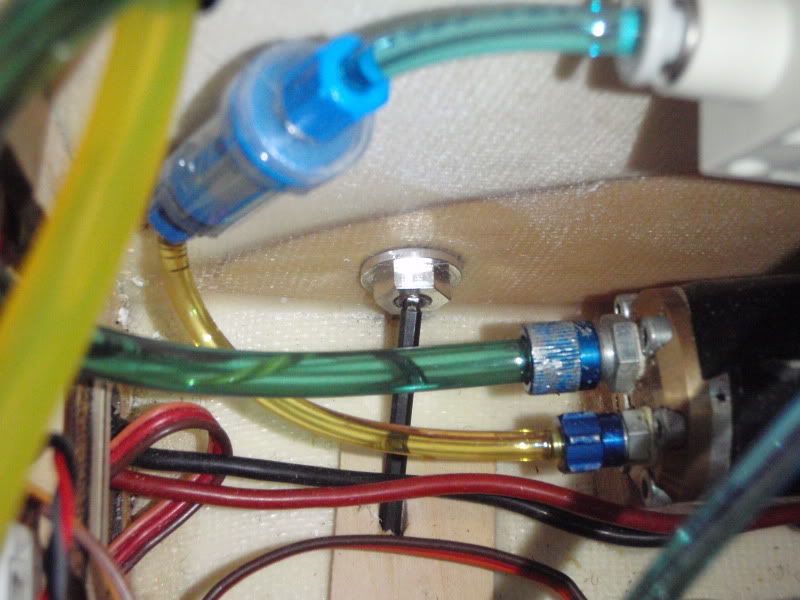
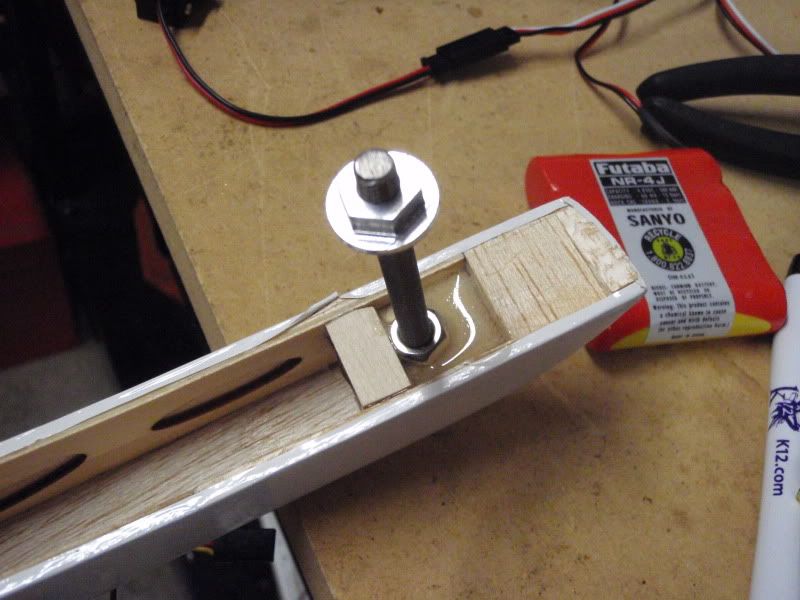
To make the wing bolts easier to install, I made some new bolts. These have both a standard hex, and a cap head hex in them. This allows me to run them into the wing with a ball-driver, and to tighten them with a small ratchet. In the bottom of my fuse, I epoxied a strip of balsa, and drilled holes in at an angle to allow the ball driver to engage the front bolts. The rear bolts are easier to deal with, since the hatch is under the rear section.
To make the booms easy to install... I installed 6mm studs in the booms. (with a jam nut, and red thread locker) This allows me to partly slide the booms into the wing, and hook up the wires. Then... I can push it the rest of the way in, an use some of my custom made aluminum flange nuts to hold them in place. You will also see a necessary mod for the booms. You need to support the ply-wood mount up to the surface of the wing. (front and rear mounts) This will give the boom more clamping surface, and it will prevent the blind nut from cracking the ply-wood mount. (and loosing your booms in flight)
As a final FYI... all the hardware is 6mm standard threads.
I've had a couple people ask about the hardware mods. In a different thread, the question was posted about how hard is it to assemble the Falcon/Tornado at the flying field. My response was it only takes about 5 minutes.
To make the wing bolts easier to install, I made some new bolts. These have both a standard hex, and a cap head hex in them. This allows me to run them into the wing with a ball-driver, and to tighten them with a small ratchet. In the bottom of my fuse, I epoxied a strip of balsa, and drilled holes in at an angle to allow the ball driver to engage the front bolts. The rear bolts are easier to deal with, since the hatch is under the rear section.
To make the booms easy to install... I installed 6mm studs in the booms. (with a jam nut, and red thread locker) This allows me to partly slide the booms into the wing, and hook up the wires. Then... I can push it the rest of the way in, an use some of my custom made aluminum flange nuts to hold them in place. You will also see a necessary mod for the booms. You need to support the ply-wood mount up to the surface of the wing. (front and rear mounts) This will give the boom more clamping surface, and it will prevent the blind nut from cracking the ply-wood mount. (and loosing your booms in flight)
As a final FYI... all the hardware is 6mm standard threads.
Dr Honda ,
wow , the custom hardware is looks like great stuff on attaching wings and tail booms ...
thanks for posting the pics and the details ... this certainly helps with getting a game plan going on my Modellbau Tornado for the tail booms !! Joe
01-17-2012, 07:43 AM
#4208
Joe
I did mine the other way around i.e. the captive nut was in the fus and the slot for the allen key was in the wing with a bolt and captive nut on the outside against the root rib, found this easier not having to contend with all the gubbins that was in the fus, I did have to put a guide tube in the wing to make sure the allen key located on the bolt, but a lot easier.
Mike
You may be interested in the mods I carried out to the Falcon, I am not saying these are all necessary or the only way to do it, but It may help, these do not include the wing mods I carried out as I can't seem to find the details.
Page 85 post 2116
Page 86 post 2140
Page 90 post 2226
Page 95 post 2358
Page 96 post 2379
Page 97 post 2405
01-18-2012, 09:08 AM
#4211
Banned
Join Date: Jul 2004
Location: England, , UNITED KINGDOM
Posts: 2,725
Likes: 0
Received 1 Like
on
1 Post
That servo position is fine but the stock position with 2 HS225 Mgs works excellently and makes breaking it down for transport easy
Deno
Deno
01-18-2012, 09:13 AM
#4212
If you are going to put two elevator servo's in the tailplane it may be worth splitting the elevator so they do not fight each other, as long as you have them on separate channels you will be able to set it up easily.
Mike
Mike
01-18-2012, 11:46 AM
#4213
I did exactly the same with my 120 installing 2 x Futaba 9650 I did not split elevator as set up through power box so no fighting etc I used two plastic servo covers with the 9650 bolted to the servo cover with 3mm titanium dome socket screws
This way is quicker than stock as I just plug servo in to trailing socket no unclipping control clevis etc used this for two and a half yrs now no problems.
I also use two servo covers in the wing to mount the BLS451 servos.
Alan
This way is quicker than stock as I just plug servo in to trailing socket no unclipping control clevis etc used this for two and a half yrs now no problems.
I also use two servo covers in the wing to mount the BLS451 servos.
Alan
01-18-2012, 03:18 PM
#4214
I think a power box in a Falcon is taking it a bit far, but to each his own, I don't take the tailplane off the booms, just remove the booms and bolt a brace between them, a multiplex plug takes care of the servo's in the tail and a RS232 on the wing root took care of the connection into the fus.
Mike
Mike
01-24-2012, 01:05 AM
#4217
My Feedback: (1)
Join Date: Oct 2010
Location: Moscow, RUSSIA
Posts: 26
Likes: 0
Received 0 Likes
on
0 Posts
hereis thread on rcgroups http://www.rcgroups.com/forums/showt...on+120&page=29
01-27-2012, 10:53 AM
#4218
Junior Member
Join Date: Oct 2011
Location: ellerton, UNITED KINGDOM
Posts: 18
Likes: 0
Received 0 Likes
on
0 Posts
Fascinating thread this one.......amazing how one plane gives rise to so much discussion....the advise you can find within is invaluable.
I have been flying for over 30 years but the last 5 or so have been purely heli's.Although I go to all the shows throughout the year and love the flying displays,the jets always got my full attention.I always said to myself I would never fly one one those things.........BUT something snapped in side my headand and I bought one....aused Boomerang complete with a Wren 54 and flew it...from that moment on my life changed...I now no longer fly heli's....
Havingflown the Boomer I wanted something a bit sleeker(and faster) so I got a Falcon 120 and a Kingtech 80F.The only mods I did was to epoxy the horizontal stab to the fins aand make it permanent and just a brace across the front for transport,fitted Hitec 225s ans standard but carbon/metal rods and linkages for strength and rigidity.I set studs in the booms so now bolt on from underneath with nyloc nuts and beefed up the mounts as recommended...other than this nothing.The wings again I used studs set in the wing root so now bolt them on from the inside...only marginally more fiddly as my UAT slightly restricts me but none the less neat and tidy.Carbon linkages for safety again.I used E-flite electric retracts with Dr Hondas hubs and brakes...oh and one of his lovely ally engine mounts...looks great....I'll post some pictures tomorrow...the only thing I didnt do was beef up the wing retract mounts.....big mistake.....more in a moment...
2 x 2400 lips for the radio and a 5300 Life for the ECU in the nose and she balanced perfectly with a full UAT at 13 inches.Didnt bother weighing her ...seemed to be quite reasonable....
so off to the air strip...we fly of a tarmac runway...3 clicks of up elevator and a couple of right aileron she is flying like a dream,smooth yet responsive,I forget the time and before I know it 6 minutes has gone and my transmitter is telling me to come home...gear down,flaps down and she floats in amazingly slowly even though no head wind,settles gently on the tarmac as sweet as anything.Exactly the same for the second and third flight...a big grin and I am really loving my Falcon......now we get to the fourth flight......as exaclty as before,no problems at all until I land...while she is still rolling I hit a small ridge in the tarmac..the right main parts company from the wing completely and the left just hanging on more by luck than anything...fortunately no real damage except bottom skin and mounting blocks have torn away...looked worse that it was I suppose...the moral here Is I should have listened to my own good advice and beefed up the mounts...so now I have paid the price and should not have trusted the mouse poo they had originally been stuck in with....lesson learnt.....anyway...all repaired and ready to go again.I may well trash the whole plane now but the retracts are safe......The Falcon is a fantstic model for the money,with some simple mods its a cracking little jet.....keep this thread alive..its invaluable and I thank all those how have shared their ideas....will upload some pics tomorrow...till next time...safe flying....
Adrian
01-27-2012, 11:22 AM
#4219
My Feedback: (5)
Join Date: Nov 2004
Location: Boise, ID
Posts: 71
Likes: 0
Received 0 Likes
on
0 Posts
Dr Honda,
Now that you have some time on your landing gear what do you think about the demensions that you used? Im thinkin in terms of thickness and width. I am getting to a point that Im bout to buy the aluminum to make my own gear. What was the width that you used?
Now that you have some time on your landing gear what do you think about the demensions that you used? Im thinkin in terms of thickness and width. I am getting to a point that Im bout to buy the aluminum to make my own gear. What was the width that you used?
 01-27-2012, 11:56 AM
#4221
My Feedback: (4)
Join Date: Apr 2005
Location: Latrobe,
PA
Posts: 2,326
Likes: 0
Received 0 Likes
on
0 Posts
ORIGINAL: pulsar110
Dr Honda,
Now that you have some time on your landing gear what do you think about the demensions that you used? Im thinkin in terms of thickness and width. I am getting to a point that Im bout to buy the aluminum to make my own gear. What was the width that you used?
Dr Honda,
Now that you have some time on your landing gear what do you think about the demensions that you used? Im thinkin in terms of thickness and width. I am getting to a point that Im bout to buy the aluminum to make my own gear. What was the width that you used?
01-27-2012, 12:17 PM
#4223
My Feedback: (4)
Join Date: Apr 2005
Location: Latrobe,
PA
Posts: 2,326
Likes: 0
Received 0 Likes
on
0 Posts
ORIGINAL: pulsar110
Perfect! Looks like the piece you used is about 4 inches wide?
Perfect! Looks like the piece you used is about 4 inches wide?
Yep.....
(Top and bottom are folded, and the middle is flattened, and not to scale)
 01-27-2012, 02:02 PM
#4225

Bargain V2 Tornado at www.modellbauuk.com and on wheels, struts & brakes if you want to save all the mods and go straight to the turbine model