


VQ A6M5 Zero Build Thread
 07-19-2010, 05:36 PM
#101
Senior Member
Join Date: Jul 2008
Location: Woodford,
VA
Posts: 138
Likes: 0
Received 0 Likes
on
0 Posts
Disaster!!
My youngest son, almost 3, of my 4 helpers, decided to help Dad out with a little toy hammer fixing on my wing...
This occurred right after I thought that I was ready( just set wing down after 2 hrs of weathering work) for the clear coat.
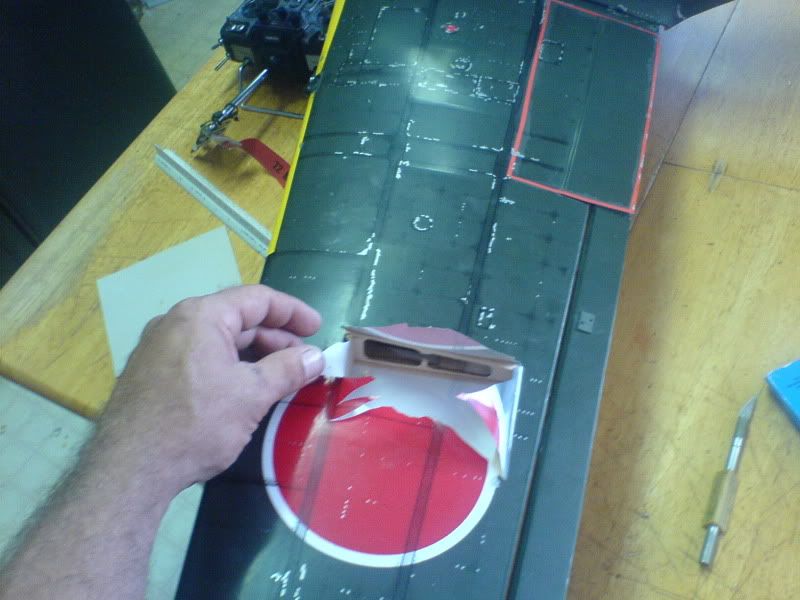
What to do? This is a very different covering that already has printed panel line, rivets and such. The puncture is located right between the ribs making patching difficult...
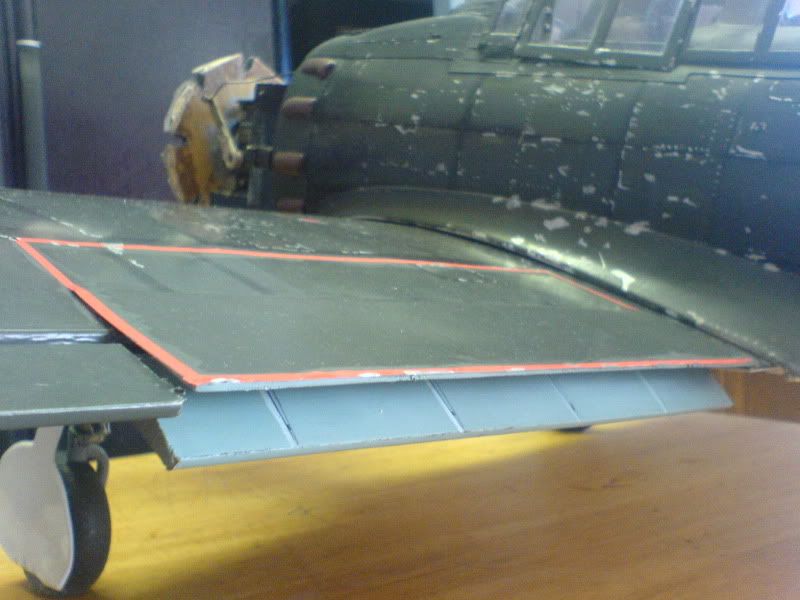
Also of note is the blue flaps... My cheap, hacked , modified split flaps on an ARF, later pics will show the addded rivets and panel lines above the flap area..
My youngest son, almost 3, of my 4 helpers, decided to help Dad out with a little toy hammer fixing on my wing...
This occurred right after I thought that I was ready( just set wing down after 2 hrs of weathering work) for the clear coat.
What to do? This is a very different covering that already has printed panel line, rivets and such. The puncture is located right between the ribs making patching difficult...
Also of note is the blue flaps... My cheap, hacked , modified split flaps on an ARF, later pics will show the addded rivets and panel lines above the flap area..
 07-19-2010, 06:31 PM
#102
Senior Member
Join Date: Jul 2008
Location: Woodford,
VA
Posts: 138
Likes: 0
Received 0 Likes
on
0 Posts
First step to repairing this type of covering(preprinted shelfing paper) is to carefully relieve said covering to expose the cap-strips.This is the closest surfaface to hopefully work with.
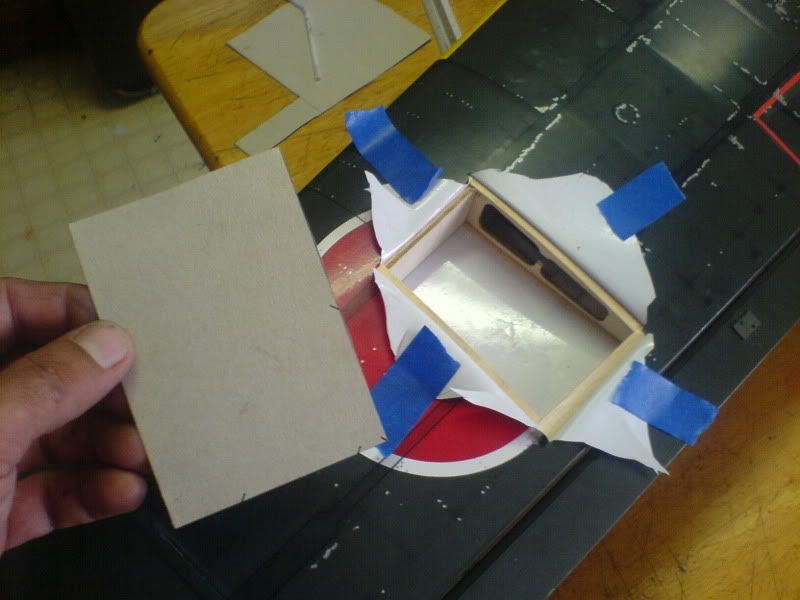
Notice cardboard template made to span between capstrips, trialing edge and leading edge.
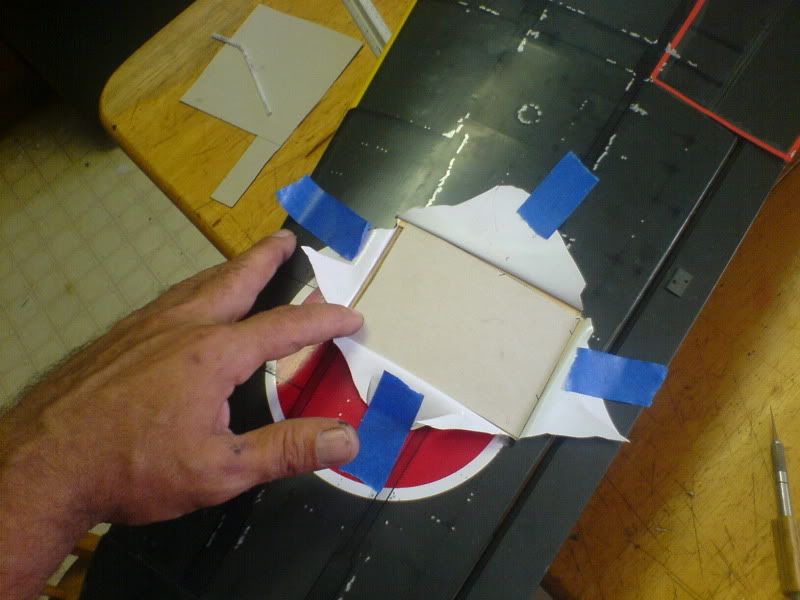
This is only a template because of the thickness of the material caused a big "ridge" in the covering. I used this template to cut a thick paper sheathing for my purpose.
Notice cardboard template made to span between capstrips, trialing edge and leading edge.
This is only a template because of the thickness of the material caused a big "ridge" in the covering. I used this template to cut a thick paper sheathing for my purpose.
07-19-2010, 07:18 PM
#104

My Feedback: (2)
Join Date: Feb 2008
Location: Elmwood Park ,
IL
Posts: 1,455
Likes: 0
Received 0 Likes
on
0 Posts
repair is looking good , and think of it this way it might turn out to be a happy occurrence ..... Zeros where very much beat up and flown hard , so you may find that this may add to the weathering and war wounds we try so hard to simulate, Anybody asks .. you did it on purpose ! LOL seriously I'm pretty sure she'll come out looking even better then before.
also seeing yours has inspired me to get cracking on my third CMP 120 zero and hopefully get a little work done on my yellow, I may send both off to you for some weathering and in prompt plastic hammering (for that authentic look !!!! ) Lmao
also seeing yours has inspired me to get cracking on my third CMP 120 zero and hopefully get a little work done on my yellow, I may send both off to you for some weathering and in prompt plastic hammering (for that authentic look !!!! ) Lmao
07-19-2010, 08:32 PM
#105
Senior Member
Join Date: Jul 2008
Location: Woodford,
VA
Posts: 138
Likes: 0
Received 0 Likes
on
0 Posts
LOL!
Thanks for the kind words Zero322.
While it can never be good as new, neither was the A6M5 in 1944.....
I am eager to get this one done and move on to the next one too.
Thanks for the kind words Zero322.
While it can never be good as new, neither was the A6M5 in 1944.....
I am eager to get this one done and move on to the next one too.
07-20-2010, 02:37 PM
#106
Senior Member
Join Date: Jul 2008
Location: Woodford,
VA
Posts: 138
Likes: 0
Received 0 Likes
on
0 Posts
Retracts and bay area.....


All of these pics are before the plane is done. I have finished and clear coated the wing yesterday and plan on shooting the fuse this evening.
Then, more pics!
All of these pics are before the plane is done. I have finished and clear coated the wing yesterday and plan on shooting the fuse this evening.
Then, more pics!
07-20-2010, 10:44 PM
#107
My Feedback: (2)
Join Date: Feb 2008
Location: Elmwood Park ,
IL
Posts: 1,455
Likes: 0
Received 0 Likes
on
0 Posts
If I had your skills to do the cockpit and pilot, I would have gotten one of these by now, in a heart beat ! Looks really really good ! if I do I may have to pick your brain on the finer details
07-21-2010, 03:57 PM
#108
Senior Member
Join Date: Jul 2008
Location: Woodford,
VA
Posts: 138
Likes: 0
Received 0 Likes
on
0 Posts
pick your brain on the finer details
I would have gotten one of these by now
Things like the pilot, engine, and tailwheel strut I would have bought if I could. Allthough I do think that mine came out very well.

Anyways, wing and fuse is clear coated, just got done working on the wing mounted MG's and setting control throws.
More pics to come showing the finished(about) airplane.
07-22-2010, 06:24 PM
#109
Senior Member
Join Date: Jul 2008
Location: Woodford,
VA
Posts: 138
Likes: 0
Received 0 Likes
on
0 Posts
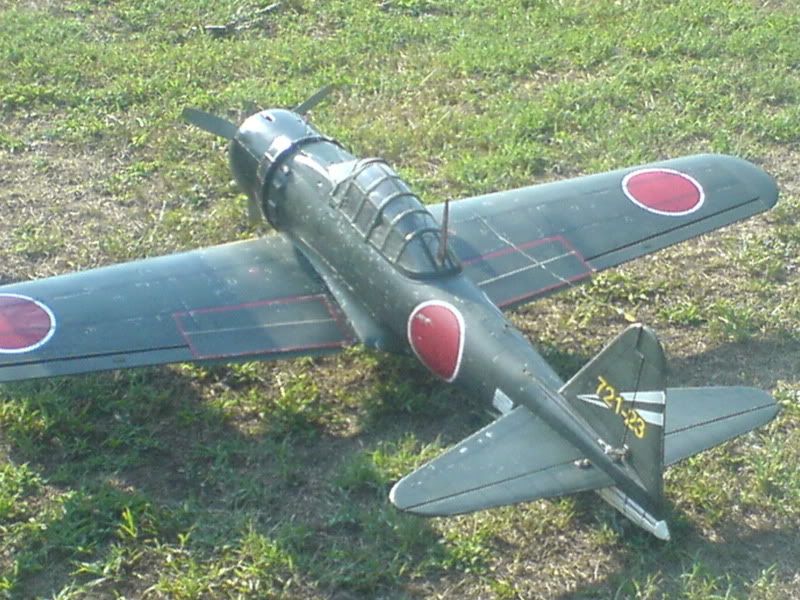
I am about done with this bird!
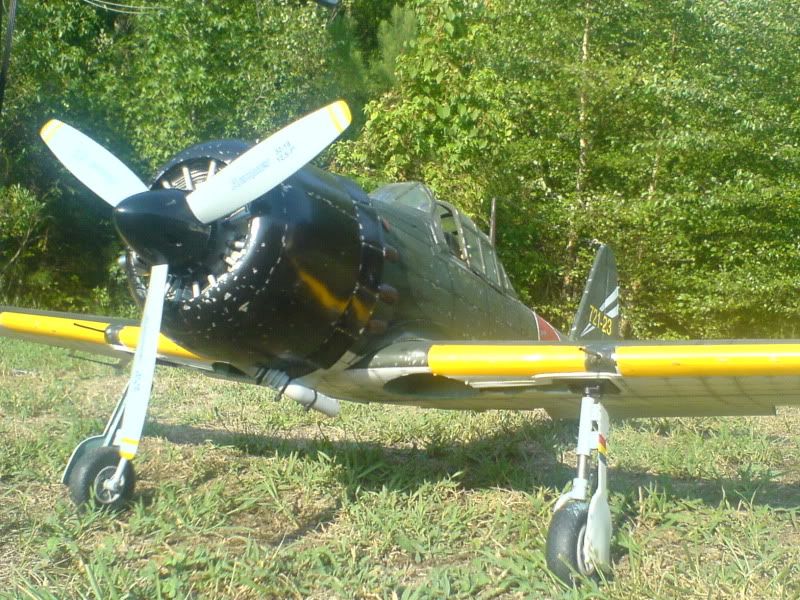
I had her out this evening for engine run-up, which didn't turn out too well. I believe that I have an air leak in my fuel system. I'll be working on that next.
I also need to replace those wing mounted MG's, which are too skinney. I'm also waiting on some more yellow paint to finish the leading edge strip.
Pics.....
07-22-2010, 07:30 PM
#110
Senior Member
Join Date: Jul 2008
Location: Woodford,
VA
Posts: 138
Likes: 0
Received 0 Likes
on
0 Posts
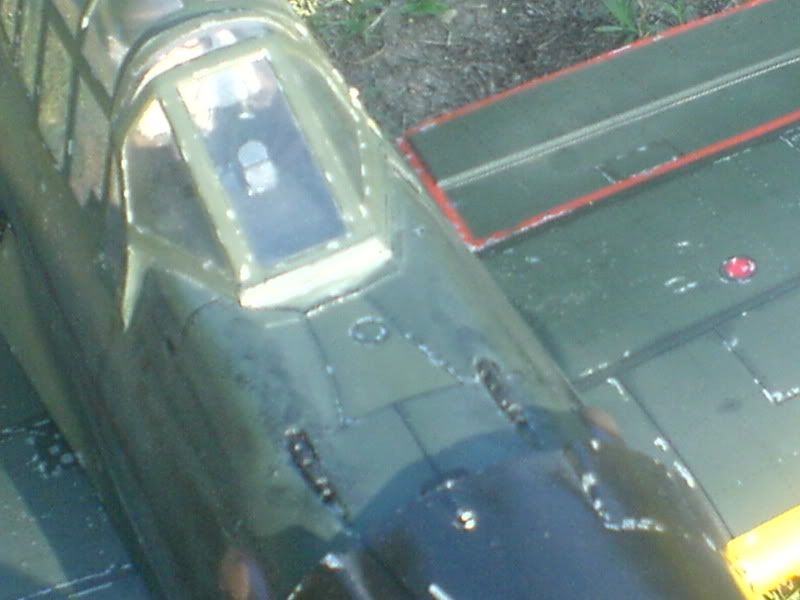
Upper part of fuse infront of cockpit showing panel lines that I carved into the plain lookin plastic, with rivets of course. Also to be seen is the gunpowder burns and residew from fuse mounted MG's.
Another view of the nose showing the weathering and "chipped" paint on cowling. Fake engine fits good and is removable.
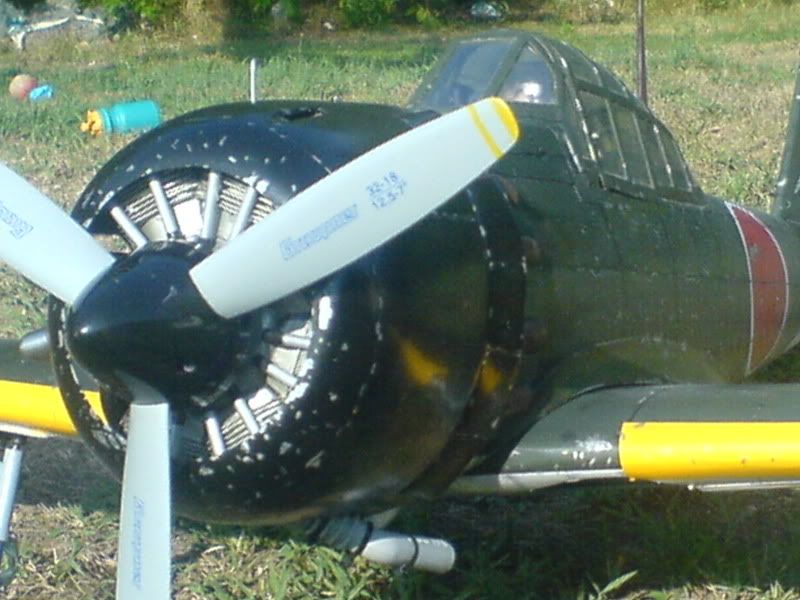
Another view of the nose showing the weathering and "chipped" paint on cowling. Fake engine fits good and is removable.
 07-22-2010, 11:54 PM
#112
My Feedback: (2)
Join Date: Feb 2008
Location: Elmwood Park ,
IL
Posts: 1,455
Likes: 0
Received 0 Likes
on
0 Posts
If there was ever a hard sell for a VQ Zero for me to get one , seeing yours it is almost impossible for me not to want one ! Ok could I impose on you either by post or by e-mail if you could please give me some instruction on the cockpit ? I did one for my 120 CMP it came out pretty good and the detail was a little easier to do because it was a little bigger, but if i tried to scale my method down it would take me forever
by the way the repair on the wing is invisible ! Looks great !
by the way the repair on the wing is invisible ! Looks great !
07-23-2010, 02:09 PM
#113
Senior Member
Join Date: Jul 2008
Location: Woodford,
VA
Posts: 138
Likes: 0
Received 0 Likes
on
0 Posts
if you could please give me some instruction on the cockpit ?
While I realize that your probally specifically talking about the VQ Zero, a more general how-to would be the most beneficial for everyone.
I wish that I started takin pics while I started the cockpit but, only after I seen how nice this bird was turning out did I start(taking pics).
The only way to properly make an illustrated how-to on making a cockpit from scratch would be to actually during the construction of one.
Unfortunately, I plan on building another stick-built kit next( Ultimate bash! SIG Astro Hog into a V3 "VAL" divebomber!!!).
Looking at my VQ Zero, all that is needed to make room for the cockpit is to simply cut-away the supplied floor to cockpit tub, thus revealing the innards all the way to the servos. I then just glued a cardstock floor in place.
Any more qustions, just ask.
I will post a pic of said cockpit floor.
I found that I had somehow sliced a hole into my fuel-line leading to my carb. I have just returned home from hobbyshop with more fuel-tubing and the yellow paint need for my L.E.
The only way to properly make an illustrated how-to on making a cockpit from scratch would be to actually during the construction of one.
04-01-2011, 09:55 PM
#116

Join Date: Feb 2008
Location: San Juan Capistrano,
CA
Posts: 281
Likes: 0
Received 0 Likes
on
0 Posts
Looks like this thread dried up March of 2010, but if anyone wants a VQ A6M Zero, Hobby People has them for $99.99 (I just bought two - one for me and one for my son). I notice that VQWARBIRDS.com is charging $169.95 for the same VQ model, in fact they are in general about 75% more on any VQ or BH Models ARF than the Hobby People store chain is. - Hobby People
Their parent company Global, is the importer now for VQ (Vinh Quang) Models and has been for BH Models for some time.
Hobby People also has the VQ P-40C for $139.99, VQWARBIRDS.com has the same for $199.99.
Shop around, before you buy!
Ps, I used a Master Air Screw 12x8x3 (three blade) with a Magnum 91 4-stroke and a DuBro 2" spinner. This model calculates out at 1/7th scale roughly.
04-02-2011, 08:54 AM
#117
My Feedback: (2)
Join Date: Feb 2008
Location: Elmwood Park ,
IL
Posts: 1,455
Likes: 0
Received 0 Likes
on
0 Posts
The link you provided doesn't work try this one www.hobbypeople.net and I'm sorry hate to burst your bubble but perhaps you purchased at a sale or special buy price, because they list the zero at 179.99 and the P-40 at 220.62 both of which are more then what VQ has them listed for
04-02-2011, 09:59 AM
#118
Join Date: Feb 2008
Location: San Juan Capistrano,
CA
Posts: 281
Likes: 0
Received 0 Likes
on
0 Posts
The VQModels are frequently on sale at Hobby People, while they are never on sale at vqwarbirds. Hate to pop your bubble, but this latest sale on the VQAM6 Zero, it was again $99.99. They seem to run a VQ sale every 3 to 4 weeks, at which time, they are generally 50% cheaper than vqwarbirds.
Plus you have the added advantage of walking into any of 20 Hobby People stores(on the west coast) if you have a problem, and vqwarbirds is only mail order.
I'd highly suggest that if anyone would like a far better deal on VQ or BHModels planes, you sign up for sale notifications by email from Hobby People. You won't be sorry.
06-12-2011, 05:50 PM
#120
My Feedback: (11)
Good day! I bought by grey version from HP 2 weeks ago. I finished the build on 6/10/11. I will post pics soon. I maidened it today! The weather was good, 75 degrees, winds 10kts. I converted mine to electric with HiTec standard servos, Phoenix 75 ESC, Rimfire .46 with a 5S 3600 battery on an APC 12x8 electric prop. This set up pulls 1150w @ 61 amps static test. I bought the retracts from VQ Warbirds (Thanks Tomas!) Radio is an Airtronics RDS8000 2.4. w/6 channel rx. I used a HiTec HS75 for the retract servo. The fit was fine, I just had to build a servo tray and it was in. I haven't put her on the scale but I would guess she's right around 7 pounds. The CG came in right on the money. No added weight.
The maiden was slightly uneventful...
I taxied out and lined up on the runway, pointed the nose into the wind and applied smooth power to half throttle. Just before reaching half throttle the tail came up and tracked nicely, a little right rudder to keep it straight adding power and she rose gracefully into the sky. Since the wind was gusting all morning, I rose a bit higher to set the trim. I like my planes with a bit of down trim to keep me honest so I set that and then she needed only a bit of right aileron trim to track nicely. I made a few high speed runs low and she sliced through the wind like butter! She is a rocket and I wondered how the landing would be. I've read on here that the Zero slows nicely but I was a bit concerned about the elecric conversion but the landing was smooth if not a bit fast. The second landing was slower as I got a better feel for how slow it can fly. It does slow down nicely without having to make flaps. now the fun part:
I forgot to set the timer for the 3 minute shake-down flight so after I had flown it for about what seemed like a minute (4 actually), I handed the transmitter to my friend Tony to let him fly. He flew some screaming high power runs and really made her fly! Then, (unexpectedly?) the power dropped to zero on the downwind leg, he masterfully pulled pack the power to reset the ESC, climbed and made the base turn to final approach to a full stop. Next time, I'll start the timer on taxi...
Jack
10-19-2011, 10:24 AM
#123
My Feedback: (11)
This plane flies like a dream and it's FAST! The radar gun had it at 85 mph. I don't fly it that fast and have propped it down to fly more scale.I added dullcoat to the finish to add to the appearance. I will post pics.I changed out the mechanical retracts for electric ones.
06-19-2012, 09:02 PM
#124
Join Date: Feb 2008
Location: San Juan Capistrano,
CA
Posts: 281
Likes: 0
Received 0 Likes
on
0 Posts
Well this thread went silent some 9 months ago, is anyone's VQ A6M5 still flying or has it become a loose pile of Balsa?
Curious, has any one tried self contained eRetracts on a VQ this models size? Results?
Curious, has any one tried self contained eRetracts on a VQ this models size? Results?
06-20-2012, 04:23 AM
#125
My Feedback: (11)
I've had 2 Zeros since my last post. I've used electric retracts in both and they held up very well. My first Zero is a pile of balsa but my second one is ready to recover in something other than the 'shelf paper' used by VQ. Other than than, it's a big hit at the field and flies well.