


ESM 50cc Corsair
 11-17-2012, 08:18 AM
#1551
Member
Join Date: Aug 2010
Location: siloam springs, AR
Posts: 49
Likes: 0
Received 0 Likes
on
0 Posts
hey Stoat, have you had a chance to detail the underside of your plane yet? looking for tips to make mine look as awesome as yours! That engine looks great, thank for the help. Roger
ORIGINAL: stoat
Ok, cool. I will be doing the underside this week so will get the camera running. Hopefully you will get some info from it.
Ok, cool. I will be doing the underside this week so will get the camera running. Hopefully you will get some info from it.
 11-17-2012, 12:37 PM
#1552

My Feedback: (27)

Join Date: May 2011
Location: Corona, CA
Posts: 160
Likes: 0
Received 0 Likes
on
0 Posts
Ok I need some insight.... I'm looking at the tube to mount the engine. Like everying else the thrust is left and down? Curious to know what others used to cut the tube mounts inside the fuse to correct this? Is there any need to use the tube at all?
11-17-2012, 01:21 PM
#1553
Senior Member

Join Date: Jan 2005
Location: new plymouth, NEW ZEALAND
Posts: 496
Likes: 0
Received 0 Likes
on
0 Posts
ORIGINAL: youmanskids
hey Stoat, have you had a chance to detail the underside of your plane yet? looking for tips to make mine look as awesome as yours! That engine looks great, thank for the help. Roger
hey Stoat, have you had a chance to detail the underside of your plane yet? looking for tips to make mine look as awesome as yours! That engine looks great, thank for the help. Roger
ORIGINAL: stoat
Ok, cool. I will be doing the underside this week so will get the camera running. Hopefully you will get some info from it.
Ok, cool. I will be doing the underside this week so will get the camera running. Hopefully you will get some info from it.
11-17-2012, 01:36 PM
#1554
Senior Member
Join Date: Jan 2005
Location: new plymouth, NEW ZEALAND
Posts: 496
Likes: 0
Received 0 Likes
on
0 Posts
ORIGINAL: midastouch_73
Ok I need some insight.... I'm looking at the tube to mount the engine. Like everying else the thrust is left and down? Curious to know what others used to cut the tube mounts inside the fuse to correct this? Is there any need to use the tube at all?
Ok I need some insight.... I'm looking at the tube to mount the engine. Like everying else the thrust is left and down? Curious to know what others used to cut the tube mounts inside the fuse to correct this? Is there any need to use the tube at all?
http://www3.towerhobbies.com/cgi-bin...&I=LXLJ20&P=ML
If you look back through this thread, you will find how I did it.
You can see I cut off the excess with the keyhole saw and glued it to the other side. Once the tube was installed and everything was covered in epoxy it was super strong.
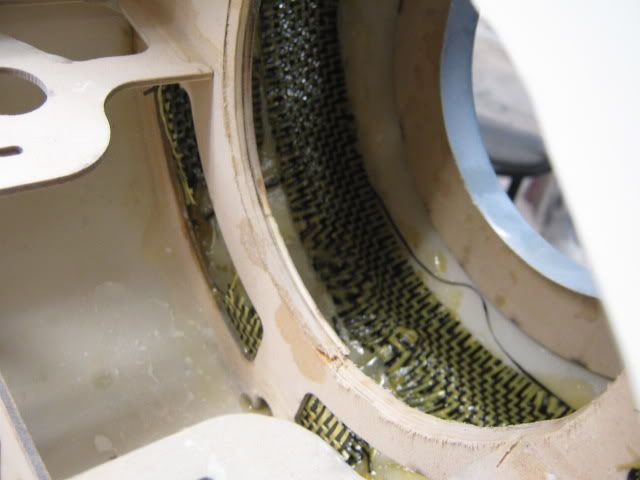
I wouldn't recommend not using the tube unless you add some reinforcing around the inside of the fuse/firewall joint - see carbon/Kevlar cloth in first photo. This joint is only a butt joint so may come apart over time with vibration - not the coolest look for your pride and joy having the motor wall off mid flight...!
Hope this helps.
Cheers
Brett
11-17-2012, 02:05 PM
#1555
My Feedback: (27)
Join Date: May 2011
Location: Corona, CA
Posts: 160
Likes: 0
Received 0 Likes
on
0 Posts
Thanks for the info. I looked through the thread but I must have overlooked it. I have the carbon Kevlar which ill install today. I was just a bit stumped on what to use to make the cut.... Thanks much
11-17-2012, 02:42 PM
#1556
My Feedback: (27)
Join Date: May 2011
Location: Corona, CA
Posts: 160
Likes: 0
Received 0 Likes
on
0 Posts
I was able to find the saw at my LHS. Hey Stoat I was looking at your photobucket engine mount photos. I noticed in some of your photos you have your engine mounted with wood behind you engine and others without. Was there reason you added the wood?
11-19-2012, 08:11 AM
#1557

My Feedback: (13)
Will several of you guys, that have completed this kit, list a summary post to include the following: the engine used, weight added to balance, modifications to the kit that a builder must do and any additional info that would be helpful. I know that it's all here on this thread,but it would be great to see info grouped.
THANKS
THANKS
11-19-2012, 08:50 AM
#1558

ORIGINAL: SWORDSN
Will several of you guys, that have completed this kit, list a summary post to include the following: the engine used, weight added to balance, modifications to the kit that a builder must do and any additional info that would be helpful. I know that it's all here on this thread,but it would be great to see info grouped.
THANKS
I mean, since you are the on that needs it, right?
 11-19-2012, 01:58 PM
#1560
ORIGINAL: SWORDSN
To much to ask huh? 5or 6 lines from the ones that have completed a kit
To much to ask huh? 5or 6 lines from the ones that have completed a kit
 ]
]Mine: FG-57 , 14.5 kg, maybe 300 g in the nose, Robart retracts, Robart tail retract,so many mods that I cannot remember now.
-Two big cowling hatches
-Opened up the Big circular hatch in front of canopy for switches, fuel filler, air filler
-One carbon rod to each elevator from 2 servos up front; Elevator horns inside fuse on carbon tubes from elevators.
-One carbon rod to rudder, horn on a carbon tube down from the rudder.
-Lengthening the robarts by moving the scissors 1 cm up on the leg, and a alu-piece inside to stiffen the springs.
-Using the largest robart hinges all around.
-Two A123 batteries in cowling, accessible via the cowling hatches. So is the carburator.
-All servos in fuse as close to CG as possible. ( 6 of them)
-3 piece wing on the alu tubes. 4 flap servos hitec 645's using a MSA-10 box for them.
 11-19-2012, 02:36 PM
#1562
SWORDSN
kWIK is right...............we've all done so many mods on the bird, I will list a few that I can remember.
Engine........4.2 brison She came in at 28 ibs then I added 3 lbs to the nose to get to balance. So flying wieght is 31 lbs. The big Brison handles the job supremely.
I took out all of the pull pull cheap plastice stuff inside the fuse. Put the elev serv in the rear of the fuse behind where the tail wheel mounts....built my own servo tray back there. The rudder servo is in it's normal place in the servo tray.......ran a carbon fibre rod back to the rudder. I put my own Pull Pull in for the retractable tail wheel steering. I use a very high quality cavlar, I will not use wire. I built and installed my own fire wall to mount the Brison to. Didn't like cylinder design. These are all my own thoughts and designs and only my humble opions not to be thought of as the only way to do things.
The wing...........mine is NOT a three piece. I have the luxury of a trailer for hauling to the field and do not like three piece wings. It's all glued together as is the stab. I use only one very strong Hitec HS 7955 TG SERVO for each side of the wing to run all three flaps. I started with the ESM stock retracts..............DID NOT LIKE THEM AT ALL. Some do and are having good luck with them. I took mine out a sold them. I had a set of Robart 148's that I sent back to Robart for a complete conversion. Haven't got'em back yet. They're converting them to electric and also lenthening them to fit the ESM Corsair. The whole conversion and parts and labor to fit them to the ESM Corsair was $350.00 bucks.......I know you were gonna ask.
There's probably more, but I can't remember everything..........Like Kwik says, too many!! not a beginner's ARF..........Great plane...........VERY VERY POOR engineering....
11-19-2012, 02:43 PM
#1563
My Feedback: (1)
Hey I don't mind. I think it would have been helpful for me. Although you must understand that everybody has different opinions and ideas about modeling. With that being said let me first say that I do not believe this is an ARF kit by any stretch. You need modeling skills to complete it or you will learn some along the way. As far as having to mold fiberglass and paint ( the majority of the plane, yes that has been done for you and saves many many hours. And for the most part looks good. First thing is the plans don't really match what is in the latest kits. No more aluminum spar. I have used the wooden ply spar and have not found it to be a problem. If you plan on making the outboard sections removable, the wooden pegs and single screw which holds them in place is very inadequate. Another bolt and nut on the inside trailing edge is needed to secure the wiing. I access mine thru the wheel bay doors. I had to fabricate my own servo covers on the bottom of the wings as my kit was short those pieces. The pieces that did come with it , the decal pattern did not match. The wheel bay doors you may need to work with and tweak to get them to match and lay correctly( my fiberglass was warped .) The biggy is the left thrust in the engine mount tube. I ditched the whole idea and used the plans that came with my DA 60 engine to make the engine mount and bolted it thru the firewall after I added a second layer of ply to the inside with some fiberglass cloth and resin. Isnt pretty but you never see it. The original firewall is just too thin. Back to the engine, I know this is a 50cc size kit but that would barley fly the thing if minimal part and accessories were used along with wire landing gear, maybe! My DA 60 has plenty of power but it wont fly it like a pattern ship. But then again I didn;t want a corsair warbird to fly like a bat out hell 3d acrobatic stunt plane. Now some argument can be made for larger engines( twins) offering less vibration , more inherent weight up front , etc. These are things which are personal preference and should be considered. One thing I forgot to mention about the mount. I did put a right thrust and a very slight downward in it. I ended up with 31/2 lbs of weight up front. I accomplished this by using the flat weights found at your hobby store and I lined the inside of my cowl with them as close to the front of the col as possible and epoxied over them( Yes I have the heaviest cowl on the forum and if the nose hits , well, it may not be pretty; on the other hand, I may have the strongest cowl on the forum too! My goal was to use as little weight as possible obviously and putting that weight as far forward as possible. I even melted lead and filled my tru turn spinner with lead ( BTW does not throw the balance of the spinning prop off at all)
I didn't use very much of the hardware that came with the kit. Bought robart hinges for all control surfaces and I went with the pull pull system but went up to heavy duty cable and clevises and turnbuckles. I did stay with the control horn assembly for rudder and elevator. The guide tubes for running your cables may not be aligned correctly for where you want your servos to be. I had to install new guide tubes. I also installed a scale cockpit which requires some additional modeling modifications( again modeling skills and experience help here) All of my sevos are either in the wings or in the mid comparment tray which is already installed in the plane. The last area of modification would probably be the landing gears. Now if you plan an building the kit with what came with it, then you will be done in about and hour. If you plan on retracts, figure about a month. Well ok maybe I'm exaggerating abit but believe you me, you can spend more hours than you probably want to fiddling with retracts. Again, lots of option, I went with Robart hydraulic but had them converted to electric by a company called Down and Locked. With some cutting and ingenious wire placement you could get a 5" wheel in the bay. I think true scale is more like 51/4". I went with a 41/2 only because of the gear door servo placement I originally chose did not allow me that space. I have since changed but I really can't justify all the extra work for 3/4" .
I suggest that before you start constructing or deconstructing anything, that you lay everything out so you can see it, write down the things you want in the plane, then think about it some more then start in one area at a time and work on that till it is complete. You can try to follow the instructions but I found them only to be useful if I was confused about how a certain part was to fit. The flaps were another sore spot. The attachment to the wing so they dont bind can be tricky with hinge placement. I also found the drill sites for the hinges in the flaps to be very thin and non supportive. I ended up epoxying brass threads( kind of like you would use in drywall so I something solid to screw my clevis pin into.
I'm sure alot of this doesn't make much sense without pictures. If you have any specific questions about my build , I will be happy to try and answer them the best I can . Alsoif you would like , you can go to youtube and under search bar type in "Corsair 2nd flight Belly Landing .m4v by Marc Morgan. This will give you an idea of how my plane handled witha DA60. Please excusre the mishap on takeoff. This has sense been corrected. Live and learn!
Hope this helps and good luck, I'm sure you will create a beautiful plane.
Sorry this was more than 5 or 6 lines
Marc
11-19-2012, 02:53 PM
#1564
OMG..........WELL SAID mmflytie..........I forgot a few of those things.....I also used the Robart hinge points instead of teh dorky white ones supplied with the kit.
CAPTAIN RON
CAPTAIN RON
11-19-2012, 03:17 PM
#1565
ORIGINAL: Mr_Grump
Kwik, If he doesn't have time to read the thread, he won't have time to complete an ESM
Kwik, If he doesn't have time to read the thread, he won't have time to complete an ESM
Just a continous series of pain and joy, pain and joy.
11-19-2012, 04:20 PM
#1568
My Feedback: (27)
Join Date: May 2011
Location: Corona, CA
Posts: 160
Likes: 0
Received 0 Likes
on
0 Posts
This thread is very helpful. The only downside is when looking at the photo gallery it does not display all photos included in the thread. It would be nice if RCU could fixed that. It would make it easier to locate certain pics and info that are very helpful....
11-20-2012, 08:55 AM
#1573
Senior Member
Join Date: Mar 2010
Location: Eugene, OR
Posts: 269
Likes: 0
Received 0 Likes
on
0 Posts
Well, they say every model aircraft has an expiration tag on it, mine expired at Warbirds Over the Rockies. It was a beautiful Corsair, not that it had the details as some of the others mentioned on this thread, but the reason I am sharing goes back to basic rules. A preflight check before each and every flight is critical to lowering the crash odds. I failed to do this just once. It is ironic because I always preached this to new pilots. I decided to participate with the big boys and get involved with the air show where the fighters were called up to eliminate a Nazi Convoy they had carefully displayed on the other side of the runway. There were 10 planes and pilots lined up to take off in a matter of minutes or seconds of each other. The air boss instructions were; "You have 5 seconds to get the engine started and taxi to the runway, or get off the tarmac." I had flown my bird several times the previous day and with that radial up front, it performed wonderfully. I was 3rd in line and taxied out just as the previous P-47 throttled up for takeoff. I pointed her down the runway and kicked it in the pants with a full right rudder application. The Corsair jackrabbited down the runway, lifted off, and she rolled to the right. Applying everything I had to compensate wasn't enough and it rolled on it's back and went in. I am glad she crashed away from the crowd. The aileron failure still is a mystery, but at least I know what it was, because the other controls still worked. Full left rudder only slowed the roll and augmented the crash as soon as the airframe rolled. This aircraft is so superb for the money, I have ordered a new one and I plan on doing some more detailing to it for next season. I will always have a Corsair in the wind.

