


BUSA 1/6th scale Sopwith Pup build.
 01-14-2013, 08:02 PM
#176
Member
Join Date: Aug 2011
Location: Dubuque, IA
Posts: 67
Likes: 0
Received 0 Likes
on
0 Posts
Another tip for drilling through ply would be to clamp a scrap of wood on the back where your drill will exit. This will make your drill blow out the scrap and the scrap will support your work piece and you should have a clean exit. Gosh I hope that helps and I don't sound like Grampa Simpson.
 01-15-2013, 05:57 AM
#177

My Feedback: (17)
Join Date: Apr 2010
Location: New Market, MD
Posts: 190
Likes: 0
Received 0 Likes
on
0 Posts
Adamle, no tip is wasted. I knew this "clamp backing to workpiece" thing helps. Why I didn't use that procedure is beyond me.
Larry, took a close look at the tips on my wood bits versus the tips on metal bits and there is a significant difference. The metal bits are smooth diameter from tip to end. My DeWalt wood bits have what can best be described as a "paddle" at the tip for clearing the wood out of the hole. I'm sure that's how I blew out the lite ply. Home Depot visit has been put on today's schedule.
Larry, took a close look at the tips on my wood bits versus the tips on metal bits and there is a significant difference. The metal bits are smooth diameter from tip to end. My DeWalt wood bits have what can best be described as a "paddle" at the tip for clearing the wood out of the hole. I'm sure that's how I blew out the lite ply. Home Depot visit has been put on today's schedule.
01-15-2013, 03:41 PM
#178
Senior Member
Thread Starter
Join Date: Sep 2008
Location: Houston, TX
Posts: 2,101
Likes: 0
Received 0 Likes
on
0 Posts
ORIGINAL: Homer712
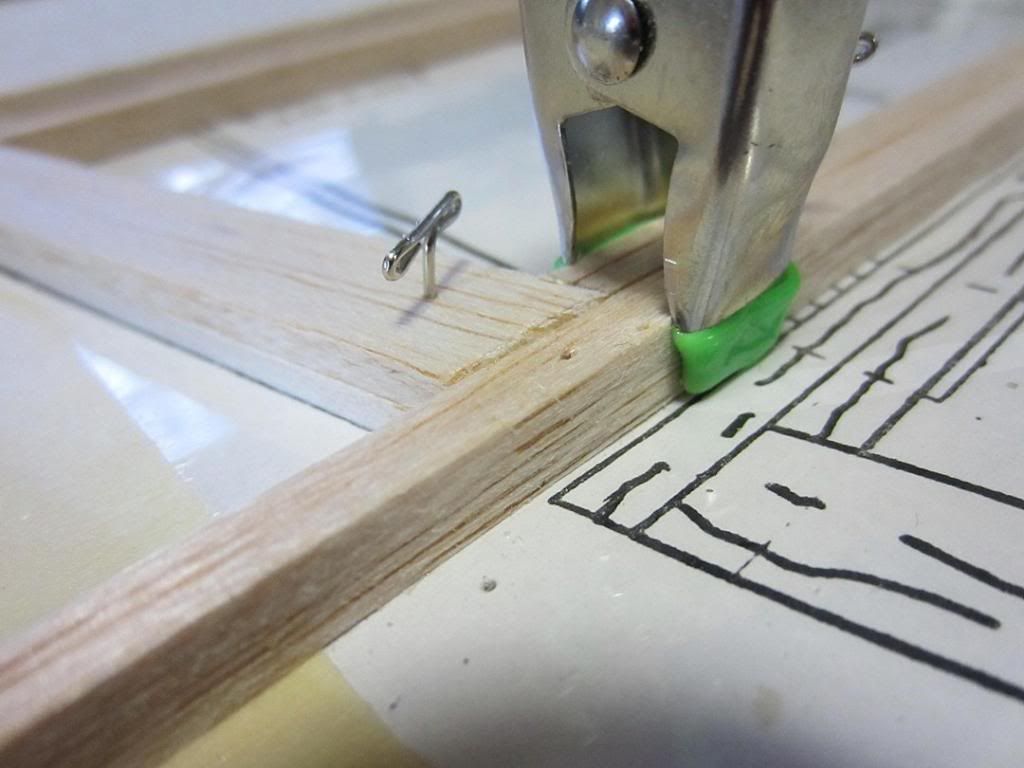
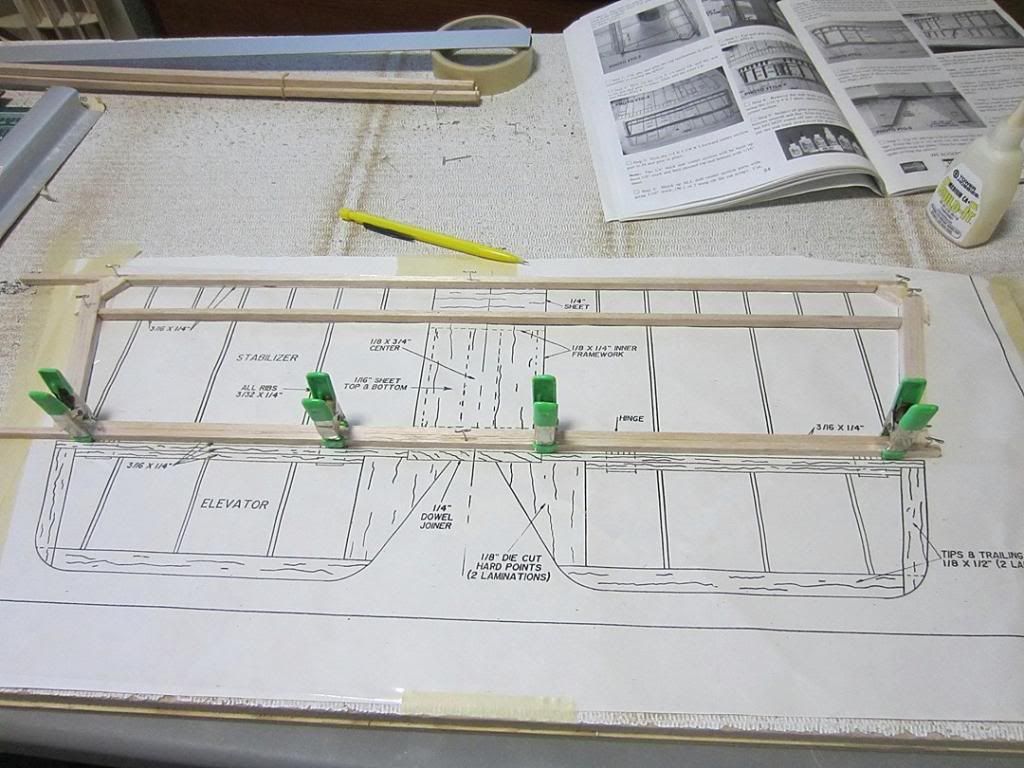
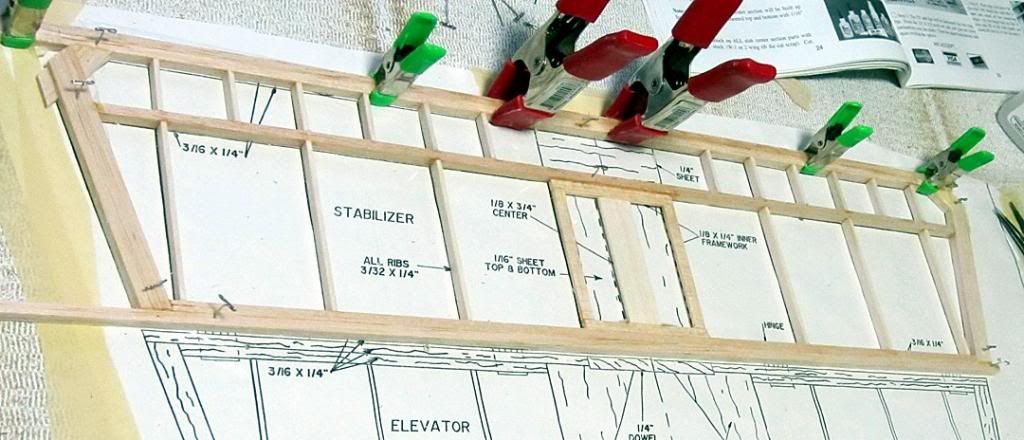
Stab and elevator, done! Even hinged. Figured I'd try my new Dubro tool on something (if I messed it up) I could fabricate from stick balsa.
[img][/img]
Stab and elevator, done! Even hinged. Figured I'd try my new Dubro tool on something (if I messed it up) I could fabricate from stick balsa.
[img][/img]
Homer. On the stab the 3/16x1/4 leading edge etc, is 3/16" tall? The instructions say on edge. I assume that means standing up and that seems to fit the drawing better.
01-15-2013, 07:23 PM
#179
My Feedback: (17)
Join Date: Apr 2010
Location: New Market, MD
Posts: 190
Likes: 0
Received 0 Likes
on
0 Posts
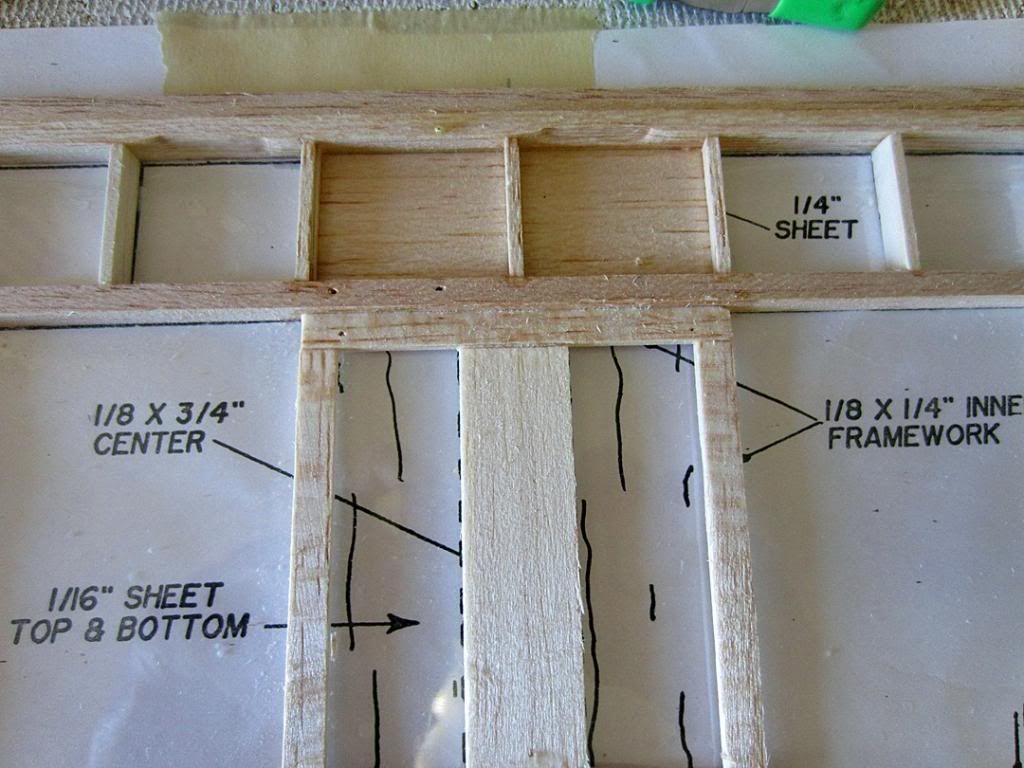
Gary, the LE/TE are both made up of two 1/4" tall by 3/16" wide (inner/outer LE and inner/outer TE) sticks glued together that end up 1/4" tall. The ribs are all 3/32" by 1/4" tall so they match up in height with the LE and TE pieces.
01-16-2013, 09:29 AM
#180
My Feedback: (17)
Join Date: Apr 2010
Location: New Market, MD
Posts: 190
Likes: 0
Received 0 Likes
on
0 Posts
Worked on patching up the bottom wing and finishing the sheeting. All in all things turned out alright. Decided not to have the sheeting overhang the W-5 ribs. No way to really make it look neat (you need the overhang to allow you to glue the sheeting to the ribs, but after that I just sanded it flat with the ribs, looks better I think).


01-16-2013, 09:39 AM
#181
My Feedback: (17)
Join Date: Apr 2010
Location: New Market, MD
Posts: 190
Likes: 0
Received 0 Likes
on
0 Posts
Started on the forward turtle deck and cabane strut mounts. Nothing hard about this stage of the build (other than if you're using Titebond like I am, the front F-1 former and strut mount pieces are not in the easiest location to find a way to clamp down while drying). Couple more turtle deck formers and some stringers, and it'll start looking like an airplane!

01-16-2013, 02:24 PM
#182
Senior Member
Thread Starter
Join Date: Sep 2008
Location: Houston, TX
Posts: 2,101
Likes: 0
Received 0 Likes
on
0 Posts
ORIGINAL: Homer712
Gary, the LE/TE are both made up of two 1/4'' tall by 3/16'' wide (inner/outer LE and inner/outer TE) sticks glued together that end up 1/4'' tall. The ribs are all 3/32'' by 1/4'' tall so they match up in height with the LE and TE pieces.
Gary, the LE/TE are both made up of two 1/4'' tall by 3/16'' wide (inner/outer LE and inner/outer TE) sticks glued together that end up 1/4'' tall. The ribs are all 3/32'' by 1/4'' tall so they match up in height with the LE and TE pieces.
Thanks Homer. That's the way I had it in the beginning but something just didn't look right.
01-16-2013, 03:47 PM
#183
Senior Member
Thread Starter
Join Date: Sep 2008
Location: Houston, TX
Posts: 2,101
Likes: 0
Received 0 Likes
on
0 Posts
This is why I sometimes I take a break from building and need to come back later. Even though I was a journeyman carpenter back in the day, and now deal with machined parts to within 0.0002", for some reason I was thinking 3/16" was wider than a 1/4". 
Now working on the stab.
Now working on the stab.
01-16-2013, 03:49 PM
#184
My Feedback: (17)
Join Date: Apr 2010
Location: New Market, MD
Posts: 190
Likes: 0
Received 0 Likes
on
0 Posts
Added the strut mount caps. Thought it may be easier to sand these to match the formers before gluing them in place then after. I was correct. Just a bit of a touch-up sanding once glued and they came out pretty well. Also, use just a very small touch of glue on these to avoid getting the glue into the wire cabane slots. I used very little and then applied a bead of gap filling CA to the cap seam that is up against the F-1 formers. Lean the fuse forward, let it dry, and I'm sure we have a good glue joint.


01-16-2013, 04:00 PM
#185
My Feedback: (17)
Join Date: Apr 2010
Location: New Market, MD
Posts: 190
Likes: 0
Received 0 Likes
on
0 Posts
Last build activity for today (and maybe a few days, sanding the turtle deck formers and stringers is the next step and I need to do that on the back porch, in decent weather, Maryland is calling for 5" plus snow tomorrow). Here's something to watch out for when gluing the F-1A formers. Put them back to back to match up the stringer slot cutouts. They will line up perfectly one way, if you turn one around, the stringer slots are off by just a bit. Lined mine up and the stringers came out straight and true.

01-17-2013, 04:18 PM
#186
My Feedback: (17)
Join Date: Apr 2010
Location: New Market, MD
Posts: 190
Likes: 0
Received 0 Likes
on
0 Posts
Added the plywood decking glue strips between the formers. The instruction manual calls for 1/8" square balsa sticks. To me, 1/8" is a rounding error. I used 1/4" balsa sticks. If the idea is to have something to glue to, give something I can glue to!

 01-17-2013, 04:33 PM
#188
My Feedback: (17)
Join Date: Apr 2010
Location: New Market, MD
Posts: 190
Likes: 0
Received 0 Likes
on
0 Posts
Followed these steps to cut the cockpit cutout into the plywood decking:
1. Marked both ends of cockpit cutout on the drawings.
2. Transferred the end marks to the plywood decking.
3. Used plans template to transfer cockpit cutout to plywood decking.
4. Put plans template through printer/scanner to reduce by 15% to allow for Balsa USA directions to cut at least 1/4" inside template.
5. Cut out cockpit cutout with Dremel Tool cutoff wheel and finished off with Dremel Tool sanding drum.
Tomorrow I'll tackle the actual gluing of the plywood decking. We'll see how that goes!
01-17-2013, 04:43 PM
#189
Senior Member
Thread Starter
Join Date: Sep 2008
Location: Houston, TX
Posts: 2,101
Likes: 0
Received 0 Likes
on
0 Posts
Looking great Homer! 
I'm running a little behind with work and all. I'll probably have to work some more OT this weekend, but I won't complain. I like the extra money! [&:]
Got a little more done on the "H" Stab today but will most likely spend tomorrow evening ordering what I need to finish up my toy Pup. I most likely won't get back on the Busa build until Sunday and since football season is over here, I should have the whole day for building. I like building.
01-18-2013, 12:21 PM
#190
My Feedback: (17)
Join Date: Apr 2010
Location: New Market, MD
Posts: 190
Likes: 0
Received 0 Likes
on
0 Posts
Gary, being a Giants fan, my season ended sooner than yours. Actually, I believe the Giants season ended sometime mid November!
I hear what your saying about work. For the last 10 years or so I was flying nothing but ARF's. Nothing wrong with ARF planes. I get lots of enjoyment out of my H9 Toledo Special and Pulse 60. But after retiring and returning to building, I can tell you that nothing (for me at least) takes the place of seeing a box of sticks you've worked on all winter take to the air. The Sig 1/5 scale Cub I built last winter is my favorite plane to fly. The Saito 72 (I tend to build a bit on the heavy side) purring along and that big yellow Cub just floating through the blue sky makes you really appreciate the joys of this hobby. I'm hopeful that the Pup flies just as realistically.
Got the plywood decking finished up today. This was the step I was most concerned about, although in the end, I think it came out pretty well. Now it's on to the aft stringers (lots of little steps at this stage of the build, but each one seems like it makes a huge difference in the looks of the Pup). The aft stringers are those 1/8" square balsa sticks again. Just feels too flimsy to me (I'm sure that the Balsa USA folks have this Pup very well engineered, but I'm going to rip some 5/32" balsa sheet into square sticks and use those). There's only five stringers back there and they're only a few inches in length. How much weight could that add.
When you get to the decking, it's easier to hold the decking in place with one hand and glue it from the inside rather than apply the glue from the top side and do that "roll" thing as Balsa USA suggests.
01-19-2013, 06:08 AM
#191
My Feedback: (17)
Join Date: Apr 2010
Location: New Market, MD
Posts: 190
Likes: 0
Received 0 Likes
on
0 Posts
Built the "solder fixture" last night, so now I'm at the stage where you get to build/solder the cabane struts.
Taken from the instruction manual: For the soldering work on this model we recommend using a soldering iron (not a gun) of 80 watts or greater, we do not recommend using a torch!
80 Watts or greater, wait, hang on, I do believe I have a couple of those in my tool box. The one labeled "Things No One Has."
I have had little luck using soldering irons on most kit applications. More times than not, the landing gear is so large a wire size that it acts like a huge heat sink and keeps the parts too cool for the solder to flow well. I've pretty much resorted to using a small torch connected to one of those camp stove type bottles. I guess if I'm careful it should work with the solder work on the Pup.
01-19-2013, 06:47 AM
#192
My Feedback: (2)
Join Date: Jun 2003
Location: Fairport, NY,
Posts: 775
Likes: 0
Received 0 Likes
on
0 Posts
I'm a soldering fool and a Pup owner so I think I can help you out. First of all, I am assuming that we are talking about the soldering of the cross bracing. No problem. (The same works for the undercarriage.)
1. Use a Scotch-Brite or fine sandpaper to brighten up the ends of the cabanes and cross braces.
2. Bend the cross braces into place.
3. Apply solder flux paste to the area to be soldered.
4. Wrap the union of the brace and the cabane with fine copper wire. TRICK: Don't just start at one end an wrap. Lay the wire into the groove made by the joint of the brace and the cabane. Then wrap back up until you now have the two ends of the wire at the same end of the wrap.
5. Twist the ends of the copper wire together to secure the wrap.
6. Contrary to the instructions, I DO use a torch but in this case, a mini torch. The same kind used for cooking (Creme Brulee).
7. Using the torch (not too close), heat the copper wire wrap until you see the flux begin to flow. Take a breath.
8. Touch the solder at one end of the wrap in the gap between the brace and the cabane. Move the torch around to keep the heat uniform. You are NOT trying to use the torch to melt the solder. You are heating the "piece" so IT is hot enough to melt the solder.
9. Once the flowing solder has entered the gap underneath the wrap, bring the solder to the outside and flow the solder through the wrap until the entire wrap is soldered from end to end and front to back. Make sure that the twisted wire is well soldered.
10. Let cool.
11. Clip the twisted copper flush. If you have soldered things right, the copper wrap is now one solid piece and the twist is not necessary.
12. Clean with alcohol. The flux is a corrosive and if you do not clean it, the metal bits will darken and corrode over time.
Hope this helps. If you have the scraps, you might want to practice first.
01-19-2013, 07:46 AM
#193
My Feedback: (17)
Join Date: Apr 2010
Location: New Market, MD
Posts: 190
Likes: 0
Received 0 Likes
on
0 Posts
Chevelle, many thanks, that helps a lot. Step by step instructions that even I can follow! Your instructions need to be posted as a "sticky" as I'm sure they would be helpful to many others as well.
Need to stop at Radio Shack and pick up that fine copper wire and silver solder. Used up what I had last year doing the landing gear on the Sig Cub.
Need to stop at Radio Shack and pick up that fine copper wire and silver solder. Used up what I had last year doing the landing gear on the Sig Cub.
01-19-2013, 08:05 AM
#194
Senior Member
Thread Starter
Join Date: Sep 2008
Location: Houston, TX
Posts: 2,101
Likes: 0
Received 0 Likes
on
0 Posts
To add to Chevelle's suggestion, I would use liquid acid flux instead of paste flux. And NEVER use acid flux on electronics, just on hardcore metal work. When I was racing slot cars I learned about this and had to. The motors and just about everything is mounted with solder. I have a 100 watter, but the torch would be just fine. After soldering clean with lighter fluid.
[youtube]http://www.youtube.com/watch?v=II8hXA16_ZA[/youtube]
[youtube]http://www.youtube.com/watch?v=II8hXA16_ZA[/youtube]
01-19-2013, 08:56 AM
#195
Senior Member
Thread Starter
Join Date: Sep 2008
Location: Houston, TX
Posts: 2,101
Likes: 0
Received 0 Likes
on
0 Posts
Still working on the H stab, I am deviating from the instructions I think. On the fore section it calls for 1/16" sheeting and they don't show any ribs, so I made some from 1/8" scrap. It's probably not necessary, but it was bugging me and I gained maybe half a gram.
01-19-2013, 11:08 AM
#196
My Feedback: (2)
Join Date: Jun 2003
Location: Fairport, NY,
Posts: 775
Likes: 0
Received 0 Likes
on
0 Posts
Use whatever works for you. I have both liquid and paste flux and use paste flux 99% of the time.
I had the great pleasure of working with a museum in their effort to build a flying replica of the 1910 Curtiss Hudson Flier. I did the 3D CAD work from photographs and textual descriptions. After the full scale plane was finished, I did it all over again and built a 1/4 scale model. There was LOTS of soldering in that project.
I documented pretty much all of the fabrication and assembly. Below is just one of the videos. It shows how the wheel front fork assembly was made. It should give you an idea of some soldering techniques. I HATED that torch and quickly replaced it with another. Stay away from the pen torches.
[youtube]http://www.youtube.com/watch?v=ipG7BOCAD58[/youtube]
01-19-2013, 09:55 PM
#197
My Feedback: (17)
Join Date: Apr 2010
Location: New Market, MD
Posts: 190
Likes: 0
Received 0 Likes
on
0 Posts
Gary, that front piece is a "solid" 1/4" balsa sheet. Can't remember which little bag that piece was in, but you should be able to find it. Fits right in like a glove.
Chevelle, I learn something new every time you post. Thank you!
Got my soldering done and I think we have decent cabane struts. I'll recheck the incidence for the top wing tomorrow, right after I rebuild the "solder fixture." Mine seems to have caught fire during the soldering process. Why I didn't put a piece of aluminum flashing on the bottom of that thing I'll never know. It's balsa and lite ply, and I'm soldering with a torch. What did I think was going to happen!
01-20-2013, 08:34 AM
#199
My Feedback: (17)
Join Date: Apr 2010
Location: New Market, MD
Posts: 190
Likes: 0
Received 0 Likes
on
0 Posts
Rebuilt the "solder fixture" this morning and turns out that I didn't really mess anything up building the cabane struts, even though my attention was divided between soldering the struts and the solder fixture being in flames.
Top wing incidence, as best as I can read (doesn't really show up that well in the photos due to the angle), is between 1 to 1 1/2 degrees positive. That will have to do. I'm sure I've flown planes with worse. First time I've actually used an angle finder during a build!
Bottom Wing

Top Wing

Top wing incidence, as best as I can read (doesn't really show up that well in the photos due to the angle), is between 1 to 1 1/2 degrees positive. That will have to do. I'm sure I've flown planes with worse. First time I've actually used an angle finder during a build!
Bottom Wing
Top Wing
01-20-2013, 09:48 AM
#200
My Feedback: (17)
Join Date: Apr 2010
Location: New Market, MD
Posts: 190
Likes: 0
Received 0 Likes
on
0 Posts
Looking over the mounting of the top wing. Balsa USA has you drill the forward bolt holes, align the top wing, then "adjust" the holes with a rat-tail file to get the wing positioned correctly. Seems a bit convoluted to me, but then I could be missing something.
Why not (per the instruction manual) mark the 9" center lines, mark the 9/16" cross line and then position the top wing on the cabane struts, align the holes in the forward solder lugs on the cross lines, secure the top wing with clips and then mark the holes from underneath the strut solder lugs, drill the holes and you're done with the forward holes. Alignment should be perfect. Balsa USA does have you do the aft holes by tracing through the holes in the aft solder lugs. Why not do the forward holes the same way. Am I missing something?
Why not (per the instruction manual) mark the 9" center lines, mark the 9/16" cross line and then position the top wing on the cabane struts, align the holes in the forward solder lugs on the cross lines, secure the top wing with clips and then mark the holes from underneath the strut solder lugs, drill the holes and you're done with the forward holes. Alignment should be perfect. Balsa USA does have you do the aft holes by tracing through the holes in the aft solder lugs. Why not do the forward holes the same way. Am I missing something?