


~~Sig Kadet Brotherhood~~.

 02-18-2013, 05:25 PM

If you cut the LG support wide enough, you can put one of these Dubro Landing Gear in. It's a lot better than having to re-bend the wire LG all the time. http://www3.towerhobbies.com/cgi-bin...&I=LXNM65&P=ML
I personally recommend putting just a little dihedral into the wing, if only for aesthetics. I built a flat LT-40 wing on one of my planes and it always looked like the wing tips were drooping.
Bob
02-18-2013, 06:40 PM
I’m not sure how much people want to read about this, but here we go. I’m formally educated in Aero and Electrical Engineering and I have much experience with aircraft and physics in general, but feel free to shoot me questions or concerns if people have feedback that they think can improve my attempt, lol. There are a lot of smart people out there, and I eat up any criticism or learning I can get, from just about any reasonable source!
: )<o ></o>
></o>
I’m a pretty good 3D pilot, and I kinda skipped the whole“trainer” phase of learning… I did much crashing and plane dismemberment on my fast-track to 3D and sport flying… It wasn’t until I destroyed a few planes that I decided to get a simulator, which should have been my FIRST purchase, in hindsight. <o></o>
Finally, after owning over 50 different planes of sizes ranging from 14” to 80”, most of them performance and 3D-oriented, I decided to “go back” and get a big lumbering trainer-style plane for some lawn-chair-sitting, food-from-a-cooler-grabbing, beer-drinking,slow-flying. My friend, who’s been flying for over 30 years, recommended the Senior Kadet, and I actually got the kit from him. I’ve never scratch-built a plane before, so forgive the hundreds of tiny mistakes along way! <o></o>
Here is the plane in “skeleton” form:<o></o>

Notice the cut-outs for where the ailerons are going. First mistake: I glued the vertical stabilizer on prior to monokoting… that was annoying later on. I also had to re-enforce the corners at the aileron cut-outs because it looked weak to me.I put little triangles in there (not shown in this pic).<o></o>
Here is the plane with my poor job of covering the nose; you can see all the cracks in the balsa.Even soaking the wood, I couldn’t manage to keep it from breaking onme. So I ended up gluing down the pieces and holding it with tape/bands. Since I decided to do an electric setup, I had to change the motor mount. I made two spacers with the appropriate thrust angle to counter torque roll.<o></o>


I really like the Sig-style color scheme for the Senior Kadet,so I used that as my inspiration for what I wanted to do. I made some changes that I thought made itlook better, in my opinion. I made a purple sweep-back on top of the nose, thicker purple band on the nose, thicker white edges on the wings/stabilizers, broader curves, more white behind the window, a sweep-back in the middle of the wing, a flat white on the bottom of the elevator, and a straight white (no curves) on the bottom of the main wing. I had some issues with overlapping the two-tone monokote, so I have a few bubbles in there, but I’ve since learned about the windex method, so the covering improved later on, such as with the wing, which was a lot cleaner on the overlaps.<o></o>

Above, I glued the horizontal stabilizer down, and you can see in the fuselage cabin where I started to re-enforce the area where I planned to mod the plane for a bolt-down wing system. For my bolt-down design, I actually wanted to keep the rubber-band dowels on the plane in case I ever decided to revert back to that instead. More on that in a bit.
<o></o>
Note that there is no dihedral in the wing:

In the following image, you can see where I decided to meet the two-tone colors:<o></o>

You can barely make out the little triangles I put inside the wing to support the corners where I felt may have been weak from the aileron cut-outs.<o></o>
Next is the wing with a straight white leading edge, which Idid not like,
 <o></o>
…so I swept it back and put a white sweep in the center as well. This is a bit different than Sig’s design,which is all white in the center, with less dramatic sweeps at the wingtips.

Next, you can see how I decided to do my bolt-down wing system.I basically made two “hooks” on the wing that fit under the front dowels of the fuselage, and I use two nylon bolts that pass through plywood plates (that pancake the wing) and into the fuselage, and finally held with blind nuts. It holds very securely, especially since the glue on the hooks and the re-enforced “box” area in the fuselage/wing are relying on the shearing force, instead of “pancaked” pieces, which could pop loose.<o></o>

For my power system, I went with a 600kv motor,5s/40C/5000mAh battery, and 60-70A ESC, with external switching BEC (3A). I’m using a 14x7 TGS prop (I’ve tested other systems and props). This produces a max of 45A, 780W, 6.4lb of thrust, at full throttle. The flying weight is 7lb. <o></o>
Here are my basic calculations that I wrote equations for in Excel:<o></o>
| Propeller Diameters<o | ||||||
| wingspan (in)<o | 78<o | |||||
| prop D (in) 3D<o | 21.0<o | |||||
| prop D (in) sport<o | 16.8<o | |||||
| prop D (in) trainer<o | 14.0<o | |||||
| Propeller Tip Speed<o | ||||||
| kv<o | 600<o | Vmin<o | Vnom<o | Vmax<o | ||
| cells<o | 5<o | -><o | 15<o | 18.5<o | 21<o | |
| prop D (in)<o | 14<o | |||||
| prop speed (mph)<o | 499.8<o | |||||
| Required Power<o | ||||||
| flying weight (oz)<o | 112<o | |||||
| lb conversion<o | 7.0<o | |||||
| gr conversion<o | 3175.2<o | |||||
| cont. power (W) 3D<o | 1400.0<o | |||||
| cont. power (W) sport<o | 700.0<o | |||||
| cont. power (W) trainer<o | 350.0<o | |||||
| Expected Minimum Runtime<o | ||||||
| mAhs<o | 5000<o | |||||
| Cells<o | 5<o | |||||
| max power (W)<o | 780<o | |||||
| volts (V) nominal<o | 18.5<o | |||||
| max amps cont.<o | 42.2<o | |||||
| min runtime (min)<o | 7.1<o | |||||
| nominal runtime (min)<o | 28.5<o | |||||
<o></o>
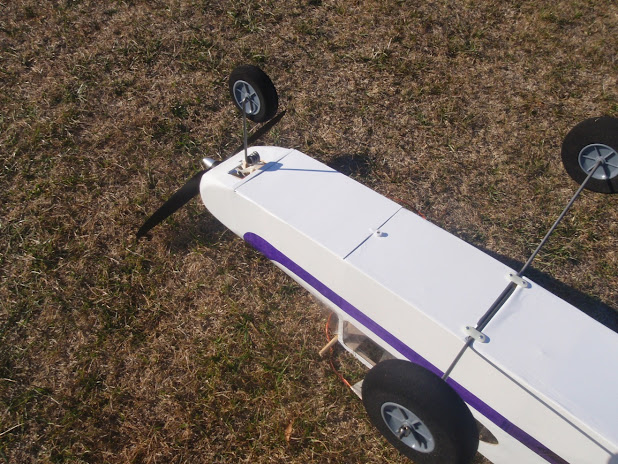
I used red conduits and clear internal sliding tubes as mycontrol links, and I attached carbon fiber ends to reduce bending at the control arm and servo endpoints. You can see these links through the monokote in some of the pictures. I decided to keep the nose-steering becauseall of my aerobatic planes are tail-draggers, and I only have two other nose-steering planes, which I love. Ijust think it’s more fun to land the nose-steering planes because you can sit them on their butts and really lean back into a two-point landing. I love doing that for some reason, lol.<o></o>
Today, I finally maidened it. My thoughts after the first flight are that it’s a bit more “draggy” than I thought it would be. I think this is due to the significant down-thrust that the plans call for, which required some uptrim on the elevator…. I may need to adjust my “flaperons” a bit as well, since they extend beyond the wing’s nominal trailing edge. I need to find a good neutral position for them such that they continue to provide proper lift from the wing, but don’t force any pitch change since they lie behind the CG. I’m going to straighten the thrust vector out a bit; I think it will clean it up some, and increase my flighttime; reducing the necessary throttle in general. <o></o>
Overall, it was very stable, as expected. I didn’t push it too hard on the first flight, but it did some nice smooth loops with zero tip-stalling, and the rudder was very responsive with nose-up flat turns and hammer heads. I plan to tweak a few things and fly again in a couple days when the weather is nice to see if my changes make a difference in performance and flight time. Overall, I’m glad I built this plane, and it will make a fine addition to my hanger. I likely won’t be getting rid of this one!<o></o>
Here are some pics of the plane before my maiden flight today:<o></o>


Here is a video of a small section of the maiden flight where I was doing some simple figure 8s and moderate tail-slide turns.
http://www.youtube.com/watch?v=Pp9aj...ature=youtu.be
I hope you guys enjoy the info. I know I love to see other people's stuff!
02-18-2013, 08:41 PM
I'm very sorry to hear about your plight, Gary. We'll keep you in our thoughts.
Bob
Thanks Bob.
02-18-2013, 08:57 PM
Has anyone converted a Sig LT-40 ARF to a tail dragger or took some dihedral out of wing? If so please tale us about it.
nextofkin
Being an ARF, taking dihedral out would be tough and really not worth it. You might just be better off building another wing. Making the LT40 into a taildragger is not that bad if your starting with a kit, but converting an ARF will be a little tougher. As Bob said, just add some extra ply up front and I did mine so my LG and wheels will be pretty much in line with the leading edge of the wing. Now, the tail wheel gets a little tougher. Honestly, I don't think its worth the trouble on an ARF unless you plan on recovering the plane. It would just be a major PIA to do with a plane already covered.
My build.
http://www.rcuniverse.com/forum/m_11392202/tm.htm
02-19-2013, 07:03 AM

N1EDMThanks for the info on the frount landing gear but what do you do with the tail gear use a separet servo or run pull-pull wires to rudder servo I was going to use a alumiun landing gear up frount anyway. I was going to keep about .750" to 1" of dihedral under each wing tip. I don't know but if it's like other trainers it has 3" plus rise per wing tip
Does this plane need nose weight or tail weight or neather will be useing a 4-stroke engine OS .61 or OS .70 or a Mangum .52 most likely the OS .70
stupidscreenname I like the way you mounted the wing might use your idea sometime, plane looks great and flyies good to.
GayHarrisHave looked at your form by the link will have to look at it agan but that was a kit and not a ARF was it ?
Thanks
nextofkin
02-19-2013, 07:08 AM
JIM....SKB#16
02-19-2013, 07:16 AM
Thanks guys for the info for the LT-40 ARF have been thinking about how to removeing some of the dihedral and have a idea of how to do it if it works I will shair this it is a new ARF still in box .
N1EDMThanks for the info on the frount landing gear but what do you do with the tail gear use a separet servo or run pull-pull wires to rudder servo I was going to use a alumiun landing gear up frount anyway. I was going to keep about .750'' to 1'' of dihedral under each wing tip. I don't know but if it's like other trainers it has 3'' plus rise per wing tip
Does this plane need nose weight or tail weight or neather will be useing a 4-stroke engine OS .61 or OS .70 or a Mangum .52 most likely the OS .70
stupidscreenname I like the way you mounted the wing might use your idea sometime, plane looks great and flyies good to.
GayHarrisHave looked at your form by the link will have to look at it agan but that was a kit and not a ARF was it ?
Thanks
nextofkin
Right, its a kit. It's possible to take out some dihedral on the ARF by using a sanding block, but your going to lose a lot of the joining ribs thickness. I wouldn't bother. I would just build the ARF and fly it. And get a kit and bash it the way you want.
02-19-2013, 07:17 AM
I’m not sure how much people want to read about this, but here we go. I’m formally educated in Aero and Electrical Engineering and I have much experience with aircraft andphysics in general, but feel free to shoot me questions or concerns if people have feedback that they think can improve my attempt, lol. There are a lot of smart people out there, and I eat up any criticism or learning I can get, from just about any reasonable source!
: )<o></o>
I’m a pretty good 3D pilot, and I kinda skipped the whole“trainer” phase of learning… I did much crashing and plane dismemberment on my fast-track to 3D and sport flying… It wasn’t until I destroyed a few planes that I decided to get a simulator, which should have been my FIRST purchase, in hindsight. <o></o>
Finally, after owning over 50 different planes of sizes ranging from 14” to 80”, most of them performance and 3D-oriented, I decided to “go back” and get a big lumbering trainer-style plane for some lawn-chair-sitting, food-from-a-cooler-grabbing, beer-drinking,slow-flying. My friend, who’s been flying for over 30 years, recommended the Senior Kadet, and I actually got the kit from him. I’ve never scratch-built a plane before, so forgive the hundreds of tiny mistakes along way! <o></o>
Here is the plane in “skeleton” form:<o></o>
Notice the cut-outs for where the ailerons are going. First mistake: I glued the vertical stabilizer on prior to monokoting… that was annoying later on. I also had to re-enforce the corners at the aileron cut-outs because it looked weak to me. I put little triangles in there (not shown in this pic).<o></o>
Here is the plane with my poor job of covering the nose; you can see all the cracks in the balsa. Even soaking the wood, I couldn’t manage to keep it from breaking onme. So I ended up gluing down the pieces and holding it with tape/bands. Since I decided to do an electric setup, I had to change the motor mount. I made two spacers with the appropriate thrust angle to counter torque roll.<o></o>
[img][/img]
[img][/img]
[img][/img]
I really like the Sig-style color scheme for the Senior Kadet,so I used that as my inspiration for what I wanted to do. I made some changes that I thought made itlook better, in my opinion. I made a purple sweep-back on top of the nose, thicker purple band on the nose, thicker white edges on the wings/stabilizers, broader curves, more white behind the window, a sweep-back in the middle of the wing, a flat white on the bottom of the elevator, and a straight white (no curves) on the bottom of the main wing. I had some issues with overlapping the two-tone monokote, so I have a few bubbles in there, but I’ve since learned about the windex method, so the covering improved later on, such as with the wing, which was a lot cleaner on the overlaps.<o></o>
[img][/img]
Above, I glued the horizontal stabilizer down, and you can see in the fuselage cabin where I started to re-enforce the area where I planned to mod the plane for a bolt-down wing system. For my bolt-down design, I actually wanted to keep the rubber-band dowels on the plane in case I ever decided to revert back to that instead. More on that in a bit.
<o></o>
Note that there is no dihedral in the wing:
[img][/img]
In the following image, you can see where I decided to meet the two-tone colors:<o></o>
[img][/img]
You can barely make out the little triangles I put inside the wing to support the corners where I felt may have been weak from the aileron cut-outs.<o></o>
Next is the wing with a straight white leading edge, which Idid not like,
[img][/img] <o></o>
…so I swept it back and put a white sweep in the center as well. This is a bit different than Sig’s design,which is all white in the center, with less dramatic sweeps at the wingtips.
Next, you can see how I decided to do my bolt-down wing system. I basically made two “hooks” on the wing that fit under the front dowels of the fuselage, and I use two nylon bolts that pass through plywood plates (that pancake the wing) and into the fuselage, and finally held with blind nuts. It holds very securely, especially since the glue on the hooks and the re-enforced “box” area in the fuselage/wing are relying on the shearing force, instead of “pancaked” pieces, which could pop loose.<o></o>
[img][/img]
For my power system, I went with a 600kv motor,5s/40C/5000mAh battery, and 60-70A ESC, with external switching BEC (3A). I’m using a 14x7 TGS prop (I’ve tested other systems and props). This produces a max of 45A, 780W, 6.4lb of thrust, at full throttle. The flying weight is 7lb. <o></o>
Here are my basic calculations that I wrote equations for in Excel:<o></o>
| Propeller Diameters<o | ||||||
| wingspan (in)<o | 78<o | |||||
| prop D (in) 3D<o | 21.0<o | |||||
| prop D (in) sport<o | 16.8<o | |||||
| prop D (in) trainer<o | 14.0<o | |||||
| Propeller Tip Speed<o | ||||||
| kv<o | 600<o | Vmin<o | Vnom<o | Vmax<o | ||
| cells<o | 5<o | -><o | 15<o | 18.5<o | 21<o | |
| prop D (in)<o | 14<o | |||||
| prop speed (mph)<o | 499.8<o | |||||
| Required Power<o | ||||||
| flying weight (oz)<o | 112<o | |||||
| lb conversion<o | 7.0<o | |||||
| gr conversion<o | 3175.2<o | |||||
| cont. power (W) 3D<o | 1400.0<o | |||||
| cont. power (W) sport<o | 700.0<o | |||||
| cont. power (W) trainer<o | 350.0<o | |||||
| Expected Minimum Runtime<o | ||||||
| mAhs<o | 5000<o | |||||
| Cells<o | 5<o | |||||
| max power (W)<o | 780<o | |||||
| volts (V) nominal<o | 18.5<o | |||||
| max amps cont.<o | 42.2<o | |||||
| min runtime (min)<o | 7.1<o | |||||
| nomimal runtime (min)<o | 28.5<o |
<o> </o>
I used red conduits and clear internal sliding tubes as mycontrol links, and I attached carbon fiber ends to reduce bending at the control arm and servo endpoints. You can see these links through the monokote in some of the pictures. I decided to keep the nose-steering becauseall of my aerobatic planes are tail-draggers, and I only have two other nose-steering planes, which I love. Ijust think it’s more fun to land the nose-steering planes because you can sit them on their butts and really lean back into a two-point landing. I love doing that for some reason, lol.<o></o>
Today, I finally maidened it. My thoughts after the first flight are that it’s a bit more “draggy” than I thought it would be. I think this is due to the significant down-thrust that the plans call for, which required some uptrim on the elevator…. I may need to adjust my “flaperons” a bit as well, since they extend beyond the wing’s nominal trailing edge. I need to find a good neutral position for them such that they continue to provide proper lift from the wing, but don’t force any pitch change since they lie behind the CG. I’m going to straighten the thrust vector out a bit; I think it will clean it up some, and increase my flighttime; reducing the necessary throttle in general. <o></o>
Overall, it was very stable, as expected. I didn’t push it too hard on the first flight, but it did some nice smooth loops with zero tip-stalling, and the rudder was very responsive with nose-up flat turns and hammer heads. I plan to tweak a few things and fly again in a couple days when the weather is nice to see if my changes make a difference in performance and flight time. Overall, I’m glad I built this plane, and it will make a fine addition to my hanger. I likely won’t be getting rid of this one!<o></o>
Here are some pics of the plane before my maiden flight today:<o></o>
[img][/img]
[img][/img]
[img][/img]
[img][/img]
[img][/img]
[img][/img]
[img][/img]
Here is a video of a small section of the maiden flight where I was doing some simple figure 8s and moderate tail-slide turns.
http://www.youtube.com/watch?v=Pp9aj...ature=youtu.be
I hope you guys enjoy the info. I know I love to see other people's stuff!
 02-19-2013, 07:19 AM
MY SR. IS OFF THE DINING ROOM TABLE AND READY FOR IT'S MAIDEN! ALL I NEED IS A LITTLE SPRING WEATHER HERE IN NORTHERN KY.
JIM....SKB#16
Excellent job!
 02-22-2013, 05:38 AM
Bob
 02-23-2013, 12:40 PM

Dave
02-23-2013, 01:35 PM
1st. The plane will be covered in transparent yellow except for the wing tips and those will be red on one wing tip and green on the other.
2nd. I don't remember right now who I purchased the from I will look it up and get back to everyone. If you search on EBay for led there are my people selling. It hard to be leave but it took me 1 ft of led per wing bay. So there is over 12 ft of clear led and 2ft of red, and green. There well be around 14 ft in the fuse, when I get to that stage I well post pic.
Bob
02-24-2013, 04:09 AM
I was asked yesterday where I purchased my LED's off EBay from a store called Citipower (WEB address below). So far I have had 1 segment(3 led) that went bad. I hope this helps .
Bob
http://stores.ebay.com/Citipower-Mal...=p4634.c0.m309
02-24-2013, 06:37 PM
02-24-2013, 06:50 PM
I think Ill have to build him a LT25 with an OS-30.
02-24-2013, 08:23 PM

IMO, reason for the downthrust, dihedral, positive wing incidence and controls set up was for an airplane that basically could fly with little operator intervention, give it inherent stability similar to a free flight airplane; if he got into trouble, could let go of the controls and it would more or less straighten itself out.
I really like your mods there; made it into a real hotdog of a fun flier.
02-24-2013, 08:43 PM

Did you ever fly a RCM Trainer 40? It made a pretty good pattern ship, but it sucks as a trainer.
