


DeHavilland Mosquito
 03-28-2013, 05:16 AM
#1701

My Feedback: (4)
Join Date: Nov 2007
Location: Montgomery Village,
MD
Posts: 363
Likes: 0
Received 0 Likes
on
0 Posts
A little update towards my progress. Added fiberglass air extractors to bottom of the wing, just need to paint them. Should be getting the Z-poxy in tomorrow so i can glass up the nose cone. but here are some pics


 03-28-2013, 06:34 AM
#1702
badazzgti03
This lookes awesome....I wonder what CMP and NitroPlanesthinks of all of your progress. I know they are looking here all of the time to see what people are saying about this model...You would think NitroPlanes would ask ChinaModel Products to look at all of these great improvements on this ARF machine and see what folks have done with it...Makes you wonder....
You are makeing great progress...Enjoy everyones comments about this Model and what all the great folks are coming up with to improve this machine....
Happy Easter Everyone....
David
03-28-2013, 06:37 AM
#1703
That's lookin real good indeed......... My Esc's are coming in this week so Will have to get to work installing then I can do the motor install . Have a problem here. the weather is turning from early spring into flying weather so that may slow things down. Hope not. In case anyone needs small pieces of screening.... Found some at a store here in the North called Canadian Tire under auto body supplies and may also be available in the us . It is used to cover rusted holes in car bodies and then the bondo goes over that . Real nice mesh and made of aluminum . size is about 6 inch square and has a contact adhesive on one side. looked good.
03-28-2013, 09:16 AM
#1704
My Feedback: (4)
Join Date: Nov 2007
Location: Montgomery Village,
MD
Posts: 363
Likes: 0
Received 0 Likes
on
0 Posts
thanks guys for the pleasant comments!!!
good find on the screen....found mine at home depot...had to buy a whole roll of it but i got plenty of extra. I have been out flying here and there, weather here in MD is variable still cold...I'm not outside if its below 45 degrees F.
good find on the screen....found mine at home depot...had to buy a whole roll of it but i got plenty of extra. I have been out flying here and there, weather here in MD is variable still cold...I'm not outside if its below 45 degrees F.


 04-01-2013, 02:46 PM
#1706
You did a great job in fairing in the center work you did on the inlets. Next project is a full sanding and start your painting from scratch and then no worry about exact paint matches and so forth. in time I may widen my inlet slots as I think I can do that with the bolt off leading edges ; without a wole lot of trouble. BUT gotta see how she flies . Just finished installing the plugs on my Castle ESC's and did the computer setup of them.... sure is neat . Before I start adding more caps to the battery leads I want to run the motors up and see if my ripple is under the 5% I think is the limit. That's the nice thing with these is that it records what you want for printout later or to check the system out. Love It.
04-02-2013, 09:32 AM
#1707
My Feedback: (4)
Join Date: Nov 2007
Location: Montgomery Village,
MD
Posts: 363
Likes: 0
Received 0 Likes
on
0 Posts
Thanks man!,
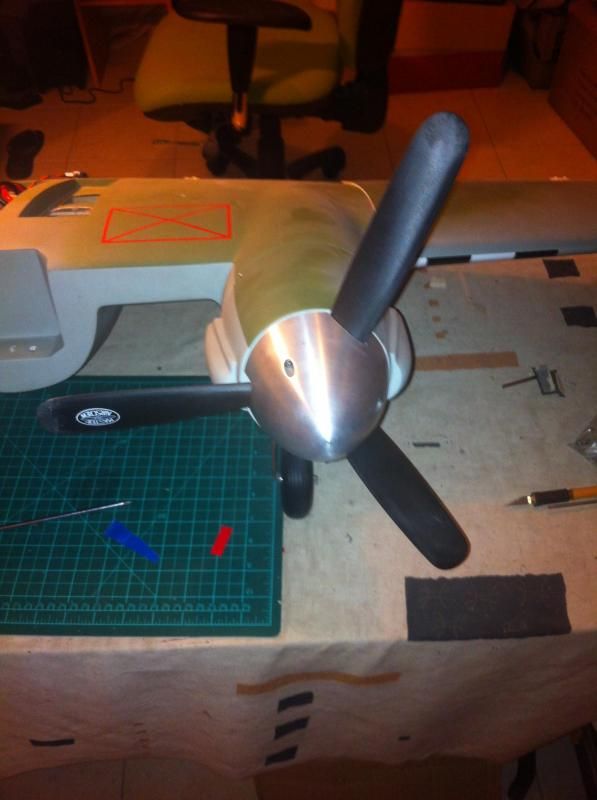
I'm going to get it in the air first before i repaint it. I use to do paint work at an autobody shop so i can get pretty crazy with an airbrush... But I'm thinking about ditching the old school camo scheme and going with a jagged edge style camo scheme as scene on some F-14 tomcats...Like a grey, black ,white ,blue color scheme. But anyways I did some glassing for the nose cone with epoxy resin and came out pretty good. Primed it and gotta do a little sanding. I'm keeping the foam insert in the cone for added strength. As for mounting the cone I have a **** load of magnets from wrecked foamies that I'm going to use. I would like to be able to access the nose area incase i need to add weights for CG testing. But here are some pics of the nose cone.


I'm going to get it in the air first before i repaint it. I use to do paint work at an autobody shop so i can get pretty crazy with an airbrush... But I'm thinking about ditching the old school camo scheme and going with a jagged edge style camo scheme as scene on some F-14 tomcats...Like a grey, black ,white ,blue color scheme. But anyways I did some glassing for the nose cone with epoxy resin and came out pretty good. Primed it and gotta do a little sanding. I'm keeping the foam insert in the cone for added strength. As for mounting the cone I have a **** load of magnets from wrecked foamies that I'm going to use. I would like to be able to access the nose area incase i need to add weights for CG testing. But here are some pics of the nose cone.
04-04-2013, 09:54 AM
#1708
Man I sure wish someone would chime in here with ideas and photos on how to make detachable wing outer sections.... Got the pipe but would like to here if anyone was sucessfull ??????
04-04-2013, 10:20 AM
#1709
Stegl,
Sorry brother..I do not think anyone in this Forum hasdone that..I beleive it is due to the stress that is created at those points that make it not practical to make them detachable......I know thewing can be a pain to handle but Ireally think you need to go ahead andepoxy them per the instructions....Make sure you use slow cure epoxy...I used 45 min epoxy, but be aware...If you mix up an ounce of the stuff even45 miniute stuff, it willstart to get tacky about the 20 minute point..The more you mix up,the shorter the time it takes to start to gel...
David
04-04-2013, 01:11 PM
#1710
My Feedback: (4)
Join Date: Nov 2007
Location: Montgomery Village,
MD
Posts: 363
Likes: 0
Received 0 Likes
on
0 Posts
hey guys,
I would love to have the wings separate but I am with you david. It is a pain to work on this big ass wing and move it around.
on the other hand here is how the nose cone is attached with no screws. I used 2 wood dowels for a guide and 4 strong magnets to hold it on.


I would love to have the wings separate but I am with you david. It is a pain to work on this big ass wing and move it around.
on the other hand here is how the nose cone is attached with no screws. I used 2 wood dowels for a guide and 4 strong magnets to hold it on.
 That nosepiece won't move for sure.
04-05-2013, 05:44 AM
That nosepiece won't move for sure.
04-05-2013, 05:44 AM
#1712
My Feedback: (4)
Join Date: Nov 2007
Location: Montgomery Village,
MD
Posts: 363
Likes: 0
Received 0 Likes
on
0 Posts
yeah man that thing is pretty secure to the plane. I'm getting closer to completing this thing and seeing what it will do in the air.
04-06-2013, 06:47 AM
#1713
Yes , very good point. Another thing I am starting to notice on this airplane is that the cloth they have used is of very poor quality and what I mean by that is that it is a very very loose weave and the only thing giving it backing is the gel-cote . Not very good in my book as the gel-cote adds to the stiffnes but makes for a very brittle ( and not flexable) outer layer. I would have to say that it is not much better than 1 to 1.5 oz tight weave glass cloth which is a poor setup. Too bad.
04-06-2013, 10:05 AM
#1714
Join Date: Jan 2007
Location: Dubai, UNITED ARAB EMIRATES
Posts: 500
Likes: 0
Received 2 Likes
on
2 Posts
Hey guys, good progress on the Mossies, and those intakes look fantastic. I like the nose sections you have made but my taste says they look a little 'sharp', I like the rounded look a little better myself. I have just painted the nose cone of mine, and also used magnets to attach.
Ok, I have been busy with some Real Life stuff that has seriously got in the way of my hobby-time, tsk tsk...but, I have managed to sort some things out. I had a few hours at home with no disturbances yesterday, so I took to the task of cutting down the 16" props, and I must say, I am pleased with the results. I also received the spinners a while back and they are a work of art for sure. Graham from TAG did a good job, and his machining skills are very good. So good in fact, that you cannot see the split line where the spinner nose bolts on. I will be painting these grey to match the underside of the plane, but for now, here are a pair of pics of what I have been up to.
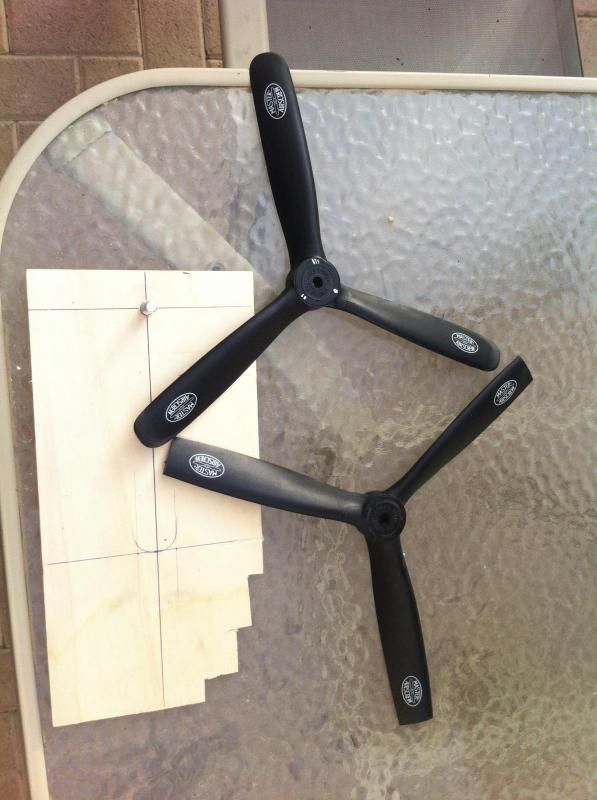
The cutting process halfway...I had cut and shaped one prop, and the other was the result of taking a saw to the original prop.
and
completed and dry fit.
Ok, I have been busy with some Real Life stuff that has seriously got in the way of my hobby-time, tsk tsk...but, I have managed to sort some things out. I had a few hours at home with no disturbances yesterday, so I took to the task of cutting down the 16" props, and I must say, I am pleased with the results. I also received the spinners a while back and they are a work of art for sure. Graham from TAG did a good job, and his machining skills are very good. So good in fact, that you cannot see the split line where the spinner nose bolts on. I will be painting these grey to match the underside of the plane, but for now, here are a pair of pics of what I have been up to.
The cutting process halfway...I had cut and shaped one prop, and the other was the result of taking a saw to the original prop.
and
completed and dry fit.
04-07-2013, 05:33 AM
#1716
Join Date: Jan 2007
Location: Dubai, UNITED ARAB EMIRATES
Posts: 500
Likes: 0
Received 2 Likes
on
2 Posts
It may be an 'error of parallax' from the photos....my spinners look a lot pointier than they are in real life, so maybe the same applies to the nose cones on yours. My next task is the retracts and they are an unending source of frustration. My biggest problem is that the retract units only accept a 5mm pin, but I am going to try and drill them out to accept a larger pin. With the dual strut configuration there is going to be a large 'twisting' moment on them.
I have also noted that the position of the retract mountings is a lot further back than they should be, so it looks like I am going to be doing some more 'woodwork' in that department. Not looking forward to it, but it will need to be done. This thing is going to start putting on more weight, but it needs to be done unfortunately. Especially when I consider that I am going to need to put closing gear doors on at some point too... LOL.... before I do that, I just want to fly her some more!!!!
Since I am not nearly taxing the ESC's, the 100A beasts will be removed this week, and replaced by a pair of 60A's, more than enough considering I am going to be drawing less than 70A total.
Anyway, onward and upward...!
04-07-2013, 11:00 AM
#1717
Tried to repost a picture but Rcuniverse picture posting down like it was last month "error 500 " whatever.
Suggestion on the 5mm pin.... Two things to consider...... first ... it is a kinda failsafe on a hard landing... better to bend there than pull the gearing mount off or bend main gear legs OR if you want a more rigid setup try going to your nearest good hardware store and buying some numbered drills that fit snug and cut off the smooth end with your dremel tool. Very hard and strong stuff; that drill rod is. I left my 5mm rod as it is. I wouldn't think that there should be any twisting with the dual strut if the wheel centerline is directly below the retract 5mm pin. I spaced my wheel so that it directly under it.
I did some simple reinforcing of the landing gear wood mounting which will post when the pic post system is back up probably tomorrow or next. If this thing flies like I hope I also planned on a single gear door... servo operated with a cheap sequencer from HK. and lastly regarding the ESC's.. have ou done a current draw with the new 3 blade props just to make sure you have some leeway going down to 60 ampers ?
ORIGINAL: cathurga
It may be an 'error of parallax' from the photos....my spinners look a lot pointier than they are in real life, so maybe the same applies to the nose cones on yours. My next task is the retracts and they are an unending source of frustration. My biggest problem is that the retract units only accept a 5mm pin, but I am going to try and drill them out to accept a larger pin. With the dual strut configuration there is going to be a large 'twisting' moment on them.
I have also noted that the position of the retract mountings is a lot further back than they should be, so it looks like I am going to be doing some more 'woodwork' in that department. Not looking forward to it, but it will need to be done. This thing is going to start putting on more weight, but it needs to be done unfortunately. Especially when I consider that I am going to need to put closing gear doors on at some point too... LOL.... before I do that, I just want to fly her some more!!!!
Since I am not nearly taxing the ESC's, the 100A beasts will be removed this week, and replaced by a pair of 60A's, more than enough considering I am going to be drawing less than 70A total.
Anyway, onward and upward...!
04-07-2013, 01:30 PM
#1718
Found an interesting picture in RCGROUPS on another nose battery installation which I think is maybe the best yet; although I would leave the sides a little higher. The plus's are easier to install multiple packs and sizes and to strap down. Easier to plug batteries to ESC's and last but not to be left out because of no extra wire lengths needed then no added capacitors needed at the ESC's because of extra wire length.
Still getting Error 500 so will try and post in a day or two..... Kinda getting fed up with the RCUniverse website and almost ready to reserect RCgroups one.
Still getting Error 500 so will try and post in a day or two..... Kinda getting fed up with the RCUniverse website and almost ready to reserect RCgroups one.
04-09-2013, 06:13 AM
#1719
My Feedback: (4)
Join Date: Nov 2007
Location: Montgomery Village,
MD
Posts: 363
Likes: 0
Received 0 Likes
on
0 Posts
hey guys i have not even been able to get on rcu for the past couple of days...seems like i missed somethings lol...
As for the fiberglass on this thing I can agree with guys...kinda cheap...I have hairline spider cracks in the fuse and a little in the center wing section it sucks..should be better..I have an HK 70mm viperjet and the glassing on that thing is pretty good for a cheap edf.
I should be maddening my mossey here soon...just gotta make an easier way to keep the battery hatches closed instead of the 4 screws...they could end up puncturing the batts..that could be bad...I have some hatch releases i got from HK I'm probably gonna rig something up with them. As for guns...gotta add guns for this...I have some 22lb industrial modeling foam and a cheap lathe...hmmm should work. I got oleo struts in to make the scale style gear...Im hoping to have this all done by the end of the week.
By the way those props are looking really good
04-09-2013, 08:55 AM
#1720
Getting fed up with this site... too many issues..... can't pm anyone......can't post pictures directly...... takes forever to get fixed. Did I miss something ?
Have finally decided to move to forum
www.rcgroups.com/forums/showthread.php?t=523476
...hope this works. Some of the guys on this one have posted there as well. Took 3 seconds or lest to post 3 pictures. Sorry RCuniverse .
If you have a problem with the abouve try RCGROUPS forum and under CMP Mosquito elctric conversions should do it.
07-25-2013, 06:41 PM
#1723
Member
Join Date: Sep 2002
Location: Indianapolis,
IN
Posts: 50
Likes: 0
Received 0 Likes
on
0 Posts
Stegl
Been off this thread for quite a long time; just noticed your thoughts about a three piece wing. Way earlier in this thread, one or two of the contributors actually did this and documented the procedures that were used to accomplish. Sorry that I can't give you the post #'s; you'll just have to go way early in this thread and roll through until you locate it. BTW, I have one of these Mosquitos new in box, but I lost interest because I thought that the requirements and re-engineering to fix all of the manufacturing flaws were above my skill levels, even with all the posts to point the way. I even procured air retracts specially made for this craft. I started to visit this thread a few monthes before I took the plunge and bought mine; at that time there wasn't all of the *****in' about all of the shortcomings of this "ARF". I also was going to try the three piece wing approach, because the one piece was a monster. Good luck with the search. Contact me through the thread if you want to talk more.
Havnfun
Jerry Sharp
07-26-2013, 06:37 AM
#1724
May take a look and reread this forum for the 3 piece wing then if you say that it is here; but all my posting will be done at RCGROUPS as much user friendly.
08-26-2013, 08:28 AM
#1725
Dear Mosquito Friends,
after I think around 200 hours of building time, the Mossi is ready for rollout on Wednesday and the maiden will be on Friday morning.
I have checked the whole thread, many thanks again for all the info�s.
My question ( to David and all the others ) : When I balance the plane upright, I need 50 gramms ( 1,5 ounces ) more dead weight as balancing it inverted.
Which method should I use ?
For those who don�t know my build , it�s here : http://www.rcuniverse.com/forum/twin...l#post11321938
So, it is a heavy bird with the scale details and the 72�Saitos.
MY CG is at 111 mm + 12 mm correction because of the radiators, anyway at 111 mm.
I think, if an airplane comes out very light, f.e. 12 pounds, You can go slightly aft with the CG . But in my case, she�s around 16,5 Pound so I think I will
follow the tips from You guys, around 110 mm is a must, but : inverted or upright , what is better?
Thanks in advance and pictures will come later
Andy