


The Tanker's Lounge
 05-12-2013, 07:17 AM
#901

ORIGINAL: Rex Ross
~~~~~~~
Dan ...........
It was a slow news day at the local newspaper office .......
http://www.timesheraldonline.com/new...t-out-by-owner
That car got me thru my Mid-Life Crisis, which I went thru twice. Now this hobby is helping me get thru my Old Age Crisis, which I have been going thru for over ten years.
The car now has a good home. A good friend of mine has a 16 year old son who wanted it. I gave it to him. He is very happy to have a fixer upper.
I am happy too. I have two new fire extinguishers. I also have enough garage space for a large HO train layout, or a pool table, or a ?????
I'm OK with the way things have turned out. No one hurt. No house damage.
ORIGINAL: YHR
I am glad you had a fire extinguisher, and some quick thinking on your part to get the vehicle out of the garage to minimize the damage done. It must hurt a little seeing your relationship with this car end like this.
I am a strong believer in having fire extinguishers around. A 30 pound Ansul fire extinguisher can fight a pretty big fire.
Dan ...........
It was a slow news day at the local newspaper office .......
http://www.timesheraldonline.com/new...t-out-by-owner
That car got me thru my Mid-Life Crisis, which I went thru twice.
Now this hobby is helping me get thru my Old Age Crisis, which I have been going thru for over ten years.The car now has a good home. A good friend of mine has a 16 year old son who wanted it. I gave it to him. He is very happy to have a fixer upper.
I am happy too. I have two new fire extinguishers. I also have enough garage space for a large HO train layout, or a pool table, or a ?????
I'm OK with the way things have turned out. No one hurt. No house damage.
*A car left running unattended in a Benicia home's garage
*It received significant damage to its engine compartment and front end
*There were no injuries reported, and the flames did not reach the nearby home
*The blaze's cause remained under investigation Thursday
 05-24-2013, 12:47 PM
#902

Join Date: Apr 2012
Location: Sellersville, PA
Posts: 775
Likes: 0
Received 0 Likes
on
0 Posts
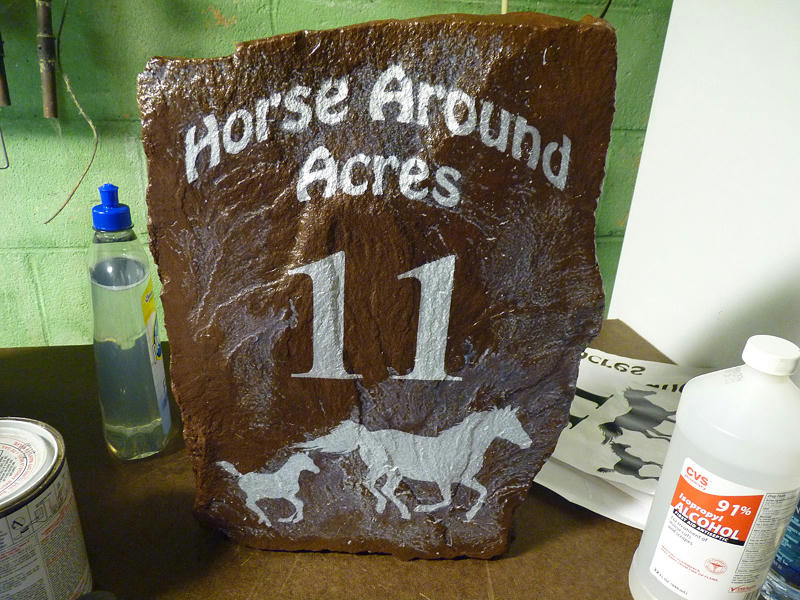
Just thought I'd post some pictures of something a little extra I did for my mom's 80th birthday.
She has a large rock garden out in the front on one corner of the driveway, so I had placed some stacking stones around it's outer edge while placing some larger flat stones within the inner area.
With all the nice large flat stones, I decided to use one as a marker for the house, as well as add the name she always liked to call the place ... "Horse Around Acres" ... to the marker.
So I got into Photoshop & created a paper stencil I could use to paint up the stone, & printed it out on my laser printer. I covered the stencil area on both sides of the paper with clear packing tape, then proceeded with the tedious task of cutting them out with my Exacto blade.
I cleaned the stone as best I could too, by soaking it in hot soapy water for a few days, & after allowing for a few more days to dry in the hot sun as well as inside, I gave it many coats of Pledge future acrylic. It made it a nice shiny wet looking deep reddish brown color stone.
I then used some contact glue on the stencils to adhere them to the stone as best I could, hoping the edges would stay down & be as flat as I could get them to cut down on soft edges & over spray.
I used some white pearlescent paint to do the coloring. After that dried, I applied several more thick coats of the Pledge acrylic finish.
Not sure this will hold up outside, but I hope it looks OK for at least through this year.
I forgot to take a shot of the stone with just the Pledge clear coats alone being on it, but here are some others.
The stone with the stencils glued to it & ready for painting.

After removing the stencils when the painting was done, & letting it completely dry, I starting applying another coat of the Pledge clear. The scary part, if you've never used this stuff before, is noticing that some areas where the stuff is laid down a little thick, have a milky white color like the next image shows ... but you will see in the next couple images, as it dries, this turns perfectly clear again ... WHEW!!! lol

When the below shot was taken, there were still some uncured white areas, but at this point the part at the top is actually just some window light glare showing & not uncured milky colored Pledge, as the top was nice & clear..

I'll eventually place it in the rock garden where I have made an area for it, & post up the completed pictures on another day, today it was nasty, cold, & raining ... Not sure I should put on a few more coats of the Pledge or not, maybe it will help, maybe it won't, but I will leave it in the house a few extra days to allow it to fully cure before moving it to the garden for good anyway. I know, it's not a masterpiece like Airbrushler's tanks on mailboxes, but mom liked it, & that's all that matters!
~ Craig ~
She has a large rock garden out in the front on one corner of the driveway, so I had placed some stacking stones around it's outer edge while placing some larger flat stones within the inner area.
With all the nice large flat stones, I decided to use one as a marker for the house, as well as add the name she always liked to call the place ... "Horse Around Acres" ... to the marker.
So I got into Photoshop & created a paper stencil I could use to paint up the stone, & printed it out on my laser printer. I covered the stencil area on both sides of the paper with clear packing tape, then proceeded with the tedious task of cutting them out with my Exacto blade.
I cleaned the stone as best I could too, by soaking it in hot soapy water for a few days, & after allowing for a few more days to dry in the hot sun as well as inside, I gave it many coats of Pledge future acrylic. It made it a nice shiny wet looking deep reddish brown color stone.
I then used some contact glue on the stencils to adhere them to the stone as best I could, hoping the edges would stay down & be as flat as I could get them to cut down on soft edges & over spray.
I used some white pearlescent paint to do the coloring. After that dried, I applied several more thick coats of the Pledge acrylic finish.
Not sure this will hold up outside, but I hope it looks OK for at least through this year.
I forgot to take a shot of the stone with just the Pledge clear coats alone being on it, but here are some others.
The stone with the stencils glued to it & ready for painting.
After removing the stencils when the painting was done, & letting it completely dry, I starting applying another coat of the Pledge clear. The scary part, if you've never used this stuff before, is noticing that some areas where the stuff is laid down a little thick, have a milky white color like the next image shows ... but you will see in the next couple images, as it dries, this turns perfectly clear again ... WHEW!!! lol
When the below shot was taken, there were still some uncured white areas, but at this point the part at the top is actually just some window light glare showing & not uncured milky colored Pledge, as the top was nice & clear..
I'll eventually place it in the rock garden where I have made an area for it, & post up the completed pictures on another day, today it was nasty, cold, & raining
... Not sure I should put on a few more coats of the Pledge or not, maybe it will help, maybe it won't, but I will leave it in the house a few extra days to allow it to fully cure before moving it to the garden for good anyway. I know, it's not a masterpiece like Airbrushler's tanks on mailboxes, but mom liked it, & that's all that matters! ~ Craig ~
05-24-2013, 02:09 PM
#903
Senior Member

Join Date: Nov 2006
Location: Grande Prairie,
AB, CANADA
Posts: 8,976
Likes: 0
Received 4 Likes
on
4 Posts
There is a two part clear coat you can purchase at Michaels. It is a little expensive, but one coat of this stuff is equal to 50 coats of varnish. It might be the thing you are looking for to protect this from the elements.
Good Job. I am sure Mom will love it.
Good Job. I am sure Mom will love it.
05-24-2013, 04:03 PM
#904

ORIGINAL: B.A.D.A.S.S.Force
Just thought I'd post some pictures of something a little extra I did for my mom's 80th birthday.
She has a large rock garden out in the front on one corner of the driveway, so I had placed some stacking stones around it's outer edge while placing some larger flat stones within the inner area.
With all the nice large flat stones, I decided to use one as a marker for the house, as well as add the name she always liked to call the place ... ''Horse Around Acres'' ... to the marker.
So I got into Photoshop & created a paper stencil I could use to paint up the stone, & printed it out on my laser printer. I covered the stencil area on both sides of the paper with clear packing tape, then proceeded with the tedious task of cutting them out with my Exacto blade.
I cleaned the stone as best I could too, by soaking it in hot soapy water for a few days, & after allowing for a few more days to dry in the hot sun as well as inside, I gave it many coats of Pledge future acrylic. It made it a nice shiny wet looking deep reddish brown color stone.
I then used some contact glue on the stencils to adhere them to the stone as best I could, hoping the edges would stay down & be as flat as I could get them to cut down on soft edges & over spray.
I used some white pearlescent paint to do the coloring. After that dried, I applied several more thick coats of the Pledge acrylic finish.
Not sure this will hold up outside, but I hope it looks OK for at least through this year. [img][/img]
I forgot to take a shot of the stone with just the Pledge clear coats alone being on it, but here are some others.
The stone with the stencils glued to it & ready for painting.
[img][/img]
After removing the stencils when the painting was done, & letting it completely dry, I starting applying another coat of the Pledge clear. The scary part, if you've never used this stuff before, is noticing that some areas where the stuff is laid down a little thick, have a milky white color like the next image shows ... but you will see in the next couple images, as it dries, this turns perfectly clear again ... WHEW!!! lol [img][/img]
[img][/img]
[img][/img]
When the below shot was taken, there were still some uncured white areas, but at this point the part at the top is actually just some window light glare showing & not uncured milky colored Pledge, as the top was nice & clear..
[img][/img]
I'll eventually place it in the rock garden where I have made an area for it, & post up the completed pictures on another day, today it was nasty, cold, & raining [img][/img] ... Not sure I should put on a few more coats of the Pledge or not, maybe it will help, maybe it won't, but I will leave it in the house a few extra days to allow it to fully cure before moving it to the garden for good anyway. I know, it's not a masterpiece like Airbrushler's tanks on mailboxes, but mom liked it, & that's all that matters! [img][/img]
~ Craig ~
Looks Fantastic to me and a great idea
05-25-2013, 11:44 AM
#905
Join Date: Apr 2012
Location: Sellersville, PA
Posts: 775
Likes: 0
Received 0 Likes
on
0 Posts
You're probably right Dan, I had looked at a few clear coatings that offer UV protection & claim they are comparable to 50-60 coats of varnish, & they were definitely on the expensive side ... even so, I am thinking about checking out what HD has locally ... because how could mom not be worth it, right?  But then again, I could just repaint them every year too, & maybe change up the design to make it interesting!
Thanks Airbrushler, & in the back of my mind I think your custom mailboxes were a subliminal inspiration that pushed the thought into my head, lol.
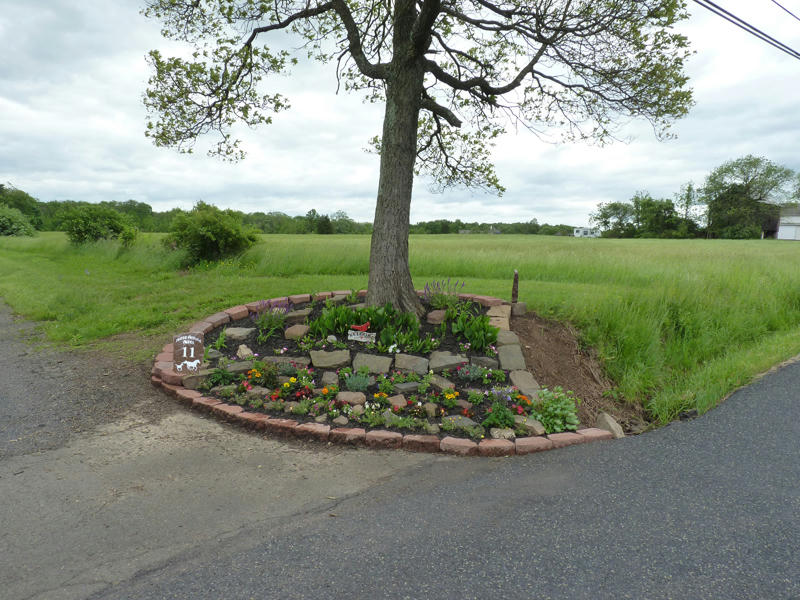
So here are a couple photos with it now sitting up on the edge of her garden as a marker ...
In this first picture it's hard to notice, but it's at the top right edge of the garden sitting on another stone, & side-ways from this view. This was just to show its current location.

This is how it is viewed when coming down the road, as it faces outward & more up the road so cars coming down can see it easily.
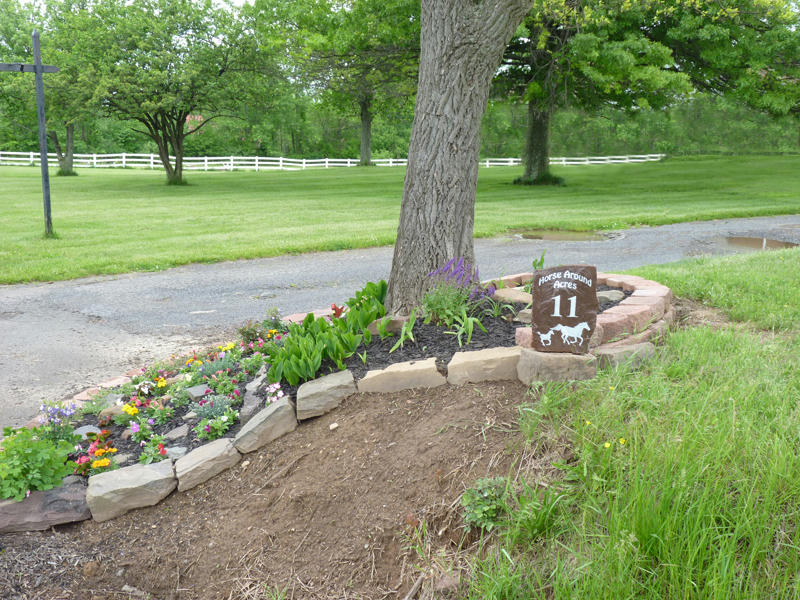

At first we had the thought to place it somewhere in a somewhat central location within the garden, so that once you were directly in front of the driveway you see the marker, however, we really liked the upper location & the way it looked. But I was now actually thinking of doing another one, & placing it in a lower left location facing down the road as my Photoshop image below is showing, so we have both down & up the road viewing bases covered. Hmmmmm .....
Yes, the mailbox has an 11 on it for house identification too, but this just looks nicer, especially since there is no fancy mailbox like Airbrushler's to see.
~ Craig ~
But then again, I could just repaint them every year too, & maybe change up the design to make it interesting! Thanks Airbrushler, & in the back of my mind I think your custom mailboxes were a subliminal inspiration that pushed the thought into my head, lol.
So here are a couple photos with it now sitting up on the edge of her garden as a marker ...
In this first picture it's hard to notice, but it's at the top right edge of the garden sitting on another stone, & side-ways from this view. This was just to show its current location.
This is how it is viewed when coming down the road, as it faces outward & more up the road so cars coming down can see it easily.
At first we had the thought to place it somewhere in a somewhat central location within the garden, so that once you were directly in front of the driveway you see the marker, however, we really liked the upper location & the way it looked. But I was now actually thinking of doing another one, & placing it in a lower left location facing down the road as my Photoshop image below is showing, so we have both down & up the road viewing bases covered. Hmmmmm .....
Yes, the mailbox has an 11 on it for house identification too, but this just looks nicer, especially since there is no fancy mailbox like Airbrushler's to see.
~ Craig ~
05-25-2013, 04:01 PM
#906
If I saw that while driving down that road I would hit the brakes, back up, and walk around your "landscaping" a few times........
That's a real eye catcher ! [X(]
That's a real eye catcher ! [X(]
05-26-2013, 07:15 AM
#907
I have always wondered why a composite hull Sherman ever existed. They were rare to begin with, and only a few exist today. I have never run across an explanation that really made sense to me. Why a cast front half and a welded rear half? That combination seems like it would be more trouble than it was worth. Maybe that's why there were not many of them !
Or maybe the Army had a bunch of cast hulls that had defective rear ends and decided to saw off and save the good front ends in their parts box for "Mystery M4 Modifications".
Somebody educate me. I have a resin upper hull and turret that I would like to use for a Firefly I started about 15 years ago ......
05-26-2013, 11:51 AM
#908

Found this thread on Cast vs Welded.
At first glance it would appear that casting had the advantage of speed and less skilled labor to produce in mass.
I've also read that the size of the casting (entire hull vs composite) depended upon the max casting size capabilities of the factory.
http://www.network54.com/Forum/47208...erall+Strength
05-26-2013, 12:28 PM
#909
Thanks Kevin ...
I'm still wondering about the "speed of manufacturing" aspect. I read somewhere that the molten metal for the cast hull took days to cool down to where it could be removed from the casting mold to do the machining operations. There was a cast hull M3 Lee also, but only about 300 of them were made and none of them left the united states, all used for training. I would think that was a good clue that rolled steel was a better choice.
I wonder how long it took to build those inflatable rubber Sherman tanks that were used to fool enemy aerial recon before D Day? And I also wonder what the heck happened to all of that stuff after the war?
The older I get the more I realize how little I know. (Additional comments about that are unnecessary).
05-30-2013, 05:55 AM
#910

Hey there guys,
I received a request to make this thread a sticky at the top of the RC Tanks Forum. Considering what goes on here in this thread, and the number of members using it, I think that this is a great idea. I've stickied this thread to the top of the forum.
Ken
05-31-2013, 08:29 AM
#913
Join Date: Sep 2009
Location: Elliot Lake ON, CANADA
Posts: 520
Likes: 0
Received 0 Likes
on
0 Posts
Well, us Canadians usually don't have much to brag about; but this guy is something else....
en.wikipedia.org/wiki/Chris_Hadfield
youtu.be/KaOC9danxNo
en.wikipedia.org/wiki/Chris_Hadfield
youtu.be/KaOC9danxNo
05-31-2013, 08:40 AM
#914
Senior Member

Join Date: Apr 2011
Location: Windsor,
ON, CANADA
Posts: 230
Likes: 0
Received 0 Likes
on
0 Posts
ORIGINAL: strmnd54
Well, us Canadians usually don't have much to brag about; but this guy is something else....
en.wikipedia.org/wiki/Chris_Hadfield
youtu.be/KaOC9danxNo
Well, us Canadians usually don't have much to brag about; but this guy is something else....
en.wikipedia.org/wiki/Chris_Hadfield
youtu.be/KaOC9danxNo
06-04-2013, 08:54 AM
#915
Nice to see that this was made a sticky!
Long overdue.
~ Jeff
Long overdue.
~ Jeff
06-04-2013, 12:31 PM
#916
Once you go "Sticky" it all gets "Tricky"!
06-09-2013, 10:50 AM
#918
Join Date: Apr 2012
Location: Sellersville, PA
Posts: 775
Likes: 0
Received 0 Likes
on
0 Posts
Our 46 year old in-ground cement pool has seen much better days, the top fiberglass step fell off a couple years ago & we just use the indent that's there for a step now.
The water line, as it sits below the 3rd step now, was purposely lowered this far this year to work on more of the upper areas of the pool, which is something we have done about every 3 years, while draining the pool completely to do the whole thing about every 7 years.
Every year we patch, seal, & paint all the really bad areas that we can get to depending on how low we take the water line (as you can see, there are many ) to try to preserve the old cement a while longer, though eventually we will lose the battle. But this war has gone on for over 31 years since the pool was about 15 anyway, so it's become a family tradition & isn't even a second thought anymore. lol
So anyway, it's not the greatest of images below, but in reality, this image has a rather secretive, & much more interesting story to tell .... details coming soon ...
~ Craig ~

The water line, as it sits below the 3rd step now, was purposely lowered this far this year to work on more of the upper areas of the pool, which is something we have done about every 3 years, while draining the pool completely to do the whole thing about every 7 years.
Every year we patch, seal, & paint all the really bad areas that we can get to depending on how low we take the water line (as you can see, there are many
) to try to preserve the old cement a while longer, though eventually we will lose the battle. But this war has gone on for over 31 years since the pool was about 15 anyway, so it's become a family tradition & isn't even a second thought anymore. lolSo anyway, it's not the greatest of images below, but in reality, this image has a rather secretive, & much more interesting story to tell .... details coming soon ...
~ Craig ~
06-10-2013, 10:34 AM
#919
Join Date: Apr 2012
Location: Sellersville, PA
Posts: 775
Likes: 0
Received 0 Likes
on
0 Posts
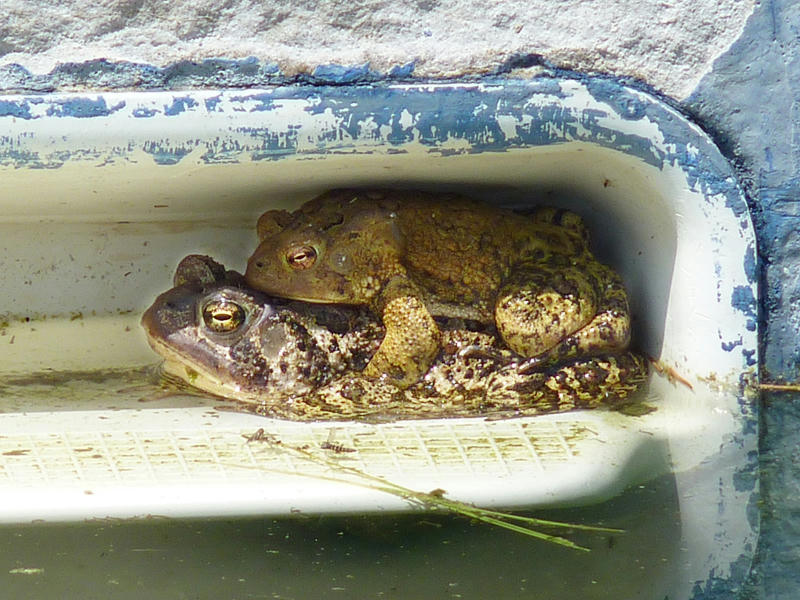
Well, in the last post mentioning my pool steps where I stated the image had a rather secretive & much more interesting story to tell, aside from the maintenance aspects I mentioned & what the image seemed to indicate on the surface, so here it is ...
With an extreme blow-up of the 3rd pool step from the image, we can see it seems the step was being used for a booty call by a couple of love struck bullfrogs!!!
~ Craig ~
With an extreme blow-up of the 3rd pool step from the image, we can see it seems the step was being used for a booty call by a couple of love struck bullfrogs!!!
~ Craig ~
06-10-2013, 07:24 PM
#921
Join Date: Apr 2012
Location: Sellersville, PA
Posts: 775
Likes: 0
Received 0 Likes
on
0 Posts
ORIGINAL: Airbrushler
LMAO they look embarrassed
LMAO they look embarrassed
Actually, I think it was less an embarrassed look, & more of a satisfied look Airbrushler, as just moments later I caught them in this photo ...


~ Craig ~
06-11-2013, 09:00 AM
#923

strange days
.....got laid off in september because of budget cuts....got a job in feb....got laid off again in apr because the compeny was going bust.....over this time I have just about sent a resume or filled out a job applacation for every day I was out of work( thats well over 250 jobs, I keep a note book)........yesterday I said yes to a job offer.....today I said yes to a better job offer...I now have to tell the first guy I got a better offer.......
.....got laid off in september because of budget cuts....got a job in feb....got laid off again in apr because the compeny was going bust.....over this time I have just about sent a resume or filled out a job applacation for every day I was out of work( thats well over 250 jobs, I keep a note book)........yesterday I said yes to a job offer.....today I said yes to a better job offer...I now have to tell the first guy I got a better offer.......
06-11-2013, 09:09 AM
#924
ORIGINAL: mustclime
strange days
.....got laid off in september because of budget cuts....got a job in feb....got laid off again in apr because the compeny was going bust.....over this time I have just about sent a resume or filled out a job applacation for every day I was out of work( thats well over 250 jobs, I keep a note book)........yesterday I said yes to a job offer.....today I said yes to a better job offer...I now have to tell the first guy I got a better offer.......[img][/img]
What if the first guy comes back with an even better offer than the second guy?
06-14-2013, 08:37 AM
#925
Join Date: Apr 2012
Location: Sellersville, PA
Posts: 775
Likes: 0
Received 0 Likes
on
0 Posts
Sorry, I just had to laugh at this video uploaded by Tamiya America ... seriously? No wonder comments & ratings were disabled 
~ Craig ~
[youtube]http://www.youtube.com/watch?v=TEYTmPX4vSM[/youtube]
~ Craig ~