


Painting guide to Waffen SS uniforms
 02-25-2013, 05:38 AM
#1

Thread Starter

I have been commissioned by my Belgian friend Karel, from BTB, to re-paint x4 German figures from Alpine in 1/16 Karel, wants all the figures painted to reflect Waffen SS troops in the Ardennes, this write up will discuss the various uniforms and camouflage patterns, for this I will be using Tamiya paints I will tell you what paints to use and in what mix ratios each figure will be covered individually, here are the x4 figures x2 are Panzer crew and x2 are Panzergrenadiers
To help paint the figures as authentic as possible I will be using “Camouflage uniforms of the Waffen SS” by Michael D. Beaver.
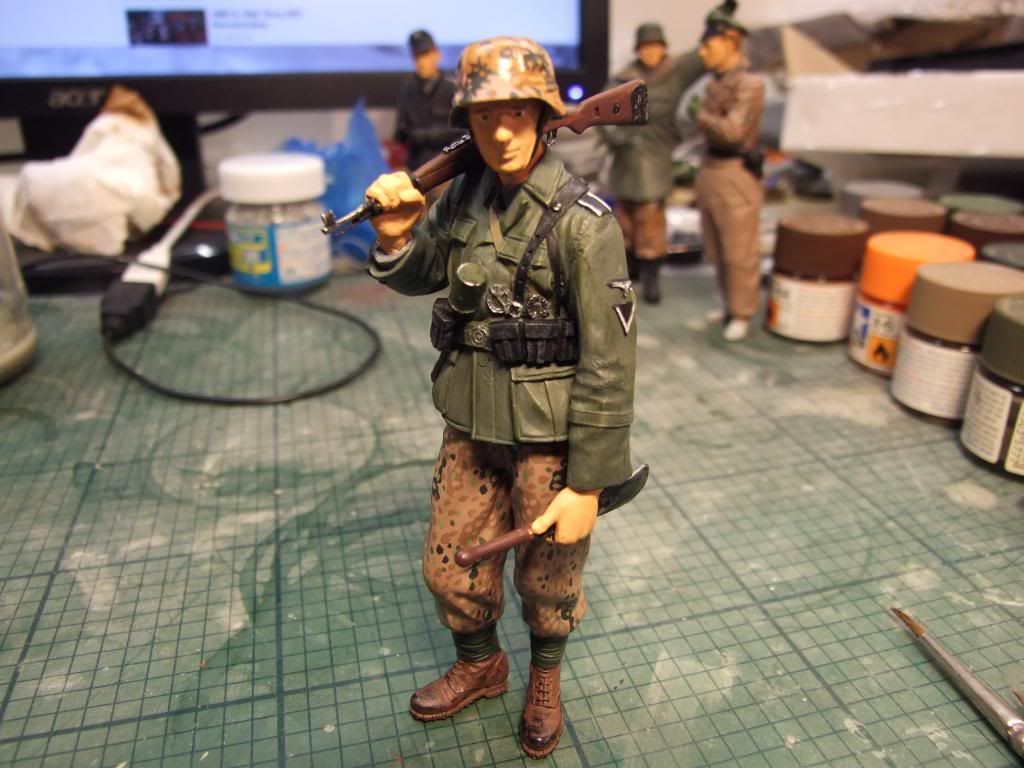
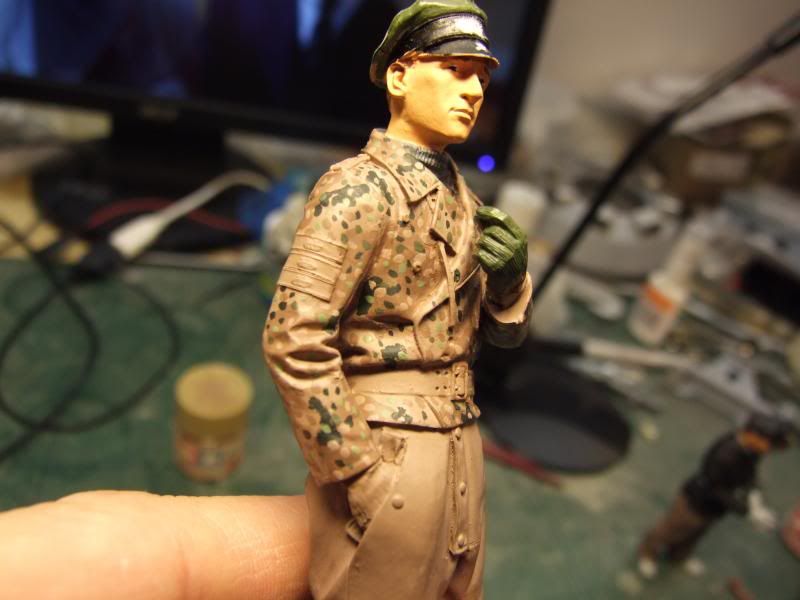
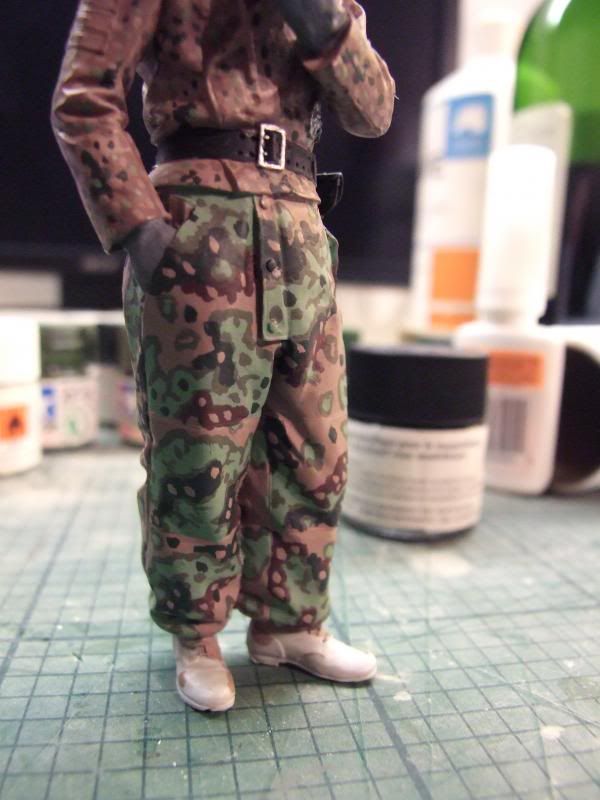
The first figure is an SS Gebirgsjäger, from the 7. SS-Freiwilligen-Gebirgs-Division „Prinz Eugen“ this figure will be changed to represent one from the Ardennes offensive, to do this all I have had to do is remove the divisional emblem on the right collar and the Gebirgs marking on the right upper sleeve latter SS collar tabs will be added, this figure will be painted wearing Pea dot M44 trousers M40 service jacket and the helmet will have an autumn Oak Leaf cover.
M44 drill uniform
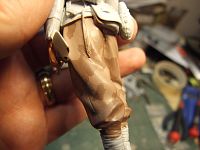
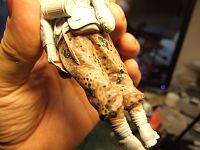
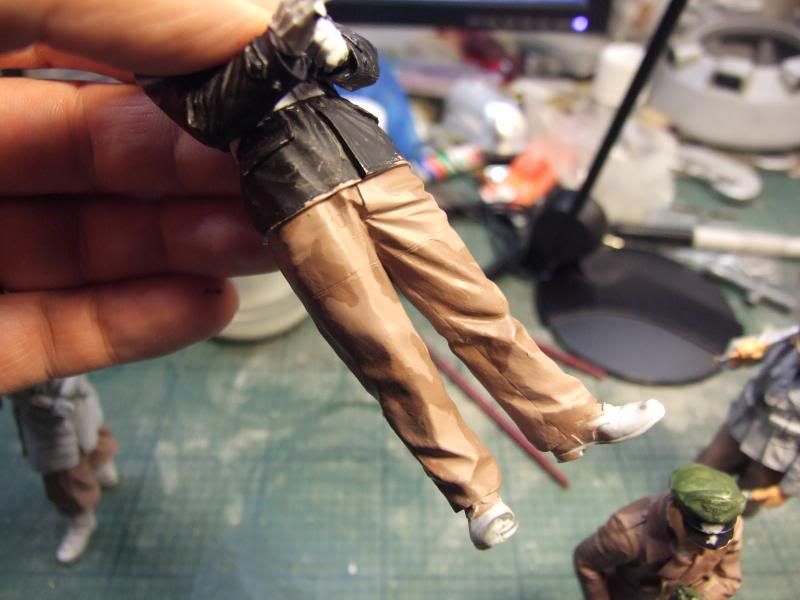
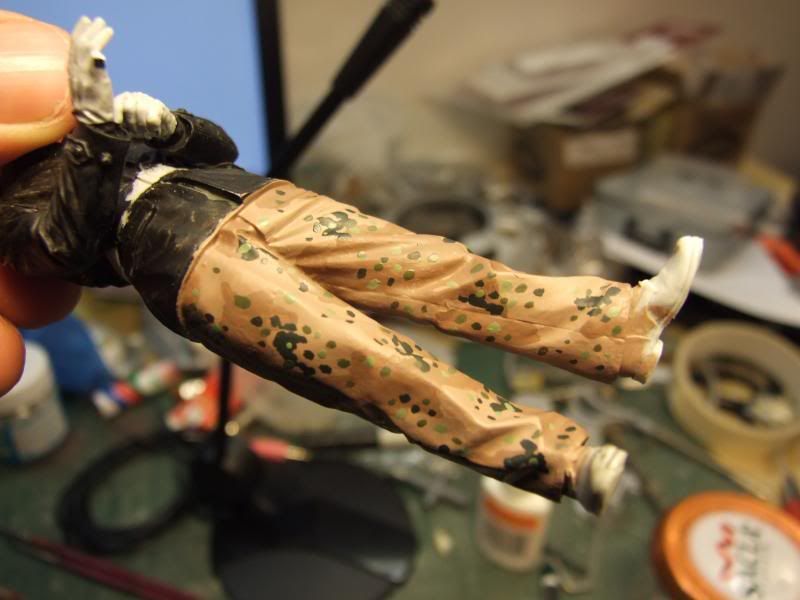
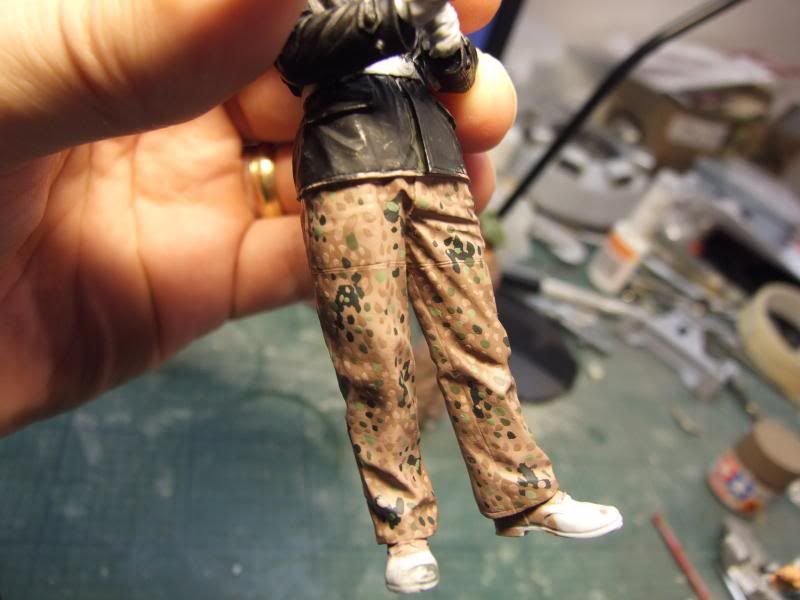
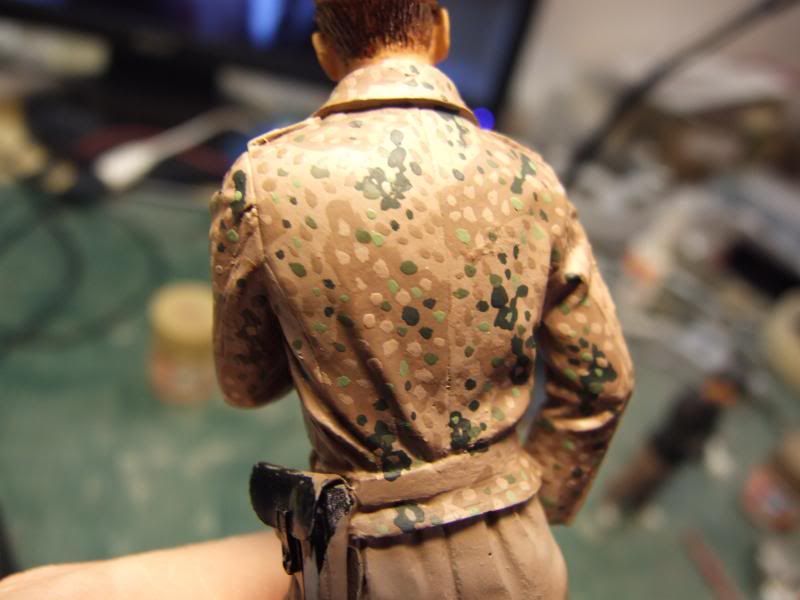
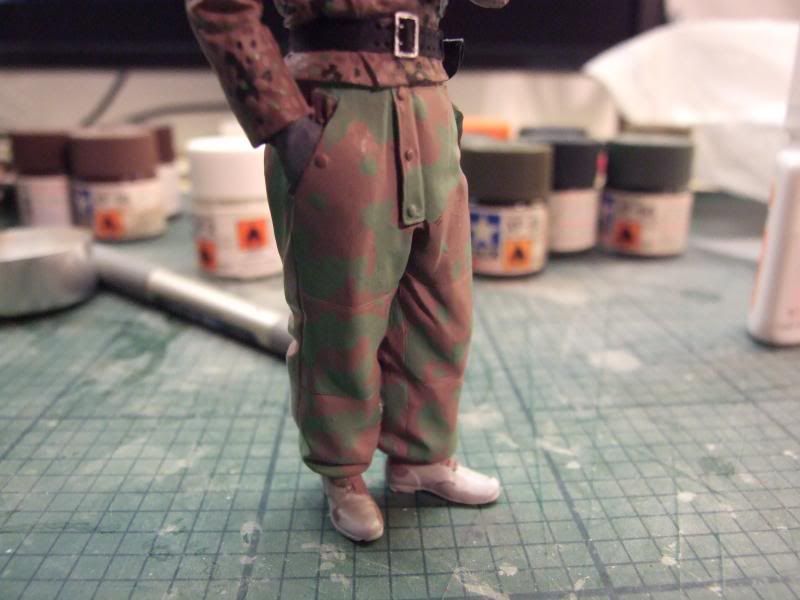
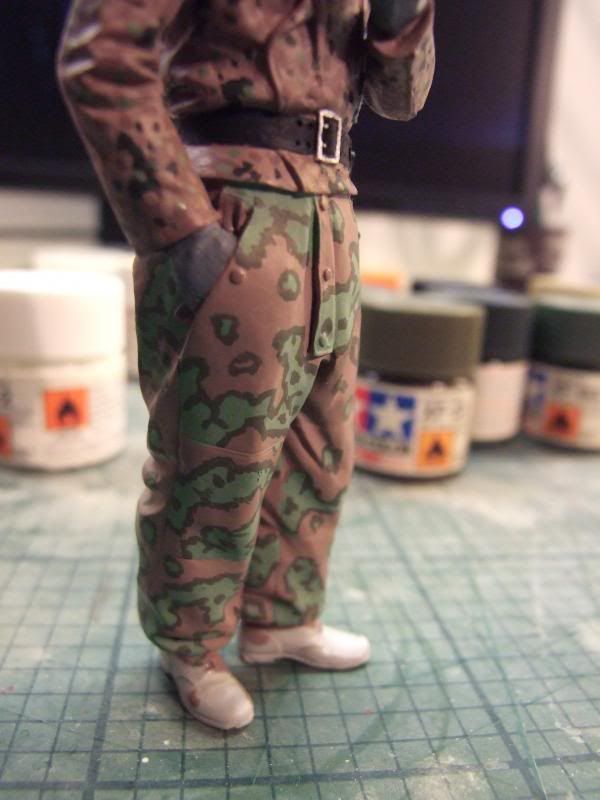
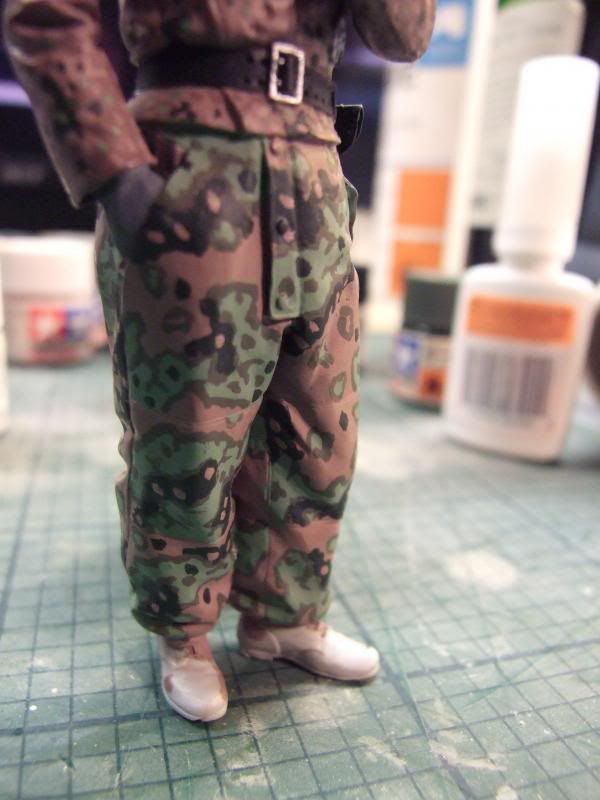
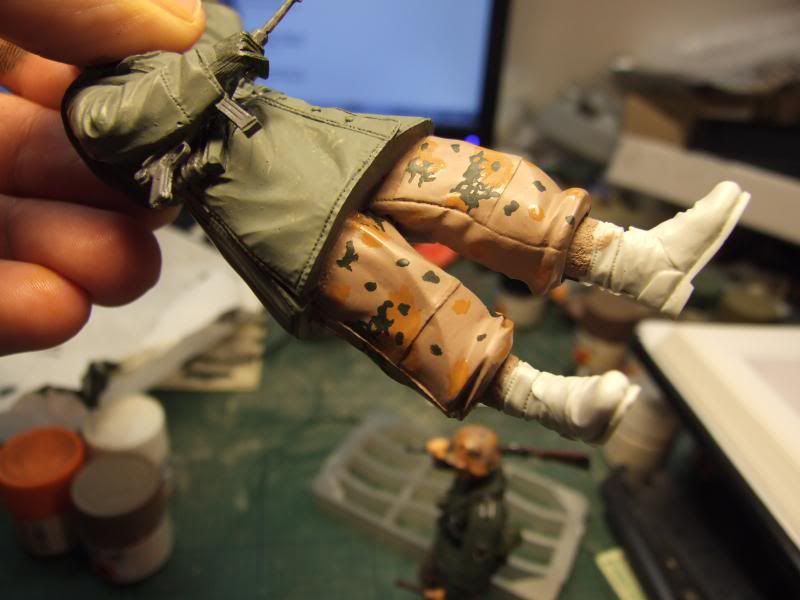
This uniform was first issued in March 1944 initially the camouflage patterns were Oak Leaf and Blared Edge latter when stocks on material were used up Pea Dot was used, this pattern was available with either a dark or light background unlike other patterns Pea Dot wasn’t reversible and both colours were released simultaneously, all SS camouflage used 5 colours in there patterns and can be difficult to work out what needs to be painted first, I start with the base colour this is also used in some of the spots latter the base colour consists of XF52 flat earth and XF2 white these are mixed at a ratio 1:1 if you are planning on painting a number of SS figures it may be worthwhile making a pot of paint so future mixing won’t need redoing, once the trousers are painted they will look like this
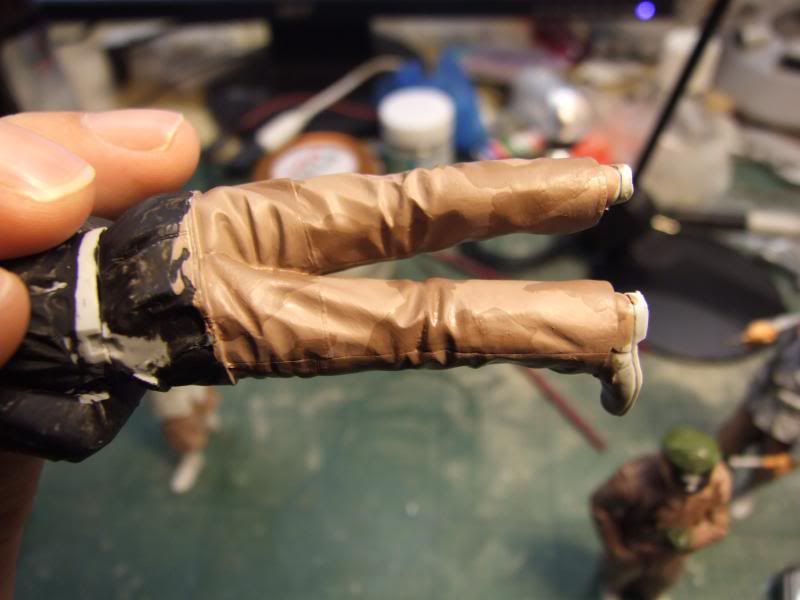
Once the paint has dried it’s time for the next colour, it’s always useful to study a picture first and try to replicate the pattern, for the main large camouflage areas for this I use XF52 flat earth once your main pattern is painted and you are happy it should look like this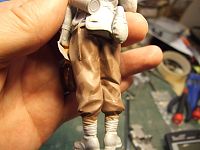
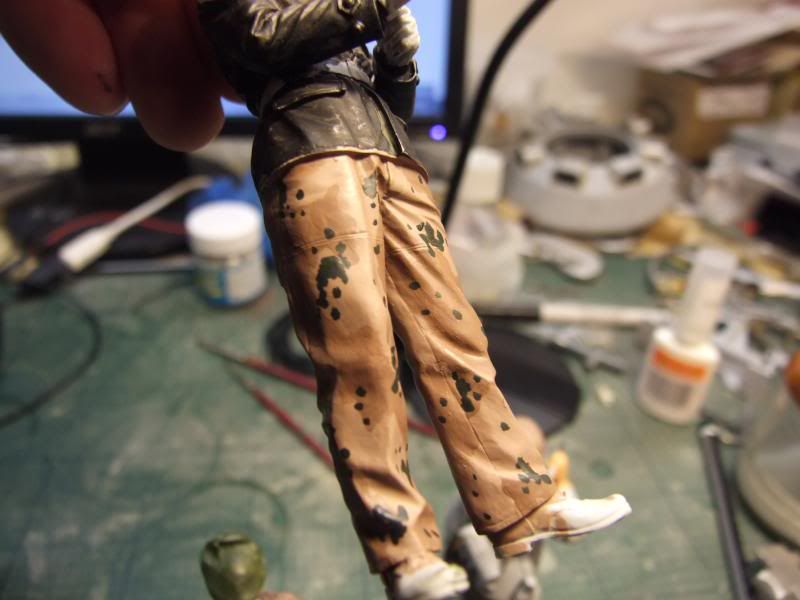
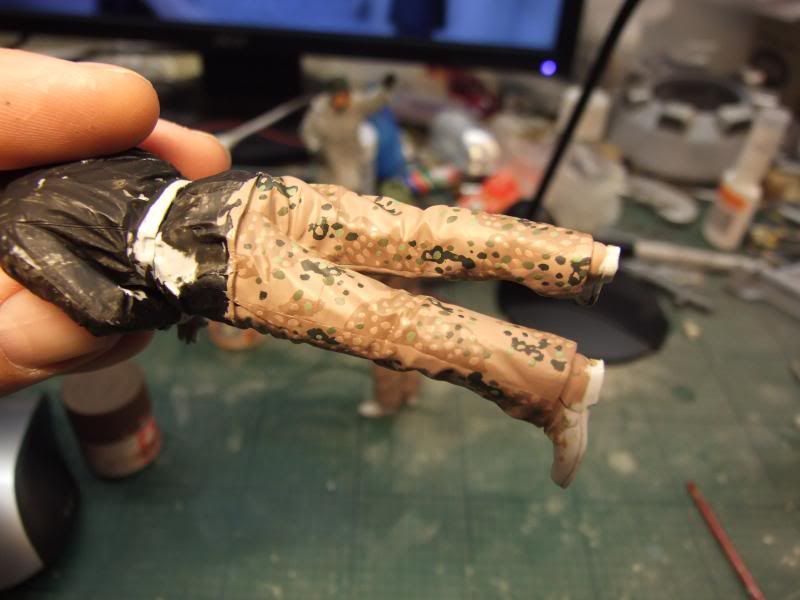
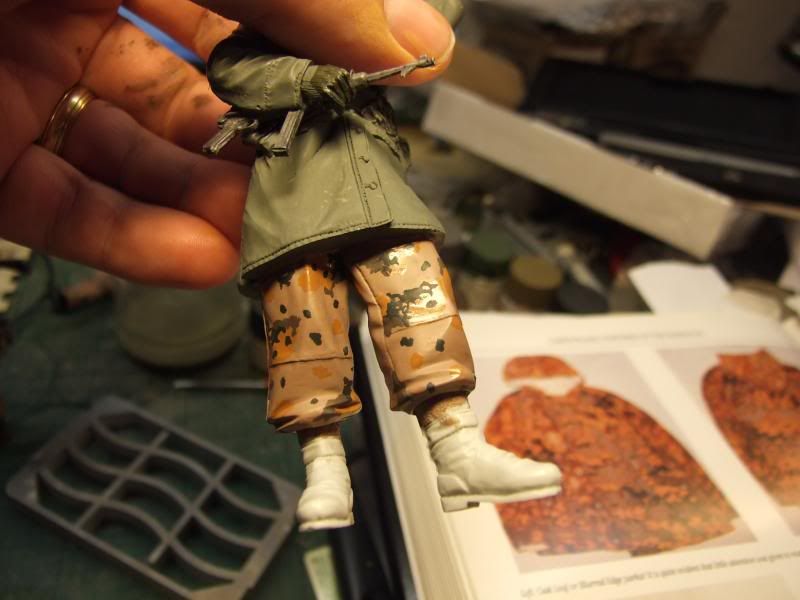
Once you have allowed the figure to dry properly next comes the darkest shade this is XF27 Black Green this is applied in small random areas again using you reference you also add the first dots at this point then it should look like this
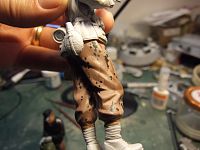
Now it’s time to add the first green dots these are the lightest shade XF5 Flat Green and XF2 White mixed at 1:1 ratio again using your reference it should look like this
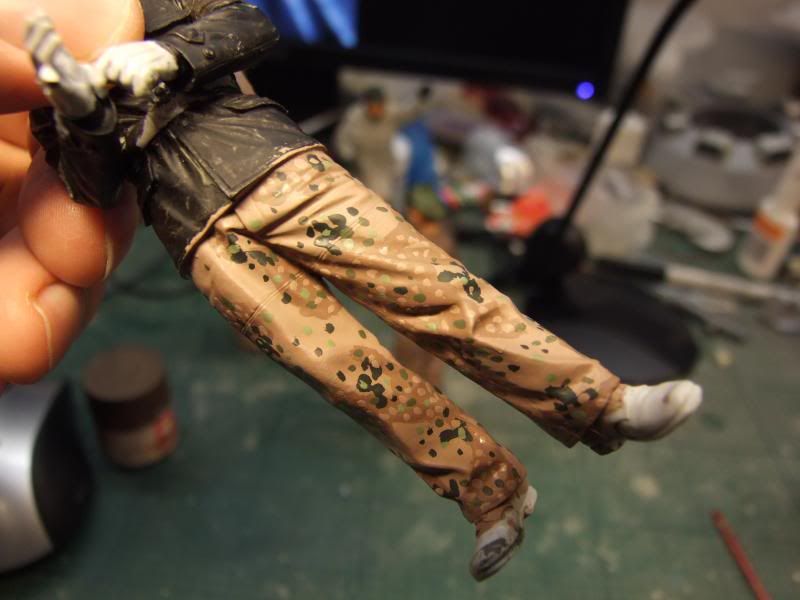
Next comes the darkest green spots which are XF5 Flat Green and XF52 Flat Earth mixed at a ratio of 1:1 again once completed it will look like this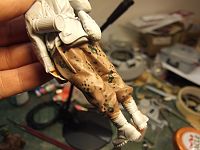
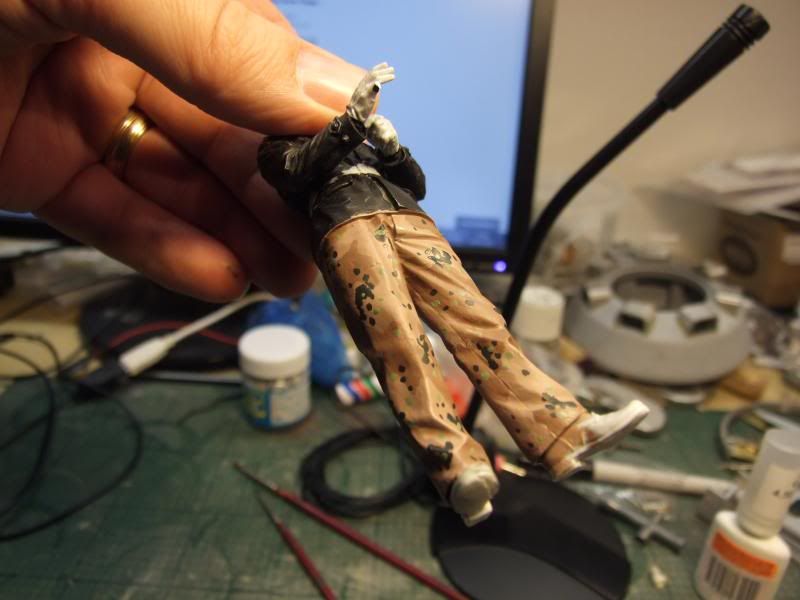
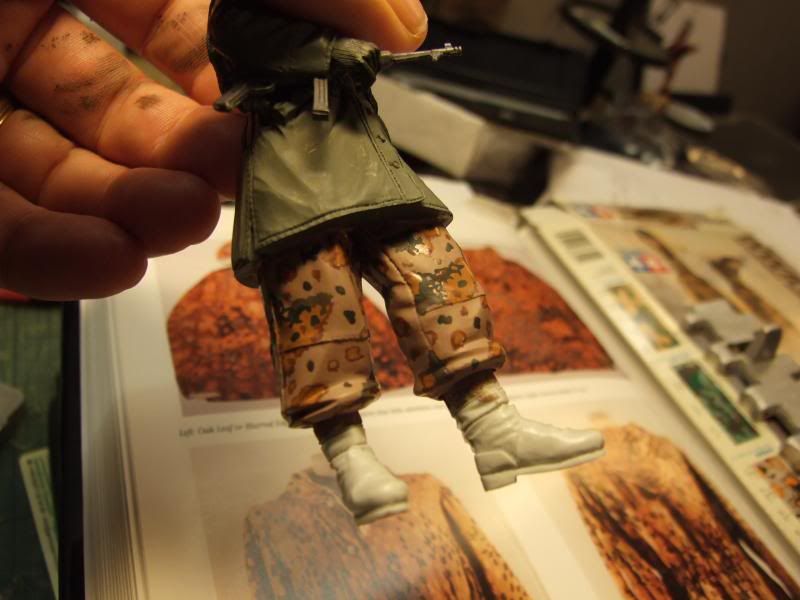
Now it’s time to start to fill in the darkest camouflage pattern with the lighter colour XF52 flat earth and XF2 white

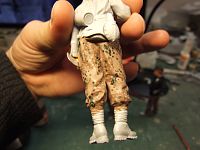
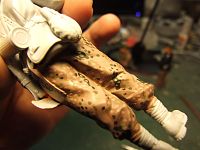
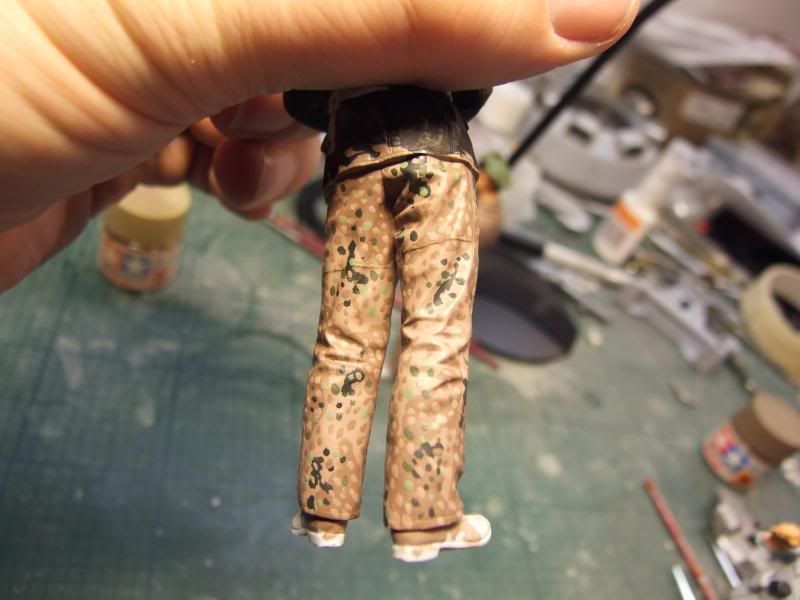
And then finally the lighter area with the darker colour XF52 Flat Earth
More to follow
To help paint the figures as authentic as possible I will be using “Camouflage uniforms of the Waffen SS” by Michael D. Beaver.
The first figure is an SS Gebirgsjäger, from the 7. SS-Freiwilligen-Gebirgs-Division „Prinz Eugen“ this figure will be changed to represent one from the Ardennes offensive, to do this all I have had to do is remove the divisional emblem on the right collar and the Gebirgs marking on the right upper sleeve latter SS collar tabs will be added, this figure will be painted wearing Pea dot M44 trousers M40 service jacket and the helmet will have an autumn Oak Leaf cover.
M44 drill uniform
This uniform was first issued in March 1944 initially the camouflage patterns were Oak Leaf and Blared Edge latter when stocks on material were used up Pea Dot was used, this pattern was available with either a dark or light background unlike other patterns Pea Dot wasn’t reversible and both colours were released simultaneously, all SS camouflage used 5 colours in there patterns and can be difficult to work out what needs to be painted first, I start with the base colour this is also used in some of the spots latter the base colour consists of XF52 flat earth and XF2 white these are mixed at a ratio 1:1 if you are planning on painting a number of SS figures it may be worthwhile making a pot of paint so future mixing won’t need redoing, once the trousers are painted they will look like this
Once the paint has dried it’s time for the next colour, it’s always useful to study a picture first and try to replicate the pattern, for the main large camouflage areas for this I use XF52 flat earth once your main pattern is painted and you are happy it should look like this
Once you have allowed the figure to dry properly next comes the darkest shade this is XF27 Black Green this is applied in small random areas again using you reference you also add the first dots at this point then it should look like this
Now it’s time to add the first green dots these are the lightest shade XF5 Flat Green and XF2 White mixed at 1:1 ratio again using your reference it should look like this
Next comes the darkest green spots which are XF5 Flat Green and XF52 Flat Earth mixed at a ratio of 1:1 again once completed it will look like this
Now it’s time to start to fill in the darkest camouflage pattern with the lighter colour XF52 flat earth and XF2 white
And then finally the lighter area with the darker colour XF52 Flat Earth
More to follow
 02-25-2013, 06:45 AM
#2

Nice work! I stink at painting figures so will be watching this with interest.
02-25-2013, 07:47 AM
#3
Thank you, I will be watching this thread.
03-07-2013, 12:37 PM
#6
Thread Starter
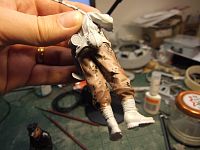
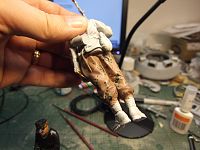
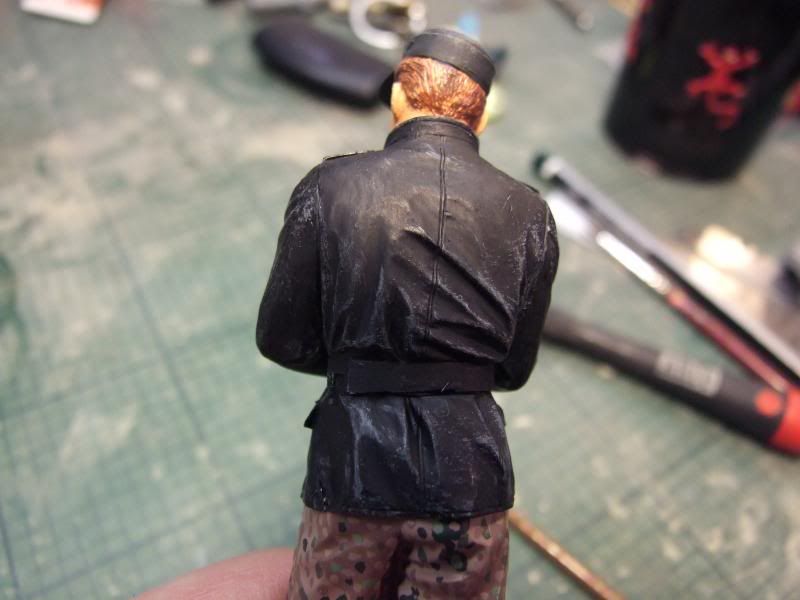
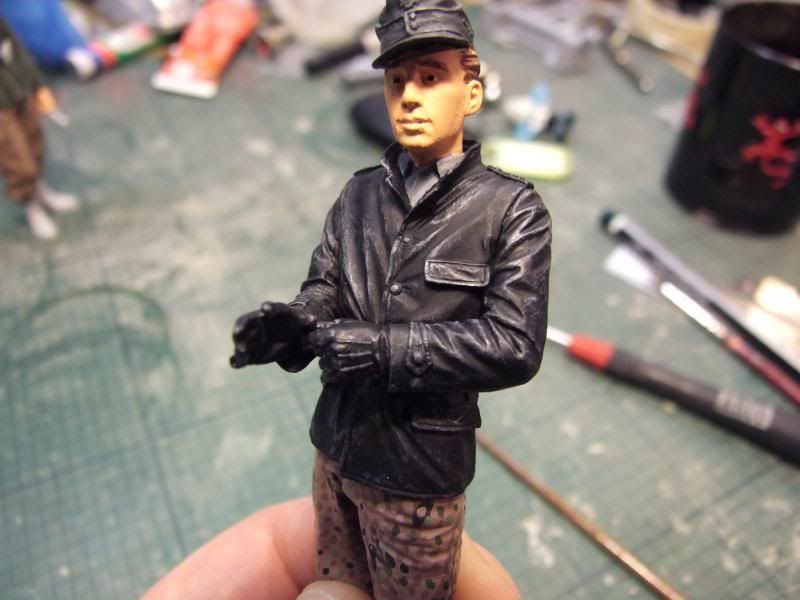
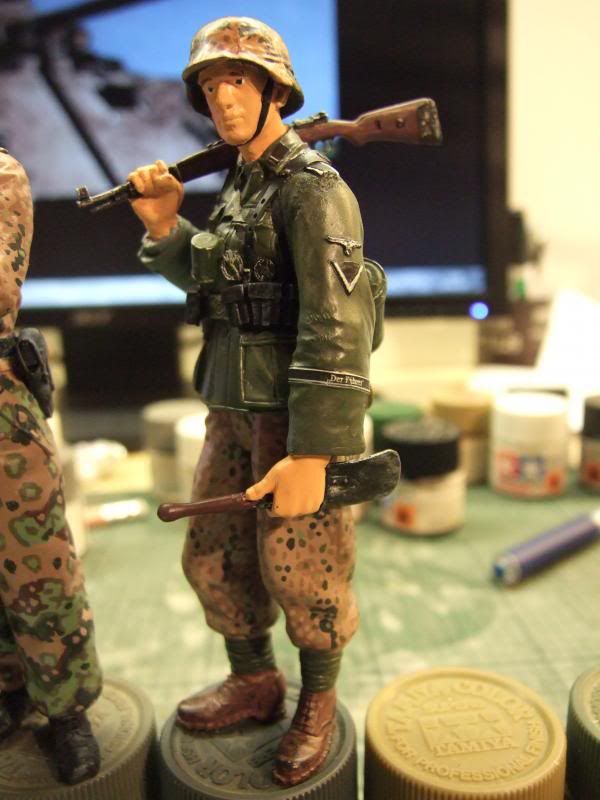
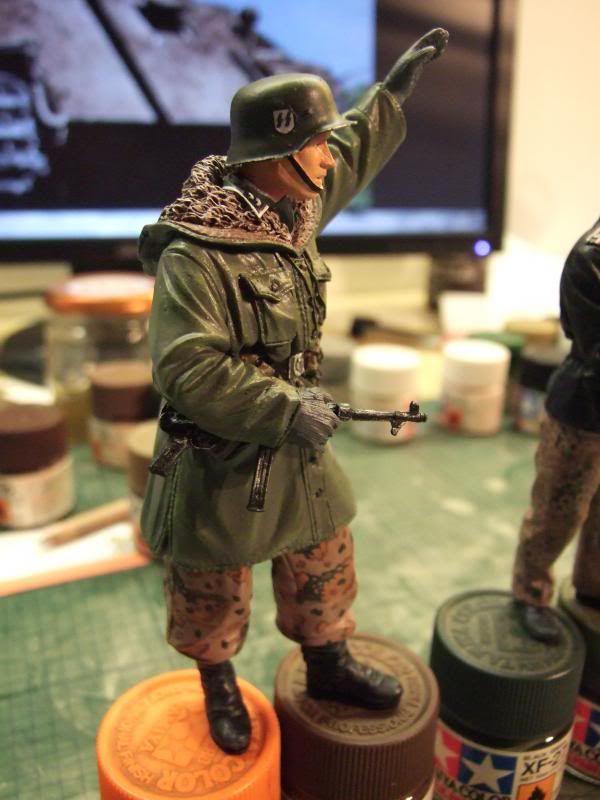
Now I have completed the figures camouflaged trousers it’s on to the next part the jacket and head first I paint the face with XF15 flat flesh the eyes and hair are whatever colour you want then the helmet cover ready for camouflage this is XF52 flat earth and XF2 white mixed 1:1 then the shirt is painted XF53 neutral grey then the entire jacket is painted XF65 field grey 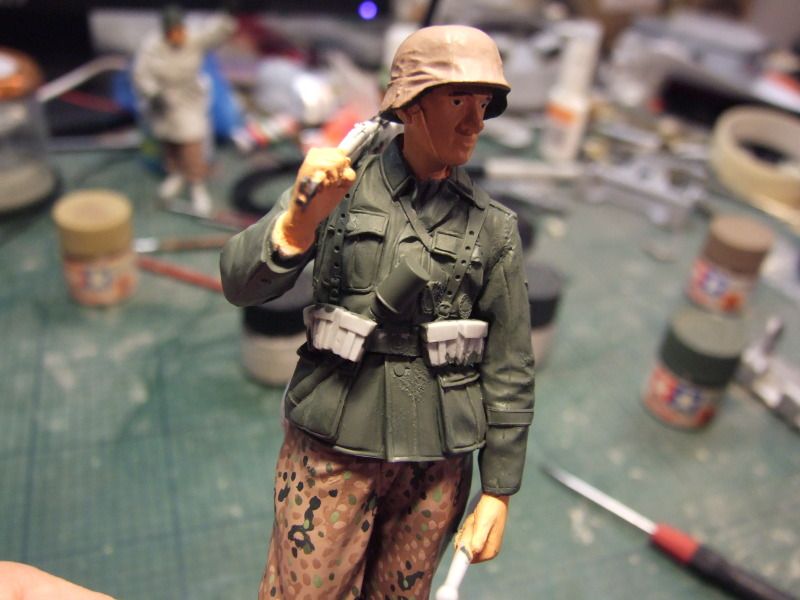
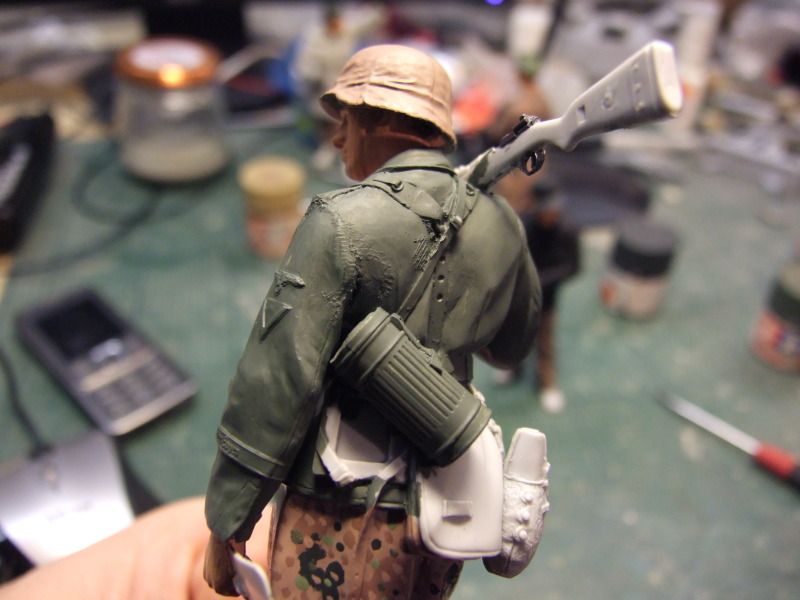
once this is done the webbing, shoulder boards, sleeve eagle and rank chevron are painted XF1 black the gas mask canister strap and bread bag were canvas so are painted XF49 the gas mask canister canteen cup and hand grenade are painted XF67 nato green the canteen is XF68 nato brown the rifle is XF10 flat brown with the metal parts picked out in XF1 black the edges of the shoulder boards, rank chevron and sleeve eagle are picked out in XF2 white are the figure has an infantry assault badge this is painted in XF16 flat aluminium as was things like buckles and chips to the canteen cup and a wound badge this was painted XF1 black boots painted in XF64 red brown the gaiters are painted XF67 nato green
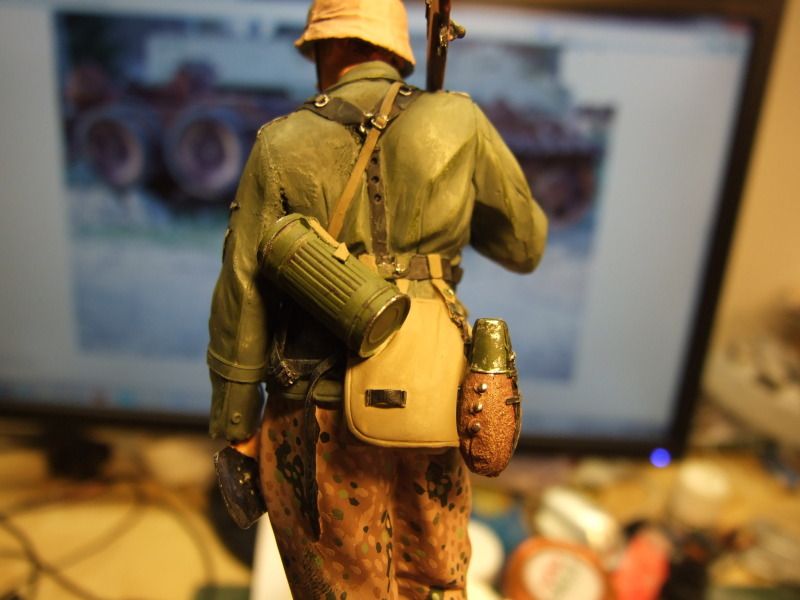
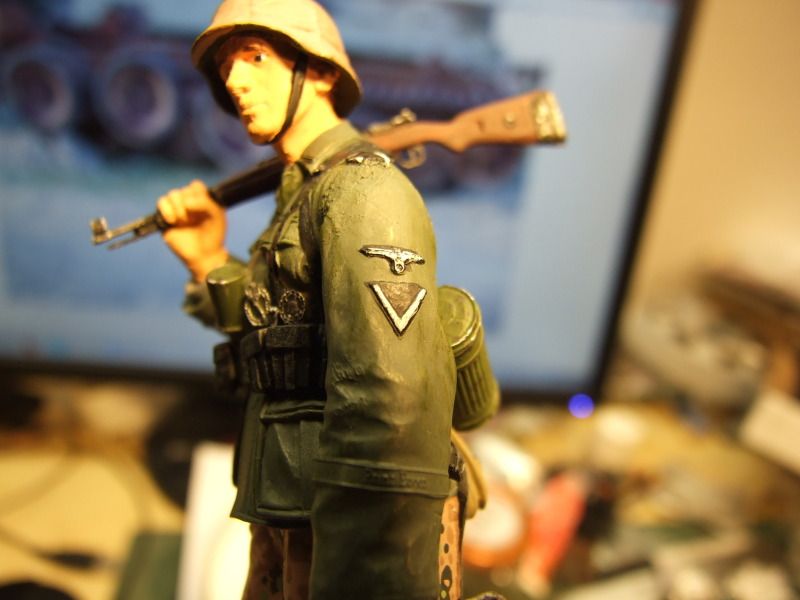
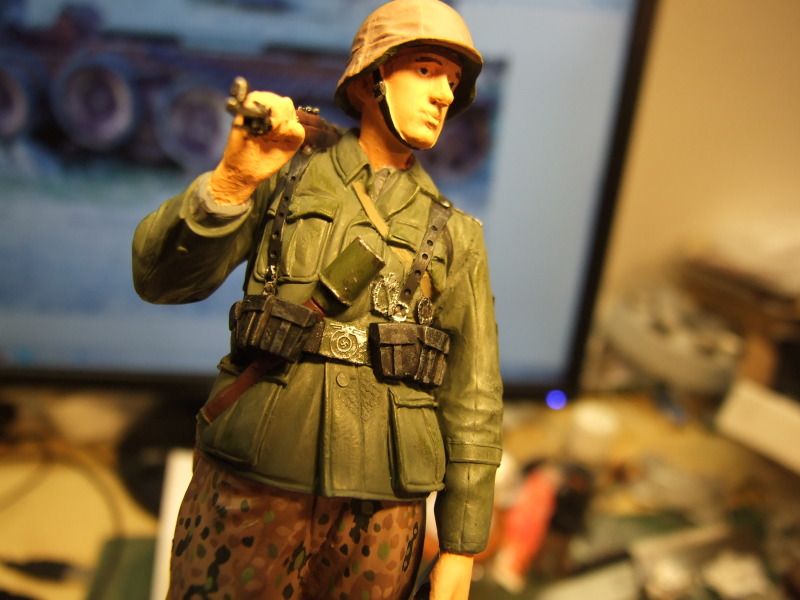
once this is done the webbing, shoulder boards, sleeve eagle and rank chevron are painted XF1 black the gas mask canister strap and bread bag were canvas so are painted XF49 the gas mask canister canteen cup and hand grenade are painted XF67 nato green the canteen is XF68 nato brown the rifle is XF10 flat brown with the metal parts picked out in XF1 black the edges of the shoulder boards, rank chevron and sleeve eagle are picked out in XF2 white are the figure has an infantry assault badge this is painted in XF16 flat aluminium as was things like buckles and chips to the canteen cup and a wound badge this was painted XF1 black boots painted in XF64 red brown the gaiters are painted XF67 nato green
03-07-2013, 01:36 PM
#7
The first set of pictures will come in handy for sure.
Nice work Mark.
~ Jeff
Nice work Mark.
~ Jeff
03-07-2013, 02:02 PM
#8
Jeff, you hurt my feelings!!! You said Mark does Nice work? He does Great work!!!
 Ok Jeff that was my stab at humor! Jinx, No flameouts!!![8D] LOL
He does Great work!!! Ok Jeff that was my stab at humor! Jinx, No flameouts!!![8D] LOL
03-08-2013, 05:33 AM
#9
Thread Starter
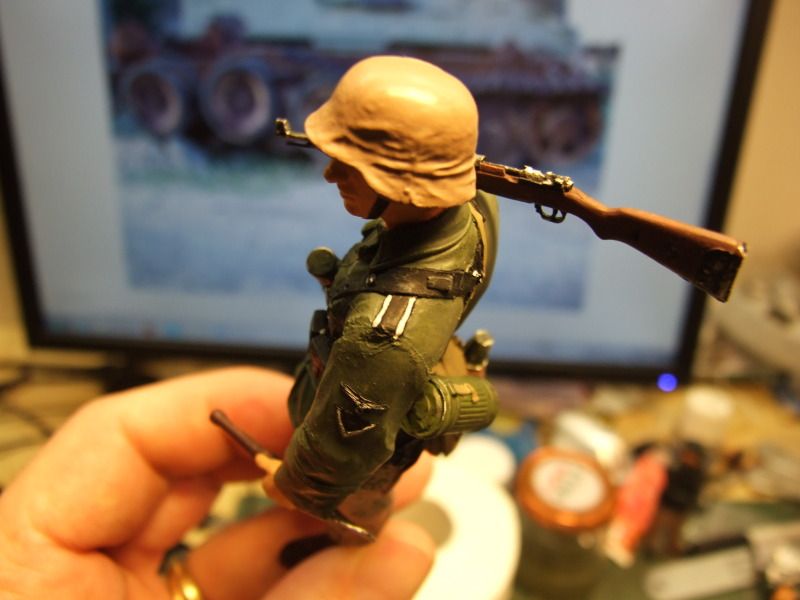
Now it’s time to complete the helmet cover this will be done in autumn oak leaf, German helmet covers were reversible autumn/summer they were released in a variety of patterns including plain tree, blared edge, palm and oak leaf pea dot was never released as a helmet cover a few that were made were converted from damaged trousers and jackets.
The base colour was done in XF52 flat earth and XF2 white 1:1 then we add the first camouflage as always its best to find a few pictures to copy and study first the colours for this is XF52 flat earth and X6 orange mixed at a ratio of 1:5 orange
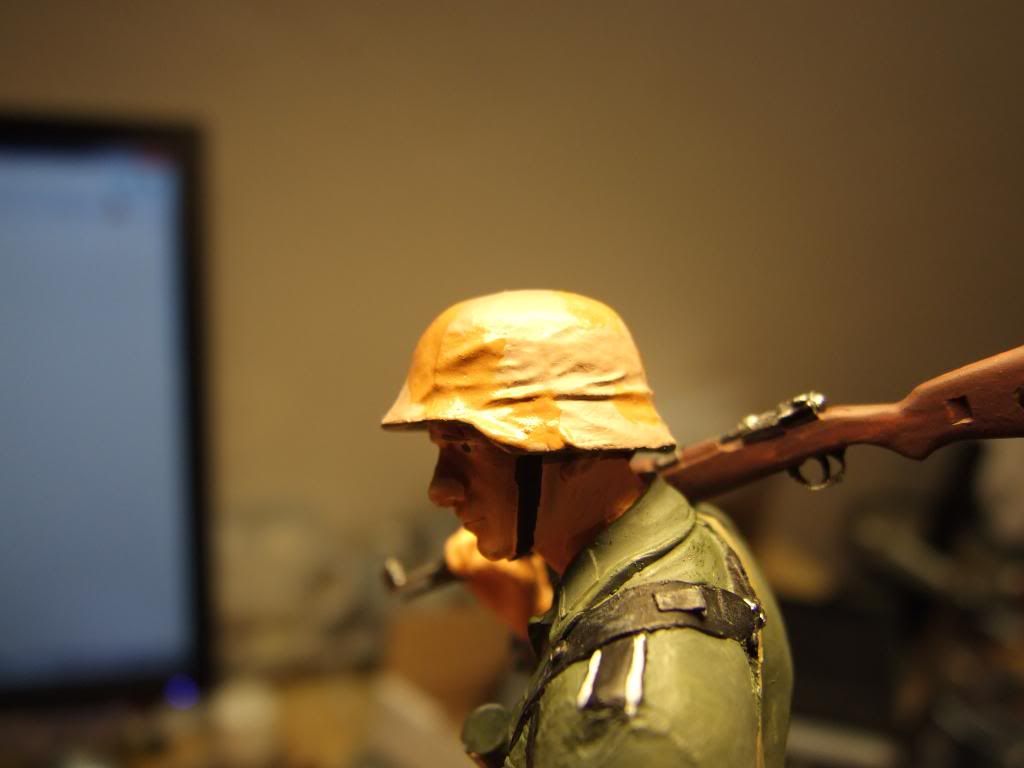
Then we add the next colour XF27 black green this is added in smaller areas and adding a few dots
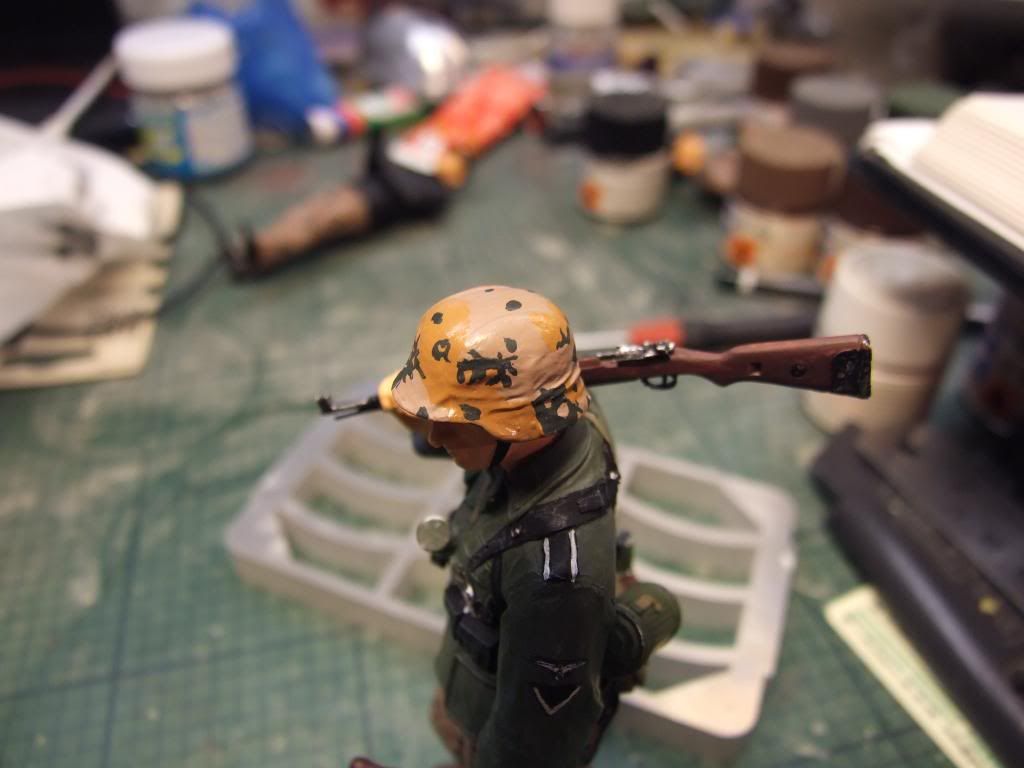
Then we add XF51 khaki drab this is painted in thin lines at the edge of the orange
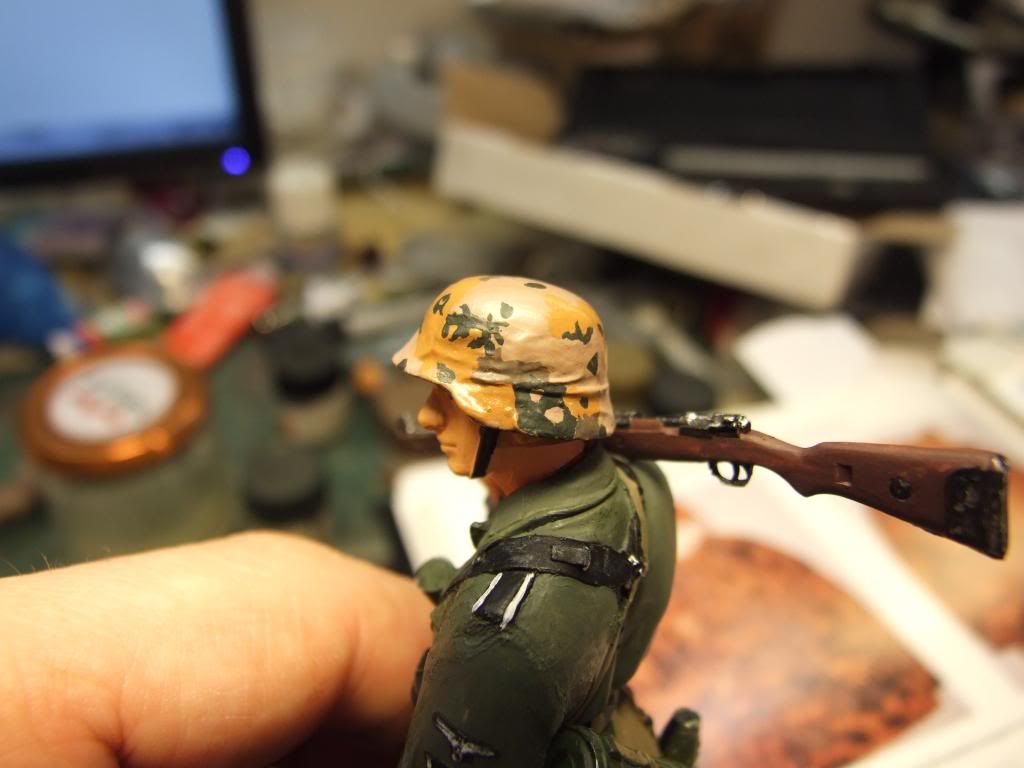
Then we finish off the pattern using XF64 and X6 mixed at 2:1 orange this you go around the edges of the pattern
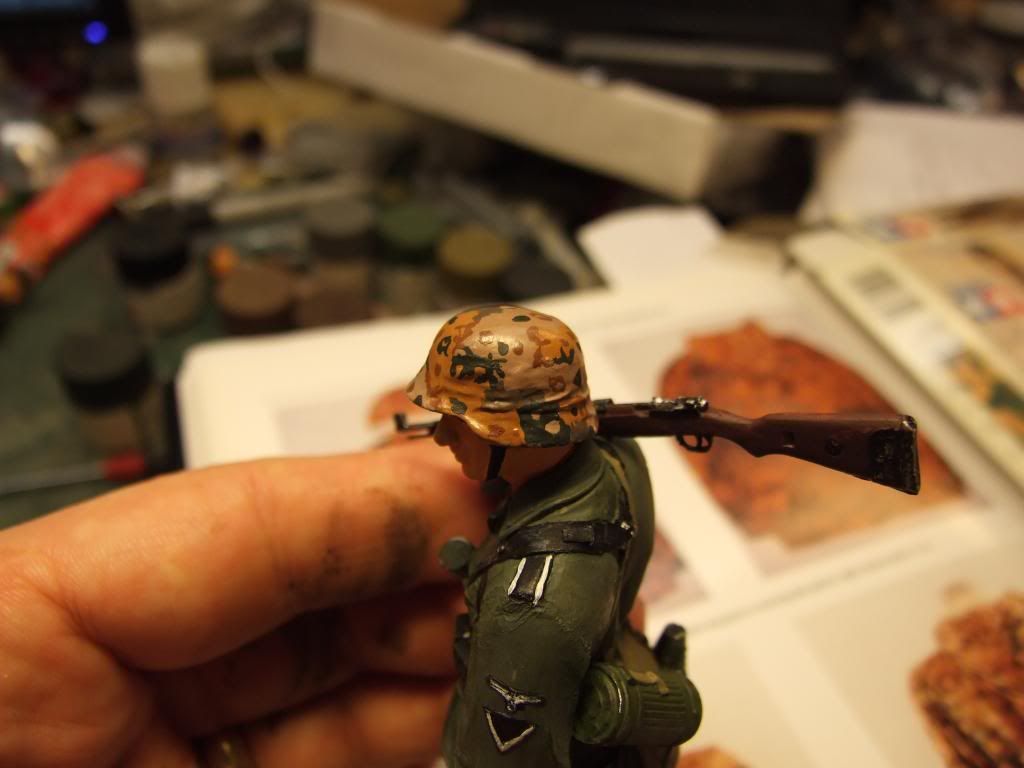
This is quite a complicated pattern and is best the practice first and study as many pictures as possible this will give the best results, all that is required now is to add the decals for the collar tabs and the honour title on the left sleeve
Next “panzer fahren“
The base colour was done in XF52 flat earth and XF2 white 1:1 then we add the first camouflage as always its best to find a few pictures to copy and study first the colours for this is XF52 flat earth and X6 orange mixed at a ratio of 1:5 orange
Then we add the next colour XF27 black green this is added in smaller areas and adding a few dots
Then we add XF51 khaki drab this is painted in thin lines at the edge of the orange
Then we finish off the pattern using XF64 and X6 mixed at 2:1 orange this you go around the edges of the pattern
This is quite a complicated pattern and is best the practice first and study as many pictures as possible this will give the best results, all that is required now is to add the decals for the collar tabs and the honour title on the left sleeve
Next “panzer fahren“

 03-08-2013, 07:27 AM
#12


Join Date: Oct 2009
Location: ninove - outeroost vlaanderen, BELGIUM
Posts: 2,610
Likes: 0
Received 0 Likes
on
0 Posts
he mark do you know the washes of citadel, luc van de voorde was showing them on me since then i have them also ... it is realy quick and so easy to shadowing the face and clothes of your figures with that
www.games-workshop.com/gws/catalog/armySubUnitCats.jspi show you on one of our meetings this year mostly one layer is enough i give very satesfying results with diferent shades
www.games-workshop.com/gws/catalog/armySubUnitCats.jspi show you on one of our meetings this year mostly one layer is enough i give very satesfying results with diferent shades
03-17-2013, 02:17 PM
#13
Thread Starter
Panzerfahrer
This is a Waffen SS Panzer crew from the LAH division that can be built as either an NCO or as an ordinary crew member, the things that make this stand out as LAH are the black leather Italian U-boat jacket which was issued to the LAH and 12th SS HJ 2nd Panzer regiment these men used Panzer IV the men who used Panther from 1st Panzer regiment HJ generaly wore Italien or Pea Dot jackets the other thing that marks this figure as LAH is the shoulder boards these have the initials LAH in Gothic script, this figure will depict an SS-Unterscharfühere
First we will be painting the trousers these will be M44 Pea Dot these trousers were also issued in autumn oak leaf and blared edge pattern the latter was very rare black would also be rare for a member of the Waffen SS, in the early years of the war is was noted that once Panzer crew had to abandon there tanks they were often targeted and the fact that in the early years they wore black made them stand out so camouflage was introduced so they looked no different from the infantry
the base colour for the trouser is XF52 flat earth and XF2 white mixed 1:1
then came the first camouflage XF52 flat earth
then came the next colour notice its in smaller patches XF27 black green
then came the next colour this is dots of light green XF5 light green and XF2 white mixed 1:1
then the next darker shade of green spots XF5 light green and XF52 dark earth mixed 1:1
then we go back to the lighter brown spots XF2 white and XF52 dark earth mixed 1:1
then we add the final darker brown spots XF52 dark earth
03-18-2013, 09:32 AM
#14
Looks good Mark!!! By following this thread you have given me hope that I will be able to try this method as well. Seems less daunting then I thought when you can see step by step how it can be done.
Thanks again for sharing,
Rudy
Thanks again for sharing,
Rudy
06-03-2013, 12:35 PM
#15
Thread Starter
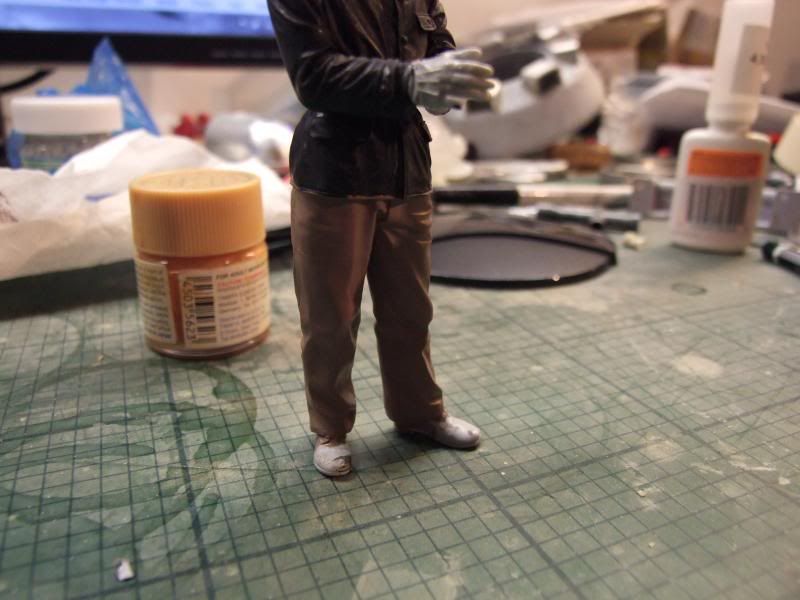
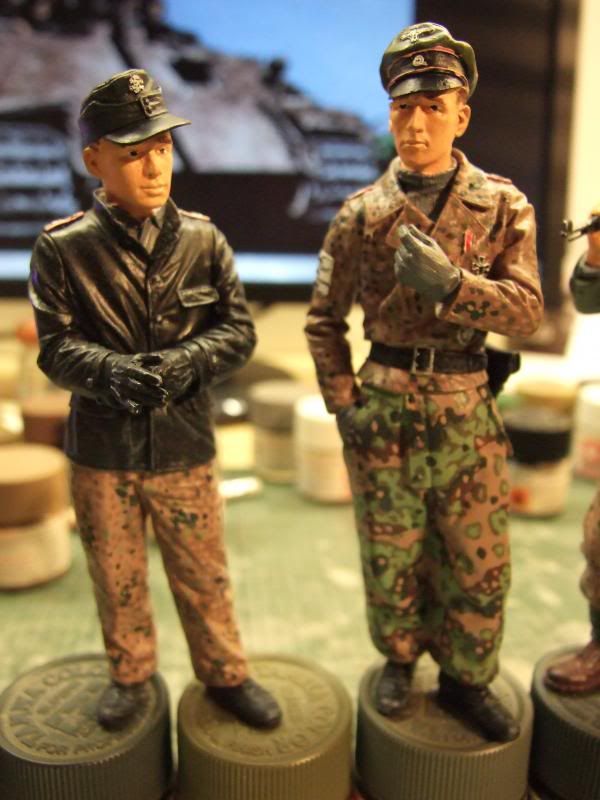
It’s been a while since my last update on the figures, all are now completed I just need to do the write up, tonight I will carry on with the Panzer crew, with his trousers completed its time to start on the jacket but first we pick out the shirt in XF53 neutral grey, his entire jacket gloves and belt are leather this is painted in XF1 flat black the M43 cap is painted in XF69 nato black this gives the scale colour of cloth whereas XF1 just doesn’t look right its well, too black, the totencopf and national eagle are picked out in white, as this figure depicts an Unterscharführer his rank is painted in white on the shoulder boards and pink piping added for Panzer divisions the LAH lettering in the centre are picked out in silver along with the enlisted man’s buckle
Panzer commandant
This figure depicts a Panzer officer originally from the Große Deutschland division heavily decorated, Karel wanted this to be converted to Waffen SS, this is simply done with the addition of the totencopf on the cap and removal of Heer markings, Karel also wanted to keep all the decorations which normally wouldn’t be seen on a camouflaged uniform.
Jacket is in the M44 pea dot pattern using the same method as used on earlier figures, the jumper is first painted in XF53 neutral grey
06-03-2013, 09:27 PM
#16
Member
Join Date: Sep 2006
Location: santee,
CA
Posts: 79
Likes: 0
Received 0 Likes
on
0 Posts
one word... awsome... Thanks for sharing. The details... you make it look as easy... like one of those Bob Ross picture painting sessions....
06-03-2013, 09:42 PM
#17
Senior Member
Looks like they are coming along nicely. I have done a few over the years and the hardest part is face and fingers. The finger nails are always forgotten and the eyes....oh the eyes....they can drive you crazy. I use Vallejo paints which can be washed away if they don't come out good. There are some nice eye decals out there now. I do the eyes with a jeweler's loupe and a pin. It is fun and I like doing the piping on the edges of the uniform, but sure does take long. As for the hands gloves are great way to cover them up. It is also critical to eliminate any shine or gloss on the figure.
06-04-2013, 01:16 AM
#18
Join Date: Oct 2009
Location: ninove - outeroost vlaanderen, BELGIUM
Posts: 2,610
Likes: 0
Received 0 Likes
on
0 Posts
how can i ever reimburse your effort in these figures mark ... it is so timeconsuming am realy very proud of the result even unfinished ... yes SS is not realy liked i know ... but i build my kampfgruppe kesnika the tanks and vehicles of Kampfgruppe Peiper in the ardennes ... its is our history they were here ... whatever its modelling and that's good but i geuss i can't show them off next year in dortmund by my koti's and panthers at the messe
thanks again mark it is much appriciated
06-04-2013, 11:49 AM
#20
Thread Starter
Mortak its all about reference and practice, the first figure I did using these methods took a lot longer that it does now though it still takes time.
Commander, they will get a flat clear coat soon to seal the decals used on some and to take any sheen away from the figures.
Karel, no problems I’m just sorry it has taken so long to complete, displaying them in Germany could be a problem mainly the ones with the swastika on the helmet and the SS decals those without may not be a problem, but it’s always better to ask.
With the jacket completed we now move onto the winter trousers which will be in summer oak leaf pattern, these were issued as reversible trousers to white with either summer or autumn on the outside patterns issued were oak leaf and blared edge patterns and very rare was the pea dot pattern, winter suits were issued in either autumn or summer depending on what was available as opposed to weather conditions.
First we start with painting the base colour again this is our premixed XF52 dark earth and XF2 flat white mixed at 1:1 ration (sorry I haven’t got a picture) once dry we start with the first shade of green this is XF5 flat green and XF2 flat white again mixed 1:1
Then we add the edge in a darker shade of green, also various splodges here and there XF5 flat green and XF52 dark earth again mixed at 1:1
Now we add darker patches and more dots this is XF27 black green
Then its time to add the last shade this time its XF10 flat brown
This is a complex pattern to paint and is best using a reference the larger the better books are good but I just happen to have a zeltbahn that I can unfold.
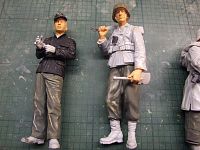
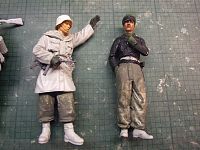
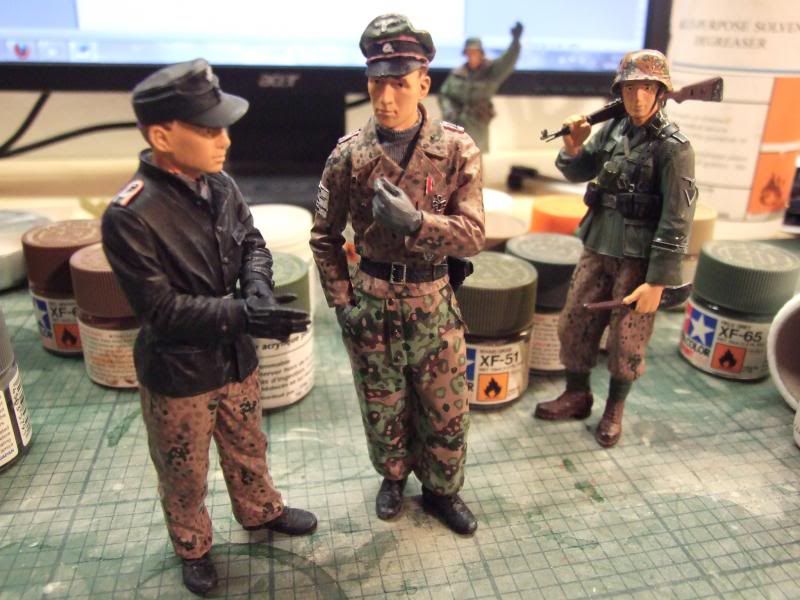
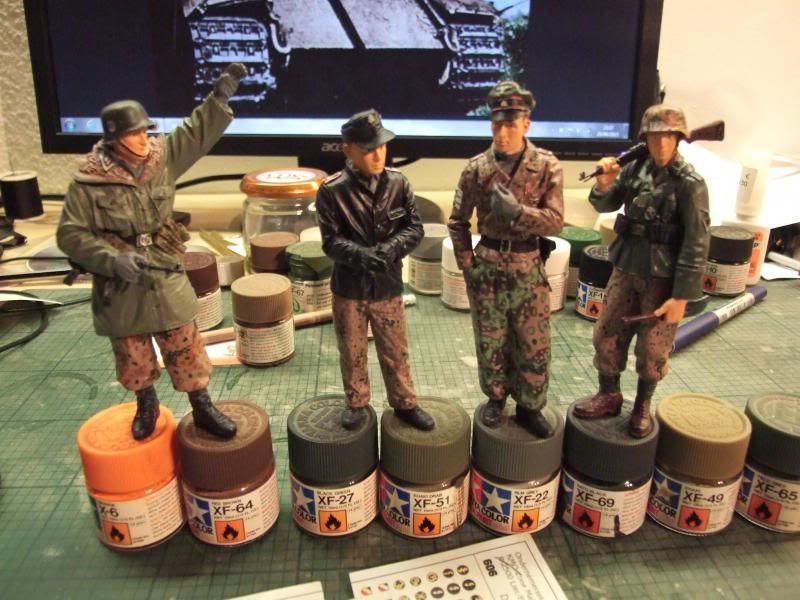
This is a group shot of the completed figures to show the effect of the camouflage
Commander, they will get a flat clear coat soon to seal the decals used on some and to take any sheen away from the figures.
Karel, no problems I’m just sorry it has taken so long to complete, displaying them in Germany could be a problem mainly the ones with the swastika on the helmet and the SS decals those without may not be a problem, but it’s always better to ask.
With the jacket completed we now move onto the winter trousers which will be in summer oak leaf pattern, these were issued as reversible trousers to white with either summer or autumn on the outside patterns issued were oak leaf and blared edge patterns and very rare was the pea dot pattern, winter suits were issued in either autumn or summer depending on what was available as opposed to weather conditions.
First we start with painting the base colour again this is our premixed XF52 dark earth and XF2 flat white mixed at 1:1 ration (sorry I haven’t got a picture) once dry we start with the first shade of green this is XF5 flat green and XF2 flat white again mixed 1:1
Then we add the edge in a darker shade of green, also various splodges here and there XF5 flat green and XF52 dark earth again mixed at 1:1
Now we add darker patches and more dots this is XF27 black green
Then its time to add the last shade this time its XF10 flat brown
This is a complex pattern to paint and is best using a reference the larger the better books are good but I just happen to have a zeltbahn that I can unfold.
This is a group shot of the completed figures to show the effect of the camouflage
06-04-2013, 12:19 PM
#21
As I said on another forum (hint hint), I just wish someone lived closer that did great work like that! I mean... I can pay.
I have a Panther crew I need done and I SUCK at figures! It's not just the uniforms but the eyes and such. Just no good at it, but I do love yours.
~ Jeff
I have a Panther crew I need done and I SUCK at figures! It's not just the uniforms but the eyes and such. Just no good at it, but I do love yours.
~ Jeff
06-04-2013, 03:41 PM
#22
Senior Member
ORIGINAL: Panther F
As I said on another forum (hint hint), I just wish someone lived closer that did great work like that! I mean... I can pay.
I have a Panther crew I need done and I SUCK at figures! It's not just the uniforms but the eyes and such. Just no good at it, but I do love yours.
~ Jeff
As I said on another forum (hint hint), I just wish someone lived closer that did great work like that! I mean... I can pay.
I have a Panther crew I need done and I SUCK at figures! It's not just the uniforms but the eyes and such. Just no good at it, but I do love yours.
~ Jeff
One trick is to duplicate the 21st Century facial features.
06-28-2013, 07:06 AM
#23
Thread Starter
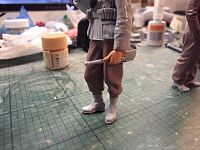
Once again it’s been a while since I last updated this thread and now we paint the last figure this is a SS Sharführer in winter uniform the winter trousers were reversible to white and came with the following camouflage patterns Oak leaf, Blared edge in either summer or autumn colours depending on what stocks were available and very rarely in Pea dot the jacket is the long fur lined type none reversible usually being issued in a grey green colour sometimes issued in Italian camouflage, this jacket is similar to the first type pullover jacket often referred to as the Kharkov jacket as that’s where it was first seen in use , this figure will have the jacket in green and the trousers will be autumn Oak leaf, I start first by painting the trousers in a mix of XF52 flat earth and XF2 this is mixed at a ratio of 1:1
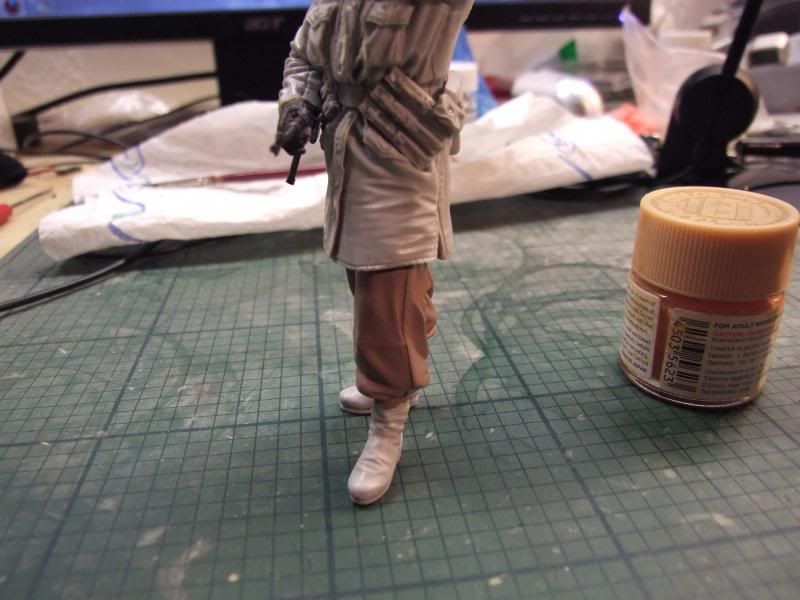
Then I paint the jacket this is done with XF22 RLM grey

The shirt is picked out with XF53 natural grey then the collar of the M40 jacket is painted XF65 field grey the fur lined hood is first painted XF52 flat earth then dry brushed with XF2 flat white
Then I paint the jacket this is done with XF22 RLM grey
The shirt is picked out with XF53 natural grey then the collar of the M40 jacket is painted XF65 field grey the fur lined hood is first painted XF52 flat earth then dry brushed with XF2 flat white
06-28-2013, 03:39 PM
#24
Senior Member
Your figures are going well. I have about 20+ figure kits sitting just waiting their turn. I have been stockpiling books and internet pix of them for years. Now it is time to do a few. I need more practice on those eyes. Maybe I can put sunglasses or goggles on them all???
06-29-2013, 12:51 PM
#25
Thread Starter
Now it’s time to add the camouflage to the trousers first off using reference XF6 orange and XF52 flat earth mixed at a ratio of 5:1
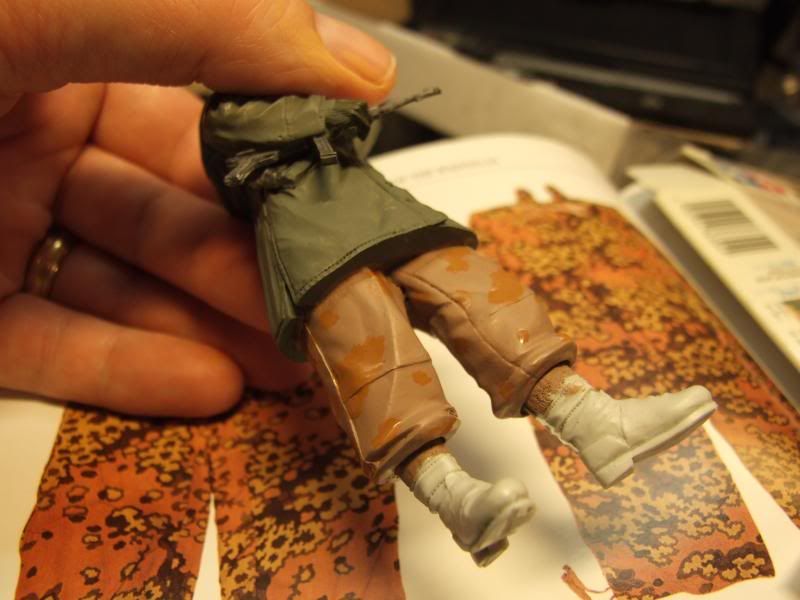
Then comes XF27 black green
Then we use XF51 khaki drab
Finally we use XF64 red brown and XF6 orange mixed at a ratio of 2:1
With the camouflage trousers completed its time to paint the boots XF1 black the helmet and the MP40 and other small details the helmet will have 2 decals from Verlinden the white shield with SS runes on the right and a Hakenkreuz in a red shield then all the figures are covered in clear matt Humberal lacquer.
I hope this has given people a little insight into how to paint Waffen SS figures with their complicated camouflage patterns, one thing I can’t stress enough is to have reference material the more the better and armed with the information on this tread you should with a little practice be able to reproduce your own figures.
A book I can’t recommend enough is “Camouflage Uniforms of the Waffen SS” by Michael. D. Beaver
The completed figures