


Panzer IV F1
 06-15-2013, 02:40 PM
#26
Always wanted a gray PIV without the turret box (like in pic #4) and the howitzer gun. 
~ Jeff
~ Jeff
 06-15-2013, 02:56 PM
#27


Join Date: Jan 2006
Location: Hamilton,
ON, CANADA
Posts: 1,422
Likes: 0
Received 7 Likes
on
7 Posts
Looks great, Asiatam did a good job on the metal wheels and idler. Does that go in with the stock HL screw?
The Mato return wheels attach with the stock coarse-thread hardware, pretty strong as is.
The Mato return wheels attach with the stock coarse-thread hardware, pretty strong as is.
06-15-2013, 03:04 PM
#28
When I fitted the upgraded rollers in my PZ4 I took one look at the E clips and reached for the parts box and found some R clips I used to use in R/C car builds, Quick to fit and easy to remove if you need to. shaun
06-15-2013, 04:05 PM
#30
Looking good. How far down did you end up dropping the rearmost return roller?
Any pictures of how the Asiatam road wheels go together or attach to the suspension? Do those road wheels using brass bushings, bearings or nothing at all?
Any pictures of how the Asiatam road wheels go together or attach to the suspension? Do those road wheels using brass bushings, bearings or nothing at all?
 01-20-2014, 05:21 PM
#34
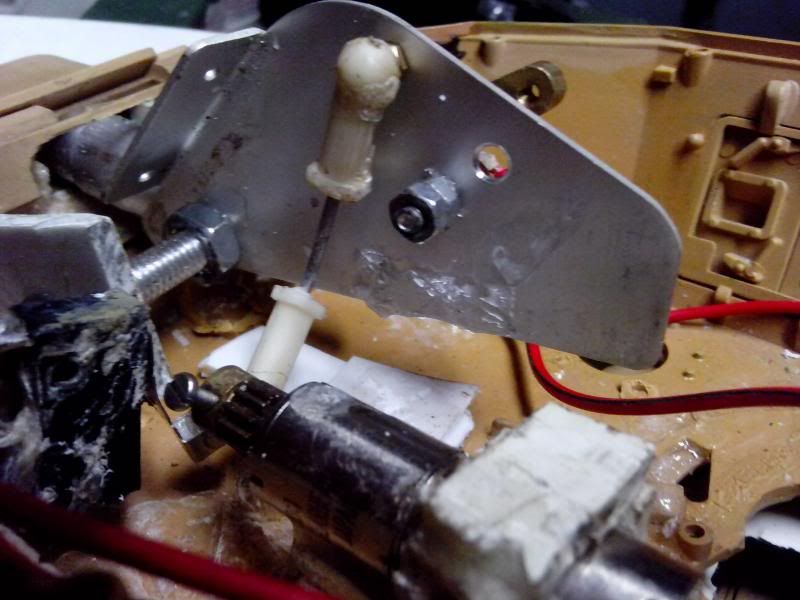
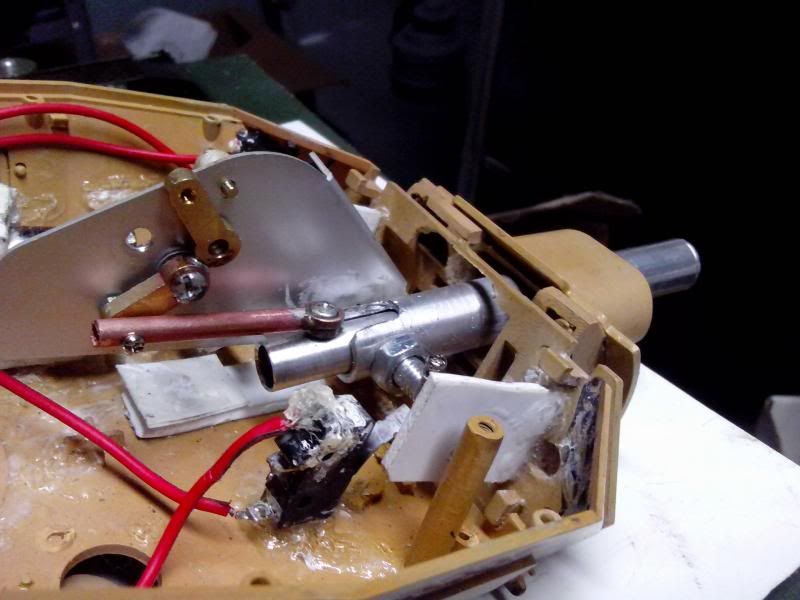
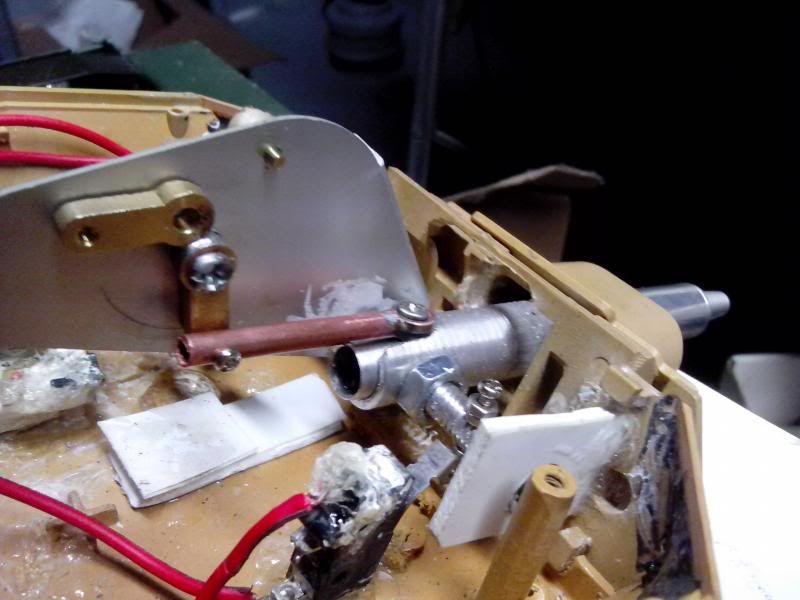
While working on the KV and having the lathe going, I went back to the Panzer IV I stated long ago. I did not like the plastic setup I had crudely made, so I went back to the drawing board and made everything new. I used plastic card for pivot mounts with bearings, and then turned and threaded some aluminum down to size to fit for the actual pivots. This also serves as a mount for the recoil stay. Then I made up a setup out of brass to control the recoil movements. Here are a couple of shots. The elevation will b controlled using a gear reduction micro motor with limit switches wired into the circuit. This has already been tested, and will be installed soon. Hope you like the new setup.


 01-26-2014, 06:53 PM
#37
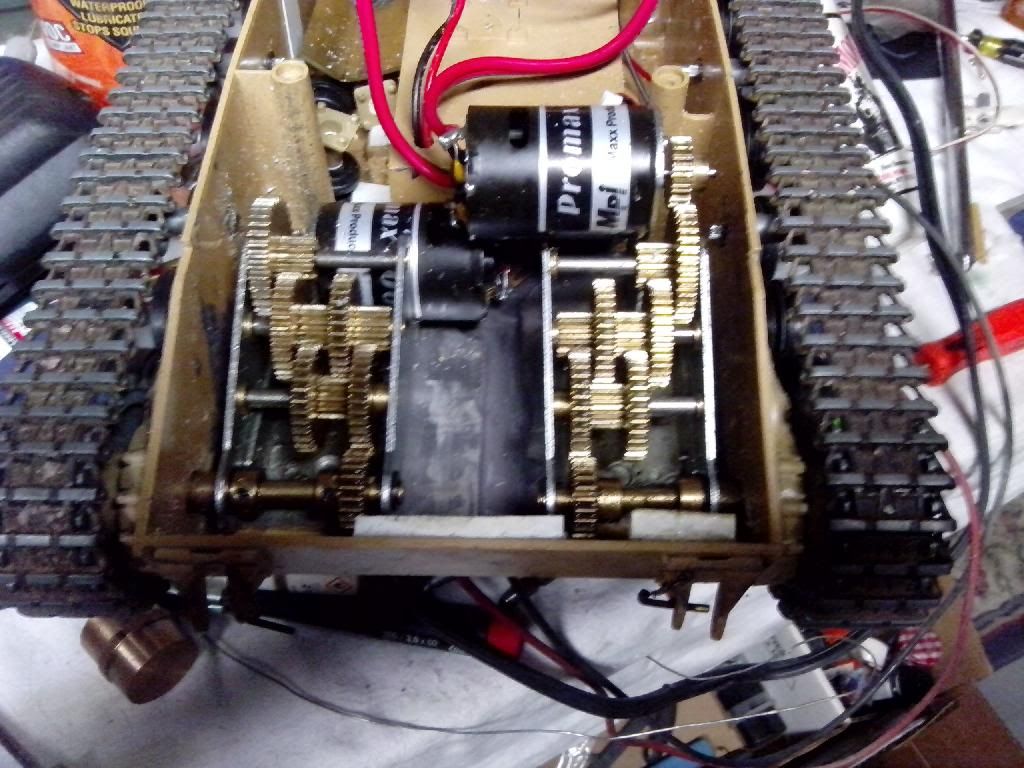
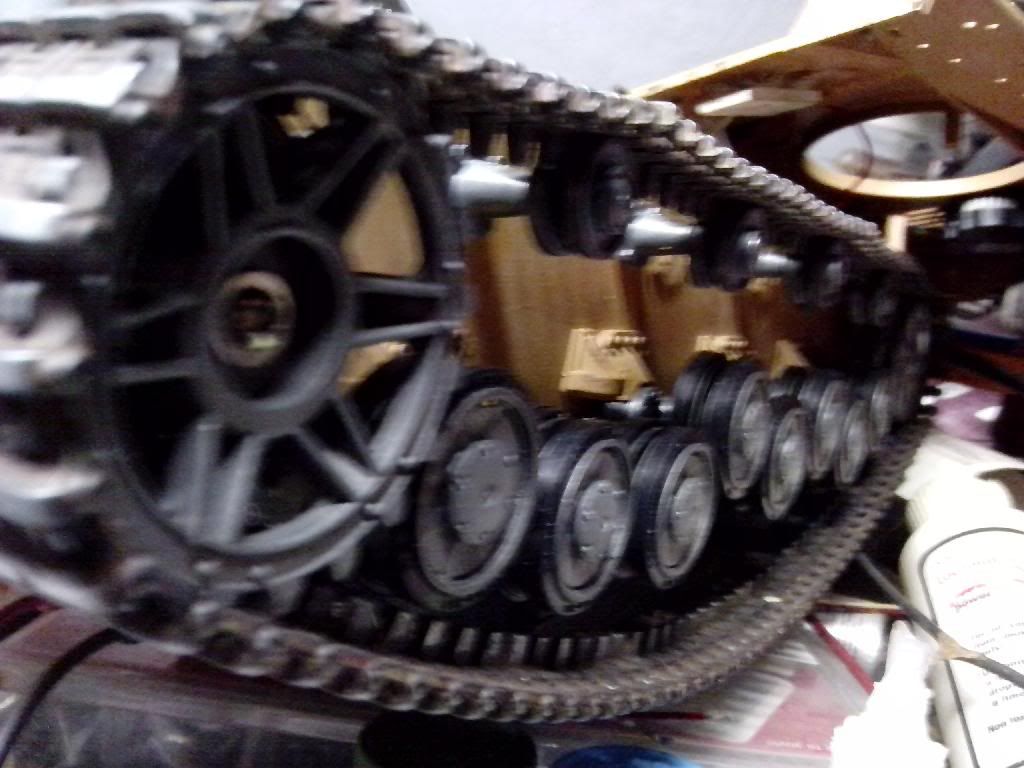
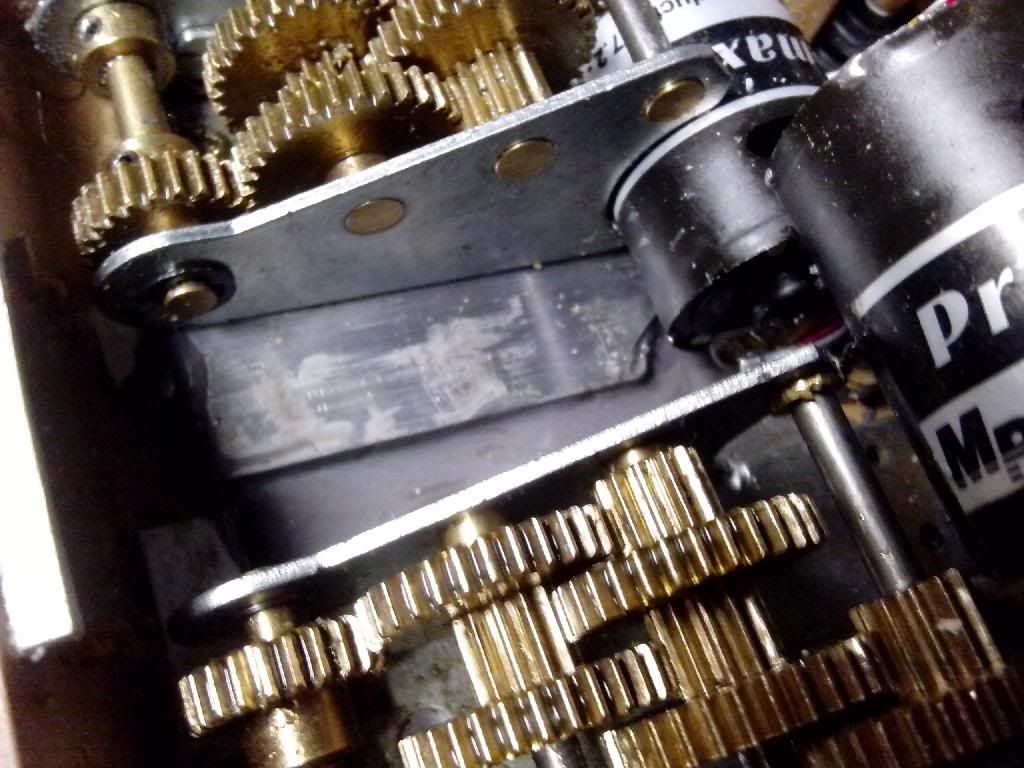
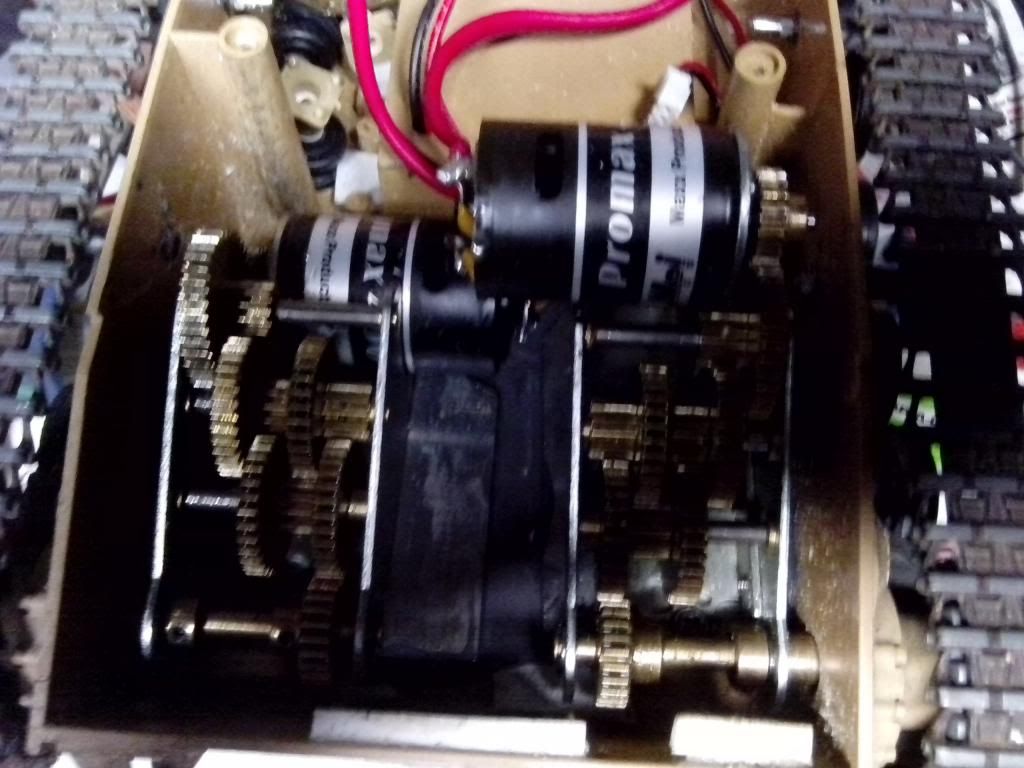
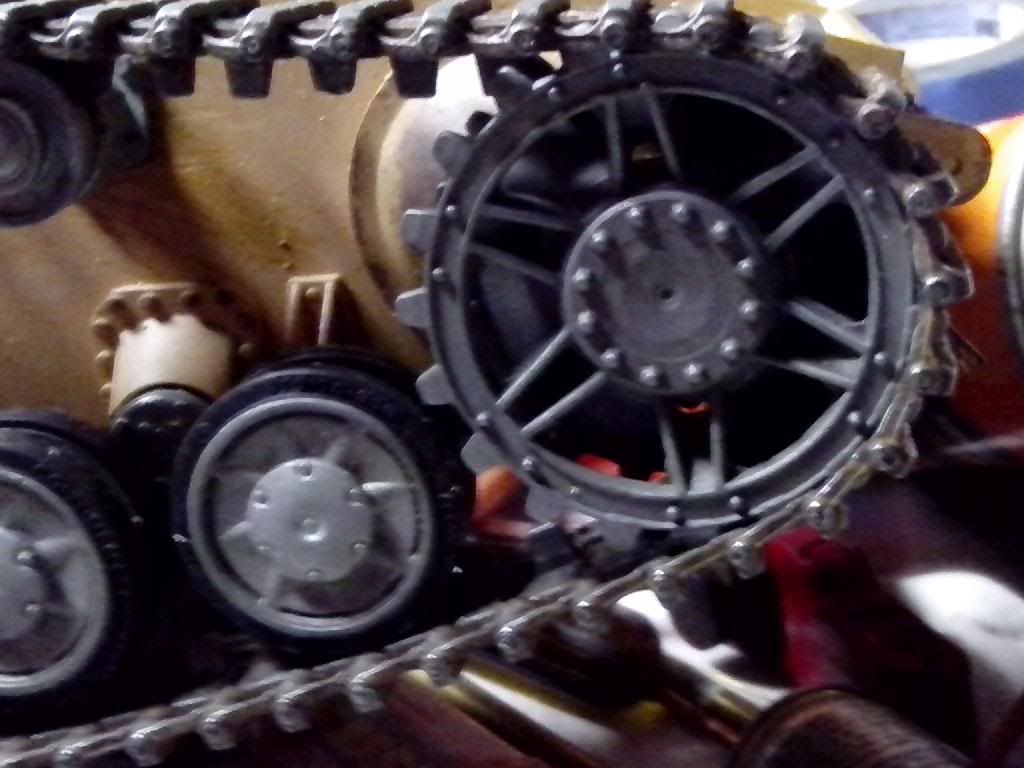
Stayed in today and worked on the PIV a little bit. I had added a set of the Mato 2.0 TU's to this tank because I had them laying around. When this model first came out, I remembered Phil telling me that updating the gearboxes was quite a pain in the rear. Well, he was right, at least without purchasing monting hardware for it. I opted to set it up on my own instead. First problem I had was the new boxes set the sprockets out way too far and the track was nowhere near straight. So, I took off the stock metal sprockets and set the Asiatam units in place to gauge what needed to be done to correct the problem. Both sides needed to be moved in as well as shimmed to get the output shafts centered through the hull. I cut out two pieces of 1/8 aluminum plate and drilled and tapped for the screws. I decided against bolting them to the plastic lower hull because over time the plastic would not hold up well. One tank I built before with a similar problem was a mato sherman. I set the gearboxes up the same way. Drilled and tapped the plates, and then atatched the TU's to the plates. Then I centered them in the hull and temporarily CA glued the plaes in place. I removed the TU's and used JB weld to permanently mount the plates where they need to be. Solid as a rock. That sherman is still going strong after about 3-4 years.So, I did the exact same thing here.
One more thing I wanted to note about this build. I opted for the Asiatam late return rollers, as the new set was not out at the time. Well, one word of caution with these rollers. They are spli wheels, like most of Asiatam's poorly made wheels. They are supposed to be press fit which work great until the tank is running around, at which point they have a habit of seperating and falling off...never to be found again. For the price of the parts, I would have expected better. I have glued the two halves together, but if they are anything like the late Tigr wheels, it is only a matter of time before they go missing. If this happens, I will buy the Schumo rollers for the tamiya tank and modify them to work on this model.
One more thing I wanted to note about this build. I opted for the Asiatam late return rollers, as the new set was not out at the time. Well, one word of caution with these rollers. They are spli wheels, like most of Asiatam's poorly made wheels. They are supposed to be press fit which work great until the tank is running around, at which point they have a habit of seperating and falling off...never to be found again. For the price of the parts, I would have expected better. I have glued the two halves together, but if they are anything like the late Tigr wheels, it is only a matter of time before they go missing. If this happens, I will buy the Schumo rollers for the tamiya tank and modify them to work on this model.


 01-26-2014, 08:33 PM
#39
Join Date: Jan 2006
Location: Hamilton,
ON, CANADA
Posts: 1,422
Likes: 0
Received 7 Likes
on
7 Posts
This is looking great! Nice and deliberate slow action with those gearboxes in a Panzer IV, navigation should be a breeze. Have you checked out the steel drifeshaft replacements for the mato gears at all?
My PnzIV is really heavy for no apparent reason Mato metal tracks.. very thick and bulky it seems.
...now I'm still pissed off about the set of Mato metal wheels I have that are useless because they simply were designed wrong. I'm surprised nobody else has mentioned them...
What are you doing for electronics?
My PnzIV is really heavy for no apparent reason
Mato metal tracks.. very thick and bulky it seems....now I'm still pissed off about the set of Mato metal wheels I have that are useless because they simply were designed wrong. I'm surprised nobody else has mentioned them...
What are you doing for electronics?
01-26-2014, 09:45 PM
#40
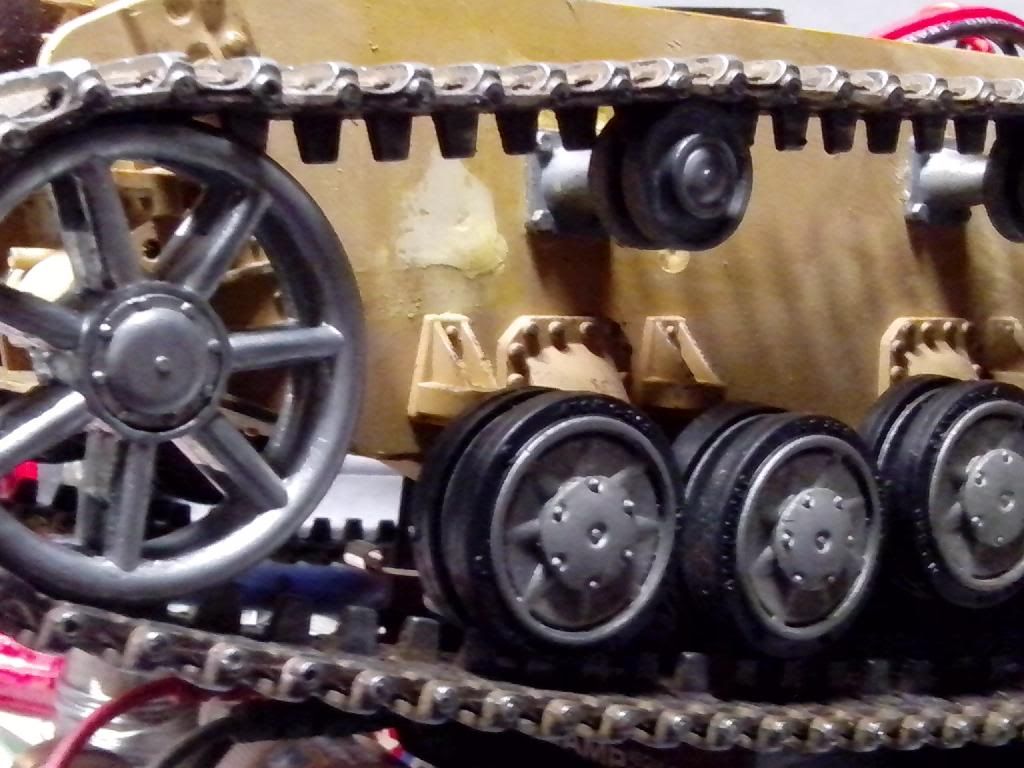
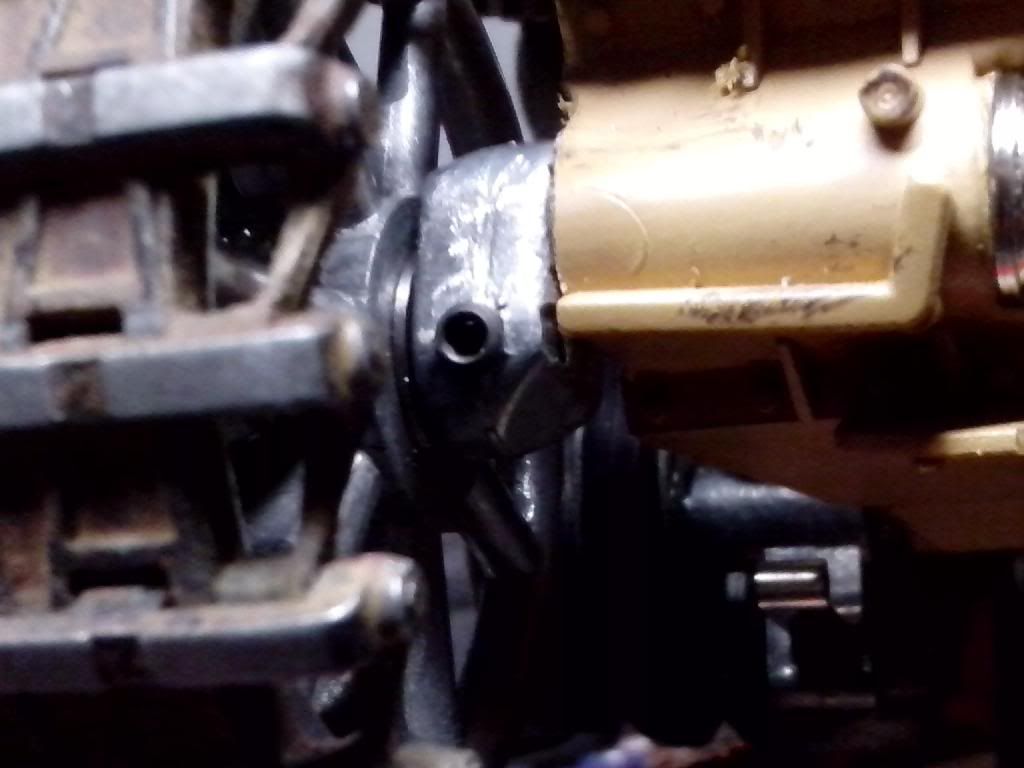
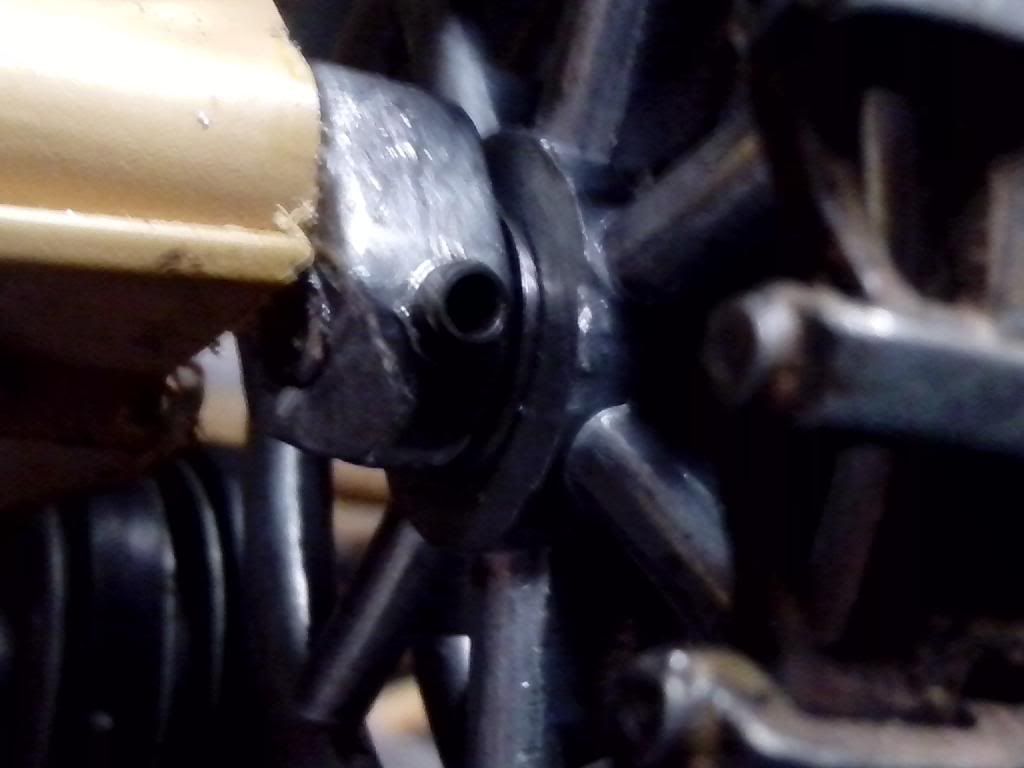
Ok, so here is another quick update. I had the idlers set on here with bearings...they too sucked. Small screw holding them in that would back out, even with simple testing being done. So, out the assembly came and on the lathe the nw Asiatam wheels went. I bored them to fit bearings and also decided a better method for retaining the axles was in order. I drilled out the threads in the idler to 4mm for an axle to slide into it (axle is a 4mm phillips screw). Then I drilled and tapped the side of the idler wheel mount for a set screw. I reassembled it and mounted them to the tank. Much better all around. Though the Asiatam idler wheels are still a two piece wheel...which sucks too. I gued them together and will see if they last. If not, I will drilled some 2mm holes and tap to fit small bolts. Either way, they will be solid. I did this on a whim and did not take any pics of the in progress work, but you get the idea.


Last edited by yellowshaker; 01-26-2014 at 09:50 PM.
01-26-2014, 09:49 PM
#41
Strato, this thing is heavy as well, wiith the metal goods on the bottom half. Suprisingly heavy. I did not look into the replacement shafts for the TU's, but it is nice to know they are available.
As for the mato wheels, I am unaware of the problems,a s I have only used Panther Mato wheels and never would use any of the wheels they sell, aside from the Shermans. Why can't they be made to work?
Electronics will be ElMod. I am near completion on the turret mods and will be ready for electronics soon...of course, my time is limited when it comes to working on the tanks these days.
01-26-2014, 10:38 PM
#42
Join Date: Jan 2006
Location: Hamilton,
ON, CANADA
Posts: 1,422
Likes: 0
Received 7 Likes
on
7 Posts
Heh I just resurrected my old thread concerning the crappy state of Mato panzer IV wheels.
My idler wheel setup and tensioner are the same as yours. I think I managed to use the stock parts, but I switched back to the plastic wheel... accidentally destroyed my metal one attempting to add bearings!! The 2 halves are held together with locktight though, they fall apart too easily.
I think I understood your post, but your roadwheels are still as they came? With 16 wheels on the IV giving resistance, I'm tempted to add bearings to my plastic ones.
01-26-2014, 10:46 PM
#43
By resistence I suppose you mean no bearings/bushings? If so, then yes. I did not add bearings to them,a s it would be a chore...I simply oiled them very well and the it is good enough that I doubt any trouble will occur for a very long time. Again, all of the wheels for theis model are way overpriced for what you get. Poor quality overall. I got everything to be as good as it can be with what we are working with. This is why Tamiya is the clear winner in bang for your buck. Modifying these HL's is fun for some of us, but to upgrade them costs a fortune, and the parts are seldom as good as the stock Tamiya kit parts. I am enjoying the KV2 build much more than this one. In the end, I am certain it will be a good runnignt ank, but not at all what I expected.
01-26-2014, 11:03 PM
#44
Join Date: Jan 2006
Location: Hamilton,
ON, CANADA
Posts: 1,422
Likes: 0
Received 7 Likes
on
7 Posts
Same feelings here. I'm not fully satisfied with my PnzIV but it is a good solid runner right now. I might experiment with adding bearings to the wheels in the future but not immediately.
KV-2 ... I hope you like is as much as I do mine. It legitimately frightens people
KV-2 ... I hope you like is as much as I do mine. It legitimately frightens people
01-30-2014, 03:56 PM
#45
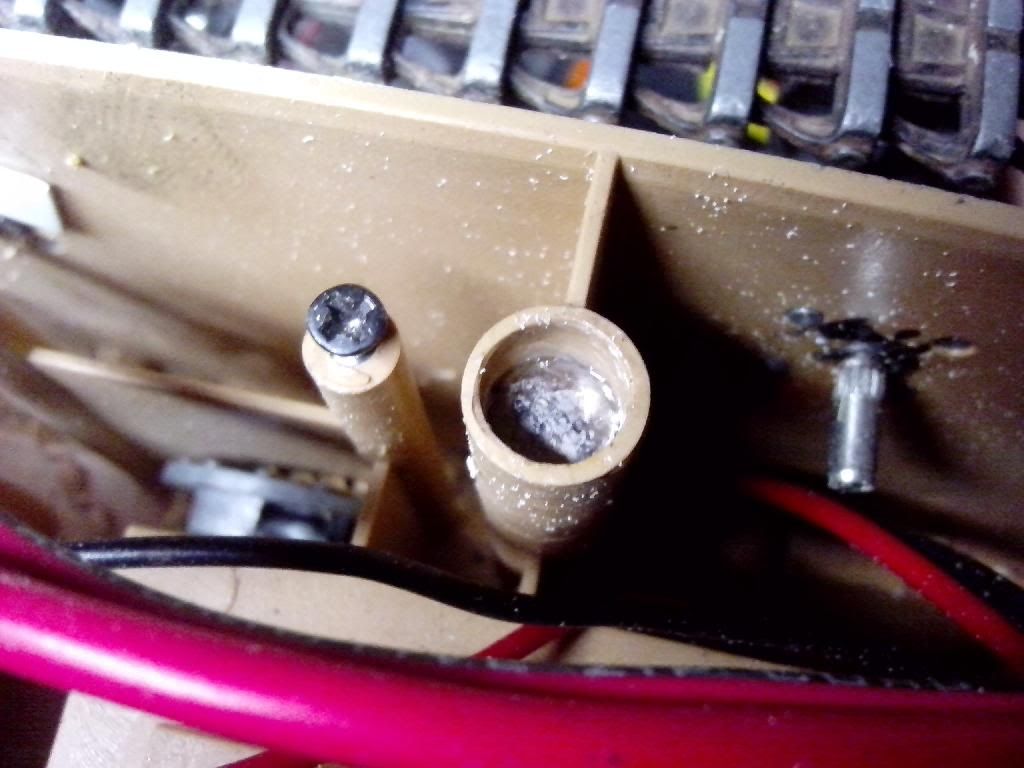
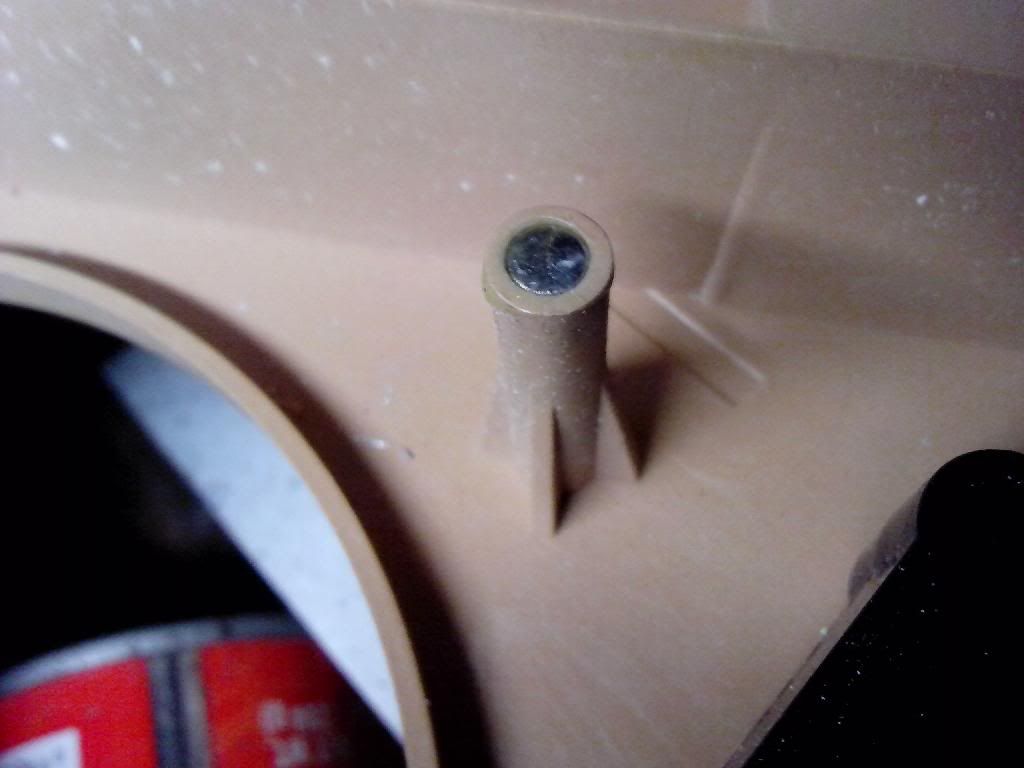
Last night i had a little time to mess with the PIV again. I didn't get much accomplished aside from adding magnets to the upper and lower hull. This has become a favorite of mine to keep from needing screws to hold the tank together.I know this is old news to many of you here, but for those who are curious, here are a couple of pictures. One of the lower and one of the upper. To do this, find magnets that are close in diameter to the standoffs on the tank. Drill out the standoff with a drillbit of the same size as the OD of your magnet and then glue in place. They have to sit deep enough to allow the hull to sit flush and the polarity of the magnets has to be correct for each one installed. Make no mistake, once installed, these magnets are plenty strong to keep the hull firmly in place over terrain. The magnets can be bought in all different sizes from KJmagnets. Hope this helps someone.

 09-06-2015, 06:07 PM
#46
Guess it's been a while since I posted. But that was the last time I worked on this tank. So, after all this time, I took it off the shelf and began looking at what needed to be done to complete it. Seems there is quite a lot left to do. I tested my turret with an El-Mod fusion board and it works as advertised  . I then tested the lower hull driving around for a bit. After programming the Fusion it is actually a very good running little tank.
I decided to keep the paint simple on this one. A panzer grey done in color modulation with some mud and dirt. I am not done yet, but here are a few photos of the progress.
Adding pictures is a pain in the ass now....
Anyway, I added the antenna holder as well as the part that knocks the antenna down. Both made from brass. Hell if I could add the pics in order though. I began to add mud layers but have called it quits for the evening. More to come...
. I then tested the lower hull driving around for a bit. After programming the Fusion it is actually a very good running little tank.I decided to keep the paint simple on this one. A panzer grey done in color modulation with some mud and dirt. I am not done yet, but here are a few photos of the progress.
Adding pictures is a pain in the ass now....
Anyway, I added the antenna holder as well as the part that knocks the antenna down. Both made from brass. Hell if I could add the pics in order though. I began to add mud layers but have called it quits for the evening. More to come...
Last edited by yellowshaker; 09-06-2015 at 06:11 PM.
09-11-2015, 12:26 AM
#50

Join Date: Aug 2010
Location: FleetUK, UNITED KINGDOM
Posts: 314
Likes: 0
Received 0 Likes
on
0 Posts
Great work and looks impressive.
Can I just ask if you had a problem with raising the front drive sprockets up and did the tracks then interfere with the underside of the top hull? - mine did - what have I missed?
Cheers
CaptB
Can I just ask if you had a problem with raising the front drive sprockets up and did the tracks then interfere with the underside of the top hull? - mine did - what have I missed?
Cheers
CaptB