


Yet another Yellow Spitfire build thread


 06-16-2013, 11:49 AM
#52

Thread Starter
My Feedback: (60)
Join Date: Dec 2001
Location: Litchfield Park,
AZ
Posts: 7,677
Likes: 0
Received 25 Likes
on
23 Posts
It's not much but glue has been put to wood and the Spitfire is underway. I've actually made a bit more progress than shown here but forgot my camera during the last visit to the shop. I won't bore you guys with pics of every step of construction but wanted to put up something to mark the "official" start of the build!

06-16-2013, 05:27 PM
#54

I could probably do a Carbon spinner for $100,
Can someone PM me a photo of the stock spinner and backplate (separate from each other) and its dimensions.
That will give me an idea on what all will be involved and how best to deal with the backplate.
Can someone PM me a photo of the stock spinner and backplate (separate from each other) and its dimensions.
That will give me an idea on what all will be involved and how best to deal with the backplate.
06-16-2013, 05:55 PM
#56
How big is that backplate?
The biggest issue with doing spinners is finding someone to do a backplate. I have a small lathe and can so parts up to 4 1/2-5" in diameter, but would prefer not to have to manually make each backplate.
So i try and reuse the original backplates, modifying the spinner for single bolt attachment for a carbon version is simple enough.
06-16-2013, 09:24 PM
#57

My Feedback: (1)
Hi Thomas,
The back plate is 142mm (approx 5 5/8") in diameter. Do you envision making a groove in the back plate into which the back of the spinner would be fitted, similar to the Tru Turn spinners?
At $100 each, I would certainly purchase one, perhaps two, and I know a few guys who fly Yellow Spitfires who are not online, but whom would each probably purchase one. So, that's at least two more in addition to my one or two.
-Ed B.
 06-22-2013, 02:58 PM
#60
Thread Starter
My Feedback: (60)
Join Date: Dec 2001
Location: Litchfield Park,
AZ
Posts: 7,677
Likes: 0
Received 25 Likes
on
23 Posts
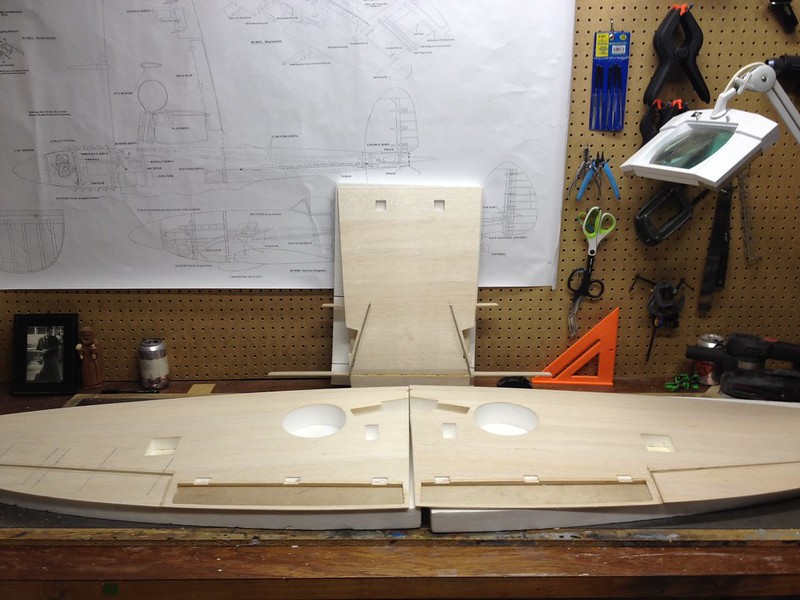
Horizontal stab progress, nearly ready for some hinges and the G10 skins which will form the gap seal for a scale hinge line.

 06-23-2013, 07:35 AM
#62
Thread Starter
My Feedback: (60)
Join Date: Dec 2001
Location: Litchfield Park,
AZ
Posts: 7,677
Likes: 0
Received 25 Likes
on
23 Posts
ORIGINAL: OldScaleGuy
Do you sand a step in the balsa sheeting at the trailing edge of the stab?
Do you sand a step in the balsa sheeting at the trailing edge of the stab?
06-26-2013, 08:09 PM
#64
Thread Starter
My Feedback: (60)
Join Date: Dec 2001
Location: Litchfield Park,
AZ
Posts: 7,677
Likes: 0
Received 25 Likes
on
23 Posts
ORIGINAL: smurfjet
I think I still have an extra panther decal in vinyl if you want it. Happy to send it to you It might not be exact for the wartime version but it was done to look like the restoration. You might be able to use it as a starting point for a template or something. Shoot me your addy and I'll drop it in the mail for you.
I think I still have an extra panther decal in vinyl if you want it. Happy to send it to you It might not be exact for the wartime version but it was done to look like the restoration. You might be able to use it as a starting point for a template or something. Shoot me your addy and I'll drop it in the mail for you.
Hey Dave, sorry for the delay but wanted to let you know I got the package of Spit "goodies". Thanks! The decal will prove very helpful when the time comes to make up the paint masks.
07-11-2013, 05:58 PM
#65
Chad,
How's the build coming along? I'm going at a slow, steady pace myself, just finished the wing reinforcements. I've been know to be rough on landing gear now and then so I went ahead and added some extra beef in that area in the form of 1/8" ply. Got the idea from Aussie Brad's build.
How's the build coming along? I'm going at a slow, steady pace myself, just finished the wing reinforcements. I've been know to be rough on landing gear now and then so I went ahead and added some extra beef in that area in the form of 1/8" ply. Got the idea from Aussie Brad's build.
07-11-2013, 08:00 PM
#66
Thread Starter
My Feedback: (60)
Join Date: Dec 2001
Location: Litchfield Park,
AZ
Posts: 7,677
Likes: 0
Received 25 Likes
on
23 Posts
Hi Joe, glad to see your Spitty is underway. I have not worked on the one I'm doing for a couple of weeks. I have another build project going and I'm furiously working on a 1/6 scale P-47 cockpit kit as well. I generally work in cycles and will probably devote a solid week to the Spitfire here very shortly. Still need to finish up the stab but I will also be starting the process of developing the bulkheads necessary to adapt my cockpit kit to the Yellow airframe. Once I have those I will knock out a couple of cockpit kits for our builds.
10-01-2013, 12:12 AM
#67
Member
Join Date: Oct 2009
Location: Essex, UNITED KINGDOM
Posts: 67
Likes: 0
Received 0 Likes
on
0 Posts
Chad,
I am just about to start assembling a yellow spitfire myself and am interested in your tail mods.
What sort of weight savings do you envisage over stock?
Thanks
Happy Landings
AM6.
I am just about to start assembling a yellow spitfire myself and am interested in your tail mods.
What sort of weight savings do you envisage over stock?
Thanks
Happy Landings
AM6.
10-01-2013, 04:02 AM
#68
My Feedback: (1)

Join Date: Jul 2004
Location: Perth WA, AUSTRALIA
Posts: 2,200
Likes: 0
Received 0 Likes
on
0 Posts
Have a read here if you want.
http://www.rcuniverse.com/forum/rc-w...thread-11.html
Cheers guys,
Brad
 11-29-2013, 09:32 AM
#70
Junior Member
Join Date: Mar 2007
Location: Barnstaple, UNITED KINGDOM
Posts: 2
Likes: 0
Received 0 Likes
on
0 Posts
hi, your build is looking good , my ya spit is progressing slowly , having to do a lot of repair/ replacement as it was used as a display model in an office , stuck together with what looks like chewing gum and painted with cheap emulsion!! and missing almost everything but the basic airframe , i think another six months work before she will be ready to fly. anyone here come across a source for main wheels all the ones i can find seem to be too fat to fit into the wings? will watch your build with interest might give me some inspiration!! keep up the good work!!
thanks
JB
thanks
JB
11-29-2013, 05:46 PM
#71
Thread Starter
My Feedback: (60)
Join Date: Dec 2001
Location: Litchfield Park,
AZ
Posts: 7,677
Likes: 0
Received 25 Likes
on
23 Posts
Thanks for checking in JB. I've actually made some progress on the Spit just have not posted any pics. I have sat aside the fuse for now and have started construction of the wing which will feature much more accurate flaps as well as the scale Frise ailerons. Pictures of the wing forthcoming as progress is made.
Here is a shot of the fuselage with all the cockpit bulkheads installed as well as the interior door detail (save for the crow bar) prior to being painted interior green. The remainder of the cockpit detail will be added after construction of the airframe is completed.

Here is a shot of the fuselage with all the cockpit bulkheads installed as well as the interior door detail (save for the crow bar) prior to being painted interior green. The remainder of the cockpit detail will be added after construction of the airframe is completed.
 11-30-2013, 08:28 AM
#75
Member
Join Date: Oct 2009
Location: Essex, UNITED KINGDOM
Posts: 67
Likes: 0
Received 0 Likes
on
0 Posts
Chad,
What type of glue do you use on he fuselage?
I have noticed a little crush damage (crazing on gel) on the rear left flank on mine (transit most likely) and although not really noticeable I would like to add a little cloth inside covering the area as a precaution
I have read elsewhere that the fuse is not epoxy?
Thanks,
AM6.