


Hal DeBolt's / Midwest Pattern Master
 06-28-2013, 12:44 PM
#51

Join Date: Oct 2004
Location: Wyoming,
MN
Posts: 233
Likes: 0
Received 0 Likes
on
0 Posts
The wing is built except for installing the landing gear blocks, the bottom sheeting, and wing tip sheeting. Ailerons still have to be made. It is amazing how rigid this structure is considering starting with flimsey 1/16" sheet and 1/4" sticks. But that is the results of D tube constsruction. Next will be the stab. Ribs are cut so that shouldn't take too long to complete. The fuselage will take the most time having to fit and install all of the equipment.
It feels good to know that I will have a Viscount again and that this time it will be a flyer.
I hope you are enjoying seeing the progress.
It feels good to know that I will have a Viscount again and that this time it will be a flyer.
I hope you are enjoying seeing the progress.
 06-28-2013, 01:29 PM
#52
Thread Starter

Nice work Heggen .. You're bending your own main gear I assume. Used what came with mine of course. Plans called for 2.25" on the mains,
2" on the nose. Print showed measurements to gain from ground / table top @ locations for front and tail for a proper stance sitting on level ground.
I'm thinking this is because of the air foiled stab and to set up a level incidence for it upon roll outs/ take offs. I think the main gear could of been just
a tad longer for the straight bend. Maybe a 1/4" - 3/8" longer in order to allow for a larger tire.
Ground clearance on this one is low.
They're all right. I bounced up the mains on mine to 2.75" and just made up the stance with the nose. I fly from grass. Tried a taxi in the back yard before heading out to
the field . Mains were a little to small for that. Those were kind of overwhelmed in the grass just trying to taxi. Didn't think the ground handling would be too good with those
for taking off and landing.
Just thought I'd pass that info along.

 06-30-2013, 07:01 PM
#54
Join Date: Oct 2004
Location: Wyoming,
MN
Posts: 233
Likes: 0
Received 0 Likes
on
0 Posts
Thanks guys. I have been playing at the lake this weekend so nothing has been accomplished on the Viscount. Wish I would have had my float plane with me as the water was glassy this morning. I hope to have some time tomorrow to build the stab and maybe cut out a rudder and fin. Also, I think I have a set of wire landing gear that will fit the Viscount without any further adjustment or bending. It will certainly make life easier. I hate bending and cutting music wire.
So, stay tuned. I am building an airplane here.
So, stay tuned. I am building an airplane here.
07-05-2013, 06:56 PM
#55
Join Date: Oct 2004
Location: Wyoming,
MN
Posts: 233
Likes: 0
Received 0 Likes
on
0 Posts
The week has flown by but I did get some more done on the Viscount. The main landing gear showed up in a box of spare landing gears from airplanes that have met their demise. The length was perfect although the vertical leg that goes onto the wing had to be repositioned through cutting and bending. It now fits perfectly in the landing gear blocks.
The stab is now finished except for the sheeting on the tips. I'll take care of that for the stab and the wing when glue is drying on the fuselage during that part of the build.
The rudder and fin have also been cut to size. In this day of barndoor size rudders, this rudder almost looks like a trim tab. But, I am staying true to the original, so the rudder size is what it is.
I am looking forward to building the fuselage. It is simple slab side construction but has a nice shape due to the rounded top.
This build is bringing back good memories of my first Viscount 48 years ago. I have to say I don't remember that much about the building of it, but I do of taxiing it around the driveway on the farm yard yearning for a smooth runway and open space to fly it. That time will come again hopefully later this summer when the Viscount is finished.
Now it is on to the fuselage build. This is a simple airplane to build and it is fun to see results come quickly. Can't wait to get at it.
07-14-2013, 07:54 PM
#56
Join Date: Oct 2004
Location: Wyoming,
MN
Posts: 233
Likes: 0
Received 0 Likes
on
0 Posts
Building time has been scarce lately but found some time this weekend to make some progress.
Attached are pictures of the slab sides for the fuselage and the motor mount assembly and formers.
The motor mounts according the the plans are 1/2" square maple that extend from the nose to the first former after the firewall. Mounted on top of them is an 8 oz deBolt round metal tank. Not having one, (but who would?) I had to substitute an 8 oz Dubro square tank. Since there is no room on top of the motor bearers for the plastic tank to fit inside the fuse, so I had to design new motor bearers to extend from the nose to the first former as on the plans and around the tank. The bearers are "u" shaped and wrap around the tank and are glued to the sides of the fuselage. Under the bearers, a tank floor will be glued in allowing the tank to be at the right height relative to the carburetor needle valve. The tank will slide in from inside the fuselage. The fuselage sides have a 1/32" plywood doubler which extends about 1 1/2" past the former at the trailing edge of the wing. This adds a great deal of strength to the forward fuselage. The location for servo rails has been marked and rail brackets have to be installed. Also, a balsa doubler at the stab location needs to be glued in and then the sides can be glued to the firewall and formers.
The sticks and sheets of balsa and plywood are beginning to look more like an airplane.
Stay tuned. There is more to come.
07-21-2013, 08:07 PM
#57
Join Date: Oct 2004
Location: Wyoming,
MN
Posts: 233
Likes: 0
Received 0 Likes
on
0 Posts
The fuselage sides and formers are now one. To prepare for that, I made sure all of the doublers and servo rail brackets were glued in place, and the positions for the formers and firewall were accurately marked. During the gluing process, I made sure all of the centerlines of the formers were all in line and clamps and braces were put in place to assure it would stay that way while the glue dried. Next, the engine beams will be glued in place, a fuel tank floor will be installed and fuel line holes will be drilled through the firewall, followed by the sheeting for the top of the fuselage. Radio installation will be next including pushrods for the elevator and rudder, throttle and steering cable, and the brake cable before sheeting the bottom of the fuse. I fly from a relatively short asphalt runway and I'm tired of running off the end of it after a landing. I have a Rocket City spring brake that I pulled from an old Sig Kougar nose gear from many years back. It worked well and is easy to install.
It is starting to look like my Viscount I remember from 1965 and am anxious to fly it.
It is starting to look like my Viscount I remember from 1965 and am anxious to fly it.
07-29-2013, 07:23 PM
#58
Join Date: Oct 2004
Location: Wyoming,
MN
Posts: 233
Likes: 0
Received 0 Likes
on
0 Posts
There is progress on the deBolt Viscount! The servos are installed temporarily, the steering, throttle, and brake cables are in. The rudder and elevator pushrod guide tubing is in and the motor mounts are glued in place. Next will be the gluing on of the bottom sheeting on the fuse behind the wing. Still have to trim the wing and stab saddle to set the correct incidence and install blocks around the motor mounts and shape the nose and then finish up a few putsy items on the wing. It is really becoming an airplane fast now and will be ready for covering soon. This airplane builds quickly and it has been a lot of fun so far. I am looking forward to putting on the original color scheme to bring the memory back of how it looked at flying fields over 50 years ago.
08-17-2013, 07:45 PM
#59
Join Date: Oct 2004
Location: Wyoming,
MN
Posts: 233
Likes: 0
Received 0 Likes
on
0 Posts
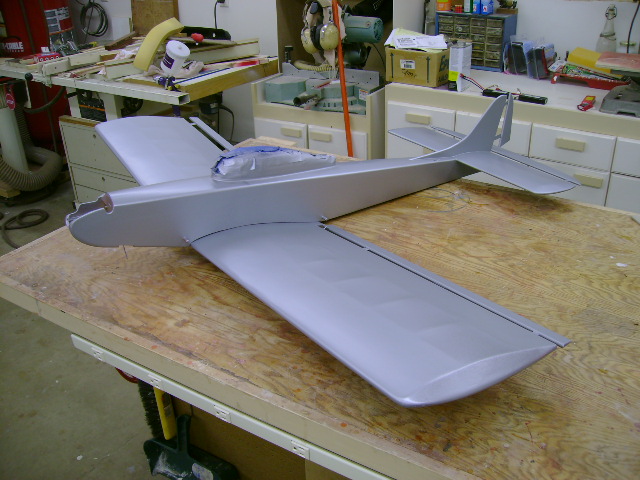
The airframe is nearly ready for covering. The work effort has been spent on the little things that take so much time but don't make much difference in appearace.The thrust and incidence angles have been double checked and fianlize, fuel tank is installed, nose blocks are installed, etc. Application of filler and a rough sanding has been done so it is ready for a final check in the sunlight to expose the dents, nicks and low spots and an another application of filler and a final sanding. Then it is on to covering. I had initially thought of covering with silk and dope as was the original. Then a thought of using plastic covering but I soon got over it and decided on Sig Koverall and Stits paint. I will apply the original color scheme of red, white and blue.
I hope to start covering this coming week.
The Viscount certianly does show its age by its design. It has lots of dihedral, a large stabilizer, tiny rudder and ailerons and suggested power was .35 to .45. I have an OS 46AX installed so it should be the more than enough.
This has been and, I am sure, will continue to be a fun and easy project. I hope to get it in the air yet this flying season.
Stay tuned. There is more to come.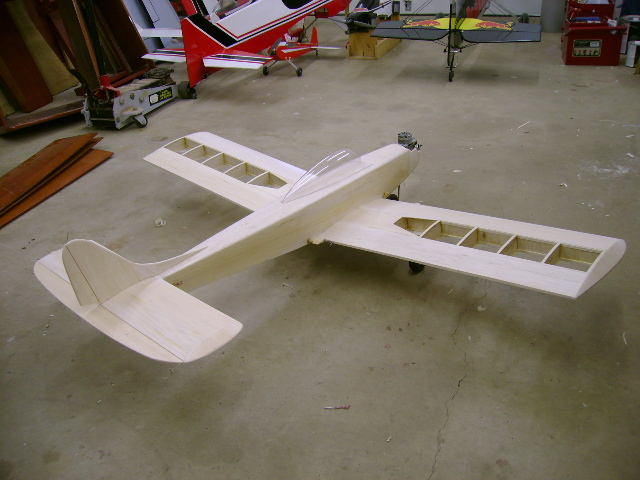
08-17-2013, 09:51 PM
#60
Very nicely done, keep posting more pics, I believe all these pretty birds have a story behind them, and a deliberate building as such can make all the stories alive.
Ehsan
Ehsan
08-18-2013, 05:28 AM
#61
Thread Starter
Nice work Heggan ...looks great. Next one I do, it'll be done with Koverall and sprayed. The .46 should pull this nice. Keep the pics coming !
Looking forward to the finished project in color.
Looking forward to the finished project in color.
09-03-2013, 06:19 PM
#62
Join Date: Oct 2004
Location: Wyoming,
MN
Posts: 233
Likes: 0
Received 0 Likes
on
0 Posts
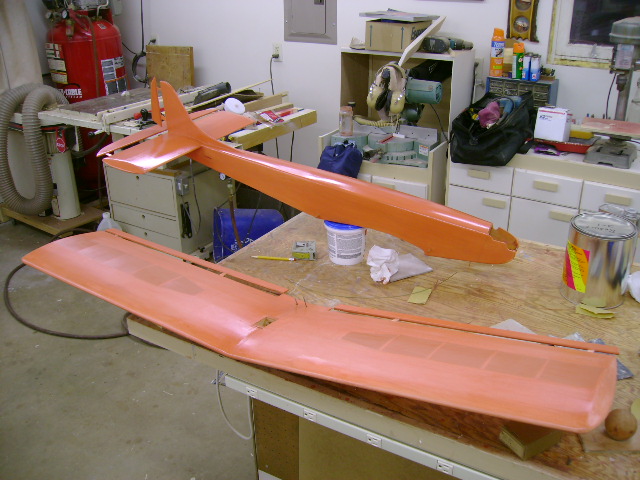
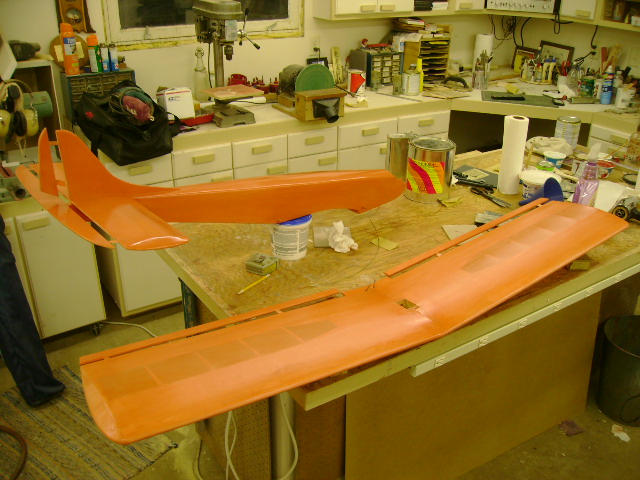
I am coming to the final stages of this build with the covering completed with Koverall and a few coats of Stits Poly Brush applied. The shine is coming up on the Stits now so it is close to color time. The color will be Stits Poly tone.
This is the second airplane I have done with this system and am getting a little higher on the learning curve. I have learned that sanding is not necessary during the first few coats of Poly Brush. Just keep spraying it on until it shines. What is important is to have a well sanded base prior to covering for a nice smooth surface. Carefully block sand the wood before covering to kill the high spots and identify the low spots, circling them with a pencil and fill them with vinyl spackle. Then sand some more. Take the airplane out into the sun shine and you will be surprised of all of the defects that show up in the surface that need attention to create a fair surface. I learned a neat trick while covering regarding trimming off the excess material to avoid frayed edges. Wherever it is to be trimmed, first apply a thin coat of Balsarite and let it dry for a couple of minutes. That will bond the fibers together for a nice clean cut. After cutting off the excess, gently iron down the cut edge with a low heat iron. Also, use a new stainless steel Xacto blade. Koverall is hard on blades, dulling them quickly.
I can't say that this project will come out perfectly but it will certainly look above average. I look at my finished models and tell myself that I could have done a little more to make it look even better. But where does one stop? It's just a model airplane and it will eventually - well, you know. Another one can always be built.
With a little luck I might get this thing in the air this month.
 09-26-2013, 05:12 PM
#64
Join Date: Oct 2004
Location: Wyoming,
MN
Posts: 233
Likes: 0
Received 0 Likes
on
0 Posts
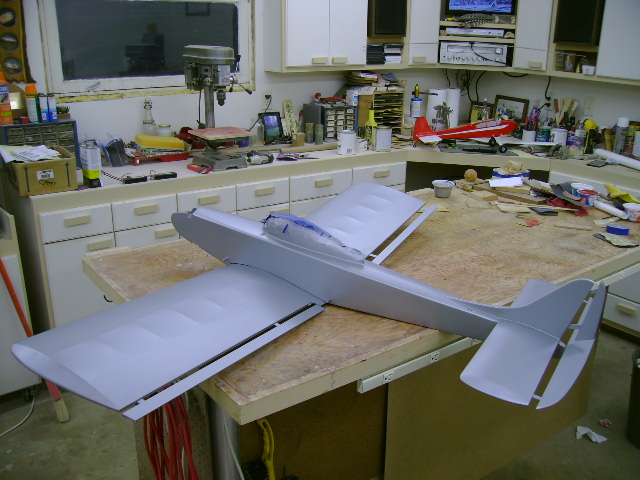
For such a simple airplane, it is certainly taking me a long time to get it done. Unfortunately there are other things in life besides models that require attention, most of them have priority. Anyway, progress is taking place. A few coats of Stits Poly Brush have been sprayed on and now Poly Spray has been applied. It appears to be ready for color. I am going with the red, white, and blue color sceme as shown on the plans. The white base might be sprayed on as soon this week-end. Then it is on to masking for blue and red color.
10-20-2013, 07:14 PM
#65
Join Date: Oct 2004
Location: Wyoming,
MN
Posts: 233
Likes: 0
Received 0 Likes
on
0 Posts
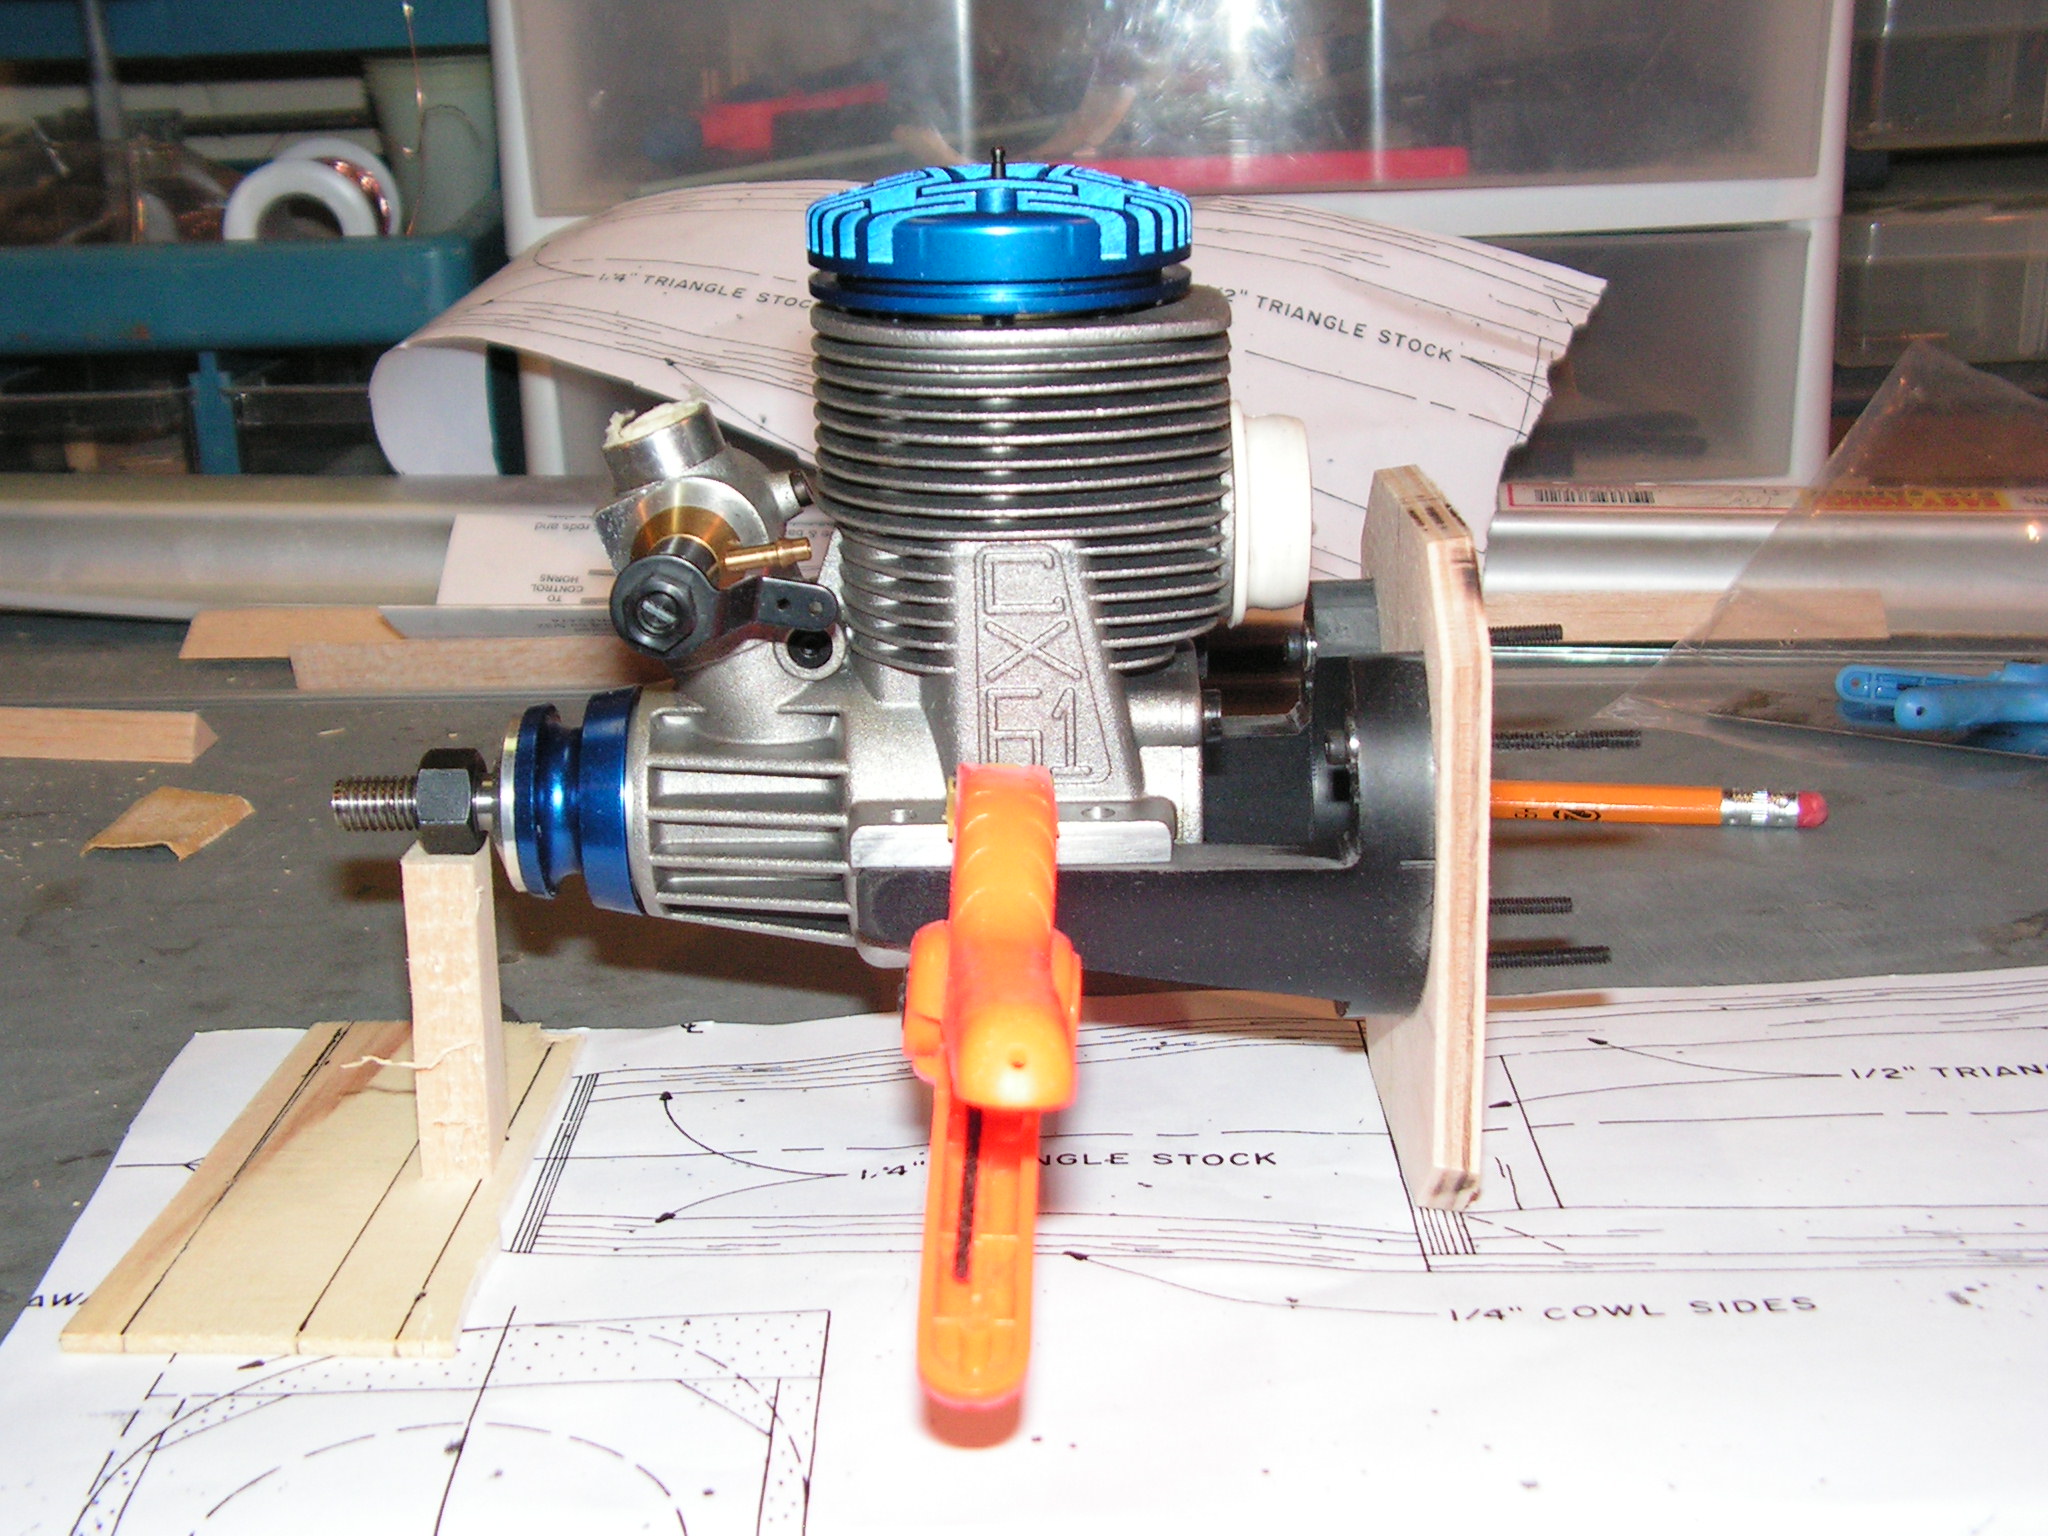
Most everything has been completed except for installing the nose gear brake cable, the battery and a platform for mounting the receiver. Then it needs to be balanced. As it is, it appears to be a little bit tail heavy and weighs just under 5 3/4 pounds. The finish is Sig Koverall with Stits Poly Fiber paint. The paint sceme is as close as I could imagine taken from a couple of pictures on the plans. It was noted on the plans that the colors were red and blue with white trim. I guessed that the front and top is supposed to be red with the white stripes, as in the US flag, with blue elsewhere. Masking that all off was a "real treat". But, less than simple paint jobs come with more than simple effort. The engine is an OS 46 AX with a 12-6 prop which will be more than enough power.
The pictures below show the state of the art of pattern plane in the early 60's. Plans were copyrighted in 1962 with pictures of multiple trophys that Hal DeBolt won. Against airplanes of the 70's and 80's, it wouldn't have a chance.
Test flights might have to wait until spring as the weather is starting to get cold and nasty. Had our first flakes of snow here today and temps are expected to be in the 30's to 40's for at least the next two weeks. Once into November there is little hope for comfortable flying weather. It will be workshop weather for the next 5+ months. Maybe I can get my 1/3 scale Pitts S2 done to fly next year.
I hope you enjoyed seeing the progress reports and pictures on the build. As soon as it becomes flying weather again, I will get her in the air and report on the flight results.
11-02-2013, 03:41 PM
#66
Join Date: Oct 2004
Location: Wyoming,
MN
Posts: 233
Likes: 0
Received 0 Likes
on
0 Posts
I am happy to say the DeBolt Viscount flew today without incident other than playing with the trim levers to get it to fly straight and level. Take off was straight but it had a fairly strong climb so some down trim fixed that. Also, a couple of beeps of left trim fixed a right roll. With that she flew very well. Only basic loops and rolls were done plus a little slow flight up high to feel it out. Landing happens with a nice nose high flair.
After the one flight, I decided to take it home to correct the slight tail heavy condition and adjust the ailerons to zero out the trim. The balance point as flown is less than a quarter inch behind the balance point indicated on the plans hence the need for down trim. A little lead shot burind under the engine should solve the problem.
It is interesting to take an airplane such as this out to the field to hear the comments from those who know only the modern day designs and equipment. Most commented about is the amount of dihedral in the wing prompting and explanation of the design being over 50 years old and how it was designed to be more stable because of the radio equipment available at the time. Then it gets into talk about relay and reed control systems of the day which required a more stable airplane. Then they notice the throttle stick is on the right and more explanation of the radio of the day forcing throttle to be on the right which further brings discussion about Mode I which then bring the question "Mode what?".
It is amazing that this was one of the top competitors in the early 60's. Proportional had just become available. On the Viscount plans, there is a picture of a proportional radio by the airplane with a bunch of trophys but the plans show reed type servos.
I am putting it away until spring and am looking forward to having a lot of fun with this airplane. It has been a fun/rewarding build.
11-03-2013, 06:11 AM
#67
Thread Starter
That's great Heggen. It is a nice flyer. I myself haven't been able to make it out lately. It's still hanging up.
I've had a few guys at the field approach me though and ask "Wow, That a Super Fli ?" No ... your close though, Same time period.
It's a DeBolt Pattern Master, and then the discussion and memories go on from there.
Seeing that I have the prints ( and manual) that are in decent shape, thinking I'll run off a few copies at Kinko's if they can run that size.
Might scratch another at some time.
Now that I've seen your scratch build with this one , you've inspired me to try my hand at it.
Recently acquired a set of copies for a Super Hots II (54" / .60). It'll be my first hand at scratch building. Super Hots is a relatively
EASY one to build. Just built a fuse jig, next up will be a wing jig that'll be used for this and many more too come.
What I'd like to find , would be a set of prints for a Goldberg Skylark 56 that are in useable- decent shape. Another from the time of the Viscount / Pattern Master.
11-03-2013, 07:33 AM
#68
Join Date: Oct 2004
Location: Wyoming,
MN
Posts: 233
Likes: 0
Received 0 Likes
on
0 Posts
Hab, Thanks.
Scratch building is a lot of fun. For sure, give the Hots a try. I had one many years ago with an HB 61 in it and had a blast. I built mine with a solid fuse with plug in wings on a tube rather than a one piece bolt on wing, much like a Sig Somethin' Extra. Radio and fuel tank were accessed by a hatch on the bottom. I was always a little leary of that very thin fuselage at the wing area and actually saw others that broke at the wing. I am tempted to build another but already have too many airplanes on the build list. I have a Skylark 56 that was acquired as a wreck that I rebuilt but I have no plans. Though it flys OK, I am not that impressed with it. It is just a good sport airplane.
Now I hope to be on to building some more viable competion pattern planes. I have a nearly ready to finish Phoenix (6-7?) that I bought at a garage sale in the 80's that has a fiberglass fuse and a built wing and tail. Also, I have a ready for covering Super Kaos. Also, laying in wait are a number of plans for a Kwik Fli III, Doug Spreng Thunder Stormer, Beachcomber - to name a few. By the time I get these built, I will be too old to fly them! I had better get back to my shop and get to work.
Good luck flying the Pattern Master!
11-03-2013, 09:37 AM
#69
Thread Starter
I was looking around for a good "ballistic" pattern of the 70's as either a scratch attempt or possibly a kit. I'm really
eyeballing one of the new YS .61FR Classics available. Little on the pricy side, but like the pressurized
system of a 2 stroke. Have an older YS .45FS and love it.
But, for a .60 size Pattern ship ( excluding GP's DB ARF) found out that http://www.bridiairplanes.com/ Aircraft will be
releasing kits of a few .60 size Pattern ships ... including the UFO and Great Escape.
Have also found the Curare is being offered by Eureka in a 2nd newer version that does not involve as much carving
as the original ( top turtle / tail empennage). a perfect candidate for the new YS .61 .
11-03-2013, 12:23 PM
#70

The Great Escape has been on the market for at least a month now. I have the UFO kit. I believe it is currently sold out.
GREAT kits!
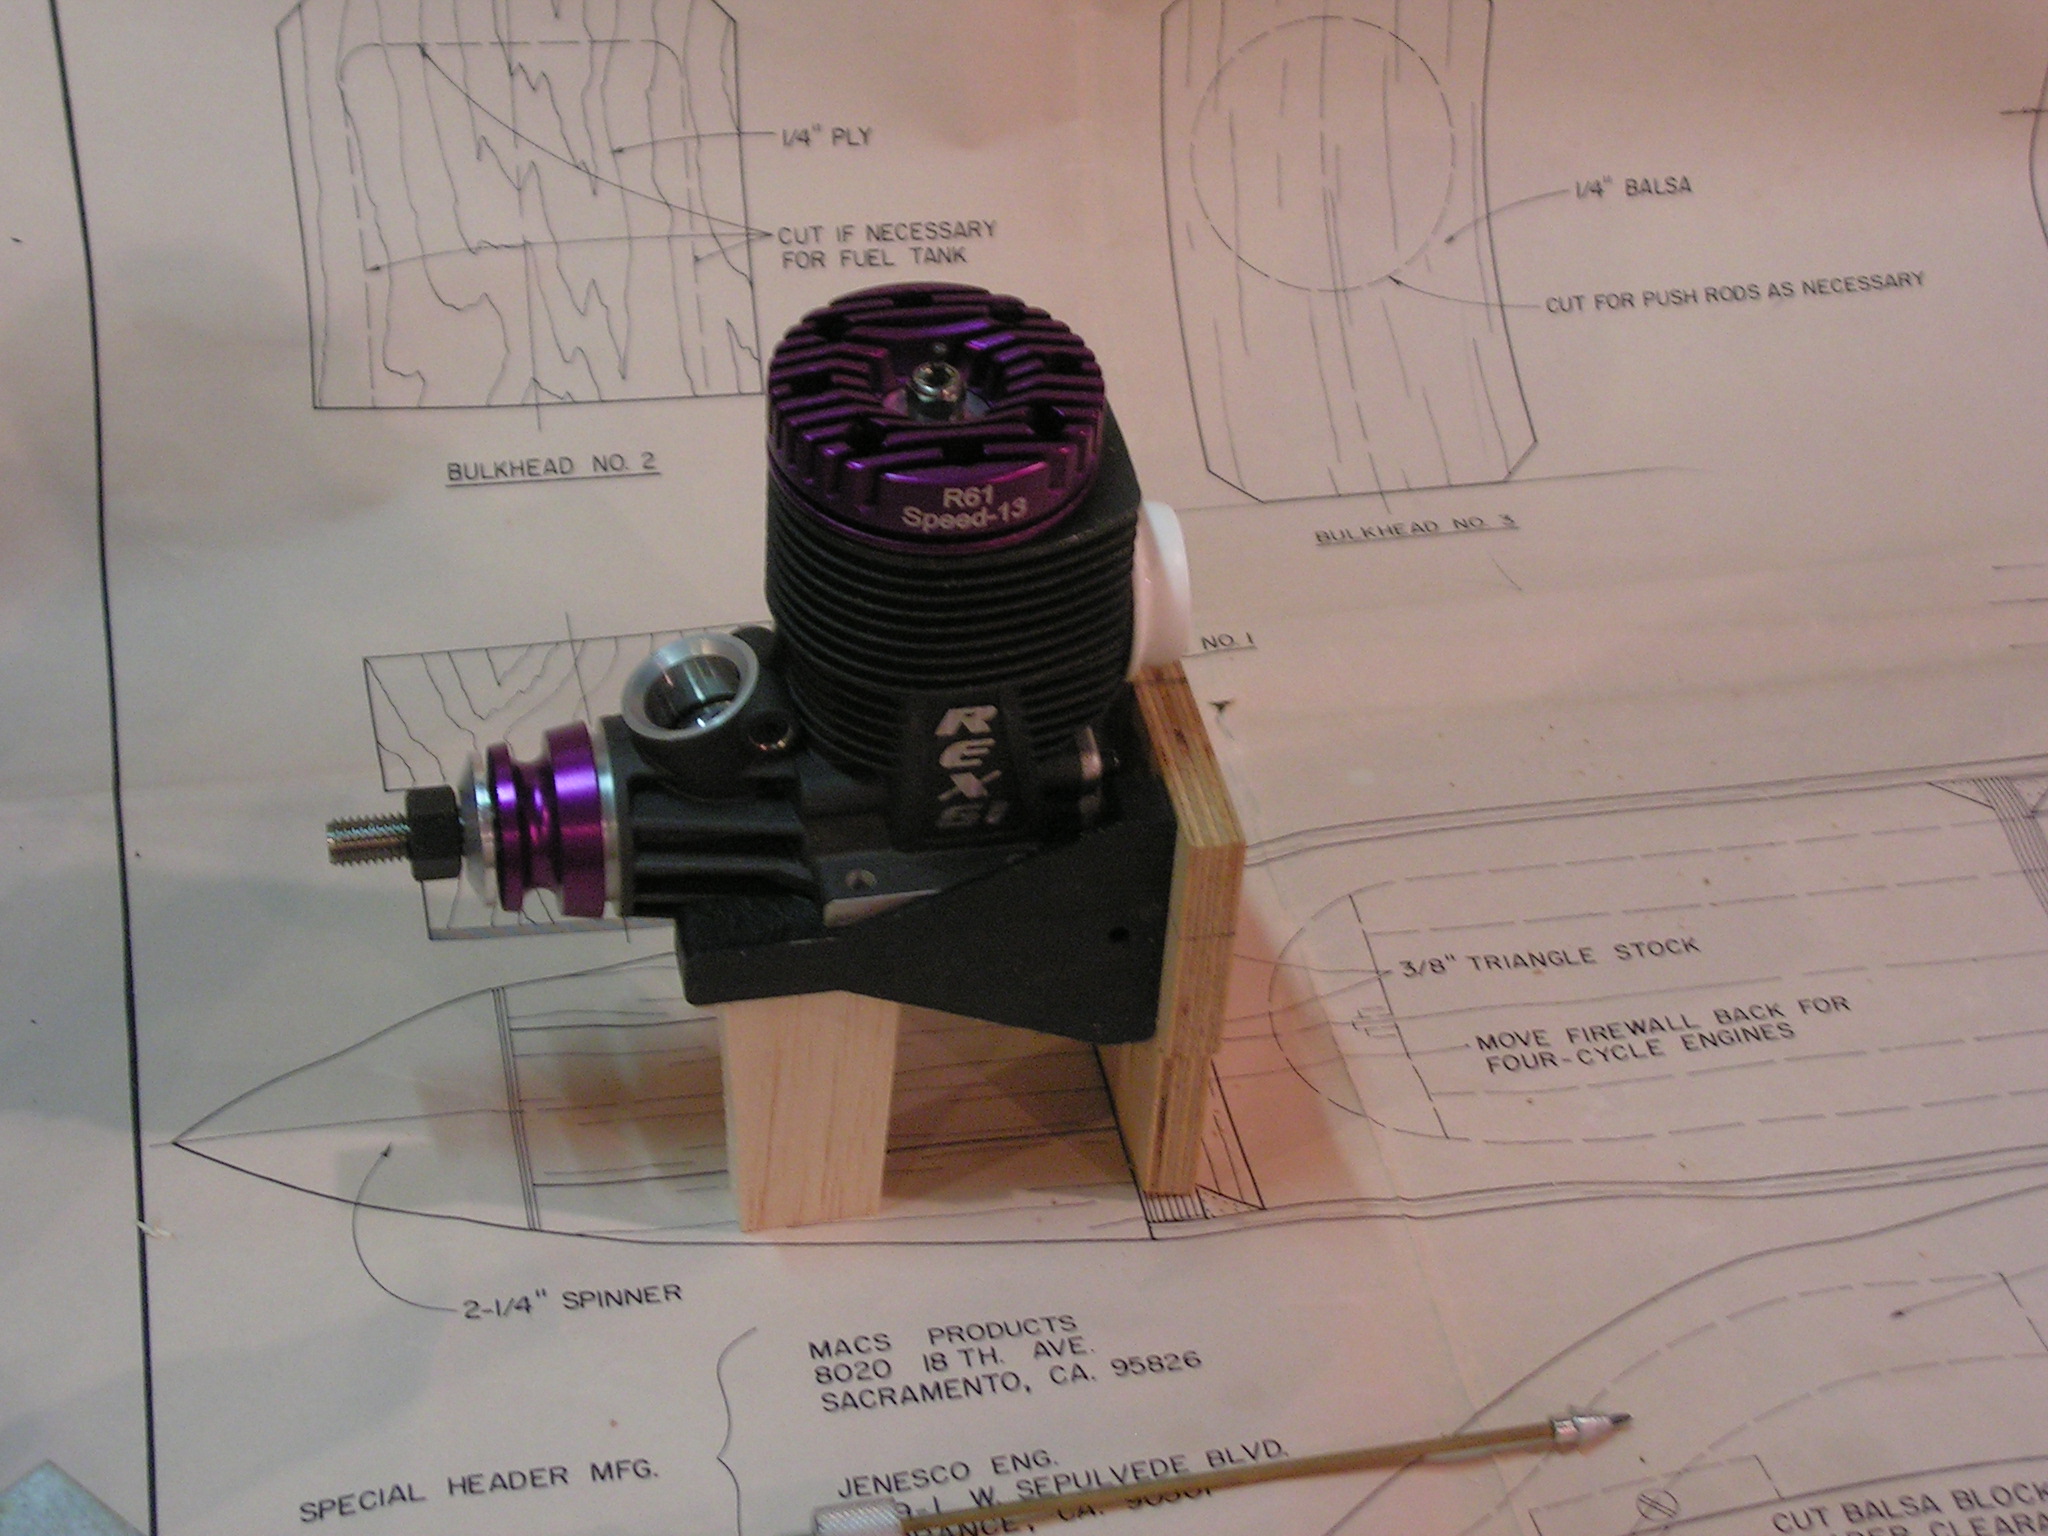
Have you considered the NovaRossi Speed/13? No difference in power from the YS, but not pumped.... yet.
http://www.smtdistributing.com/NOVAROSSI_c2.htm
I am mounting my NovaRossi C61F on my Great Escape. I have my Black Speed/13 for my Escape.
Brian
GREAT kits!
Have you considered the NovaRossi Speed/13? No difference in power from the YS, but not pumped.... yet.
http://www.smtdistributing.com/NOVAROSSI_c2.htm
I am mounting my NovaRossi C61F on my Great Escape. I have my Black Speed/13 for my Escape.
Brian
11-03-2013, 02:42 PM
#71
Thread Starter
The Great Escape has been on the market for at least a month now. I have the UFO kit. I believe it is currently sold out.
GREAT kits!
Have you considered the NovaRossi Speed/13? No difference in power from the YS, but not pumped.... yet.
http://www.smtdistributing.com/NOVAROSSI_c2.htm
I am mounting my NovaRossi C61F on my Great Escape. I have my Black Speed/13 for my Escape.
Brian
GREAT kits!
Have you considered the NovaRossi Speed/13? No difference in power from the YS, but not pumped.... yet.
http://www.smtdistributing.com/NOVAROSSI_c2.htm
I am mounting my NovaRossi C61F on my Great Escape. I have my Black Speed/13 for my Escape.
Brian
I was looking at the UFO. Contacted , and inquired about the Escape and
the UFO. The site said currently out of stock last time I looked. I inquired about both. Blue Jay (Lattas) sent a note back saying about 3 mos. for the UFO.
Do you have a build thread going for that?
11-03-2013, 03:41 PM
#72
No. I have 4 irons in the fire at the moment... A Dirty Birdy, a Great Escape, an Escape, and a Bridi designed Telemaster with my daughter.
I will probably put it together next build season. Although, I think I might go with a foam wing and stab...
Brian.
I will probably put it together next build season. Although, I think I might go with a foam wing and stab...
Brian.
05-20-2015, 03:10 PM
#73
This fits in that "Ripley's Believe it or Not" column. About 25 years ago, I built the Midwest Pattern Master and flew it wearing out two engines. The plane was a great flyer. I just didn't realize what a great flyer it could be. On it's last flight a friend was also flying a Chipmunk all decked out with smoke and also a real nice flyer. We were the only two at the field. As he circled left doing a knife edge, I was circling right when the 1 in 1000 chance of collision occurred. After the loud thump followed by silence, his plane went down in glory. At the time, that was about $350 in 1990 dollars. For some unknown reason, my Pattern Master was still flying albeit a little squirrely. I knew something was wrong so I kept level flight and did a slow descending turn, with no engine on, gliding towards the main part of the landing field. As I bled off speed, I noticed that the right wing started to dip causing the plane to veer slightly to the right. I compensated with aileron and a bit of rudder. At landing speed, as the plane approached the ground, I couldn't hold any more left aileron as the plane settled down on the field and it cartwheeled ever so slightly. The plane landed and I walked over to see what happened.
The propeller was broke; the front nose wheel was gone, pulled out; and the right wing had a big bite taken out of the leading edge about 1/3rd out from the fuselage. A closer look at this 1 inch by about 4 inch rectangular hole in the wing revealed that not only was the leading edge missing, but also the main spar. All that was holding the wing together was the trailing edge, the aileron and the remaining Monokote covering that wasn't torn off! The Chipmunk bit a sizeable hole out of my wing with it's wing tip. It just sliced through it!
What I realized afterwards was that as I turned and bled off air speed, the lifting pressure was holding the wing up tight against any remaining structure enough to keep it flying. As airspeed bled off, so did the lift and the wing started to droop and then turn the plane. Fortunately I was able to save it for another day anticipating a future rebuild. It was stored away with many other now relic RC stuff.
Well, time flew by and life happens until this year when I had the opportunity to get back into flying RC airplanes. I'm building a bucket list 1/5 scale airplane, but I thought I might resurrect that pattern plane that I had so much fun with i.e. fly in the Summer and build in the Winter. The plane was just rebuilt and refitted with the latest radio gear, a Taranis system and I now have her ready to fly again. See pictures. She's not as pretty as she once was. There's a lot of oil soaked Monokote and a few minor dings, but I'll bet she will fly as well as she did back then. I'll just have to learn to fly her all over again. I managed to scavenge some old Irvine .40 Mk II engines from the internet as I wanted to just drop in a newer engine without redoing the whole front end with a new and different motor. Since I built the front end like a bullet nose, it's pretty tight up front.
I trust those that built and have flown this model can appreciate a well designed kit and nice flying airplane. Even one that can survive a mid air collision.
Last edited by szempruw; 05-20-2015 at 03:14 PM.
05-20-2015, 06:57 PM
#74
Join Date: Oct 2004
Location: Wyoming,
MN
Posts: 233
Likes: 0
Received 0 Likes
on
0 Posts
Way to go with bringing the wreckage back to service. My philosophy is - A wrecked airplane is a terrible thing to waste. It seems you feel the same way About 5 of my flyable models were TBK's (trash barrel kits).
I hope you can wear out another two engines this time around.
I hope you can wear out another two engines this time around.