


Corsair F4U-1A Top Flite Giant ARF Modifications
 07-21-2013, 05:26 PM
#301

Thread Starter

Join Date: Feb 2007
Location: Los Gatos, CA
Posts: 797
Likes: 0
Received 0 Likes
on
0 Posts
This is all great information. Keep it coming. I'll try it all and let you all know what the fix is. I'm going to find this bug. This bird is fat and I think beautiful, however, she flys great.
Now that I'm home and rested I'm going to turn the plane on and see how much elevator is required. If it is simply the fact that I have them set to low for the neutral position I'll adjust and take a little nose weight out. However, if it is a lot I'll remove a larger amount of weight. I'll also check for incidence issues as well. I don't think that is it because after the trim she flew great. I mean very well.
I turned her hard and stalled her three ways and she didn't have any ugly tendencies. I wish she lighter but she is no lemon and a keeper for sure.
Also on the UP-3 valve. First I'm going to get one of those fail safe systems. It is the one that if the air bleeds to a set amount the gear will extend automatically. Also I'll again triple check the air lines. I did this and knew that if the doors close it would hold air. However with the doors open it lost all air pressure. At that point I should not have flown.
Keep sending ideas.
Thanks,
Michael
 07-21-2013, 05:29 PM
#302
Thread Starter
Join Date: Feb 2007
Location: Los Gatos, CA
Posts: 797
Likes: 0
Received 0 Likes
on
0 Posts
Also I do believe that 5 1/2" is best.
And for the value I'll try some lubricant and see. Thank duplicator41.
And for the value I'll try some lubricant and see. Thank duplicator41.
07-22-2013, 07:41 AM
#303

My Feedback: (2)
Michael, make SURE all your UP3 connections are correct. I have that valve and it can be confusing as to where the air in and air out lines go! I managed to misconnect mine 3 !!! times LOL.
Look at the diagram you got with the valve. The one that shows the air connections and their proper placement. Not saying this is the problem but its worth a second look.
Look at the diagram you got with the valve. The one that shows the air connections and their proper placement. Not saying this is the problem but its worth a second look.
07-22-2013, 02:08 PM
#304
I am also using a UP-3, and had a similar problem. It turned out my linkage had slipped a fraction and the shuttle valve was not travelling to it's limit, leaving a slight opening in the "doors open" port, bleeding the system. A adjustment fixed it. No problem since.
Old Dawg
Old Dawg
07-26-2013, 07:51 AM
#305
Senior Member

Join Date: Dec 2009
Location: Austin, TX
Posts: 121
Likes: 0
Received 0 Likes
on
0 Posts
Pneumatic or electric retracts each have there own set of problems. I just did a maiden on my TF-FW190 with electric retracts and ended up having to do a belly landing due to a malfunction of one of the actuators not letting the gear extend. Like you I had a small amount of damage, easy to repair. Getting ready for second flight this weekend, I expect all to go well.
07-29-2013, 03:52 PM
#306

Ive been operating the standard Robart air set on my Corsair with zero faults but one of my own doing. I installed an SMC air pressure gauge and it developed a leak so I ended up removing it... Problem solved. The system holds air for days. Luckily I caught the leaking gauge in preflight and didnt fly that day.
Robart
Corsair Retracts and Tail retract
Air valve with speed adjustments (red unit)
1X large air tank
1X medium air tank
1X small tank
Restrictors on mains up/down circuits
1X set of quick disconnects with sealing valve for the wing.
I added the extra tank volume because I was consuming a lot more air until I found the slow leak. Now I could go back and remove the small tank no problem. However, its light and I have enough air for 3-4 cycles maybe more so there is a margin of safety there. Without it there would still be 3 safe cycles and very little loss in pressure.
My gear cycles one main at a time then the tail gear last in a very nice controlled manner. Doing so takes a few seconds but the appearance is great.
Ive seen way more problems reported about the electric system including one of our guys in the club with his TF FW.
08-18-2013, 11:06 PM
#307
Thread Starter
Join Date: Feb 2007
Location: Los Gatos, CA
Posts: 797
Likes: 0
Received 0 Likes
on
0 Posts
Hello all,
I�m back to posting and in these next few posts I�m show my repairs and my second test flight after these repairs. The flight was successful, however, the bulkhead that supports my scale tailwheel came apart. In these next few post I�ll try to give the best details I can.
Photo 1 shows the original damage from the belly landing.
Photos 2 and 3 shows the sanding of the areas damaged.
Photos 4 shows the new main gear cover plates.
Photos 5 and 6 show the main doors.
08-18-2013, 11:07 PM
#308
Thread Starter
Join Date: Feb 2007
Location: Los Gatos, CA
Posts: 797
Likes: 0
Received 0 Likes
on
0 Posts
For the damaged areas I glued all the broken pieces as close to their original locations using thick CA. After that I had to use two small pieces of balsa wood to fill some open areas. Then using bondo I filled the areas and sanded them smooth.


08-18-2013, 11:08 PM
#309
Thread Starter
Join Date: Feb 2007
Location: Los Gatos, CA
Posts: 797
Likes: 0
Received 0 Likes
on
0 Posts
After my first flight I found that my air leak was from a single air cylinder. This repair included a air fail safe system. This little device costs around $100.00 and installed in between the servo that controls the valve. Also it pressure system is installed in between the airlines. You set the minimum pressure and the once the pressure gets to that pressure weather you switch the gear the system lowers the main gear automatically.
In these eight photos they show the beginning of my second flight. I should tell you that I had a friend come over after my repairs were complete and we re-balanced the airplane. I was way to nose heavy. I removed a little more than a pound.
The flight was great, however, you can see that the same doors will not close correctly. As I replaced all four air cylinders there is no air leak. Even if there were the fail safe would have extend when the pressure became to low. It did not loose air and I performed several low passes and a roll with the doors open on one side.
08-18-2013, 11:09 PM
#310
Thread Starter
Join Date: Feb 2007
Location: Los Gatos, CA
Posts: 797
Likes: 0
Received 0 Likes
on
0 Posts
These photos show my second flight. Photos 1 through 3 show my first approach. Directly after photo 3 the main wheels touched down and I did not release the elevator pressure and the plane bounced back into the air. As seen in photo 4.
Photos 5 through 8 show my second attempt and good and soft. I�m ready to paint the weathering.


Photos 5 through 8 show my second attempt and good and soft. I�m ready to paint the weathering.
08-19-2013, 07:55 AM
#313
Thread Starter
Join Date: Feb 2007
Location: Los Gatos, CA
Posts: 797
Likes: 0
Received 0 Likes
on
0 Posts
Chris,
Yes my navigation lights are on and the plywood bulkhead decontaminated on one layer only. I thought I would simply 3M Hysol epoxy and add a couple of screws.
Do you think the screws are over kill? I do not want to add any more weight in the tail I have to.
Yes my navigation lights are on and the plywood bulkhead decontaminated on one layer only. I thought I would simply 3M Hysol epoxy and add a couple of screws.
Do you think the screws are over kill? I do not want to add any more weight in the tail I have to.
08-20-2013, 09:05 PM
#315
Yes use Hysol and clean away any loose wood and ensure a good bond. I didnt use any screws because the Hysol laminated the skin back on to the bulkhead. The wood is just crap, use thin CA anywhere you have access to the edge of the plywood in this plane to toughen it up.
08-23-2013, 09:42 PM
#316
Thread Starter
Join Date: Feb 2007
Location: Los Gatos, CA
Posts: 797
Likes: 0
Received 0 Likes
on
0 Posts
Ok now I have fixed the tail and I found my error with the main gears doors not always closing!
I simply removed all loose wood and glued the support bar and re-installed the tail wheel and that was complete. As for the main gear doors, I noticed that the doors would work well the first time at the start of each day. When I would cycle them 6 or 8 times they stopped working. I took the main gear covers and gear out and could see that the main air cylinder when retracting the gear would compress the air lines to close the doors. At first the air lines would work and after several times the line would collapse and no more working doors. Photo 1 shows the new cylinders and new airlines.
Now time to weather my corsair now. In photos 2 through 7 shows how I start. First I study lots of photos and decide on how much weathering I’m going to do. As this is Pappy Boyington’s plane flown on and off island made runways, I planed to make this a dusty and dirty plane. I then mix up a dusty sandy color and work the bottom so as to test there first. This color is very thin so it allow me to spray broad strokes and get a better flow of the base (foundation) color.
08-23-2013, 09:45 PM
#317
Thread Starter
Join Date: Feb 2007
Location: Los Gatos, CA
Posts: 797
Likes: 0
Received 0 Likes
on
0 Posts
These photos show third and four color getting darker and darker. I use little Dixie cups to mix and match colors. Using painters tape on the edge of sheets of paper I can mask areas and make sharp lines.


08-23-2013, 09:47 PM
#319
Thread Starter
Join Date: Feb 2007
Location: Los Gatos, CA
Posts: 797
Likes: 0
Received 0 Likes
on
0 Posts
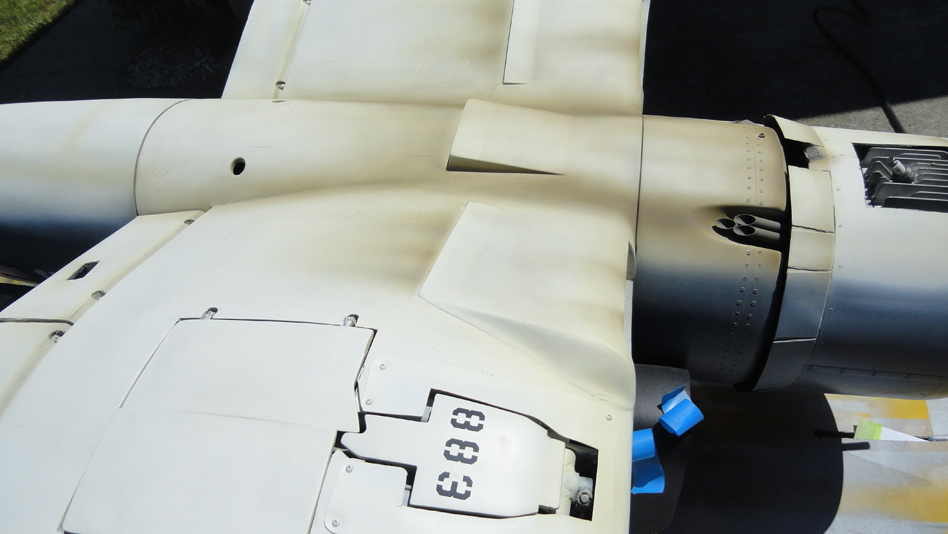
Here I’m finishing off the exhaust. Here I again use three more colors. Two are darker and I use a little red to get that burnt look. The third and final color is medium to dark grey. The dark colors are smooth and the grey is puffy and a little streaky.


08-23-2013, 09:48 PM
#320
Thread Starter
Join Date: Feb 2007
Location: Los Gatos, CA
Posts: 797
Likes: 0
Received 0 Likes
on
0 Posts
Now it�s time for the top. When I turned the plane over I have to stop and laugh. All that work so far (about four and half hours) and with the plane on her feet I couldn�t see any of that hard work. Also I thought about some of the other RC guys who simply do not even do panel lines and or detail to the bottom of their planes. Oh well.
I do the top the same as the bottom. I use three colors and get darker with each color. The difference is that as the top is dark blue my foundation / starting color is much darker than the tan / sand color I started with on the bottom.


I do the top the same as the bottom. I use three colors and get darker with each color. The difference is that as the top is dark blue my foundation / starting color is much darker than the tan / sand color I started with on the bottom.
08-23-2013, 09:48 PM
#321
Thread Starter
Join Date: Feb 2007
Location: Los Gatos, CA
Posts: 797
Likes: 0
Received 0 Likes
on
0 Posts
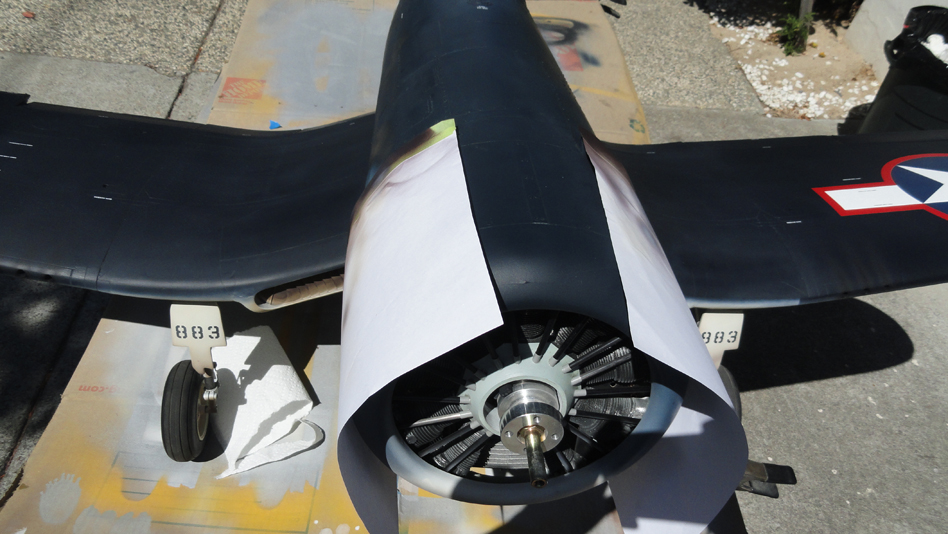
With that started decided to paint and make my anti-skid strips on both sides of the wings. I first mask then off. I don’t show many photos of this process as I can not stop to take photos to make this work. Here is what I do after masking. I mix up some flat black with some dark earth. I never use solid black alone as it dries out looking fake.
At the plane I get a cup of Mirco-balloons at the ready.
I paint the masked area fast and heavy. I make this very wet with paint.
Then before the paint even has anytime to dry and or set I sprinkle (very heavy amounts of) Micro-balloons all over the strip areas. Then I blow the Micro-balloons all over. After a little drying time I use a soft wide brush to stroke off all the extra Micro-balloons off.
Then I spray another light and even coat of black.
Last I mix up some lighter black, more like dark grey and add a tiny amount of red and add some offset color.
Then peel off the masking tape. The entire area is textured and looking great. Well in my opinion.
I do this as I have tried many other options and this way is the best so far. I have used black sand paper and found that it looks good, however, when fuel and or cleaning fluid gets on the paper it becomes soiled and starts to lift off.
Last edited by MRadu; 08-24-2013 at 07:43 AM.
08-23-2013, 09:51 PM
#323
Thread Starter
Join Date: Feb 2007
Location: Los Gatos, CA
Posts: 797
Likes: 0
Received 0 Likes
on
0 Posts
These photos show my finished work. I did add the discoloration to the side of the fuselage for the excess fuel run off. See photo 5.
I hope you like it. This weathering took me all day (Friday/today). I'm going out to fly my Corsair this coming Sunday. I should have photos and maybe some video!


I hope you like it. This weathering took me all day (Friday/today). I'm going out to fly my Corsair this coming Sunday. I should have photos and maybe some video!