


Flight-Model KI-61 ???
 09-29-2012, 02:10 AM
#101
Senior Member
Thread Starter
Join Date: Nov 2007
Location: newark, UNITED KINGDOM
Posts: 525
Likes: 0
Received 0 Likes
on
0 Posts
just looking at your latest pics and comparing to what I have:-
Got a long Zenoah type trumpet going through the firewall, so air is being drawn well away from the engine and from inside the (cooler) fuz. Noticed that you have only a small hole in the firewall behind the carb.
Fitted a pipe to the metering diaphragm and ran that back into the fuz.
If the muffler has solved it though, job done [8D]
 07-02-2013, 03:55 PM
#102
Junior Member
Join Date: Jul 2013
Location: maryboroughQLD, AUSTRALIA
Posts: 7
Likes: 0
Received 0 Likes
on
0 Posts
Hi all from Australia here, have recently found this Model on Hobbyking, Have you guys sorted engine probs with heat >? Also how about some vids guys come on im Waiting to see' the suspense is doing my head in LOL , there is not many vids of this plane and all of you Limmy buggers have the best ones i have seen fantastic stuff , the only thing stopping me from having same setup is information from you guys come on ARGHH , The weather is perfect now argh mostly sunnies days and no much wind , I was going to get a Vq ki 61 60 size an modify the canopy but meh , i like the look of the one you guys are masterfully completing I WANT VIDEO PLEASE LOL
have the best ones i have seen fantastic stuff , the only thing stopping me from having same setup is information from you guys come on ARGHH , The weather is perfect now argh mostly sunnies days and no much wind , I was going to get a Vq ki 61 60 size an modify the canopy but meh , i like the look of the one you guys are masterfully completing I WANT VIDEO PLEASE LOL Cheers nev
07-04-2013, 09:36 AM
#103
Senior Member
Thread Starter
Join Date: Nov 2007
Location: newark, UNITED KINGDOM
Posts: 525
Likes: 0
Received 0 Likes
on
0 Posts
No probs with heat here, but you need a good exit hole underneath.
Moss trouble at t'field [:@] Getting scarified soon so I should be able to fly her.
Go get one, they are cheap, well built and easy to fly.
Moss trouble at t'field [:@] Getting scarified soon so I should be able to fly her.
Go get one, they are cheap, well built and easy to fly.
07-05-2013, 03:48 PM
#104


Sorry, no vids yet here, Nev.
Seems all of the flight reports, mine included, submitted so far say it's a real doll to fly. I'm probably the "fat boy" in the group as my customizations put me at just over 16lbs/7.25kg...Still flies great and lands easily.
Seems all of the flight reports, mine included, submitted so far say it's a real doll to fly. I'm probably the "fat boy" in the group as my customizations put me at just over 16lbs/7.25kg...Still flies great and lands easily.
07-05-2013, 06:08 PM
#106

nevaskai64, I have been flying mine regularly. It is light and easy flying for a warbird. Recently I had engine problems. Was flying and running ok and then just quit. I was able to get the gear down and landed ok. I thought maybe it was too lean. Richened up the high needle a little. Flew again and seemed to be doing fine, then just quit again. This was on down wind. I was able to do a 180 and landed gear up. Wet grass so no damage. I think the electronic ignition is going bad be cause on ground run it has an intermittent miss at high speed. I've replaced the ignition and will see. The point is that the plane is light enough and flys good enough that I was able to land ok both time. Not always the case with warbirds.
I think at a club show someone took a video of my plane flying. Trying to find out and post a copy if there is one.
I think at a club show someone took a video of my plane flying. Trying to find out and post a copy if there is one.
07-30-2013, 04:19 AM
#108
Join Date: Jun 2011
Location: Birmingham, UNITED KINGDOM
Posts: 128
Likes: 0
Received 0 Likes
on
0 Posts
Hi all, I'm just putting one of these kits together and thought I'd throw my hat in the ring.
I was quite impressed by the quality of assembly for the price, everything seems to be glued where it should be. Ok, they could have sanded the fuselage sides a little before covering it but it's not really noticeable unless you look close. I've still gone over the joints I can reach using cyno, and epoxied the engine and tank bays. I've also lined the engine mount box top and sides with 3/32" balsa to a) keep fuel out by closing off the holes and b) brace the structure.
I've fitted e-flite 120 electric retracts but found I had to fit 1/8" wedges to stop the wheel trying to retract right through the top skin and out the other side. So it will look a bit bandy-legged with the wheels down, I can live with that.
Two points I can't live with:
One - the radiator. It's not close, it's not even pretending to be close.
I've added 1/4" balsa wedges front and back plus a 1/2" sheet cap to allow me to contour it and get it somewhere near the right size and shape. It's not 100% or anywhere near but at least it doesn't stop you dead in your tracks.
Two - the wheel well liners and doors. I've closed off the wheel bays by sheeting the spar web and surrounding ribs to tidy it up a bit and thrown the plastic liners in the bin, which also means I can fit Robart 3 1/4" wheels. I'm still thinking about the doors, maybe a composite of glass/1/32 balsa/glass/litho plate, molded to contour on the wing? Or maybe just 1/16" aluminium sheet rolled to contour - anything but those flat play sheets supplied with the kit, they stand proud of the wing by nearly 1/4"! To start with I'll leave the u/c legs naked until I see how it flies.
I'm fitting a Magnum 91 four stroke, this means the centreline of the tank is an inch or more higher than the needle so that may be an issue, if so I'll fit a Perry pump to regulate the pressure.
Last issue - how are you retaining the canopy? Self tapping screws seems a bit harsh for something that needs removing to assemble the model at the field, has anyone tried using magnets or a hatch catch?
07-30-2013, 06:51 AM
#109
Glad to see another going together. Pics are a must
You are so right about the radiator. Below are some pics of how I handled that one.
Also a few pics of the landing gear and doors. As for the hatch cover just a pair of small button head screws with a hex drive. I added a bit of lite plywood to the fuse on the inside to make up the space between the fuse and the "pin" on the hatch to keep the screw from wobbling.
07-30-2013, 07:25 AM
#111
Join Date: Jun 2011
Location: Birmingham, UNITED KINGDOM
Posts: 128
Likes: 0
Received 0 Likes
on
0 Posts
Hi frets, mine is lot more 'quick and dirty' than yours, you really went to town on it. What have you used for the wheel covers? it looks like you planed thick section wood to match the wing, I will be happy with something laying flat against the wing as I fly from grass and need a forgiving setup for when the legs get tweaked as the wheel drops in a rabbit hole.
07-30-2013, 10:44 AM
#112
Join Date: Jun 2011
Location: Birmingham, UNITED KINGDOM
Posts: 128
Likes: 0
Received 0 Likes
on
0 Posts
this is fun - it seems that Photobucket and Linux Mint don't talk any more so I've had to boot up in Windows to link these pics!
First, this fella last tried his hand in a Gladiator until low'n'slow got mixed up with turbulence behind a tree then no more Glad -
[img]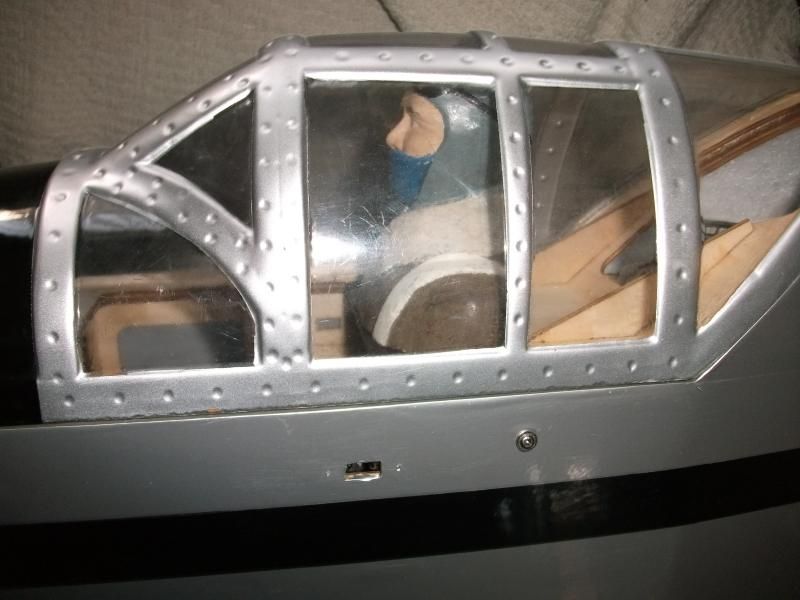 [/img]
and the wheel well with the retract mounted on wedges -
[img]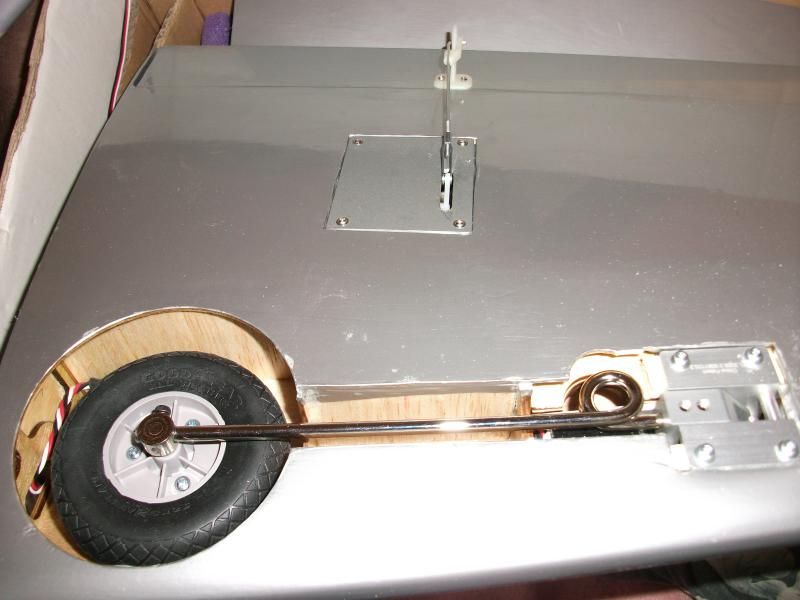 [/img]
The radiator, as I said, quick and dirty -
[img]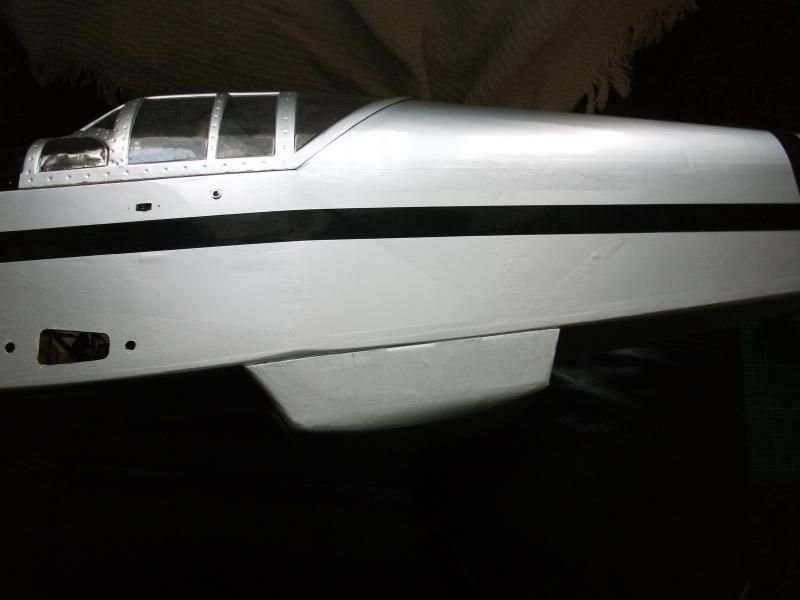 [/img]
[img] [/img]
[img]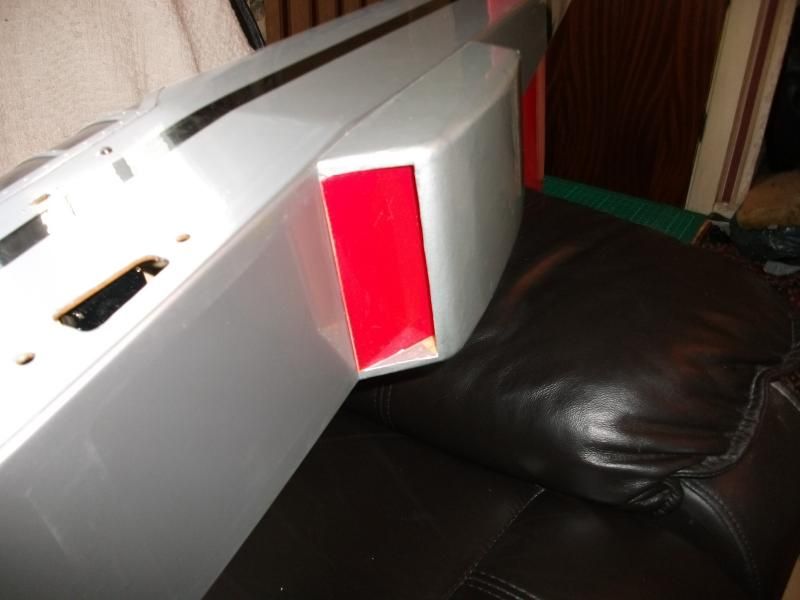 [/img]
First, this fella last tried his hand in a Gladiator until low'n'slow got mixed up with turbulence behind a tree then no more Glad -
[img]
 [/img]
and the wheel well with the retract mounted on wedges -
[img]
 [/img]
The radiator, as I said, quick and dirty -
[img]
 [/img]
[img]
 [/img]
[img]
 [/img]
07-30-2013, 12:27 PM
[/img]
07-30-2013, 12:27 PM
#114
Senior Member
Thread Starter
Join Date: Nov 2007
Location: newark, UNITED KINGDOM
Posts: 525
Likes: 0
Received 0 Likes
on
0 Posts
Magnum 90 should be fine. 1" above centre line of carb is a bit iffy though [:@]
Can you chuck the tank and fit a Dubro jobular? They are a bit lower and flatter.
Can you chuck the tank and fit a Dubro jobular? They are a bit lower and flatter.
07-30-2013, 06:10 PM
#115
robc57, its looking good. Welcome to KI 61 territory. I replaced the ignition on my DLE 20 and that seems to have solved the problem. Flew several time the other day with no problems. I built a whole new radiator but your mod looks good, certainly better than what came with the kit.
07-30-2013, 07:02 PM
#116
Ya got that right, RBean.....anything looks better than that original radiator!
Nice mod there robc57. Like you said , "quick and dirty", but in the end a vast improvement. Looks great, too....and it will look even better at 20' off the deck at 50+mph on a low pass
Nice mod there robc57. Like you said , "quick and dirty", but in the end a vast improvement. Looks great, too....and it will look even better at 20' off the deck at 50+mph on a low pass
07-31-2013, 11:29 AM
#117
Join Date: Jun 2011
Location: Birmingham, UNITED KINGDOM
Posts: 128
Likes: 0
Received 0 Likes
on
0 Posts
Thanks Gents.
Dogshome, I just happened to have a 14oz DuBro in stock and it fits a treat, still a bit high but better than the supplied tank. Are you still in the Wythall area - you were looking for somewhere to fly at lunchtimes when we conversed a couple of years back when the Lucas club was looking for a new field.
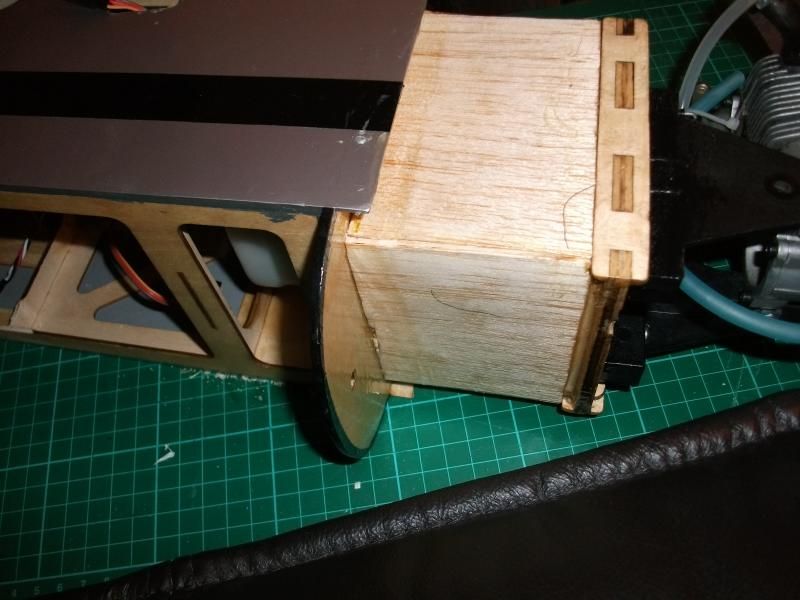
Ok, so I plated the motor box (hard to fuel proof cleanly with two long haired cats in the house):
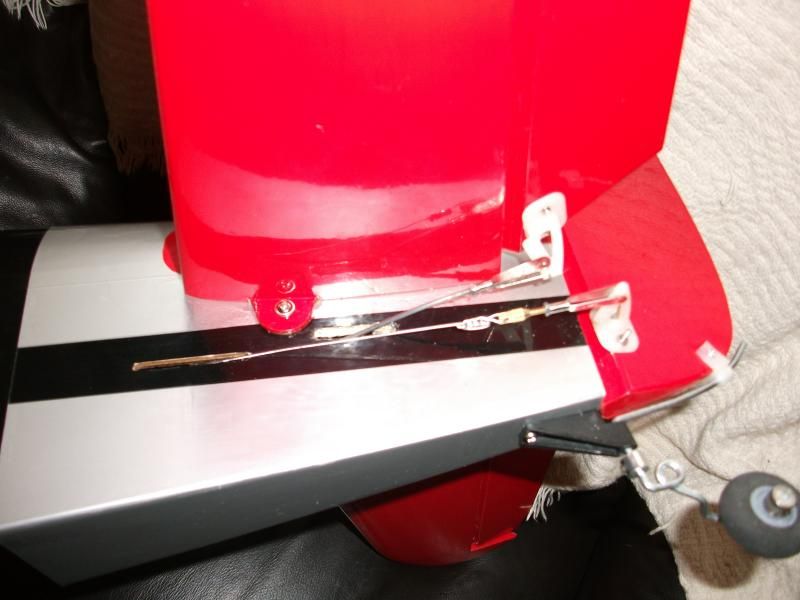
Fitted the elevator servo centrally with a carbon pushrod:
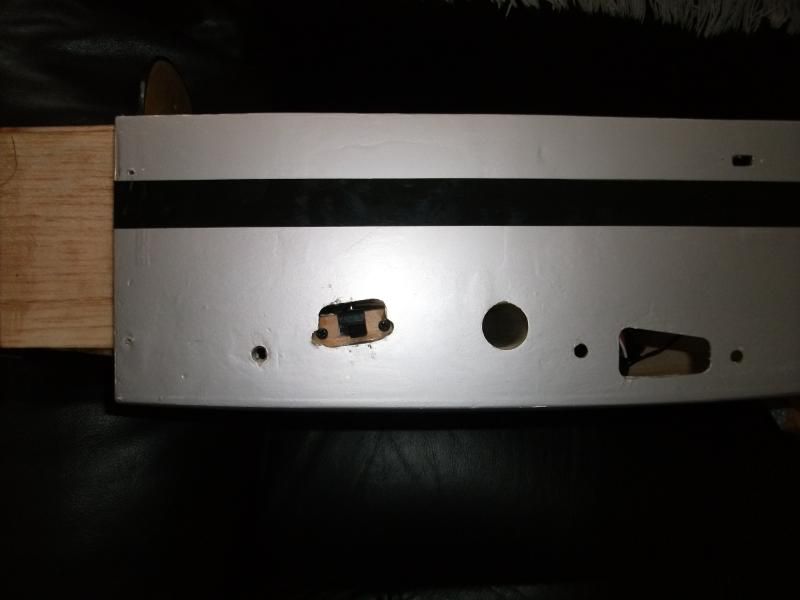
Retract switch to be accessed through one wheel well:

and receiver switch through the other:
Then I moved the cross member back a couple of inches to give easier access to the wing bolts:
I'm running out of jobs to do, just fit a receiver battery on top of the motor box and check the balance, should be good to go for the weekend!
Dogshome, I just happened to have a 14oz DuBro in stock and it fits a treat, still a bit high but better than the supplied tank. Are you still in the Wythall area - you were looking for somewhere to fly at lunchtimes when we conversed a couple of years back when the Lucas club was looking for a new field.
Ok, so I plated the motor box (hard to fuel proof cleanly with two long haired cats in the house):
Fitted the elevator servo centrally with a carbon pushrod:
Retract switch to be accessed through one wheel well:
and receiver switch through the other:
Then I moved the cross member back a couple of inches to give easier access to the wing bolts:
I'm running out of jobs to do, just fit a receiver battery on top of the motor box and check the balance, should be good to go for the weekend!
08-12-2013, 04:32 AM
#118
Join Date: Jun 2011
Location: Birmingham, UNITED KINGDOM
Posts: 128
Likes: 0
Received 0 Likes
on
0 Posts
It's flown needing a few clicks of down elevator and a couple of right aileron trim, the old Magnum 91 four stroke proved a good match. I've got it balanced roughly on the spar, I'm thinking it might need a little lead in the nose to give a more settled flightpath. Full flap (60 degrees or so) with 6% down mix worked well, the model almost hovering in the breeze on a whisper of throttle.
The next job will be to cover up the u/c legs to improve it's looks on the ground.
The next job will be to cover up the u/c legs to improve it's looks on the ground.
08-12-2013, 08:06 PM
#119
robc57, congrads on getting her airborne. Got mine out today with good weather. Got in three flights. Simply a good flying plane and unique. Not any others at the field.
08-13-2013, 08:16 AM
#120
Senior Member
Thread Starter
Join Date: Nov 2007
Location: newark, UNITED KINGDOM
Posts: 525
Likes: 0
Received 0 Likes
on
0 Posts
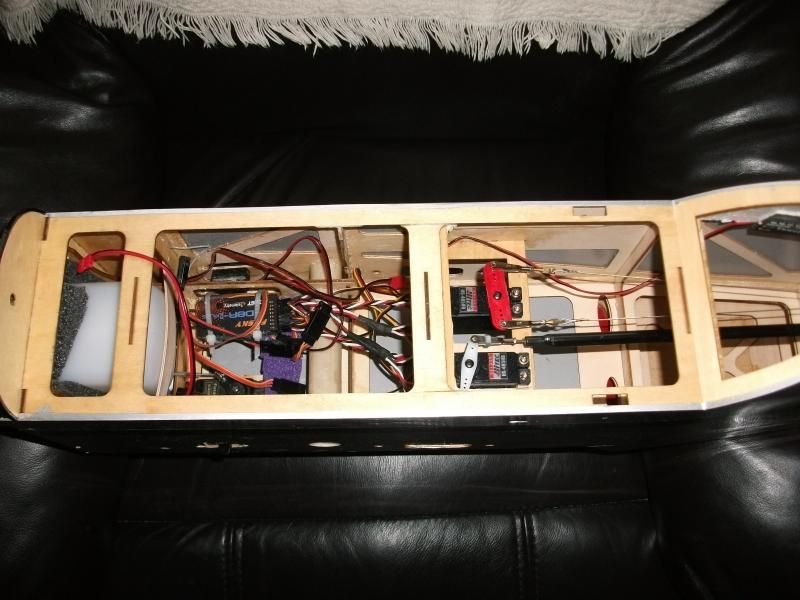
I must move the cross-piece on mine! The wing bolts are the only hassle on this plane now. I use multway Multiplex connectors for each wing as there are 2 servos and an electric retract in each.
It does nice barrell rolls, straight rolls, loops and stall turns. Top speed is about 70MPH I guess with the 15cc - enough for a good fast low pass
It does nice barrell rolls, straight rolls, loops and stall turns. Top speed is about 70MPH I guess with the 15cc - enough for a good fast low pass
08-13-2013, 12:58 PM
#121
Join Date: Jun 2011
Location: Birmingham, UNITED KINGDOM
Posts: 128
Likes: 0
Received 0 Likes
on
0 Posts
Moving that crosspiece makes a world of difference with fitting the wing bolts. I'm using nylon thumbscrews from Modelfixings.co.uk, they're less likely to come loose than the allen screws and are plenty strong enough to stop the wings slipping away from the sides with the bonus that no tools are needed to assemble the model.
Looking at that photo, I really must tidy up the wiring!
Looking at that photo, I really must tidy up the wiring!
09-16-2013, 03:08 AM
#122
Join Date: Jun 2011
Location: Birmingham, UNITED KINGDOM
Posts: 128
Likes: 0
Received 0 Likes
on
0 Posts
repair time - a heavy landing in a crosswind knocked the left retract out, the two 20mm * 10mm liteply retract mounting rails snapped from the sideload on the wheel, pulling the rib behind the retract apart. That rib has a large elliptical lightening hole through it but it would probably have been strong enough if the beam hadn't snapped.
So, as the wingtip touched down it tried to slew the model round, bending the wing tube and pushing the left wing root trailing edge through the fuselage side. Some 1/16" birch ply splints fixed the fuselage side and bottom, and I added a couple of balsa cross braces across the fuselage behind the rear incidence pin to stop it happening again. Two ply ribs to brace the existing ones that the U/C mounts bond to, a new pair of beams from proper marine grade ply, a little 3/32 balsa sheet and a film patch should see it fixed.
The biggest problem is that the E-Flite retract unit lost it's lead which snapped off where it exits the encapsulation, if I can't grind away the epoxy and solder on a new lead that's a dead unit and �60+ down the drain. At least Lado supply spares for their retract units!
09-18-2013, 12:18 AM
#124
Join Date: Jun 2011
Location: Birmingham, UNITED KINGDOM
Posts: 128
Likes: 0
Received 0 Likes
on
0 Posts
From all I can find on the web E_Flite don't sell spares and don't offer a repair service, though I need to contact Horizon UK to confirm that. Luckily I'd won a pair of the same units on ebay for half the price of a new set so I've dropped one of those in to get the model airworthy again. Still leaves me in need of one main unit for the next model. Lado electric retracts may be double the price, but they are built to last and they can supply spares.
Repairs were simple enough and I reckon it's a lot stronger now though the silver film I'd got isn't a perfect match so it will be a permanent scar. Now I'm left wondering whether to reinforce the other side or wait for nature to take it's course.
Repairs were simple enough and I reckon it's a lot stronger now though the silver film I'd got isn't a perfect match so it will be a permanent scar. Now I'm left wondering whether to reinforce the other side or wait for nature to take it's course.
09-18-2013, 07:17 AM
#125
Glad your repairs were able to be accomplished fairly quickly. As far as the silvers matching, I would regard it not as a permanent scar but rather as the first step in making it look "scale".
Weathering and field repairs always made the finish uneven and incongruous. Now you're sporting a true field repair!
Weathering and field repairs always made the finish uneven and incongruous. Now you're sporting a true field repair!