


Scratch built Polish Tug "Klimek"
 07-31-2013, 07:26 PM
#1

Here we go again.
This will be a build for a scratch build Klimek Tugboat. I have built several other scratch built boats and all turned out pretty good.
Now I'm wanting to build a Tug. I searched around the net and located a high res JEPG of the Klimek. I then took that copy and blew it up 265% in paint. I then took it to the local print shop and printed off three copies. One to cut up, One for the actually build and one to keep handy, never know when I may need it.
First I started out by cutting all the formers and keel out of the plans.
Using spray glue I positioned all the formers on 1/4 inch birch ply.
The keel was made from Poplar wood and is 3/8 inch thick.
After all the formers and keel were cut I started laying it all out adjusting the slots as I went along so that everything fit the way I think it should.
The keel was drilled for the stuffing box and the rudder post.
Then everything was tacked glued in place.
Two 1/4 square balsa sticks were used for the tops on the formers inside and out.
A top deck was cut but won't be attached until the hull is planked and the inside glassed.
All this took about 5 hours and $20 dollars for wood so far.
Deciding what material to plank the hull with and leaning towards 1/8x1/4 balsa.
That's all for now. I'll post as many pictures as I can along the way.
Almost forgot. At the scale I'm using it worked out to be 1/20 scale with a hull length of 32 inches.

The following users liked this post:
xingchuiyu (02-23-2020)
07-31-2013, 07:37 PM
#4
I have finally found a couple of photos of the Tug.(See Above) Same as I'm building but with a different name.
There is also a bunch of other photos of a model going together.
here is the website if anybody is interested.
https://plus.google.com/photos/11003...CPfogdzNxJ6JGw
There is also a bunch of other photos of a model going together.
here is the website if anybody is interested.
https://plus.google.com/photos/11003...CPfogdzNxJ6JGw
08-01-2013, 07:25 AM
#5

My Feedback: (5)
Wayne,
Glad to see you are back building again, have missed you. Surprised you are not building sister tug for your daughter?
I looked at the website you suggested, interesting build photos besides then photos of the real boat. Plenty of subject matter there to help/guide you on your build. All the detail you might want.
Your build looks really nice so far; I'll be following it as you go along.
Bob
08-01-2013, 09:49 AM
#6

I am so glad you are posting this ! I admit my dedication to finishing my boat project has been weak lately ! But I always like seeing pictures of other peoples projects..
08-06-2013, 09:54 PM
#9
Lets see if I can get caught up here.
The hull has been planked.

Didn't have a picture of it completely planked.
Once the hull was planked and sanded I put my first mate to work.
First we took spackle and covered the entire hull.
Then she, for the most part sanded it all off.

Until we ended up with a nice smooth hull.
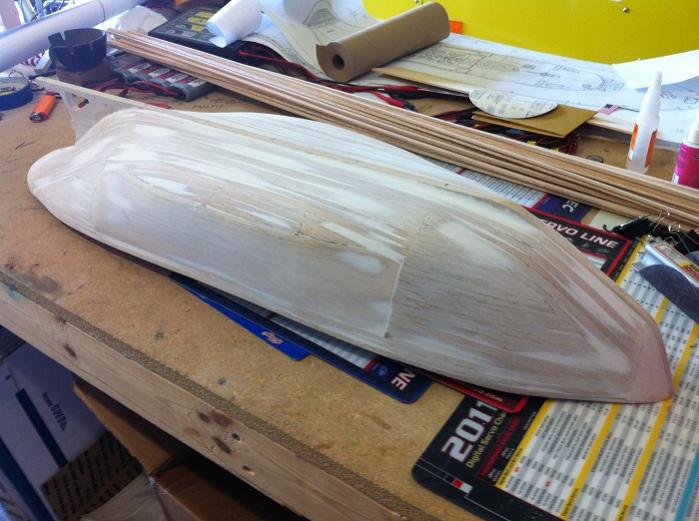

And today I glassed it using 1.5 oz cloth and epoxy resin from US Composites.


So now we are caught up. I'll let it sit for a day or two to fully cure and then glass the keel.
The hull has been planked.
Didn't have a picture of it completely planked.
Once the hull was planked and sanded I put my first mate to work.
First we took spackle and covered the entire hull.
Then she, for the most part sanded it all off.
Until we ended up with a nice smooth hull.
And today I glassed it using 1.5 oz cloth and epoxy resin from US Composites.
So now we are caught up. I'll let it sit for a day or two to fully cure and then glass the keel.
Last edited by wayne d; 08-06-2013 at 09:59 PM.
08-07-2013, 04:00 AM
#10
Senior Member
My Feedback: (2)
Join Date: Sep 2004
Location: Montgomery, AL AL
Posts: 285
Likes: 0
Received 0 Likes
on
0 Posts
As a boat-building eewbie, I am impressed and look forward to following your progress; I learn so much from following the build threads. I've built and flown rc airplane kits since I retired. The limited work area in my storeroom/shop has been my excuse for sticking to ARF's rather than stick-builts. So far, I've built two boat kits. First was a single planked canoe which demonstrated the results of impatience.. Now I've completed a double-planked 1930 Dodge split-cockpit runabout kit which turned out much better and significantly expanded my knowledge. Both efforts have contributed to my envy of your first mate; my oldest grandson is into computers and my twin grandsons are at the age they want to "play" with the finished product, at least for a while. My next project will be a sailboat which will, eventually, teach me how to sail 
Please keep up the good work and I'll just watch over your shoulder and try to stay out of the way.
Jack
Please keep up the good work and I'll just watch over your shoulder and try to stay out of the way.
Jack
 08-13-2013, 06:44 AM
#14
My Feedback: (5)
Good Morning Wayne,
This is the second try first being about two hours+ ago. Was going along fine until I tried to use a 'Smiley', then it froze up! Any way, I was saying I do notice some improvements on the site but they still need work.
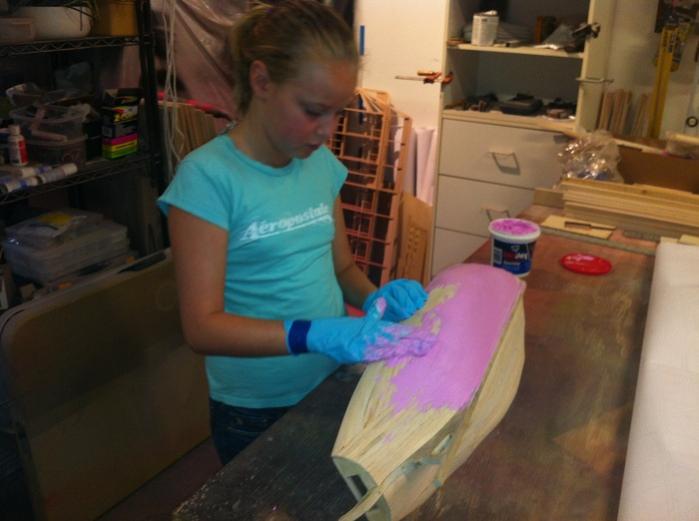
Was that a "new" Lobster Boat I saw in the corner of one of the pictures? It appeared Pink. The ones I know you have are Blue, "Linda 'J'" and Yellow, "Capt Morgan". Maybe it's just a re-paint on 'Linda J.' since I didn't see any name on the stern?
I'll be watching the rest of your build with extreme interest. The only tug I have is the RTR Atlantic Tug. It's nice but not the same as building one.
I'm currently working on getting a Dumas Dauntless into the water. She weights almost 25 pounds and the pond where I will be running her has a relatively steep bank so now I'm working on a trailer to both launch and retrieve her. Another Dauntless owner built one a couple years ago so mine's modeled after his with a few personal modifications. Haven't posted any of the pics yet but will be doing so when I'm closer to the end of construction.
Bob
This is the second try first being about two hours+ ago. Was going along fine until I tried to use a 'Smiley', then it froze up! Any way, I was saying I do notice some improvements on the site but they still need work.
Was that a "new" Lobster Boat I saw in the corner of one of the pictures? It appeared Pink. The ones I know you have are Blue, "Linda 'J'" and Yellow, "Capt Morgan". Maybe it's just a re-paint on 'Linda J.' since I didn't see any name on the stern?
I'll be watching the rest of your build with extreme interest. The only tug I have is the RTR Atlantic Tug. It's nice but not the same as building one.
I'm currently working on getting a Dumas Dauntless into the water. She weights almost 25 pounds and the pond where I will be running her has a relatively steep bank so now I'm working on a trailer to both launch and retrieve her. Another Dauntless owner built one a couple years ago so mine's modeled after his with a few personal modifications. Haven't posted any of the pics yet but will be doing so when I'm closer to the end of construction.
Bob
08-13-2013, 07:27 AM
#15
Hey Bob
the motor gave up in my daughters blue boat. Not sure why but its gone. While I had the boat apart to replace it my daughter tells me that she no longer likes the blue. Imagine that!
so I ask her what color would you like. She said pink. I said PINK! Are you kidding? No kidding on her part, so off to the paint shop is goes.
Thats my story and I'm sticking to it.
08-13-2013, 10:30 AM
#17
Got the hull all primed and feel pretty good about it.

Also finished glassing the inside, so its as waterproof as I can make it.

Now here is the thing that's been bugging me. The rudder. I like to have it serviceable. In other words, I want to be able to remove it before painting and not build it in place so I have to work around it. So I modified the Keel just a little.
Not exactly scale, but I'm good with it.

Also finished glassing the inside, so its as waterproof as I can make it.
Now here is the thing that's been bugging me. The rudder. I like to have it serviceable. In other words, I want to be able to remove it before painting and not build it in place so I have to work around it. So I modified the Keel just a little.
Not exactly scale, but I'm good with it.
08-13-2013, 02:32 PM
#19
My Feedback: (5)
Wayne,
Wish I'd known about your concern over the rudder. Attached, I hope, is another way to do just what you want, a removable rudder, but you could have used the existing keel frame. When (if) you receive this, make reference to point number "34. Make the rudder post . . .". Keep this on file for future reference.
Bob
Well, no luck on file attachment. Max file size is 19.5K and the .doc file is 2 Meg! I doubt seriously if it can be zipped to 19K. Bummer.
08-14-2013, 06:12 PM
#24

You can buy premade half-round material or make it from the appropriate sized dowelling yourself. I'll have to do some checking into sources on where to buy premade from as it's been a while since I looked for some