


Modkat (Kingcat like design and build)
 12-03-2006, 10:34 PM
#176
Senior Member
Thread Starter
My Feedback: (1)

Join Date: Jun 2005
Location: Antelope Valley,
CA
Posts: 825
Likes: 0
Received 0 Likes
on
0 Posts
ORIGINAL: coolitdown40
Thanks, that helps a lot and it looks like I've got some research to do hehe. Does the fiberglass add any strength or more weight than monokote?
Thanks, that helps a lot and it looks like I've got some research to do hehe. Does the fiberglass add any strength or more weight than monokote?
Fiberglass & Paint
Pros
1. Long lasting finish
2. Will not sag with time & lasts as long as the airplane does
3. Adds more durability to paint job
Cons
1. Adds more weight than shrink covering (the amount depends greatly on the experience of the modeler)
2. Requires a bit of practice to get desired results
Monokote (shrink wrap)
Pros
1. Easy to apply
2. Adds minimal weight to aircraft
3. Easy to repair
Cons
1. Sags and requires reheating
2. May/will come off eventually
 12-03-2006, 11:18 PM
#177
Junior Member
Join Date: Oct 2006
Location: , TX
Posts: 23
Likes: 0
Received 0 Likes
on
0 Posts
I kept fogetting to mention this about cornering the market but here it is. There has been anouther kit like this one on the market for a little bit.
http://www.avia-richmodel.com/englis...iew.asp?ID=771
http://www.avia-richmodel.com/englis...iew.asp?ID=771
12-03-2006, 11:30 PM
#178

ORIGINAL: Mods-R-Me
This is an ongoing debate between modelers. I'll give you the "Mods" point of view on the subject.
ORIGINAL: coolitdown40
Thanks, that helps a lot and it looks like I've got some research to do hehe. Does the fiberglass add any strength or more weight than monokote?
Thanks, that helps a lot and it looks like I've got some research to do hehe. Does the fiberglass add any strength or more weight than monokote?
I will add a third option (in the interest of mass confusion
 ) - Sig Koverall and paint/dope. It is a polyester fabric that you apply with dope or Balsarite adhesive and is sealed with dope, then painted. It heat shrinks beautifully and does not sag or wrinkle - EVER. If you are willing to paint, it is an excellent option. Finished weight is about the same to 10% more than film if you are careful, it is far tougher than film (but not as tough as 'glass) and very easy to work with. If you have only applied film before, you will be amazed at how nice the Koverall goes on.
Mark
12-03-2006, 11:36 PM
#179
Senior Member
Thread Starter
My Feedback: (1)
Join Date: Jun 2005
Location: Antelope Valley,
CA
Posts: 825
Likes: 0
Received 0 Likes
on
0 Posts
ORIGINAL: coolitdown40
I kept fogetting to mention this about cornering the market but here it is. There has been anouther kit like this one on the market for a little bit.
http://www.avia-richmodel.com/englis...iew.asp?ID=771
I kept fogetting to mention this about cornering the market but here it is. There has been anouther kit like this one on the market for a little bit.
http://www.avia-richmodel.com/englis...iew.asp?ID=771
I agree with Mods views, but I would say that the fiberglass adds significantly to the durability of the model and makes it much more hangar rash resistant in my experience. And MK WILL come off, it's mostly a matter of time...
I will add a third option (in the interest of mass confusion ) - Sig Koverall and paint/dope. It is a polyester fabric that you apply with dope or Balsarite adhesive and is sealed with dope, then painted. It heat shrinks beautifully and does not sag or wrinkle - EVER. If you are willing to paint, it is an excellent option. Finished weight is about the same to 10% more than film if you are careful, it is far tougher than film (but not as tough as 'glass) and very easy to work with. If you have only applied film before, you will be amazed at how nice the Koverall goes on.
I will add a third option (in the interest of mass confusion ) - Sig Koverall and paint/dope. It is a polyester fabric that you apply with dope or Balsarite adhesive and is sealed with dope, then painted. It heat shrinks beautifully and does not sag or wrinkle - EVER. If you are willing to paint, it is an excellent option. Finished weight is about the same to 10% more than film if you are careful, it is far tougher than film (but not as tough as 'glass) and very easy to work with. If you have only applied film before, you will be amazed at how nice the Koverall goes on.
12-06-2006, 12:47 AM
#181
Senior Member
Thread Starter
My Feedback: (1)
Join Date: Jun 2005
Location: Antelope Valley,
CA
Posts: 825
Likes: 0
Received 0 Likes
on
0 Posts
The build has slowed down a bit due to me constructing the fuse plug, wing, and tail booms simultaneously. I usually update at least once on the weekends but the Modkat is a point where all the components are dependant on each other causing me to multi-task.
__________________________________________________ _____________________________________________
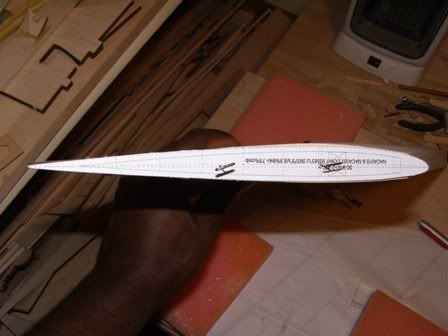
Fuse Plug 4
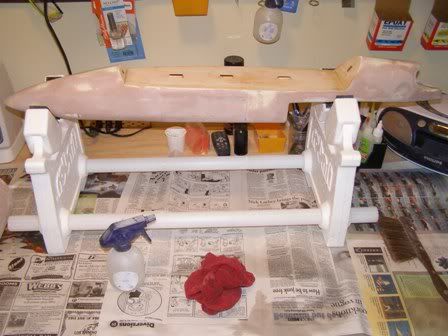
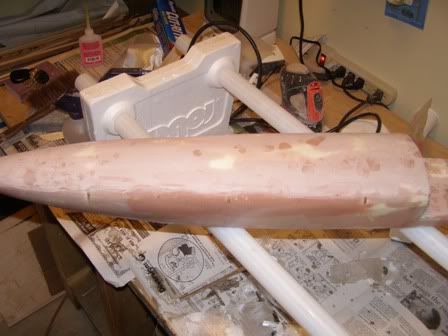
I'm done sanding [sm=shades_smile.gif] (figure 1)! The fuse is not perfect, but it's good enough to fiberglass. To really fine tune the plug, it must be coated with primer to see all the hi/low spots and divots. Then, fill & sand, fill & sand, fill & sand all over again [sm=drowning.gif]. I will admit that the toughest part of the plug was to get the tail end symmetrical (figure 2). The color difference between the white spackle and grey primer kept playing tricks on my mind or maybe I was going crazy for all the effort, take your pick [sm=bananahead.gif].
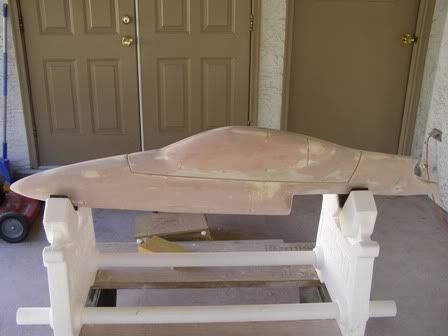
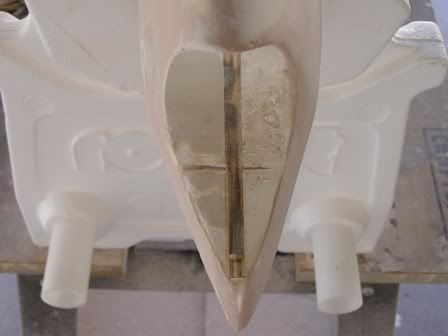
Figures 1 & 2
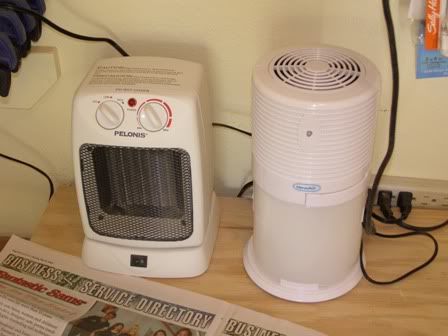
I knew it was time to glass because the Bondo cracked along the edges every time the plug was repositioned. To combat this I beveled all the seams with a sanding block (figure 3). The edges will be built up using a hard mixture of tooling resin after the plug is glassed. This way the seams will be almost as hard as the plug. When fiber glassing, the most important consideration is weather. Epoxy needs to be at 70 degrees and above to cure properly. Also, the humidity needs to be as low as possible (~50% and below). To get a real time reading of the weather, I went to Lowes and purchased a thermometer/humidity gauge for $12 (figure 4). As you can see from the readings, this is not the best day for fiber glassing.
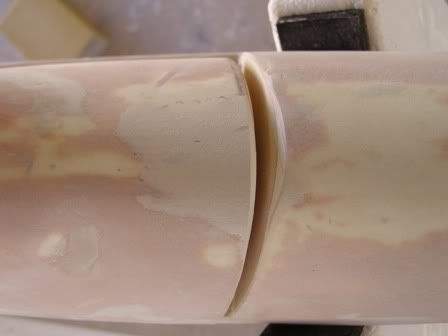

Figures 3 & 4
Solution? A space heater and dehumidifier (figure 5). These units do not need to be very big since I work in a very small area. I got the temp up to 75 degrees and the humidity down to 30% after a few hours- TIME FOR GLASSING! First, I wiped down the plug with alcohol to remove all contaminates (figure 6).
Figures 5 & 6
Next, I covered the top of plug in one layer of 5oz fiberglass cloth (figures 7 & 8). After it became tacky, I flipped the plug over and feathered the edges with an 80 grit sanding block (figure 9). Then, the bottom was glassed (figure 10). I stopped this process here because the wing needs to be completed before the plug sanding begins. There is a large fairing between the fuse and wing. I plan on molding the bottom of the fuse with epoxy and filler to achieve a gapless wing saddle area. This is much easier to do once the wing is sheeted.
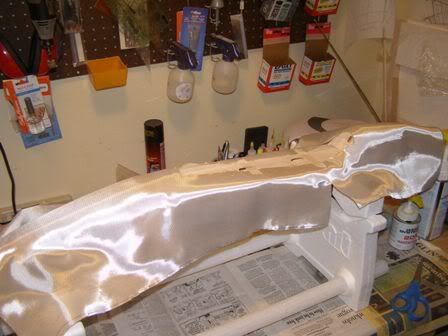
Figures 7 & 8

Figures 9 & 10
Wing Construction 2
The outer wing construction is pretty straight forward (figures 1 & 2). One thing that will be instituted in the production model is a self aligning leading edge (LE)/trailing edge (TE). The ribs will slide into notches cut into the LE and TE. This will negate the need to a bunch of "T" pins and 90 degree squares. I guess I forgot to put in that feature while my rushing to get a plane in the air . I did find that the hinge point holes were right on though [sm=thumbs_up.gif] (figure 3).
Figures 1 & 2
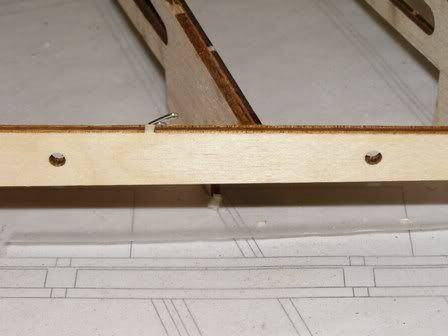
Figure 3
What’s Next?
1. Finish left wing panel
2. Install final fuse details
More to come,
Mods
__________________________________________________ _____________________________________________
Fuse Plug 4
I'm done sanding [sm=shades_smile.gif] (figure 1)! The fuse is not perfect, but it's good enough to fiberglass. To really fine tune the plug, it must be coated with primer to see all the hi/low spots and divots. Then, fill & sand, fill & sand, fill & sand all over again [sm=drowning.gif]. I will admit that the toughest part of the plug was to get the tail end symmetrical (figure 2). The color difference between the white spackle and grey primer kept playing tricks on my mind or maybe I was going crazy for all the effort, take your pick [sm=bananahead.gif].
Figures 1 & 2
I knew it was time to glass because the Bondo cracked along the edges every time the plug was repositioned. To combat this I beveled all the seams with a sanding block (figure 3). The edges will be built up using a hard mixture of tooling resin after the plug is glassed. This way the seams will be almost as hard as the plug. When fiber glassing, the most important consideration is weather. Epoxy needs to be at 70 degrees and above to cure properly. Also, the humidity needs to be as low as possible (~50% and below). To get a real time reading of the weather, I went to Lowes and purchased a thermometer/humidity gauge for $12 (figure 4). As you can see from the readings, this is not the best day for fiber glassing.
Figures 3 & 4
Solution? A space heater and dehumidifier (figure 5). These units do not need to be very big since I work in a very small area. I got the temp up to 75 degrees and the humidity down to 30% after a few hours- TIME FOR GLASSING! First, I wiped down the plug with alcohol to remove all contaminates (figure 6).
Figures 5 & 6
Next, I covered the top of plug in one layer of 5oz fiberglass cloth (figures 7 & 8). After it became tacky, I flipped the plug over and feathered the edges with an 80 grit sanding block (figure 9). Then, the bottom was glassed (figure 10). I stopped this process here because the wing needs to be completed before the plug sanding begins. There is a large fairing between the fuse and wing. I plan on molding the bottom of the fuse with epoxy and filler to achieve a gapless wing saddle area. This is much easier to do once the wing is sheeted.
Figures 7 & 8
Figures 9 & 10
Wing Construction 2
The outer wing construction is pretty straight forward (figures 1 & 2). One thing that will be instituted in the production model is a self aligning leading edge (LE)/trailing edge (TE). The ribs will slide into notches cut into the LE and TE. This will negate the need to a bunch of "T" pins and 90 degree squares. I guess I forgot to put in that feature while my rushing to get a plane in the air
. I did find that the hinge point holes were right on though [sm=thumbs_up.gif] (figure 3).Figures 1 & 2
Figure 3
What’s Next?
1. Finish left wing panel
2. Install final fuse details
More to come,
Mods
12-08-2006, 01:29 PM
#182
Member
Join Date: May 2003
Location: White Rock,
NM
Posts: 35
Likes: 0
Received 0 Likes
on
0 Posts
I love me some good fiberglassing action. Just checking in. New job is keeping me pretty occupied and all. Very nice so far Mods. [sm=thumbup.gif]
Just checking in. New job is keeping me pretty occupied and all. Very nice so far Mods. [sm=thumbup.gif]
12-08-2006, 05:31 PM
#183
Senior Member
Join Date: May 2006
Location: , UNITED KINGDOM
Posts: 242
Likes: 0
Received 0 Likes
on
0 Posts
Does any one have any info on wing design as I want to design my own plane but have got to the wing root and do not have a clue on what size I should make it is there a guide some where to get more info
12-11-2006, 12:15 AM
#184
Senior Member
Thread Starter
My Feedback: (1)
Join Date: Jun 2005
Location: Antelope Valley,
CA
Posts: 825
Likes: 0
Received 0 Likes
on
0 Posts
ORIGINAL: speed lover
Does any one have any info on wing design as I want to design my own plane but have got to the wing root and do not have a clue on what size I should make it is there a guide some where to get more info
Does any one have any info on wing design as I want to design my own plane but have got to the wing root and do not have a clue on what size I should make it is there a guide some where to get more info
Try: [link=http://www.airfieldmodels.com/information_source/index.htm]www.airfieldmodels.com[/link] or [link=http://webpages.charter.net/rcfu/HelpsHints/ModDgn.html]A qiuck "cliff notes" look at rc design[/link]
I highly recommend airfieldmodels. A large chunk of my r/c knowledge was gained from there.
__________________________________________________ _____________________________________________
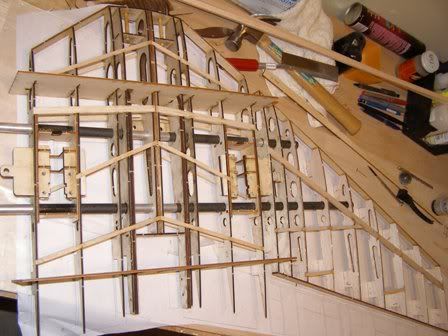
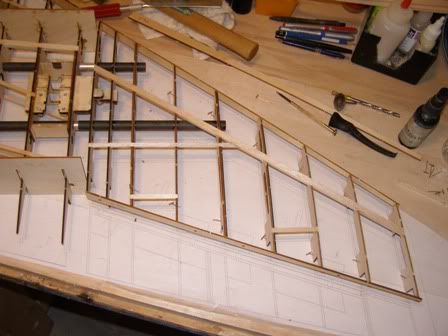
Wing Construction 3
Summary
The holidays have been busy. This is the first real shop day I've had all week, but it was productive. The other wing is nearly complete. Starting to see daylight.
Construction
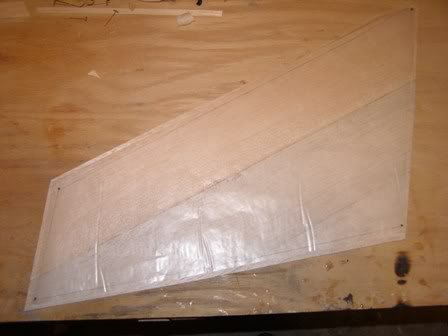
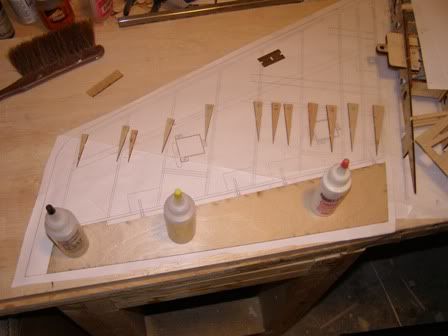
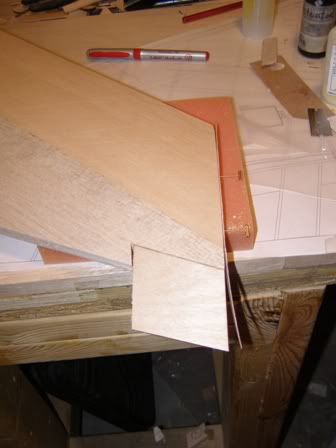
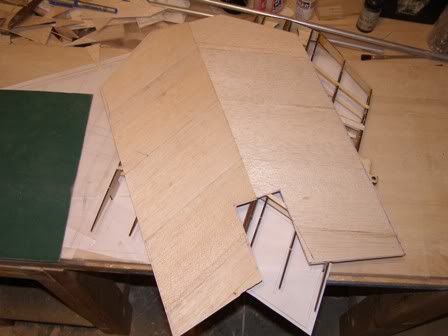
The other wing is framed and ready for sheeting (figure 1). The production model will have the wing sheeting pre-cut so I made a template to trace and load the dimensions into CAD using wax paper (figure 2).
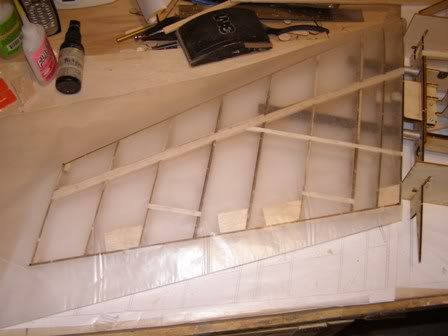
Figures 1 & 2
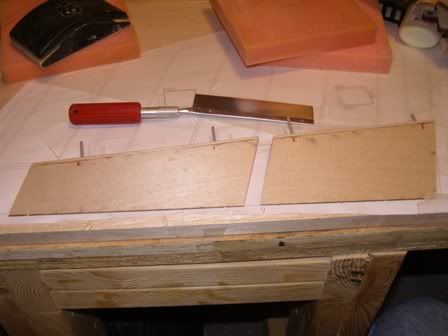
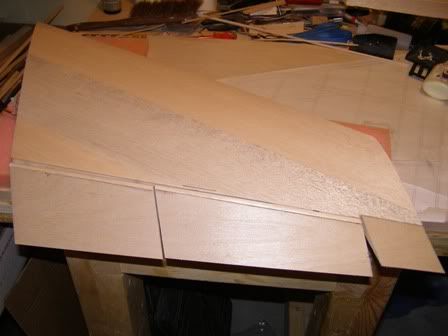
Next, I joined three pieces of 3/32 balsa to match the approximate dimensions of the template and cut out the basic shape (figures 3 & 4). For a step by step tutorial on this process [link=http://www.airfieldmodels.com/information_source/how_to_articles_for_model_builders/construction/edge_join_balsa_sheet_skins/index.htm]CLICK HERE[/link].
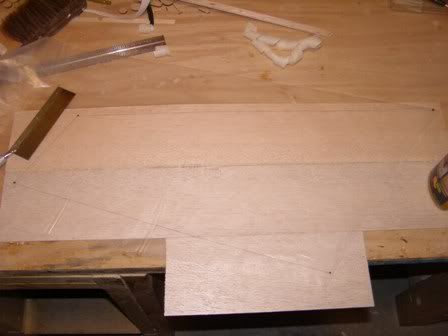
Figures 3 & 4
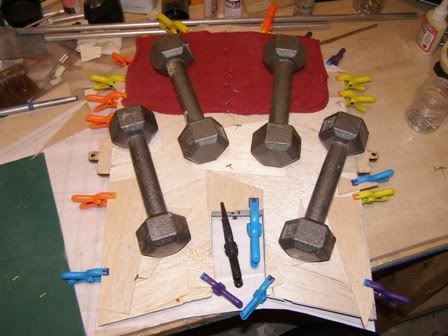
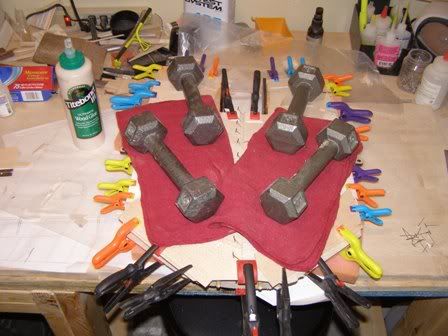
To attach the sheeting to the wing I used Titebond Alphatic Resin (figure 5). The sheeting is then held in place with clamps and weights until the glue cures (figure 6). In the past I used CA but it does not give enough time to adjust the sheeting for the best fit. The alphatic resin gives you at least 30 min until it sets and creates a very strong bond.
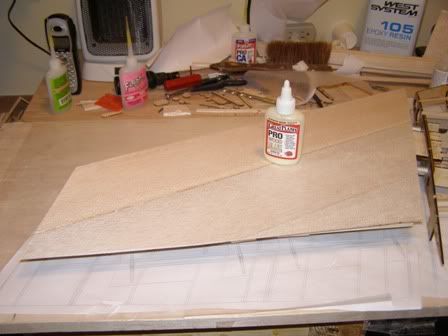
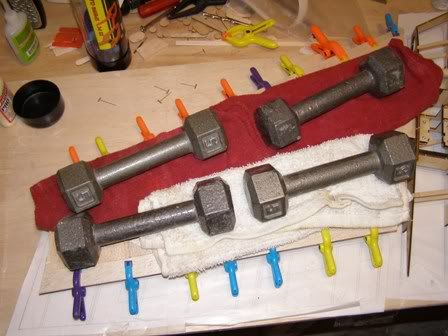
Figures 5 & 6
What's Next?
1. Finish sheeting the wings
2. Attach the wing leading edge
3. Blend the fuse plug with the wing.
More to come,
Mods
12-13-2006, 01:54 PM
#185
Senior Member
Join Date: May 2006
Location: , UNITED KINGDOM
Posts: 242
Likes: 0
Received 0 Likes
on
0 Posts
Cheers got all the info I need I seen the engine and wing area chart and I was planning to put in an engine that was twice the size it should be according to the chart. But the wing loading would work out good at 21oz/ft for a 49" span at 4lbs the engine would be a .46 Irvine just wondering if you could give me your thoughts about this.
12-14-2006, 12:57 AM
#186
Senior Member
Thread Starter
My Feedback: (1)
Join Date: Jun 2005
Location: Antelope Valley,
CA
Posts: 825
Likes: 0
Received 0 Likes
on
0 Posts
ORIGINAL: speed lover
Cheers got all the info I need I seen the engine and wing area chart and I was planning to put in an engine that was twice the size it should be according to the chart. But the wing loading would work out good at 21oz/ft for a 49" span at 4lbs the engine would be a .46 Irvine just wondering if you could give me your thoughts about this.
Cheers got all the info I need I seen the engine and wing area chart and I was planning to put in an engine that was twice the size it should be according to the chart. But the wing loading would work out good at 21oz/ft for a 49" span at 4lbs the engine would be a .46 Irvine just wondering if you could give me your thoughts about this.
__________________________________________________ __________________________________________________ ____
Wing Construction 4
Summary
Wings Done! There is one low point it in the wing tip sheeting where the build tab didn't come off cleanly, but this is easily repairable.
Construction
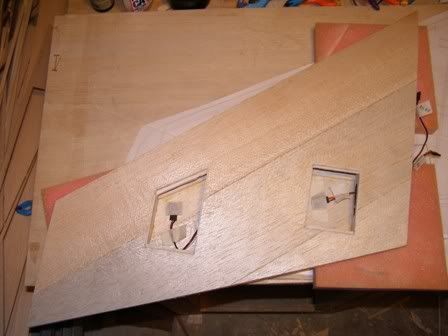
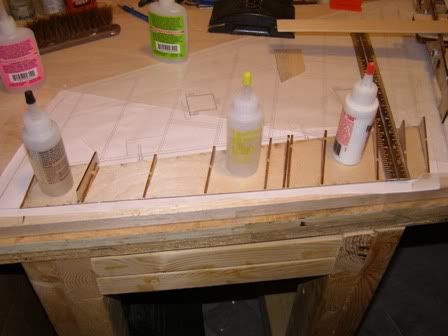
First, I removed the build tabs and routed the servo extension wires through the lightening holes in the wing ribs (figure 1). To keep track of what goes where I labeled th eends of each servo extention (figure 2). This makes putting the plane together and connecting all the electronics at the field much easier.
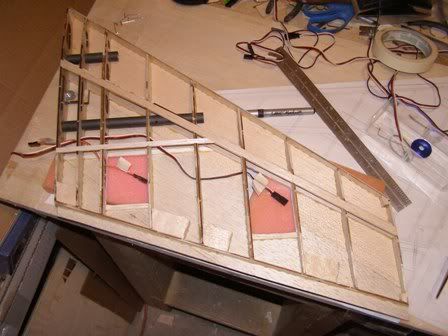
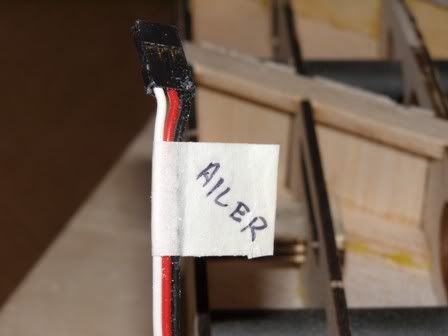
Figures 1 & 2
Second, I constructed the sheeting for the wing top using the same methods demonstrated in the above posts and glued it to the wing ribs using Aliphatic Resin (figures 3 & 4).
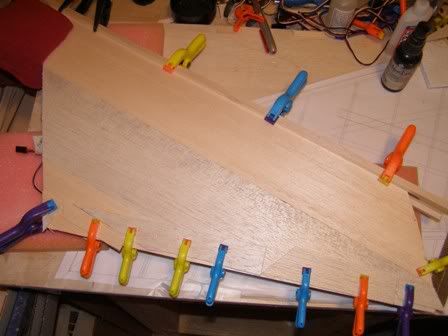
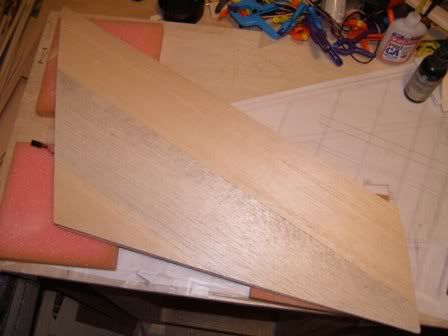
Figures 3 & 4
Third, the servo hatches were blended in with the wing sheeting using 60 grit sand paper and the servo heads were taped to the wing sheeting to keep them from damaging the finish (figures 5 & 6).
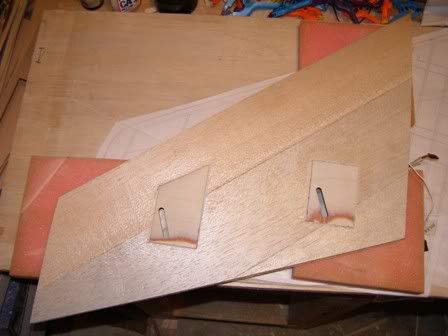
Figures 5 & 6
Lastly, here are shots of the wing root anf wing tip ribs. You can clearly see how the root is fully symetrical and the tip is semi-symetrical. Looks like all that CAD-ing paid off [sm=shades_smile.gif].

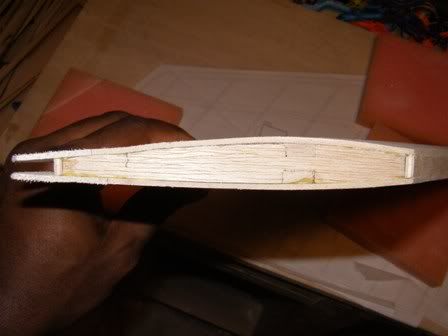
Figures 7 & 8
More to come,
Mods
12-17-2006, 02:37 AM
#187
Senior Member
Thread Starter
My Feedback: (1)
Join Date: Jun 2005
Location: Antelope Valley,
CA
Posts: 825
Likes: 0
Received 0 Likes
on
0 Posts
Wing Construction 5
Summary
I decided to work on the wing trailing edge and see if the "hidden hinge" technique was do-able. It is possible, but takes a little patience and careful attention to detail. I started a new thread over in the tips and techniques section demonstrating how to install hidden hinges on any wing. Check it out if you want to see how to do it: [link=http://www.rcuniverse.com/forum/m_5125610/anchors_5125610/mpage_1/key_/anchor/tm.htm#5125610]Hidden Hinges Made Easy Thread[/link].
Construction
Since the wing was 90% complete, I decided to build the control surfaces and leading edge. The laser cut 1/32" ply control surface sheeting was held down with weights while the ribs were glued in with CA (figures 1 & 2).
Figures 1 & 2
Second, the control surfaces were separated with scrap 1/16" ply spacers (figure 3). Then, the hinge blocks and leading edge caps were installed and the entire assembly was beveled with a 60 grit sanding block (figure 4). After this the laser cut control surface top was glued on with Aliphatic Resin and held down with weights.
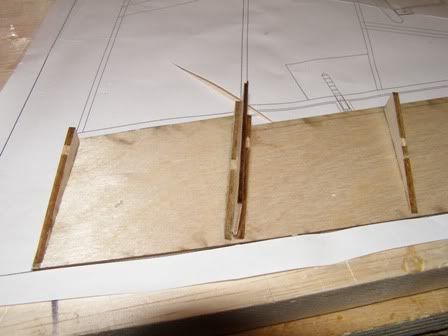
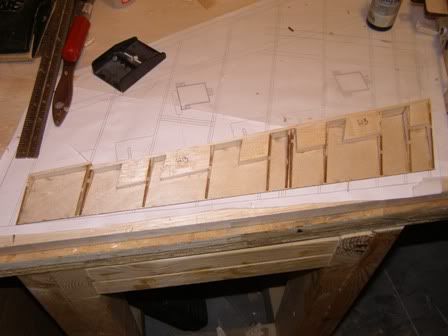
Figures 3 & 4
Third, the wing tip was carefully separated from the control surface assembly with a razor saw and attached to the wing trailing edge using a template generated from Soldiworks (figures 5 & 6). The production plans will have quite a few templates like this to aid in shaping. I found them to be very useful and easy to attach to any surface using 3M Super Spray Adhesive.
Figures 5 & 6
Fourth, the control surface leading edge was attached and sanded to shape (figure 7). Then, the hinge points were installed in the laser cut holes (figure 8).


Figures 7 & 8
Lastly, the flap and aileron were separated using a razor saw and test fit to the wing (figures 9 & 10). Finally, the wing leading edge was attached and sanded to shape using a razor plane.
Figures 9 & 10
Completed Wing
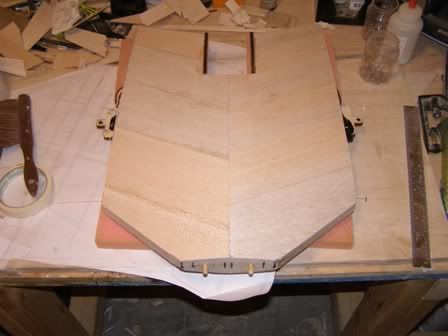
Now that the wing is complete, it's time to sheet the wing center. I used the same technique to sheet the center as I did to sheet the wing (figures 11 & 12).
Figures 11 & 12
What's Next?
1. Route the servo extensions through the center. May dry install the retracts now or wait until the fuse is done.
2. Sheet the top of wing center
3. Fit the fuse plug to the wing
More to come,
Mods
Summary
I decided to work on the wing trailing edge and see if the "hidden hinge" technique was do-able. It is possible, but takes a little patience and careful attention to detail. I started a new thread over in the tips and techniques section demonstrating how to install hidden hinges on any wing. Check it out if you want to see how to do it: [link=http://www.rcuniverse.com/forum/m_5125610/anchors_5125610/mpage_1/key_/anchor/tm.htm#5125610]Hidden Hinges Made Easy Thread[/link].
Construction
Since the wing was 90% complete, I decided to build the control surfaces and leading edge. The laser cut 1/32" ply control surface sheeting was held down with weights while the ribs were glued in with CA (figures 1 & 2).
Figures 1 & 2
Second, the control surfaces were separated with scrap 1/16" ply spacers (figure 3). Then, the hinge blocks and leading edge caps were installed and the entire assembly was beveled with a 60 grit sanding block (figure 4). After this the laser cut control surface top was glued on with Aliphatic Resin and held down with weights.
Figures 3 & 4
Third, the wing tip was carefully separated from the control surface assembly with a razor saw and attached to the wing trailing edge using a template generated from Soldiworks (figures 5 & 6). The production plans will have quite a few templates like this to aid in shaping. I found them to be very useful and easy to attach to any surface using 3M Super Spray Adhesive.
Figures 5 & 6
Fourth, the control surface leading edge was attached and sanded to shape (figure 7). Then, the hinge points were installed in the laser cut holes (figure 8).
Figures 7 & 8
Lastly, the flap and aileron were separated using a razor saw and test fit to the wing (figures 9 & 10). Finally, the wing leading edge was attached and sanded to shape using a razor plane.
Figures 9 & 10
Completed Wing
Now that the wing is complete, it's time to sheet the wing center. I used the same technique to sheet the center as I did to sheet the wing (figures 11 & 12).
Figures 11 & 12
What's Next?
1. Route the servo extensions through the center. May dry install the retracts now or wait until the fuse is done.
2. Sheet the top of wing center
3. Fit the fuse plug to the wing
More to come,
Mods
12-17-2006, 06:25 AM
#188

My Feedback: (27)
Join Date: Mar 2004
Location: Port Washington,
WI
Posts: 1,251
Likes: 0
Received 0 Likes
on
0 Posts
Mods,
All I can say to this point is "PHENOMINAL!!!!"
I'm not sure how likely it will be that I venture into this type of aircraft - or even kit design, but I have learned more than I thought possible from follwing this thread. The level of craftsmanship and attention to detail is simply awe-inspiring and should be beneficial to any modeler. And I can see that when you get the prototype finished, you won't even have to worry about an assembly manual - you will already have one of the best ever produced residing right here on RCU! I'm certain you have a real winner in the Modkat.
12-17-2006, 11:12 AM
#189
Senior Member
Thread Starter
My Feedback: (1)
Join Date: Jun 2005
Location: Antelope Valley,
CA
Posts: 825
Likes: 0
Received 0 Likes
on
0 Posts
ORIGINAL: krossk
Mods,
I can see that when you get the prototype finished, you won't even have to worry about an assembly manual - you will already have one of the best ever produced residing right here on RCU!
Mods,
I can see that when you get the prototype finished, you won't even have to worry about an assembly manual - you will already have one of the best ever produced residing right here on RCU!
I have learned more than I thought possible from following this thread
. Wait until I get to the plugs [&:].Mods
12-18-2006, 01:01 AM
#190
Senior Member
Thread Starter
My Feedback: (1)
Join Date: Jun 2005
Location: Antelope Valley,
CA
Posts: 825
Likes: 0
Received 0 Likes
on
0 Posts
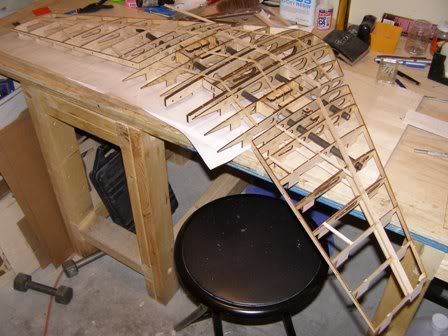
Wing Construction 6
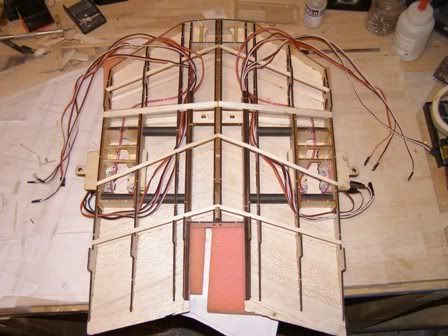
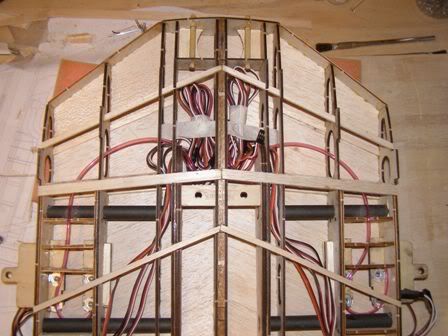
Another fulfilling shop day has come to a close with the completion of the wing center. I just realized that it will take (8) 36" servo extensions to link up all the control surfaces and all these wires run through the wing center [X(].
Construction
First, I ran all the servo extension wires through the fuse and secured them in place until the top sheeting is installed (figures 1 & 2).
Figures 1 & 2
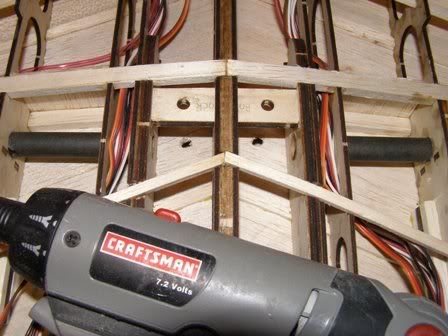
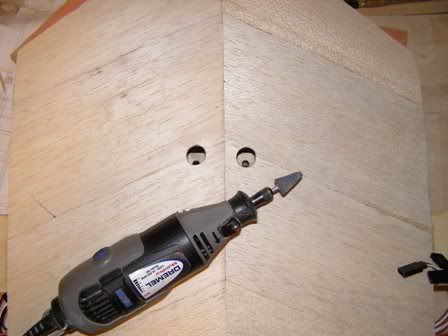
Second, the wing bolt pilot holes were drilled into the bottom sheeting (figure 3). My biggest problem with drilling through balsa is that it never leaves a clean hole. This can be countered by finishing the hole with a conical head grinding stone Dremel attachment (figure 4). It leaves the cleanest holes I've ever seen in balsa with minimal effort.
Figures 3 & 4
Third, the top sheeting was applied using the technique in the above posts (figures 5 & 6).
Figures 5 & 6
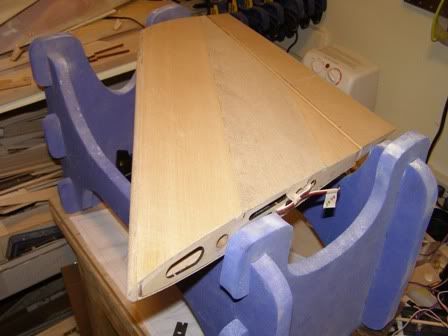
Fourth, the leading edge was attached and shaped using CAD derived templates (figure 7). I'm so loving the templates. Takes out all the guesswork and makes it so easy to achieve the perfect shape LE. Don't know why I didn't start using them sooner [sm=confused.gif]. Shot of the finished wing center (figure 8).
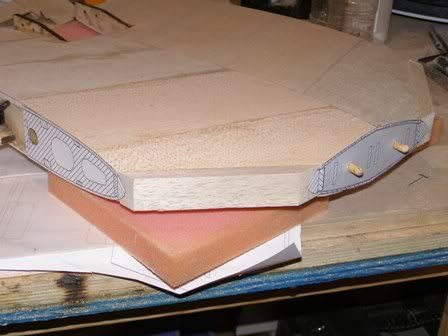
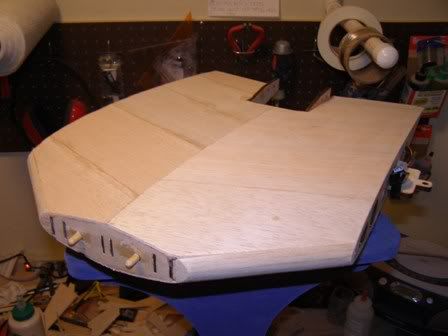
Figures 7 & 8
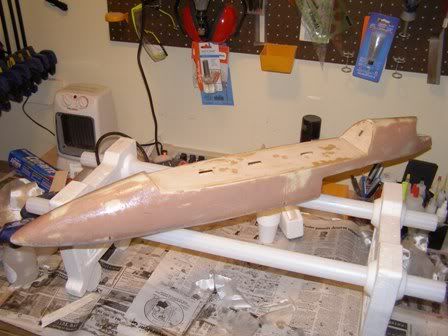
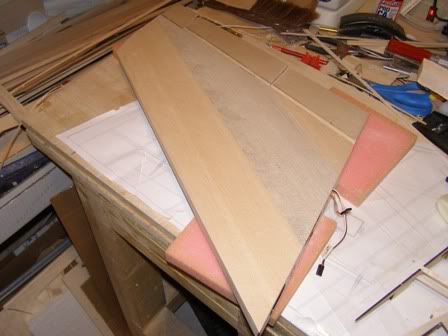
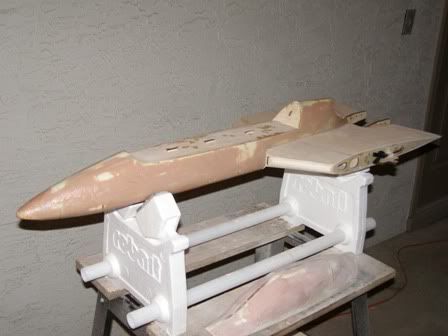
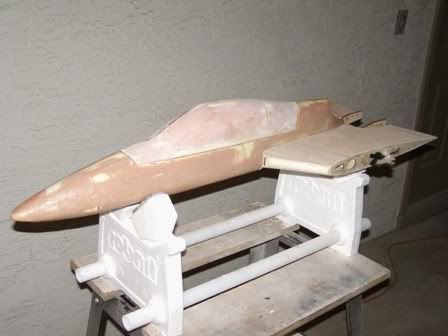
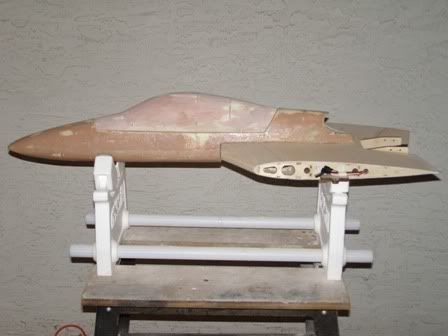
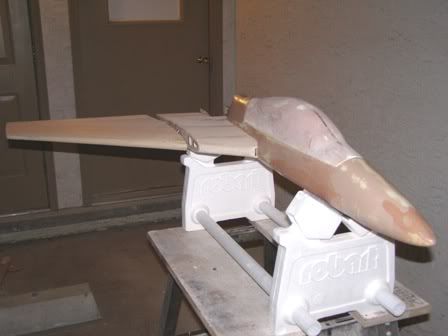
Just for grinsI had to fit the plug up to the wing center and get some shots. Starting to look like an airplane!
What's Next?
1. Finish the other wing
2. Finish the fuse plug
More to come,
Mods
Another fulfilling shop day has come to a close with the completion of the wing center. I just realized that it will take (8) 36" servo extensions to link up all the control surfaces and all these wires run through the wing center [X(].
Construction
First, I ran all the servo extension wires through the fuse and secured them in place until the top sheeting is installed (figures 1 & 2).
Figures 1 & 2
Second, the wing bolt pilot holes were drilled into the bottom sheeting (figure 3). My biggest problem with drilling through balsa is that it never leaves a clean hole. This can be countered by finishing the hole with a conical head grinding stone Dremel attachment (figure 4). It leaves the cleanest holes I've ever seen in balsa with minimal effort.
Figures 3 & 4
Third, the top sheeting was applied using the technique in the above posts (figures 5 & 6).
Figures 5 & 6
Fourth, the leading edge was attached and shaped using CAD derived templates (figure 7). I'm so loving the templates. Takes out all the guesswork and makes it so easy to achieve the perfect shape LE. Don't know why I didn't start using them sooner [sm=confused.gif]. Shot of the finished wing center (figure 8).
Figures 7 & 8
Just for grins
I had to fit the plug up to the wing center and get some shots. Starting to look like an airplane!What's Next?
1. Finish the other wing
2. Finish the fuse plug
More to come,
Mods
12-18-2006, 01:25 AM
#191
Junior Member
Join Date: Oct 2006
Location: , TX
Posts: 23
Likes: 0
Received 0 Likes
on
0 Posts
Mods,
I'm trying to put a list together of parts needed for this plane to buy them now and so far I've got the BSE FIRE .90L, Robart 520 Tri Gear 90 Deg Rail Mount Nose, (8) 36" servo extensions, and Hitec HS-125MG 2BB Wing Servo U. Also, how many of the flat hitec servos will be needed and will other hardware be included such as control horns, push rods, etc...?
A little off topic but I've been looking it anyone makes (not sure what they are called) rudder/elevator supports. Rods that link the elevator and rudder together. I've searched the internet but with no avail. I have a Sig Fazer and have jimmy rigged my own but it really needs more support with what I do with the plane. It’s been clocked at 70mph level flight ground speed and as it goes by you will see the rudder vibrating violently.
12-18-2006, 01:40 AM
#193
Senior Member
Thread Starter
My Feedback: (1)
Join Date: Jun 2005
Location: Antelope Valley,
CA
Posts: 825
Likes: 0
Received 0 Likes
on
0 Posts
I'll get a Modkat parts list together for you.
Oh, you're talking about flying wires [sm=idea.gif]. Used some of the kevlar type with my beater plane. Here's the link [link=http://www2.towerhobbies.com/cgi-bin/wti0001p?&I=LXFV30&P=ML]Flying wires[/link].
Hope this helps,
Mods
Oh, you're talking about flying wires [sm=idea.gif]. Used some of the kevlar type with my beater plane. Here's the link [link=http://www2.towerhobbies.com/cgi-bin/wti0001p?&I=LXFV30&P=ML]Flying wires[/link].
Hope this helps,
Mods
12-20-2006, 10:30 PM
#195
Senior Member
Thread Starter
My Feedback: (1)
Join Date: Jun 2005
Location: Antelope Valley,
CA
Posts: 825
Likes: 0
Received 0 Likes
on
0 Posts
ORIGINAL: coolitdown40
Mods,
I'm trying to put a list together of parts needed for this plane to buy them now and so far I've got the BSE FIRE .90L, Robart 520 Tri Gear 90 Deg Rail Mount Nose, (8) 36" servo extensions, and Hitec HS-125MG 2BB Wing Servo U. Also, how many of the flat hitec servos will be needed and will other hardware be included such as control horns, push rods, etc...?
Parts List
Servos
1. HS-125MG 2BB: (4)
2. GWS Micro 2BBMG (6)
3. Standard 50oz or greater servo (1)
Servo Extensions
1. 36" servo extensions (8)
2. 24" servo extensions (4*)
* This number will change once I fiber glass the boom sections
Miscellaneous
1. Control Horns* (8)
2. 4-40 Control Rods (?)
3. Flexible Throttle Control Rod (1)
4. 18oz Tetra Bubbless Tank (1)
5. Dave Brown Muffler Cradle (1)
6. Robart 1/8" hinge points (18)
* If you intend on flying beyond 90mph I recommend using the steel control horns linked on page 5.
Landing Gear
1. Robart 520 Tri Gear 90 Deg Rail Mount Nose or Spring Air 701 with Firewall Mounted Nose (1 set)
Engine
1. 0.75-90cc Glow Engine* (1)
*Engine brands vary greatly. I personally fly with Jett engines. The Modkat performs best with 0.90 FIRE with Counter Rotating Crankshaft and exhaust routed through the fuse.
__________________________________________________ _______________________________________________
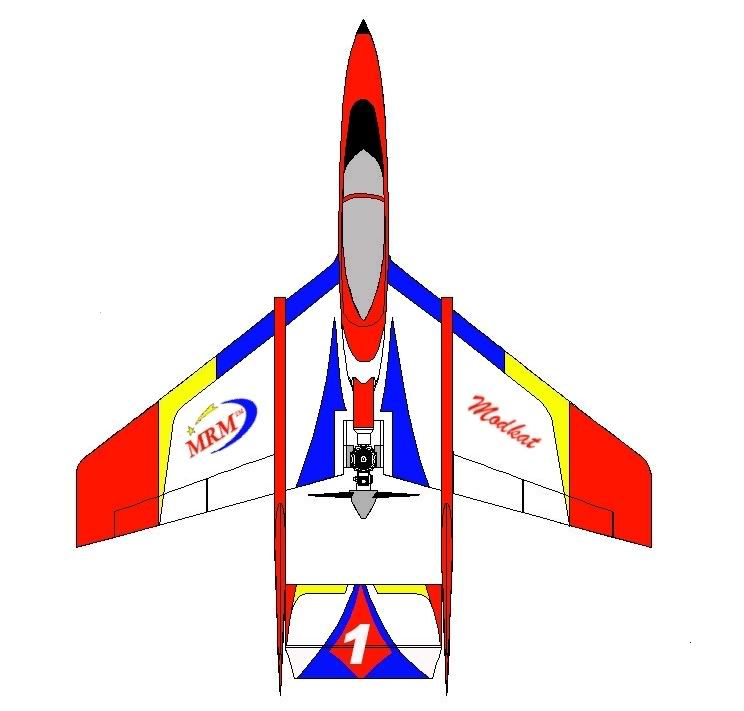
Made some progress on the color scheme. I was going for; "easily distinguishable at the field"
. 
More to come,
Mods
12-21-2006, 03:48 AM
#196
Junior Member
Join Date: Oct 2006
Location: , TX
Posts: 23
Likes: 0
Received 0 Likes
on
0 Posts
Thanks for the list.
Do you have a better qualtiy blank profile of the ModKat. The one you posted bedfore becomes distored when I try to open it up in any type of photo editing software.
Do you have a better qualtiy blank profile of the ModKat. The one you posted bedfore becomes distored when I try to open it up in any type of photo editing software.
12-21-2006, 07:27 AM
#197
Senior Member
Thread Starter
My Feedback: (1)
Join Date: Jun 2005
Location: Antelope Valley,
CA
Posts: 825
Likes: 0
Received 0 Likes
on
0 Posts
ORIGINAL: coolitdown40
Thanks for the list.
Do you have a better qualtiy blank profile of the ModKat. The one you posted bedfore becomes distored when I try to open it up in any type of photo editing software.
Thanks for the list.
Do you have a better qualtiy blank profile of the ModKat. The one you posted bedfore becomes distored when I try to open it up in any type of photo editing software.
Mods
12-21-2006, 09:21 AM
#198
My Feedback: (19)

Join Date: Apr 2002
Location: Cleveland,
OH
Posts: 5,576
Likes: 0
Received 0 Likes
on
0 Posts
Word of note to those perhaps considering the Jett 90 reverse-rotation configuration. Crankshafts for the left hand engines are out of stock. They will remain unavailable for a few months into the new year.
12-21-2006, 04:15 PM
#199
Senior Member
Thread Starter
My Feedback: (1)
Join Date: Jun 2005
Location: Antelope Valley,
CA
Posts: 825
Likes: 0
Received 0 Likes
on
0 Posts
ORIGINAL: bob27s
Word of note to those perhaps considering the Jett 90 reverse-rotation configuration. Crankshafts for the left hand engines are out of stock. They will remain unavailable for a few months into the new year.
Word of note to those perhaps considering the Jett 90 reverse-rotation configuration. Crankshafts for the left hand engines are out of stock. They will remain unavailable for a few months into the new year.