


CRRC 40cc kit
 12-02-2009, 07:57 PM
#451

Are you running this engine in an USRA plane class and that was the racefuel you had to run? If so my apologies but I find it pretty hard to believe experienced racers would run fuel mixed at 100:1. If not, regular pump gas and Walmart oil at 40:1will work much better than 108 w/100:1 Amsoil.
 12-02-2009, 08:21 PM
#453

My Feedback: (36)
Join Date: Jan 2005
Location: mukwonago,
WI
Posts: 189
Likes: 0
Received 0 Likes
on
0 Posts
Hi octane race-gas causes problems on engines not built that need it (high compression,turbo or supercharged) Octane SLOWS the burn in normal engines causing low power and high temps.It is like the opposite of nitro.As far as the oil goes.GOOD oil has a mixing ratio on the container,you don't take 80-1 oil and mix it at 30-1 cause the engine said to. The engine manufacture assumes you will use the worst oil possible and the want to cover the worst-case scenario. Think of it this way,just like other additives ,some oil is more concentrated then others with a different additive package. Mixing a good synthetic at 30-1 will give you terrible related symptoms as it does not burn as petroleum based oils will under the right conditions,there-by putting a real DAMPER on combustion.Adding race gas to this will only further slow the combustion event. I have read these threads for years about this subject and have not responded,BUT,the facts need to be told and and not "debated" as the facts stand alone.
12-02-2009, 08:37 PM
#454

My Feedback: (170)
Join Date: Jun 2005
Location: Miami,
FL
Posts: 67
Likes: 0
Received 0 Likes
on
0 Posts
yes, i agree with capitalB 100%.
i was using amsoil 100:1 mixed at 25:1 for break in on my gf40i and it gave me nothing but problems. it would foul my plugs in a matter of minutes (carbon tracking).
i switched my break in fuel to the cheap penzoil 2 stroke and haven't had a single issue since. motor runs great now.
i still use the amsoil but at 50:1 on my other engines and they run perfect.
12-02-2009, 09:35 PM
#455
My Feedback: (20)
Join Date: Feb 2008
Location: Brighton,
CO
Posts: 147
Likes: 0
Received 0 Likes
on
0 Posts
Helodrvr- Thanks for the #'s. Do you remember about what you were getting on the low end? Thanks again
CapitalB- Great info and agreed. Octane can be a curse as well as a blessing. It ALL depends on the engine compression ratio/combustion chamber pressure, intake temperature, and in the case of the turbo or supercharged engine your MP, inches of Hg, Bar, Boost, whatever unit of measure you use!! The only other variable could be flame propagation within the combustion chamber. High compression and high induction temps need higher octane to prevent detonation. I know what the induction temp is on my CRRC 40... ambient +/- a few degrees. I have not looked for and therefore do not know what the compression ratio is on my little 40.
CapitalB and Drola-As for the oil, I agree 100% as well! If you mix to the oil specs, you go against the engine manufacturers recommendations, but if you mix to the engine you end up mixing to a ratio not recommended by the oil manufacturer. Damned if you do, damned if you don't. Some oils will actually tell you not to mix them with specific fuels (eg Burris and Maxima say NOT to mix their Castor oils with 100LL Aviation fuel due to separation of oil and fuel at specific temps).
That's why we were mixing 100:1. We were using Amsoil Dominator. I believe that it is Amsoil Saber that recommends mixing 50:1, but I am not sure. I have always run Dominator in my BMEs, Fuji, and ZDZ at 100:1. I've also run out of fuel at the field and "borrowed" fuel mixed with Redline oil at 80:1. Is that perfect? NO! Did the fuel cause flame outs? NO! No dead sticks! It worked.
I fly recreationally, I am not a pro.
Thanks again and happy flying!!
R21


 12-02-2009, 09:49 PM
#457
My Feedback: (6)
Join Date: May 2005
Location: HASTINGS,
MN
Posts: 278
Likes: 0
Received 0 Likes
on
0 Posts
Last season I switched my oil to Ammzoil Saber and ran it 50:1 in my three gas model engines and those in my weed whip and leaf blower. I noticed an improvement in the smoothness and throttle response right away so I'll be running that oil and ratio again next season. In a nutshell, they all ran better than they had before when I was using conventional two stroke oil. I use 87 octane pump gas. Works for me!! 
12-02-2009, 09:52 PM
#458
My Feedback: (20)
Join Date: Feb 2008
Location: Brighton,
CO
Posts: 147
Likes: 0
Received 0 Likes
on
0 Posts
Chart is absolutely right........as it should be!
I just ran to the shop, my Dominator bottle says 50:1 and the Saber bottle that I have been running and thought was Dominator says 100:1. 5 out of 3 of us pilots are dyslexic I'm told.
R21
I just ran to the shop, my Dominator bottle says 50:1 and the Saber bottle that I have been running and thought was Dominator says 100:1. 5 out of 3 of us pilots are dyslexic I'm told.
R21
12-02-2009, 09:59 PM
#460
My Feedback: (6)
Join Date: May 2005
Location: HASTINGS,
MN
Posts: 278
Likes: 0
Received 0 Likes
on
0 Posts
50:1 just seemed to be safer to me for a start with synthetic lubricants (old habits die hard you know!) so that's what I chose to run, but a lot of other guys at my field are running 100:1 like it says on the bottle and their motors run just fine. I'll no doubt have to work up to it.
12-03-2009, 12:08 AM
#461
Junior Member
Join Date: Nov 2008
Location: Denver,
CO
Posts: 15
Likes: 0
Received 0 Likes
on
0 Posts
Race,
Before you had starting working with me on this engine, Dave and I were working on it with my 50:1 87 octane E-10 gas with Ace hardware 2 stroke oil.
The 108 leaded race gas with amsoil saber 100:1 improved our numbers and transitions the day you helped me, so that seems to be at least the right direction.
I went with the 108 leaded because that was the only way to get rid of the ethanol that Dave thought might be causing me some problems.
12-18-2009, 03:44 PM
#462

Well, I got my kit engine from Valley View yesterday and put it together. I tried running it today and can't get it to stay running more than a second or two. Seems to not be getting gas after it burns out the fuel from choking it. I've tried different needle settings and still haven't had much success. How far open does the throttle need to be for normal starting? I've tried from just cracked and pretty far open a couple of times and not much difference. My G62 starts right up with about the same fuel and starting proceedure I am using.
12-26-2009, 02:27 PM
#463
Junior Member
Join Date: Dec 2009
Location: Southeast BC, BC, CANADA
Posts: 1
Likes: 0
Received 0 Likes
on
0 Posts
Hello Texastbird
While I don't have lots of experience with this engine, I have only broken mine in and not flown it , and won't likely fly it till spring comes. It's -20c here right now.
But I have read through this whole post and have notice that noone has been using the proper starting procedure for this type of carb. I have lots of experience with this type of carb on chain saws. It has a choke with a preset throttle idle increase that is set when the choke is applied. When the choke is applied, it is set with a spring release that is trigered off by a throttle movement.
Starting cold engine procedure :
1. If there is not gas to carb yet, with ignition off and choke on, turn over engine untill carb creates vacume in fuel line to advance gas to carb. Don't over do it.
2. Turn on ignition and with choke stil on, no extra throttle, flip prop untill it fires only once. The engine can flood easy with over choking.
3. Here is the tricky part. Don't move throttle after choke has been set,. but manually turn choke off . Thiis will leave the throttle setting to advanced starting idle. If throttle is moved, the advanced idle will trigger the spring return off, and will have to be resett by truning on the choke, and then turning if off again. this will resett the throttle to high idle. The engine starts best with this procedure and the correct amount of starting throttle is used by this process without touching the transmitter throttle.
Warm starting:
When the engine is warm, no choke should be needed, and will likely flood it. But, the engine likes that pre starting throttle setting, and the choke should be applied to "set" the throttle, but turned off manually before trying to start the engine EVERY TIME you start.
If the engine won't start, it may be a flooding problem, as these engines don't like a wet plug. Most times this engine will be mounted with cylinder pointed down, and can cause the plug to get wet with fuel. It only takes a moment to check the plug for gas moisture. If wet, a dozen flips with the plug out, and choke off will clear the engine. Dry the plug, and start engine with no choke and idle "set" by choke.
If plug is not wet, and engine won't start, there may be an air leak and crank case is not causing enough pressure changes to cause rubber diaphragm in carb to not pump fuel from tank.
An engine that starts, but won't continure to run is likely not an electrical probelm but a fuel problem.
1. air leak in crankcase. remove air tube from crank case and attach a long clear tube to crank case, at least two to three feet long. Put the end in a cup of water that is about 6" lower then carb. Flip over prop slowly and watch level of water in the hose rise and fall with each turn on the prop. Carefull to use hose long enough to not draw water into the engine. If there is very little movement back and forth of water in tube, there is likely an air leak, and the engine will have to be taken appart and resealed. Make sure there is silicone in the one bolt hole (at bottom) that can let air into engine, and that selaent is filling the back plate seating gruve, and around the inside of all bolts in crank halves. Be patient, let it dry overnight. retest in same manner with water and tube.
If you have good presure and vacuume variations and engine will still not run for more then a moment, the diaphragm may have a leak.
Attach your long tube to the diaphragm inlet, and apply a slight vacuum by your mouth to the tube. Make sure your tube is clean, perferably new.... Stick your tongue on the end of the tube after drawing some air out, don't over do it. If it won't hold the vacuum, there is likely a leak.
While the diaphragm is off ( the side with the chrome cover) , check valve under neath it. It may also have dirt or somthing causing it to not function properly. There could be a piece of machining debree from manufacturing. It could cause it to either flood or restrict gas. It's right under the diaphragm, and is controled by the diaphragm. Also, on the air and fuel inlet side, are the two rubber flap valves that should be inspected that they sit flush. Also underneath that rubber gasket is a fuel screen and can get pluged up with debree. An engine sitting for a long period can get pluged with oil when the gas evaporates, and leaves the oil residue behind.
One last fuel problem can be caused by a partial block in the tank vent. Most new tanks have two vents to alow venting upside down in flight. But some older ones only have one and sometimes can get gummed up if left for long periods. A "T " should not be used for filling purposes in the cab feed line. This line should always have as little joints as possible as this type of engine is relient of fuel vacuum to draw fuel, any leaks in the line will cause problems with engine starving of gas.
An improperly vented tank will cause problems with the fuel being drawn to the engine by it's vacuum. The engine will start and run for a moment, but then the presure drop in the tank caused by a blocked vent will then cause fuel from getting to the engine to keep it running.
Check for air leaks in carb gaskets and manifolds. I found that the matching surfaces in the manifold to engine were not matched very well and did some grinding to alow for better air flow. This is easy to do by placing the gasket to engine bolt line up and look for the gasket blocking air flow into the engine. Cut, or better, grind the gasket to match the inlet of the engine, and then check the gasket to manifold for fit and air flow. Grind the manifold to match the gasket if needed. Better air flow means more horse power. I found the muffler match to be even worse and ground both the gasket and muffler especially. This is one of the best and simplest performance enhansments you can do to this type of engine.
Hope this helps.
Thomas
12-26-2009, 04:36 PM
#464
Thanks for your reply, Thomas. I resealed the bolts for the crankcase. No leaks that I can find, but I am trying anything I can. My friend has a carburetor we are going to switch out to see if anything different happens. We'll try it tomorrow.
12-27-2009, 12:18 AM
#465

Hey all, I finally got through this entire thread, after just putting together the CRRC 40 that Santa left me. Woo Hoo!
My first frustration was looking for the split washer for the prop shaft. I finallly found one of my own, but the instructions didn't say where to put it, but I put it between the prop shaft and the threaded shaft. Now that I see I should use threadlock, should I take it apart?
The rest went together real nice and tight. It seems they may have improved on the castings since some of these posts were made.
The spark plug that came with it didn't have a gasket/washer. Is that OK? When I get a new resistor plug should I leave off the gasket?
I split out the skinny end of the sensor holder with the screw, but looks useable for now. The sensor was pushing out of the mount by the glue and caused it to bump out. Is that OK? There was another gasket/spacer piece not mentioned in the instructions which seemed to go under the sensor. Is that right?
The sensor is a good 1/16" away from the magnet. Is that OK?
My big question. Do I need an optical switch? I am using a 2.4 TX. Does it go between the battery and the CDI? I've only used magneto engines (weedwacker conversions) so don't know.
How fast can I safely rev this? The closest prop I found at the LHS was a 20x6 which seems smallish. I'm at 6,000 ft, so it may not have the power. I also have an 18x6.
Thanks,
Rod S
12-27-2009, 02:36 AM
#466
One more thing. I have a Champion rcj7y as mentioned earlier. And I see that it is a bit longer in the beak, but the main problem I see is that it takes a bigger wrench, so the plug cap won't fit over it. I imagine the rcj7j would have the same problem. Are you that use these plugs just pry the cap wider and use a hose clamp on it, or is there a better plug?
Thx
RS
Thx
RS
12-29-2009, 11:50 AM
#467
Senior Member
Join Date: Nov 2007
Location: newark, UNITED KINGDOM
Posts: 525
Likes: 0
Received 0 Likes
on
0 Posts
Hi all,
I just assembled one of these engines. Looking for a 70" ish plane for it now! A couple things I noticed were:-
* It's obviously a slogger and not a screamer looking at the ports size and timings. I just knife-edged the transfer splits as there were some large square edges in there.
* The carb adaptor does not line up with the carb. There is a 2 or 3mm lip one side. I ground it out to fit properly.
* Caphead bolts in general are bit short. The ones holding the carb are short if you use the trumpet and too long if you don't. I fitted longer ones to the exhaust as these get most wear.
* Yes the sensor is in a very vulnerable position!
* Fitted a tap/nipple to the carb cover.
* Also found that the carb upside down makes more sense for needles and throttle linkage. The plastic pulse pipe is long enough to do this.
* Supplied sealant is actually quite good, spreads well and sets nice and slow.
12-29-2009, 11:58 AM
#468
Senior Member
Join Date: Nov 2007
Location: newark, UNITED KINGDOM
Posts: 525
Likes: 0
Received 0 Likes
on
0 Posts
ORIGINAL: Flight Risk
My first frustration was looking for the split washer for the prop shaft. I finallly found one of my own, but the instructions didn't say where to put it, but I put it between the prop shaft and the threaded shaft. Now that I see I should use threadlock, should I take it apart?
My first frustration was looking for the split washer for the prop shaft. I finallly found one of my own, but the instructions didn't say where to put it, but I put it between the prop shaft and the threaded shaft. Now that I see I should use threadlock, should I take it apart?
Plug is a taper seat type (cone) and doesn't need a gasket.
12-29-2009, 02:12 PM
#469
ORIGINAL: dogshome
I didn't fit any washer here. Had to remove the same split washer on my CRRC 26 as it makes the extension piece run off-centre. The spring washer wasn't very flat even when compressed. A bit of blue threadlock on the thread is a good idea, but don't get any on the taper or key in case you need to get it apart in future.
Plug is a taper seat type (cone) and doesn't need a gasket.
ORIGINAL: Flight Risk
My first frustration was looking for the split washer for the prop shaft. I finallly found one of my own, but the instructions didn't say where to put it, but I put it between the prop shaft and the threaded shaft. Now that I see I should use threadlock, should I take it apart?
My first frustration was looking for the split washer for the prop shaft. I finallly found one of my own, but the instructions didn't say where to put it, but I put it between the prop shaft and the threaded shaft. Now that I see I should use threadlock, should I take it apart?
Plug is a taper seat type (cone) and doesn't need a gasket.
Good info Lightwave. I hadn't known about the fast idle with choke off.
I got mine to fire up easily and ran it about 10 minutes, then I set the idle down and it died. Wore my arm out trying to get it to restart, tried different batteries and couldn't get a spark. After taking everything apart I finally noticed that a pin in the female battery connector was bent over. Straighted it and "Walla!" it starts..
 Ill probably invert the carb to make setting up easier.
Rod S
12-31-2009, 01:43 AM
#470
Senior Member
ORIGINAL: Flight Risk
One more thing. I have a Champion rcj7y as mentioned earlier. And I see that it is a bit longer in the beak, but the main problem I see is that it takes a bigger wrench, so the plug cap won't fit over it. I imagine the rcj7j would have the same problem. Are you that use these plugs just pry the cap wider and use a hose clamp on it, or is there a better plug?
Thx
RS
BCCHI
12-31-2009, 01:41 PM
#471
Junior Member
Join Date: Dec 2009
Location: Wien, AUSTRIA
Posts: 2
Likes: 0
Received 0 Likes
on
0 Posts
Hi
i got such Motor for Christmas and built it some dass later. Unfortunately i did Not realize that there has to Be a lock washer on the prop shaft. Can i use the Motor without it or should i rebuild it? Is there an easy Way to get the Hearings off the axis?
I hope you can help me and sorry for my english.
Wish you all �* happy New Year soon
greetings, Martin
01-01-2010, 03:51 PM
#473
Senior Member
Join Date: Aug 2005
Location: New Romney, UNITED KINGDOM
Posts: 125
Likes: 0
Received 0 Likes
on
0 Posts
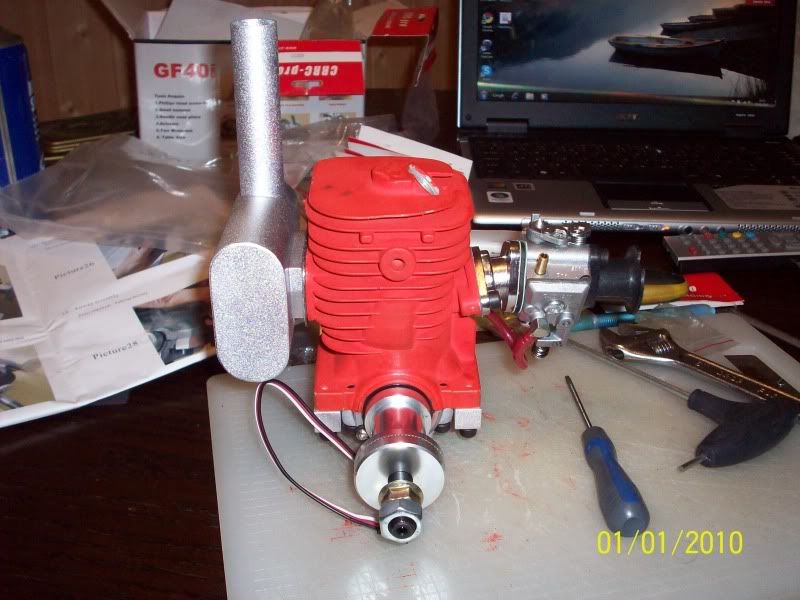
OK started the Engine build last night.

Started with the crank shaft and Bearings.
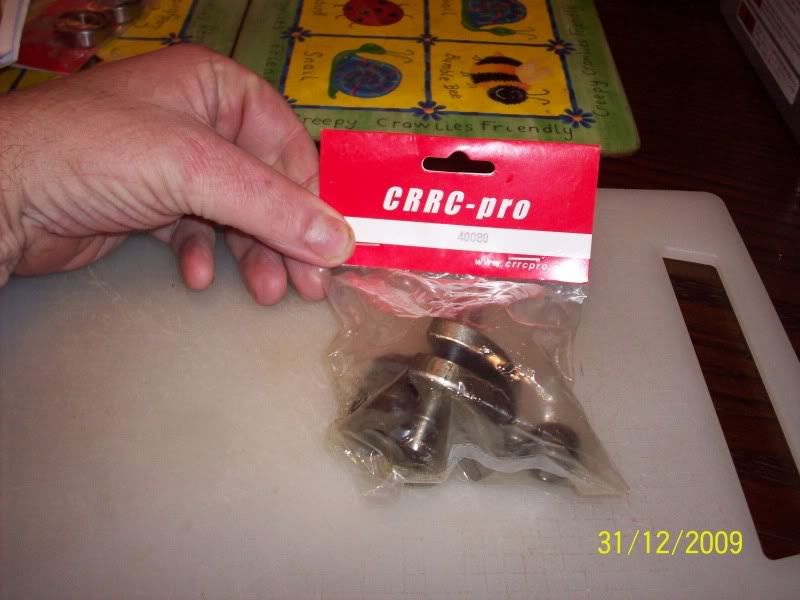
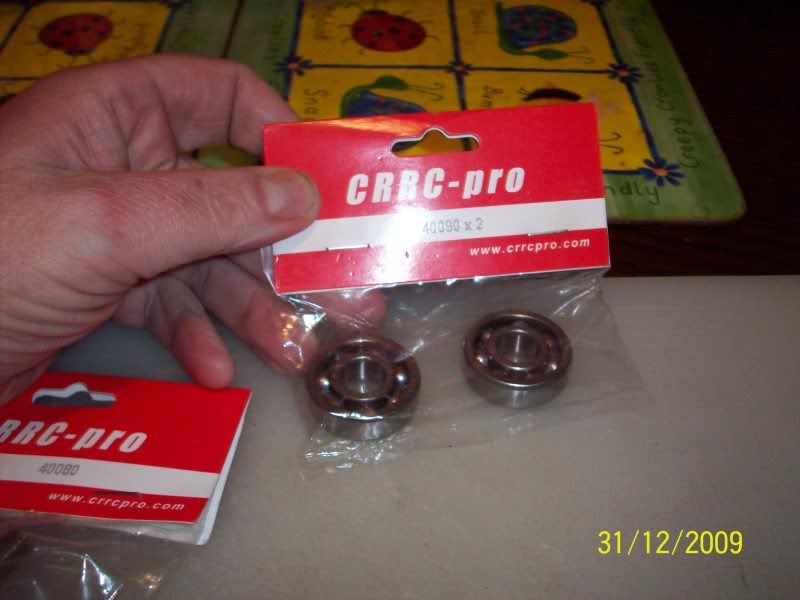
Then installed the prop shaft assembly
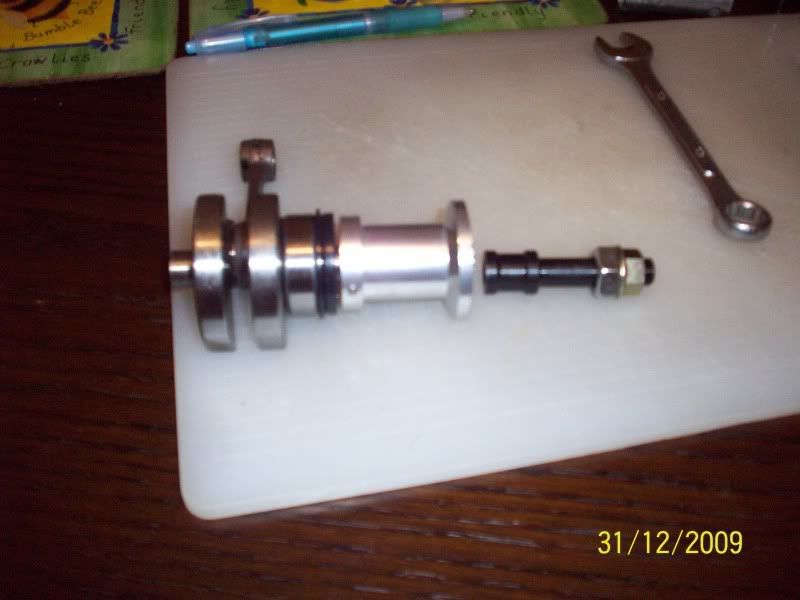
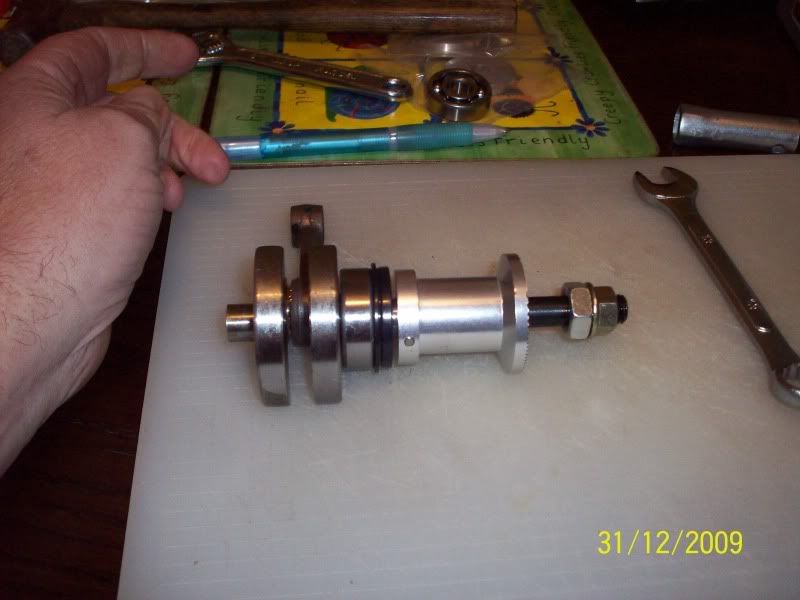
Next was the Piston with its Little end bearing and cottle pin.
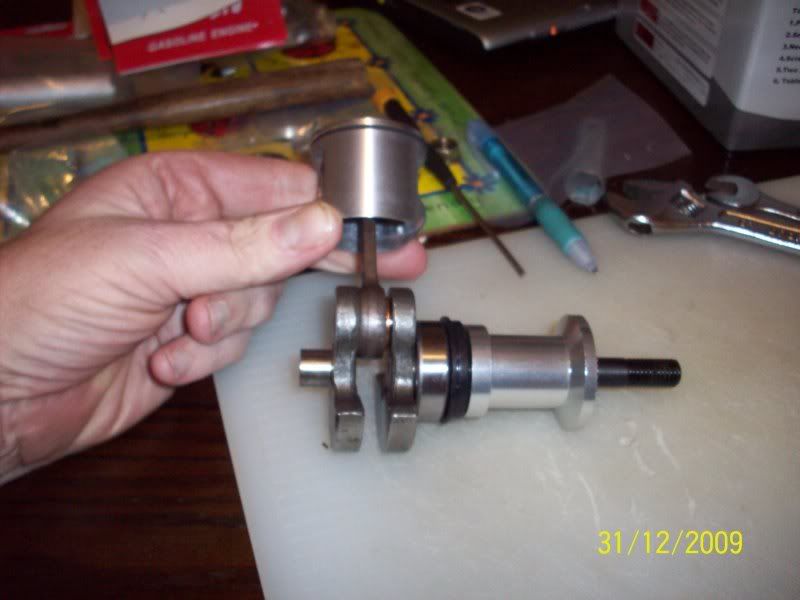
So far so good, I will do some more later today....
Fitted the carburetor today.

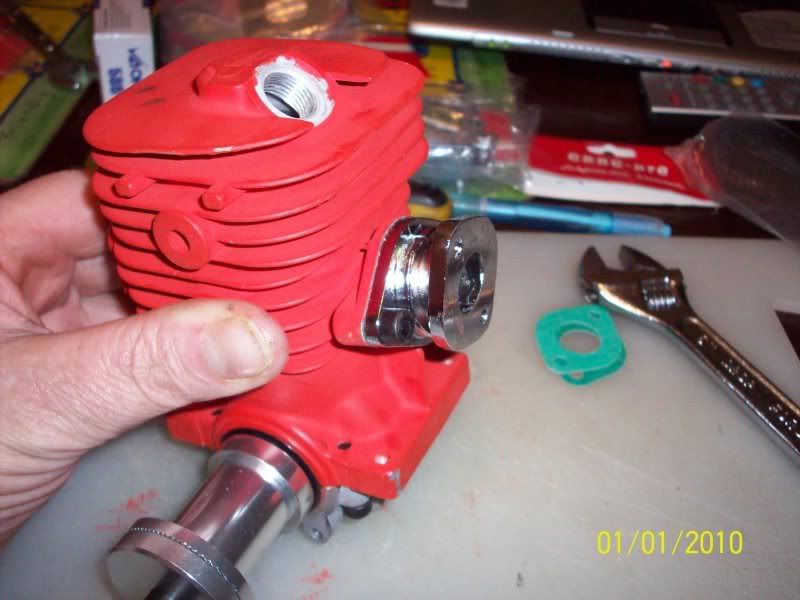
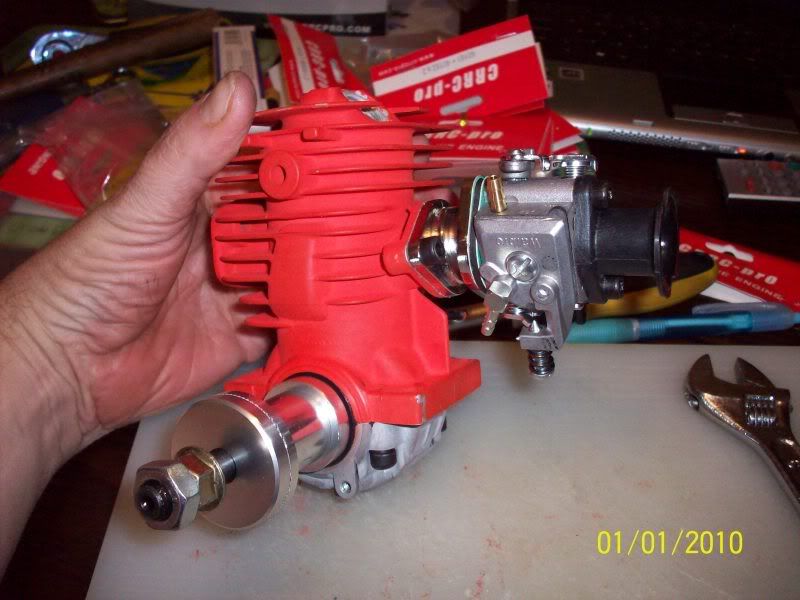
Also fitted the timing sensor
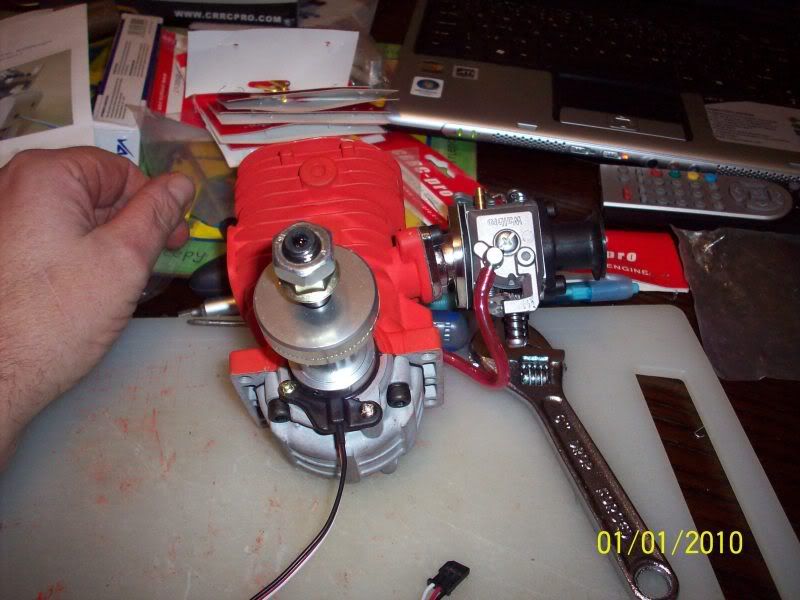
Then the engine brackets "Included"
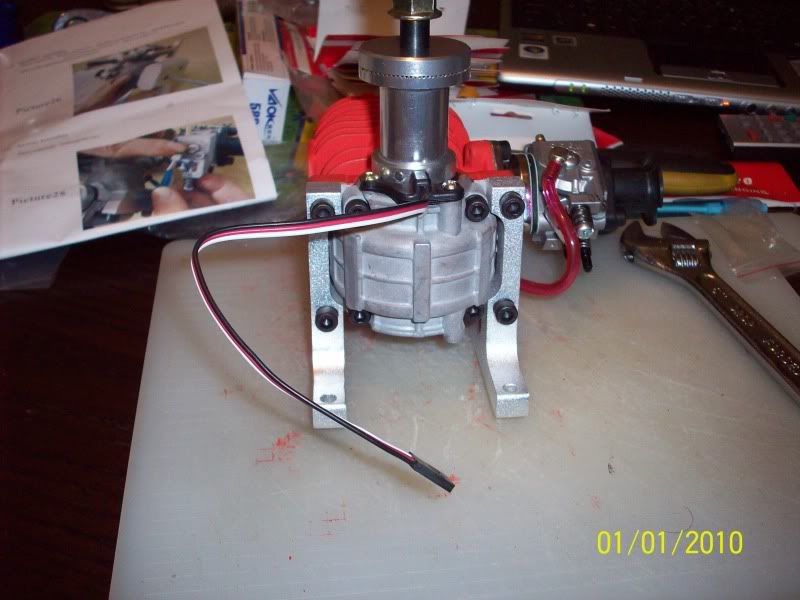
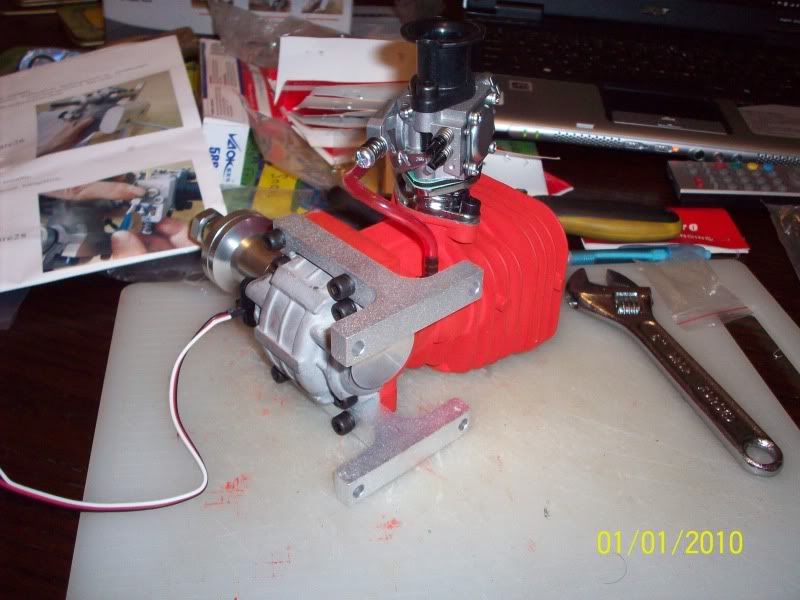
The engine is now complete after fitting the exhaust...
Started with the crank shaft and Bearings.
Then installed the prop shaft assembly
Next was the Piston with its Little end bearing and cottle pin.
So far so good, I will do some more later today....
Fitted the carburetor today.
Also fitted the timing sensor
Then the engine brackets "Included"
The engine is now complete after fitting the exhaust...
01-01-2010, 06:14 PM
#474
Senior Member
Join Date: Nov 2007
Location: newark, UNITED KINGDOM
Posts: 525
Likes: 0
Received 0 Likes
on
0 Posts
Thanks for the pics [8D] I should have taken some of mine with mods [sm=red_smile.gif]
I think opening the bags and putting them in the bin takes longer than the actual assembling!
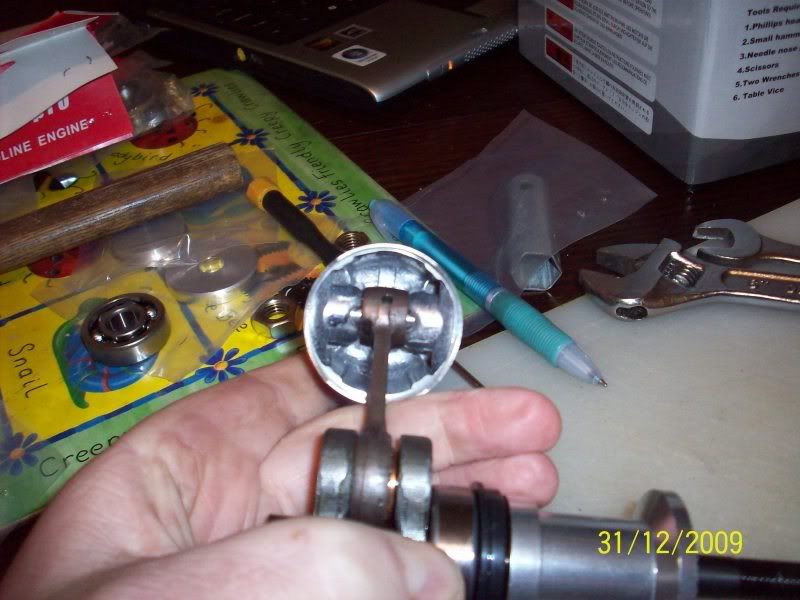
Having just run my CRRC 26 and found it completely out-performs the SPE 26 it replaces, I decided to get the Dremel out on the 40 again. That is 8600 RPM vs 7700 RPM and the difference is purely in the porting - transfers mainly. I WAS going to open the transfers a bit more on the 40, but then I noticed the piston. On this engine, transfer goes through the piston. It has some very rough and very square edges and they don't match the ports in the liner. Not any more! Very easy to modify these ports, although you need a diamond cutter as the alloy quickly blunts a steel one.
When I run it up, I'll post RPMs.
You can just see the rough and square edges here:-

I think opening the bags and putting them in the bin takes longer than the actual assembling!
Having just run my CRRC 26 and found it completely out-performs the SPE 26 it replaces, I decided to get the Dremel out on the 40 again. That is 8600 RPM vs 7700 RPM and the difference is purely in the porting - transfers mainly. I WAS going to open the transfers a bit more on the 40, but then I noticed the piston. On this engine, transfer goes through the piston. It has some very rough and very square edges and they don't match the ports in the liner. Not any more! Very easy to modify these ports, although you need a diamond cutter as the alloy quickly blunts a steel one.
When I run it up, I'll post RPMs.
You can just see the rough and square edges here:-