


Align t-rex 600n project
 04-29-2014, 11:37 PM
#1

Thread Starter
My Feedback: (3)
Join Date: Jul 2003
Location: waterbury,
NE
Posts: 165
Likes: 0
Received 0 Likes
on
0 Posts
just bought this wrecked helicopter off ebay. they call it a t-rex 600N pro DFC i believe. i know how to fix and rebuild flybar helicopters. but this new flybarless helicopters are new to me. so i figure it would be good experience to figure out how to fix and rebuild the new ones as well and how they work.
1st thing i did was to purchase an assembly manual as a reference book if anything else. and this is the way i got it in the mail!
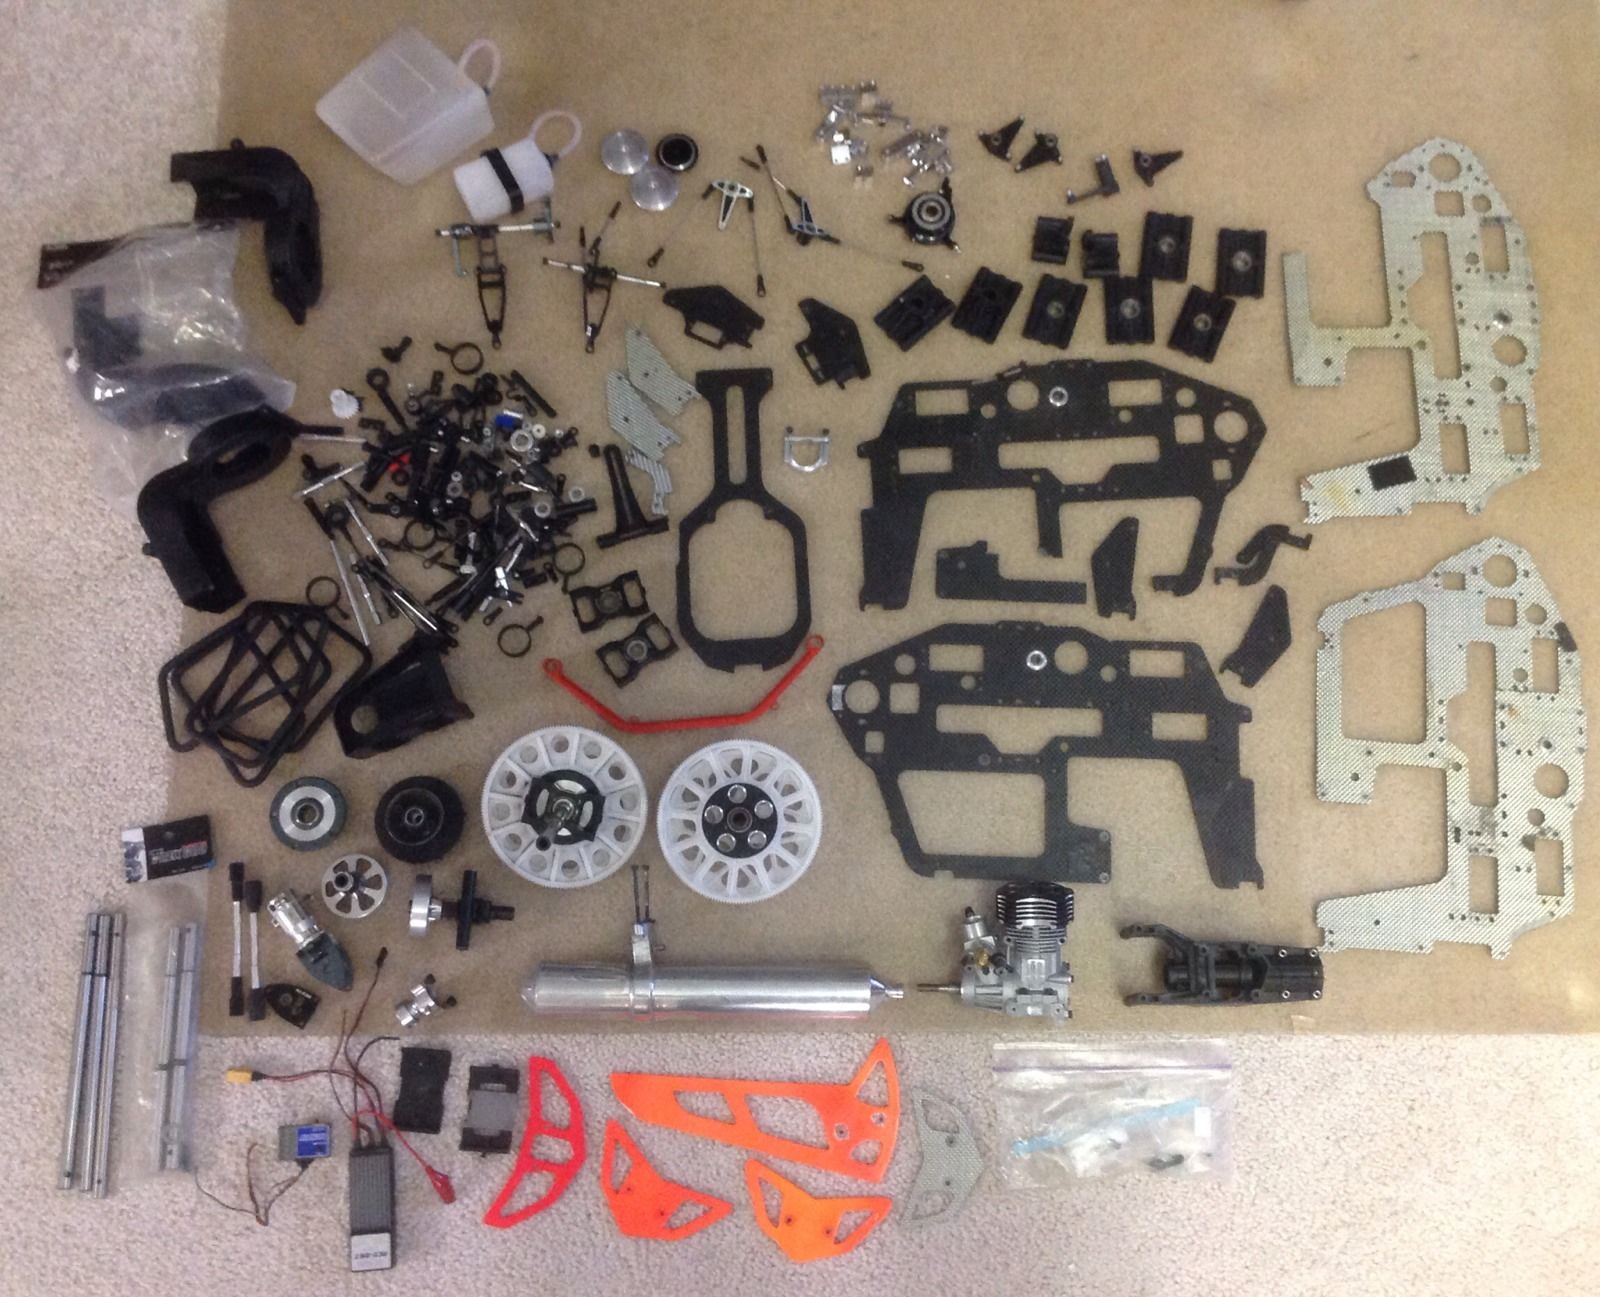
bought some new flybarless rotor head parts. took the main mast out of the package and put it in my lathe and spinned it up to make sure the new main mast was ok. which it was. wanted to make sure before hanging new parts on it. want to do it right the first time! so far got the new flybarless rotor head rebuilt thats far as i got.

next few steps will be to get some replacement parts for the clutch,main gear and get another frame for it once i get paid again. as the frame is cracked,pieces broken and few spots broken clear through. will post more pictures once i get time and money and parts to work on it more so stay tuned.
1st thing i did was to purchase an assembly manual as a reference book if anything else. and this is the way i got it in the mail!
bought some new flybarless rotor head parts. took the main mast out of the package and put it in my lathe and spinned it up to make sure the new main mast was ok. which it was. wanted to make sure before hanging new parts on it. want to do it right the first time! so far got the new flybarless rotor head rebuilt thats far as i got.
next few steps will be to get some replacement parts for the clutch,main gear and get another frame for it once i get paid again. as the frame is cracked,pieces broken and few spots broken clear through. will post more pictures once i get time and money and parts to work on it more so stay tuned.

 04-30-2014, 11:27 AM
#3
Thread Starter
My Feedback: (3)
Join Date: Jul 2003
Location: waterbury,
NE
Posts: 165
Likes: 0
Received 0 Likes
on
0 Posts
thanks. just started and already leaning a little on the new helicopters. its kinda fun rebuilding this helicopter. to me it just as much fun to build them as flying them.
05-05-2014, 02:06 PM
#5
Thread Starter
My Feedback: (3)
Join Date: Jul 2003
Location: waterbury,
NE
Posts: 165
Likes: 0
Received 0 Likes
on
0 Posts
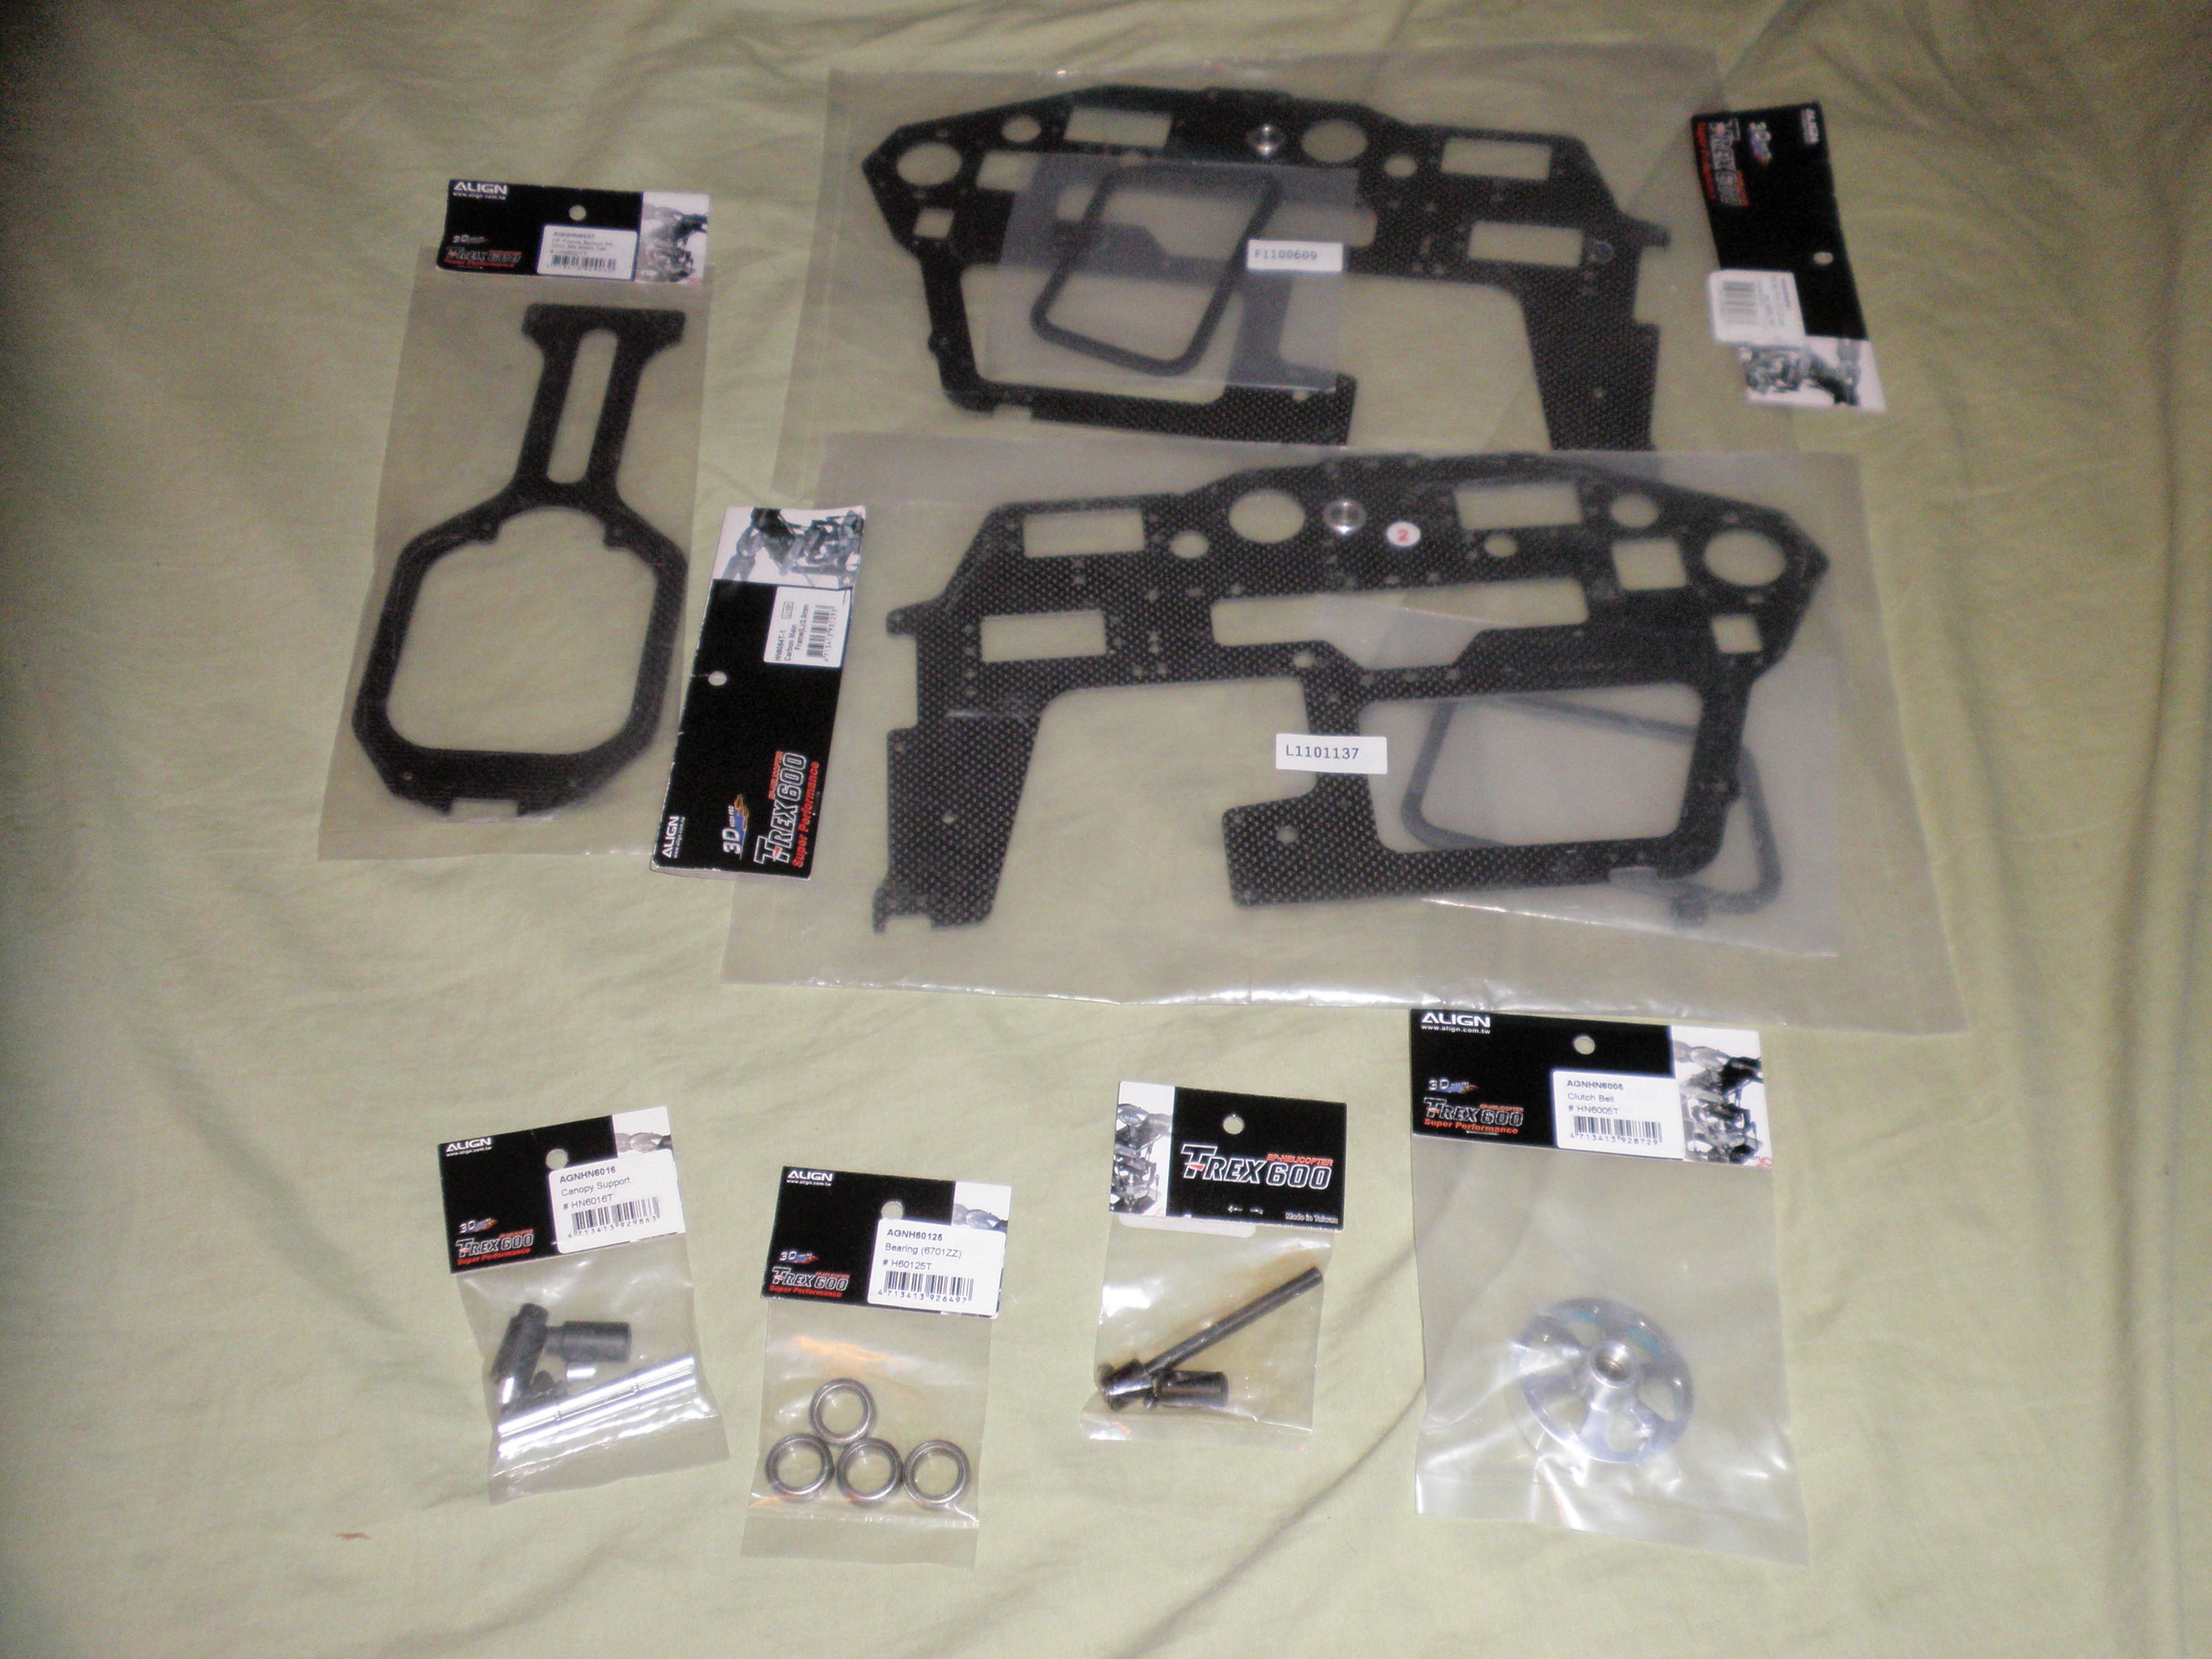
well the ups man visited me today. got some of my t-rex 600N parts and looks like the other half will be coming tomorrow.
then a coarse knucklehead me forgot to order the bottom block bearing. so that will be few days before i get that! just when you think you have everything you always seem to forget something lol. anyway i can least get started on the main frame till the bearing i forgot gets here.
then a coarse knucklehead me forgot to order the bottom block bearing. so that will be few days before i get that! just when you think you have everything you always seem to forget something lol. anyway i can least get started on the main frame till the bearing i forgot gets here.
05-05-2014, 10:31 PM
#6
Thread Starter
My Feedback: (3)
Join Date: Jul 2003
Location: waterbury,
NE
Posts: 165
Likes: 0
Received 0 Likes
on
0 Posts
well tonight i was messing around and found i have a small problem! was using the old junk frame for the mounting pattern and the bearing blocks with the old bearings in them for fitment wise. and found that my main shaft is too short and does not reach the 3rd bottom bearing block. did a short research on the net and found other guys with same problem! found out that it was a align flaw. but the good news is they corrected it with a new different main shaft that is longer and should fit the 3rd bearing block for $20. so back apart comes the main rotor head since this one will not work! but on the other side i'm glad i checked fitment before i started bolting stuff together on the new frame. so in a way this has saved me some time and showed me where the flaw was. so now just need to correct it before i move forward with installing the new frame. sure glad i got into the habit of pre fitting parts before mounting them.

05-08-2014, 11:05 PM
#9
Thread Starter
My Feedback: (3)
Join Date: Jul 2003
Location: waterbury,
NE
Posts: 165
Likes: 0
Received 0 Likes
on
0 Posts
UPDATE: 5/09/14
well the ups man brought almost all of the rest of my parts today except the main shaft witch that should be coming any day now.

started the frame parts today! replaced the one-way bearing with a new kde one-way bearing and also the other bearing that go's on top of that, then greased the one-way bearing then put the shaft back in it. so now the main gear is done.


also replaced the 3 main rotor bearing blocks with new bearings!

then moved on to the clutch assembly. replaced with new bearings,then assemed the clutch or least the frame half on the clutch.

then i started to assemble the parts onto the frame. canopy mounts,bearing blocks,frame half on the clutch,tail rotor control pulley,landing skid mounting blocks,motor mount and installed new hardware to go along with it.
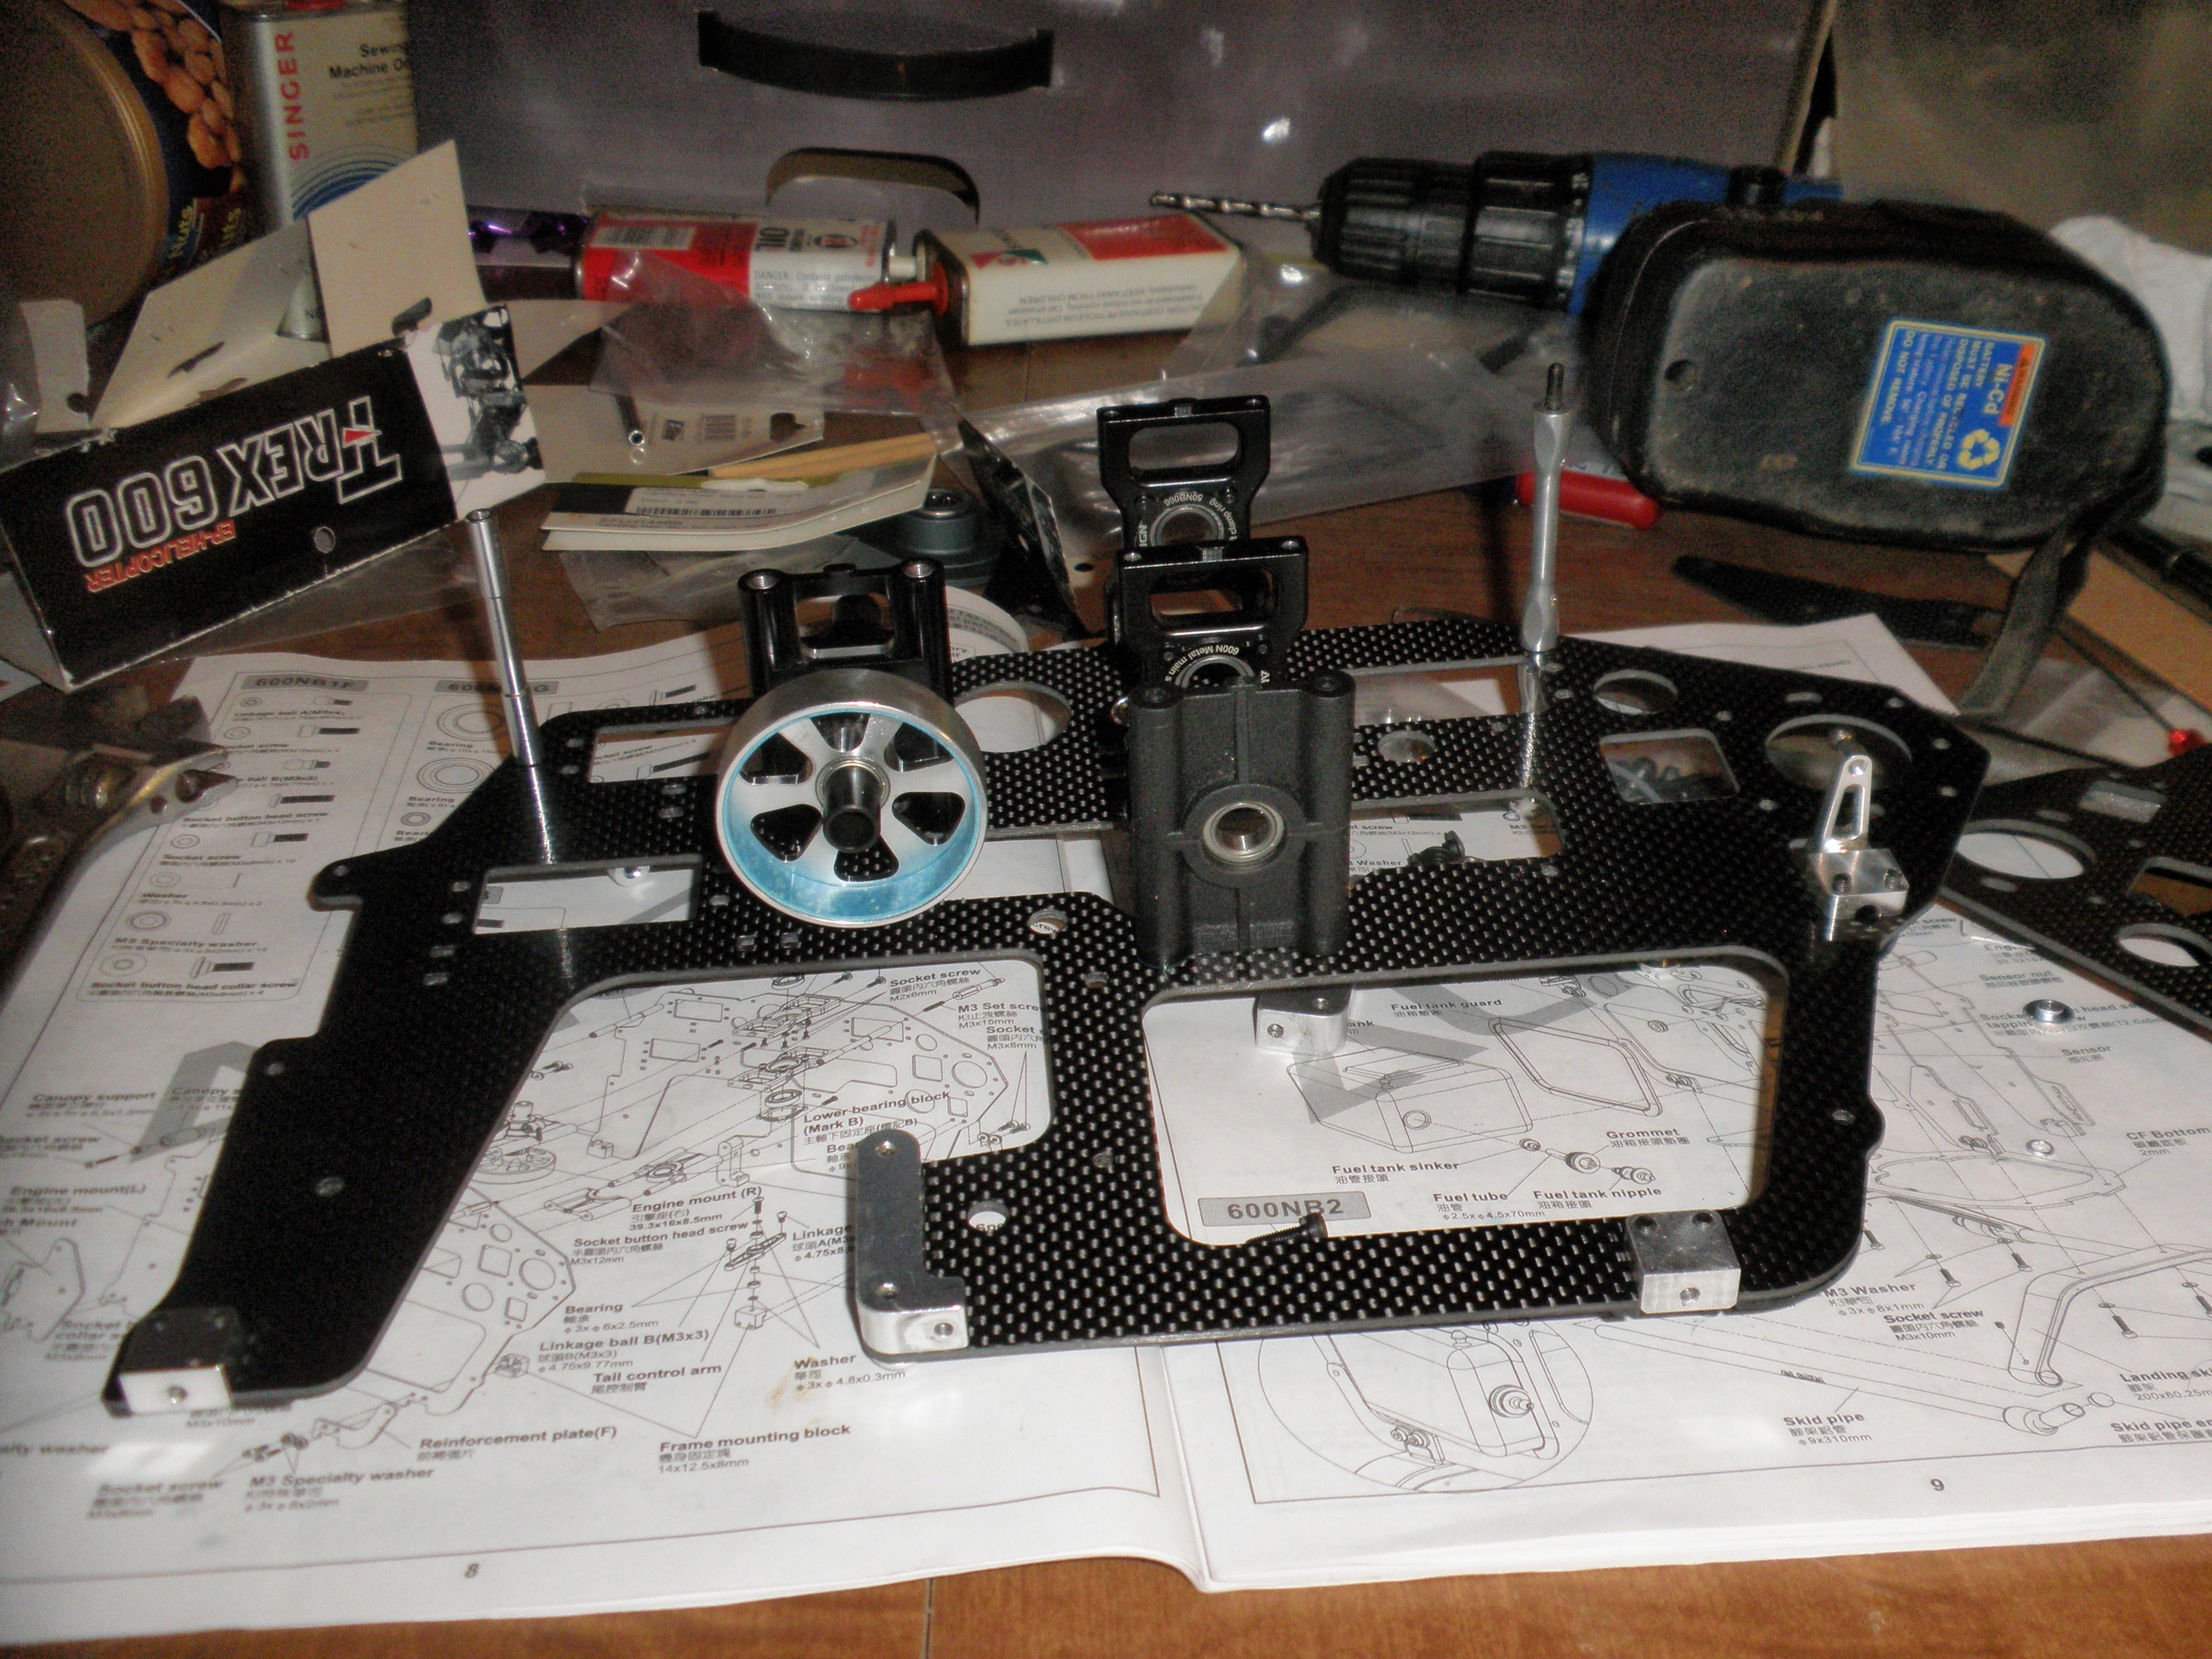
and this is what i have at this stage. rest will have to wait till i get some more money or wait till next month when i get paid again. will update the next stage when i can or able too. its now starting to take shape instead of a box full of piled parts lol. so far its been fun building my first flybarless helicopter!!

well the ups man brought almost all of the rest of my parts today except the main shaft witch that should be coming any day now.
started the frame parts today! replaced the one-way bearing with a new kde one-way bearing and also the other bearing that go's on top of that, then greased the one-way bearing then put the shaft back in it. so now the main gear is done.
also replaced the 3 main rotor bearing blocks with new bearings!
then moved on to the clutch assembly. replaced with new bearings,then assemed the clutch or least the frame half on the clutch.
then i started to assemble the parts onto the frame. canopy mounts,bearing blocks,frame half on the clutch,tail rotor control pulley,landing skid mounting blocks,motor mount and installed new hardware to go along with it.
and this is what i have at this stage. rest will have to wait till i get some more money or wait till next month when i get paid again. will update the next stage when i can or able too. its now starting to take shape instead of a box full of piled parts lol. so far its been fun building my first flybarless helicopter!!
05-09-2014, 09:41 AM
#11
Thread Starter
My Feedback: (3)
Join Date: Jul 2003
Location: waterbury,
NE
Posts: 165
Likes: 0
Received 0 Likes
on
0 Posts
thanks. starting to make little headway and taking shape. for my first flybarless helicopter so far its been fun to build. the flybarless helicopters are out of my comfort zone! witch is not a bad thing its a good thing. few things are a little different then the flybar helicopters i'm used too building but don't look like much different. onlything i can tell so far that is different is the rotor head and different type of gyro. instead of just one gyro like on the flybar helicopters. it has 3 gyros one on the tail rotor,one for the pitch(for and aft) and one the the ailerons(left and right). other then that the rest looks pretty much the same. least this flybarless helicopter will be good experience for me how to build few things was not to sure on but figured it out. in the assembly manual there are few steps that are kinda confusing what to do exactly and kinda vague on the information. but once i figured it out not too bad.
05-09-2014, 09:48 AM
#12
Thread Starter
My Feedback: (3)
Join Date: Jul 2003
Location: waterbury,
NE
Posts: 165
Likes: 0
Received 0 Likes
on
0 Posts
UPDATE 5/09/14
well the mailman brought me another package today! got the correct main rotor head shaft and it fits and aligns much better now. it makes its way to the 3rd bearing block now.

well the mailman brought me another package today! got the correct main rotor head shaft and it fits and aligns much better now. it makes its way to the 3rd bearing block now.
05-12-2014, 07:20 AM
#13
Banned
thanks. starting to make little headway and taking shape. for my first flybarless helicopter so far its been fun to build. the flybarless helicopters are out of my comfort zone! witch is not a bad thing its a good thing. few things are a little different then the flybar helicopters i'm used too building but don't look like much different. onlything i can tell so far that is different is the rotor head and different type of gyro. instead of just one gyro like on the flybar helicopters. it has 3 gyros one on the tail rotor,one for the pitch(for and aft) and one the the ailerons(left and right). other then that the rest looks pretty much the same. least this flybarless helicopter will be good experience for me how to build few things was not to sure on but figured it out. in the assembly manual there are few steps that are kinda confusing what to do exactly and kinda vague on the information. but once i figured it out not too bad.
I am now making a beginner's skid to be mounted under the existing landing skid.
I want the ping pong balls to be free to spin (roll on contact). I have to find a way of drilling the holes in the balls exactly opposite each other.
Right now I can only think of cutting off a circle of same diameter as the balls in a stiff paper sheet; bending the sheet at 90 degrees on the circle diameter, sitting the balls in that 90 degree bend and marking the balls drilling centers.
I think that should work sufficiently accurate for the purpose.
Zor
05-12-2014, 12:10 PM
#14
Thread Starter
My Feedback: (3)
Join Date: Jul 2003
Location: waterbury,
NE
Posts: 165
Likes: 0
Received 0 Likes
on
0 Posts
and nice to enjoy finding a solution.
I am now making a beginner's skid to be mounted under the existing landing skid.
I want the ping pong balls to be free to spin (roll on contact). I have to find a way of drilling the holes in the balls exactly opposite each other.
Right now I can only think of cutting off a circle of same diameter as the balls in a stiff paper sheet; bending the sheet at 90 degrees on the circle diameter, sitting the balls in that 90 degree bend and marking the balls drilling centers.
I think that should work sufficiently accurate for the purpose.
Zor
there was a align 55h.
1. i'm not familiar with the align engines
2.its missing the prop nut and washer
3. top of the head is cracked(from crash maybe)
4.the crank shaft is slightly bent
5. hard to find parts for this motor
i'm thinking of going with a os 55 engine instead. mainly because i know how to work those and can find parts for it pretty easy. i may skip the engine and servo section for time being and work on the rest of the helicopter. till i can afford the motor,radio system,servos,gyro then go back to that section as i can afford it. i may just focus next on the landing skid assembly and start building the rotor and tail boom assembly next.
05-24-2014, 12:47 PM
#16
Thread Starter
My Feedback: (3)
Join Date: Jul 2003
Location: waterbury,
NE
Posts: 165
Likes: 0
Received 0 Likes
on
0 Posts
i'm still here right now just saving up some money so i can afford a new engine for the helicopter. one that came with it the heat sink is cracked at the head and crankshaft is bent! all the parts i need to fix the motor money wise it is cheaper to buy another engine instead of fixing the old one. that and align motors are hard to find parts for. going to go with a os engine that way if i need part they are easy to get.
06-23-2014, 09:45 AM
#17
Banned
i'm still here right now just saving up some money so i can afford a new engine for the helicopter. one that came with it the heat sink is cracked at the head and crankshaft is bent! all the parts i need to fix the motor money wise it is cheaper to buy another engine instead of fixing the old one. that and align motors are hard to find parts for. going to go with a os engine that way if i need part they are easy to get.
I am still checking periodically for when you return.
Any progress on funds for a new engine ?
Zor
06-23-2014, 04:59 PM
#18
Thread Starter
My Feedback: (3)
Join Date: Jul 2003
Location: waterbury,
NE
Posts: 165
Likes: 0
Received 0 Likes
on
0 Posts
not yet i have not forgot about it. things went to hell in a handbasket on me! need to fix my coupler on my car trailer,then car repairs,car insurance came due.
then got busy hauling junk cars to make some money. did manage to get a good used tail rotor for it though that i will need at some point. but that's far as i got with it lately.
i'm still looking forward to find funds and time to finish it to see it fly.
lately just can't seem to get ahead money wise.
06-24-2014, 05:49 AM
#19
Banned
not yet i have not forgot about it. things went to hell in a handbasket on me! need to fix my coupler on my car trailer,then car repairs,car insurance came due.
then got busy hauling junk cars to make some money. did manage to get a good used tail rotor for it though that i will need at some point. but that's far as i got with it lately.
i'm still looking forward to find funds and time to finish it to see it fly.
lately just can't seem to get ahead money wise.
then got busy hauling junk cars to make some money. did manage to get a good used tail rotor for it though that i will need at some point. but that's far as i got with it lately.
i'm still looking forward to find funds and time to finish it to see it fly.
lately just can't seem to get ahead money wise.
I sure understand as I am in a very similar situation.
I can hardly find any time these days for the hobby and money is also a problem.
Income tax paid end of April and Vehicles and property insurance paid early June.
Paint house exterior,
Build a new 12 feet long gate for access to the backyard.
Repair gate to the side yard.
Repair 4 bird houses and repaint.
The Thundebird is out to the computer specialists for computer repair; Another fair cost.
I have not found time to build the heli beginner's skid with bamboo sticks (BLADE 300 X).
I have not flown my models yet this year. So many things have to take priority.
We are not the only ones in this situation.
Just keep up the enthousiasm _ _ _ summer is so short _ _ _ L O L (smileys do not work today).
Talk to you soon.
Zor
07-15-2014, 10:55 PM
#20
Thread Starter
My Feedback: (3)
Join Date: Jul 2003
Location: waterbury,
NE
Posts: 165
Likes: 0
Received 0 Likes
on
0 Posts
i did manage to get a new gas tank.fuel filter,fuel line,hardware that i bought on a parts lot on ebay.
now just need to go to the hardware store and buy some thin safety wire. so i can secure the clunk valve in the fuel tank so it don't come off the fuel line.
then i can install that. still working on getting the landing skids,and buying a new engine as i get the money. new engine is around $300! i have about $177 so i'm getting close to buying the new motor for it.
07-16-2014, 03:23 AM
#21
Banned
i did manage to get a new gas tank.fuel filter,fuel line,hardware that i bought on a parts lot on ebay.
now just need to go to the hardware store and buy some thin safety wire. so i can secure the clunk valve in the fuel tank so it don't come off the fuel line.
then i can install that. still working on getting the landing skids,and buying a new engine as i get the money. new engine is around $300! i have about $177 so i'm getting close to buying the new motor for it.
You are making some progress and that is encouraging.
Just letting you know that I am subscribed and have a note whenever you post.
Being a hobby there should be no rush. You will get there sometime at your own leisure and financial situation.
Best of luck and take care.
Zor
Last edited by Zor; 07-16-2014 at 03:33 AM. Reason: Fixing typo
07-16-2014, 08:26 AM
#22
Thread Starter
My Feedback: (3)
Join Date: Jul 2003
Location: waterbury,
NE
Posts: 165
Likes: 0
Received 0 Likes
on
0 Posts
been changing few things as well as i go along. because i don't like some of the parts they used so i spring for the optional parts.
like the case the tailboom slides into. has plastic inserts that can weaken and strip out easy. so i took them out and replaced them with aluminum inserts. also will be making few upgrades as i go along.
like the case the tailboom slides into. has plastic inserts that can weaken and strip out easy. so i took them out and replaced them with aluminum inserts. also will be making few upgrades as i go along.
07-16-2014, 09:53 PM
#23
Thread Starter
My Feedback: (3)
Join Date: Jul 2003
Location: waterbury,
NE
Posts: 165
Likes: 0
Received 0 Likes
on
0 Posts
well made little progress got the gas tank in that was in a parts lot i bought on ebay along with some misc hardware. picked out what i needed and going to sell the rest.

skipped ahead working on the tail boom mount. put 2 new bearings in the umbrella gear case. now all i need is the top and bottom small bearings,front drive gear,front umbrella gear. also took out the plastic mounting bolts because i did not like the plastic mounting bolts(breaks to easy and strips out easy) and replaced them with aluminum mounting bolts(much stronger and don't strip out as bad).


now all i need is the other parts and this part will be ready for assembly later on. now all i need to work on is getting a new os engine,upgraded aluminum cooling fan(aluminum cooling fan cools better than factory plastic fans) and get landing gear parts. then i can move onto the next step and page.
skipped ahead working on the tail boom mount. put 2 new bearings in the umbrella gear case. now all i need is the top and bottom small bearings,front drive gear,front umbrella gear. also took out the plastic mounting bolts because i did not like the plastic mounting bolts(breaks to easy and strips out easy) and replaced them with aluminum mounting bolts(much stronger and don't strip out as bad).
now all i need is the other parts and this part will be ready for assembly later on. now all i need to work on is getting a new os engine,upgraded aluminum cooling fan(aluminum cooling fan cools better than factory plastic fans) and get landing gear parts. then i can move onto the next step and page.
07-19-2014, 10:39 PM
#24
Thread Starter
My Feedback: (3)
Join Date: Jul 2003
Location: waterbury,
NE
Posts: 165
Likes: 0
Received 0 Likes
on
0 Posts
well did some shopping for the helicopter tonight! (1.)got an upgraded g-force engine cooling fan to replace the factory plastic fan.(2.) got a set of landing gear braces.(3.) landing gear skid pipes(4.) kde direct upgraded aluminum receiver mount to replace the plastic factory one. can you tell i don't like a lot of plastic lol? now only thing left is to buy the motor at this stage. and i will have to wait on the engine till get little bit more money before i can buy it.
07-20-2014, 03:34 AM
#25
Banned
Translation of title . . . A bit at a time, the bird makes his nest.
The fascination of assembling components and ending with a flying bird has not changed since the origin of dreamers like Leonardo da Vinci, Lilienthal and Alberto Santos Dumont.
There was also the fascination of assembling components and ending with a workable radio system.
Anyone may ask what I know about that and you will get an answer with pictures.
Zor

