


Gas radial engines
 12-16-2014, 08:31 AM
#276


So you are the beneficiary of lots of problems with the 33's and 84's where the rest of us wound up sending our engines to Ray if we wanted them to work....
 12-18-2014, 04:56 PM
#277

For making your own exhaust ring on the FG-60R3, what parts do you use for the threaded collar to screw into the exhaust port? Is that a Saito part or off the shelf somewhere? Also, do you start with a header flange from one of the Saito engines? I appreciate the info!
12-19-2014, 01:34 AM
#278
Member
Join Date: Jan 2003
Location: UK, Surrey
Posts: 68
Likes: 0
Received 0 Likes
on
0 Posts
Hi, by the time you have sourced all the parts done all the work you might just be better off getting one of these, at least you know it will fit and they have a proven record
http://www.keleo-creations.com/index...roducts_id=364
I'm going to start my FG-60R3 tomorrow for the fist time, as there is no choke is there any any particular procedure for this engine, for starting by hand?
http://www.keleo-creations.com/index...roducts_id=364
I'm going to start my FG-60R3 tomorrow for the fist time, as there is no choke is there any any particular procedure for this engine, for starting by hand?
12-19-2014, 05:58 AM
#279
Senior Member

Join Date: Apr 2014
Location: Brisbane, Australia
Posts: 305
Likes: 0
Received 0 Likes
on
0 Posts
Hi, by the time you have sourced all the parts done all the work you might just be better off getting one of these, at least you know it will fit and they have a proven record
http://www.keleo-creations.com/index...roducts_id=364
I'm going to start my FG-60R3 tomorrow for the fist time, as there is no choke is there any any particular procedure for this engine, for starting by hand?
http://www.keleo-creations.com/index...roducts_id=364
I'm going to start my FG-60R3 tomorrow for the fist time, as there is no choke is there any any particular procedure for this engine, for starting by hand?
If your on an engine stand you may be able to poke the tip of your finger in the carby entrance to choke it for the very first time but it isn't always necessary, they start easy enough.
Cheers Blair
Last edited by Blair K.; 12-19-2014 at 06:01 AM.
12-19-2014, 06:32 AM
#280
Senior Member
Join Date: Apr 2014
Location: Brisbane, Australia
Posts: 305
Likes: 0
Received 0 Likes
on
0 Posts
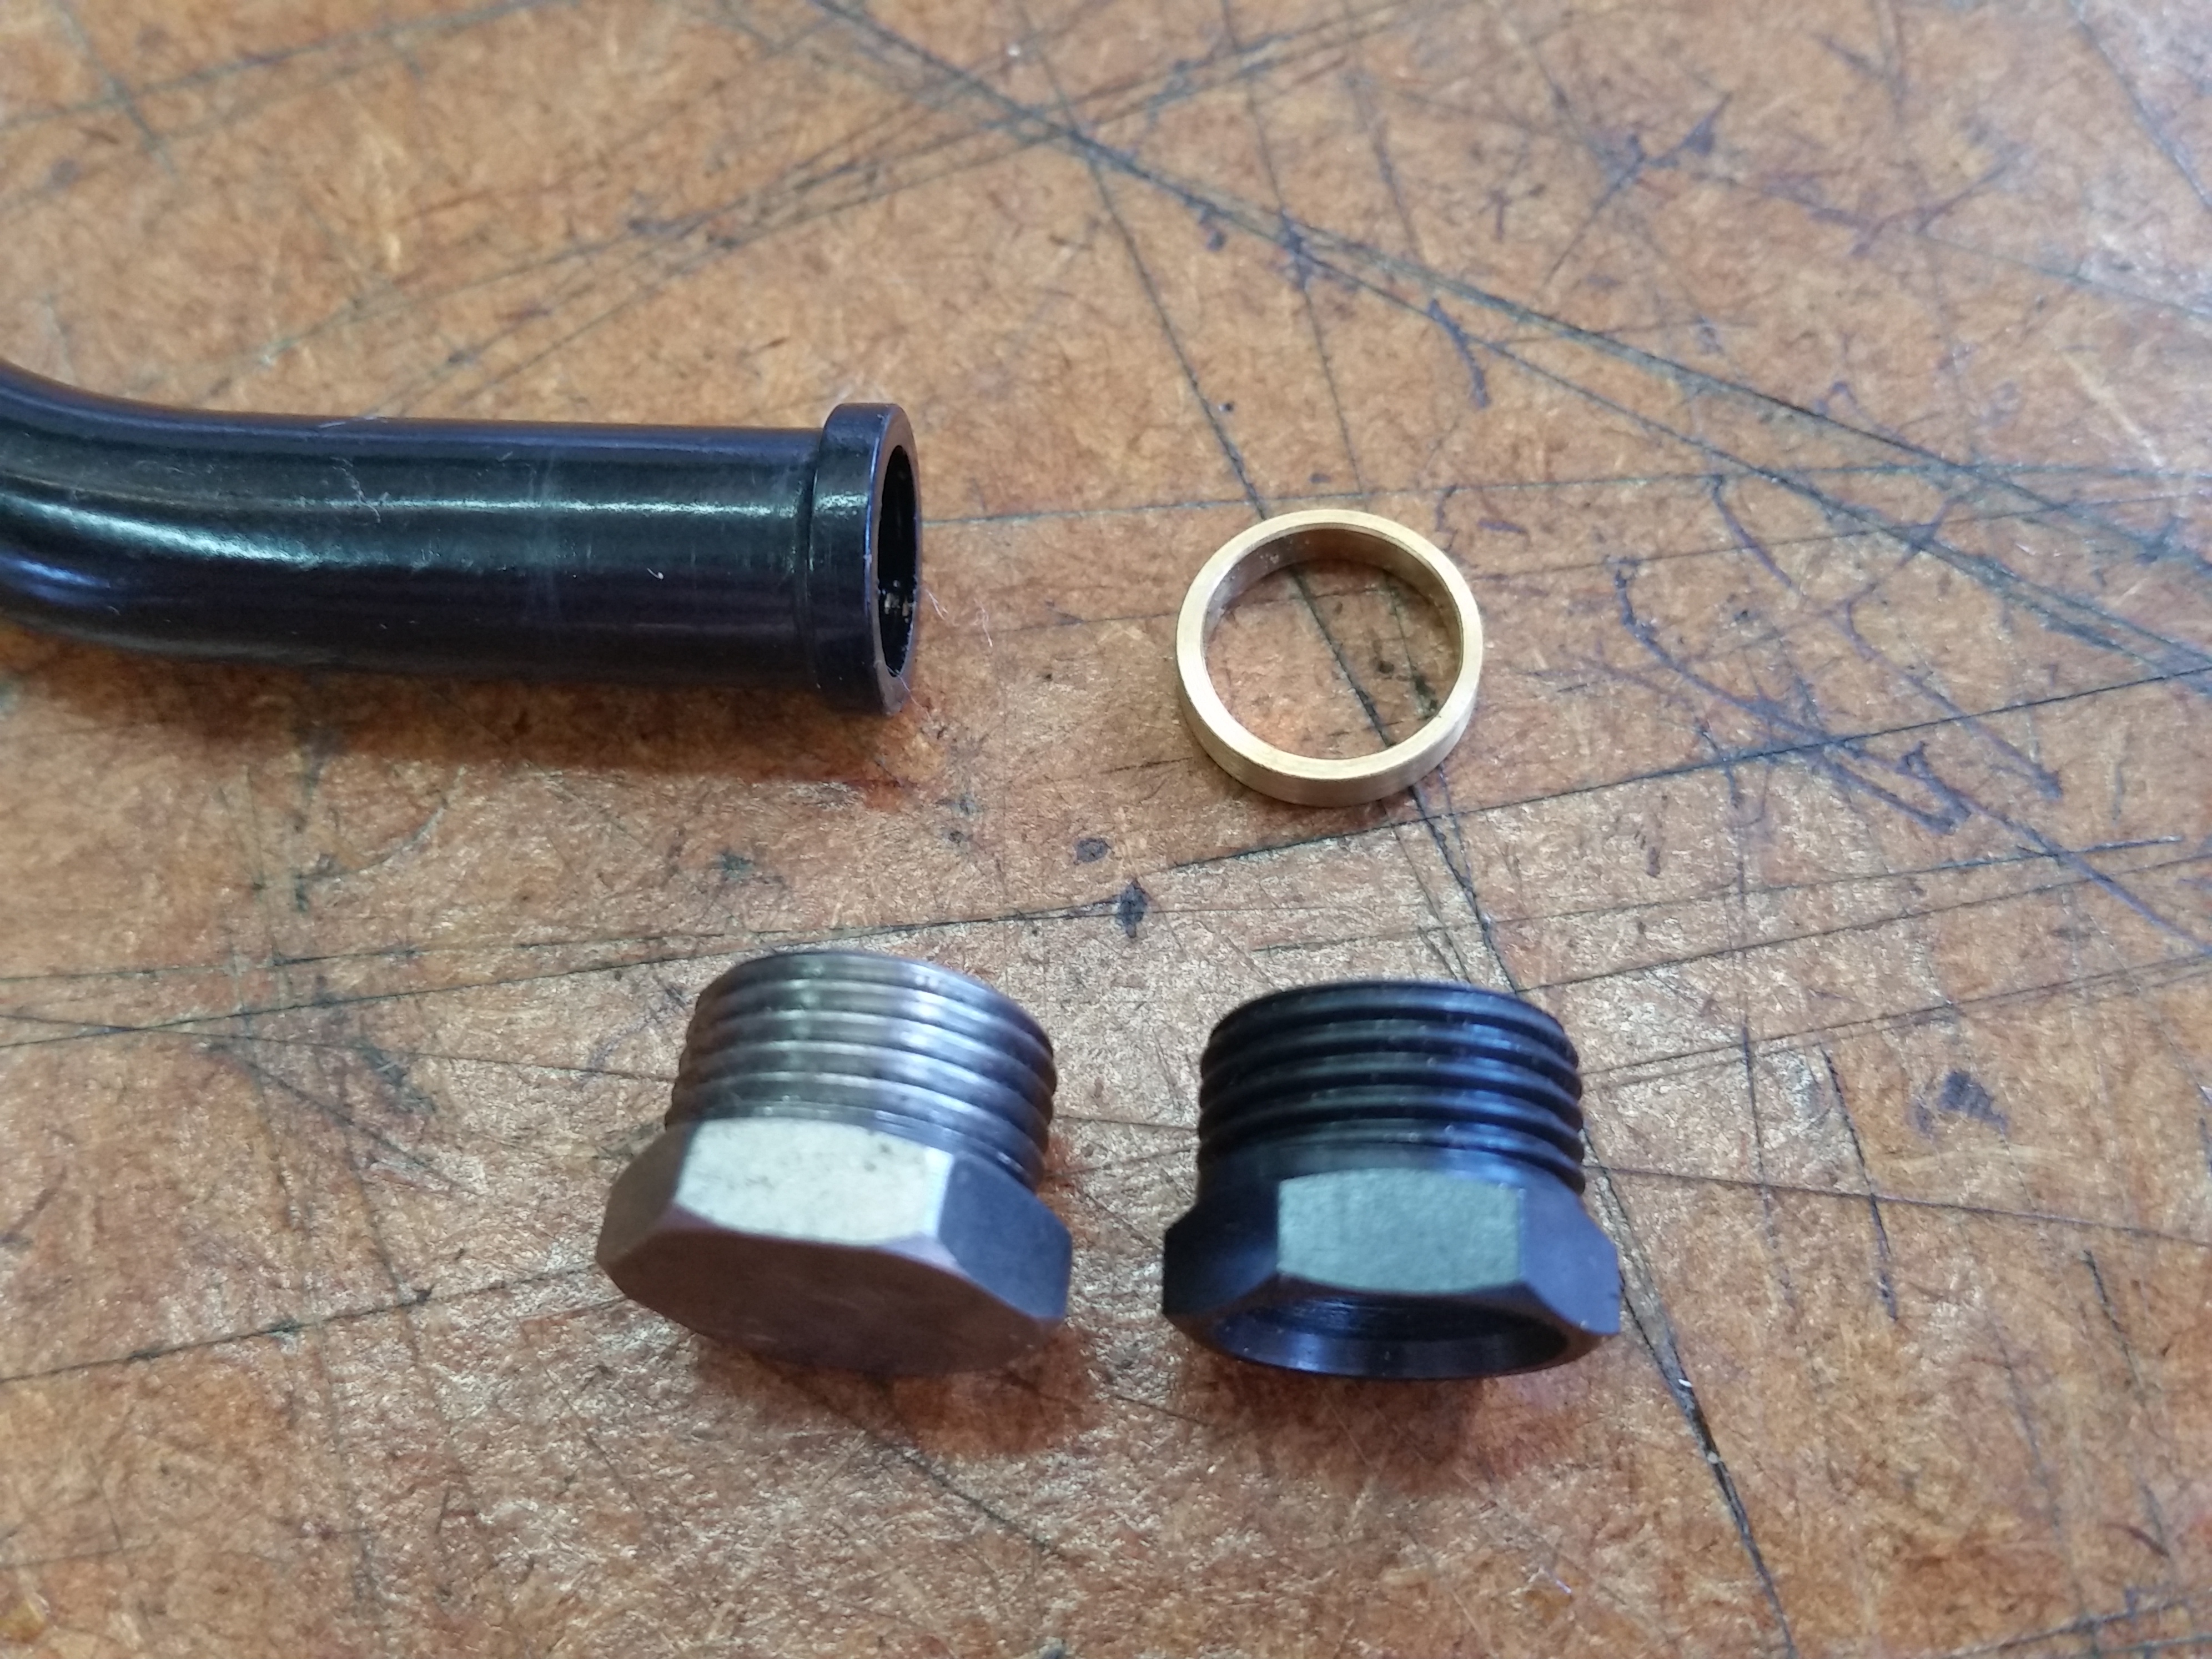
I make my own threaded collars, brass ferals for this purpose but you can buy threaded collars to suit any saito, look on Horizon Hobby to get a part number and google from there for a local source , all exhaust threads on a saito are 1mm pitch so only the diameters change, 12x1 , 13x1, 14x1 would likely be the size, id do away with that 90 degree elbow right out of the cylinder too.
Alternatively destroy a set of those horrible flex pipes that come with the radial and you've got the feral and collar arrangement there already.
Some of my work
Last edited by Blair K.; 12-19-2014 at 06:42 AM.
12-19-2014, 12:22 PM
#281
Hi John, they are easily started with no choke, I held the prop in clinched grip and turn it over and I could see it draw fuel through the lines quickly by itself, with fuel up near the carby a couple of flicks and away she went.
If your on an engine stand you may be able to poke the tip of your finger in the carby entrance to choke it for the very first time but it isn't always necessary, they start easy enough.
Cheers Blair
If your on an engine stand you may be able to poke the tip of your finger in the carby entrance to choke it for the very first time but it isn't always necessary, they start easy enough.
Cheers Blair
Some evidence below:
https://www.youtube.com/watch?v=qzhi_NGeQwE
12-19-2014, 06:02 PM
#282
Hi, by the time you have sourced all the parts done all the work you might just be better off getting one of these, at least you know it will fit and they have a proven record
http://www.keleo-creations.com/index...roducts_id=364
I'm going to start my FG-60R3 tomorrow for the fist time, as there is no choke is there any any particular procedure for this engine, for starting by hand?
http://www.keleo-creations.com/index...roducts_id=364
I'm going to start my FG-60R3 tomorrow for the fist time, as there is no choke is there any any particular procedure for this engine, for starting by hand?
Hi Slither, I can help you when it comes to making exhausts, before we go this road I ask are you looking to do this for custom needs and are you good with your hands as an exhaust ring can be tricky.
I make my own threaded collars, brass ferals for this purpose but you can buy threaded collars to suit any saito, look on Horizon Hobby to get a part number and google from there for a local source , all exhaust threads on a saito are 1mm pitch so only the diameters change, 12x1 , 13x1, 14x1 would likely be the size, id do away with that 90 degree elbow right out of the cylinder too.
Alternatively destroy a set of those horrible flex pipes that come with the radial and you've got the feral and collar arrangement there already.
 I imagine anything that fits the Saito 1.20 will work here. What diameter did you end up with on the ring for the FG-33R3 (the circle, not the tubing...)? The sounds coming out of that thing were amazing! Horizon's website lacks any info on the individual parts directly... I took a quick look after posting last night, and it appears that they are alpha coded and I will need to cross reference with specific engines to determine what is what. This is a hassle
 , but doable. I thought someone here might know right off which part(s) would work...
12-19-2014, 07:24 PM
, but doable. I thought someone here might know right off which part(s) would work...
12-19-2014, 07:24 PM
#283
Senior Member
Join Date: Apr 2014
Location: Brisbane, Australia
Posts: 305
Likes: 0
Received 0 Likes
on
0 Posts
Ok thats what I wanted to hear 😃
Nothing like having your own work on display and an independent sound too! On my fg33 it had many things creating that note, yes the exhaust was an animal but keep in mind I had run into trouble with 3 different cylinder temps and gone looking for a fix, along the way I found 2.2 kg of extra thrust on pump fuel with no nitro added.
That engine had a fuel pump, big bore walbro carby, custom inlet manifold and the custom exhaust, it WAS NOT an exhaust ring.
It was thin walled stainless steel tube 3/8 diameter for the primary bend from the head, it then stepped up to thin wall 1/2" untill it reached the bottom of the engine then it went into a thin wall 7/8 collector.
All cylinders fired into that collector like on a hot rod. I welded multiple pieces of bar stock together and pressed them into the round tube to pull the collector into shape and used drifts so further pull the webs into the 3 gaps.
That exhaust was an angry sounding thing thats for sure, trouble uploading pics, will put some up shortly.
Cheers Blair
12-19-2014, 08:02 PM
#285
Senior Member
Join Date: Apr 2014
Location: Brisbane, Australia
Posts: 305
Likes: 0
Received 0 Likes
on
0 Posts
If you have access to a machine shop and a suitably skilled machinist you can make the nuts and ferals, only 3 of each so its not such a big ask. If you make the exhaust from stainless remember to purge weld it if your using a tig for the stainless, got to keep argon gas flowing on the inside or the carbon growth will block your flow of exhaust gasses later. Alternatively I use k&s brass tube as its easy to work with and relatively light, I normally choose the tube with biggest inside diameter for flow, that normally leaves aluminum out of the equation as I find it rips when it has a thin wall and you try and bend it.
My planes normally end up needing weight in the nose so I build heavier exhausts instead of adding dead weight.
Method to bend K&S brass tube(I found copper fatigues and breaks).
bending it in the larger sizes(5/16 - 5/8) is fairly easy once you know how, took me many many hours to get this right. First heat it till it goes brown but not red hot and allow to cool, dont quench. It is important to get the brass to tarnish a little so the lead doesn't tin its surface later. Now stand it vertically in some type of a flame /heat proof setup with one end against aluminium sheet to block it off.
Next cast molten lead into the pipe quickly till its full. Next reheat the pipe so the lead goes molten again and packs down hard with no seams or weld lines or cavities in the lead as these faults allow the brass tube to collapse and destroy the pipe during bending. Next once cooled pull it around a mandrel for your desired bend and trim it roughly to length afterwards using 1mm cut off wheel in a gringer leaving about an inch more than needed, always leave more as its often needed somehow.
now holding gently with old pliers reheat the pipe and the lead runs out leaving nice bends in 0.014" walled tube without any kinks.
you may get some small ripples on the inside of the bend but compared to those nasty convoluted flex pipes your engine wont know they are there!
Bent with lead cast and remelted before bending, the reheating is super important, 1 in 4 bends wont work otherwise as the lead forms cavities and the tube collapses.
Last edited by Blair K.; 12-20-2014 at 05:51 AM.
12-20-2014, 07:52 AM
#286
Member
Join Date: Jan 2003
Location: UK, Surrey
Posts: 68
Likes: 0
Received 0 Likes
on
0 Posts
Hi, all the engine started fist flick but cylider 3 is not getting hot at all and doesnt seem to be running. I am getting a spark but the HT lead cap doesnt seem to want to say on to the spark plug, it keeps dropping off. Has anyone else had this issue, and are there better spark plugs for this motor. Also what should the spark pug gap be?
 12-20-2014, 08:14 AM
#288
Member
Join Date: Jan 2003
Location: UK, Surrey
Posts: 68
Likes: 0
Received 0 Likes
on
0 Posts
Hi, Hpergm, I just watched your fist run video and it was interesting to see that your No. 3 cylider was also much colder on the first run. Is this because for run-in the engine is very rich and as the fuel gets leaned out at the end of the run-in period the temperaturs of the cyliders evens as well.
I was thinking that with mine because No3 was much cooler it was not therefore fiering, any advice or help woul be appreciated.
lots of questions I know but I want to make sure all is oksy and what I am experiencing is normal.
I was thinking that with mine because No3 was much cooler it was not therefore fiering, any advice or help woul be appreciated.
lots of questions I know but I want to make sure all is oksy and what I am experiencing is normal.
12-20-2014, 01:40 PM
#290
Senior Member
Join Date: Apr 2014
Location: Brisbane, Australia
Posts: 305
Likes: 0
Received 0 Likes
on
0 Posts
Hi, all the engine started fist flick but cylider 3 is not getting hot at all and doesnt seem to be running. I am getting a spark but the HT lead cap doesnt seem to want to say on to the spark plug, it keeps dropping off. Has anyone else had this issue, and are there better spark plugs for this motor. Also what should the spark pug gap be?
Next if need be take off number 3 clip and close it up on itself , in your fingers will be fine, Re install the clip opening it up the bare minimal so its got the best chance of hanging on.
the lead should slide over and you should hear that clip lock in.
Next change number 3 plug to number 1 with a quick visual inspection, if theres black oily carbon all up in the electrode then maybe a clean may be in order, acetone de oils them fairly well.
After installing if the problem is in that plug then number 1 cylinder will be cold.
Ive had that exact issue twice, once it was plug, then I found out it was inlet manifold.
Fingers crossed for you mate !
Cheers Blair
12-20-2014, 02:36 PM
#291
Senior Member
Join Date: Apr 2014
Location: Brisbane, Australia
Posts: 305
Likes: 0
Received 0 Likes
on
0 Posts
John, out of interest I posted on page 6 , post #130, a testing tool I made for spark plugs, I had 2 Saito plugs that made good spark at atmospheric pressure but the spark broke down as soon as they were over 30 psi.
Cheers Blair
Cheers Blair
12-20-2014, 02:39 PM
#292
Member
Join Date: Jan 2003
Location: UK, Surrey
Posts: 68
Likes: 0
Received 0 Likes
on
0 Posts
Hi Blair, yes I have all the tiny sping clips, I will try and close up the clip. I've orderd some new plugs in case the plug is faulty. Also I noticed that some of the bolts on cylinder 3 had come loose and I had to retighten these so maybe the tapptes now need adjsting.
Do you think it's worth my while puting thread lock on all the cylinder bolts it seems strange they should come loose after just half the fist tank of fuel?
Do you think it's worth my while puting thread lock on all the cylinder bolts it seems strange they should come loose after just half the fist tank of fuel?
12-20-2014, 02:49 PM
#293
Senior Member
Join Date: Apr 2014
Location: Brisbane, Australia
Posts: 305
Likes: 0
Received 0 Likes
on
0 Posts
John thats very strange, how loose? Totally loose as in the cylinder actually moving or just needed some more tension?
If you want to loctite them in you may want to clean those screws and holes thoroughly with acetone on cotton tip or the loctite will never hang on.
Id suggest 222 loctite as its for fine threads you wish to undo.
cheers Blair
If you want to loctite them in you may want to clean those screws and holes thoroughly with acetone on cotton tip or the loctite will never hang on.
Id suggest 222 loctite as its for fine threads you wish to undo.
cheers Blair
12-20-2014, 02:58 PM
#295
Senior Member
Join Date: Apr 2014
Location: Brisbane, Australia
Posts: 305
Likes: 0
Received 0 Likes
on
0 Posts
If at least 2 were tight I doubt it would be your temperature issue.
Have you pulled off the lead while the engines running to see if its actually running with out that cylinder?
Have you pulled off the lead while the engines running to see if its actually running with out that cylinder?
12-20-2014, 03:08 PM
#296
Member
Join Date: Jan 2003
Location: UK, Surrey
Posts: 68
Likes: 0
Received 0 Likes
on
0 Posts
Probably just loose from manufacture, I did remove the HT lead from number 3 whilst the engine was running and the difference was negligible. I think my best bet is to tighten everything up, re set the tappets and ues 3 new plugs then see where I am.
12-20-2014, 03:20 PM
#298
Member
Join Date: Jan 2003
Location: UK, Surrey
Posts: 68
Likes: 0
Received 0 Likes
on
0 Posts
Yes i did swap the plugs and turned the engine over with an electric starter with all the plugs out and the spark from the plug that was in number 3 cylinder did seem week so I heve orderd 3 new plugs. I'm thinking if that doesnt work I should return the engine to SAITO to investigate.
12-20-2014, 05:34 PM
#300
Hi, Hpergm, I just watched your fist run video and it was interesting to see that your No. 3 cylider was also much colder on the first run. Is this because for run-in the engine is very rich and as the fuel gets leaned out at the end of the run-in period the temperaturs of the cyliders evens as well.
I was thinking that with mine because No3 was much cooler it was not therefore fiering, any advice or help woul be appreciated.
lots of questions I know but I want to make sure all is oksy and what I am experiencing is normal.
I was thinking that with mine because No3 was much cooler it was not therefore fiering, any advice or help woul be appreciated.
lots of questions I know but I want to make sure all is oksy and what I am experiencing is normal.
My theory is that:
- Since the top cylinder will always run leaner at part throttle due to gravity effects, it will proceed to seat its ring much quicker (read: higher temps = greater ring expansion) than the other two.
- This will allow faster build up of its compression, giving a more intense explosion, and in return more blow-by of combustion products.
- This blow-by will proceed to put out the next cylinder waiting to fire - No.3.
Therefore, and in order to "rebalance" the compression of the cylinders (through heat-cycling) in multicylinder Saitos, what I usually do is to remove temporarily the ignition lead from the top cylinder to allow No.3 to start firing (no blow-by from No.1 to put out No. 3 when doing this - try it) and get up to temperature - but only for a limited period of time as the triple ignition module will load-up and may be damaged. This trick slightly accelerates ring seating on No.3. Replace the top lead on No.1 once it gets too cold.
After a tank of this juggling, just run the engine as Saito suggests: WOT <4,000 (very rich) - do not care about the engine running smoothly. You will notice that the cylinders will start evening-out (No.3 firing sporadically but with increasing frequency, tyring to get up to temp). You need to be patient and "read" what the engine tells you - this takes 2-3 tanks of 500cc. Once all cylinders fire most of the time, its time to start leaning out while watching the cylinder temps.
One more thing: as long as the engine is rich, fuel will pool in the intake chamber and still give you "rich" bottom cylinders. It is for this reason that Saito tells you to lean the engine to peak and go fly. When flying, the engine orientation changes and this helps even-out the mixture for all cylinders. Just put the engine on the test stand and then lean the stand to one side with the engine on part throttle and full throttle; on part throttle you will notice the cylinder towards the ground to start misfiring and losing temp. On full, no problem.
Hope this makes some sense!
Hector.
Last edited by hpergm; 12-20-2014 at 05:37 PM.